TOTALINE Star CG1000 Series User manual

Manufacturer reserves the right to
discontinue, or change at any time,
specifications or designs without notice
and without incurring obligations.
REPLACEMENT COMPONENTS DIVISION LITERATURE NUMBER P101-3SI
© CARRIER CORPORATION 2002 11-02 CATALOG NUMBER 570-703
PRINTED IN U.S.A. REPLACES EAC-1SI
SAFETY CONSIDERATIONS
Read and follow manufacturer instructions carefully. Fol-
low all local electrical codes during installation. All wiring
must conform to local and national electrical codes. Improper
wiring or installation may damage air cleaner.
Recognize safety information. This is the safety alert sym-
bol . When the safety alert symbol is present on equipment
or in the instruction manual, be alert to the potential for person-
al injury.
Understand the signal words DANGER, WARNING, and
CAUTION. These words are used with the safety alert symbol.
DANGER identifies the most serious hazards which will result
in severe personal injury or death. WARNING signifies a haz-
ard which could result in personal injury or death. CAUTION
is used to identify unsafe practices which would result in minor
personal injury or property damage.
Installation and servicing of air-conditioning equipment can
be hazardous due to system pressure and electrical compo-
nents. Only trained and qualified service personnel should
install, repair, or service air-conditioning equipment.
Untrained personnel can perform the basic maintenance
functions of cleaning and replacing filters. All other operations
should be performed by trained service personnel. When work-
ing on air-conditioning equipment, observe precautions in the
literature, tags and labels attached to the unit, and other safety
precautions that may apply.
Follow all safety codes. Wear safety glasses and work
gloves.
GENERAL
The Totaline® Series CG1000 electronic air cleaner is
designed to be used in place of a standard, 1-in. filter in the
ductwork of a house or building. The electronic air cleaner is
normally installed in the filter rack of the furnace or air handler.
It helps to remove pollens, allergens, bacteria, dust mites,
smoke, and chemicals from the filtered air. A 24-VAC at 2 va
power supply is required.
INSTALLATION
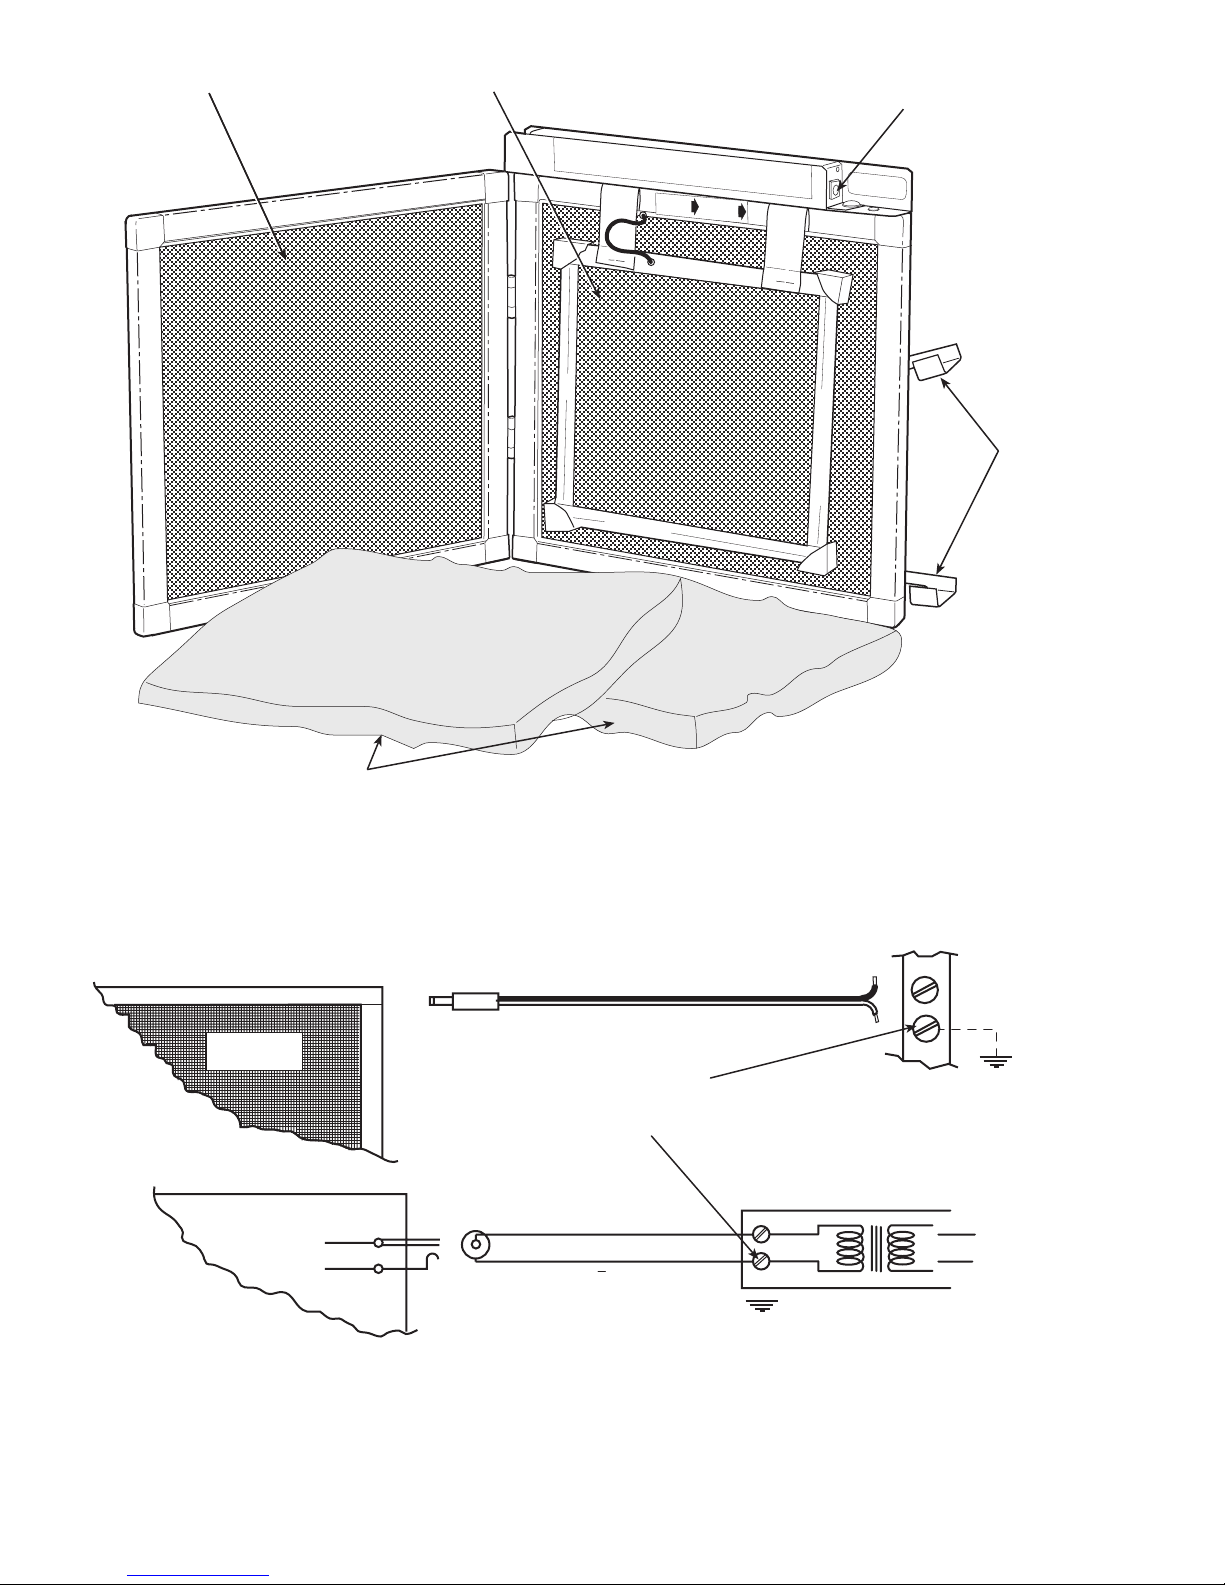
1. Open the electronic air cleaner by lifting the latches on
the side of the frame and opening. See Fig. 1. Inspect
for damage and make sure all the parts are present.
2. Disconnect all power to unit before installation.
3. Wire electrical power plug to 24 VAC (2 va) power
source (field supplied). Most forced-air heating or
cooling systems have an internal 24 VAC power
source to which the electronic air cleaner can be safely
connected without overloading other circuits. Before
wiring the electronic air cleaner to the power source,
check with a voltmeter that the source does not exceed
30 VAC. See Fig. 2.
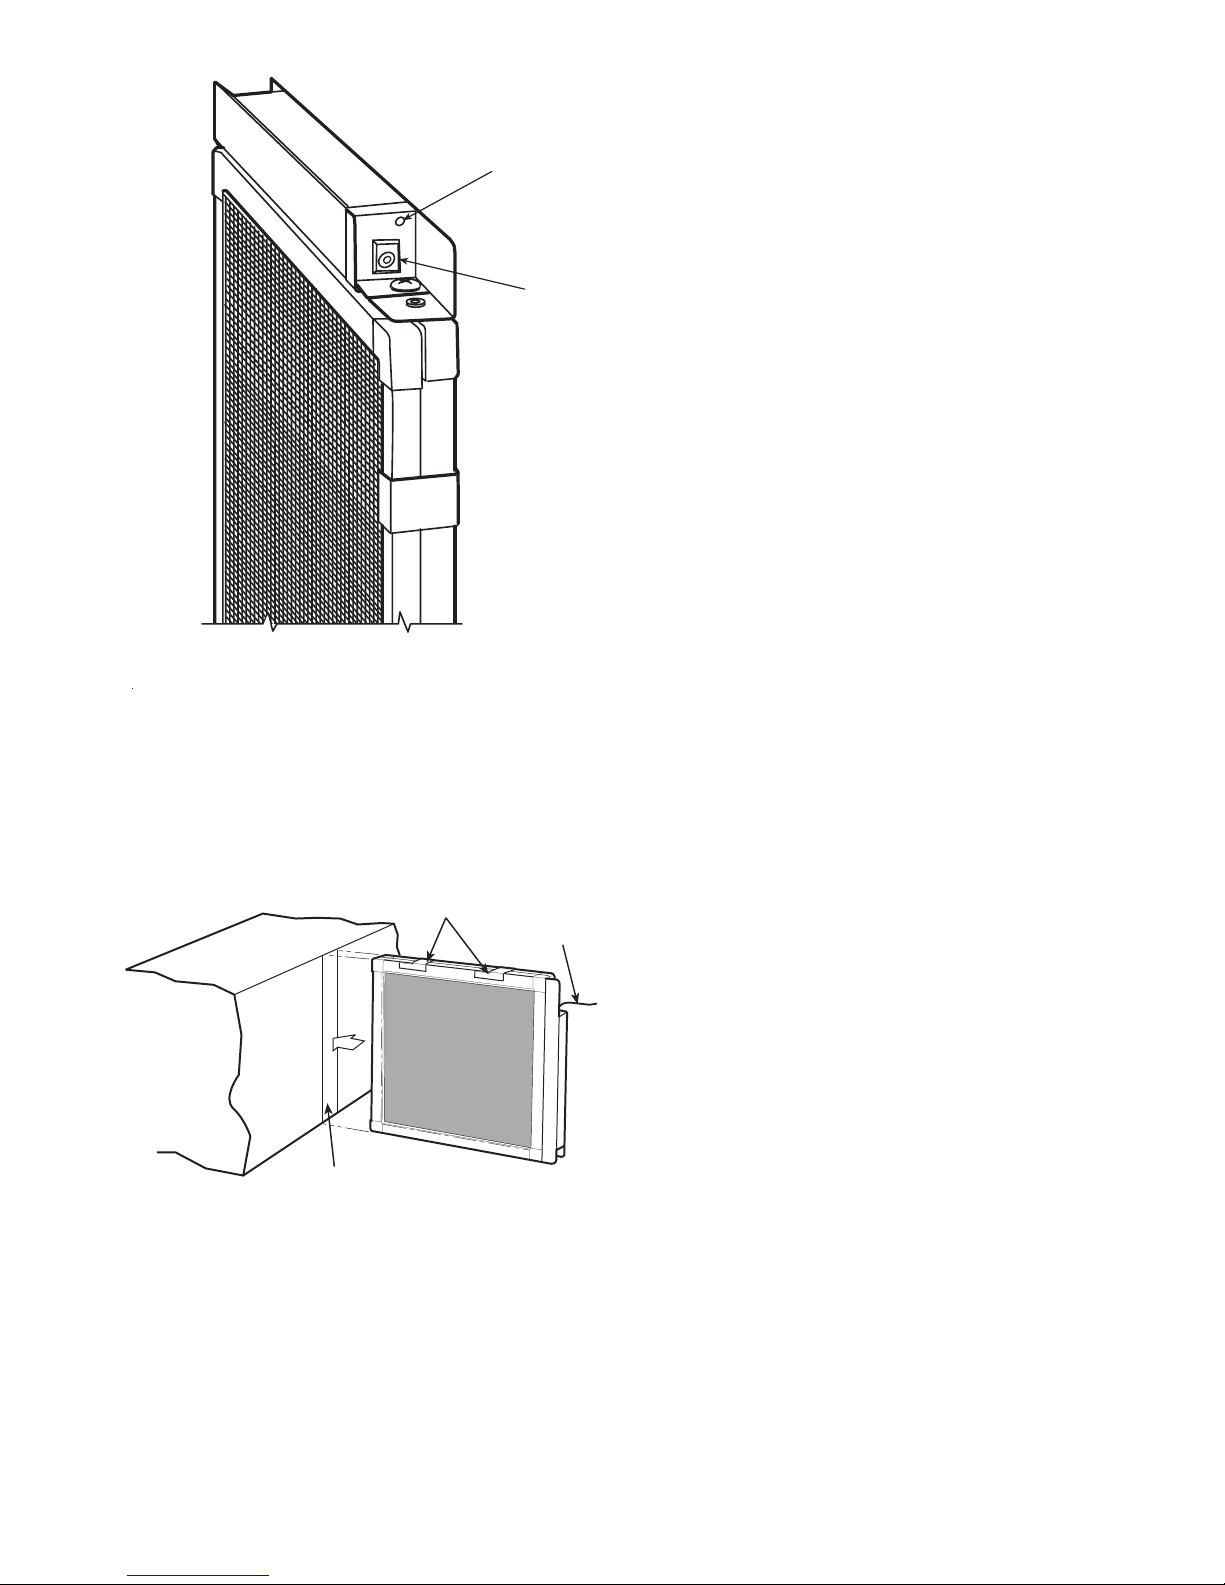
4. Insert the power plug into the port on the electronic air
cleaner. See Fig. 3. If it is necessary to pass the cord
through a hole in the wall of the unit or through an
access door, electrical tape, or the supplied rubber
grommet, should be wrapped around the cord at the
point of entry for protection.
5. Slide the electronic air cleaner into the filter rack of the
air-conditioning equipment or furnace. On a typical
installation, the latches should be facing up and the
power plug should be outside the ductwork. See Fig. 4.
OPERATION
The electronic air cleaner operates by removing particles
from the air in two different ways. As the air flows through the
electronic air cleaner, the fiberglass pads filter out most of the
airborne particles. The electrified center screen continues the
process. It helps to remove pollens, allergens, bacteria, dust
mites, smoke, and chemicals from the filtered air.
While the electronic air cleaner is operating, the power sup-
ply light will be on. See Fig. 3. If the light does not come on
when power is supplied to the electronic air cleaner, refer to the
Troubleshooting section.
The electronic air cleaner uses little power and is on con-
tinuously. The system fan can be operated continuously for
increased air circulation through the air cleaner.
IMPORTANT: Read entire instructions before installing
the air cleaner.
Before beginning any modification, be certain that the
main line electrical disconnect switch is in the OFF posi-
tion. Electric shock could result. Tag disconnect switch
with suitable warning labels.
The electronic air cleaner is designed to operate at 24 VAC.
Damage or physical injury could result if wired to higher
voltages.
INSTALLATION,
OPERATION, AND
MAINTENANCE
INSTRUCTIONS
Series CG1000
Electronic
Air Cleaner
2
OUTSIDE SCREEN CENTER SCREEN POWER SUPPLY
INPUT PORT
LATCHES
FIBERGLASS PADS
24 VOLTS
AC POWER
SOURCE (FIELD
SUPPLIED)
SOLID BLACK
WHITE STRIPE
NOTE: IF ONE TERMINAL
OF POWER SOURCE IS
GROUNDED, HOOK THE
WHITE STRIPED WIRE TO
THIS TERMINAL
ELECTRONIC
AIR CLEANER
ELECTRONIC
AIR CLEANER
SOLID BLACK + (INSIDE)
WHITE STRIPE -- (OUTSIDE)
24 VOLT AC
POWER SOURCE
(FIELD SUPPLIED)
Fig. 1 — Electronic Air Cleaner Details
Fig. 2 — Power Supply Wiring
3
MAINTENANCE
Typically, cleaning should be performed every month. Once
cleaning has been performed, hold up the electronic air cleaner
to a strong light. If the outline of the center screen can be seen,
the fiberglass filter pads do not need to be replaced. If the out-
line cannot be seen, replace the fiberglass pads. Typically, the
fiberglass pads will need to be replaced every 3 to 6 months.
Cleaning
1. Unplug the power cord from the electronic air cleaner
and remove the air cleaner from the filter rack. See
Fig. 3.
2. Vacuum the outside mesh screens of the electronic air
cleaner if lint is present. A soft cloth and water mixed
with detergent can be used to clean the outside of the
device. Do not use alcohol, organic solvents or other
chemical agents for cleaning. To avoid damage to elec-
trical components, do not wash the electronic air
cleaner with excessive water.
3. Plug the power cord back in and re-install the elec-
tronic air cleaner into the filter rack.
Filter Pad Replacement
1. Unplug the power cord from the electronic air cleaner
and remove the air cleaner from the filter rack. See
Fig. 3.
2. Open the electronic air cleaner by lifting the latches on
the side of the frame.
3. Remove the two dirty pads from inside the electronic
air cleaner.
4. Place the two new pads (purchased separately) on
either side of the center screen. See Fig. 5. Be sure the
pads fit squarely into the outside retainer screens.
5. Close the electronic air cleaner and make sure the
latches are secured.
6. Place the electronic air cleaner back into the filter rack
and plug in the power cord.
TROUBLESHOOTING
If the air cleaner does not seem to be functioning, check the
following:
1. Verify that the power supply light is on. If light is off,
check power supply and wiring connections.
2. If power supply light is on, perform maintenance pro-
cedure and replace fiberglass filters.
POWER SUPPLY
INDICATOR
POWER
SUPPLY
PORT
LATCHES
FILTER TRACK
POWER
SUPPLY
CORD
Fig. 3 — Power Supply Details
Fig. 4 — Typical Electronic Air Cleaner
Installation

Manufacturer reserves the right to
discontinue, or change at any time,
specifications or designs without notice
and without incurring obligations.
REPLACEMENT COMPONENTS DIVISION LITERATURE NUMBER P101-3SI
© CARRIER CORPORATION 2002 11-02 CATALOG NO. 570-703
PRINTED IN U.S.A. REPLACES EAC-1SI
Your Assurance of Quality
ALL Totaline® products are backed with a one-year
warranty by Carrier Corporation, the world’s largest
manufacturer of air conditioning, heating, and
refrigeration products.
FIBERGLASS FILTER LOCATION
(IN FRONT OF CENTER SCREEN)
CENTER
SCREEN
FIBERGLASS FILTER LOCATION
(BEHIND CENTER SCREEN)
Fig. 5 — Filter Replacement
ELECTRONIC AIR CLEANER LIMITED TWO-YEAR WARRANTY
TWO-YEAR WARRANTY — This CARRIER CORPORATION product is warranted to be free from defects in material
and workmanship under normal use and maintenance for a period of two years from the date of original installation. A
new or remanufactured product or part to replace the defective part will be provided without charge for the part itself
through a qualified servicing CARRIER CORPORATION dealer or service PROVIDED the deflective part is returned to
our distributor. The replacement part assumes the unused portion of the warranty.
THIS WARRANTY DOES NOT INCLUDE ANY ADDITIONAL LABOR ALLOWANCE OR OTHER COSTS or other
costs incurred for diagnosis repairing removing, installing, shipping, servicing, or handling of either defective parts or
replacement parts. SUCH COSTS MAY BE COVERED BY a separate warranty provided by the installer.
LIMITATIONS OF WARRANTIES — ALL IMPLIED WARRANTIES (INCLUDING IMPLIED WARRANTIES OF MER-
CHANTABILITY) ARE HEREBY LIMITED IN DURATION TO THE PERIOD FOR WHICH THE LIMITED WARRANTY
IS GIVEN. THE EXPRESSED WARRANTIES MADE IN THIS WARRANTY ARE EXCLUSIVE AND MAY NOT BE AL-
TERED, ENLARGED OR CHANGED BY ANY DISTRIBUTOR, DEALER OR OTHER PERSON WHATSOEVER.
CARRIER WILL NOT BE RESPONSIBLE FOR:
1. Normal maintenance as outlined in the installation and servicing instructions or owners manual including cleaning
and/or replacement of filters or electronic powerhead.
2. Damage or repairs required as a consequence of faulty installation or application by others.
3. Failure to start due to voltage conditions, blown fuses, open circuit breakers or other damages due to the inadequa-
cy or interruption of electrical service.
4. Damage or repairs needed as a consequence of any misapplication, abuse, improper servicing, unauthorized alter-
ation, or improper operations.
5. Damage as a result of floods, winds, fires, lightning, accidents, corrosive atmosphere, or other conditions beyond
the control of CARRIER CORPORATION.
6. Parts not supplied or designated by CARRIER CORPORATION.
7. CARRIER CORPORATION products installed outside the continental U.S.A., Alaska, Hawaii, and Canada.
8. ANY SPECIAL INDIRECT OR CONSEQUENTIAL PROPERTY OR COMMERCIAL DAMAGE OF ANY NATURE
WHATSOEVER. Some states do not allow the exclusion of incidental or consequential damages, so the above
limitation may not apply to you.
Replacement Components Division • Carrier Corporation
Syracuse, New York • Lit. No. 249393-001 REV. A 6/96
Table of contents
Other TOTALINE Air Cleaner manuals

TOTALINE
TOTALINE P102-BB14A Manual

TOTALINE
TOTALINE P103-QUATTRO User manual

TOTALINE
TOTALINE P103-R1700G User manual

TOTALINE
TOTALINE Gold P102-350 User manual

TOTALINE
TOTALINE 1300 Series Manual

TOTALINE
TOTALINE P102-12 Manual

TOTALINE
TOTALINE P103-RRUVL-012 User manual

TOTALINE
TOTALINE P102-400DM User manual


