TOTALINE A-i230NS User manual

USERMANUALEN
TWOSTAGEVACUUMPUMP
A-i230NS/A-i260NS
NON SPARK UNIT
SUITABLE FOR USE WITH NEW
REFRIGERANTS R32,HFO-1234yf

USERMANUAL
I. Pump components
II. Operating Manual
1. Before operating
All motors are designed for operating voltages plus or minus 10% of the normal
rating. Single voltage motors are supplied fully connected and ready to operate.
(a) Check the voltage and frequency at the outlet and ensure it matches the
specifications on the pump motor metal plate. Ensure that the ON-OFF switch is in
the OFF position before connecting the pump to a power source. Remove and
discard the exhaust plug from the exhaust fitting.
(b) Fill the oil reservoir with oil before activate the pump. Remove the Oil Fill cap and
add oil until oil show at the bottom of the sight glass. Refer to technical data in
manual for the correct oil capacity of pump.
(c) Place back the Oil Fill cap and remove the cap from the inlet fitting. Turn the motor
switch to ON position. Place back the cap on the inlet fitting when the pump runs
smoothly. This may takes 2 to 30 seconds depends on the ambient temperature.
After the pump operates for approximately one minute, check the sight glass for
proper oil level, which should be aligned with the sight glass Oil Level line. Refill oil if
necessary.
Note: The oil level should be aligned with the indicating line on the sight glass when
the pump is running. Insufficient oil filled will result in poor Vacuum performance.
Excessive of oil can result in overflowing of oil from the exhaust fitting.
Base
Motor
Fan Cover
Capacitor Box
Handle
Oil drain
Sight Glass
Housing
Exhausting Fitting

2. To shut off pump after use
To prolong pump lifespan and smooth start-up, these procedures to shut off pump
should be followed.
(a) Turn off the manifold valve between the pump and the system.
(b) Remove the hose from the pump inlet.
(c) Cover the inlet port openings to prevent any contamination or foreign particles
from entering the port.
III. Maintenance
1. Vacuum pump oil:
The condition and type of oil used in any high performance vacuum pump are
extremely important in determining the ultimate attainable vacuum. It is recommended
to use the high Performance Vacuum Pump Oil, which is specifically blended to
maintain maximum viscosity at normal running temperatures and to improve cold
weather start up.
2. Oil change procedure
(a) Ensure the pump is warmed up.
(b) Remove the Oil Drain cap. Drain off contaminated oil into a container and dispose
it properly. Oil can be removed from the pump by opening the inlet and partially
blocking the exhaust with a cloth while the pump is running. Do not operate the pump
for more than 20 seconds using this method.
(c) When the drainage of oil completed, tilt the pump forward to remove the residual
oil.
(d) Place back the Oil Drain cap. Remove the Oil Fill cap and fill the oil reservoir with
new vacuum pump oil until the oil level is seen at the bottom of the sight glass.
(e) Ensure that the inlet ports are covered before turn on the pump. Allow it to run for
one minute to check the oil level. If the oil level is below the sight glass Oil Level line‚
fill oil slowly (with the pump running) until the oil reaches the Oil Level line. Place
back the Oil Fill cap, ensure the inlet is covered and the oil drain cap is closed tightly.
(f) i) lf the oil is badly contaminated with sludge that forms during operation, you may
need to remove the oil reservoir cover and wipe it.
ii) The alternative method to deal with heavily contaminated oil is to force the oil from
the pump reservoir. Leave the pump to run until it is warmed up.
While the pump is still running‚ remove the oil drain cap and restrict the exhaust
slightly. This will back-pressure the oil reservoir and purge the oil with contaminants.
Turn off the pump when oil stop flowing.
iii) Repeat this procedure as required until the contaminants is removed completely.
iv) Replace the Oil Drain cap and refill the oil reservoir to the proper oil level with
clean vacuum pump oil.

IV. Troubleshooting Guide
Following guide will help you to recover the functionality should there be any
malfunction occurs:
1. Failure To Start
Check the operating voltage. The pumps are designed to start at ±10% operating
voltage (loaded) at 5°C. However, if exceeded the maximum voltage, switch
malfunction may occur.
2. Oil leakage
(a) Ensure the oil is not a spillage from vacuum pump, etc.
(b) If leakage exists, the housing gasket or the shaft seal may need to be replaced. If
leakage exists in the area of the oil drain plug, you may need to reseal the plug using
a commercial pipe thread sealer.
3. Failure To Attain A Good Vacuum
(a) Ensure the vacuum gauge and all connections are in good condition and leak free.
You can confirm leakage by monitoring the vacuum with a thermistor gauge while
applying vacuum pump oil at connections or suspected leak points. The vacuum will
improve briefly while the oil is sealing the leak.
(b) Ensure the pump oil is clean. A badly contaminated pump may require several oil
flushes.
(c) Ensure the oil is at the proper level. For optimum pump operation, the oil must be
even with the Oil Level line on the sight glass when the pump is running. Do not
overfill as operating temperatures will cause the oil to expand, which will appear at a
higher level than when the pump is not running. To check the oil level, start the pump
with the inlet covered. Check the oil level in the sight glass. Add oil if necessary.

V. Technical Drawing
1OILDRAINVALVE13 TRESTLE23 FANCOVER
2O‐RING14 RUBBERFOOT24 EXHAUSTFITTING
3SIGHTGLASS15 BASE25 VALVEPLATE
4HOUSING16 MOTORHULL26 ANTI‐FOGCOVERY
5O‐RING17 MOTORSTATOR27 O‐RING
6PUMPBACKCOVER18 CENTRIFUGALSWITCH28 O‐RING
7BACKROTARYVANE19 MOTORROTOR29 INLETFITTING
8PUMPBACKROTOR20 BEARING30 HANDLE
9PUMPBACKSTATOR21 MOTORCOVER31 CAPACITOR
10PUMPFRONTROTOR22 FAN32 CAPACITORBOX
11FRONTROTARYVANE33 SOCKET
12PUMPFRONTSTATOR34 POWERSWITCH
VI. Technical Parameter
Twostagesvacuumpumps
ModelsA‐i230‐NSA‐i260‐NS
Frequency50Hz60Hz50Hz60Hz
Flowrate2.5CFM
71L/min
3.0CFM
84L/min
5.0CFM
142L/min
6.0CFM
170L/min
Ultimatevacuum1Pa
7.5microns
1Pa
7.5microns
Stage22
Power1/2HP3/4HP
Inletport1/4"&3/8"SAE1/4"&3/8"SAE
Oilcapacity350ml550ml
Dimensions(mm)320x125x232340x132x245
Weight8.6kg13.5kg

ISTRUZIONID’USO IT
POMPADELVUOTODOPPIOSTADIO
A-i230NS/A-i260NS
UNITA' ANTI SCINTILLA
ADATTA PER UTILIZZO CON NUOVI
REFRIGERANTI R32,HFO-1234yf

ISTRUZIONID’USO
I. Componenti della pompa
II. Manuale operativo
1. Prima dell’utilizzo
Tutti i motori sono progettati per tensioni di esercizio superiori o inferiori del 10% del
valore nominale. I motori monofase vengono forniti completamente collegati e pronti
al funzionamento.
(a) Controllare il voltaggio e la frequenza in uscita e assicurarsi che corrisponda alle
specifiche riportate sulla targhetta metallica del motore della pompa. Assicurarsi
che l’interruttore ON-OFF sia in posizione OFF prima di connettere la pompa
all’alimentazione. Rimuovere il tappo di scarico dal raccordo.
(b) Riempire il serbatoio dell’olio prima di avviare la pompa. Rimuovere il tappo
dell’olio e versarlo lentamente fino a che l’olio compaia nella parte inferiore
dell’indicatore. Fare riferimento al manuale per la corretta quantità di olio da versare
nella pompa.
(c) Riposizionare il tappo dell’olio e rimuovere il tappo sul raccordo di aspirazione.
Girare l’interruttore del motore sulla posizione ON. Riposizionare il tappo sul raccordo
di aspirazione quando la pompa si avvia normalmente. Bisogna attendere da 2 a 30
secondi in funzione della temperatura ambiente.
Dope che la pompa funziona per circa un minuto, controllare sull’indicatore il corretto
funzionamento dell’olio, che dovrebbe allineato con la linea Oil Level sull’indicatore.
Aggiungere dell’olio se necessario.
Note: Il livello dell’olio deve essere allineato con il livello segnato sull’indicatore
quando la pompa è in funzione. Un livello insufficiente di olio si ripercuoterà sulle
prestazioni della pompa . Se l’olio è in eccesso potrebbe fuoriuscire dal tappo dell’
olio.
Maniglia
Scatola del
condensatore
Griglia del
ventilatore
Motore
Base
Tappo scarico olio
Indicatore
Separatore olio
Tappo dell'olio

2. Spegnimento della pompa dopo l’uso
Per prolungare la vita della pompa è necessario seguire le seguenti procedure.
(a) Chiudere il rubinetto che collegata la pompa al sistema.
(b) Rimuovere i tubi in ingresso alla pompa.
(c) Riposizionare il tappo di chiusura sui raccordi in aspirazione per prevenire
qualsiasi ingresso di contaminanti nella pompa.
III. Manutenzione
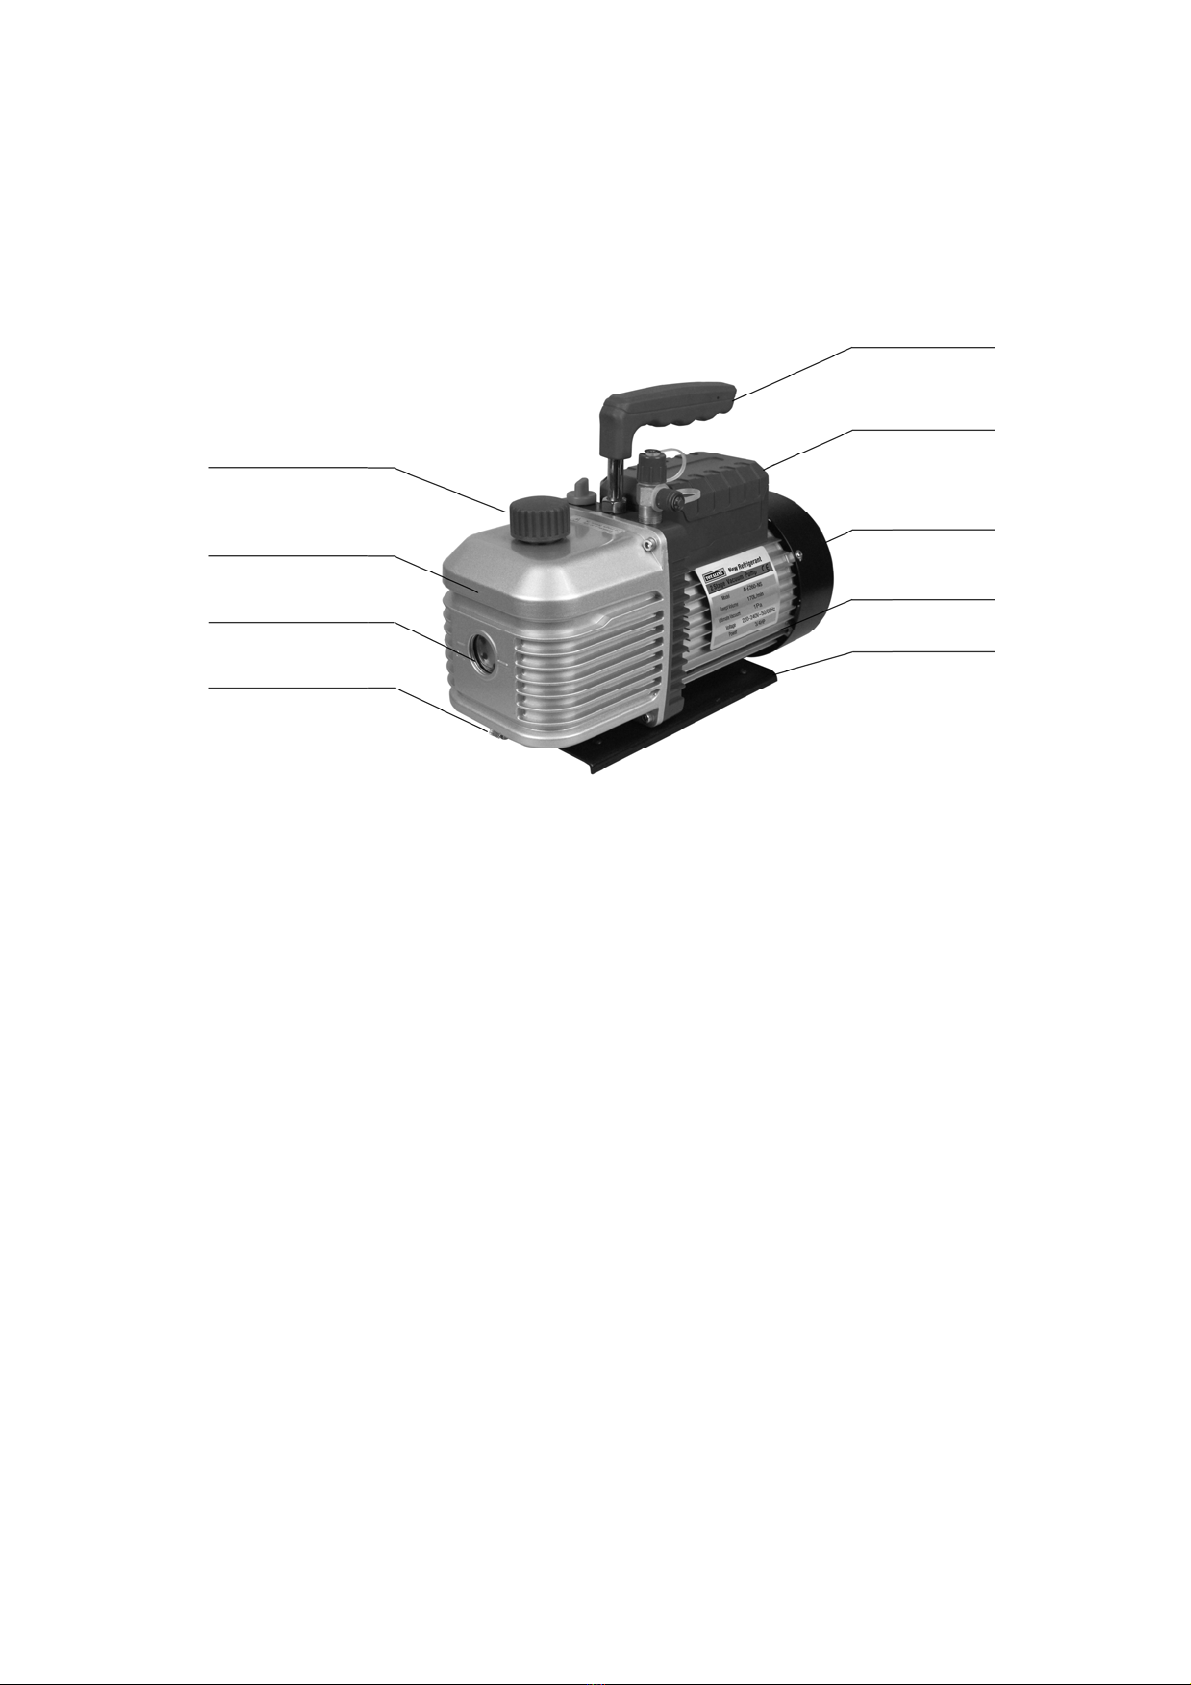
1. Olio pompa a vuoto:
Le condizioni e il tipo di olio utilizzato nella pompa a vuoto sono determinanti per il
raggiungimento del massimo vuoto ottenibile. È raccomandato l’utilizzo di Oli ad alte
prestazioni specifici per pompe del vuoto, che sono specificamente creati per
ottenere la massima viscosità alle temperature di esercizio standard e per migliorare
lo start up a freddo.
2. Procedura per la sostituzione dell’olio
(a) Assicurarsi che la pompa si sia riscaldata.
(b) Rimuovere il tappo di scarico dell’olio. Scaricare l’olio contaminato in un apposito
contenitore e smaltirlo correttamente. L’olio può essere rimosso della pompa
aprendo tappo sul raccordo di aspirazione e bloccando parzialmente lo scarico con
un panno mentre la pompa è in funzione.
Non utilizzare la pompa per più di 20 secondi utilizzando questa procedura.
(c) Quando il drenaggio è completato, inclinare la pompa per rimuovere l’olio residuo.
(d) Rimettere il tappo di scarico dell’olio. Rimuovere il tappo dell’olio e riempire il
serbatoio finché il livello è visibile alla base dell’indicatore.
(e) Assicurarsi che il tappo sul raccordo di aspirazione della pompa sia chiuso prima
di accendere la pompa. Far funzionare la pompa per circa un minuto e verificare il
livello dell’olio. Se il livello è inferiore alla linea Oil Level nell’indicatore, riempire
lentamente (con la pompa in funzione) fino a quando l’olio raggiunge la linea segnata
nell’indicatore. Rimette il tappo dell’olio e assicurarsi che il tappo sul raccordo di
aspirazione e il tappo di scarico siano chiusi saldamente.
(f) i) se l’olio è severamente contaminato da sostanze con presenza di residui solidi
formate durante il funzionamento, potrebbe essere necessario lo smontaggio del
coperchio del serbatoio dell’olio e pulire l’interno.
ii) una procedura alternativa per affrontare un olio contaminato è quella di forzare lo
spurgo dell’olio attraverso il tappo di scarico.. Lasciare la pompa in funzione finché
non si è riscaldata. Mentre la pompa è in funzione rimuovere il tappo di scarico
dell’olio e limitare leggermente lo scarico dell’olio esausto. Questo creerà una
contropressione nel serbatoio che spurgherà l’olio dai contaminanti. Spegnere la
pompa quando il flusso dell’olio si ferma.
iii) Ripetere questa procedura sino a quando i contaminanti saranno rimossi
completamente.
iv) Rimettere il tappo di scarico dell’olio e riempire il serbatoio dell’olio in modo da
avere un corretto livello di olio nella pompa a vuoto.

IV. Risoluzione dei problemi
La seguente guida aiuterà a recupera la funzionalità della pompa a vuoto nel caso si
verifichino malfunzionamenti:
1. Mancato avviamento
Verificare la tensione di esercizio. Le pompe sono progettate per funzionare con una
tensione di esercizio ±10% di quella nominale a 5°C. Tuttavia se si supera la tensione
massima potrebbero verificarsi malfunzionamenti.
2. Perdite di olio
(a) Assicurarsi che l’olio non sia fuoriuscito dalla pompa a vuoto, etc.
(b) Se venisse individuata una perdita, potrebbe essere necessario sostituire la
guarnizione del serbatoio. Se la perdita si verifica nella zona del tappo di scarico
dell’olio potrebbe essere necessario risigillare il tappo usando un o-ring commerciale.
3. Mancato raggiungimento di un buon grado di vuoto
(a) Verificare che il misuratore di vuoto e le connessioni siano in buone condizioni. È
possibile verificare la presenza di perdite monitorando il vuoto con un vacuometro,
controllando le connessioni tra la pompa e il sistema dove si sospettano le perdite.
Il grado di vuoto aumenterà lievemente dopo aver sigillato la perdita.
(b) Assicurarsi che l’olio della pompa sia pulito. Una pompa severamente
contaminata potrebbe richiedere alcuni cicli di sostituzione d’olio.
(c) Assicurarsi che l’olio sia al livello corretto. Per un funzionamento ottimale della
pompa, l’olio deve essere a livello della linea Oil Level nell’indicatore quando la
pompa è in funzione. Non riempire eccessivamente in quanto le normali temperature
di esercizio potrebbero causare un espansione dell’olio che apparirà ad un livello
superiore rispetto a quando la pompa è ferma. Per controllare il livello dell’olio,
avviare la pompa con l’ingresso chiuso. Verificare il livello dell’olio nell’indicatore.
Aggiungere dell’olio se necessario.

V. Vista esplosa
1TAPPOSCARICOOLIO13 COPERCHIOSERBATOIO23GRIGLIA
2O‐RING14 PIEDINIDIGOMMA24TAPPODELL'OLIO
3INDICATORE15 BASAMENTO25VALVOLALAMELLA
4SERBATOIOOLIO16 GUSCIOMOTORE26PARATIAOLIO
5O‐RING17 STATOREMOTORE27O‐RING
6COPERCHIOPOSTERIOREPOMPA18 INTERRUTTORECENTRIFUGO28O‐RING
7PALETTATENUTAROTOREPOSTERIORE19 ROTOREMOTORE29RACCORDIASPIRAZIONE
8ROTOREPOSTERIORESTADIOPOMPA20 CUSCINETTO30MANIGLIA
9STATOREPOSTERIORESTADIOPOMPA21 COPERCHIOMOTORE31CONDENSATORE
10ROTOREANTERIORESTADIOPOMPA22 VENTILATORE32SCATOLACONDENSATORE
11PALETTATENUTAROTOREANTERIORE33PRESAELETTRICA
12STATOREANTERIORESTADIOPOMPA34INTERRUTTORE
VI. Parametri tecnici
Pompaavuotodoppiostadio
ModelloA‐i230‐NSA‐i260‐NS
Frequenza50Hz60Hz50Hz60Hz
Portatanominale2.5CFM
71L/min
3.0CFM
84L/min
2.5CFM
71L/min
3.0CFM
84L/min
Vuotofinale1Pa
7.5microns
1Pa
7.5microns
Stadi22
Potenza1/2HP3/4HP
Attacchiaspirazione1/4"&3/8"SAE1/4"&3/8"SAE
Caricad'Olio350ml550ml
Dimensioni(mm)320x125x232340x132x245
Peso8.6kg13.5kg

BEDIENUNGSANLEITUNG DE
A-i230NS/A-i260NS
FUNKEN GESCHÜTZTE EINHEIT
GEEIGNET FÜR DAS NEUE
KÄLTEMITTEL R32,HFO-1234yf
ZWEISTUFIGE VAKUUMPUMPE

BEDIENUNGSANLEITUNG
I. Komponenten
II. Bedienungsanleitung
1. Vor der Inbetriebnahme
Alle Motoren sind für Betriebsspannungen zum Nominalwert +/- 10 % ausgelegt.
Einzelspannungsmotoren werden mit allen Anschlüssen betriebsbereit geliefert.
Spannung und Frequenz am Ausgang prüfen und sicherstellen, dass die Werte
(a) den Spezifikationen auf dem Typenschild des Pumpenmotors entsprechen. Der
EIN-AUS-Schalter muss sich in der Position AUS befinden, bevor die Pumpe an
die Stromversorgung angeschlossen wird. Abluftstopfen von der Armatur
abnehmen und entsorgen..
(b) Vor dem Einschalten der Pumpe den Öltank befüllen. Dazu die Einlassschraube
abnehmen und Öl bis zur unteren Markierung des Schauglases einfüllen. Infos zur
korrekten Ölmenge der Pumpe finden Sie in der Bedienungsanleitung.
(c) Einlassschraube wieder einsetzen und den Stopfen von der Armatur abnehmen.
Netzschalter in die Position EIN bringen. Sobald die Pumpe gleichmässig läuft, den
Stopfen wieder auf die Armatur setzen. Je nach Umgebungstemperatur kann dieser
Vorgang 2 bis 30 Sekunden dauern.
Nach einem Betrieb von ca. 1 Minute das Schauglas auf korrekten Füllstand prüfen
(der Ölstand sollte mit der Markierung übereinstimmen). Ggf. Öl nachfüllen
Hinweis: Der Ölstand sollte bei laufender Pumpe mit der Markierung auf dem
Schauglas übereinstimmen. Eine unzureichende Ölmenge kann die Leistung der
Vakuumpumpe beeinträchtigen, zu viel Öl zu einem Überlaufen an der Abluftarmatur
führt..
Abluftschraube
Schauglas
Gehäuse
Ölablassschraube
Griff
Kondensatorkasten
Lüfterabdeckung
Motorkörper
Sockel

2. Abschalten der Pumpe
Um eine lange Lebensdauer der Pumpe und einen jederzeit reibungslosen Start zu
gewährleisten, ist beim Abschalten wie folgt zu verfahren:
(a) Verteilerventil zwischen Pumpe und System schliessen.
(b) Schlauch vom Pumpeneinlass abnehmen.
(c) Einlässe verschliessen, um ein Eindringen von Fremdpartikeln zu verhindern.
III. Wartung
1. Öl der Vakuumpumpe:
Der Zustand und Typ des in Hochleistungs-Vakuumpumpen verwendeten Öls sind
zur Bestimmung des erreichbaren Vakuums unerlässlich. Wir empfehlen deshalb
den Einsatz von Hochleistungs-Vakuumpumpenöl, dessen spezielle
Zusammensetzung eine maximale Viskosität bei normalen Betriebstemperaturen
sowie einen reibungslosen Start bei kalten Temperaturen ermöglicht.
2. Ölwechsel
(a) Die Pumpe zunächst warmlaufen lassen.
(b) Ölablassschraube entfernen. Gebrauchtes Öl in einen Behälter ablassen und
entsprechend entsorgen. Zum Entfernen des Öls bei laufender Pumpe den Einlass
öffnen und die Abluftöffnung teilweise mit einem Lappen verstopfen. Die Pumpe
keinesfalls länger als 20 Sekunden in diesem Zustand laufen lassen.
(c) Ist das Öl vollständig abgelassen, die Pumpe nach vorne neigen und das Restöl
entleeren.
(d) Ablassschraube wieder einsetzen, die Öleinfüllschraube abnehmen und neues Öl
einfüllen, bis der Füllstand unten im Schauglas zu sehen ist.
(e) Vor dem Einschalten der Pumpe unbedingt alle Einlässe verschliessen. Pumpe
eine Minute laufen lassen und dann den Füllstand prüfen. Befindet sich dieser
unterhalb der Markierung des Schauglases, Öl vorsichtig (bei laufender Pumpe)
nachfüllen, bis die Markierung erreicht ist. Öleinfüllschraube wieder einsetzen und
sicherstellen, dass Einlass und Ablassschraube fest verschlossen sind.
(f) i) Ist das Öl mit Schlamm verschmutzt, der sich beim Betrieb bildet, die Ölwanne
entfernen und auswischen.
ii) Alternativ kann extrem verschmutztes Öl auch mechanisch aus dem
Pumpenbehälter entfernt werden. Dazu die Pumpe zunächst warmlaufen lassen und
während des Betriebs die Ölablassschraube entfernen und die Abluftöffnung teilweise
blockieren. Durch den entstehenden Gegendruck wird das Öl zusammen mit den
Schmutzstoffen ausgebracht. Sobald der Ölfluss versiegt, die Pumpe abschalten.
iii) Dieses Verfahren beliebig oft wiederholen, bis alle Schmutzstoffe komplett entfernt
sind.
iv) Ölablassschraube wieder einsetzen und den Behälter bis zur
Schauglasmarkierung mit sauberem Vakuumöl befüllen.

IV. Problemhehebung
Die folgende Anleitung soll helfen, durch Fehlfunktionen verursachte Probleme zu
beheben:
1. Fehler beim Start
Betriebsspannung prüfen. Die Pumpen sind für einen Start mit normaler
Betriebsspannung +/- 10 % und 5 °C vorgesehen. Bei Überschreiten dieses
Spannungswertes kann es zu Schaltfehlern kommen.
2. Ölverlust
(a) Prüfen, wo das Öl austritt, d. h. Vakuumpumpe etc.
(b) Bei Vorliegen eines Lecks muss vielleicht die Gehäuse- oder Wellendichtung
gewechselt werden. Tritt der Ölverlust an der Ablassschraube auf, ist diese ggf. mit
einer Gewindedichtung zu versiegeln.
3. Unzureichende Ansaugleistung
(a) Vakuummanometer und alle Anschlüsse müssen sich in einem guten und
leckfreien Zustand befinden. Das Vakuum lässt sich mit einem Kaltleiterfühler
messen, und zwar durch Aufbringen von Vakuumpumpenöl an den Anschlüssen oder
möglichen Leckstellen.
Das aufgebrachte Öl sorgt für ein kurzzeitiges Verschliessen des Lecks, wodurch sich
das Vakuum erhöht.
(b) Pumpenöl auf Sauberkeit prüfen. Eine extrem verschmutzte Pumpe muss
vielleicht mehrmals mit Öl gespült werden.
(c) Ölfüllstand prüfen. Um einen optimalen Betrieb zu gewährleisten, muss das Öl bei
laufender Pumpe die Markierung am Schauglas erreichen.
Nicht überfüllen, da sich das Öl bei Betriebstemperatur ausdehnt. Um den Füllstand
zu prüfen, die Pumpe mit verschlossenem Einlass starten.
Ölstand per Schauglas prüfen. Ggf. Öl nachfüllen.

V. Technische Zeichnung
1ÖLABLASSSCHRAUBE13 ABSTÜTZBLOCK23 LÜFTERABDECKUNG
2O‐RING14 GUMMIFUSS24 ABLUFTSCHRAUBE
3SCHAUGLAS15 SOCKEL25 VENTILPLATTE
4GEHÄUSE16 MOTORKÖRPER26 ABDECKPLATTE
5O‐RING17 MOTORSTATOR27 O‐RING
6HINTERERPUMPENABDECKUNG18 RADIALWECHSEL28 O‐RING
7HINTERERDREHSCHIEBER19 MOTORROTOR29 EINLASSARMATUR
8HINTERERPUMPENLÄUFER20 LAGER30 GRIFF
9HINTERERPUMPENSTATOR21 MOTORABDECKUNG31 KONDENSATORKASTEN
10VORDERERPUMPENLÄUFER22 LÜFTER32 KONDENSATOR
11VORDERERDREHSCHIEBER33BUCHSE
12VORDERERPUMPENSTATOR34NETZSCHALTER
VI. Technische Parameter
ZweistufigeVakuumpumpe
ModelleA‐i230‐NSA‐i260‐NS
Frequenz50Hz60Hz50Hz60Hz
Flussrate2.5CFM
71L/min
3.0CFM
84L/min
2.5CFM
71L/min
3.0CFM
84L/min
Endvakuum1Pa
7.5microns
1Pa
7.5microns
Stufe22
Leistung1/2HP3/4HP
Einlassstutzen1/4"&3/8"SAE1/4"&3/8"SAE
Ölvolumen350ml550ml
Abmessungen(mm) 320x125x232340x132x245

GEBRUIKERSHANDLEIDINGNL
TWEETRAPSVACUÜMPOMP
A-i230NS/A-i260NS
VONKVRIJ UNIT
GESCHIKT VOOR GEBRUIK MET NIEUWE
KOUDEMIDDELEN R32,HFO-1234yf

GEBRUIKERSHANDLEIDING
I. Pompcomponenten
II. Bedieningshandleiding
1. Voor de inbedrijfname
Alle motoren zijn met 10% tolerantie in voltage ontworpen t.o.v. de normale spanning.
Enkel fase motoren zijn compleet met kabel aangesloten en direct gereed voor
ingebruikname.
(a) Controleer de netspanning (bijv.230V) en vergelijk dit met de waarde op het metalen
type plaatje op de pomp. Zorg ervoor dat de AAN/UIT schakelaar op “UIT” staat voordat
er spanning op komt. Verwijder de uitlaatdop op de pomp.
(b) Vul het olie reservoir met olie voordat de pomp wordt ingeschakeld. Verwijder
hiervoor de olievuldop van de uitlaat op de pomp en vul de pomp met olie tot de bodem
van het kijkglas. De juiste olievulling kan in de specificaties van de pomp worden
gevonden.
(c) Sluit de inlaat af met een afsluitkapje (1/4” & 3/8” SAE ). Zet de schakelaar AAN.
Plaats de olievuldop pas weer terug op de uitlaat als de pomp rustig loopt. Dit kan 2 tot
30 seconde duren afhankelijk van de omgevingstemperatuur.
Nadat de pomp ongeveer één minuut gewerkt heeft, moet het olieniveau worden
gecontroleerd door middel van het kijkglas. Dit niveau zou gelijk moeten zijn aan de olie
niveau lijn welke op het oliekijkglas te vinden is. Vul olie bij wanneer dat nodig is.
Opmerking: Het olieniveau moet worden afgestemd met de niveaulijn op het kijkglas
wanneer de pomp draait.
Onvoldoende olievulling kan leiden tot slecht vacumeren van de pomp.
Overmatige olievulling kan leiden tot het overlopen van olie uit de uitlaatdop
Olieafvoer
Kijkglas
Behuizing
Olievuldop
Handvat
Elektrische box
Ventilator kap
Motor
Voetplaat

2. Het uitschakelen van de pomp na gebruik
Om een goede opstart en de levensduur te verlengen, dienen de volgende procedures
te worden gevolgd bij het uitschakelen van de pomp.
(a) Sluit op de meterset de kraan en slang af welke tussen de pomp en de installatie zit.
(b) Verwijder de slang van de pompinlaat (1/4” & 3/8” SAE ).
(c) Bedek de pompinlaat (1/4” & 3/8” SAE ) met een afsluitkapje om geen vervuiling in de
pomp te krijgen.
III. Onderhoud
1. Vacuümpompolie
De conditie van de olie en het type olie welke gebruikt wordt in een high performance
vacuümpomp is het van uiterst belang om de uiteindelijke haalbare vacuüm te
verkrijgen.
Het is aanbevolen om “high Performance Vacuüm Pomp Olie” te gebruiken. Dit is een
specifiek gemengde olie om te zorgen voor een maximale viscositeit bij normale
bedrijfstemperaturen en om bij koude temperaturen op te starten.
2. Olie wissel procedure
(a) Zorg ervoor dat de pomp is opgewarmd.
(b) Verwijder de olie afvoerschroef aan de onderzijde onder het kijkglas. Vang de olie op
in een kan om deze netjes af te kunnen voeren. Olie kan uit de pomp worden verwijderd
door het openen van de afvoerschroef aan de onderzijde en gedeeltelijk blokkeren van
de uitlaat bovenop (waar je de olie vult) met een doek, terwijl de pomp draait. Doe deze
methode zeker niet meer dan 20 seconden.
(c) Wanneer de olie uit de pomp is gelopen kun je hem wat schuin kantelen om het
laatste restant te verwijderen.
(d) Plaats de olie afvoer schroef terug in de pomp. Verwijder de olievuldop van de uitlaat
boven op de pomp en vul het pompreservoir met nieuwe vacuümpompolie totdat de olie
zichtbaar wordt in de bodem van het kijkglas.
(e) Zorg ervoor dat de ingangspoort afgesloten is voordat de pomp wordt aangezet. Laat
de pomp één minuut draaien en controleer dan opnieuw het olieniveau. Als het
olieniveau lager staat dan de niveaulijn op het kijkglas, kun je wat olie bijvullen (met een
draaiende pomp) totdat de olie het juiste niveau bereikt.
Plaats de olieafsluitdop weer terug en zorg ervoor dat de pompinlaat bedekt is met een
afsluitkapje.
(f) i) Wanneer de olie erg is vervuild met slib/ bezinksel/ sludge welke gedurende de
werking gevormd wordt kan het raadzaam zijn om de oliereservoirdeksel te verwijderen
en schoon te poetsen.
ii) De alternatieve methode om deze vervuiling weg te krijgen is om de olie van het
pompreservoir geforceerd te verwijderen.
Laat de pomp lopen totdat hij warm is geworden. Wanneer de pomp nog loopt verwijder
de olie afvoerschroef en bedek de olievuldop aan de bovenzijde met bijvoorbeeld een
doek. Dit zal resulteren in het terugpersen van de olie uit het reservoir samen met de
verontreiniging. Schakel de pomp uit wanneer de olie stopt met stromen.
iii) Herhaal deze procedure totdat te verontreiniging is verwijderd.
iv) Verwijder de olievuldop en vul de pomp metzuivere schone olie tot het juiste niveau
is bereikt.

IV. Probleem oplossingen
De volgende punten kunnen mogelijk helpen bij het oplossen van storingen aan de
vacuümpomp:
1. Fout bij starten
Controleer de voedingsspanning. De pompen zijn ontworpen om te starten bij + of -
10%: voedingsspanning bij 5 °C. Echter, wanneer de maximale voedingsspanning wordt
overschreden kan dit problemen geven bij inschakelen van de vacuümpomp.
2. Olielekkage
(a) Zorg ervoor dat de olie niet gemorst is bij bijvoorbeeld het vullen van de
vacuümpomp etc.
(b) Wanneer er een lekkage aanwezig blijft, kan mogelijk de behuizingspakking of de
aspakking moeten worden vervangen. Wanneer er een lekkage optreed in de buurt van
de olieafvoerschroef, zou eventueel de schroefdraadpakking moeten worden vervangen
(bijv. Loctite).
3. Probleem bij het verkrijgen van een juist vacuüm
(a) Zorg ervoor dat de vacuümmeter en alle verbindingen lekkage vrij en in een goede
conditie zijn. U kunt lekkages opmerken door het controleren van het vacuüm met een
vacuümmeter, terwijl je vacuümpompolie op verdachte punten smeert. Het vacumeren
met een werkende vacuümpomp zal kortstondig verbeteren.
(b) Zorg dat er schone vacuümpompolie in de pomp zit. Bij een sterk vervuilde pomp zal
er diverse malen gespoeld moeten worden met schone olie.
(c) Zorg dat de olie op het juiste niveau in het kijkglas van de werkende pomp staat voor
een goed vacuüm.
Overvul de pomp niet met olie. Het gebruik van de pomp leidt tot temperatuursstijging
van de olie en zal deze olie doen expanderen waardoor het olieniveau hoger zal zijn
t.o.v. een niet werkende pomp. Dit kan op het kijkglas worden afgelezen.
Om het olieniveau op het kijkglas te controleren dient de pomp te worden opgestart met
de pompinlaat (1/4” & 3/8” SAE ) afgesloten. Voeg olie toe wanneer nodig.

V. Technische tekening
1OLIEAFVOERSCHROEF/DOP13 CHASISTUSSENSTUK23VENTILATORKAP
2O‐RING14 RUBBERENVOET24UITLAATPOORTOLIEVULDOP
3KIJKGLAS15 VOETPLAAT25KLEPPENPLAAT
4BEHUIZING16 MOTORBEHUIZING26BOVENKAPBEHUIZING
5O‐RING17 MOTORSTATOR 27O‐RING
6POMPDEKSELACHTERZIJDE18 CENTRIFUGAALSCHAKELAAR28O‐RING
7DRAAIGEDEELTEACHTERZIJDEFAN 19 MOTORROTOR29INLAATPOORT
8POMPROTORACHTER20 LAGER30HANDVAT
9POMPSTATORACHTER21 MOTORDEKSEL31CONDENSATORHOUDER
10POMPROTORVOOR22 VENTILATOR32CONDENSATOR
11DRAAIGEDEELTEVOORZIJDEFAN33STEKKERAANSLUITING
12POMPSTATORVOOR34SPANNINGSSCHAKELAAR
VI. Technische parameters
Tweetrapsvacuümpomp
ModellenA‐i230‐NSA‐i260‐NS
Frequentie50Hz60Hz50Hz60Hz
Pompdebiet2.5CFM
71L/min
3.0CFM
84L/min
2.5CFM
71L/min
3.0CFM
84L/min
Max.vacuümbereik 1Pa
7.5microns
1Pa
7.5microns
Trap22
Capaciteit1/2HP3/4HP
Inlaatpoort1/4"&3/8"SAE1/4"&3/8"SAE
Olievulling350ml550ml
Afmetingen(mm) 320x125x232340x132x245
Gewicht8.6kg13.5kg
This manual suits for next models
1
Table of contents
Languages:
Popular Water Pump manuals by other brands

Watson-Marlow
Watson-Marlow MasoSine EC 25 manual

Xylem
Xylem Goulds AquaBoost VS instruction manual

Knauer
Knauer WellChrom HPLC-Pump K-120 manual

Xylem
Xylem LOWARA Hydroquench 3000 MK2 Operating and maintenance instructions

Pentair
Pentair Compli 1010/4 BWE instruction manual

Tryton
Tryton TPB1102 instruction manual

Champion
Champion C46530 Owner's Manual and Operating Instructions

Elmo Rietschle
Elmo Rietschle S-VSI 300 (44) operating instructions

Stermay
Stermay 782A Plus Operation instructions

GORMAN-RUPP PUMPS
GORMAN-RUPP PUMPS 12B20-B/S1 Installation, operation, and maintenance manual with parts list

Lincoln
Lincoln CENTRO-MATIC B Series manual

Kohler
Kohler TP 3.0 owner's manual