TotGuard FAT TIRES User manual
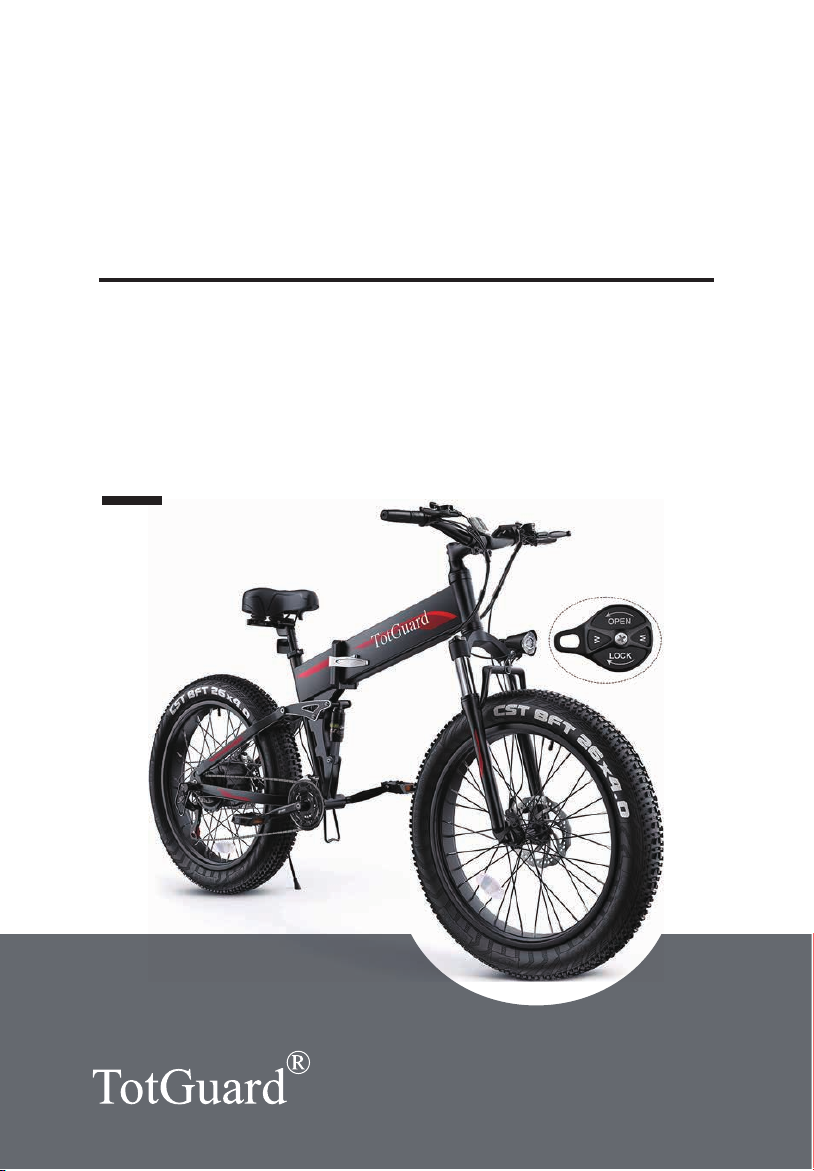
FAT
TIRES
MOUNTAIN
BIKE
Made in China

Catalog:
Structure Illustration
Product Safety Notice
Daily Maintenance Precautions
Parts list as following picture
Detailed handlebar description
Assembly
Assembly suspension fork
Charge Your E-Bike
Display and Setting
LCD Display Controls
LCD Display Operations
Daily Care and Maintenance
Specifications
Troubleshooting
Warning and Warranty
1
2
3
3
4
5
10
11
12
13
14
16
22
23
24

Structure
Illustration
1

Please remember to wear a helmet or other protectors
to avoid injury when riding your electric bike.
Please make sure that all parts of the electric bike are
properly installed and not damaged.
Please check whether the folded part is locked and the
brake system is well.
Before use, please confirm whether the power is suffi-
cient.
Before your riding, be sure to check that the tires are in
good condition, inflated properly, and have sufficient
tread remaining.
When feeling unwell physically or mentally due to illness
or under the influence of medicine or alcohol, please do
not ride ebike.
E-bike is designed for only one rider, and never try to
ride double or more, or ride the e-bike holding a child or
load.
Please do not climb slope over 30 ° ,and do not sharply
speed up or slow down on the slope.
Never exceed the 300 Ib(136 kg) maximum load rating.
Do not ride under wet conditions. The ebike may slide
from under your feet causing injury. Wet conditions may
damage the electronics and void the warranty.
Do not modify the product from the manufacturers origi-
nal design.
Electric bicycle is only used as a daily means of trans-
portation, and should not be used in extreme sports or
other dangerous riding methods. Don't go up and down
steps. Don't ride on the highway.
Product Safety Notice
Before your riding, please read this manual carefully and observe the follow-
ing precautions:
2

Due to the particularity of lithium batteries, users should
charge them at least once within a month. Damage to the
battery due to improper maintenance is not covered by the
warranty.
Avoid prolonged exposure to sun or rain and avoid storage in
places with high temperatures or corrosive gas.
Please don't use other brand battery, charger or cable and
repair them by your owm. Please don't charge overtime, it is
better to charge in 0~40℃environment.
Measure the tire pressure at least once each month and
measure again before starting a long-distance riding.
Without permission, never try to open or dissemble the bat-
tery, or perform any irrational operations on it or use it.
Carefully remove the packaging material protecting the bike frame and
components.
Daily Maintenance
Precautions
Parts list as following picture
1
2
3
4
E-bike Front wheel*1 Saddle assembly*1 Charger*1
Battery*1 Pedals*1 Rearreflector*1 Front reflector*1 Tool*2
3
①
⑥ ⑦ ⑧ ⑨
② ③ ④
⑤

Detailed handlebar
description
Front shift lever
Brake power
off system
Horn
switch Headlight switch
Shift button
Speed control handle
Electric drive
downshift button
Power switch/
Press for 3s
Grip
Electric drive upshift button Front reflector
Derailleur lever
key hole charge
4

Assembly
Remove the ebike from
the package.
Take out the front wheel
set and align it with the
clearance of the front brake
before installing it, then
install.
Arod is pierced on the
center shaft of the wheel.
Tighten the nuts at both
ends,and then use a
wrench to lock it in a clock-
wise direction.
Check whether there is a
gap on both sides of the
disc motor after locking.
5
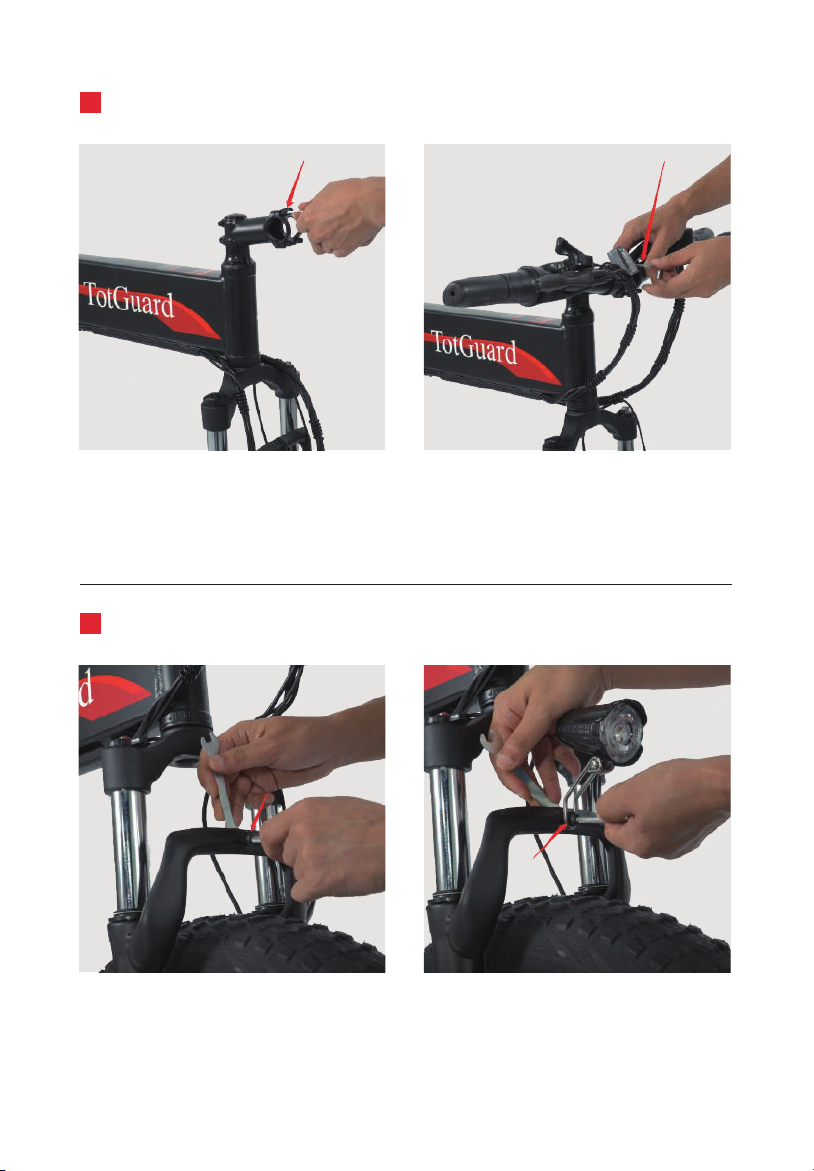
1
2

First remove the four
screws of the stem,as
shown in the gure,install
the handlebar at the center
point and lock the screws
(5.1Nm)
Adjust the angle of the
stem to the position per-
pendicular to the frame,
first lock the screw of the
stem cover, and then lock
the two screws of the
arrow.
Install the seat, adjust it to
a suitable height and fix it
with quick release.
The left pedal is tightened
counter clockwise and the
right pedal is tightened
clockwise.
The bicycle battery has
been assenbled before
leaving the factory, and can
be removes and installed
later.
Seat post quick release
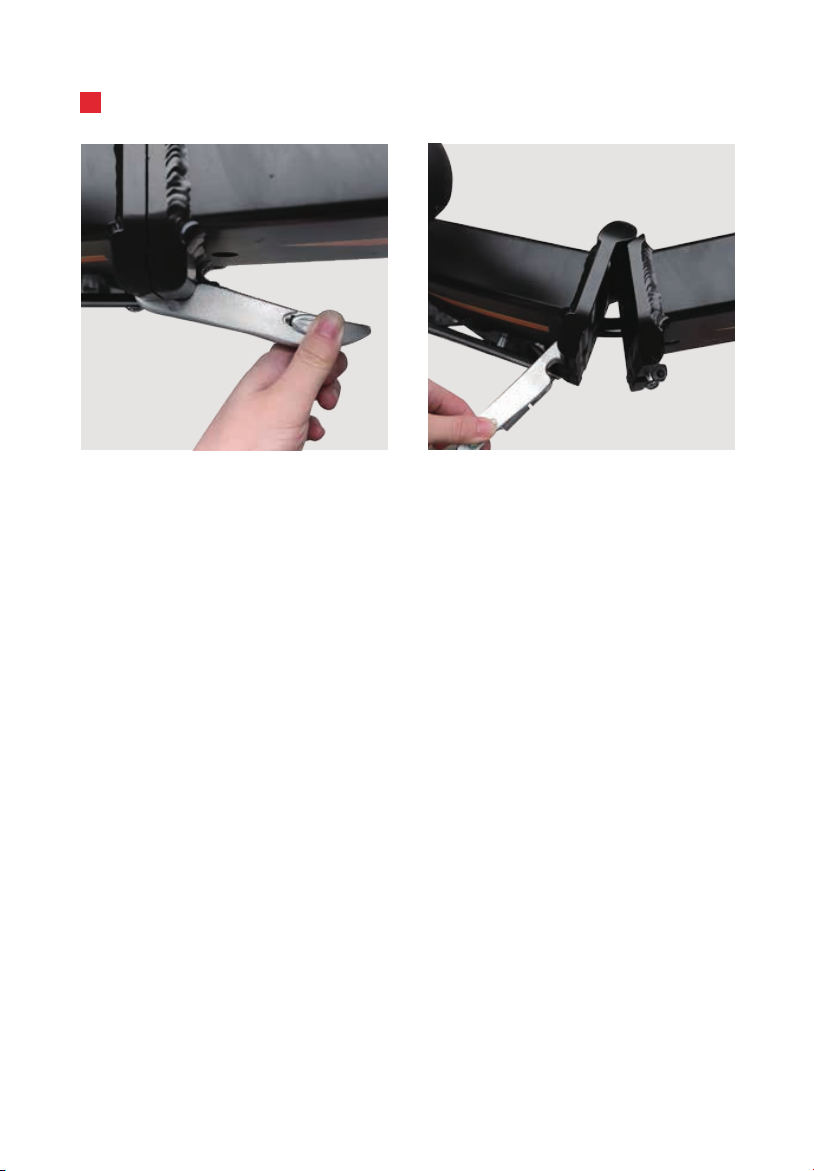
6
3
4
6
5
STEP1: Unscrew this latch with
a tool and remove half of it.
STEP2: Pick up the handlebars,
embed the middle of the handle-
bars and simply screw the other
half of the latch into place.
STEP1: Unscrew this latch with
a tool and remove half of it.
STEP2: Pick up the handlebars,
embed the middle of the handle-
bars and simply screw the other
half of the latch into place.
Mounting the handlebars
Installation of headlights
7

STEP1:Identify the markings
and insert the corresponding
holes.
STEP2: Tighten with a tool.
STEP1:Open the latch and
insert downwards.
STEP2: Just adjust to the ap-
propriate height and close the
latch.
Mounting pedals
Installation of seats
8
STEP1: Press the button to
open the clamp.
STEP2: The battery can be
removed by folding the frame
slightly.
Remove the battery
9

10
The suspension fork can move down about 6cm, helping you to handle
bumps, rocks, and uneven terrain.
The lockout lever is located on top of the right side of the suspension
fork. can be turned clockwise until it stops to fully lock out the suspen-
sion fork’ s range. To unlock the lockout lever, turn the knob counter-
clockwise until it stops and the resistance can be reduced.
Assembly
suspension fork
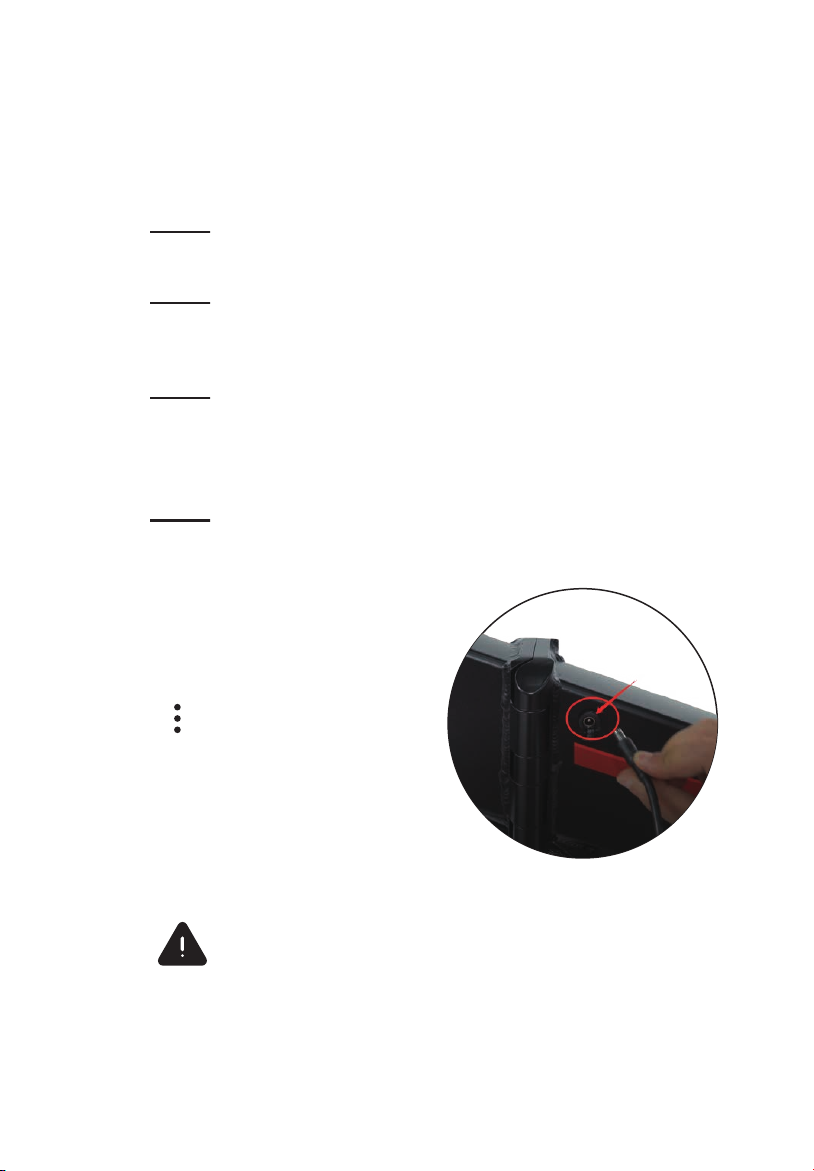
The charge port is on the tail of the battery. See pic-
ture1.
Insert the charging plug of the charger into the connect-
ing charge port of the battery (please make sure the
charge port is dry).
When the charger indicator turns red, it is in charge;
when it turns green, it is fully charged. After fully
charged, please unplug the charger as long-time
charging affects battery life.
Please cover the charging port after charging in case of
water in.
After charging the battery, please unplug the charger first
and press the button. Then check the battery. If the bat-
tery light turns green, it turns out the battery is fully
charged. Please make sure that the battery button is
turned on that can be found on the top end of the battery
when you want to check the battery level and LCD dis-
play.
Step 1
Step 2
Step 3
Step 4
11
WARM
TIPS
Charge
Your E-Bike
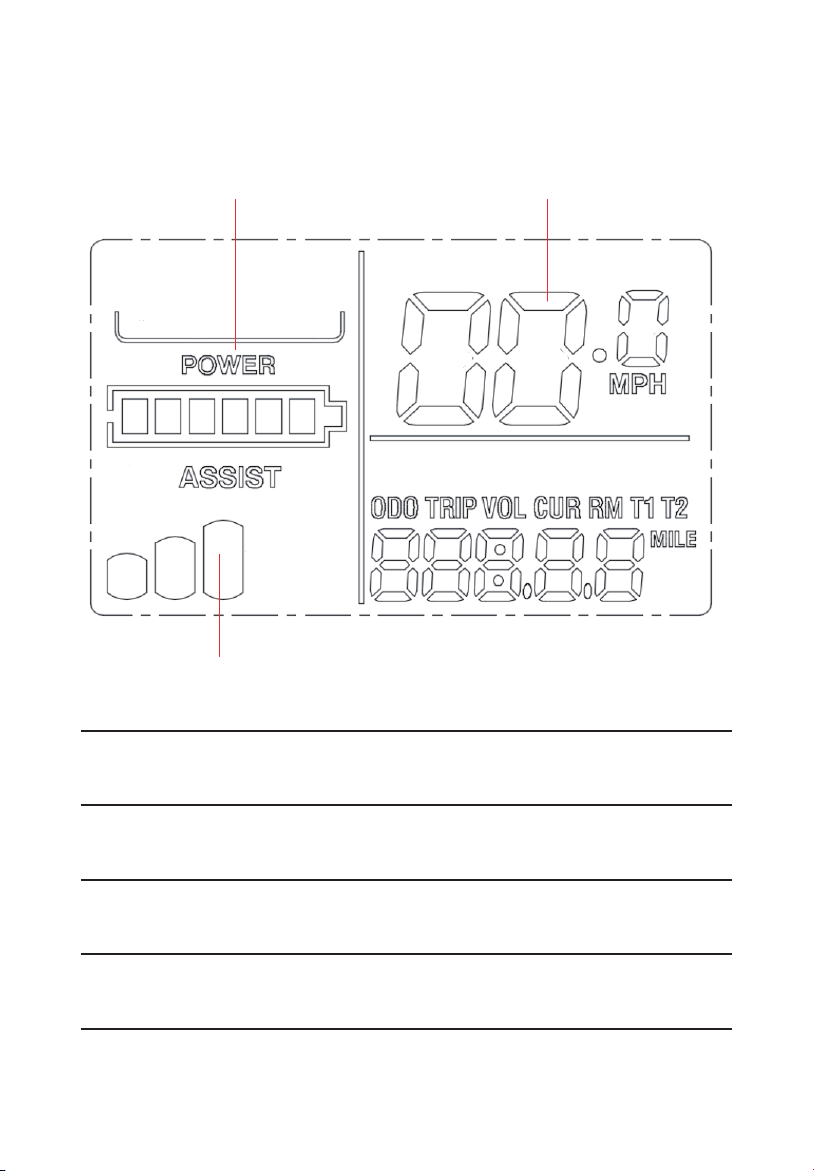
Display and Setting
These numbers show distance data for a single trip. Data is automatically
Battery Level
Pedal Assist Level
Speed
TRIP
These numbers show odometer data (i.e., cumulative distance)
ODO
This icon indicates how much battery life you have left.
BATTERY LEVEL
1,2,3: Displays the current power assisted mode.
POWER ASSISTED MODE
Those functions are not available.
VOL CUR RM T1 T2
12

LCD Display Controls
These numbers show distance data for a single trip. Data is automatically
1
4
5
Turn on bike
Turn off bike
Increase pedal assist (PAS) level
Decrease pedal assist (PAS) level
Toggle odometer, trip odometer
Turn on headlight
Activate Electric Bell
Press and hold M until power
engages(turn the battery first)(3)
Press and hold M(3)
Press + button (1)
Press—button (2)
short press ”M” button (3)
Press once (4)
Press once (5)
13
Operation Directions
3
2

LCD Display Operations
Setting Mode: When the ebike is on, press and hold + and — buttons
at the same time for 3 seconds to enter the setting mode. Press once M
to confirm and enter the next set. Press + or — to adjust the number.
Press and hold + and — buttons at the same time for 3 seconds to quit
the Setting Mode.
P01
P02
P03
P04
P05
P06
P07
P08
P09
P10
P11
P12
P13
Backlight brightnes
Mileage unit
Voltage rating
Dormancy time for LCD
display automatic turn off
PAS level
Diameter
Speed measurement
magnetic steel number
Speed Limit
Zero start/non-zero start
settings
Drive mode set
Assistance sensitivity
setting
Power start strength set
Three types of magnetic
steel
Level 1is thedarkestand level 3 is the brightest
0for KM;1for MILE
24 V/36V/48V/60V/64V; default 48 V
0 for no dormancy; other numbers are dormancy
timewith range of 1-60 minutes;
0 for 3 levels mode; 1 for 5 levels mode; 2 for 9
levels mode; Default 3 pedal assist levels mode
Unit: inch; accuracy: 0.1——Limitedfunction
1-100——Limitedfunction
Range 0-100 km/h,100 forno speed limit——Limit-
edfunction
0 for zero start;1 for non-zero start; Without pedal-
ing or using a throttle, the ebikein zero startcan
drive itself; too risky, would not recommend
0: Pedal power drive (through the power gear to
determine how much power output, this time the
throttle is invalid).1: Electric drive (through the
handle drive, this time pedaling is invalid).2: Auxil-
iary drive and electric drive coexist simultaneously
Range:1-24——Limitedfunction
Range :0-5——Limitedfunction
5,8 and 12 grains——Limitedfunction
Yes
Yes
No
Yes
No
No
No
No
Yes
Yes
No
No
No
14
Mode Function Description Valid-
ness

15
Mode Function Description Valid-
ness
P14
P15
P16
P17
P18
P19
P20
Controller limit
Controller undervoltage
ODO zero setting
Cruising setting
Speed display proportion-
al setting
0 level enable
Agreement setting
Range: 1-20A; Default 12 A——Limitedfunction
Limitedfunction
Long press + for 5 seconds to resume ODO to
zero
0: 1: enable cruising; automatic cruising option-
al——Limitedfunction
Range :50%~150%——Limitedfunction
0: include 0 level; 1: not include 0 level——Lim-
itedfunction
0: 2 Agreement; 1: 5S Agreement; 2: Standby;
3: Standby——Limitedfunction
No
No
Yes
No
No
No
No

Daily Care and Maintenance
Cleaning and Storage
If you see stains on the bike body, wipe them off with a damp cloth. If the
stains won't scrub off, put on some toothpaste, and brush them with a
toothbrush, then wipe them off with a damp cloth.
Notes: do not clean the bike with alcohol, gasoline, kerosene, or other
corrosive and volatile chemical solvents to prevent dire damage. Do not
wash the bike with a high-pressure water spray. During cleaning, make
sure that the bike is turned off, the charging cable is unplugged, and the
rubber flap is closed as water leakage may result in electric shock or
other major problems. When the bike is not in use, keep it indoors where
it is dry and cool. Do not put it outdoors for a long time. Excessive sun-
light, overheating and overcooling accelerate the battery pack's life span
Battery Maintenance
Use original battery packs, use of other models or brands may bring
about safety issues;
Do not touch the contacts. Do not dismantle or puncture the casing.
Keep the contacts away from metal objects to prevent short circuits
which may result in battery damage or even injuries and deaths;
Use original power adapter to avoid potential damage or fire;
Mishandling of used batteries may do tremendous harm to the envi-
ronment. To protect the natural environment, please follow local
regulations to properly dispose of used batteries.
After every use, fully charge the battery to prolong its life span.
Storage and Disposal
Please try to store the bike in a cool and dry place between 50 ° F –
77 ° F (10 ° C – 25 ° C). In extremely humid environments the interior
of the bike may suffer condensation or even water accumulation,
which may damage the battery rapidly. Devices are not intended for
use at elevations greater than 2000m above sea level prolonged
exposure to UV rays, rain, and the elements may damage the en-
closure materials, store indoors when no tin use.
In daily use, try to avoid recharging the bike after completely ex-
hausting the battery. If the battery is low, charge it as soon as possi-
ble.
Please charge the bike every other month to preserve the battery.
16
2
1
1
2
3
3
4
5

Recommended Service Intervals
Regular inspection and maintenance are key to ensuring bikes from Tot-
Guard ebike function as intended and to reduce wear and tear on their
systems. Recommended service intervals are meant to be used as guide-
lines. Real-world wear and tear, and the need for service, will vary with
conditions of use. We generally recommend inspections, service, and
necessary replacements are performed at the time or mileage interval
that comes first in the following table.
Weekly,100-200 mi
Monthly,250-750 mi
Weekly,100-200 mi -Check drivetrain for proper alignment and
function (including the chain, freewheel, chainring, and derail-
leur).-Check wheel trueness and for quiet wheel operation (with-
out spoke noise).-Check the condition of the frame for any
damage.
Clean the frame by wiping the frame down with a damp
cloth.-Use barrel adjuster(s) to tension derailleur/brake cables if
needed.
Interval
Monthly,250-750 mi
Interval
Inspect
Service
Replace any components confirmed by TotGuard Support Team
or a certified, reputable bike mechanic-Repair in a bike shop( To t -
Guard Support Team would cover all repairing costs )
Replace
Check brake and shifter cables for corrosion or fraying.-Check
bike is shifting properly, proper derailleur cable tension.-Check
brake pad alignment, brake cable tension, chain stretch and
spoke tension-Check accessory mounting (rack mounting bolts,
fender hardware, and alignment)
Clean and lubricate drivetrain.-Check crankset and pedal
torque.-Clean brake and shift cables.-True and tension wheels if
any loose spokes are discovered.-Balance the battery.
Inspect
Service
Replace brake and shift cables if necessary-Replace brake pads
if necessary.-Repair in a bike shop(TotGuard Support Team would
cover all repairing costs )
Replace
17

Pre-Ride Safety Checklist
Notice: Before every ride, and after every 25-45 miles(40-72 km), we advise
following the pre-ride safety checklis
Ensure front and rear brakes work properly. Check
brake pads for wear andensure they are not over-
worn.Ensure brake pads are correctly positioned in
relation to the rims.Ensure brake cables are lubri-
cated, correctly adjusted, and display no obvious
wear. Ensure brake levers are lubricated and tightly
secured to the handlebar.Test that the brake levers
are firm and that the brake and the brake light are
functioning properly
Ensure tires are inflated within the recommended
limits posted on the tire sidewalls and hold air.
Ensure tires have good tread, have no bulges or ex-
cessive wear, and are free from any other dam-
age.Ensure rims run true and have no obvious wob-
bles, dents, or kinks. Ensure all wheel spokes are
tight and not broken.Check axle nuts and front
wheel quick release to ensure they are tight. Ensure
the locking lever on the quick release skewer is cor-
rectly tensioned, fully closed, and secured.
Every 6 Months,
750-1250mi
Inspect drivetrain (chain, chainring, freewheel, and derailleur).-In-
spect all cables and housings.
Standard tune-up by a certified, reputable bike mechanic is
recommended.-Grease bottom bracket.
Interval Inspect
Service
Replace brake pads, tires, cables and housingsif necessary.-Re-
pair in a bike shop(TotGuard Support Team would cover all repairing
costs )
Replace
Brakes
01:
02:
Wheels
and
Tires
Safety Check
18
Table of contents
Other TotGuard Bicycle manuals


