6
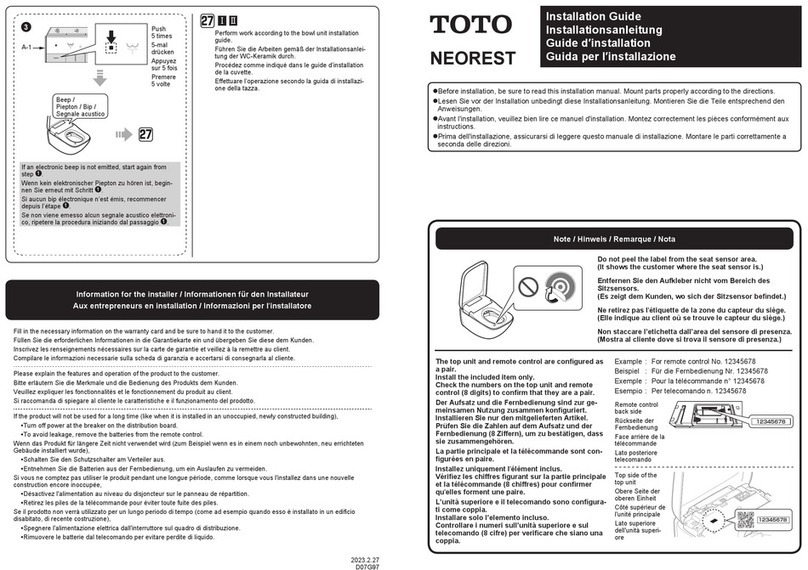
Try to operate the remote controller
to select the easy-to-use position.
✲
The remote controller receiver
performance may differ depending
on the conditions such as the size
of the room, wall, materials, etc.
Press the "Wand Cleaning O /OFF"
button to confirm that the wand
extends and retracts.
If the remote does not activate the
EOREST functions, please move
within the mounting area or try the
opposite wall.
Drill small holes (3 mm) in the wall to
make it easier to drill in the screws.
When installing onto sheet rock or tile,
first drill 33 mm deep (6 mm) holes into
the wall and then use anchor bolts to
attach the hanger to the wall.
Use the theft-preventive part when the
remote controller is fixed. For the
mounting method, refer to the
contained instruction manual.
(Do not start installation before asking
the customer's intension.)
4
, )
5
2
-) ) $,
, ) ) ../ 0 1 2/34/ 567
$, )
3
1
$, )
✲
& ) ) $+
✲
+
✲
Be sure to install the batteries in the correct +/-
positions.
1
Remove the tape from connector A.
2
Pull out connector B and connect it to
connector A. (Do not pull connector B
forcibly.)
1
Open the toilet seat and lid to prevent them from being damaged and make it easier to install.
2
Slide the tip end of the mounting bolt to the inner side from the notched section on
the rear side, and insert the bolt to the rear mounting hole.
3
Tighten the mounting bolt manually and tighten it again to mount it so firmly that it
will not be shifted from the toilet bowl.
1
Insert the lid diagonally from the bottom, and tighten the screw on it.
2
Attach the dressing cover.
3
Store connected connectors A and B into the main unit.
4
Push the lead wire of connector A into the notched section and insert it deeply.
-) ) $,
1
$+
$
!!"# $%
- ) ) ) , ) ,
,
(Check to see that the power plug is securely and tightly plugged
in to avoid the risk of fire or electrical shock).
Power outlet
Silicone
sealant
Power plug
2
"
3
,
4
,
)
If the lid contacts an obstacle when it opens for the first time after the cabinet
panel breaker is turned on, the lid may stop on the way for the next time. (The
unit memorizes the position where the lid opens continually for 3 times.) In this
case, turn off the cabinet panel breaker once and then on again without any
obstacle and press the "LID OPE " button on the remote controller.
The lid opens automatically when you approach the toilet after the cabinet panel
breaker is turned on and the soft light flashes about 10 to 60 seconds.
The soft light flashes for about 1 minute. (Motion detection sensor A under
preparation) In the meantime, the lid does not "AUTO OPE ".
The deodorizer starts operation.
Confirm that the wand performs initial operation, or comes out once and return to
its original placed, after the warm air exit cover opens and closes.
(The figure shows a case of
water supply from the floor.)
Mounting bolt
otched section
Connector B
Tape
Connector A
Lead wire
Connector A
Phillips
screwdriver
otched sectionotched section
Dressing cover
Insert and fit.
Lid
Screw
Connector B
,
Rear mounting
hole
Remote controller hanger
Suitable mounting position for the
remote controller.
Easy-to-use mounting position for
the remote controller.
Guideline for
suitable mounting
position.
450150
Guideline for
easy-to-use
mounting
position.
300
1000
950
770
Screws
Anchor bolts
Remote
controller
hanger
Battery poket cover
<Back side>
Open
Close
+
−
−
2AA batteries
+
)
) ) + $,
1
)
✲
Be sure to mount the main unit after connecting the connection hose.
(Mounting the main unit before connecting the hose will make it difficult to connect the connection hose.)
✲
When the product is mounted on the toilet bowl, the toilet seat or lid may be removed if you hold them.
1
Pass the connection hose through he hole of the plate.
2
Keep the main unit in parallel to the toilet bowl and put the main unit right down on the toilet bowl.
✲
Check that connector A for toilet bowl flush valve is not caught between the hose and the hole.
✲
This is done in order to prevent the filthy water preventive packing from turning over.
& $, $ $ )
(Failure to observe this caution may cause the water to spout out.)
# ) $ $ , )
(The bending hose may cause water leakage.)
$
2
!!"#
Connection hose
Branch fitting
Connector A for toilet
bowl flush valve
Filthy water preventive packing
Tape
Connection hose
Hole of the plate
Cap nut
(with packing having a straightener)
(The figure shows a case of water supply from the floor.)
✲
Check that the packing is attached with the nut. Failure to attach the packing may cause water leakage.
✲
Check that the above components are set securely and that the connection hose cannot be removed.
Insert the straightener into the elbow joint from the projecting part, and tighten the
cap nut on the connection hose by using a wrench.
Remove the straightener.
Tighten the nut on the connection hose to mount
it on the elbow joint by using a wrench.
1
2
Wrench
Connection
hose
Cap nut
(with packing)
Straightener
Turn to
the right.
Connection hose
Elbow joint
Insert the straightener
into the elbow joint.
(The projecting part is to be at the elbow joint side.)
✲
Remove the straightener from the connection hose before installation.

