Tout Terrain ADVENTURE FORK II User manual
MANUAL
ADVENTURE FORK II

LIEFERUMFANG PACKAGE CONTENTS
• [1] 1x Ahead Expander
• [1] 1x Ahead expander
• [2] 1x Halterung Radschützer
• [2] 1x Fender mount
• [3] 4x Senkscheibe M5
• [3] 4x Countersunk washer M5
• [4] 4x ISO 10642 Schraube M5x16
• [4] 4x ISO 10642 bolt M5x16
• [5] 1x ISO 10642 Schraube M6x16
• [5] 1x ISO 10642 bolt M6x16
• [6] 1x Logo
• [6] 1x Logo
• [7] 6x Gewindebuchsen für Gabelscheide
• [7] 6x Threaded sleeve for fork blade
• [8] 2x ISO 7380 Schraube M5x20
• [8] 2x ISO 7380 bolt M5x20
• [9] 2x ISO 7380 Schraube M5x18
• [9] 2x ISO 7380 bolt M5x18
• [10] 2x ISO 7380 Schraube M5x16
• [10] 2x ISO 7380 bolt M5x16
• [11] 2x Quermutter für Bremssattel
• [11] 2x Barrel nut for brake caliper
• [12] 2x ISO 7380 Schraube M5x16
• [12] 2x ISO 7380 bolt M5x16
• [13] 4x ISO 10511 Sicherungsmutter M5
• [13] 4x ISO 10511 Locknut M5
• [14] 8x ISO 7089 Plastik-Unterlegscheibe
• [14] 8x ISO 7089 plastic washer
• [15] 1x Steckachse 15mm x 110mm
• [15] 1x Thru axle 15mm x 110mm
[1]
[2]
[3]
[3]
[4][4]
[5]
[6]
[8]
[8]
[10]
[10]
[9]
[9][7]
[7]
[7]
[11]
[11]
[12]
[12]
[13]
[15]
[14]
[14]
[14]
[14]
[14]
[14]
[14]
[14]

EIGENSCHAFTEN SPECIFICATIONS
• Lichtkabel
• Stromversorgung
• Bremsleitung
• Lighting
• Power supply
• Break lines
Gabeleinbauhöhe
Gabeleinbauhöhe
Gabelschaft
steerer tube
Gabelschaftlänge (ungekürzt)
steerer tube length (uncut)
Oset
oset
Achsstandard
axle type
Max. Reifenbreite
max. tire width
Bremsaufnahme
brake mount
Anschraubpunkte
Mounting points
Interne Kabelführung
Internal cable routing
495 mm
Carbon tapered 1 1/8“ – 1 1/2“
348 mm
51 mm
15 x 110 mm
27.5“ / 29“ x 3.0“
PM 7“ / 180 mm (nativ)
• 3-Punkt-Bikepacking (Edelstahl-Buchsen)
• Radschützer
(Halterung im Lieferumfang enthalten)
• Frontgepäckträger
• 3-point-bikepacking
(stainless steel threaded sleeve)
• Mudguard (bracket included)
• Front rack

MONTAGE ASSEMBLY
Das Kürzen des Gabelschafts, das Aufpressen des Gabelkonus und die Montage
der Gabel in den Rahmen sollte von Fachpersonal ausgeführt werden.
Shortening the steerer tube, pressing the crown race and mounting the fork into
the frame should carried out by a qualied mechanic.
Wichtig! Im Falle einer unsachgemäßen Installation besteht STURZGE-
FAHR. Jeder der folgenden Hinweise muss zwingend beachtet werden.
Nicht Einhalten der Vorschriften kann zum Versagen der Gabel und mögli-
cherweise zu einem Sturz mit schwerwiegenden Folgen führen.
Important! Improper installation may damage the fork and result
in a CRASH. All assembly instructions must be followed. Failure to follow
the instructions can lead to fork failure and loss of control of the bicycle
with serious consequences.
Achte darauf, dass sich der Gabelkonus auf den Konussitz der Gabel präzise auf-
pressen lässt. Nutze hierzu ein geeignetes Spezialwerkzeug. Beim Aufschlagen
halte die Gabel in der Luft und setze sie keinesfalls auf – Bruchgefahr!
Make sure the crown race is pressed precisely onto the crown race seat.
Use only a crown race setting tool for this purpose. When hammering
the crown race tool, keep the fork in the air. Never impact the fork while
it is on the ground – this will result in damage to the fork.
Installiere alle Teile des Steuersatzes. Stecke die gewünschte Zahl von Spacern
(max. 30 mm) unter den Vorbau und markiere den Schaft an der Oberkante des
Vorbaus. Beachte beim Kürzen des Schaftes außerdem die Dicke der Abschluss-
kappe des Steuersatzes, so dass diese den Gabelschaft nicht berührt. Die Dicke
varriiert je nach Steuersatz. Bringe kein Fett oder Öl auf den Gabelschaft, da
sonst der Vorbau schlechter klemmt.
Install the fork in the frame with all parts of the headset assembled correctly.
Mount the stem with the desired number of spacers (max. 30 mm) underneath.
Mark the steerer tube at the top edge of the stem, then remove the stem and
mark the steerer again at your desired cut length, taking into account the depth
required for your top-cap, as well as the location of the upper bolt of the stem
clamp. Do not use any oil or grease on the fork shaft as this reduces the clamping
force.

Nutze zum Absägen des Gabelschafts eine passende Vorrichtung. Anschließend
ist die Schnittstelle zu entgraten. Die Schnittkante ist mit Klarlack, Sekundenkle-
ber oder einem Zweikomponenten Epoxydharz Kleber zu versiegeln.
Use a suitable cutting device to shorten the steerer tube, then deburr the steerer.
Seal the cutting edge with a clear varnish, superglue, or a two-component epoxy
resin adhesive.
Da der Gabelschaft aus Carbon gefertigt ist, sind Ahead-Krallen NICHT
zugelassen. Verwende den mitgelieferten Ahead Expander.
Since the steerer tube is made from carbon DO NOT use an ahead
star nut, but the suppliead Ahead expander.
Überprüfe auch den Klemmbereich des Vorbaus. Dieser sollte gratfrei sein und
einen großächigen Klemmbereich aufweisen. Tout Terrain Carbongabeln wer-
den sehr präzise gefertigt. Daher sollte dein Vorbau satt aufgeschoben werden
können und kein Spiel aufweisen. Nutze bei Bedarf zusätzlich Carbon Montage-
paste. Wenn du alle Punkte beachtet hast, werden geringe Anzugsmomente be-
nötigt (max. 4-5 Nm). Beachte das vom Vorbauhersteller angegebene Drehmo-
ment.
Check the clamping area of the stem, which should be burr-free and have
a large clamping area. Tout Terrain carbon forks are manufactured very precisely
– your stem should be reasonably tight with no play. If necessary, use carbon as-
sembly paste. With proper assembly, low torque (4-5 Nm) is sucient for xing
the stem - always follow the torque specications of the stem manufacturer.

Beachte bei der Montage des Bremssattels die Angaben des Bremsenherstellers.
Achtung: Stelle sicher, dass der Gewindeschaft der Befestigungschrauben einen
Überstand von min. 11 mm und max. 14 mm unterhalb des Bremssattels bzw.
des Adapters aufweist (bei einer 180 mm Bremsscheibe ist in der Regel eine
M6x20 Schraube mit DIN 125 6,4 Unterlegscheibe und Schraubensicherung
Loctite 243 o.Ä. zu empfehlen. Die mitgelieferten Befestigungsschrauben der
Bremse können davon abweichen).
Der maximale Bremsscheibendurchmesser beträgt 203 mm.
When installing the brake caliper, follow the brake manufacturer's instructions.
Attention: Make sure that the threaded shaft of the mounting screws has a
protrusion of min. 11 mm and max. 14 mm below the brake caliper or adapter
(for a 180 mm brake disc, an M6x20 screw with DIN 125 6.4 washer and Loctite
243 threadlocker or similar is usually recommended. The supplied mounting
screws of the brake may dier).
The maximum brake disc diameter is 203 mm.
min. 11.0 mm
max. 14.0 mm
min. 11.0 mm
max. 14.0 mm
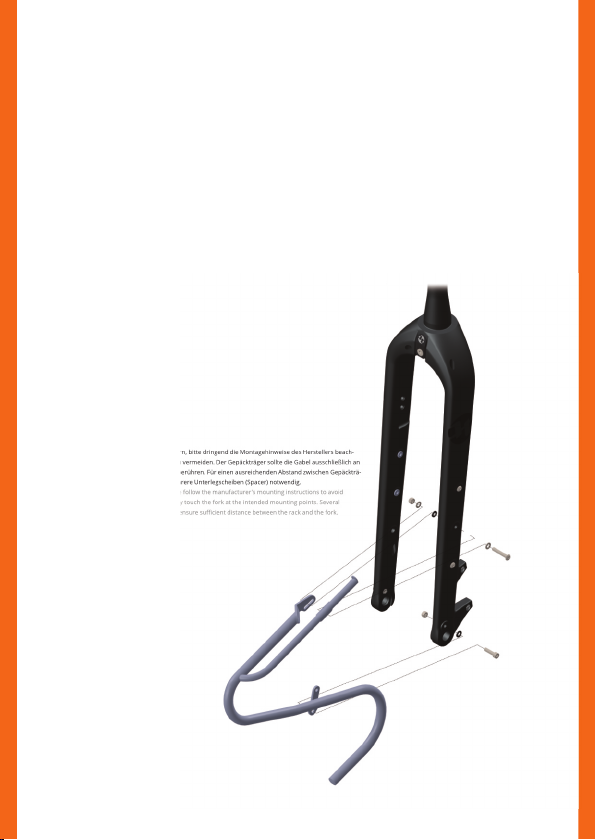
Wichtig! Bei anderen Frontgepäckträgern, bitte dringend die Montagehinweise des Herstellers beach-
ten, um eine Beschädigung der Gabel zu vermeiden. Der Gepäckträger sollte die Gabel ausschließlich an
den vorgesehenen Anschraubpunkten berühren. Für einen ausreichenden Abstand zwischen Gepäckträ-
ger und den Gabelholmen sind ggf. mehrere Unterlegscheiben (Spacer) notwendig.
Important! For other front racks, please follow the manufacturer's mounting instructions to avoid
damage to the fork. The rack should only touch the fork at the intended mounting points. Several
washers (spacers) may be necessary to ensure sucient distance between the rack and the fork.
FRONTGEPÄCKTRÄGER FRONT RACKS
Adventure Fork II mit Tubus Duo
Adventure Fork II with Tubus Duo
Anbauteile, die Im Lieferumfang enthalten sind:
Mounting parts included in delivery:
• [13] 4x ISO 10511 Sicherungsmutter M5
• [13] 4x ISO 10511 Nut M5
• [16] 6x ISO 7089 Unterlegscheibe M5
• [16] 6x ISO 7089 Washer M5
• [14] 4x ISO 7089 Plastik-Unterlegscheibe M5
• [14] 4x ISO 7089 plastic washer M5
• [17] 2x ISO 7380 Schraube M5x45
• [17] 2x ISO 7380 bolt M5x45
• [18] 2x ISO 4762 Schraube M5x20
(im Lieferumfang des Tubus Duo enthalten)
• [18] 2x ISO 4762 Bolt M5x20
(included in delivery of the Tubus Duo)
[13]
[13]
[18]
[14]
[14]
[17]
[16]
[16]
[2]
[19]
[20]
[3]
[3]
[4][4]
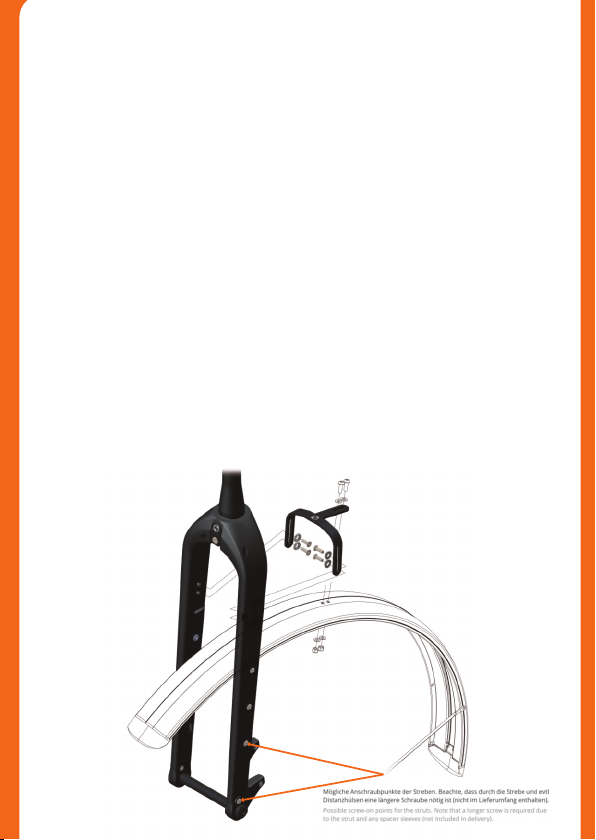
RADSCHÜTZER MUDGUARD
Adventure Fork II mit Radschützer
Adventure Fork II with mudguard
Anbauteile, die Im Lieferumfang enthalten sind:
Mounting parts included in delivery:
• [2] 1x Halterung Radschützer
• [2] 1x Fender mount
• [3] 4x Senkscheibe M5
• [3] 4x Countersunk washer M5
• [4] 4x ISO 10642 Schraube M5x16
• [4] 4x ISO 10642 bolt M5x16
Wichtig! Die unter [19] und [20] abgebildeten Teile sind nicht im Liefer-
umfang enthalten. Je nach Radschützer kann auch die Schraube unten
und die Mutter oben positioniert werden.
Important! the parts shown under [19] and [20] are not included in the
delivery. Depending on the mudguard, the bolt can also be positioned at
the bottom and the nut at the top.

Entferne das Logo, um ein Verdrehen
des Scheinwerfers zu verhindern.
Remove the logo to prevent the
headlight from twisting.
[21]
SCHEINWERFER FRONT LIGHT
Adventure Fork II mit Scheinwerfer
Adventure Fork II with front light
Wichtig! Benötigte Anbauteile [21] für die Montage des Scheinwerfers
sind nicht im Lieferumfang enthalten (M6 Gewinde an der Gablekrone).
Important! Parts required for the assembly [21] of the front light are not
included in the delivery (M6 thread on the fork crown).

KABELVERLEGUNG CABLE ROUTING
Die Tout Terrain Adventure Fork II ist für die interne Verlegung der Brems-
leitung vorbereitet (s. Abb. links). Zudem bietet sie die Möglichkeit der in-
ternen Kabelverlegung z.B. für einen Scheinwerfer oder eine USB-Strom-
versorgung wie den CINQ Plug5 Pure (siehe Abb. rechts). Wir empfehlen,
die Montage von einem Fachhändler ausführen zu lassen.
The Tout Terrain Adventure Fork II is prepared for internal brake line rou-
ting (see left gure). In addition, it oers the possibility of internal cable
routing, e.g. for a headlight or a USB power supply such as the CINQ Plug5
Pure (see right gure). We recommend having the installation carried out
by a specialist dealer.

Die Garantie beträgt 12 Monate auf Verarbeitungsfehler und die
einwandfreie Funktion deiner Gabel. Von der Haftung ausgeschlossen
sind Schäden jedweder Art an den montierten Zubehörteilen.
Our forks are covered by a 12-month limited warranty which covers
manufacturer defects. We are not liable for any damage to installed
accessories.
Bei Fragen und technischen Problemen können Sie sich gerne an uns wenden.
Besuchen Sie auch regelmäßig www.tout-terrain.de für aktuelle Informationen.
Please contact us if you have any problems or technical questions.
Visit www.tout-terrain.de regularly for updated information.
GARANTIE WARRANTY
Tout Terrain GmbH & Co. KG
Industriestraße 11
79194 Gundelngen
Germany
Tel. +49 761 20 55 10-00
info@tout-terrain.de
www.tout-terrain.de
11/2022
© 2022 Tout Terrain
Technische Änderungen vorbehalten
© 2022 Tout Terrain
Details subject to change
Table of contents
Other Tout Terrain Bicycle Accessories manuals


