Tout Terrain STREAMLINER User manual

STREAMLINER
ENDE

2
Lieber Kunde, vielen Dank, dass du dich für den Streamliner entschieden
hast. Wir fertigen diesen nach höchstem Qualitätsstandard, und hoffen,
dir damit ein Produkt zu liefern, das dir lange viel Freude bereitet.
Wir wünschen viel Spass mit dem Streamliner.
DE
ZUBEHÖR
Kupplung (26,8/27/27,2/30/30,9/31,4/31,6/35)
Standard Splint für Kupplung
Schnellverschluss-Splint für Kupplung
For English instructions see page 6.
Vor Inbetriebnahme 3
Montage 3
Inbetriebnahme 3
Betrieb 5
Abstimmen der Federung 5
Wartung 5

3
• Befestige nun den Schalt- und Bremszug
mit den im Lieferumfang enthaltenen
Kabelbindern.
• Zur Befestigung der Sattelstütze nutze bitte
Fett- oder Montagepaste. Beachte das
Drehmoment der Sattelstützenklemme
von max. 9 Nm. Überprüfe die Verdreh-
Sicherheit.
• Achte bei der Montage der Pedale auf die
jeweilige Montageseite und Kennzeichnung.
Nutze Fett um diese zu montieren.
Das max. Anzugsmoment ist 25 Nm.
INBETRIEBNAHME
Wichtig: Fahre niemals, ohne die Prüfungen
in 1 und 2 durchgeführt zu haben.
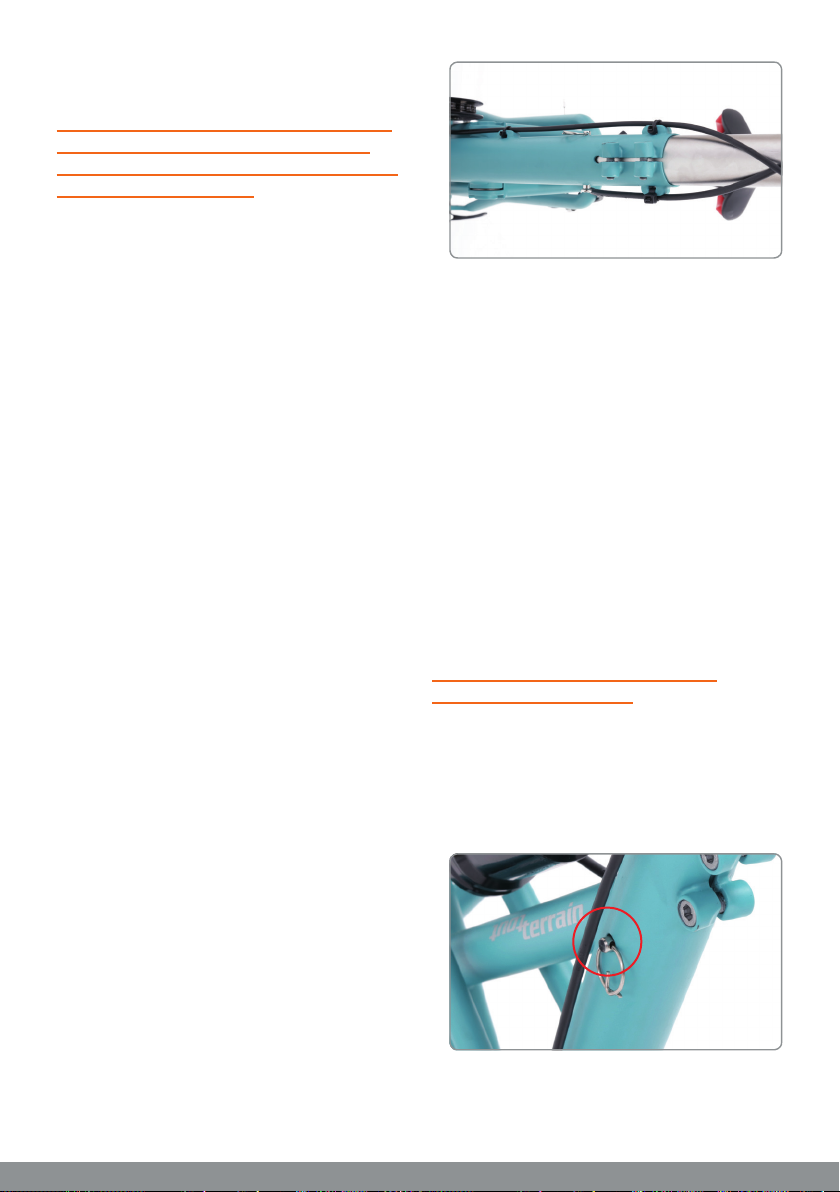
1. Stelle sicher, dass der Schnellspanner
am Hinterrad fest verschlossen ist.
2. Sichere die Deichsel immer mit dem
Sicherungssplint.
VOR INBETRIEBNAHME
Wichtig: Der Streamliner ist für den sport-
lichen Einsatz auch in ruppigem Gelände
konzipiert. Der Betrieb mit diesem erfordert
vom Radfahrer eine gewisse Erfahrung und
Sicherheit beim Radfahren.
Folgende Punkte solltest du vor der ersten
Benutzung mit Kind beachten:
• Anfänger sollten den Betrieb des Anhängers
im Gelände meiden.
• Die Reaktionsmöglichkeiten mit Anhänger
sind eingeschränkt und das Bremsverhalten
ist deutlich reduziert gegenüber der Fahrt
ohne Anhänger.
• Zu deiner und zur Sicherheit deines Kindes
muss dein Fahrrad, insbesondere die
Bremsen, in einwandfreiem Zustand sein.
MONTAGE
• Verbinde den Rahmen mit der Deichsel. Ste-
cke den Splint ein (s. Bild Inbetriebnahme/2.).
Ziehe beide Schrauben mit 9 Nm an, nach-
dem du den Streamliner komplett montiert
hast und am Zugfahrrad ausgerichtet hast!
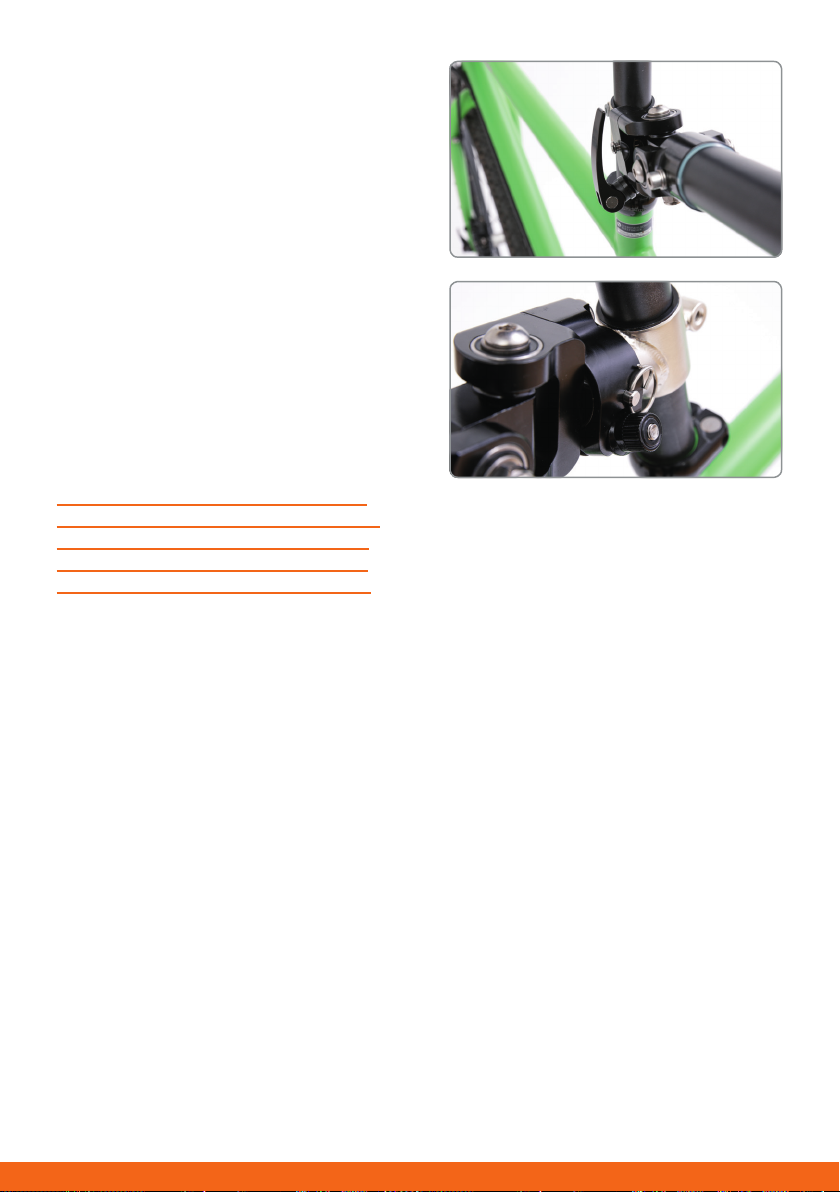
• Befestige den Lenker mit den vorgesehenen
Drehmomenten am Vorbau (5 Nm). Achte
auf die richtige Brems- und Schaltzugverle-
gung. Überprüfe anschließend den Lenker
auf Verdreh-Sicherheit.
4
3. Ziehe die Sattelstütze aus dem Zugfahrrad
heraus. Das Kupplungsstück an der Sattel-
stütze über die Sattelstütze stecken. Der
Durchmesser der Kupplungsschelle muss
genau mit dem der Sattelstütze überein-
stimmen. Die Schelle darf auf der Stütze kein
Spiel haben. Sie darf allerdings auch nicht
weiter als 1 mm aufgebogen werden, um
die Montage zu erleichtern. Dann schiebe die
Stütze wieder in das Fahrrad und positionie-
ren das Kupplungsteil so knapp wie möglich
über dem Rahmen, allerdings so, dass du
bei Bedarf im Gelände die Sattelstütze noch
um einige Zentimeter absenken kannst.
Das Kupplungsrohr muss gerade nach
hinten zeigen, dann ziehe die Schraube mit
einem 5 mm Inbus fest. Das Anzugsmoment
der Schraube darf 9 Nm nicht überschreiten.
Achtung: Montiere den Streamliner nicht
an Carbonstützen, sowie an extreme Leicht-
baustützen! Bei absenkbaren Stützen und
gefederten Teleskopstützen beachte bitte
die Anweisungen der jeweiligen Hersteller.
4. Ankuppeln: Dazu muss der Schnellspanner
der Kupplung offen stehen und die Kupp-
lungsteile müssen schmutzfrei sein. Das
Kupplungsgelenk wird über das Kupplungs-
rohr geschoben, bis es ganz auf diesem
steckt (die Schnellspannschelle berührt nun
fast die Sattelstützenschelle). Am einfachs-
ten geht das, wenn der Anhänger auf seinem
Ständer steht und das Fahrrad mit der einen
Hand an die Kupplung geführt wird, während
man mit der anderen Hand die Kupplung
auf das Fahrrad ausrichtet. Achte darauf,
dass der Anhänger genau in der Flucht hinter
dem Fahrrad hängt. Gehe nun wie folgt vor:
a) Stecke immer den Sicherungsbolzen
durch die Kupplung.
b) Der Schnellspanner muss fest sitzen
und sorgfältig geschlossen werden.
5. Ergonomie:
• Verschiebe den Vorbau auf der Deichsel,
so dass das Kind eine angenehme Sitzposi-
tion einnimmt. Das Kind sollte bequem den
Lenker erreichen können, ohne überstreckt
zu sitzen. Löse hierzu die 2 Schrauben auf
der Unterseite des Vorbaus und verschiebe
diesen. Dann ziehe die Schrauben mit einem
Anzugsmoment von 8 Nm wieder an.
• Bitte stelle die Sattelhöhe korrekt ein. Das
Kind sollte bei durchgestrecktem Bein mit
der Ferse das Pedale berühren. Gegebenen-
falls benötigst du bei fortgeschrittenem
Alter des Kindes eine längere Sattelstütze.
Ziehe die Sattelstütze NIE über die Mindest-
einstecktiefe hinaus.
• Stelle nun die Griffweite des Bremshebels
ein. Drehe mit einem Inbus Schlüssel die
Schraube so weit, dass der Hebel vor dem
mittleren Fingergelenk steht.
b)
a)

5
BETRIEB
Die maximale Zuladung beträgt 35 kg. Bitte
beachte für den Betrieb die folgenden Punkte:
• Transportiere nie ein Kind, dessen Motorik
oder Größe noch nicht genug ausgeprägt ist,
dass es sich selbständig am Lenker fest-
halten kann.
• Dem Kind muß immer ein passender
Radhelm aufgesetzt werden.
• Statte dein Kind mit Fahrradhandschuhen
sowie geeigneter atmungsaktiver Fahrrad-
bekleidung aus.
• Zum Schutz vor Schmutz und Fliegen
sollte dein Kind immer eine Brille tragen,
je nach Wetter ggf. mit UV-Schutz.
• Denke daran, dass dein Kind auf dem
Streamliner aktiv ist und ermüden kann.
Plane daher immer angemessene Touren
sowie genügend Erholungspausen ein.
• Sorge ebenso für genügend Trinken und
Essen während der Tour.
• Kommuniziere während der Tour aktiv
mit deinem Kind, damit es lernt wann und
wie es zu schalten und zu bremsen hat.
ABSTIMMEN DER FEDERUNG
In der Luftkammer muss je nach Zuladung ein
unterschiedlicher Luftdruck eingestellt werden.
Stelle den Luftdruck so ein, dass der Negativ-
federweg (sag) ca. 30 % des Federwegs vom
Federelement beträgt. Dies sollte im fahr-
fertigen Zustand vorgenommen werden, d.h.
mit Kind. Die Dämpfung sollte immer möglichst
schwach eingestellt sein, so dass das Feder-
element schnell ausfedert, aber ohne beim
Ausfedern durchzuschlagen. Lese hierzu auch
die separate Anleitung für das Federelement.
Bitte beachte auch, dass das Federelement
je nach Bodenbeschaffenheit angepasst
werden kann.
Tipp: Eine separate Anleitung des Dämpfers
mit detaillierten Informationen gibt es als
Download für dein Produkt unter: https://
tout-terrain.de/de/die-produkte/anhaenger/
WARTUNG
Überprüfe in regelmäßigen Abständen
die Verschleißsteile – je nach Nutzung.
Teile, die vor jeder Fahrt auf Verschleiß
und Funktion überprüft werden sollten:
• Reifenprofiltiefe
• Luftdruck des Reifens
• Speichenspannung und Rundlauf des Rades
• Funktionsfähigkeit des Federelements
• Fester Sitz des Rades
Bitte registriere dein Produkt unter
www.tout-terrain.de.
Dies dient der Garantieerfassung
und damit deiner Sicherheit.

6
Dear customer, thank you for purchasing our Streamliner.
Our goal is to manufacture our products to the absolute highest
standards. We hope to deliver a product which will provide long-
lasting enjoyment. We wish you lots of fun with your Streamliner!
EN
ACCESSORIES
Hitch (26,8/27/27,2/30/30,9/31,4/31,6/35)
Standard spline for hitch
Quick release spline for hitch
Before startup 7
Assembly 7
Startup 7
Operation 9
Tuning the suspension 9
Maintenance 9
7
• Fasten the shift and brake cables with the
included cable ties.
• Install the seat post with grease or assembly
paste. Tighten the seat post clamp to 9 Nm
and make sure components are secure.
• When mounting the pedals, pay attention to
the respective mounting side and markings.
Apply grease to the pedal axle threads and
mount the pedals with a maximum torque
of 25 Nm.
STARTUP
Important: Never ride without having
checked points 1 – 2 below.
1. Ensure that the quick release fastener at the
rear wheel is closed.
2. Insert the safety pin through the frame AND
drawbar.
BEFORE STARTUP
Important: The Streamliner is is designed for
cycling and rough terrain. Using it requires
a certain degree of experience and confidence
cycling in these conditions.
You should take the following points into
consideration before using the Streamliner
with a child:
• Test some routes with the Streamliner be-
fore using them with a child for the first time.
• Beginners should avoid using the Streamlin-
er off-road.
• Riding with a trailer alters the handling of
the bicycle, and the braking effectiveness is
reduced considerably compared to riding
without a trailer. Braking distance is also
increased compared to riding without a
trailer attached.
• Your bike should be in good working order,
especially the brakes. This will help to ensure
your safety.
ASSEMBLY
• Insert the draw-bar into the frame, then
insert the cotter pin (see picture in
Startup/2.). Align the frame and draw bar,
then tighten both frame bolts to 9 Nm.
• Attach the handlebar to the stem and tighten
bolts to 5 Nm. Pay attention to ensure
correct brake and shift cable routing.
Check the handlebars for torsional stability.

8
3. Pull the seat post out of the bicycle frame.
Take out the hitch, which is fastened to the
seat post, out of the coupler and slide it onto
the seat post. The hitch must fit securely on-
to the seat post. Make sure to install the cor-
rect hitch and shim. The hitch should not
have any play at the seatpost. You should not
need to open the hitch more than 1 mm –
any more and the hitch is too tight. Re-insert
the seatpost into the frame and position the
hitch close to the frame, but high enough
such that you can lower the seat post if
necessary. The hitch must be aligned with
the rear of the bike, and tightened with
a 5 mm allen key to a maximum of 9 Nm.
Warning: Do not mount the trailer to carbon
or other lightweight seat posts. For dropper
posts please make sure to follow all manufac-
turer instructions.
4. Attaching the trailer to the bike: The coupler
quick release must be open and the hitch
and coupler must be free of contamination
(eg. dirt, water, grease). Push the coupler
over the hitch until it is completely inserted
(the coupler will almost contact the seat
post). Grasp the trailer coupler with one
hand, and move the bicycle and hitch
towards coupler with the other. Make sure
that the Streamliner hangs straight behind
the bike. Proceed as follows:
a) Always insert the cotter pin through
the hitch and coupling.
b) The quick-release fastener needs to be
attached securely and closed accurately.
5. Ergonomics:
• Slide the stem on the drawbar so that the
child has a comfortable seating position.
The child should be able to comfortably
reach the handlebar with without stretching.
To adjust the stem loosen the 2 bolts on the
lower part of the stem and slide it. Make sure
to re-tighten the bolts with a torque of 8Nm.
• Adjust the saddle height for your child.
They should be able to touch the pedal with
their heel when their leg is straightened.
Taller children may require a longer seat-
post. Never extend the seatpost beyond the
minimum-insertion markings.
• Adjust the reach of the brake lever using
an Allen key, turning the bolt until the lever
is just in front of the middle finger knuckle.
b)
a)

9
OPERATION
The maximum additional load is 35 kg. Please
consider the following points for use:
• Never transport a child whose motor func-
tion or size is not sufficient to independently
grip the handlebars and stabilize themselves.
• Your child must always wear a properly
fitted helmet.
• Equip your child with cycling gloves as well
as suitable, breathable bicycle clothing
appropriate to riding conditions.
• To protect your child from dirt and flies
they should always wear protective glasses.
In bright conditions ensure they have
appropriate sun and UV protection.
• Remember that your child is active on the
Streamliner and can become fatigued.
Always plan trips appropriate to their skill
and fitness level, and plan breaks for them
to rest and recover. Make sure to bring
sufficient food and water for your trip.
• Communicate with your child while riding so
they learns when to change gears and brake.
TUNING THE SUSPENSION
Shock pressure should be adjusted dependant
on your child’s weight. Adjust the air pressure
so that the negative travel (sag) is about 30 %
of the travel of the shock. This should be done
when the Streamliner is ready to go. i.e. with
child. Damping should be adjusted so that the
shock compresses quickly, but without kicking
back on rebound. Please also read the separate
manual for the shock.
Note that the shock should also be adjusted
according to terrain and riding conditions.
Tip: A separate manual for the shock
containing detailed informationen on
setup is available for download on the
product webpage at: https://tout-terrain.de/
en/the-products/trailers/
MAINTENANCE
Examine the wear-parts at regular intervals
according to your useage. Parts which should
be examined before each trip for wear and
function include:
• Tire tread
• Tire air pressure
• Spoke tension and free rotation of the wheel
• Shock function
• Correct & secure wheel fitment
Please register your product at
www.tout-terrain.de.
This will validate your warranty,
and with that, your safety.

10
NOTIZEN / NOTES

11

Tout Terrain GmbH & Co. KG
Industriestraße 11
79194 Gundelfingen
Deutschland
Tel. +49 761 20 55 10 00
www.tout-terrain.de
© 2019 Tout Terrain GmbH & Co. KG ist ein eingetragenes
Warenzeichen. Technische Änderungen vorbehalten.
© 2019 Tout Terrain GmbH & Co. KG is a registered
trademark. Details subject to change.
Stand: Mai 2019
Seriennummer / Serial number
Datum / Date
Händlerstempel / Stamp of retailer
ÜBERGABE / HANDOVER
Other manuals for STREAMLINER
2
Table of contents
Languages:
Other Tout Terrain Bicycle Accessories manuals


Popular Bicycle Accessories manuals by other brands


Specialized
Specialized Elite CylcoComputer user manual

Sigma
Sigma BC 16.16 manual

Playcore
Playcore Dero Setbacks installation instructions

VDO Cyclecomputing
VDO Cyclecomputing x3dw instruction manual

Cateye
Cateye RAPID X2 manual

buratti meccanica
buratti meccanica Clorofilla Trail Use and maintenance manual


