Tout Terrain SINGLETRAILER User manual
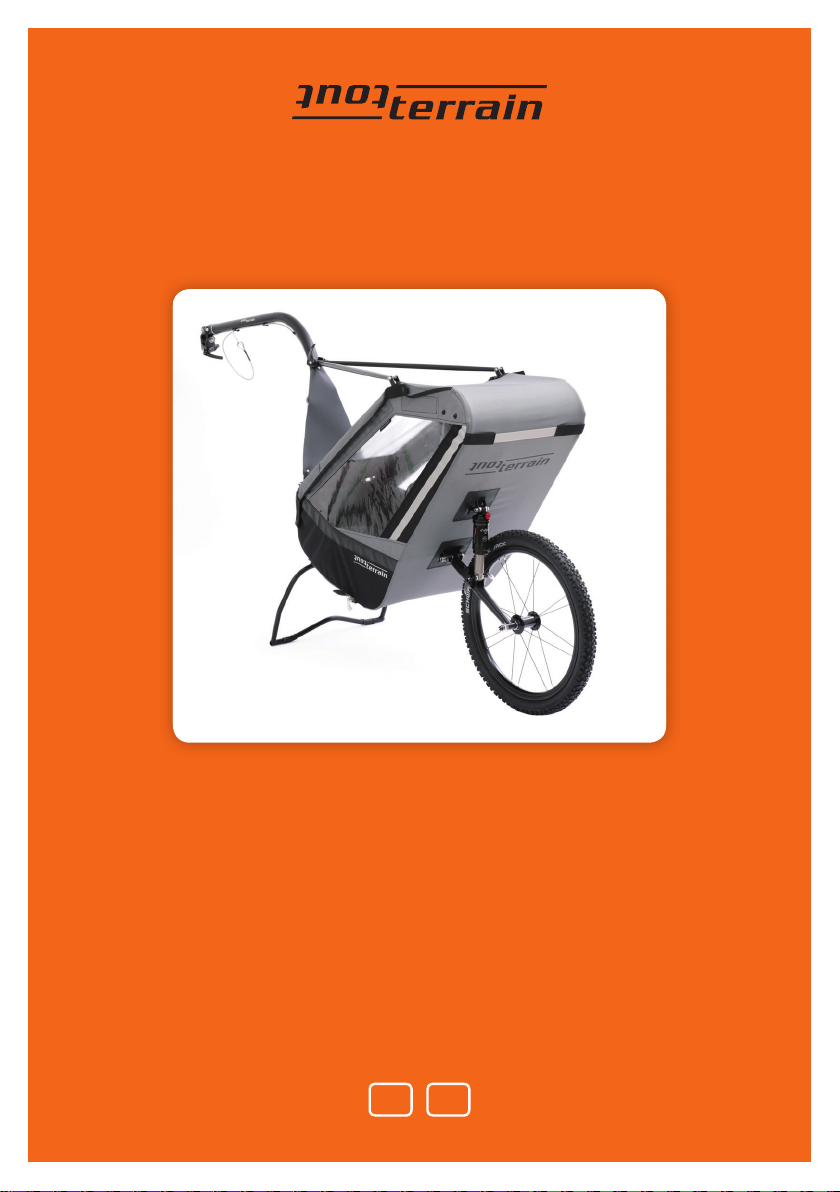
SINGLETRAILER
ENDE

2
Lieber Kunde, vielen Dank, dass du dich für den Singletrailer
entschieden hast. Wir fertigen diesen nach höchstem Qualitäts-
standard, und hoffen, dir damit ein Produkt zu liefern,
das dir lange viel Freude bereitet. Wir wünschen viel Spass.
DE
For English instructions see page 9.
ZUBEHÖR
Kupplung (26,8/27/27,2/30/30,9/31,4/31,6/35)
Schutzblech
Cargobag
Weber Babyschale
iSURO Kissen
Thule Baby Supporter
Schnellverschluss-Splint für Kupplung
ERSATZTEILE (AUSZUG)
Standard Splint für Kupplung
Ständerhaken
Ständer
Verdeck Nieten
Verdeck
Sonnenverdeck
Achsabdeckung
Vor Inbetriebnahme 3
Montage / Inbetriebnahme 3
Betrieb 5
Verdecke 5
Sicherheitsgurt 7
Abstimmen der Federung 7
Anbau des Schutzblechs 8
Wartung 8

3
2. Die obere Deichselstrebe wird senkrecht
nach oben, die Hauptdeichsel nach vorne
geklappt, und dann die obere Deichselstrebe
nach unten bis der Schnellspanner in den
Haken der Hauptdeichsel einrastet. Danach
den Schnellspanner schließen. Der Schnell-
spanner muss immer sorgfältig verschlossen
werden!
3. Das Hinterrad wird mit der Schnellverschluss
Steckachse in die Schwinge eingebaut, wie
nachfolgend dargestellt (a). Anschliessend
wir die Nabe mit der Gummiabdeckung
wieder verschlossen (b).
VOR INBETRIEBNAHME
Wichtig: Der Singletrailer ist für den sportli-
chen Einsatz auch in ruppigem Gelände konzi-
piert. Der Betrieb mit diesem erfordert vom
Radfahrer eine gewisse Erfahrung und Sicher-
heit beim Radfahren.
Folgende Punkte solltest du vor der ersten
Benutzung mit Kind beachten:
• Mache einige Testfahrten mit realistischer
Beladung mit dem Anhänger, bevor
du zum ersten Mal ein Kind beförderst.
• Anfänger sollten den Betrieb des Anhängers
im Gelände meiden.
• Die Reaktionsmöglichkeiten mit Anhänger
sind eingeschränkt und das Bremsverhalten
ist deutlich reduziert gegenüber der Fahrt
ohne Anhänger.
• Zu deiner und zur Sicherheit deines Kindes
muss dein Fahrrad, insbesondere die
Bremsen, in einwandfreiem Zustand sein.
INBETRIEBNAHME
Wichtig: Fahre niemals, ohne die Prüfungen
in 1 – 5 durchgeführt zu haben.
1. Betrieb auf Strassen: Pos.1 wählen, in die-
ser Position hat der Anhänger 16 cm Feder-
weg, und der Schwerpunkt liegt etwas tiefer.
Fahrten im Gelände: Pos. 2 wählen, hier
hat der Anhänger 20 cm Federweg, und der
Schwerpunkt liegt etwas höher. Der Schnell-
spanner muss immer sorgfältig verschlossen
werden!
Pos. 2
Pos. 1

4
Achtung: Stelle sicher, dass das Rad
vollständig eingerastet ist. Dies erkennst
du daran, dass der Stift komplett in der
Steckachse verschwindet.
4. Ziehe die Sattelstütze aus dem Zugfahrrad
heraus. Das Kupplungsstück an der Sattel-
stütze über die Sattelstütze stecken. Der
Durchmesser der Kupplungsschelle muss
genau mit dem der Sattelstütze übereinstim-
men. Die Schelle darf auf der Stütze kein
Spiel haben. Sie darf allerdings auch nicht
weiter als 1 mm aufgebogen werden, um die
Montage zu erleichtern. Dann schiebst du
die Stütze wieder in das Fahrrad und positio-
nieren das Kupplungsteil so knapp wie mög-
lich über dem Rahmen, allerdings so, dass du
bei Bedarf im Gelände die Sattelstütze noch
um einige Zentimeter absenken kannst. Das
Kupplungsrohr muss gerade nach hinten zei-
gen, dann ziehst du die Schraube mit einem
5 mm Inbus fest. Das Anzugsmoment der
Schraube darf 9 Nm nicht überschreiten.
Achtung: Montiere den Singletrailer nicht
an Carbon- oder anderen extremen Leichtbau-
sattelstützen. Bei absenkbaren Stützen und
gefederten Teleskop Stützen die Hinweise des
Herstellers beachten!
5. Ankuppeln: Dazu muss der Schnellspanner
der Kupplung offen stehen und die Kupp-
lungsteile müssen schmutzfrei sein. Das
Kupplungsgelenk wird über das Kupplungs-
rohr geschoben, bis es ganz auf diesem
steckt (die Schnellspannschelle berührt nun
fast die Sattelstützenschelle). Am einfachs-
ten geht das, wenn der Anhänger auf seinem
Ständer steht und das Fahrrad mit der einen
Hand an die Kupplung geführt wird, während
man mit der anderen Hand die Kupplung auf
das Fahrrad ausrichtet. Achte darauf, dass
der Anhänger genau in der Flucht hinter dem
Fahrrad hängt. Gehe nun wie folgt vor:
a) Stecke immer den Sicherungsbolzen durch
die Kupplung.
b) Der Schnellspanner muss fest sitzen und
sorgfältig geschlossen werden.
b)
a)

5
c) Sichere immer mit dem Sicherungsseil!
Dieses sollte am Rahmen und nicht an der
Sattelstütze befestigt werden. Somit kann
auch ein eventueller Bruch der Sattelstütze
abgesichert werden. Je nach Rahmengrösse
und -bauform ist das Sicherungsseil zu lang,
in dem Fall wickele es einfach zwei- oder
dreifach um das Rahmenrohr.
BETRIEB
Die maximale Zuladung beträgt 25 kg. Bitte
beachte für den Betrieb die folgenden Punkte:
• Transportiere nie ein Kind, ohne es mit den
Fünf-Punkt-Sicherheitsgurten festzuschnal-
len. Alle fünf Gurte können individuell in
der Länge verstellt werden, und die Schulter-
gurte sind zusätzlich über die drei Quergurte
in der Sitzlehne höhenverstellbar.
• Trotz der grossen Sicherheit im Singletrailer
sollte dem Kind zusätzlich ein Radhelm auf-
gesetzt werden.
• Denke daran, dass sich dein Kind im Trailer
kaum bewegt und deshalb schnell auskühlt.
Du solltest immer dem Wetter angepasste
Kleidung für dein Kind dabei haben, um ein
Auskühlen oder Überhitzen zu verhindern.
• Im Boden an der tiefsten Stelle befindet
sich ein kleines Netz, es dient als Wasser-
und Schmutzablauf sowie als Dauerlüftung.
Das Netz sollte also niemals komplett mit
Gegenständen zugedeckt werden.
• Alle Schrauben am Singletrailer sind mit
Stopmuttern oder Schraubensicherung gesi-
chert. Trotzdem sollten von Zeit zu Zeit der
sichere Sitz aller Schrauben überprüft wer-
den. Auch die Speichen sollten regelmäßig
überprüft und gegebenenfalls nachgespannt
werden.
• Die Spannung im Sitz und in der Rücken-
lehne kann jeweils individuell mit vier
Schrauben hinter der Sitzfläche und hinter
der Rückenlehne eingestellt werden.
Bitte nicht überspannen, da sonst unnötige
Kräfte auf den Singletrailer wirken.
• Die Spannung in Seiten- und Bodenteilen
kann durch die Klettverschlüsse, welche die
Bespannung am Rahmenrohr fixieren, nach-
gespannt werden.
• Beachte, dass der Ständerhaken immer
vollständig geschlossen ist.
VERDECKE
Es gibt mehrere Verdeckmöglichkeiten, die
auch kombiniert werden können, um eine
optimale Innentemperatur zu ermöglichen:
• Offen: Das Netzverdeck wird aufgerollt und
hinter die Sitzlehne gesteckt. Das Fenster-
verdeck wird ebenfalls aufgerollt (achte
darauf, dass die vorderen Gummibänder
seitlich nach aussen schauen) und oben mit
den Gummibändern per Druckknopf an der
Seite des Trailers befestigt werden.

6
• Mit Netzverdeck: Dies ist bei schönem Wet-
ter und schnellem Fahren ideal. Das Kind be-
kommt viel frische Luft und ist trotzdem opti-
mal geschützt. Das Fensterverdeck ist
aufgerollt auf dem Trailer verstaut. Schließe
die Druckknöpfe oben und unten vorne am
Verdeck sowie den Klettverschluss am Spritz-
schutz. Das grobmaschige Netz erlaubt einen
guten Luftdurchlass und hält größere Insek-
ten wie z.B. Bienen ab. Kleine Fliegen können
aber dennoch hindurch gelangen.
• Mit Regenverdeck: Das Netzverdeck wird
aufgerollt hinter die Sitzlehne gesteckt, das
Regenverdeck wird analog zum Netzverdeck
geschlossen. Der Anhänger ist so regenfest,
jedoch nicht wasserdicht. An den Deichsel-
stellen kann bei extremem Regen zwar ein
wenig Wasser eindringen, dieses läuft aber
durch den Abfluss im Boden wieder hinaus.
• Mit Sonnenverdeck: (mit Fenster oder Netz-
verdeck kombinierbar) Schließe die Druck-
knöpfe vorne und hinten sowie das Gummi-
band in der Mitte des Sonnenverdecks
(vorne und in der Mitte umschließt das
Verdeck bzw. das Gummiband die Deichsel).
Fixiere nun das Fensterverdeck mit den
Gummibändern hinten in den Doppeldruck-
knöpfen des Sonnenverdecks.
• Regen- und Netzverdeck: Ideal für kühlere
Tage ist die Kombination aus Regen- und
Netzverdeck, denn sie ermöglicht eine Be-
lüftung bei gleichzeitigem Windschutz im
Kopfbereich. Knöpfe hierzu das Regen-
an das Netzverdeck und nutze die Gurte
um diese beiden im Bereich der Deichsel-
strebe zu verbinden.
Das Fenstermaterial ist UV-absorbierend.
Achtung: Wir empfehlen, nie mit
offenem Verdeck zu fahren.

7
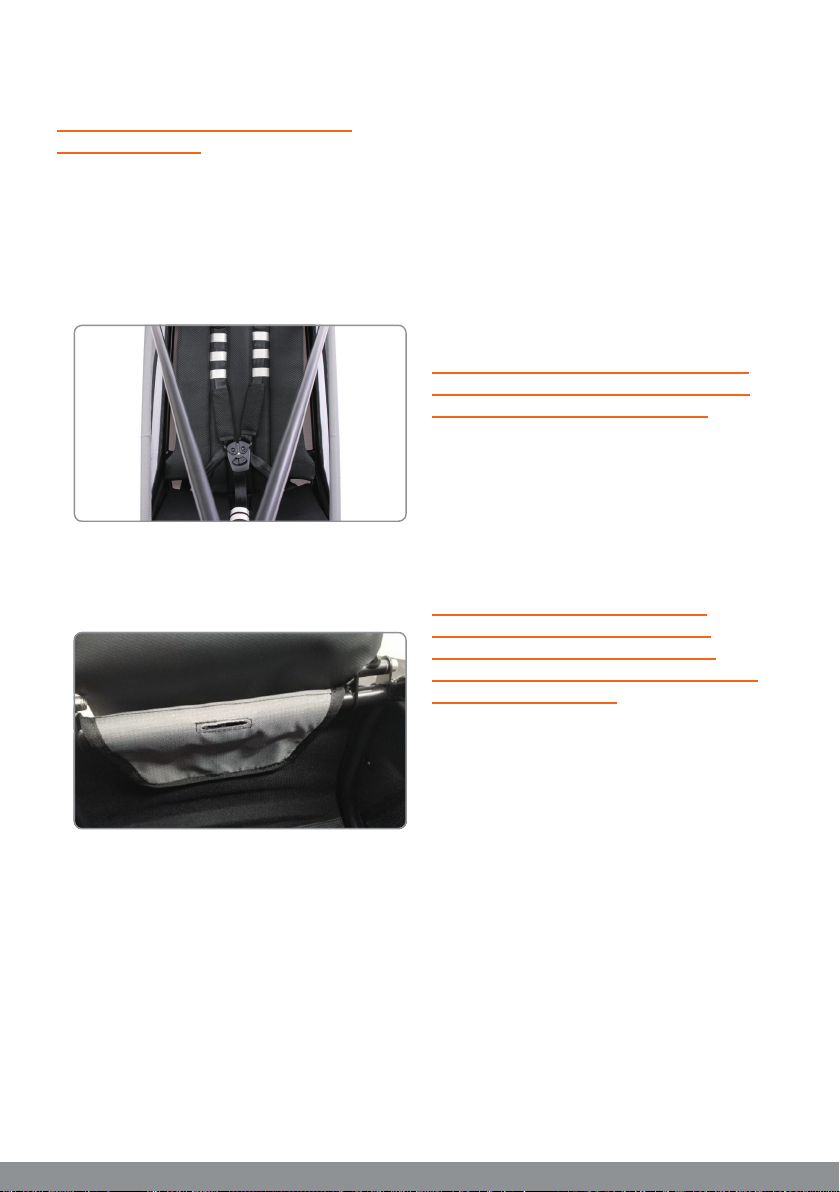
SICHERHEITSGURT
• Du kannst je nach Größe des Kindes die
Gurte anpassen. Verwende dazu die vor-
handenen Schlaufen.
• Ein abgenähter Schlitz garantiert eine einfa-
che Befestigung von z.B. einer Weber Baby
Schale. Auch bei uns im Webshop erhältlich!
• Falls du Baby- oder Kindersitze montieren
möchtest, beachte bitte auch die jeweiligen
Montagehinweise der Hersteller.
ABSTIMMEN DER FEDERUNG
Stelle den Luftdruck so ein, dass der Negativ-
federweg (sag) ca. 30 % des Federwegs vom
Federelement beträgt. Dies sollte im fahr-
fertigen Zustand vorgenommen werden, d.h.
mit Kind und ggf. Gepäck. Die Dämpfung kann
über das Einstellrad reguliert werden. Beginne
bei der Abstimmung mit minimaler Dämpfung,
damit das Federelement so feinfühlig wie mög-
lich anspricht. Überprüfe den Luftdruck in
regelmäßigen Abständen und passe ihn mit
zunehmendem Gewicht deines Kindes an.
Achtung: Drücke nicht auf die Federung,
wenn der Ständer nach unten geklappt ist,
er wird sonst mit einer Kraft belastet, für
die er nicht ausgelegt ist.
Die Dämpfung sollte durch Drehen der ent-
sprechenden Einstellschraube immer mög-
lichst schwach eingestellt sein, so dass das
Federelement schnell ausfedert. Wenn du den
Federweg verstellst (Strassen oder Gelände-
Position), beachte, dass evtl. auch der Luft-
druck und die Dämpfung angepasst werden
müssen. Lese hierzu auch die separate Anlei-
tung für das Federelement.
Bitte beachte auch, dass das Federelement
je nach Bodenbeschaffenheit angepasst
werden kann.
Tipp: Eine separate Anleitung des Dämpfers
mit detaillierten Informationen gibt es als
Download für dein Produkt unter: https://
tout-terrain.de/de/die-produkte/anhaenger/

8
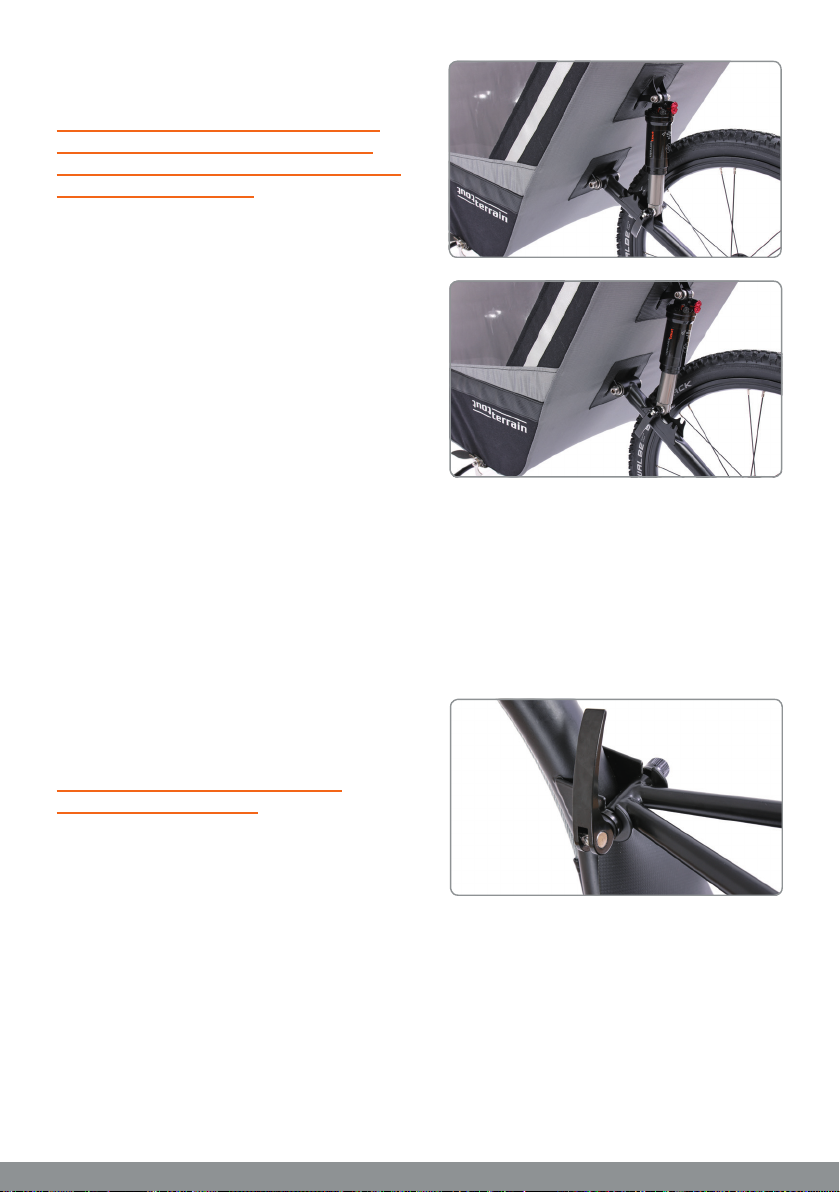
ANBAU DES SCHUTZBLECHS
Wichtig: Das Schutzblech kann ohne
Werkzeug montiert werden. Bitte prüfe vor
jeder Fahrt den Sitz der Schnellspanner.
Zur Vereinfachung der Montage kann das
Laufrad entfernt werden. Folgende Montage-
schritte sind durchzuführen:
• Löse die Mutter des Dämpfer Schnell-
spanners und montiere den Halter auf
die Achse des Schnellspanners zwischen
Schwinge und Mutter.
• Montage des zusätzlichen Schnellspanners
mit Hülse: Montiere den mitgelieferten
Schnellspanner in dem noch freien Schlitz
der Schwinge und dem freien Loch des
Halters. Die Hülse dient als Abstandshalter
im freien Schlitz der Schwinge.
• Wenn du die Dämpferposition änderst, tau-
sche die Hülse mit dem Dämpfer. Die Posi-
tion des Schutzblechs bleibt unverändert.
Tipp: Mit dem Langloch kannst du die Position
für diverse Reifenbreiten anpassen.
WARTUNG
Überprüfe in regelmäßigen Abständen
die Verschleissteile – je nach Nutzung.
Teile, die vor jeder Fahrt auf Verschleiß
und Funktion überprüft werden sollten:
• Reifenprofiltiefe
• Luftdruck des Reifens
• Speichenspannung und Rundlauf des Rades
• Funktionsfähigkeit des Federelements
• Fester Sitz des Rades
• Stelle sicher, dass das Spiel des Hinterrades
mit der Schraubenmutter korrekt eingestellt
ist. Gegebenenfalls mit 11 mm und 19 mm
Maulschlüssel die Sicherungsmutter nach-
stellen.
Achtung: Stelle sicher, dass das Rad komplett
eingerastet ist. Dies erkennst du daran, dass
der Stift in Achsmitte vollständig verschwindet
(s. S. 3 Inbetriebnahme, Punkt 3).
Bitte registriere dein Produkt unter
www.tout-terrain.de.
Dies dient der Garantieerfassung
und damit deiner Sicherheit.

9
Dear customer, thank you for purchasing our Singletrailer.
We aim to manufacture these products according to the highest
quality standard. We hope to deliver a product to you which
guarantees long-lasting enjoyment. We wish you lots of fun.
EN
SPARE PARTS (SELECTION)
Standard spline for hitch
Kickstand hook
Kickstand
Cover rivets
Cover
Sun cover
Axle cover
ACCESSORIES
Hitch (26,8/27/27,2/30/30,9/31,4/31,6/35)
Mudguard
Cargobag
Weber baby seat
Isuro pillow
Thule baby supporter
Quick release spline for hitch
Before startup 10
Assembly / Startup 10
Operation 12
Covers 13
Safety belt 14
Tuning suspension 14
Attaching the fender 15
Maintenance 15
10
2. The upper drawbar is folded, the main draw-
bar is folded forward, and then the upper
drawbar downward until the quick-release
engages with the hooks of the main drawbar.
Close the quick-release afterwards.
The quick-release must be always locked
carefully!
BEFORE STARTUP
Important: the Singletrailer is designed for
cycling and rough terrain. Using it requires
a certain degree of experience and confidence
cycling in these conditions.
You should take the following points into con-
sideration before using the trailers with a child:
• Test some routes with the trailer and
a load before using it with a child for the
first time.
• Beginners should avoid using the trailer
off-road.
• Riding with a trailer alters the handling of
the bicycle, and the braking effectiveness
is reduced considerably compared to riding
without a trailer. Braking distance is also in-
creased compared to riding without a
trailer attached.
• Your bike should be in good working order,
especially the brakes. This will help to ensure
your safety.
STARTUP
Important: Never ride without having
checked points 1 – 2 below.
1. For road riding one can select position 1.
In this position the trailer has 16 cm suspen-
sion travel, and the center of gravity is lower.
In Position 2 the trailer has 20 cm of travel,
and the center of gravity is slightly higher.
For off-road trips this position is preferable.
The quick-release must always be tightened
securely!
Pos. 2
Pos. 1

11
3. The rear wheel is fitted with the quick-
release axle which is attached to the swing-
arm as shown below (a). Once the wheel
is mounted, affix the rubber hub/axle cover
to protect the components (b).
Warning: Make sure that the wheel is
securely attached. This is indicated when
the spring-loaded thru-axle shaft returns
completely into the thru-axle - the shaft
will sit flush with the axle.
4. Pull the seat post out of the bicycle frame.
Take out the hitch, which is fastened to the
seat post, out of the coupler and slide it onto
the seat post. The hitch must fit securely
onto the seat post. Make sure to install the
correct hitch and shim. The hitch should not
have any play at the seatpost. You should not
need to open the hitch more than 1 mm –
any more and the hitch is too tight. Re-insert
the seatpost into the frame and position the
hitch close to the frame, but high enough
such that you can lower the seat post if
necessary. The hitch must be aligned with
the rear of the bike, and tightened with
a 5 mm allen key to a maximum of 9 Nm.
Warning: Do not mount the trailer to carbon
or other lightweight seat posts. For dropper
posts please make sure to follow all manufac-
turer instructions.
5. Attaching the trailer to the bike: The coupler
quick release must be open and the hitch
and coupler must be free of contamination
(eg. dirt, water, grease). Push the coupler
over the hitch until it is completely inserted
(the coupler will almost contact the seat
post). This is easiest when the trailer is rest-
ing on its stand: grasp the trailer coupler with
one hand, and move the bicycle and hitch
towards coupler with the other. Make sure
that the Singletrailer hangs straight behind
the bike. Proceed as follows:
b)
a)

12
a) Always insert the cotter pin through the
hitch and coupling.
b) The quick-release fastener needs to be
attached securely and closed accurately.
c) Always secure with the safety cable! This
should be attached to the frame and not to
the seat post. The trailer will then remain at-
tached in the event of seatpost failure. De-
pending on frame size and design, the safety
cable may be too long. In this case simply
loop the cable around the frame seat tube
two or three times until the appropriate
length is achieved.
OPERATION
The maximum additional load is 25 kg.
Please consider following points for the use:
• Never transport a child without fastening
the 5-point-seat belts. All belts can be indi-
vidually adjusted in length, and the shoulder
belts are also adjustable in height over the
three transverse straps in the backrest.
Always route the shoulder belt from through
transverse strap which is just above your
child’s shoulders.
• Despite the trailer’s safety, your child should
always wear a helmet.
• Remember that your child hardly moves
in the trailer and therefore can cool down
quickly. You should always carry weather
specific clothing in order to prevent your
child from getting cold or overheating.
• On the bottom is a small mesh section, which
serves as water and dirt drain as well as per-
manent ventilation. The mesh should never
be covered completely.
• All screws in the Singletrailer are secured
with lock-nuts or thread-locker. Neverthe-
less, regularly check the tightness of all
screws. Spokes should be examined regular-
ly and readjusted if necessary.
• The tension in the seat and in the backrest
can be adjusted individually with four screws
behind and underneath the seat. Please do
not overtighten as excess force may damage
the Singletrailer.
• The tension in side and bottom of the cover
may reduce over time. The cover can be
re-tightened by adjusting the velcro fasten-
ers which attach the cover to the frame.
• Make sure the stand hook is fully engaged.
Important: Always check that the wheel is
engaged completely and you cannot pull it out!

13
COVERS
There are several cover options with various
configurations to allow an optimized tempera-
ture inside the trailer:
• Open: The net-cover is rolled up and put
behind the backrest. The window-cover is
also rolled up (make sure that the front
elastic straps look laterally outward) and
fastened with the elastic straps at the side
of the trailer by pushbuttons.
• Mesh-cover: This is ideal in good weather
conditions and during fast riding. The child
gets lots of fresh air and is still well protect-
ed. The window cover is rolled up and
stowed away on the trailer. Close the push-
buttons at the top and bottom of the cover
and attach the velcro fastener at the spray
guard.
• Rain-cover: The mesh-cover is rolled up
and stored behind the backrest, the win-
dow-cover is closed. Close the pushbuttons
at the top and bottom of the cover and at-
tach the velcro fastener at the spray guard.
In this configuration the trailer is rainproof,
but not water-tight. Some water may make
its way through junctions in the cover, but
drains through the mesh port in the floor.
• Sun-cover (also usable in combination with
the Mesh- and Rain-cover): Close the push-
buttons at the front and back of the cover
and attach the elastic strap in the middle
of the cover (in the front and middle of the
sun cover, the sun cover wraps around
the draw-bar frame). Now attach the Rain-
or Mesh-cover elastic straps to the push-
buttons on the sun-cover straps.
• Rain- and mesh-cover: We recommend
this combination for cool weather condi-
tions. The child gets fresh air and is still
wind protected in the sensitive head area.
Attach the Rain-cover to the push-buttons
on the Mesh-cover and use the straps to
connect them to the draw-bar frame.
14
The window material is UV-absorbing.
Warning: We do not recommend riding
with an open cover.
SAFETY BELT
• You can adjust the straps according to the
size of your child using the loops provided.
• Stitched slots allow easy attachment of
infant supports such as the Weber Baby
Supporter (available in our webshop)
• If you install baby or child seats, follow the
respective installation instructions of the
manufacturers.
TUNING SUSPENSION
Adjust the air pressure so that the negative
travel (sag) is about 30 % of the travel of the
shock. This should be done when the Single-
trailer is ready to go. i.e. with child and any
additional cargo. The damping can be adjusted
with the adjustment knob. Start tuning with
minimum damping so that the shock responds
as sensitively as possible. Check the air pres-
sure at regular intervals and adjust it as your
child’s weight increases.
Warning: Do not press on the suspension,
if the stand is extended, otherwise you risk
overloading and damaging the stand.
The damping (adjusted by turning the respec-
tive knobs) should always be adjusted as light
as possible, so that the shock releases quickly.
If you adjust the suspension travel (road or
off-road position) note that shock air pressure
and damping may also require adjustment.
Tip: A separate manual for the shock
containing detailed informationen on
setup is available for download on the
product webpage at: https://tout-terrain.de/
en/the-products/trailers/

15
ATTACHING THE FENDER
Important: There are no tools required to
attach the mudguard to the trailer. It is easier
to assemble the mudguard if you remove
the wheel. Please check that the mud-guard
quick releases are secured properly before
every ride.
• Undo the the shock quick-release and re-
move the nut. Slide the mudguard over the
axle of the quick release and replace the nut.
• Assemble the additional quick release with
the spacer in the open slot of the shock
mount. The spacer is avoids deformation
of the shock mount.
• If you change the shock position, swap
the shock with the spacer. The position
of the mudguard remains the same.
Tip: The fender is slotted so you can adjust
the position for different tire widths.
MAINTENANCE
Examine the wear-parts at regular intervals ac-
cording to your useage. Parts, which should be
examined before each trip for wear and func-
tion include:
• Tire tread
• Tire air pressure
• Spoke tension and free rotation of the wheel
• Shock function
• Correct & secure wheel fitment
• Make sure the play of the axle and the wheel
is adjusted correctly. If required, adjust the
safety nut with a 11 mm & 19 mm fork
wrench
Warning: Always, make sure the wheel engag-
es completely with the swing arm, especially
after readjusting. The end of the axle needs
to be flat and the center pin of the axle fully
retracted inside the axle (see page 10 Startup,
item 3).
Please register your product at
www.tout-terrain.de.
This will validate your warranty,
and with that, your safety.

Tout Terrain GmbH & Co. KG
Industriestraße 11
79194 Gundelfingen
Deutschland
Tel. +49 761 20 55 10 00
www.tout-terrain.de
© 2019 Tout Terrain GmbH & Co. KG ist ein eingetragenes
Warenzeichen. Technische Änderungen vorbehalten.
© 2019 Tout Terrain GmbH & Co. KG is a registered
trademark. Details subject to change.
Stand: Mai 2019
Seriennummer / Serial number
Datum / Date
Händlerstempel / Stamp of retailer
ÜBERGABE / HANDOVER
Table of contents
Languages:
Other Tout Terrain Bicycle Accessories manuals


Popular Bicycle Accessories manuals by other brands


Specialized
Specialized Elite CylcoComputer user manual

Sigma
Sigma BC 16.16 manual

Playcore
Playcore Dero Setbacks installation instructions

VDO Cyclecomputing
VDO Cyclecomputing x3dw instruction manual

Cateye
Cateye RAPID X2 manual

buratti meccanica
buratti meccanica Clorofilla Trail Use and maintenance manual


