TP-Link Omada POE160S User manual
Installation Guide
Note:
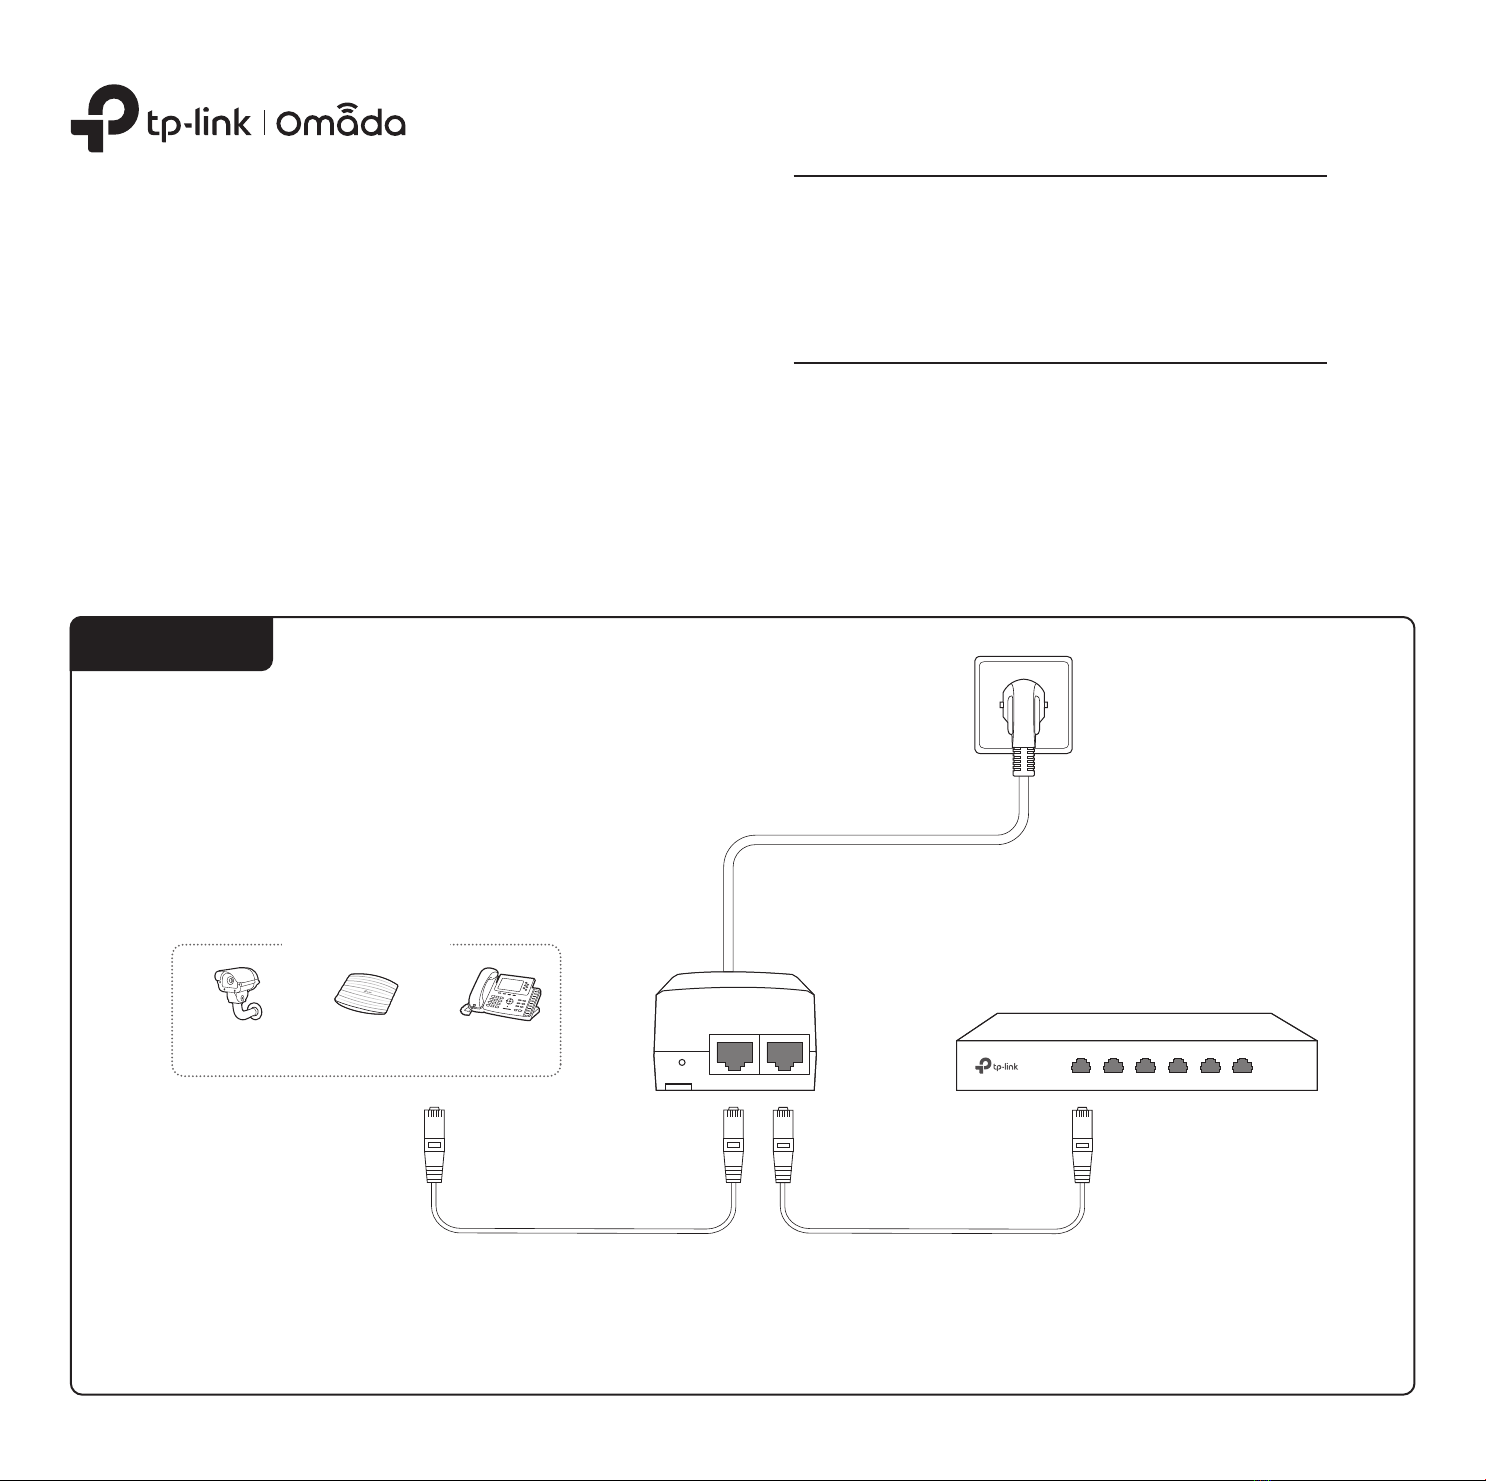
1. The PoE Injector supplies steady power and data connectivity to a powered device such as PoE IP Camera, PoE AP and PoE IP Phone through an Ethernet cable.
2. For POE170S/POE380S, plug the product into the wall outlets with earthing connection through the power supply cord.
PoE Injector
Connection
IP Camera AP IP Phone
Powered Device (PD)
PWR PWR+DATA OUT DATA I N
Ethernet Device
(switch, router, etc.)
PoE+ Injector
Note:
For simplicity, we will take POE160S for example in this Guide.
LED Explanation
O: Power o
Steady Yellow: Power on, no PoE power supply
Steady Green: Power on, normal PoE power supply
Flashing Green: Abnormal PoE power supply
PWR
On: Power on
O: Power o
PWR
On: Normal PoE power supply
O: No powered device connected
Flashing: Abnormal PoE power supply
PoE
© 2023 TP-Link
7106510598 REV2.0.0
For POE170S/POE380S
For POE160S/POE260S
A:
Yes. All RJ45 ports of the PoE injector support 10/100/1000 Mbps.
Q1. Can the PoE injector supply power to a PoE device which
doesn’t have a gigabit PoE port?
A1: Ensure the PD is PoE-compliant and its connecting port supports the PoE
function.
A2: Ensure the power consumption of the PD doesn’t exceed the maximum
power supply of the PoE injector, otherwise the overload protection of the
PoE injector will be activated. The quality and length of the Ethernet cable
may inuence the reception of the power supply.
Q2. What can I do if my PoE injector doesn’t supply power to
the powered device or the supplied power is unstable?
FAQ
For technical support and other information, please visit
https://www.tp-link.com/support, or simply scan the QR code.
To ask questions, find answers, and communicate with TP-Link users or
engineers, please visit https://community.tp-link.com to join TP-Link
Community.
Safety Information
Keep the device away from water, re, humidity or hot environments.
Do not attempt to disassemble, repair, or modify the device. If you need service, please
contact us.
The plug on the power supply cord is used as the disconnect device, the
socket-outlet shall be easily accessible.
Plug the product into the wall outlets with earthing connection through the power supply
cord.
The PoE ports shall not be used to charge lithium batteries or devices supplied by lithium
batteries.
Please read and follow the above safety information when operating the device. We
cannot guarantee that no accidents or damage will occur due to improper use of the
device. Please use this product with care and operate at your own risk.
Specications
Operating Temperature
POE160S/POE260S:
0˚C to 40˚C (32˚F to 104˚F)
POE170S/POE380S:
0˚C to 45˚C (32˚F to 113˚F)
Storage Temperature -40˚C to 70˚C (-40˚F to 158˚F)
Storage Humidity 5% to 90% RH non-condensing
Operating Humidity 10% to 90% RH non-condensing
Environmental and Physical Specifications
Interfaces
IEEE 802.3i, IEEE 802.3u, IEEE 802.3ab, IEEE 802.3af,
IEEE 802.3at
IEEE 802.3bt (Only for POE170S/POE380S)
IEEE 802.3bz (Only for POE260S)
Standards
POE160S/POE260S: PWR
POE170S/POE380S: PWR, PoE
10Base-T/100Base-TX: UTP category 5 cable or above (max. 100 m)
1000Base-T/2.5GBase-T: UTP category 5e cable or above (max. 100 m)
5GBase-T: UTP category 5e cable or above (max. 100 m)(Only for POE380S)
10GBase-T: UTP category 6a cable or above (max. 90 m)(Only for POE380S)
LED
Cable Type
General Specifications
POE160S/POE170S:
2 × 10Mbps/100Mbps/1Gbps RJ45 Ports
POE260S:
2 × 10Mbps/100Mbps/1Gbps/2.5Gbps RJ45 Ports
POE380S:
2 × 10Mbps/100Mbps/1Gbps/2.5Gbps/5Gbps/10Gbps RJ45 Ports
Dimensions
(L×W×H) POE160S/POE260S: 125×59.4×36.8 mm
POE170S/POE380S: 154.7×70×42 mm
Wall
Mountable Ye s
POE160S/POE260S: 30 W
POE170S: 60 W
POE380S: 90 W
Maximum
Power Supply
POE160S/POE260S: 115.7 mm (Vertical), 37.7 mm (Horizontal)
POE170S/POE380S: 102 mm (Vertical)
Distance Between
Mounting Holes
TP-Link hereby declares that the device is in compliance with the essential
requirements and other relevant provisions of directives 2014/30/EU, 2014/35/EU,
2009/125/EC, 2011/65/EU and (EU)2015/863.
The original EU declaration of conformity may be found at
https://www.tp-link.com/en/support/ce.
TP-Link hereby declares that the device is in compliance with the essential
requirements and other relevant provisions of the Electromagnetic Compatibility
Regulations 2016 and Electrical Equipment (Safety) Regulations 2016.
The original UK Declaration of Conformity may be found at
https://www.tp-link.com/support/ukca
BSMI Notice
安全諮詢及注意事項
請使用原裝電源供應器或只能按照本產品注明的電源類型使用本產品。
清潔本產品之前請先拔掉電源線。請勿使用液體、噴霧清潔劑或濕布進行清潔。
注意防潮,請勿將水或其他液體潑灑到本產品上。
插槽與開口供通風使用,以確保本產品的操作可靠並防止過熱,請勿堵塞或覆蓋開口。
請勿將本產品置放於靠近熱源的地方。除非有正常的通風,否則不可放在密閉位置中。
請不要私自拆開機殼或自行維修,如產品有故障請與原廠或代理商聯繫。
警告:為避免電磁干擾,本產品不應安裝或使用於住宅環境。
限用物質含有情況標示聲明書
單元
PCB
外殼
電源線
其他及其配件
限用物質及其化學符號
備考1.〝超出0.1 wt %〞及〝超出0.01 wt %〞係指限用物質之百分比含量超出百分比含量基準值。
備考2.〝○〞係指該項限用物質之百分比含量未超出百分比含量基準值。
○
○
○
○
○
○
○
○
○
○
鉛
Pb
○
○
○
○
鎘
Cd
○
○
汞
Hg
○
○
六價鉻
Cr+6
○
○
多溴聯苯
PBB
○
○
多
溴二苯醚
PBDE
○
○
Canadian Compliance Statement
This device contains licence-exempt transmitter(s)/receiver(s) that comply with Innovation, Science and Economic
Development Canada’s licence-exempt RSS(s). Operation is subject to the following two conditions:
(1) This device may not cause interference.
(2) This device must accept any interference, including interference that may cause undesired operation of the device.
L’émetteur/récepteur exempt de licence contenu dans le présent appareil est conforme aux CNR d’Innovation, Sciences et
Développement économique Canada applicables aux appareils radio exempts de licence. L’exploitation est autorisée aux
deux conditions suivantes :
1) L’appareil ne doit pas produire de brouillage;
2) L’appareil doit accepter tout brouillage radioélectrique subi, même si le brouillage est susceptible d’en compromettre le
fonctionnement.
この装置は、クラスA情報技術装置です。この装置を家庭環境で使用すると電波妨害を引き起こすことがあります。こ
の場合には使用者が適切な対策を講ずるよう要求されることがあります。
VCCI-A
Responsible party:
TP-Link USA Corporation
Address: 10 Mauchly, Irvine, CA 92618
Website: https://www.tp-link.com/us/
Tel: +1 626 333 0234
Fax: +1 909 527 6804
E-mail: [email protected]
This equipment has been tested and found to comply with the limits for a Class A digital device, pursuant to part 15 of
the FCC Rules. These limits are designed to provide reasonable protection against harmful interference when the
equipment is operated in a commercial environment. This equipment generates, uses, and can radiate radio frequency
energy and, if not installed and used in accordance with the instruction manual, may cause harmful interference to radio
communications. Operation of this equipment in a residential area is likely to cause harmful interference in which case
the user will be required to correct the interference at his own expense.
This device complies with part 15 of the FCC Rules. Operation is subject to the following two conditions:
1) This device may not cause harmful interference.
2) This device must accept any interference received, including interference that may cause undesired operation.
Any changes or modications not expressly approved by the party responsible for compliance could void the user’s
authority to operate the equipment.
We, TP-Link USA Corporation, has determined that the equipment shown as above has been shown to comply with the
applicable technical standards, FCC part 15. There is no unauthorized change is made in the equipment and the
equipment is properly maintained and operated.
Issue Date: 2023.8.24
Product Name: PoE Injector
Model Number: POE160S/POE170S/POE260S/POE380S
FCC compliance information statement
This is a class A product. In a domestic environment, this product may cause radio interference, in which case the user
may be required to take adequate measures.
CE Mark Warning
CAN ICES-3 (A)/NMB-3(A)
Industry Canada Statement
E
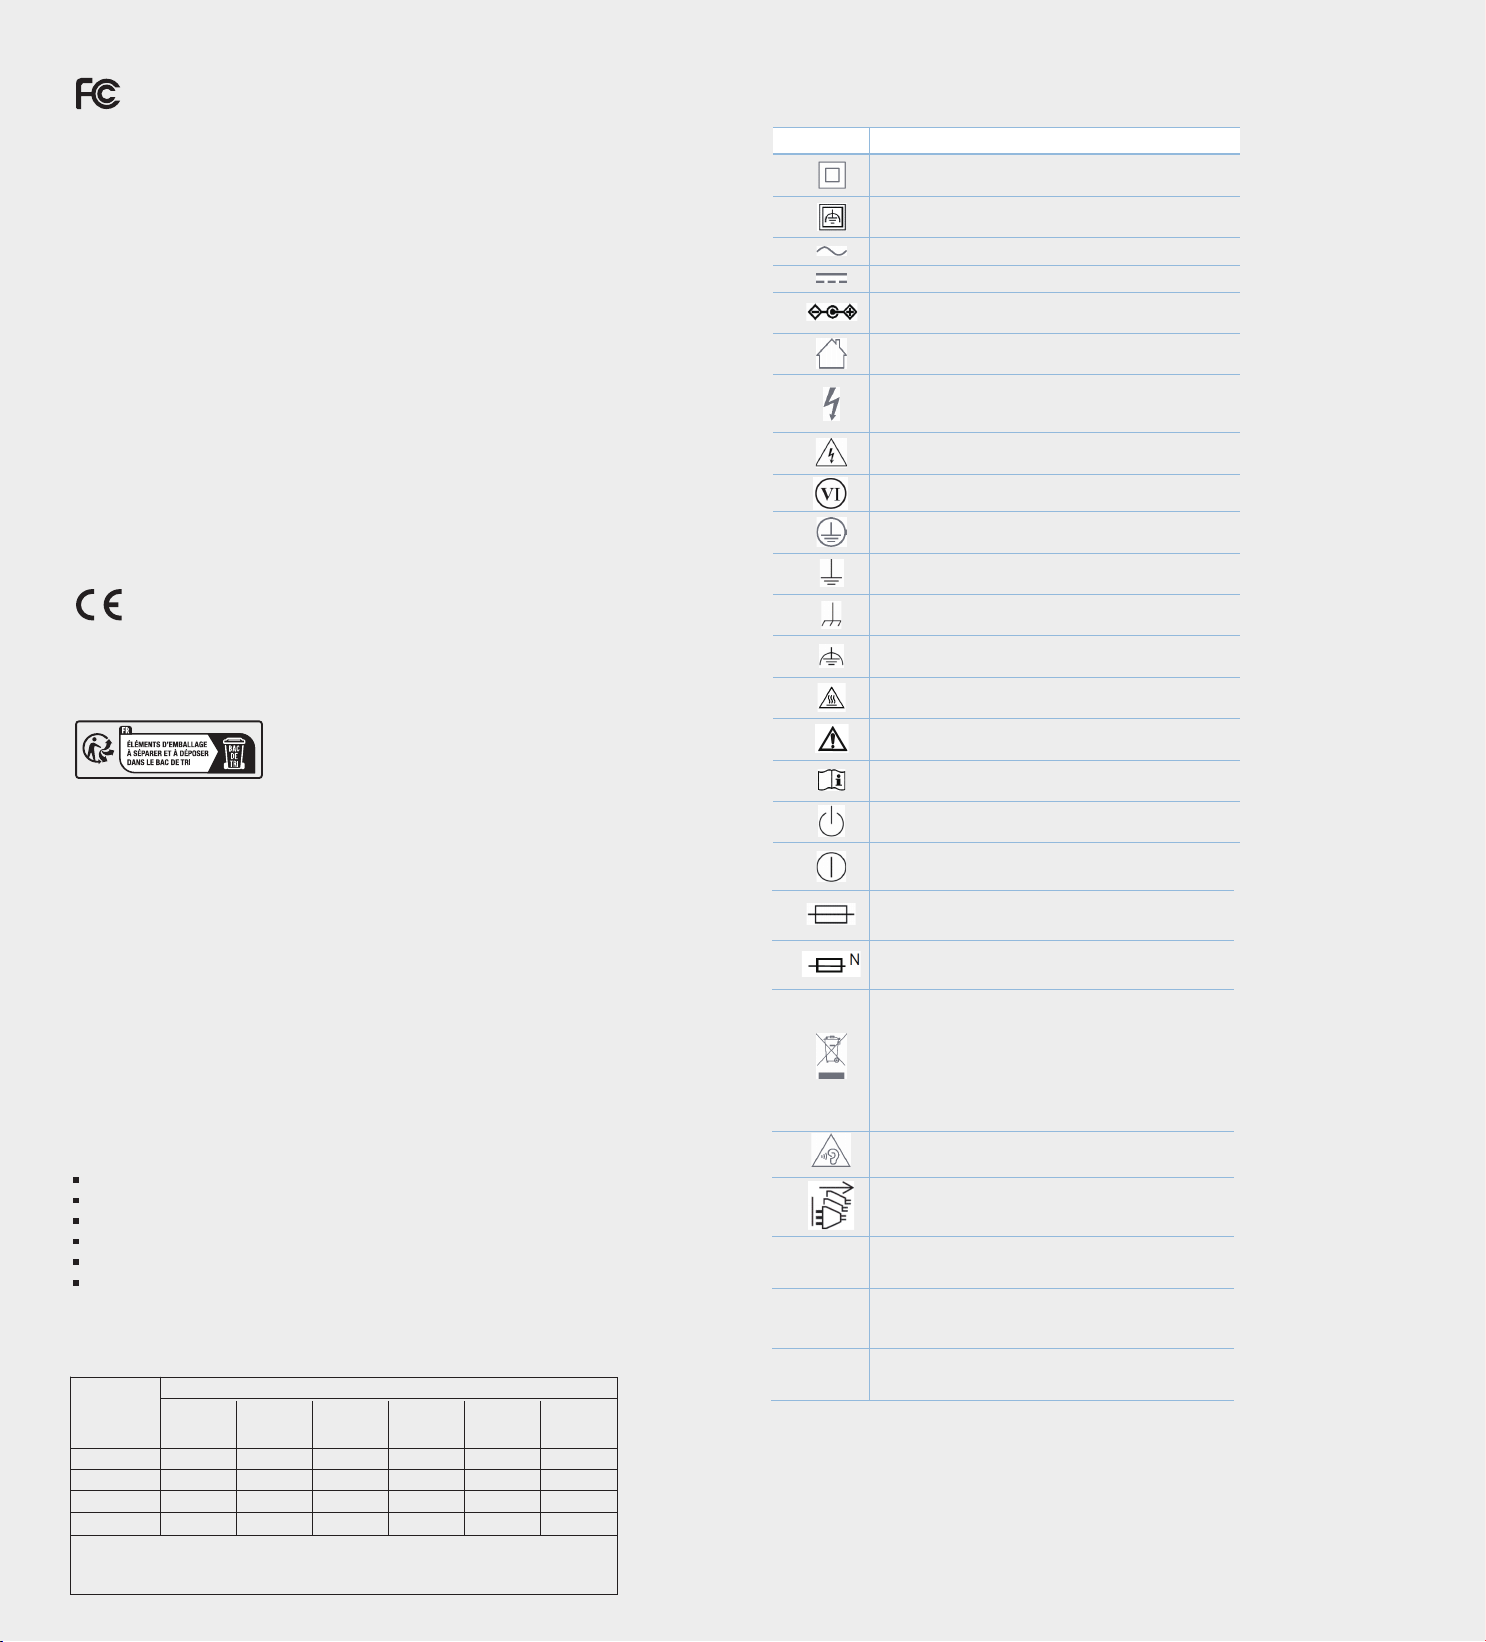
xplana�on of the symbols on the product label
The Equipment marking is at the bottom of the device. S
ymbols may vary from products.
Symbol
Explanation
Cla ss II equipment
Cla ss II equipment with functional earthing
Alternating current
Direct current
Pol a rity of d.c. po wer connector
For indoor use only
Dangerous voltage
Cauti on, risk ofelectric shock
Ene rgy eciency Ma rking
Protective earth
Earth
Fra me or chassis
Functional earthing
Cauti on, hot surface
Cauti on
Operator's manual
Stand-by
"ON"/"OFF" (push-push)
Fuse
Fuse is used in neutral N
Cauti on, avoid listening at high vol ume levels for l ong periods
Dis connection, all power plugs
m
Switch of mini-gap construction
µ
Switch of micro- gap construction (for US version)
Switch of micro-gap /micro
-
disconnection construction
(for other versions except US)
ε
Switch without contact gap (Semiconductor switching device)
RECYCLING
This product bears the selective sorting symbol for Waste
electrical and electronic equipment (WEEE). This means that
this product must be handled pursuant to European directive
2012/19/EU in order to be recycled or dismantled to minimize its
impact on the environment.
User has the choice to give his product to a competent recycling
organization or to the retailer when he buys a new electrical or
electronic equipment.
Wall Mounting Requirements (for POE170S/POE380S)
To mount the device on a wall, use 2 screws which complies with ANSI B1.1 4#, (5#), 6# standard and are more than 7 mm
in length. When the screws are xed on the wall, the distance between the screw head and the wall should be more than
1.5 mm.
This manual suits for next models
3
Other TP-Link Laboratory Equipment manuals


Popular Laboratory Equipment manuals by other brands


Belden
Belden HIRSCHMANN RPI-P1-4PoE installation manual

Koehler
Koehler K1223 Series Operation and instruction manual

Globe Scientific
Globe Scientific GCM-12 quick start guide

Getinge
Getinge 86 SERIES Technical manual

CORNING
CORNING Everon 6000 user manual

Biocomp
Biocomp GRADIENT MASTER 108 operating manual


