TPI UltraVision 9050 User manual

TPI 9050 UltraVision
Industrial Acoustic Imager
User Manual V2.6

Warranty and Calibration
WARRANTY
This product is warranted to the purchaser against defects in material and workmanship for one year
from the date of purchase.
Covered by Warranty: Repair parts and labor; or replacement of the product at company’s option.
Normal transportation charges to the purchaser are also covered.
Not Covered by Warranty: Damages to the product which are the result of abuse, improper use or
maintenance are not covered. Any other expense, consequential damages, incidental damages, or
incidental expenses including damages to property are not covered. Transportation expenses to the
company are not covered.
Some states do not allow the exclusion or limitation of incidental or consequential damages, so the
above limitations or exclusions may not apply to you.
To Obtain Warranty Performance: Include with the product: your name, address, phone number,
written description of the problem and proof of purchase date. Carefully package and return to:
TPI, Inc. TPI Canada TPI, Europe Ltd..
9615 SW Allen Blvd. 342 Bronte Rd. S., Unit 6 Unit 6
Beaverton, OR 97005 Milton, Ontario L9T 5B7 Rutherford Way Industrial Estate
USA Canada Rutherford Way
503-520-9197 905-693-8558 Manor Royal
www.testproductsintl.com www.tpicanada.com Crawley
West Sussex
RH10 9LN
44 (0) 1293 53019
www.tpieurope.com
Implied Warranties: Any implied warranties, including implied warranties of merchantability and
fitness for a particular purpose, are limited in duration to three years from date of purchase. To the
extent any provision of this warranty is prohibited by federal or state law and cannot be preempted, it
shall not be applicable. This warranty gives you specific legal rights, and you may also have other
rights which vary from state to state.
Calibration
Calibration is recommended once per year. Please contact TPI for service and
calibration.

Overview
The TPI 9050 UltraVision Industrial Acoustic Imager supports audible and ultrasonic
frequencies.
The 9050 uses microphone array beam forming technology to acquire sound source
distribution data, and collect video images in real time with a high-definition camera.
By integrating the sound source distribution data with the video image, the changing
sound source is dynamically presented on the display screen.
The UltraVision Industrial Acoustic Imager helps you quickly detect potential
pressurized gas leaks and vacuum leaks in noisy industrial environments. Used in
power systems, it can help you quickly identify potential partial discharge fault
points.
The 9050 acoustical imager is made of an aluminum alloy shell, which is strong and
durable and can adapt to the complex and changeable working environment.
The UltraVision is simple and convenient to operate and can be used to quickly find
faults. Only two parameters need adjustment, the test frequency range and test
dynamic range, to meet the vast majority of test requirements.
The 9050 supports camera mode, video mode, and data recording to provide job
site is flexibility. The large capacity TF data memory card can be expanded, and test
results can be exported and reported quickly.

Safety
To prevent possible product damage or personal injury, please note:
Read these safety instructions carefully before using the product.
•Use the product only for the purpose it was designed.
•Do not disassemble. There are no user serviceable parts.
•In case of equipment malfunction, terminate use and contact TPI.
•Please contact TPI for maintenance and calibration.
•Do not place the 9050 near a heat source, flame or in a high temperature
environment.
•Please do not charge the device in a high temperature environment (over
113°F / 45°C).
•If internal lithium-ion battery leakage occurs, stop using the device and
contact TPI.
•If contact with battery leakage occurs, wash with water immediately and
seek medical attention.
•If the 9050 is going to be stored for a month or more, please keep the
instrument in an environment where the ambient temperature is below
104°F / 40°C. Storage at higher temperature may result in battery
leakage and may cause damage to the device.

Terminology
USB Power Delivery (USB PD)
A power delivery protocol based on USB3.1, which is often used to transmit more
power in USB interface.
Sound Pressure Level (SPL)
A physical quantity used to express the magnitude of sound waves, the unit of
measure is decibels (dB). It is also used as dBSPL.
Audible domain
The frequency range of sound that can be perceived by human ears generally refers
to the sound in the frequency band of 20Hz-20kHz.
Ultrasonic
Generally refers to the frequency of more than 20kHz sound, the human ear cannot
perceive.
Sound image
Refers to the two-dimensional data table representing the intensity distribution of
sound sources in the space plane after the signal collected by microphone array is
calculated by the sound source location algorithm.
Palette
The color data used in the color mapping of the sound cloud charts.
Sound cloud image
The sound pressure level data of each resolution point on the sound image is
mapped to a certain color number on the palette according to a certain conversion
formula to form a color image, and then it is fused with the visible image to form an
sound cloud image.
Test frequency range
When a frequency range is selected within the full frequency range supported by the
device, the device will only measure and display a sound cloud image that is within
this frequency range. Sound outside this frequency range will not be displayed.
Frequency peak
A peak in the spectrum, denotes a strong sound energy distribution at this particular
frequency.
Dynamic range
The scale of the intensity of the sound source that can be shown on the sound cloud
image.
Field of view
For a camera, it is an angle formed by the camera and the two diagonal points of the
rectangular picture which is captured by the camera.
For a sound cloud image, it is the angle formed by the microphone array and the two
diagonal points of the rectangular sound image which is captured by the microphone
array.
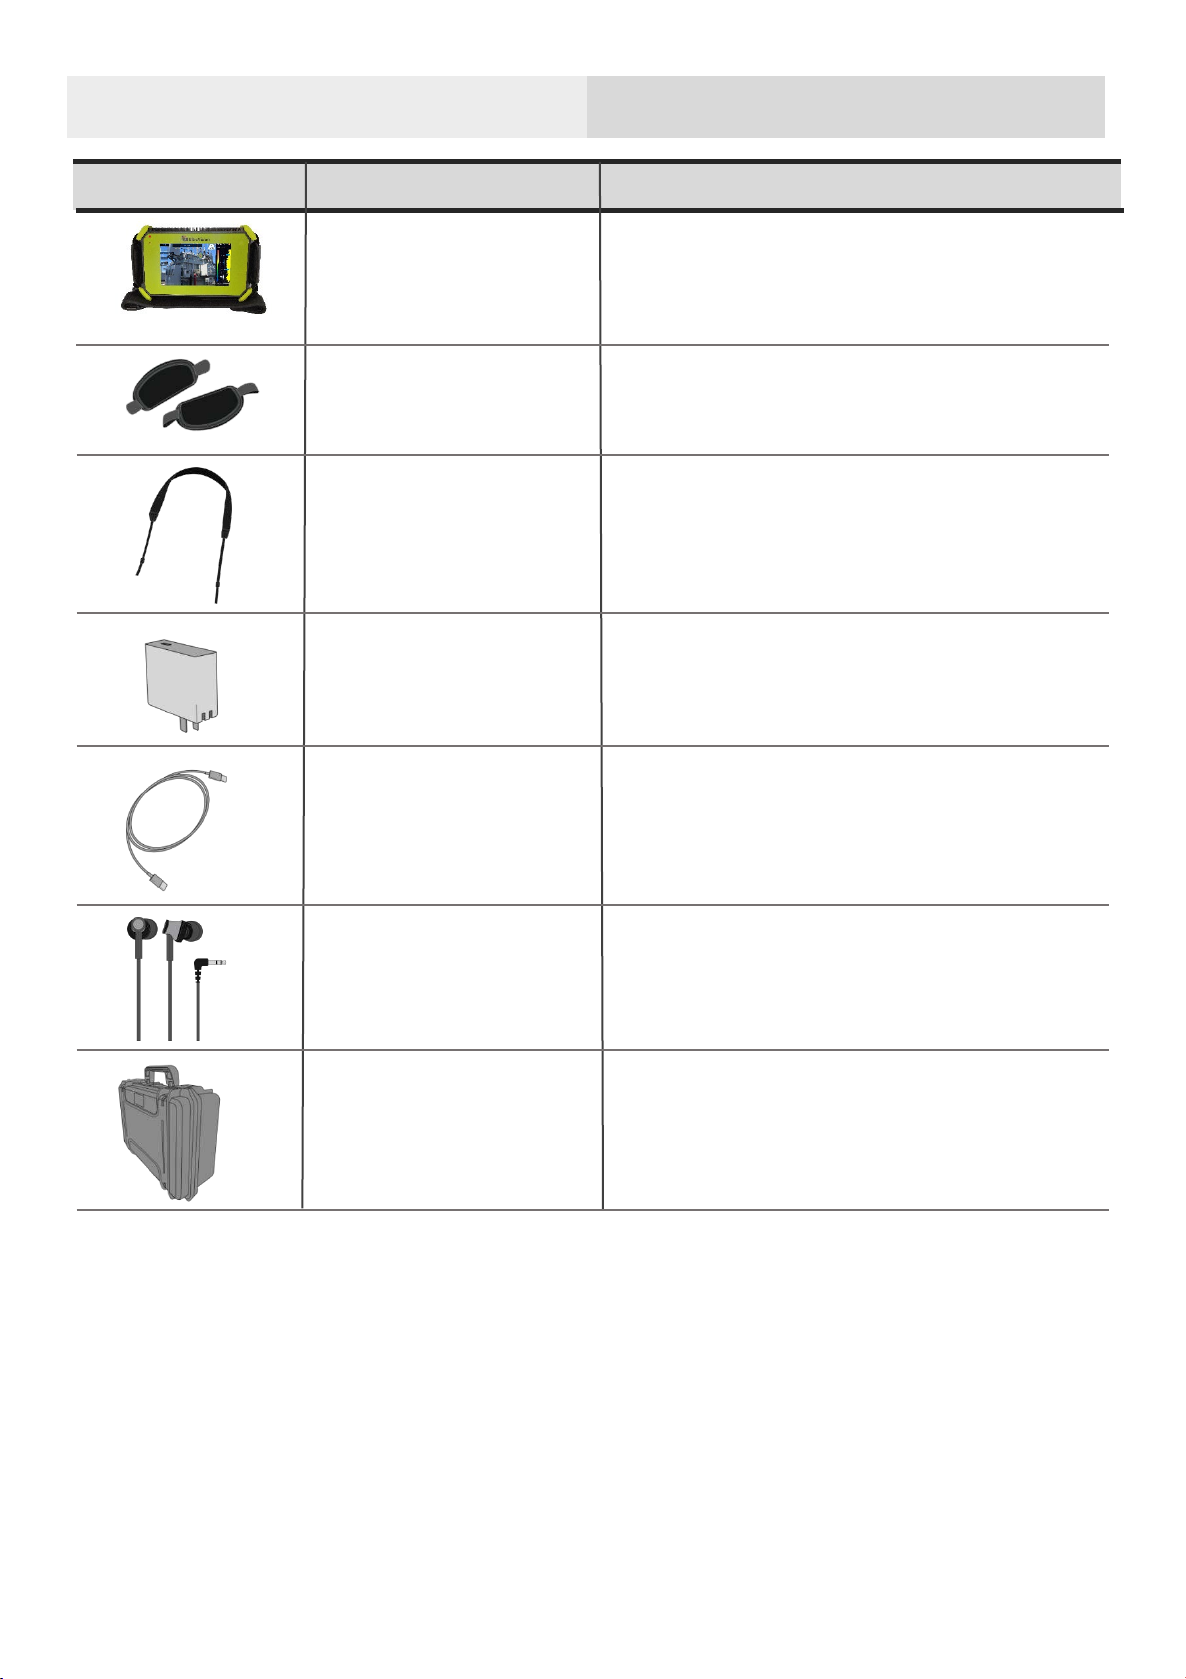
Device and accessories
A9055
Carrying case for the 9050 and
accessories
Description
Part Number
Part
Charging cable
A9052
Power adapter charging
Hand straps
A9050
9050
Shoulder strap
UltraVision industrial acoustic
imager
A9051
A9053
A9054
Connect to 9050 to monitor
ultrasonic wave, etc

Battery and Charging
Battery information
Built-in lithium-ion battery nominal capacity 6600mAh@7.2V.
Charging information:
Please charge the device through the USB Type-C port marked with the charging
logo
The 9050 supports USB PD quick charging protocol. It is recommended to use a
power adapter or power bank that supports 12V to 20V voltage output and the
minimum output power is not less than 15W to charge the device.
Charging and Battery Endurance:
Keep the 9050 turned off while charging. After inserting the charger, the charging
indicator will turn on, indicating that the 9050 is charging; The 9050 is fully charged
when the charging indicator turns off.
When the battery is fully charged, the device displays 4 grids of level when turned
on and can be used for about 4 hours; 3 grids can be used for about 2.5 to 3 hours;
2 grids can be used for about 1.5 to 2 hours; 1 grid can be used for about half an
hour to 1 hour.
When the battery's charge gets low, you'll see the low battery warning on the screen.
Please charge in time.
To extend battery life:
Please do not charge the 9050 for more than 24 hours.
Charge the battery regularly when stored for long periods of time.
Store the 9050 at temperatures of 4°F to 104°F (-20℃to +40℃)
Note: When the battery will no longer take a charge and
requires replacement, please contact TPI for service. Do not
disassemble the 9050 as the battery is not user replaceable.
Function
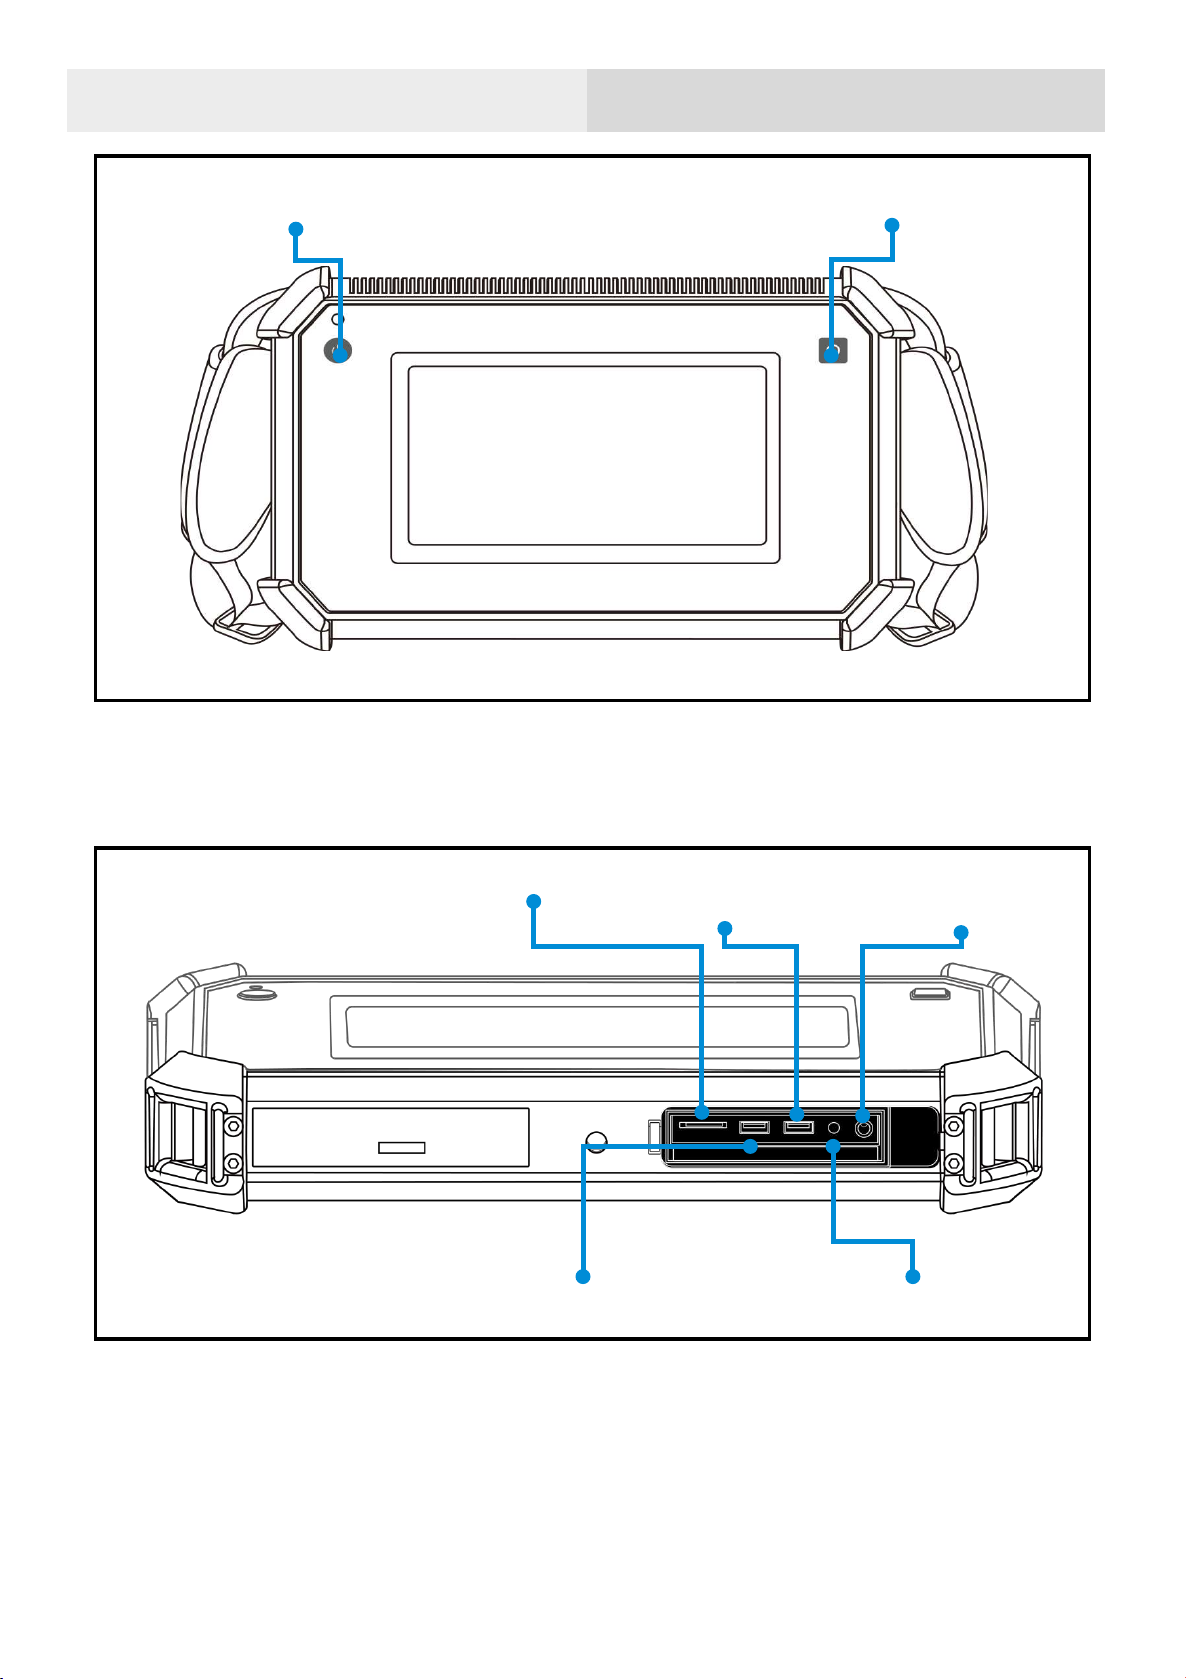
Charging indicator
Monitor
headphone socket
Power Button
Function Button
TF Card
USB Type-C Communication
USB Type-C
charging interface
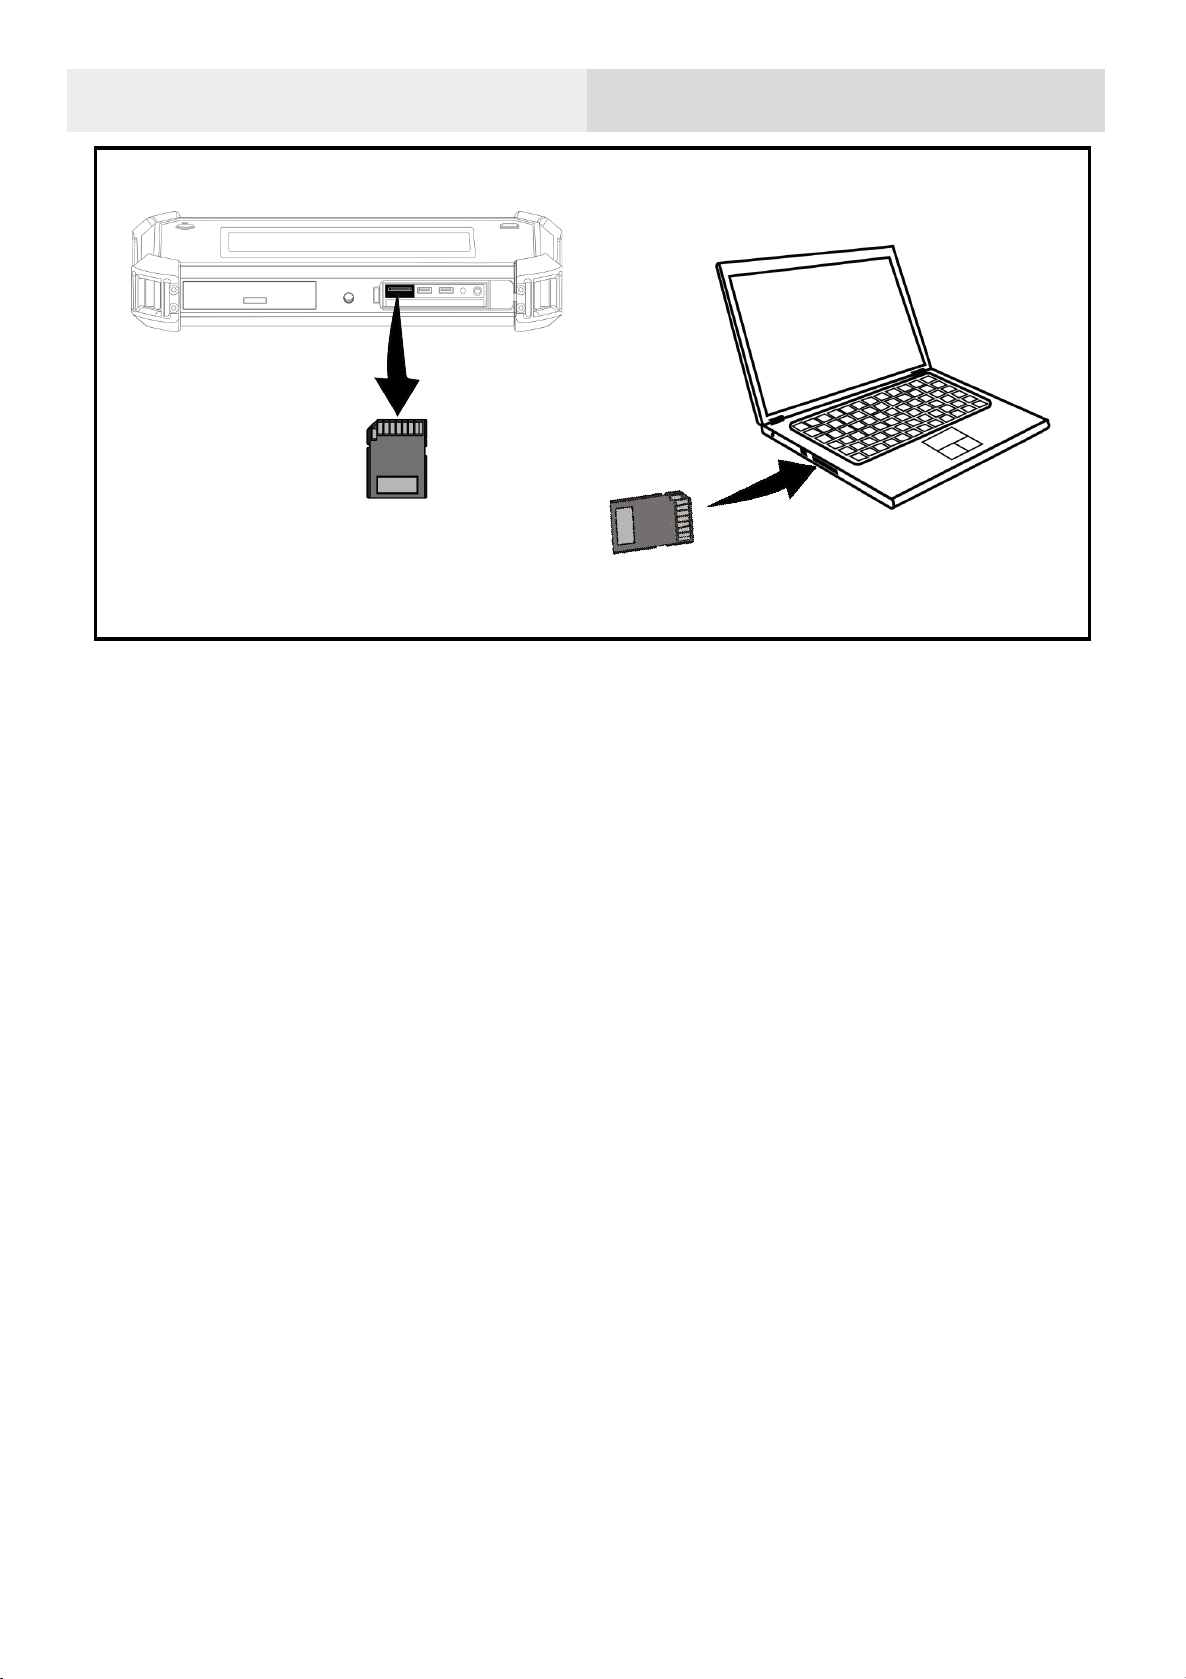
Expandable TF card
Notes for the use of TF Card
•Do not remove or insert the TF card when video recording.
•After taking photos and recording videos, please wait until the data is saved
successfully before inserting and removing the TF card.
•Do not remove or insert the TF card when browsing and marking data under
the playback menu.
•When reading TF card data on the PC, do not change the names of files and
folders in the TF card, otherwise, test data may not be correctly identified and
displayed in the playback menu.
三脚架

Tripod
Threaded mouth
②
①
三脚架
③
①
②
③
Hand straps and shoulder strap
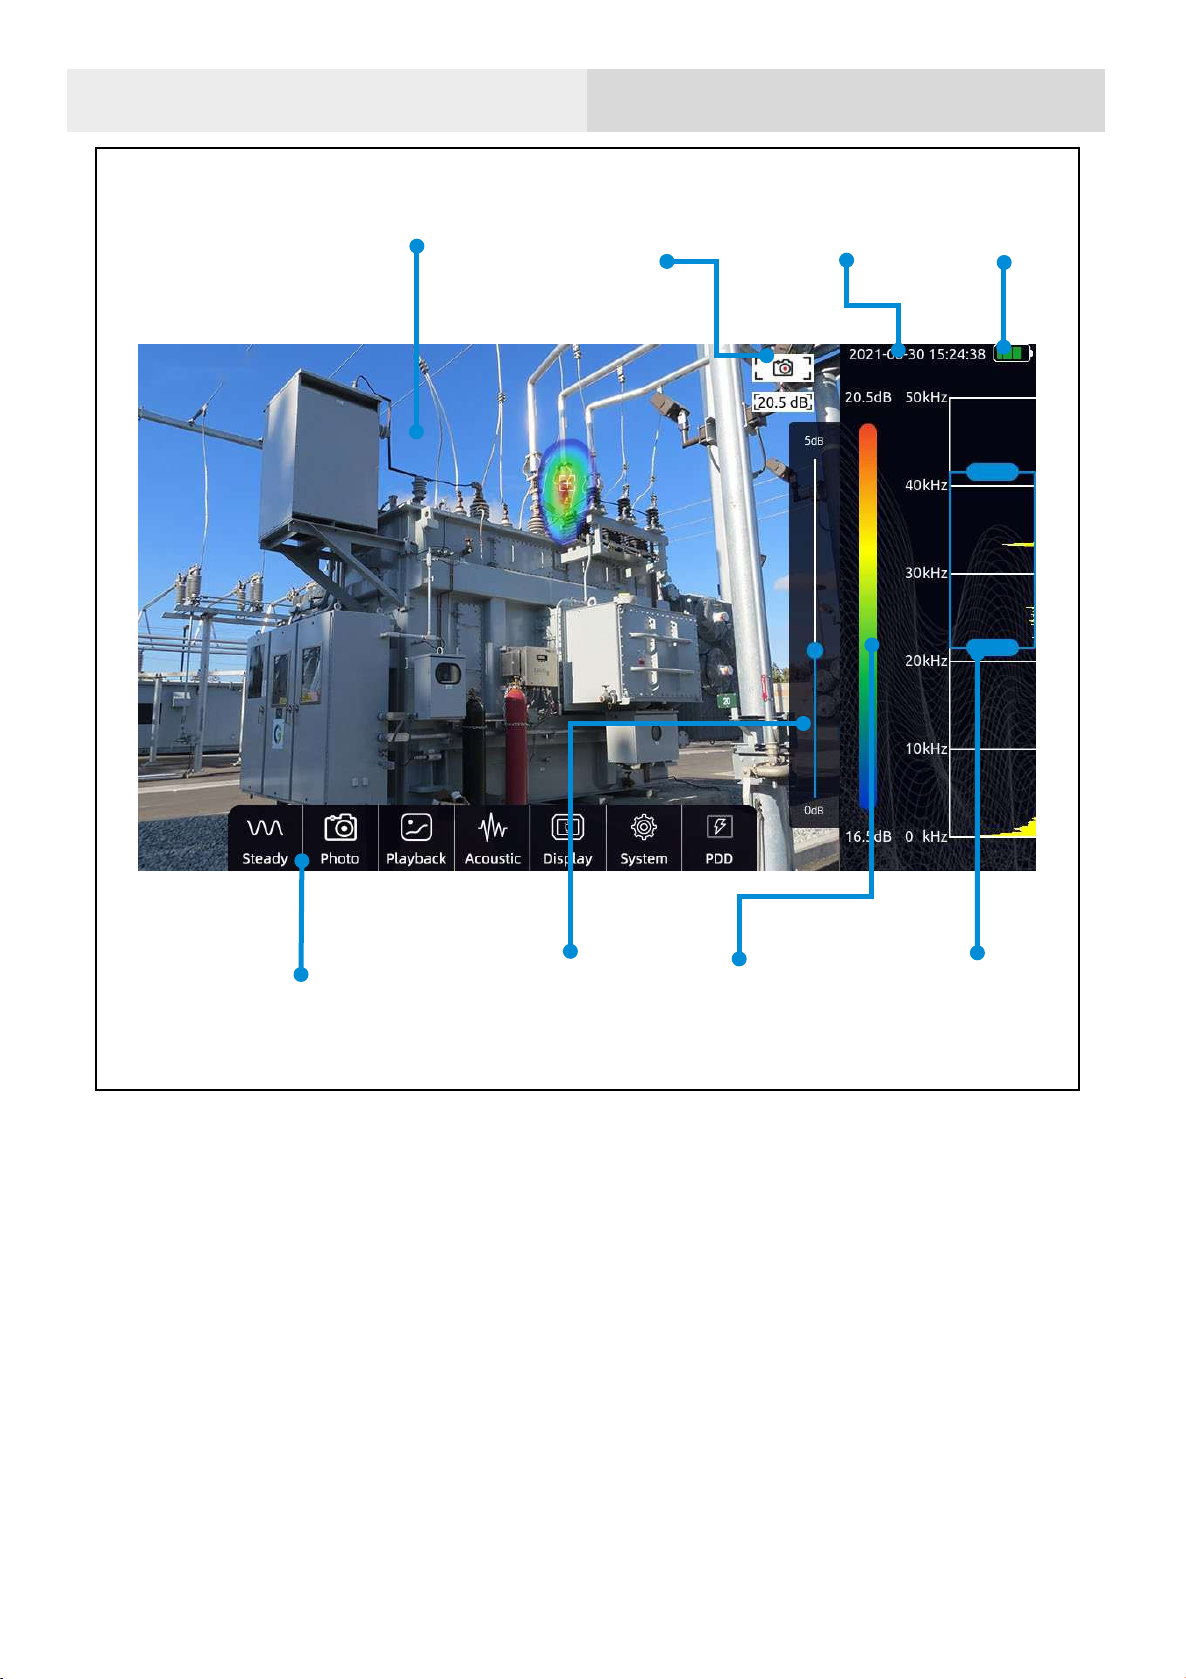
Software interface
Spectrum and
select box of test
frequency range
Battery
Dynamic range
quick setup
Video area
Work mode icon
System
Function menu
Palette

Function menu
Click in the video area of the screen to call out the menu bar
Click again or do nothing for a few seconds, the menu will be
hidden automatically
The Function menu include
Playback
System
Work mode
switch button
Acoustic
Display
steady-state
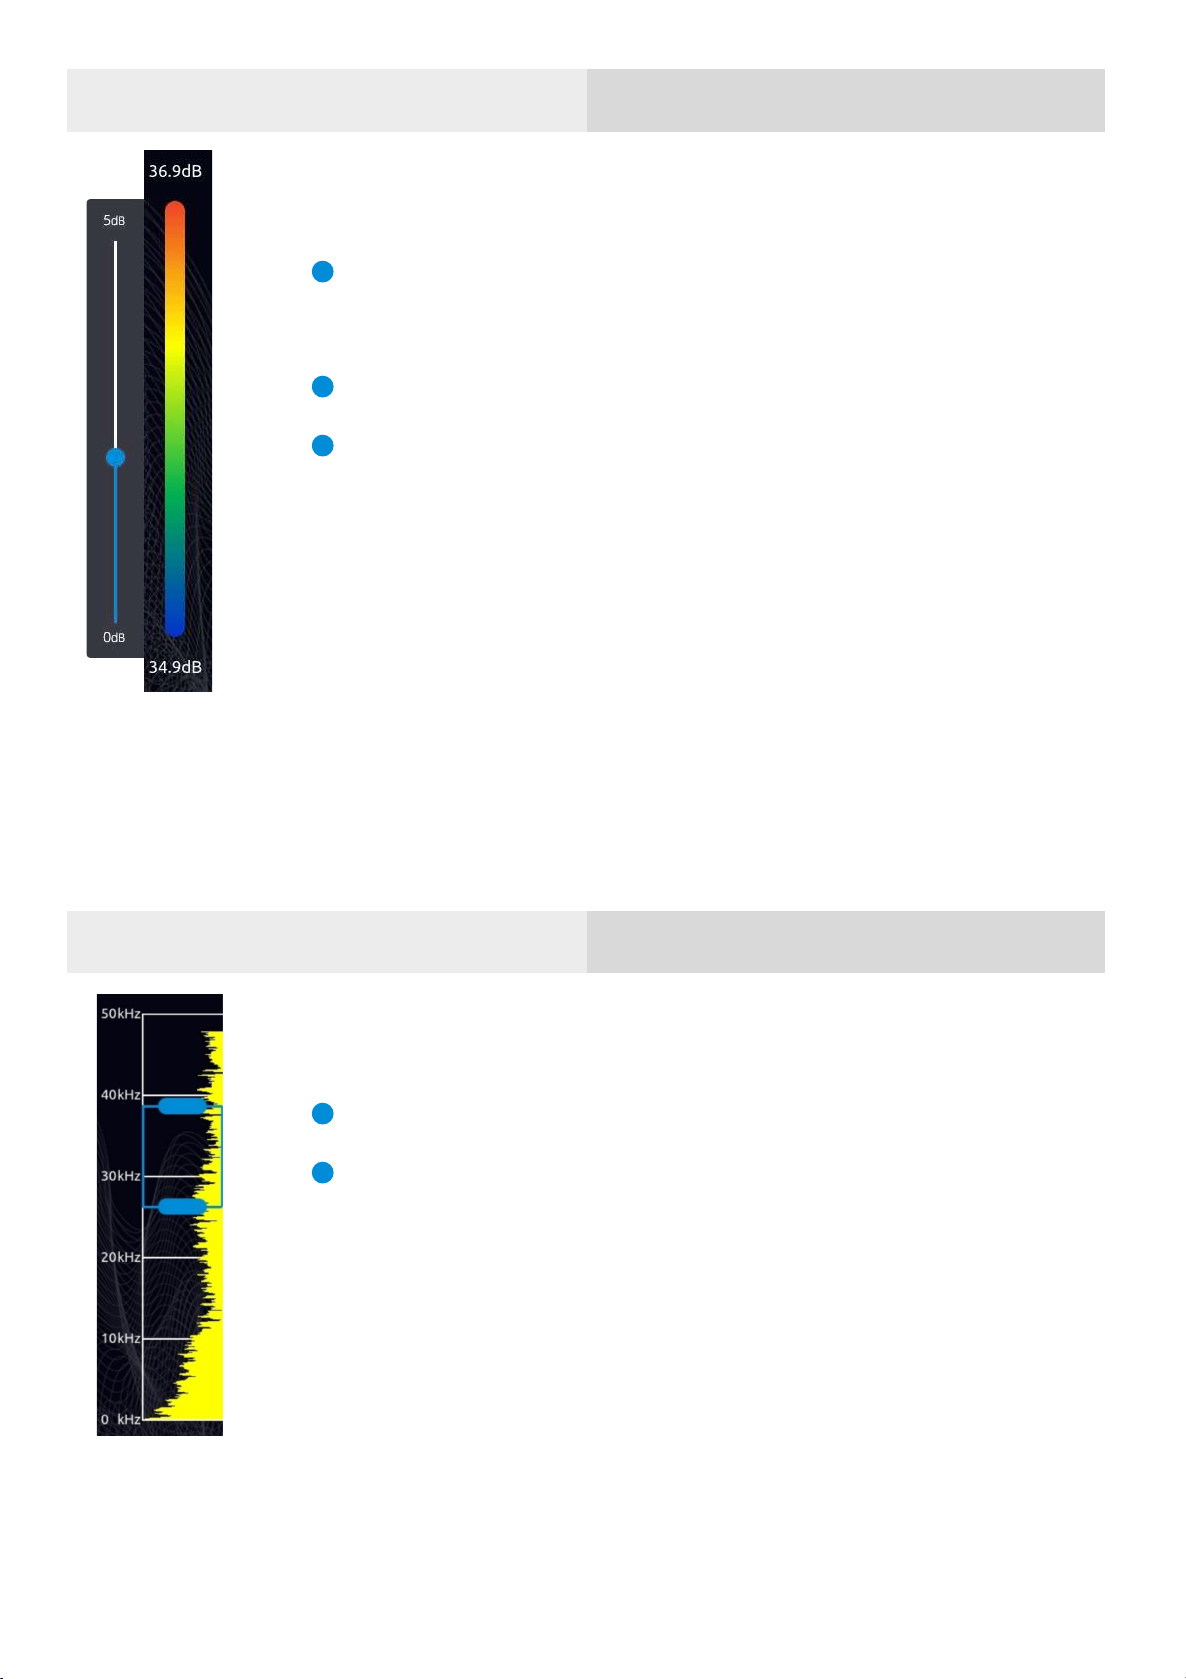
Palette and dynamic range
Click the palette on the main interface to call out the
dynamic range dialog
Click the area outside the dynamic range dialog to hide
Dynamic range parameter can be adjusted into this
dialog
Test frequency range
Press on select box to move it
Press on a single side of select box to adjust up limit or
down limit
Transient and steady state modes
Click the transient / steady state mode button to switch the working
mode of the equipment.
In the transient mode, the equipment has a very fast response speed to
the transient signal and can quickly respond to the change of sound source. It
is suitable for locating rapidly changing sound source models, such as partial
discharge sound source.
In the steady-state mode, the equipment will reduce the response speed
to the signal, and the cloud image will be relatively stable. It is suitable for the
observation of stable signals.
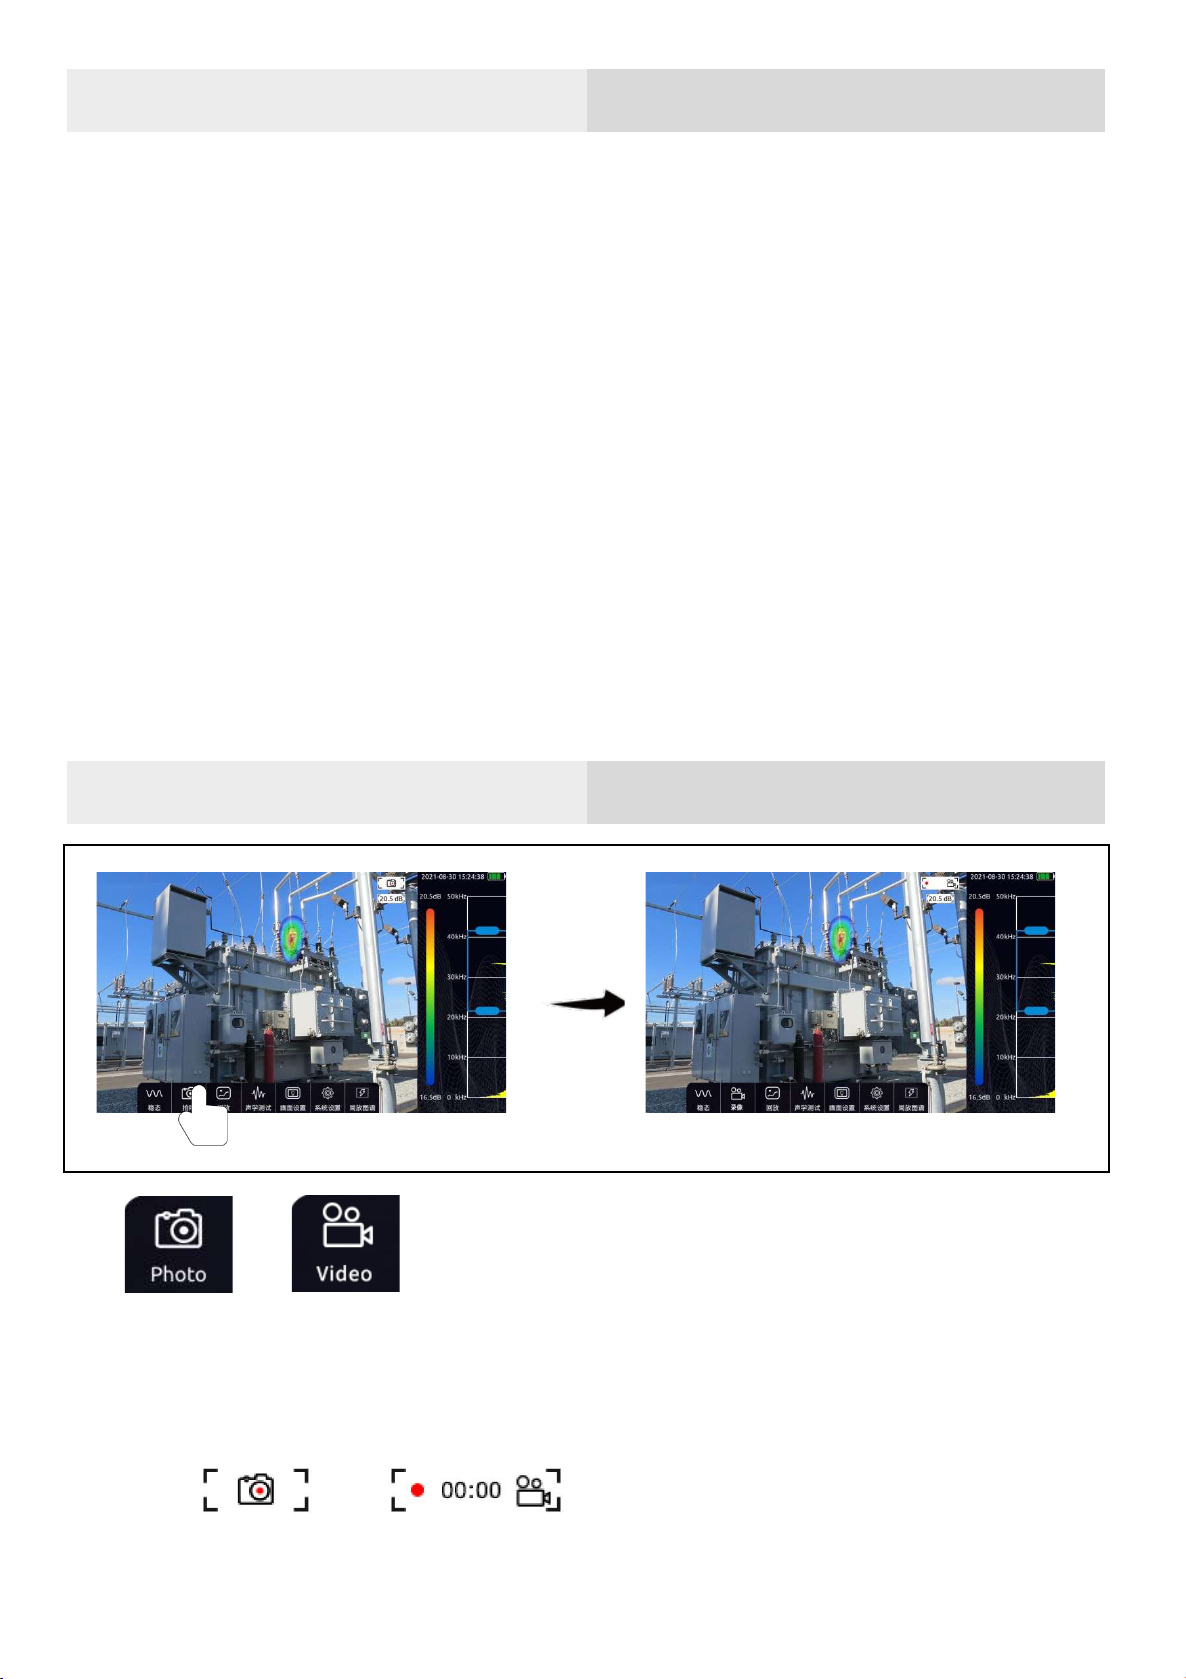
Video and photo
Click the button on the left of the menu bar to switch between camera
mode and video mode.
The icon in the upper right corner of the video area will remind you of the
work mode which the device is currently in.
a. In camera mode, press the function button to take a picture.
b. In video mode, press the function button to start recording, press again
to stop or it will automatically stop when video exceeds 5 minutes.
During video recording, you can know the duration of current recording
through the icon in the upper right corner of the video area.
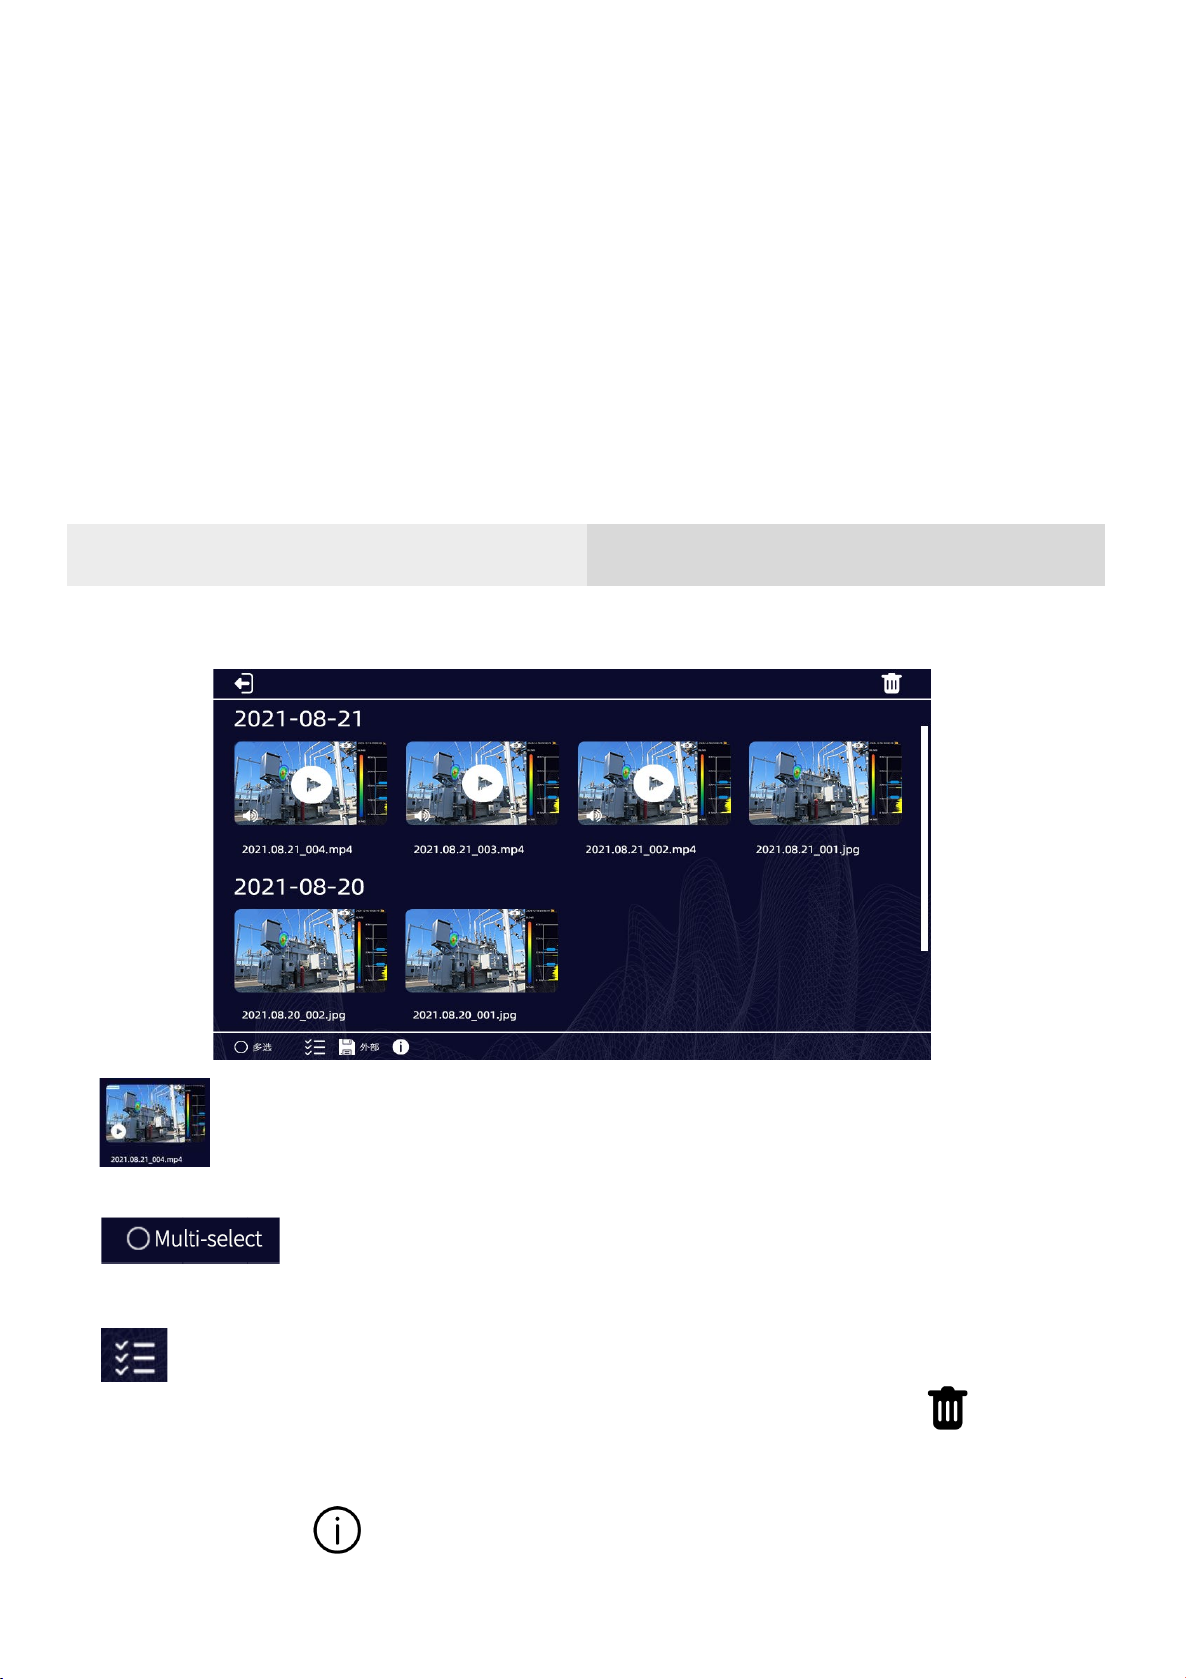
Playback
Pictures and recorded video data can be viewed in the playback window.
a. Click a picture or video to check full size image or play a video.
b. Click Multiple-select to select multiple videos or photos for
deletion.
c. Click the select all button to select all.
d. After selecting a video or photo, click the upper right corner“ ”to
delete the data.
e. Press button“ ”to check usage information of current storage space.

Picture Playback
Double click the picture to enlarge and play back the picture. After
enlarging the picture, you can drag the picture with your finger, and double-
click the picture again to restore the original size.
Press the“ ”and“ ” or touch and sliding left and right to view the
next or before.
Video playback
Click the video thumbnail to zoom in and play the video.
Press on ” ”to playback a video.
Press the video to stop.
Press the“ ”and“ ” or touch and sliding left and right to view the
next or before.
Drag the progress bar below the video to adjust the playback progress.

Picture, audio, text Tags
In "Playback," click a video or an image and six white flag ICONS appear
at the bottom of the screen. You can click the icon to mark a video or picture.
The video or picture can be tagged with image, audio, and text. A total of six
tag contents can be added for the three tag types.
Picture tag can take a picture as the tag content, the picture content can
be nameplate, character tag, etc. Click the icon to select image markers, press
the function button on the right to take a photo with the camera, click the
save icon in the upper right corner to save the marked content, click the
button on the right to cancel the picture taken, click the lower right corner to
select the photo resolution, the marked picture supports 1920*1080,
1280*720 and 640*480 resolutions.
Audio tag can record a piece of audio as the tag content, the audio can be
a human voice or other live voice. Click the icon to select the audio mark, and
press the function button on the right to record an audio with the
microphone in the microphone array. The audio is single channel. To improve
sound recording, microphone arrays can be placed close to the source or
speaker. After recording, press the function button on the right to stop
recording. Click the save button to save the recording.
Text tag can input a paragraph of text as the markup content, it also
supports keyboard input and two-dimensional code scanning. Click the mark
icon to select the text mark and then click the keyboard icon. Click in the pop-
up input box and the input keyboard will pop up. You can use the keyboard
to input words, symbols, English and so on. After typing, click Save to save the
text markup.
Click the icon to select the text mark and then click the two-dimensional
code icon. The device will start the camera to scan the two-dimensional code

automatically. Identify to the two-dimensional code will display its contained
text information, press the save button to save the text information, press "re-
identify" to re-identify the code again.
Acoustic
Dynamic range
Sliding the slide to adjust dynamic range.
Or click the palette bar on the right of the software interface to call out the
dynamic dialog and quickly adjust it.
Cursor sound pressure level
The cursor function can be turned on or off.
When the cursor sound pressure level function is enabled, the cursor will
be displayed on the video screen, and the cursor number will be displayed
below the cursor. And the image energy of the position indicated by the
cursor will be displayed below the photo and frequency recording status
indicator in the upper right. If three cursors are set, the sound pressure level
shown by the cursor 1, 2 and 3 will be displayed from top to bottom. The
number of cursors can be set in System Settings > Tools > Number of
cursors. A maximum of three cursors can be set.
Record sound while recording video
Press button to enable record sound while recording video.
When it is enabled, if you record video, the sound will be recorded as well.

Ultrasonic monitoring
The equipment can modulate the signal in the ultrasonic frequency band
to the audible frequency band, and can monitor the signal with headphones.
Ultrasonic modulation is realized by superheterodyne. The reference
frequency of modulation can be set. It is recommended to use a frequency
band of about 38.6 kHz for near modulation and monitoring.
Focusing
The focusing function is mainly used to eliminate environmental
interference noise, reflection noise, multi-source interference, etc. when the
test environment is noisy and the cloud image is more than single one,
scattered and chaotic, the focusing function can be turned on to focus the
presentation of the audio-visual cloud image within a circle and eliminate other
interference sources.
Double click the circle in the center of the main interface to switch the size
of the test range. Double click again to restore the initial size.

Display
Brightness:the brightness is adjustable. When used outdoors, it is
recommended to increase brightness for better visual clarity. When
used indoors, it is recommended to reduce the brightness for a longer
battery life.
Rainbow: set palette to use rainbow
Iron bow: set palette to use iron bow
Grayscale: set palette to use grayscale
Table of contents


