TrailFX Terravore AWN001 User manual
Visit www.trailfx.com or Call 1 (866) 638-4870 for Warranty Information / Tech Support / Product Updates.
Keystone Automotive Operations Inc. All Rights Reserved. 11/22/2022-R01 Page-1-6
APPLICATION: UNIVERSAL
Assembly, Installation, Operation and
Maintenance Instructions
AWNINGS
Part Number:
AWN001/AWN002/AWN003
60 minutes
Dealer / Installer:
Provide a copy of these instructions to the end user of this product. These instructions
provide important operating and safety information for proper usage of this product.
Demonstrate the proper use of the product with the end user. Have the end user
demonstrate that they understand the proper use of the product.
End User:
Read
and follow all instructions included in this manual. Ask your Dealer / Installer for
assistance if you do not understand the proper use of the product.
WARNING
The Terravore Awning can be mounted in various ways depending on the vehicle for which it is being attached to.
Additional parts may be required in order to properly attach or work with different vehicle models and setups. The
intended use of this product is to be used while vehicle is parked.
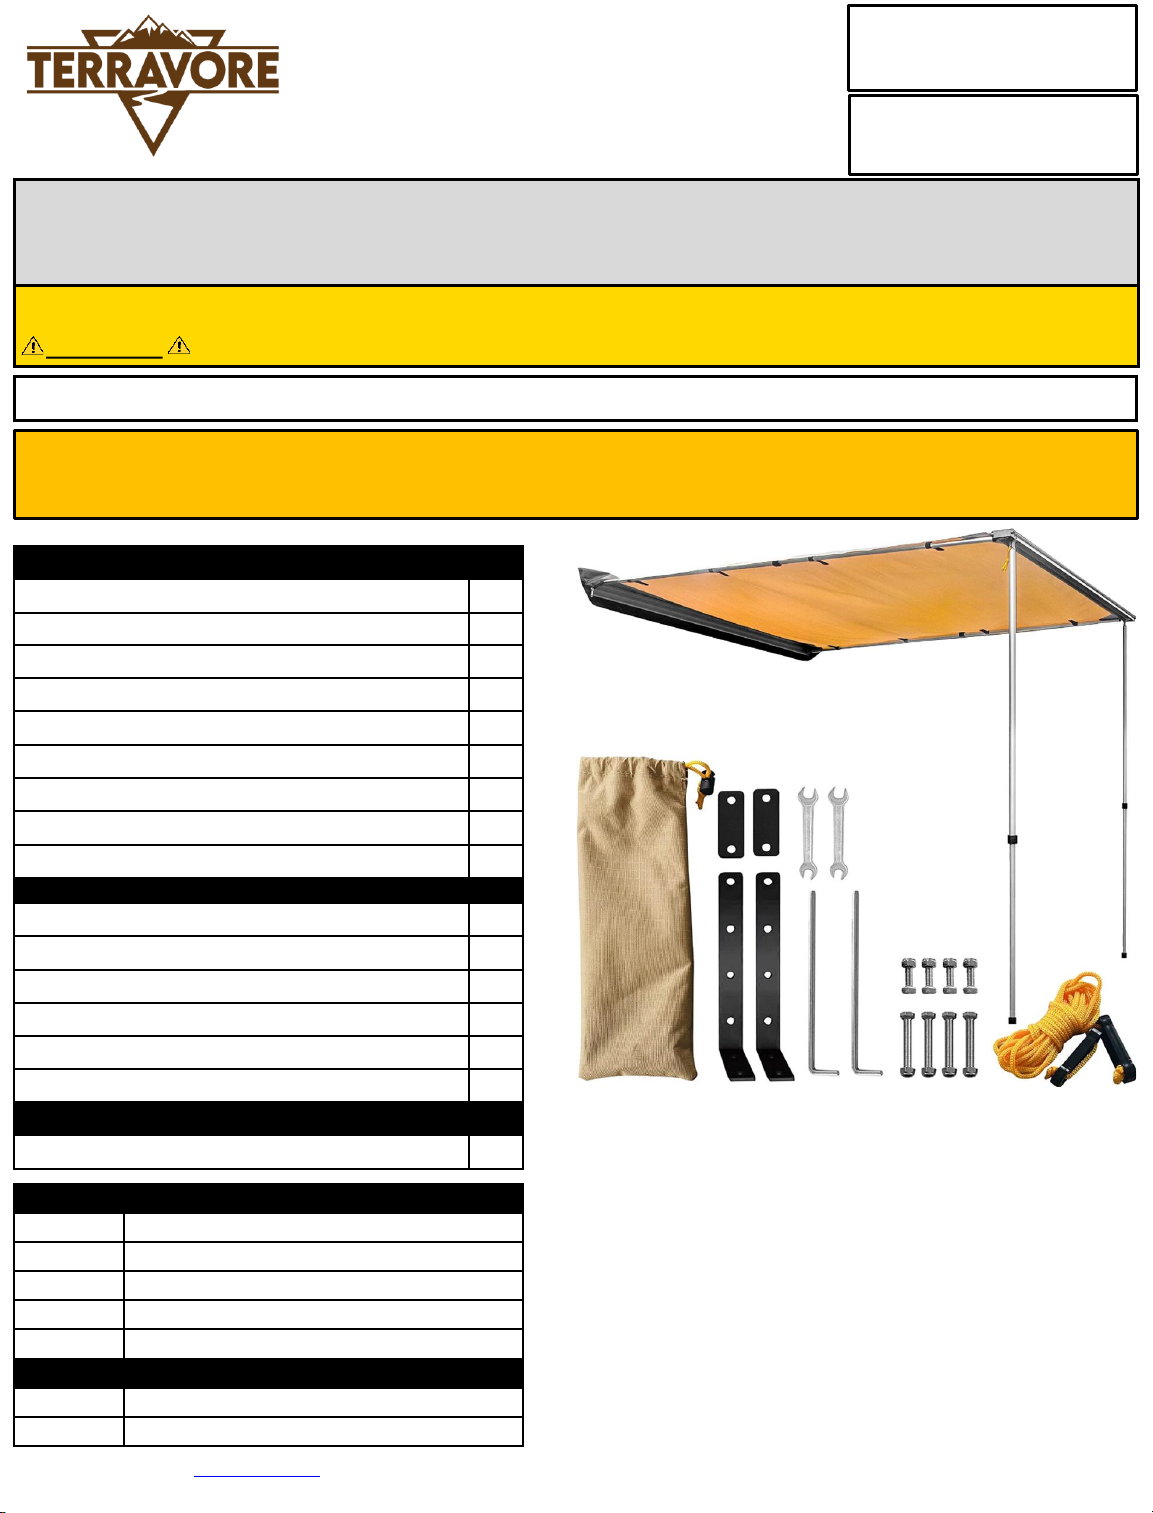
Parts List:
Description
Qty
Awning with Cover 1
Mounting Bracket “L” Style 2
Mounting Bracket “Straight” Style 2
Tension Cord with Ground Stake 2
Bolt with Nylock Nut M8x20mm 4
Bolt with Nylock Nut M8x55mm 4
Wrench –(10mm / 13mm) 2
Carrying Pouch 1
Tools Required
Tape Measure 1
13mm Wrench or Ratchet 1
10mm Wrench or Ratchet 1
Drill 1
5/16” Drill Bit 1
Step Bit 1
Optional Hardware –Sold Separately
U-Bolts –1-7/8” to 2” Radius 2
Replacement Parts - Sold Separately
AWNRP1
SERVICE KIT UNIVERSAL
AWNRP2
REPL ARM HORIZONTAL - AWN001
AWNRP3
REPL ARM HORIZONTAL - AWN002
AWNRP4
REPL ARM HORIZONTAL - AWN003
AWNRP5
REPL POST VERTICAL UNIVERSAL
Accessories –Sold Separately
AWN004
SHADE WALL 78" - AWN001/AWN002
AWN005
SHADE WALL 98" - AWN003

Visit www.trailfx.com or Call 1 (866) 638-4870 for Warranty Information / Tech Support / Product Updates.
Keystone Automotive Operations Inc. All Rights Reserved. 11/22/2022-R01 Page-2-6
INSTALLATION PROCEDURE:
Mount to Roof Basket
Note: Prior to installing, check for clearance to ensure awning will not interfere with the opening and closing of
doors. When installing with an existing roof basket, be sure the basket is sturdy and mounted securely to the
vehicle roof. Roof baskets will need to be a minimum of 2-1/2” tall for the awning to be mounted or will need to
have mesh or grated flooring for awning brackets to clamp to. Additionally, spacing of the mounting holes should be
measure approximately 1-5/8” apart.
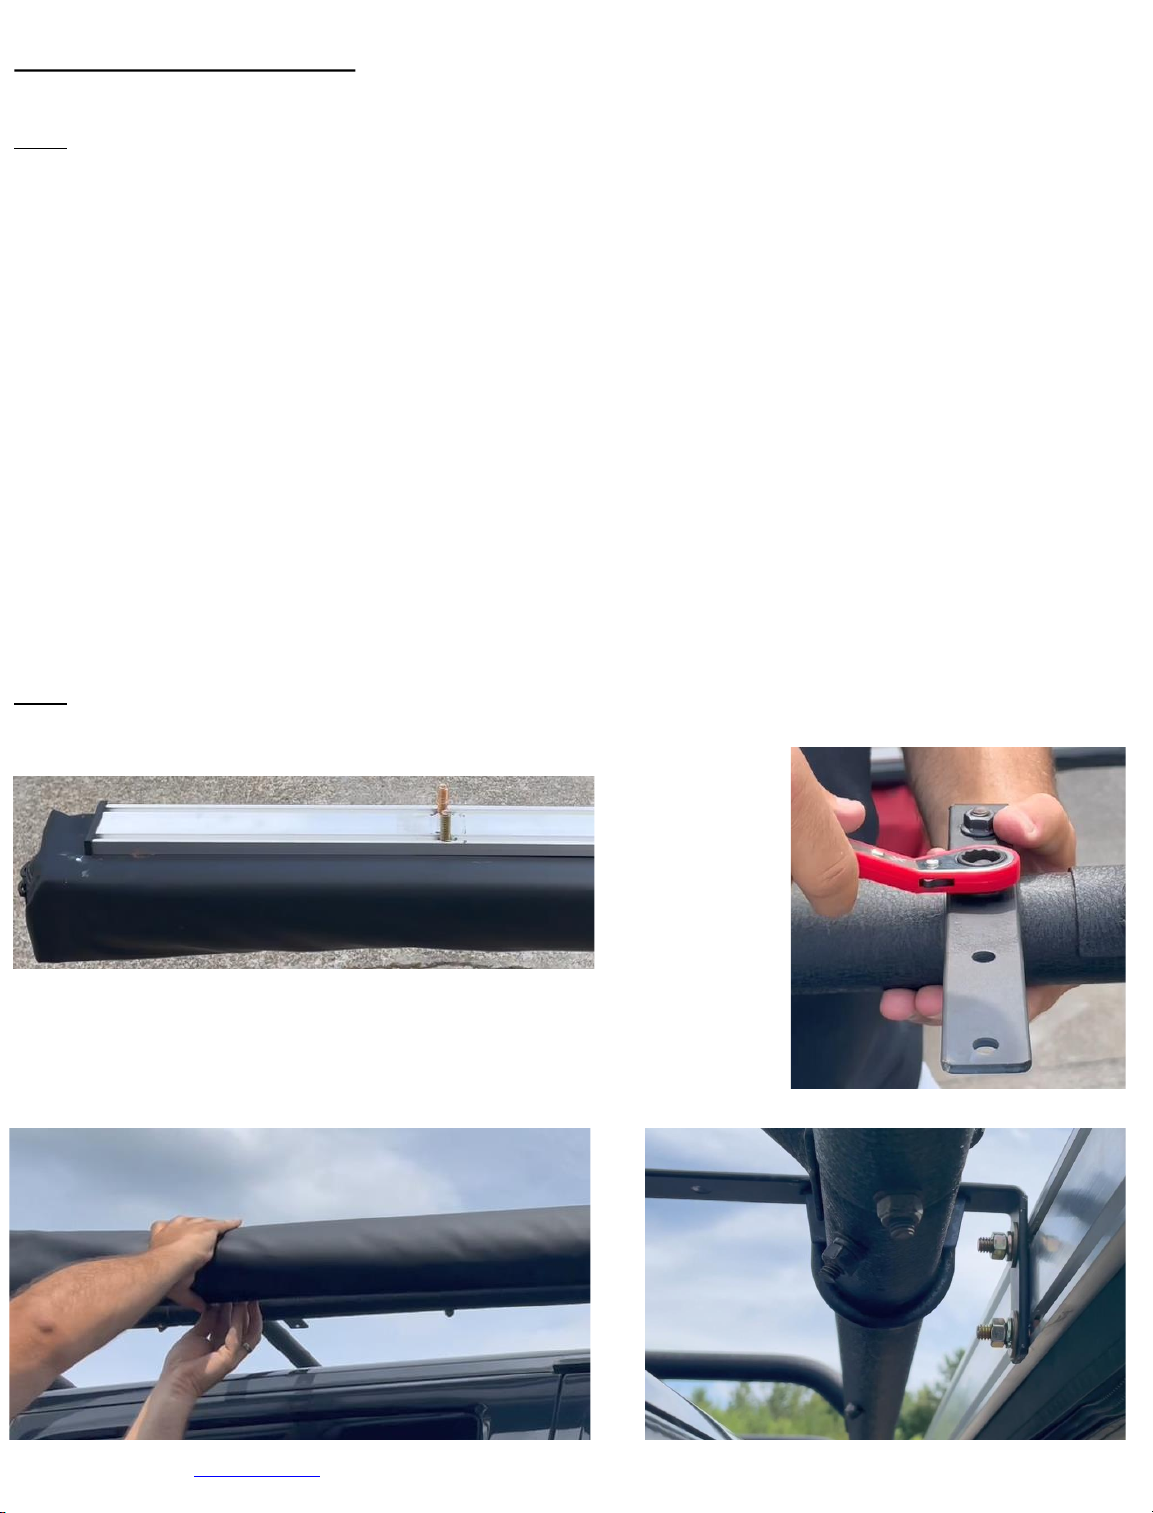
1) Place the awning on a flat surface. Remove the plastic end caps exposing the channel. Slide the short
M8x20mm bolts through the channel to a minimum distance of 12 inches from each end. Installer can adjust
accordingly once awning is positioned. (Fig 1) (If mesh or grated floor basket skip to Step 5)
2) 2-1/2” Tall Basket –Using the awning with bolts within the channel as a template, position the awning against
the roof basket to mark the holes that will need to be drilled. (Holes in the channel should be approx. 1-5/8”
apart in a vertical line and minimum distance of 4 ft. for 6.6 ft. awnings and a minimum of 5 ft. for 8.2 ft. awnings
apart. See dot in Fig. 2)
3) Using a 5/16-inch drill bit, carefully drill the marked locations in the roof basket.
4) Once roof basket is drilled, attach the awning, placing the bolts thru the drilled holes and secure with the Nylock
nuts and the straight mounting bracket to assist with bracing. This may require assistance from another
installer. Start on one side with one bolt and Nylock nut to hold in place and move to the opposite side. (Make
sure awning is straight for proper function.) Repeat the process until the two brackets are secured.
5) Mesh Basket –Place the L-bracket on the basket floor using the straight bracket from the underside, to clamp
to the basket. Use the provided (4) M8x55mm bolts to clamp onto the basket. (Fig 3)
Note: Periodically check all hardware to
ensure Nylock nuts and bolts are secure.
Fig 1
Fig 3
Fig 2
Visit www.trailfx.com or Call 1 (866) 638-4870 for Warranty Information / Tech Support / Product Updates.
Keystone Automotive Operations Inc. All Rights Reserved. 11/22/2022-R01 Page-3-6
INSTALLATION PROCEDURE:
Mount to Tubular Roof Rack (TrailFX J021T, J029T, JL012T, JL014T)
Note: Prior to installing, check for clearance to ensure awning will not interfere with the opening and closing of the
doors. Be sure to check your tubular roof rack for proper measurements of the tubing. Provided measurements are
based on TrailFX style roof racks.
1) Place the awning on a flat surface. Remove the plastic end caps exposing the channel. Slide the short
M8x20mm bolts through the channel to a minimum distance of 12 inches from each end. Installer can adjust
accordingly once awning is positioned. (Fig 1)
2) Using 5/16” x 2” x 4-1/2” U-Bolts (plus nuts) or 1-7/8” – 2” exhaust clamps, measure minimum distance of 4 ft.
for 6.6 ft. awnings and minimum of 5 ft. for 8.2 ft. awnings to install the selected U-bolts purchased separately.
3) Using the L-bracket, attach the long side to the U-bolts (Fig 2). Note the L-bracket holes on the long side may
need to be drilled for proper alignment/fitment. Using a drill bit or step bit, carefully drill the hole to the needed
size. Recoat the bracket with black spray paint to help with the elements.
4) Holding the awning up to the short side of the L-brackets, align the bolts from inside the channel to the bracket.
This may require assistance from another installer. Start on one side with one bolt and Nylock nut to hold in
place and move to the opposite side. (Make sure awning is straight for proper function.) Repeat the process
until the two brackets are secured. (Fig 3 & 4)
Note: Periodically check all hardware to ensure hardware is secure.
Fig 1
Fig 3
Fig 2
Fig 4

Visit www.trailfx.com or Call 1 (866) 638-4870 for Warranty Information / Tech Support / Product Updates.
Keystone Automotive Operations Inc. All Rights Reserved. 11/22/2022-R01 Page-4-6
INSTALLATION PROCEDURE:
Mount to Crossbar / Roof Rack
Note: Prior to installing, check for clearance to ensure awning will not interfere with the opening and closing of the
doors. Some cross bars have a “T-slot” design that will allow the provided bolts the ability to slide through the
channel, preventing a need for drilling. Check all products for best installation method. Below instructions are
based on the need to drill.
1) Place the awning on a flat surface. Remove the plastic end caps exposing the channel. Slide the short
M8x20mm bolts through the channel to a minimum distance of 12 inches from each end. Installer can adjust
accordingly once awning is positioned.
2) Spread the cross bars on the roof rack to minimum distance of 4 ft. for 6.6 ft. awnings and minimum of 5 ft. for
8.2 ft. awnings.
3) Using the L-bracket, place the long side over the crossbars in a position that would clear the roof line and allow
doors to open freely.
If the crossbars have a T-slot, remove the end cap and insert the M8 x 55mm bolt, to position the L-bracket.
Secure and skip to Step 6.
If the crossbars do not have a T-slot, mark two holes to drill on the crossbar using the L-bracket as template.
Proceed to Step 4.
4) Using a 5/16-inch drill bit, carefully drill the marked locations in the crossbars.
5) Once crossbars are drilled, attach the L-brackets on top of the crossbars in line with the drilled holes and secure
with the provided M8x55mm bolts and Nylock nuts.
6) Hold the awning up to the short side of the L-brackets aligning the bolts inside the channel to the bracket. This
may require assistance from another installer. Start on one side with one bolt and Nylock nut to hold in place
and move to the opposite side. (Make sure awning is straight for proper function.) Repeat the process until the
two brackets are secured.
Note: Periodically check all hardware to ensure Nylock nuts and bolts are secure.

Visit www.trailfx.com or Call 1 (866) 638-4870 for Warranty Information / Tech Support / Product Updates.
Keystone Automotive Operations Inc. All Rights Reserved. 11/22/2022-R01 Page-5-6
SETUP PROCEDURE:
1. Undo the zipper on the protective cover. While holding the awning in place, release the captive buckles.
2. Flip the awning over the top of the cover to rest on top of the awning frame, this will now allow you to easily
swing out the horizontal poles past 90°. Pull the horizontal poles out to extend them out as far as possible,
twist to lock into place.
3. Holding the awning in your hands, unroll it to its full length. Vertical poles may come loose from the channel
on the end of the awning frame while unrolling awning.
4. Carefully release the legs from inside the channel. With one hand holding the center of the awning, set each
leg to the desired height. Twist the bottom half of the leg to lock in place.
5. While holding the awning frame end with one hand, align the end pin on one of the horizontal legs with the
hole in the end of frame. Twist the leg to lock in position. Repeat on the other horizontal leg.
6. Attach the awning to the horizontal arms with the hook and loop fastener.
7. Using the pegs and guide ropes pull the awning front beam diagonally outwards to secure the legs.
NOTE: The pegs supplied are designed to be used in hard soil. Adifferent peg design and size may be
required to secure your awning depending on the type of terrain you are anchoring it to.
8. Pack away is a reverse of steps 1-7. Be sure to roll the awning material underneath itself.Avoid packing away
the awning wet.
PRODUCT CARE
➢Clean only with cold water and soft brush - do not use soap or detergent.
➢Do not expose to petrol, oil or solvents.
➢Avoid creases and seams when rolling up the awning.
➢Allow the awning to dry before packing away. If the awning has been stored wet, open it at a more convenient
time to allow it to dry.
➢Always set up awning with sufficient angle to allow water to run off.
➢It is highly recommended to secure your Terravore awning to the ground in windy conditions. In extreme
circumstances, the awning should be packed away to prevent damage to the awning and to prevent personal
injury.

Visit www.trailfx.com or Call 1 (866) 638-4870 for Warranty Information / Tech Support / Product Updates.
Keystone Automotive Operations Inc. All Rights Reserved. 11/22/2022-R01 Page-6-6
Warranty Terms:
3 Year Limited Warranty:
TrailFX and Keystone Automotive Operations Inc. make no guarantees or warranties for products not
manufactured by KeystoneAutomotive Operations Inc. Such products are covered solely under any
applicable warranty of the manufacturer. It is always recommended that the operating instructions and
warranty instructions provided by the manufacturer are followed.
KeystoneAutomotive Operations Inc. warrants its products to be free from manufacturing and material
defects to the original purchaser for the length of warranty stated above from the date of retail purchase.
If any products are found to have a manufacturing or material defect, the product will be replaced or
repaired at the option of TrailFX and KeystoneAutomotive Operations Inc. with proof of purchase by the
original purchaser. The original purchaser shall pay all transportation and shipping costs associated with
the return of the defective product and the defective product shall become the property of Keystone
Automotive Operations Inc.
The Warranty applies to KeystoneAutomotive Operations Inc. products used for individual and
recreational purposes. Commercial usage of the Keystone Automotive Operations Inc. products limits the
warranty to 90-days from date of purchase.
The Warranty applies only to Keystone Automotive Operations Inc. products which are found to be
defective in manufacturing or material. This warranty does not apply to normal wear and tear of the finish
placed on Keystone Automotive Operations Inc. products.
TrailFX and Keystone Automotive Operations Inc. are not responsible for any labor costs incurred for
removal or replacement of the defective product.
TrailFX and KeystoneAutomotive Operations Inc. are not responsible for repair or replacement of any
product under the limited warranty where the product was improperly installed, misapplied, altered,
abused, neglected, overloaded, misused or damaged as a result of an accident, including any use of the
product not in accordance with all product operating and safety instructions.
Without limiting the generality of the foregoing, TrailFX and Keystone Automotive
Operations Inc. shall under no circumstances be liable for any incidental or consequential loss or damage
whatsoever arising out of, or in any way relating to any such breach of warranty or claimed defect in, or
non-performance of the products. Some states do not allow the exclusion or limitation of incidental or
consequential damages, so the above exclusion or limitation may not apply to you.
This limited warranty gives you specific legal rights, and you may also have other rights that vary from
state to state.
This manual suits for next models
2
Table of contents
Popular Lawn And Garden Equipment manuals by other brands

Becx Machines
Becx Machines WLA60 user manual

Simplicity
Simplicity 2442 Illustrated parts list

hillvert
hillvert HT-ES-1500 user manual

Ferris
Ferris 1000z Series Operator's manual

Coopers of Stortford
Coopers of Stortford Light-Up Plinth w/Planter Instructions for use

Yardistry
Yardistry R003 installation manual


