manuals.online logo
Brands
  1. Home
  2. •
  3. Brands
  4. •
  5. TrailPRO
  6. •
  7. Automobile Accessories
  8. •
  9. TrailPRO TPRGBW4 User manual

TrailPRO TPRGBW4 User manual

SPXRGBUBKIT
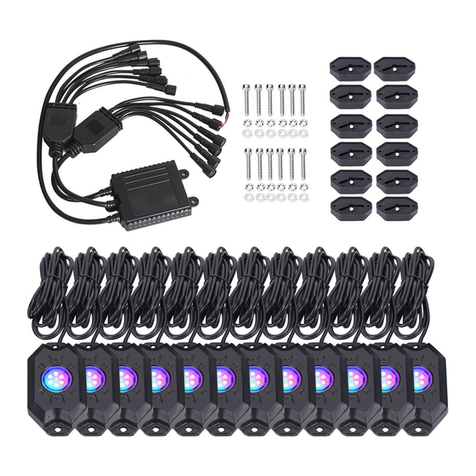
WHAT’S INCLUDED
4x CREE LED Pods With 3mtr Lead
4x Flat Rubber Mounting Pads
4x Curved Rubber Mounting Pads
1
-
x Bluetooth RGB Control Module
Mounting Accessories
TPRGBW4
OPTIONAL
EXTENSION CABLE
(TPRGBEXT4)
KIT INCLUDES
Please read instruction manual before commencing.
ADDITIONAL PARTS REQUIRED
BEFORE YOU START
3 Amp Fuse & Fuse holder
Wire
Zip-Ties
OPTIONAL
Switch
Relay
RGBW LED ROCKLIGHT KIT
INSTALLATION
Find a location for the RGBW module
(avoid mounting the module in a location
that get’s extremely hot or wet). Make sure all
4 cables from the light pods will reach the module
(each light pod has a 3 meter lead).
If more length is required use
optional extension lead
(Part# TPRGBEXT4 - Sold Separately).
Find an appropriate location for the light
pods using either the supplied FLAT or
CURVED rubber mounting pads (IMAGE 1).
The lights should be mounted where they will not
come into contact with tyres, suspension or where
they will rub/drag along the ground.
Run and connect the light cables to the RGBW module.
Be mindful to keep the cable away from any moving parts
or where the cable can be pinched or snagged (zip ties are
your friends).
1
2
3
THIS PRODUCT IS FOR OFF-ROAD USE ONLY
!
(E1) DO NOT connect the extension leads (TPRGBEXT4) together.
(E2) ONLY ONE Extention lead (TPRGBEXT4) can be used per
output from the module.
!
EXT.
TPRGBEXT4 EXT.
TPRGBEXT4
E1 E2
ONE EXTENSION
LEAD (TPRGBEXT4) PER
CONNECTOR OUTPUT
SPXRGBUBKIT
TPRGBW4
For more information please visit: www.trailpro.com.au
IMAGES 2 & 3 shows the recommended wiring options.
IMAGE 2: Wiring direct to power and using the APP to turn
the lights ON and OFF.
NOTE: Use a 3amp fuse on the red 12V+ power wire.
IMAGE 3: Using a SWITCH to turn the lights ON and OFF.
NOTE: A switch, 12V relay & 3amp fuse on the 12V+ power wire
will be required for this configuration.
3 AMP FUSE
IMAGE 2
3 AMP FUSE
ON OFF
12V+
87
8586
30
87a
IMAGE 3
WIRING DIAGRAM
SPXRGBUBKIT
IMAGE 1
Back of the pad includes
3 routing options
Curved pads to be used on rounded
surfaces (eg. Roll Bar, Bull Bar etc.).
Flat pads work best on
flat surfaces.
NOTE: When wired to a switch,the RGBW controller will default to the last mode/colour used.
No need to access the app
GET THE APP!
Visit the TrailPRO website for the Apple/Android app.
SPXRGBUBKIT
3
AMP
FUSE
3
AMP
FUSE
Stinger is a Power Brand of AAMP Global
15500 Lightwave, Clearwater, Florida 33760
P: 888-228-5560
support@stingerelectronics.com
www.stingerelectronics.com
© 2019 AAMP Global
LIMITED WARRANTY:
Stinger warrants this product to be free of defects in materials and workmanship for a period of
one (1) years from the original date of purchase. This warranty is not transferable and applies
only to the original purchaser from an authorized Stinger dealer in the United States of America
only. Should service be necessary under this warranty for any reason due to manufacturing
defect or malfunction, Stinger will (at its discretion), repair or replace the defective product with
new or remanufactured product at no charge. Damage caused by the following is not covered
under warranty: accident, misuse, abuse, product modification or neglect, failure to follow
installation instructions, unauthorized repair attempts, misrepresentations by the seller. This
warranty does not cover incidental or consequential damages and does not cover the cost of
removing or reinstalling the unit(s). Cosmetic damage due to accident or normal wear and tear
is not covered under warranty.
INTERNATIONAL WARRANTIES:
Products purchased outside the United States of America are covered only by that country’s
Authorized Stinger reseller and not by Stinger. Consumers needing service or warranty informa-
tion for these products must contact that country’s reseller for information.
Group
Device List
Power Button
SCAN for Apple iOS SCAN for Android
User Guide
GET THE APP
Scan the QR Code, or visit Google Play or iTunes to
download the Happy Lighting app. Once the app is
installed, power up the RGB Module and open the
app. The module should auto-connect and be listed
in the device list. And Dan says Let There Be Light.
Happy Lighting App
SPXRGBUBKIT
TPRGBW4
Limited Warranty:
TrailPRO warrants this product to be free of defects in materials and build
for 12 months from the original date of purchase. This warranty is not transferable
and applies to the original purchaser from TrailPRO or authorized reseller in
Australia only. Should service be required under this warranty due to manufacturing
defect or malfunction, TrailPRO will ( at its discretion), repair or replace the defective
product with new or remanufactured product at minimal or no charge.
Damage caused by the following is not covered under warranty: accident, misuse,
abuse, product modication or neglect, failure to follow installation manual,
unauthorized repair attempts. This warranty does not cover incidental or consequential
damages and does not cover the cost of removing or reinstalling the unit(s). Cosmetic
damage due to accident or normal wear and tear is not covered under warranty.
For more information please visit: www.trailpro.com.au

Other TrailPRO Automobile Accessories manuals

TrailPRO TPWHIPS5 User manual

TrailPRO

TrailPRO TPWHIPS5 User manual

TrailPRO TPRGBW12 User manual

TrailPRO

TrailPRO TPRGBW12 User manual

Popular Automobile Accessories manuals by other brands

Yakima Whispbar K621W Fitting instructions

Yakima

Yakima Whispbar K621W Fitting instructions

Innovate Motorsports SCG-1 user manual

Innovate Motorsports

Innovate Motorsports SCG-1 user manual

Pyle PLCM34WIR user manual

Pyle

Pyle PLCM34WIR user manual

Thule 1678 instruction manual

Thule

Thule 1678 instruction manual

Whelen Engineering Company CEM8 installation guide

Whelen Engineering Company

Whelen Engineering Company CEM8 installation guide

Metec 840405 Mounting instructions

Metec

Metec 840405 Mounting instructions

Westin SPORTSMAN 40-1205 installation instructions

Westin

Westin SPORTSMAN 40-1205 installation instructions

Sirius XM RAdio Dock & Play quick start guide

Sirius XM RAdio

Sirius XM RAdio Dock & Play quick start guide

ROKIOTOEX Coyote Crossbars installation guide

ROKIOTOEX

ROKIOTOEX Coyote Crossbars installation guide

Midtronics xMB-9640 user guide

Midtronics

Midtronics xMB-9640 user guide

Starkey 3601 manual

Starkey

Starkey 3601 manual

Kuda 191090 Installation instruction

Kuda

Kuda 191090 Installation instruction

ICI Alumilite Steps 840121412920 Direction for Installation and Use

ICI

ICI Alumilite Steps 840121412920 Direction for Installation and Use

Acrosser Technology AR-B6005 user manual

Acrosser Technology

Acrosser Technology AR-B6005 user manual

Fortin THAR-AUD1 manual

Fortin

Fortin THAR-AUD1 manual

Abrams UG-600 Installation and configuration manual

Abrams

Abrams UG-600 Installation and configuration manual

Temper CARdylet CL-CARGADOR-M-7.4/32-C user manual

Temper

Temper CARdylet CL-CARGADOR-M-7.4/32-C user manual

Crux RVCCH-75 installation guide

Crux

Crux RVCCH-75 installation guide

manuals.online logo
manuals.online logoBrands
  • About & Mission
  • Contact us
  • Privacy Policy
  • Terms and Conditions

Copyright 2025 Manuals.Online. All Rights Reserved.