Trane CleanEffects Air Filtration System Owner's manual

Trane CleanEffectsTM Whole House Air Filtration System
User’s Information Guide
Congratulations – Your TRANE CleanEffectsTM air filtration system is the most advanced,
innovative and effective whole house air filtration system on the market today. It is designed to
deliver what we call TRANE AirTM throughout your home. It delivers air that is meticulously filtered
and cleaned of up to 99.98% of allergens to provide maximum comfort. You and your family can
breathe easier than ever before.
© Trane 2008
32-5038-06

2 Numbers in [brackets] are for 50 Hz international systems. 32-5038-06
User’s Information
Figure 1. COMPONENTS OF THE TRANE CLEANEFFECTSTM
1) PRE-FILTER - Traps large particles such as hair and lint
before they can enter the COLLECTION CELL section.
2) FIELD CHARGER - Charges the contaminants. Only to
be removed, cleaned or serviced by a qualified
technician.
3) COLLECTION CELL (2) - Removes and collects very
small impurities from the air.
4) CABINET - Mounts between the furnace or air handler
and return air duct work and houses the COLLECTION
CELLS, FIELD CHARGER and PRE-FILTER.
3
2
4
5
1
3
6
5) POWER DOOR - The solid state power supply compo-
nents that convert the 24 Volt AC to the high-voltage,
direct current required to power the FIELD CHARGER
and COLLECTION CELLS. Allows access to the COL-
LECTION CELLS, FIELD CHARGER and PRE-FILTER.
6) 24 VOLT POWER CABLE
DISPLAY FEATURES
The air cleaner display (Fig. 2) has the following
functions:
LED and PRE-FILTER lights display the operating status
of the air cleaner, indicating when to clean the PRE-
FILTER or COLLECTION CELLS.
The LED display is also used in the SET-UP mode, see
page 7.
1 2 3
LED's
POWER
PRE-FILTER
RESET
PRE-FILTER
RESET
CLEAN
DIRTY
Fig. 1
Fig. 2
NOTE: International (50 Hz) Timings:
Due to differences in electrical systems outside the
United States, customers with 50 Hz electrical
systems will need to be aware of minor differences
in the timings shown in this guide. 50 Hz timings
will appear in [brackets] following the standard 60 hz
timings.

32-5038-06 Numbers in [brackets] are for 50 Hz international systems. 3
User’s Information
SEQUENCE OF OPERATION
Turn on the unit by pressing and releasing the POWER
button. The backlit POWER and RESET button will
illuminate along with the first green LED indicating power
is present. When the indoor fan is operating the first
green LED will slowly flash. This indicates the FIELD
CHARGER and COLLECTION CELLS have power and
the unit is operating normally. There is a slight time
delay between the indoor fan starting and LED flashing.
NOTE: There is a 10 [12] minute delay after the indoor
fan operates, before the air cleaner starts to operate,
each time the power to the air cleaner is turned off/on.
Your air filtration system only operates when the air is
circulating through the indoor unit. The air filtration
system is most effective at cleaning the air if the fan
operates continuously. Most thermostats have a
setting that will permit continuous fan operation.
Continuous fan mode during Cooling operation
may not be appropriate in humid climates. If the
indoor air exceeds 60% relative humidity or simply
feels uncomfortably humid, it is recommended that
the fan only be used in the AUTO mode.
In normal operation, the air cleaner may make a slight
sound as the air passes through it and is cleaned. In
some applications, you may notice this sound coming
from the return air vent(s). If desired, this sound level
can be reduced with minimal impact on air cleaning
efficiency by reducing the power setting of the FIELD
CHARGER in the SET-UP mode (see pages 7-8).
MAINTENANCE
▲
WARNING
!
RISK OF ELECTRIC SHOCK: These servicing
instructions are for use by qualified personnel
only. To reduce the risk of electric shock, do not
perform any servicing other than that contained in
this User's Information Guide unless you are
qualified to do so.
▲
CAUTION
!
Before cleaning the coil or ducts in the air handler or
furnace, remove the COLLECTION CELLS, FIELD
CHARGER, and PRE-FILTER from the air cleaner.
Chemicals used during the cleaning of the air
handler, furnace, or ductwork can damage the air
cleaner components and degrade the performance of
the air cleaner.
For maximum efficiency, the COLLECTION CELLS and
PRE-FILTER should be inspected and cleaned as
prescribed in this User's Information Guide.
The FIELD CHARGER should only be removed and
cleaned annually by a qualified service professional.
CLEANING
Cleaning Instructions:
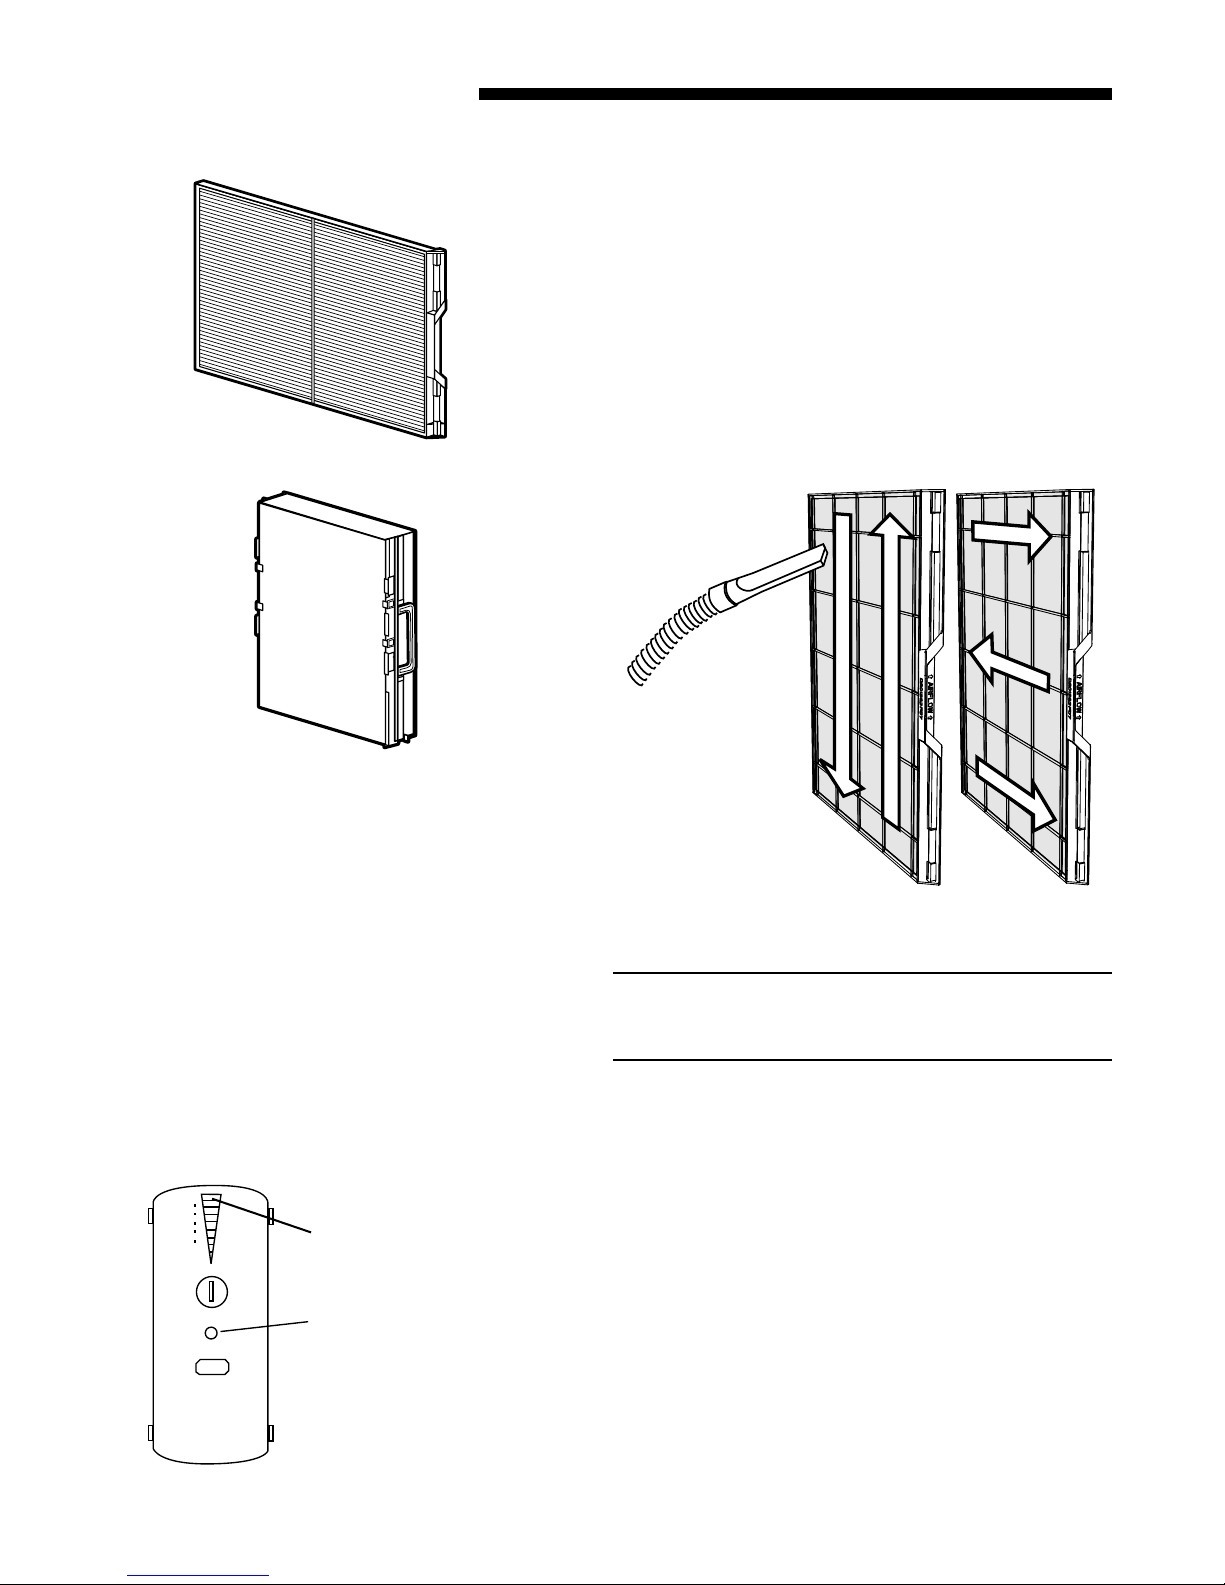
The air cleaner utilizes a PRE-FILTER and
COLLECTION CELLS. The purpose of the PRE-FILTER
is to capture large particles before they enter the
COLLECTION CELLS which allows the COLLECTION
CELLS to work more efficiently.
1. Turn the air conditioning system off at the Comfort
Control (thermostat).
▲
WARNING
!
High Voltage is present within the air cleaner for
operation. Before removing the Power Door, turn the
power off and wait at least 15 seconds to allow
voltage to discharge. Failure to follow instructions
could result in death or serious personal injury.
2. Turn off power to the air cleaner by pushing and
holding the POWER button for three seconds. The
LED’s will remain on until the voltage has discharged
and it is safe to remove the door. This requires
approximately 15 seconds. Do not remove the
door until all the lights are off.
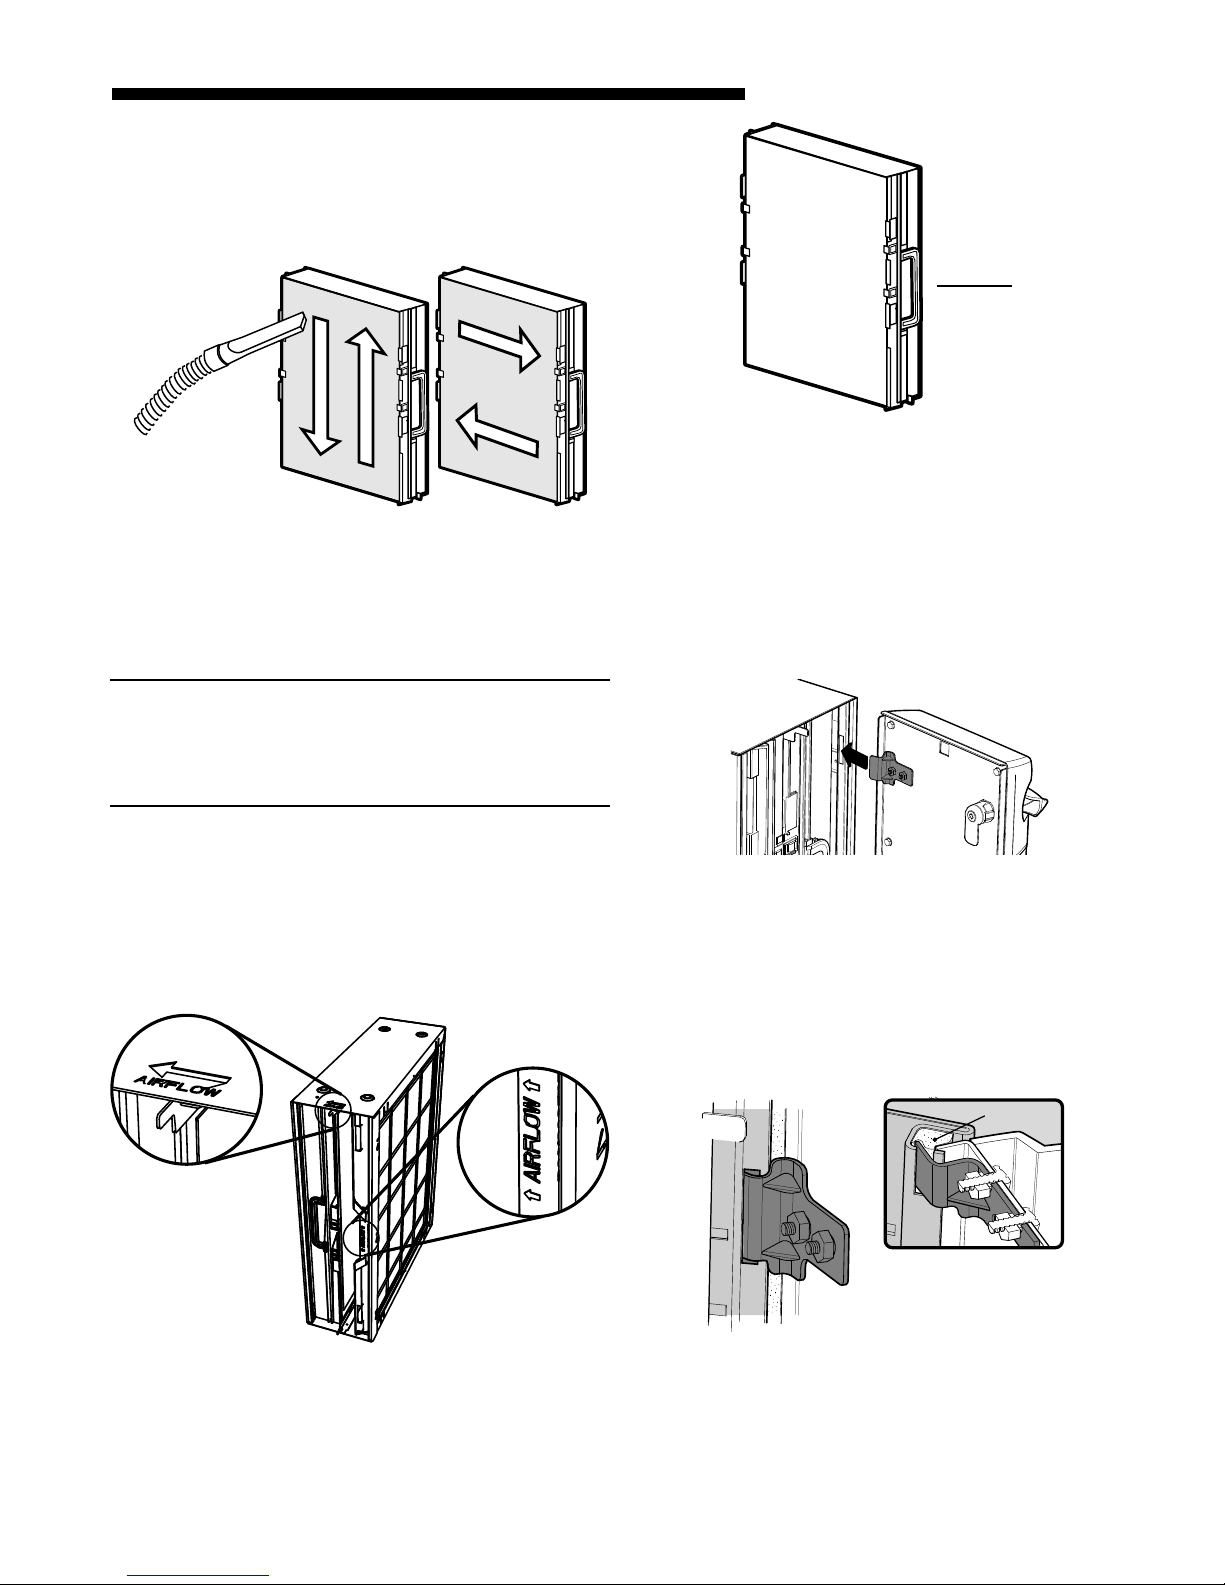
3. Disconnect the power/control cable.
4. Rotate the two latches and remove the door as
shown in Figure 3. Place the door in a secure
location.
Fig. 3
Rotate Latches
▲
CAUTION
!
Handle the door only by using the handles on the
front of the door. Grasp the door by the handles as
depicted in Figure 3 to remove and replace the door.
Do not handle the door on the edges. Metal edges
may be sharp and could result in injury if the door is
not handled properly.

4 Numbers in [brackets] are for 50 Hz international systems. 32-5038-06
User’s Information
The air cleaner is factory set to notify the home owner to
clean the PRE-FILTER every two months [10 weeks] of
actual run time of the air cleaner. This notification can
be changed by the installer/home owner to 1 month or 3
months [5 to 15 weeks] depending on the conditions in
the home (pets, smokers, etc.). Please see “SET-UP
MODE” (Page 7) to change the factory settings.
1. Using a vacuum hose, vacuum in even strokes
across the length of the PRE-FILTER. After
vacuuming the entire PRE-FILTER using even
strokes going in one direction, repeat the
process using even strokes going in the
opposite direction as shown in Figure 7.
NOTE: Do NOT replace the plastic PRE-FILTER with
a metal type PRE-FILTER. A metal PRE-FILTER will
cause reduction in efficiency and potential failure of
the electronics in the air cleaner.
COLLECTION CELLS
The clean/dirty LED light bar indicator will illuminate as
the system cleans the air. The LED lights will progress
from green to yellow and then to red. When the last red
indicator is flashing, it is time to clean the COLLECTION
CELLS (see Figure 6). The air cleaner is factory set to
notify the home owner to clean the COLLECTION
CELLS every six months [31 weeks] of actual run time
of the air cleaner. This notification can be changed by
the installer/home owner to 2 months, 4 months, 6
months, or 9 months [10, 20, 31 or 46 weeks] depending
on the conditions in the home (pets, smokers, etc.).
Please see “SET-UP MODE” (Page 7) to change the
factory settings.
Fig. 7
Fig. 4
Fig. 5
VACUUM CLEANING
Vacuuming is the preferred method to clean the PRE-
FILTER and COLLECTION CELLS. It is recommended
that the PRE-FILTER and the COLLECTION CELLS be
vacuumed outside the home to ensure particles on the
filters are not re-introduced into the air. Persons highly
sensitive to the collected particles should wear
appropriate respiratory protection while cleaning.
PRE-FILTER –
It is time to clean the PRE-FILTER when the red “PRE-
FILTER” light (shown in Figure 6) is illuminated.
Fig. 6
PRE-FILTER
RESET
CLEAN
Flashing red light indicates
that it is time to clean the
COLLECTION CELLS
Red light indicates that it is
time to clean the PRE-FILTER
5. Remove the PRE-FILTER (Figure 4) and/or the
COLLECTION CELLS (Figure 5) from the air cleaner.

32-5038-06 Numbers in [brackets] are for 50 Hz international systems. 5
User’s Information
2. Once vacuuming is completed on one side of the
COLLECTION CELL, turn the COLLECTION CELL
over and repeat on the other side of the COLLEC-
TION CELL.
NOTE: It is normal for COLLECTION CELLS to
discolor during operation. Vacuuming will not
restore the Collection cells to their original color.
However, vacuuming does restore the COLLECTION
CELLS to a high efficiency.
REPLACING THE PRE-FILTER AND COLLECTION
CELLS INTO THE AIR CLEANER
1. Replace the PRE-FILTER into the air cleaner.
Ensure that the "AIRFLOW indicator arrow" on the
PREFILTER is pointing in the same direction as the
"AIRFLOW indicator arrow" on the air cleaner
cabinet.
2. Reinstall the COLLECTION CELLS into the air
cleaner. Ensure the handles on both of the COL-
LECTION CELLS are folded flat.
Handles Fold
Flat
3. Replace the power door onto the air cleaner.
To install the door, follow the instructions in Figures
11 - 14 below.
1. Using a vacuum hose, vacuum in even strokes
across the entire COLLECTION CELL surface.
Vacuum using even strokes in one direction, then
repeat the process using even strokes in the oppo-
site direction, as demonstrated in Figure 8 below.
Fig. 10
Fig. 8
Fig. 9 Fig. 12
Insert tabs into cabinet slots. Edge of door should fit into
channel against gasket. (See detail)
Gasket
Hold door so that tabs are aligned with slots in cabinet.
Fig. 11
Other manuals for CleanEffects Air Filtration System
1
Table of contents
Other Trane Air Cleaner manuals

Trane
Trane FD145CLFR000D Series Owner's manual

Trane
Trane CleanEffects Air Filtration System Owner's manual

Trane
Trane XV90i Owner's manual

Trane
Trane FD145CLFR000D Series Service manual

Trane
Trane TFD215ALAH005C Owner's manual

Trane
Trane TFE260 Assembly instructions

Trane
Trane CleanEffects 32-5038-10 Owner's manual