Tranquil Mount TMO-ML02 User manual

INSTALLATION GUIDE
TMO-ML02
Multi-functional Professional Mobile Stand
For TV panels:32”-55”(x4)
The Whole Load capactiy:400Lbs(181kg)
MAX VESA:600x400mm

WARNING
•Be sure to read this entire manual thoroughly and you fully understand all the instructions and warning before
attempting to begin your installation.
This product should only be installed by someone who has a basic knowledge of building construction,installation and
fully understands these instructions.
•
• Needing more than three people together to complete the installation.
• Each step when leaving the mounting screws 3mm, easy to adjust back, wait for all the installation and adjustment
is completed, then tighten the screws in place.
2 of 4
Table of Contents
Parts List ........................................................................................................................................................................
.....
2
. ... .................................................................................................
....
3,4
Installation of the mount
......................
...................
..................................................................
Installation of the Screens & Product fine tuning............... 4
Wall Plate(x2)
Beam(x3)
Base Bar(x2)
Upright(x2)
End Cap(x6)
Universal Wheel (x4)
Left Monitor
Bracket(x4)
Right Monitor
Bracket(x4)
Wall Plate
Adapter(x4)
4040 Corner(x12) 8080 Corner(x4)
T-Nuts
56x
Combination screw
M8x20
54x
Level(x1)
Combination screw
M8x30
2x
M6x12
(White)
16x
M6x25
(White)
16x
M8x12
(White)
16x
M8x25
(White)
16x 16x 16x
washer 2 (White)
6.2x 16x1.5 17.0x 9.0x 14.0
spacer(black )
Hexagon wrench
M6(x1)
with your product.
Parts may appear slightly different than illustrated.
Before you b egin, make sure all parts shown are
included
Parts List
Description
M8x25
philips pan head screw
philips pan head screw
philips pan head screw
M8x12
philips pan head screw1
2
3
4
5
6
7
M6x12
M6x25
16
16
16
16
6.2x 16x1.5
washer 2
spacer
16
15x15x40
Combination screw
Combination screw
Level
M8x30
T-Nuts M8
M8x20
2
1
56
54
Hexagon wrench 1 M6
M8 Nut 16 M8
Washer 1 16
16 17.0x 9.0x 14.0
M8 Nut
16x 16x
washer 1 (black
(black) )
8.2x 16x1.5
8.2x 16x1.5
3 of 4
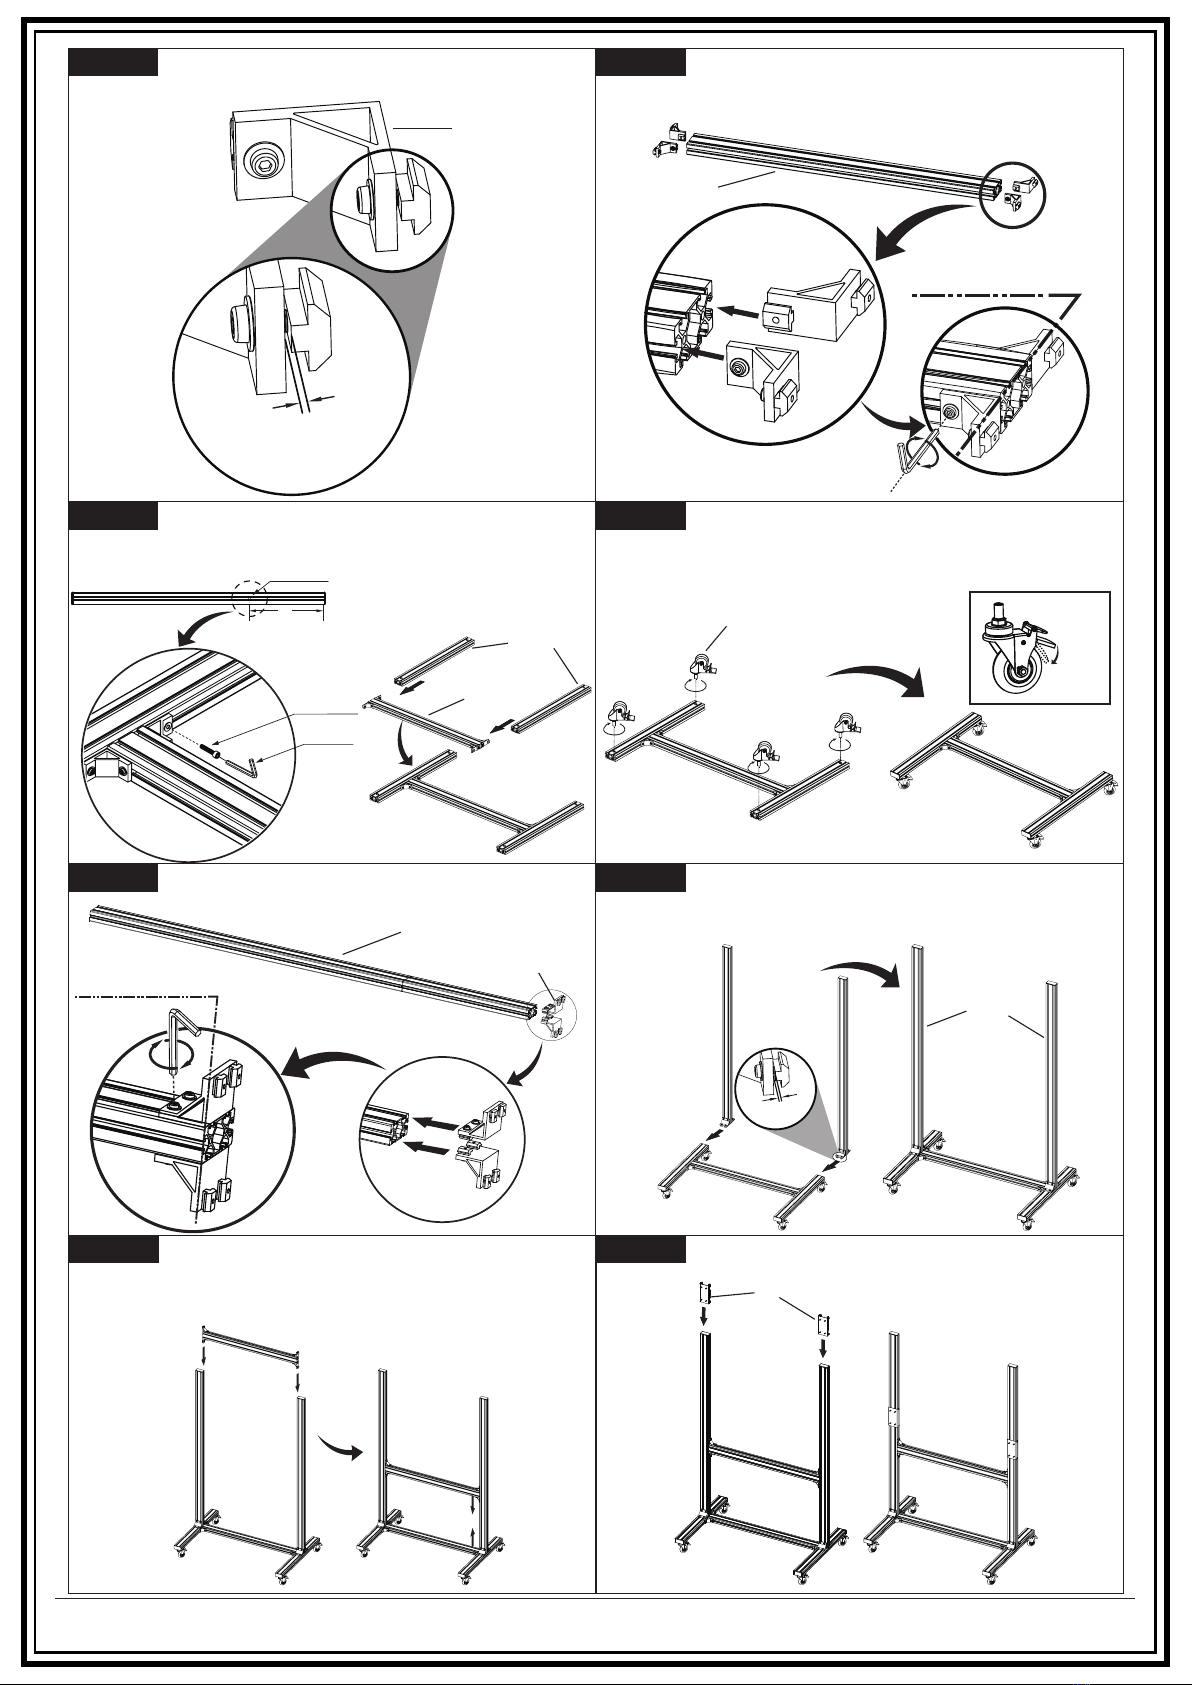
Don’t overtighten the M8 screws,keep 3mm
gap between the nut and the corner.
4040 corner
Beam
Adjust the direction of the “T” nut, put it into
the transverse beam, align and then lock M8
screw with M6 hex wrench we provided.
3mm
Align and then lock M8 screw with
M6 hex wrench we provided.
Step1
Step3
Step5 Step6
Step7 Step8
Step4
Step2
Adjust the direction of the “T” nut, put it into the transverse
beam, control the size 237.0mm,align and then lock M8 screw
with M6 hex wrench we provided.
Turn over base Turn base to normal
Lock
Before installing the universal wheel, lock the wheel first,
then install the 4 wheels according to clockwise direction
as shown at pictures. Do not unlock after installation,so
that it’s easier for the following installation.
3mm
Install the second beam, refer to step 2, control the
size of 670.0mm.
670.0mm
Install vertical aluminum extrusion, following step 2 Mounted vertical aluminum extrusion slide into the base,
adjust the vertical aluminum extrusion aluminum extrusion
with an intermediate base collinear.
Install wall plate adapter
237.0mm
Combination
Screw M8x30
Base Bar
Universal Wheel
Beam
Make the Combination Screw M8x30 screw
through the hole in order to achieve the purpose
of positioning
Hexagon
wrench M6
Align and then lock M8 screw with
M6 hex wrench we provided.
Upright
Upright
Wall Plate Adapter
8080 corner

Step13 Step14
Step15 Step16
Step11 Step12
Step9 Step10
4 of 4
Extended panel installation, since the panel is relatively
heavy, need two people carrying both ends to maintain
a balance when tightening the nuts.
Repeat steps 7,8,9 installation method to install a third
aluminum extrusion and the second panel.
screws
M6x12
M6x25
M8x12(don’t need washer 2)
M8x25(don’t need washer 2)
spacer 17.0x 9.0x14.0
Monitor Bracket
Monitor Bracket
(Flat screen is not provided)
(Flat screen is not provided)
WASHER 2
x
yTVcs
cs
y
After two panels installed, according to the width of the
TV to adjust the distance between the two panels, the distance
between the two panels is equal to the width of the TV.
Secure the interface arms to the mount using
Don't forget to put
the end caps on, don’t use too much strength so as to
damage them.
Tigh
Each monitor bracket has independent front and back up and down
adjustment function, the adjustment amplitude is 20mm. ten the screws in various parts.
M8 Nut
washer 1 (black)
8.2x 16x1.5
washer 2 (White)
6.2x 16x1.5
Popular TV Mount manuals by other brands


Kindermann
Kindermann DisplayShift2 Wings 55-78 Mounting instructions

Mounting Dream
Mounting Dream MD2380-24 Installation instruction

NeoMounts
NeoMounts LED-WR100BLACK instruction manual

New Star
New Star NeoMounts FPMA-W950 instruction manual

Toshiba
Toshiba WAL14C Operation manual

Philips
Philips SQM5322/27 user manual