Transvideo RainbowHD User manual

Rev 1.1
January 2014 751TS0035
RainbowHD
Operator Manual

2 RainbowHD
About
This Operator Manual describes the use of the Transvideo RainbowHD family.
The first Rainbow has been introduced to the Film Industry during year 1994.
The RainbowHD is our latest contribution to the Digital Cinematography world, including advanced
decision tools for the HD world.
The RainbowHD family includes the following products:
RainbowHD 7” HD Monitor
RainbowHD SBL 7” HD Monitor SuperBright
If the physical, electrical and optical characteristics of the products are different, the user interface is
the same.
This manual describes RainbowHD with Build 133 (and up).
The products described in this manual are professional equipment. Utilization of these products
implies knowledge of basics in video signal management, HDTV and film making concept.

Operator Manual Rev 1.1 3
Warning & Caution
WARNING:
There is very high voltage inside of the component. Risk of injury or death.
WARNING:
This product must be used in a correct grounded electrical environment; ground defects can create
severe problems to the equipment, the picture quality and even cause danger for the user.
WARNING:
Copyright law and international treaties protect this product, its design and its software. One
or several international patents apply to the RainbowHD.
Unauthorized reproduction or distribution of this product or its design or its software or any
portion of them, may result in severe civil and criminal penalties, and will be prosecuted to the
maximum extent possible under the law.
CAUTION:
Warranty is void is the product is opened. The unit contains electrostatic sensitive devices, which can
be damaged or destroyed if you touch them. Very high voltage is present in the product and there is
some risk of electric shock if opened by a non-accredited technician. Standard ESD procedures must
be strictly followed during disassembly/re-assembly of the unit.
The user and/or technician assume full responsibility or any risk of bodily injury, death or property
damage arising out of the use or disassembly or repair of this equipment. In no event shall Transvideo
S.A. or its local representatives be liable to a user, technician or third party for any loss of income or
any damage of any kind resulting from the use of or work on the said equipment.

4 RainbowHD
TABLE OF CONTENT
About ................................................................................................................................................. 2!
Warning & Caution ........................................................................................................................... 3!
TABLE OF CONTENT .................................................................................................................................. 4!
INTRODUCTION ......................................................................................................................................... 7!
Unpacking ......................................................................................................................................... 7!
General safety instructions ............................................................................................................. 7!
Power requirements......................................................................................................................... 8!
Start-up ............................................................................................................................................. 8!
PRODUCT OVERVIEW................................................................................................................................. 9!
Parts identification ........................................................................................................................... 9!
User interface ................................................................................................................................. 10!
Direct functions............................................................................................................................ 10!
Joystick pad................................................................................................................................. 10!
Views............................................................................................................................................ 10!
USING THE HOME VIEW ........................................................................................................................... 12!
USING THE OPERATOR VIEW.................................................................................................................... 13!
Timecode ..................................................................................................................................... 13!
Tally.............................................................................................................................................. 13!
Battery / power information .......................................................................................................... 13!
USING THE DIT VIEW............................................................................................................................... 14!
Waveform luminance ................................................................................................................... 14!
Vectorscope ................................................................................................................................. 14!
Histogram luminance ................................................................................................................... 14!
Audio monitoring .......................................................................................................................... 14!
Video input and standard ............................................................................................................. 14!
Timecode ..................................................................................................................................... 14!
Tally.............................................................................................................................................. 14!
Battery / power information .......................................................................................................... 14!
USING THE WAVEFORM VIEW................................................................................................................... 15!
Timecode ..................................................................................................................................... 15!
Tally.............................................................................................................................................. 15!
Battery / power information .......................................................................................................... 15!
Waveform luminance ................................................................................................................... 15!

TABLE OF CONTENT
Operator Manual Rev 1.1 5
USING THE BODY-RIG VIEW ..................................................................................................................... 16!
Horizon......................................................................................................................................... 16!
Battery / power information .......................................................................................................... 16!
Tally.............................................................................................................................................. 16!
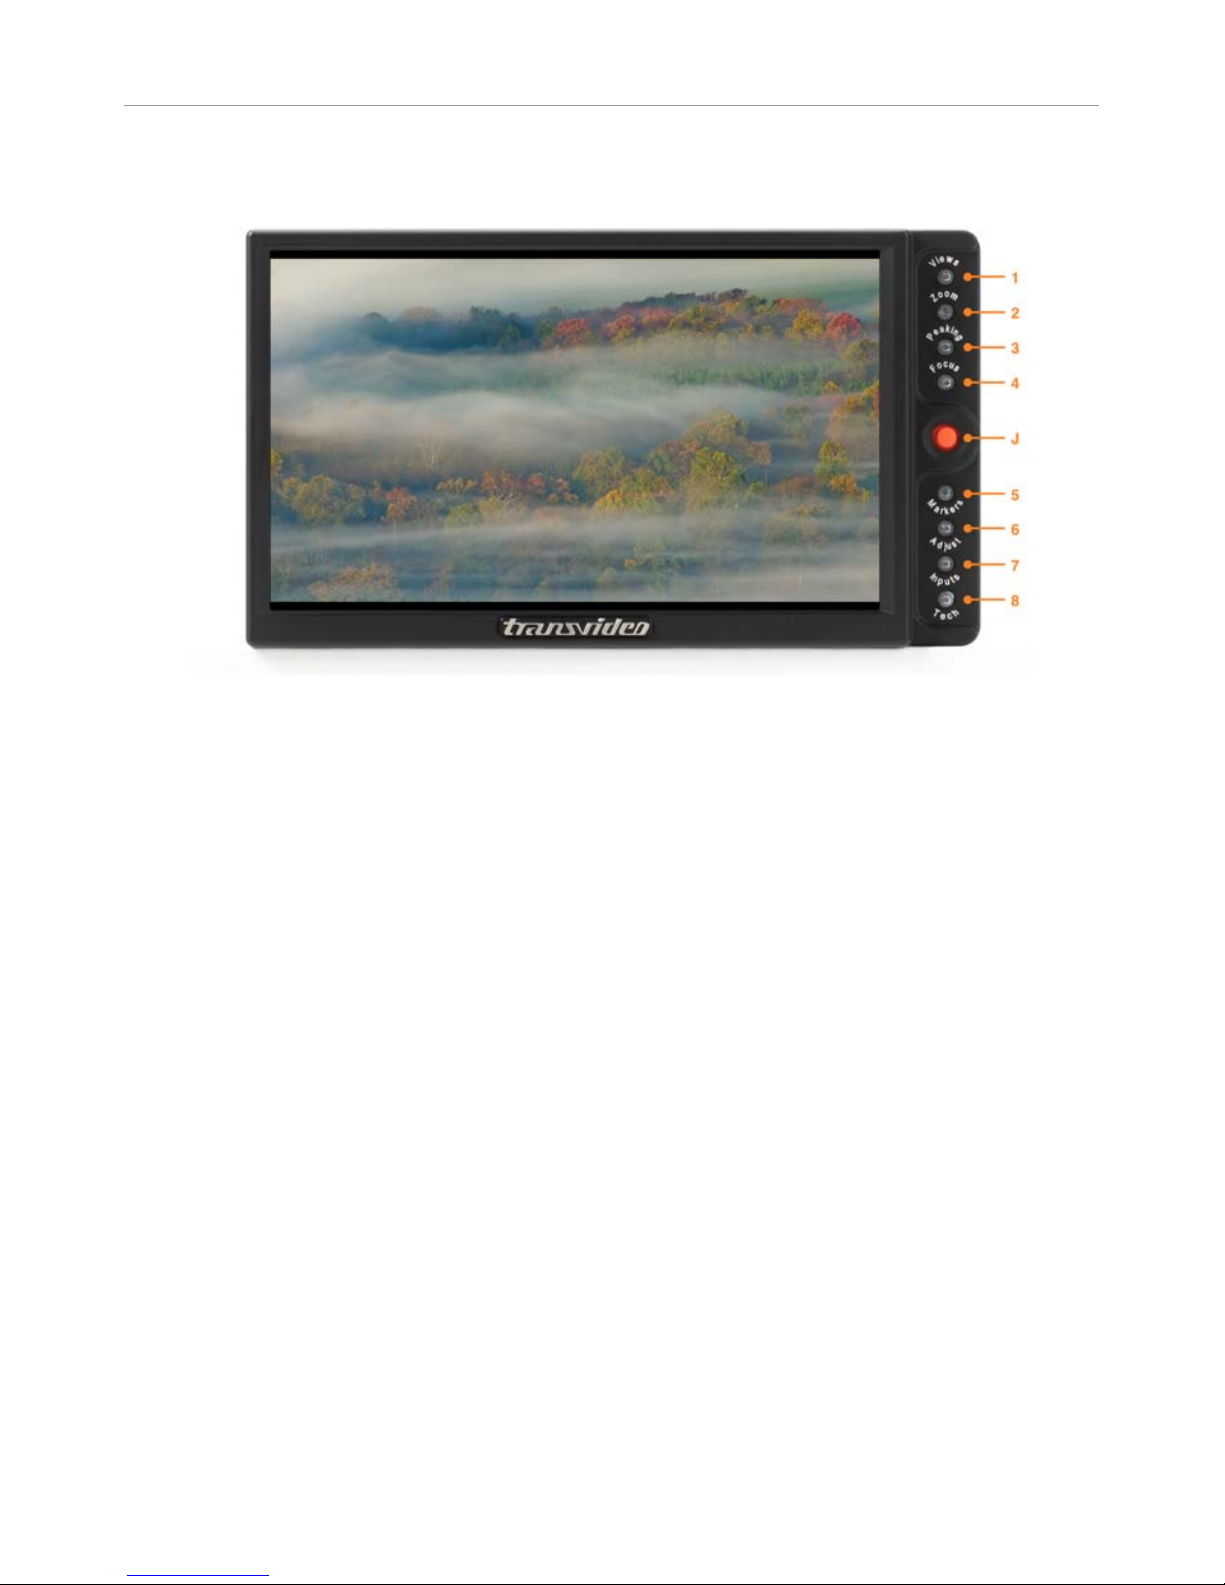
USING THE DIRECT FUNCTIONS ................................................................................................................ 17!
Views................................................................................................................................................ 17!
Home............................................................................................................................................ 17!
Operator ....................................................................................................................................... 17!
DIT ............................................................................................................................................... 17!
Waveform..................................................................................................................................... 17!
Body-Rig ...................................................................................................................................... 17!
BackFocus chart .......................................................................................................................... 17!
Zoom modes ................................................................................................................................... 18!
Pixel to pixel zoom (1:1)............................................................................................................... 18!
Anamorphic zoom ........................................................................................................................ 18!
Custom zoom ............................................................................................................................... 18!
Peaking............................................................................................................................................ 19!
Focus Helper ................................................................................................................................... 19!
Markers............................................................................................................................................ 20!
Central cross ................................................................................................................................ 20!
Safe area...................................................................................................................................... 20!
Marker 1.33:1 (4:3)....................................................................................................................... 20!
Marker 1.56:1 (14/9)..................................................................................................................... 20!
Marker 1.78:1 (16/9)..................................................................................................................... 20!
Marker 1.85:1 ............................................................................................................................... 20!
Marker 2.39:1 ............................................................................................................................... 20!
Display adjustments....................................................................................................................... 21!
Brightness .................................................................................................................................... 21!
Contrast........................................................................................................................................ 21!
Saturation ..................................................................................................................................... 21!
Hue (NTSC only).......................................................................................................................... 21!
Colorimetry................................................................................................................................... 21!
Aspect ratio & anamorphic desqueeze ........................................................................................ 21!
Profile (Log profiles) ..................................................................................................................... 21!
Input selection ................................................................................................................................ 22!
SDI ............................................................................................................................................... 22!
HDMI ............................................................................................................................................ 22!
CVBS ........................................................................................................................................... 22!
Dual Link ...................................................................................................................................... 22!
Technical adjustments................................................................................................................... 23!
Audio volume ............................................................................................................................... 23!
Audio pair selection...................................................................................................................... 23!
FLIP.............................................................................................................................................. 23!
Backlight dimmer.......................................................................................................................... 23

TABLE OF CONTENT
6 RainbowHD
SERVICE &MAINTENANCE ....................................................................................................................... 24!
General ............................................................................................................................................ 24!
Useful tips ....................................................................................................................................... 24!
Cleaning ....................................................................................................................................... 24!
Full reset....................................................................................................................................... 24!
Hardware, Software and Firmware .............................................................................................. 24!
Updating your RainbowHD............................................................................................................ 25!
Calibration....................................................................................................................................... 25!
Product Return ............................................................................................................................... 25!
SPECIFICATIONS ..................................................................................................................................... 27!
Common characteristics................................................................................................................ 27!
Supported standards ..................................................................................................................... 28!
TRANSVIDEO EQUIPMENT LIMITED WARRANTY ........................................................................................ 29!

Operator Manual Rev 1.1 7
INTRODUCTION
Unpacking
Packing list
Control the content of the package accordingly to the packing list.
2 years warranty
All RainbowHD are covered by a 2 years limited warranty unless otherwise noted.
Get a 3rd year for free by registering your product online within the first month of the purchase.
http://www.hd4dp.com/register-my-product
General safety instructions
IMPORTANT:
Never seal the monitor in a plastic bag. Never use the monitor in full sun with a Raincover.
Before using the monitor make sure that the product is not damaged, that the protective glass is not
broken and that the connector do not have missing pins, foreign objects inside the housing.
The RainbowHD needs to be in a ventilated area for a proper cooling. Prolonged use in confined
environment without ventilation can damage the monitor.
Cables
The cables must be in good condition and adapted to the environment where you are working. A bad
quality or wrong-wired cable or damaged connectors may damage this equipment or other
equipment attached to it and/or create interferences.
The video cable must be adapted for carrying HD SDI signals. Proper 75 Ωconnectors must be used.
Always check the connector before plugging a cable to your monitor.
Transvideo offers high quality cables for cameras, power supplies and other equipment. Contact
Transvideo S.A. or its local representative in case of need.
Installation
The RainbowHD must be securely mounted on the camera or on its location of use. Several mounting
points with ¼-20” nut are present on this equipment for a secured professional use.
Do not use the monitor with loose fixation or damaged brackets for your own safety and that of
others working with you.
Transvideo manufactures high quality brackets and accessories for the comfort of use and security
for the equipment and user. Please contact Transvideo S.A. or its local representative in case of need
or visit http://www.hd4dp.com.

INTRODUCTION
8 RainbowHD
Power requirements
RainbowHD accepts an input voltage range from 10 to 36V DC through the XLR 4-pins male
connector protected against inversion of polarity.
AC voltage can be used with an appropriate AC/DC converter. Recommended AC power adaptor is
the Transvideo AL30.
V-Mount and Gold Mount batteries can be used when a battery back is connected to the monitor
through the XLR 4-pins connector.
Power instructions
The power consumption slightly varies with the input voltage, the operating temperature and the
equipment configuration. The internal power supply is protected against reverse polarity. Over
voltage may cause severe damages to the equipment and/or to other equipment connected to it.
This product must be used in a properly grounded electrical environment. Ground defects can create
severe problems to the equipment and/or picture quality and may even cause danger for the user.
Turning power On/Off
The ON/OFF Switch is on the right side of the monitor.
The product needs a certain time to reach its nominal brightness.
This time can vary with the temperature.
Galvanic insulation
For safety of use the RainbowHD family feature a galvanic insulation of the DC input. Do not connect
the power ground to the chassis of the monitor or to the metallic body of the power connector in
order to keep the galvanic insulation. The galvanic insulation is rated at 1000VDC. The chassis of the
monitor is connected to the video ground.
Anton-Bauer batteries / FuelReader™
Transvideo Labs engineer’s integrated communication between the fuel computer of Logic Series
Digital batteries from Anton-Bauer and RainbowHD. The FuelReader™ gives to the user a view of the
remaining available percentage of the battery and the time to run.
You need to use the battery socket from Transvideo (P/N 918TS0202-AB) to enjoy the benefits of the
FuelReader™.
WARNING RISK OF FIRE:
It is always recommended to remove the power source from the monitor when you do not use it
and/or when you travel. Especially if you place the monitor in a closed environment (bag, box, …).
Start-up
①Connect an appropriate power supply or battery support to the XLR4 connector.
②Connect a video source (SDI, HDMI, CVBS) to the corresponding input
③Set the power switch to ON
④Select the correct input with "Inputs" key

Operator Manual Rev 1.1 9
PRODUCT OVERVIEW
Parts identification
All connectors are on the back and on the right side of the monitor. Depending on the monitor, the
connectors and their location may differ.
1. HDMI input – type A
2. HD/SD SDI input 1 – BNC *
3. HD/SD SDI reclocked output 1 – BNC *
4. HD/SD SDI input 2 – BNC
5. HD SD SDI processed output – BNC
6. CVBS input – BNC
7. CVBS output (loop through) – BNC
8. DC input – XLR 4-pins male
9. ON/OFF switch
10. USB
11. AUDIO monitoring output – jack 3.5 *
* On RainbowHD SBL only

PRODUCT OVERVIEW
10 RainbowHD
User interface
1. Views – (p17)
2. Zoom – zoom modes (p18)
3. Peaking – peaking modes (p19)
4. Focus – focus helper (p19)
5. Markers – (p20)
6. Adjust – display adjustments (p21)
7. Inputs – input selection (p22)
8. Tech – technical adjustments (p23)
Direct functions
Most of the functions are directly accessible from the keypad (1-8).
Keys light up when the function is activated (if needed).
Keys blink when it is possible to adjust the function (if needed).
Joystick pad
When no menu is activated, a short push on the joystick knob (J) gives access to the contextual
menu (if any). The menu displays in overlay at the right. A long push on the joystick knob exits from
the contextual menu.
When a menu is activated, the joystick (J) allows to adjust parameters (up/down, left/right, diagonal)
and to validate them (short/long push).
Views
Patent pending
The concept of Views is a job-oriented concept. We introduce a view for each specific job (operaror,
DIT, body-rig, waveform, …).
Each view shows the image with its specific tools package.

PRODUCT OVERVIEW
Operator Manual Rev 1.1 11
Depending of the view, the direct functions (1-8) may be used or turned into other specific direct
functions.
Each view can give access to a contextual menu to adjust some specific parameters, through a short
push on the joystick knob.
The Views are described in the next chapters. More views are coming. It will be possible to add a
view by a simple software update (p25).

12 RainbowHD
USING THE HOME VIEW
The HOME view shows only the picture from the first line first pixel to the last line last pixel.

Operator Manual Rev 1.1 13
USING THE OPERATOR VIEW
The OPERATOR view shows the picture and a status bar.
Ti.
Timecode
Displays the SDI embedded timecode (ATC).
Ta.
Tally
Activated through the REC/STOP command embedded in the SDI.
B.
Battery / power information
Displays the input voltage from the power supply or the battery. With Anton Bauer batteries,
gives the remaining percentage of charge of the battery and the time to run (see page 8).

14 RainbowHD
USING THE DIT VIEW
The DIT view features measurements and tools that don’t display in overlay on the image.
W.
Waveform luminance
Shows a line representation of luminance (Y component). The waveform has the same width
than the picture, making the picture analysis more accurate and easy.
V.
Vectorscope
Shows a representation of the color vectors
H.
Histogram luminance
Shows a statistical representation of luminance (Y component) as a bargraph.
A.
Audio monitoring
Displays the SDI embedded audio presence for all channels. Vu-meter and Peak-meter
display one audio pair of the 8 possible. Audio pair selection is done in the technical
adjustments (see page 23).
S.
Video input and standard
Ti.
Timecode
Displays the SDI embedded timecode (ATC).
Ta.
Tally
Activated through the REC/STOP command embedded in the SDI.
B.
Battery / power information
Displays the input voltage from the power supply or the battery. With Anton Bauer batteries,
gives the remaining percentage of charge of the battery and the time to run (see page 8).

Operator Manual Rev 1.1 15
USING THE WAVEFORM VIEW
The WAVEFORM view shows the picture with a waveform in overlay and a status bar.
Ti.
Timecode
Displays the SDI embedded timecode (ATC).
Ta.
Tally
Activated through the REC/STOP command embedded in the SDI.
B.
Battery / power information
Displays the input voltage from the power supply or the battery. With Anton Bauer batteries,
gives the remaining percentage of charge of the battery and the time to run (see page 8).
W.
Waveform luminance
Shows a line representation of luminance (Y component). The waveform has the same width
than the picture, making the picture analysis more accurate and easy.

16 RainbowHD
USING THE BODY-RIG VIEW
The BODY-RIG view shows the picture and a status bar with VirtualHorizon (only available on SBL).
H.
Horizon
Color coded leveler with adjustable sensitivity.
When Cal-on-Tap is activated, tap on screen or on Transvideo logo to zero calibrate the
horizon. A temporization of 3 seconds allows stabilizing the position of the system.
Short push on the joystick knob (J) – accesses the horizon
settings
Press key 1 to set the horizon to 0.
A temporization of 3 seconds allows stabilizing the position of
the system.
Press key 2 then use the joystick (up & down) to adjust the
sensitivity of the horizon. Validate by pressing the joystick knob.
Press key 3 to activate or deactivate the Cal-on-Tap function.
B.
Battery / power information
Displays the input voltage from the power supply or the battery. With Anton Bauer batteries,
gives the remaining percentage of charge of the battery and the time to run (see page 8).
Ta.
Tally
Activated through the REC/STOP command embedded in the SDI.

Operator Manual Rev 1.1 17
USING THE DIRECT FUNCTIONS
Views
Short push on Views – toggles between different views:
Home / Operator / DIT / Waveform / Body-rig
Read pages 12 to 16 for description of the views
Long push on Views – accesses to the list of views
Home
Short push on key 1 to display the Home view
Long push on key 1 to activate or deactivate the view
Operator
Short push on key 2 to display the Operator view
Long push on key 2 to activate or deactivate the view
DIT
Short push on key 3 to display the DIT view
Long push on key 3 to activate or deactivate the view
Waveform
Short push on key 4 to display the Waveform view
Long push on key 4 to activate or deactivate the view
Body-Rig
Short push on key 5 to display the Body-rig view
Long push on key 5 to activate or deactivate the view
BackFocus chart
Press key 6 to display a back focus chart.
When activated, all the tools (zoom, peaking…) are
deactivated. Push the key 1 to deactivate the back focus chart.

USING THE DIRECT FUNCTIONS
18 RainbowHD
Zoom modes
Pixel to pixel zoom (1:1)
Beyond the native resolution of the picture, magnify implies to create pixels that doesn’t exist. This is
why the pixel to pixel mode (1:1 zoom) is the higher magnification ratio in a Transvideo monitor.
Anamorphic zoom
The Anamorphic zoom mode displays the 2.39:1 picture using the full height of the screen, cropping
left and right sides. Moving left and right in the picture is possible with the joystick.
Custom zoom
The Custom zoom mode magnifies a specific zone of the native picture. It allows to display in full
screen the active 16/9 area of a picture, for example when shooting with some DSLRs or with the
ARRI Alexa in 4:3 mode. Long push on Zoom to adjust the custom zoom mode.
Short push on Zoom – toggles between different zoom modes
OFF / Anamorphic zoom / Custom zoom / Pix to pix zoom
When activating the zoom, a pictogram showing the relative
position of the magnified zone is displayed.
Use the joystick to move the magnified zone (horizontal, vertical,
diagonal). A long push on the joystick knob centers the picture.
After 5s of inactivity, it is not allowed to move within the image (the
led stops blinking and the pictogram disappears).
Long push on Zoom – Custom zoom adjustments
When adjusting the custom zoom, a frame showing the zone to
magnify is displayed on screen.
Custom zoom
Press key 1 to activate / deactivate the custom zoom.
Adjust size
Press key 2 then use joystick (up & down) to adjust the size of
the zone to magnify.
Validate by pressing the joystick knob.
Adjust position
Press key 3 then use joystick (up & down, left & right) to adjust
the position of the zone to magnify.
Validate by pressing the joystick knob.

USING THE DIRECT FUNCTIONS
Operator Manual Rev 1.1 19
Peaking
This function emphasizes the contours of the picture, making manual focusing easier.
Short push on Peaking – activates or deactivates the peaking
When activating the peaking, the settings are displayed in the right
side of the screen.
Use the joystick to adjust the peaking level (up & down).
After 5s of inactivity, the led stops blinking and peaking is activated
on the selected level.
Focus Helper
This function displays in-focus zone with colored dots, making manual focusing easier.
Short push on Focus – activates or deactivates the focus helper
When activating the focus helper, the settings are displayed in the
right side of the screen.
Select the desired emphasis color (left & right) and level (up &
down) with the joystick.
After 5s of inactivity, the led stops blinking and focus helper is
activated on the selected color and level.

USING THE DIRECT FUNCTIONS
20 RainbowHD
Markers
Short push on Markers – shows or hides the markers
Several markers can be simultaneously displayed.
When the safe area marker is activated (but hidden), it will be possible
to adjust the value of the safe area by using the joystick (up & down).
Long push on Markers to select the markers to display.
Long push on Markers –markers selection
Central cross
Press key 1 to activate / deactivate the central cross.
Safe area
Press key 2 then use the joystick (up & down) to adjust the safe
area marker (50 to 99%). Validate by pressing the joystick knob.
Marker 1.33:1 (4:3)
Press key 3 to activate / deactivate the marker 4:3.
Marker 1.56:1 (14/9)
Press key 4 to activate / deactivate the marker 14/9.
Marker 1.78:1 (16/9)
Press key 5 to activate / deactivate the marker 16/9.
Marker 1.85:1
Press key 6 to activate / deactivate the marker 1.85:1.
Marker 2.39:1
Press key 7 to activate / deactivate the marker 2.39:1.
This manual suits for next models
1
Table of contents
Other Transvideo Monitor manuals

Transvideo
Transvideo CineMonitorHD Evolution User manual

Transvideo
Transvideo CineMonitor HD 3DView series User manual

Transvideo
Transvideo Stargate User manual

Transvideo
Transvideo Stargate Series User manual

Transvideo
Transvideo Rainbow HD User manual

Transvideo
Transvideo Starlite RF User manual

Transvideo
Transvideo CineMonitorHD 3DView Evolution User manual

Transvideo
Transvideo CineMonitorHD63DView evolution User manual

Transvideo
Transvideo cinemonitorhd User manual

Transvideo
Transvideo CineMonitor HD 3DView series User manual