TravelScoot ESCAPE User manual

ravelScoot®
Owner's Manual
Please read all important safety information before riding your TravelScoot for the first time.
2
For answers to your questions, call 1-877-339-7505
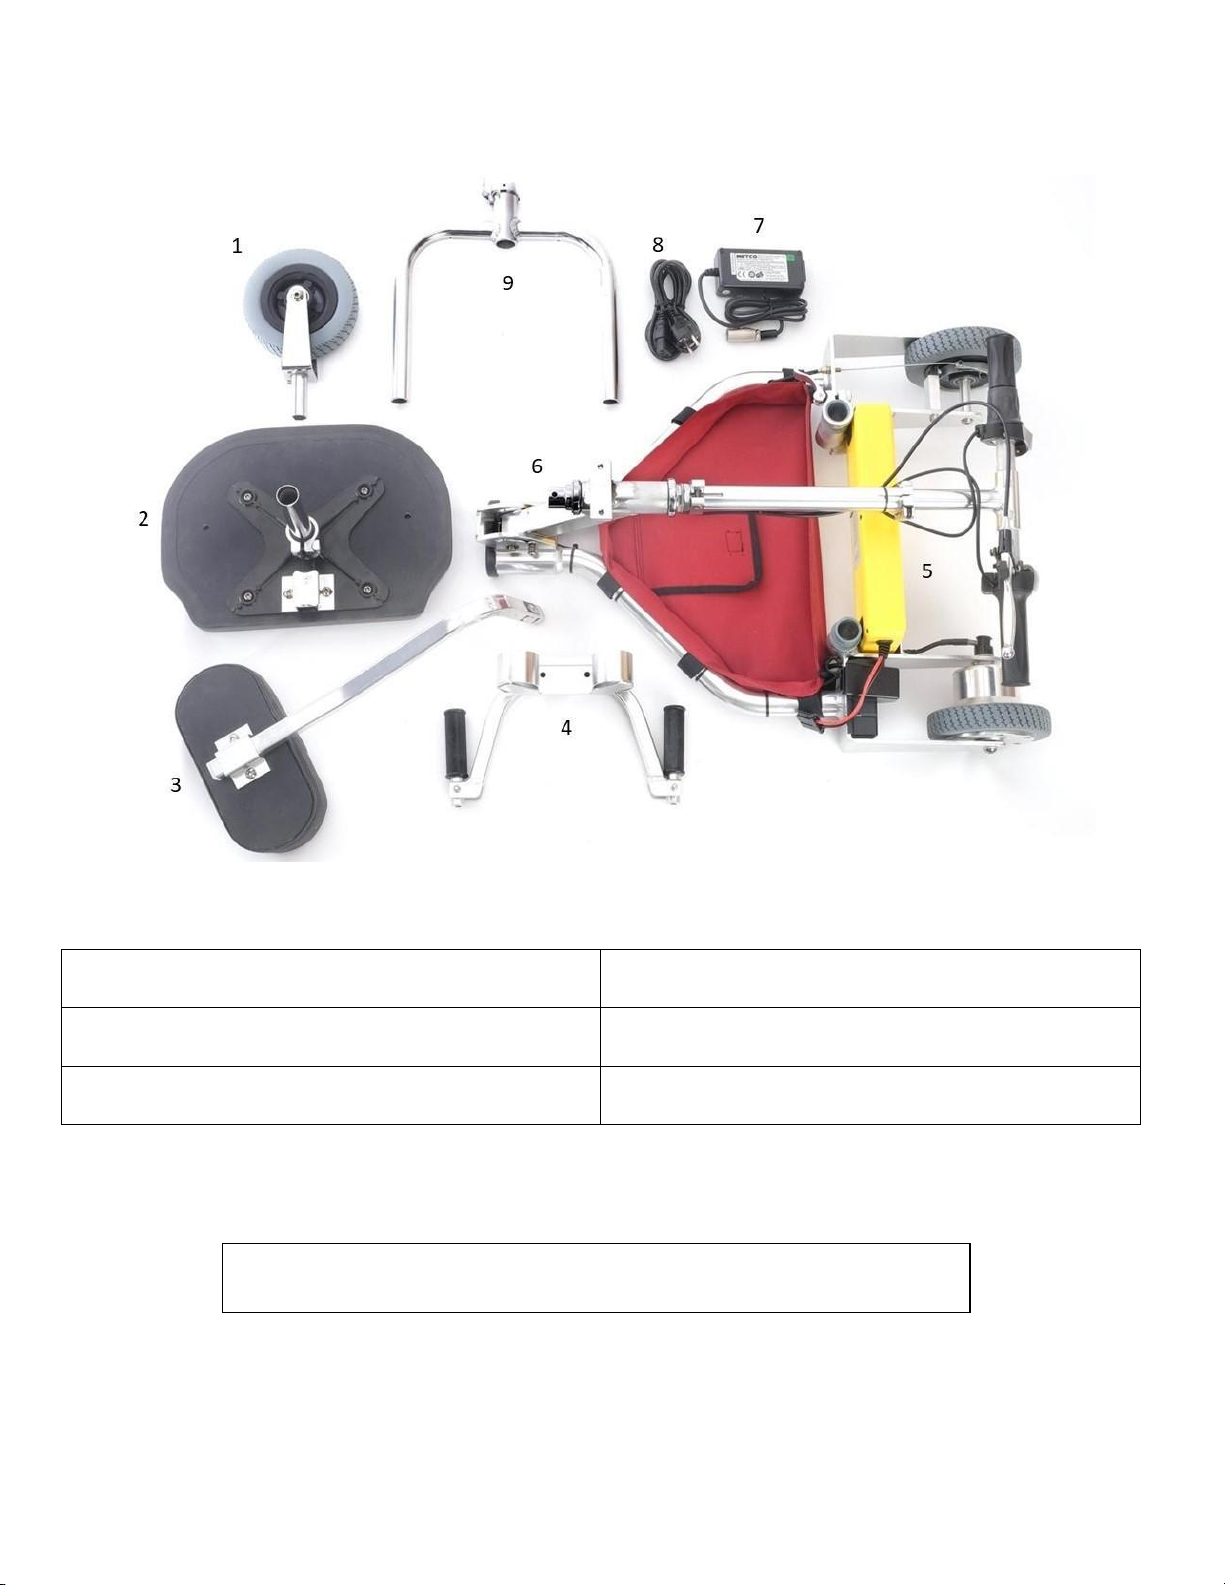
TravelScoot Parts
Please ensure that you have the following parts when you unpack your TravelScoot for the first time:
1. Wide front wheel
4. Footrest assembly
2. Seat cushion and post
5.Lithium-ion battery
3. Backrest
6. Yoke
Please keep the original box for returns or warranty-related shipping.

3
For answers to your questions, call 1-877-339-7505
Table of Contents
Introduction. . . . . . . . . . . . . . . . . . . . . . . . . . . . . . . . . . . . . . . . . . . . . . . . . . . . . . . . . . . . . . . . . . . . . . . . . . . . . . . . . . . . . . . . Pg. 4
Terms and Conditions . . . . . . . . . . . . . . . . . . . . . . . . . . . . . . . . . . . . . . . . . . . . . . . . . . . . . . . . . . . . . . . . . . . . . . . . . . . . . . . Pg. 5
Important Safety Information . . . . . . . . . . . . . . . . . . . . . . . . . . . . . . . . . . . . . . . . . . . . . . . . . . . . . . . . . . . . . . . . . . . . . . . . Pg. 6
General Safety and Slopes, Maneuverability, Pre-Ride Safety Check, Indoor Use, Outdoor Use, Securing the
TravelScoot
Assembling your TravelScoot . . . . . . . . . . . . . . . . . . . . . . . . . . . . . . . . . . . . . . . . . . . . . . . . . . . . . . . . . . . . . . . . . . . . . . . . Pg. 8
Battery Charging Procedures . . . . . . . . . . . . . . . . . . . . . . . . . . . . . . . . . . . . . . . . . . . . . . . . . . . . . . . . . . . . . . . . . . . . . . . . Pg. 11
Additional Battery Information, Battery Info for Foreign Travel,
Battery Tips
Getting on and off your Scooter . . . . . . . . . . . . . . . . . . . . . . . . . . . . . . . . . . . . . . . . . . . . . . . . . . . . . . . . . . . . . . . . . . . . . . Pg. 12
Operating your TravelScoot . . . . . . . . . . . . . . . . . . . . . . . . . . . . . . . . . . . . . . . . . . . . . . . . . . . . . . . . . . . . . . . . . . . . . . . . . Pg. 12
Connecting the Battery, On/Off Switch and Forward/Reverse Selector,
Throttle, Brake Levers, Parking Brakes, Turning with your TravelScoot
Maintenance . . . . . . . . . . . . . . . . . . . . . . . . . . . . . . . . . . . . . . . . . . . . . . . . . . . . . . . . . . . . . . . . . . . . . . . . . . . . . . . . . . . . . . Pg. 14
Cleaning Tips
Brakes, Lubrication, Tightening
Travel Tips. . . . . . . . . . . . . . . . . . . . . . . . . . . . . . . . . . . . . . . . . . . . . . . . . . . . . . . . . . . . . . . . . . . . . . . . . . . . . . . . . . . . . . . . . Pg. 15
Air Travel
Cruise Ship Travel
Specifications . . . . . . . . . . . . . . . . . . . . . . . . . . . . . . . . . . . . . . . . . . . . . . . . . . . . . . . . . . . . . . . . . . . . . . . . . . . . . . . . . . . . . Pg. 17
TravelScoot Components and Controls . . . . . . . . . . . . . . . . . . . . . . . . . . . . . . . . . . . . . . . . . . . . . . . . . . . . . . . . . . . . . . . Pg. 18

4
For answers to your questions, call 1-877-339-7505
Introduction
Congratulations on your purchase of the TravelScoot electric mobility scooter! The TravelScoot combines state-of-the-art
components with safety, comfort, and portability in mind. We are confident its design will provide you with the conveniences
you expect during your daily activities and travelling abroad.
This owner’s manual will provide you with valuable information about the proper use, care, and maintenance of your new
scooter. Understanding how to safely operate and care for your scooter should give you many years of trouble-free scooting.
Please take a few moments and read these instructions thoroughly to familiarize yourself with all aspects of the TravelScoot.
NOTE: This owner’s manual is based on the latest specifications and product information available at the time of publication.
We reserve the right to make technical as well as editorial changes as they become necessary. Any changes to our products
may cause slight variations between the illustrations and explanations in this manual and the product you have purchased.
Product Support
TravelScoot Canada, is the sole distributor for Canada. We provide support and replacement parts for all products sold by
TravelScoot Canada. You should be able to find answers to most of your inquiries on our website.
Information Exchange
Business Cards
New TravelScoot owners are frequently stopped by curious individuals with questions and requests for demonstrations. To
help with this new-found popularity, we have included a stack of business cards to help you better manage your time. We
firmly believe that we have the best customers in the world. Thank you for your kindness, generosity, and patience as you
share your experiences with others regarding the TravelScoot. If you need more cards, please do not hesitate to contact us
for more.
TravelScoot Canada.
Toll Free: 1 (877) 339-7505
www.travelscootcanada.com
Email: sales@travelscootcanada.com

5
For answers to your questions, call 1-877-339-7505
Terms and Conditions
EXPRESS WARRANTY
Your new TravelScoot is covered by our 2-year warranty, starting from the delivery date. The warranty does not
cover normal wear-and-tear or use by persons weighing more than 350 lbs. This limited warranty is the sole
warranty for your TravelScoot. The only uses for this product are described in this manual.
WARRANTY TERMS
The limited warranty extends only to the original owner and is not transferable. This limited warranty covers all
parts of the TravelScoot and is effective under the following conditions:
●The product is completely and correctly assembled.
●The product is used under normal conditions and for its intended purpose.
●The product receives all necessary maintenance and adjustments.
The TravelScoot electric mobility scooter is designed for general transportation and recreational use only. This
limited warranty does not cover normal wear and tear, normal maintenance items, nor any damage, failure, or loss
caused by improper assembly, maintenance, adjustment, storage or use of the TravelScoot. This limited warranty is
void if the product is ever:
●Used in any manner contrary to the instructions in this Owner’s Manual.
●Modified in any way.
●Ridden by more than one person at a time.
●Used for commercial purposes (rental, public use etc.)
●Operated with a battery or charger not supplied by TravelScoot.
We strongly recommend that you retain the original shipping box for the TravelScoot at least for the duration of the
warranty period.
The manufacturer of the TravelScoot is not liable for incidental or consequential loss nor damage, due directly or
indirectly, from the use of this product. Some states do not allow the exclusion or limitation of incidental or
consequential damages, so this may not apply to you. The TravelScoot is warranted for two years from the date of
delivery. The manufacturer will replace, without charge to you, any component found to be defective within the
warranty period. This warranty gives you specific legal rights.
RETURNS
All returns must be made within 14 days of delivery and only in as new condition in the original packaging. The
customer is responsible for all shipping costs* including incidental shipping damage caused by improper packing.
All returns are subject to a 10% restocking fee.

6
For answers to your questions, call 1-877-339-7505
Important Safety Information
Attention! Please read this manual in full before operating your new TravelScoot for the first time.
The TravelScoot is designed for persons who have walking difficulties but who are otherwise fairly mobile. Make sure that the
TravelScoot is right for you. Persons who are confined to a wheelchair, experience significant balance issues, and/or require
constant personal care should NOT use the TravelScoot!
Below are some precautions, tips, and other safety considerations that will help you become accustomed to operating the
TravelScoot safely.
General Safety
●Investigate and comply with all local laws regarding personal mobility scooter use.
●As with bicycles, it is strongly recommended that you wear a helmet while operating the TravelScoot.
●When taking corners or turning, reduce your speed and proceed with caution.
●Please note that the TravelScoot does not come equipped with anti-tipping wheels or other similar devices.
●This product is not a toy or a recreational vehicle.
●Always ensure that the power button is turned OFF and the parking brakes are engaged before getting on or off the
seat for any reason.
●To prevent misuse, remove the battery when the scooter is unattended.
●Do not tow anything by the backrest.
●Do not operate at night unless adequate front and rear lights are attached.
●Avoid prolonged exposure to rain, snow, ice, salt, or standing water, whenever possible.
●Maintain and store in a clean and dry condition.
●Be aware that loose-fitting clothing can become caught in the rear wheels.
●The TravelScoot should only be ridden on fairly hard-packed surfaces.
●Use your common sense. Reckless driving can result in an accident.
With a little patience, you will be in full control as you confidently maneuver through doorways, on and off elevators, and up
and down ramps.
Slopes
The center of gravity (C.G.) on an incline, such as ramps, is shifted toward the rear. Tipping over backwards is possible, but
can be easily prevented. To avoid such accidents, do the following:
●Always shift your upper body toward the handlebars in order to move your C.G. forward.
●Always twist the throttle slowly, even on level ground! The motor has high torque. Quickly twisting the throttle,
causing excessive acceleration, could tip you over backwards in extreme cases.
●Always be prepared to apply your brakes when riding downhill. Do not allow your scooter to go faster than you could
walk down the hill.
●Avoid starting on an incline from a full stop. Approach any incline with reasonable speed and utilize the vehicle’s
momentum.
●Approach an incline only if you are sure that you will reach the top without having to stop. If you are forced to stop
along the way, either restart by shifting your upper body forward and accelerating gently or get off and push.
●When approaching an incline, do not zigzag or drive at an angle up the face of the incline. Drive your scooter straight
up. This will greatly reduce the possibility of tipping or falling.
●Never travel up or down a potentially hazardous incline (e.g., areas covered with ice, snow, cut grass, wet leaves,
gravel, etc.) Do not drive in mud unless unavoidable. Exercise caution when riding on snow.
●When driving down a ramp, release the throttle and keep both hands ready to apply the brakes to ensure a safe,
controlled descent. Do not allow the scooter to free roll faster than the scooter’s top speed.
●If you drive your scooter down a longer slope, continuously apply the brakes. Under no circumstances allow it to gain
more than walking speed or you may not be able to stop quickly enough.

7
For answers to your questions, call 1-877-339-7505
●Speed bumps, lowered curbs, and other slightly uneven conditions are generally no problem, but they should be
taken head on at a reduced speed. Never approach them at an angle, and observe the same precautions as on
inclines. Keep in mind that the small wheels cannot roll over objects much higher than 1 inch. Lower objects should
be approached with moderate speed. If you are at a stop and one of the wheels is blocked by such an object, do not
apply the throttle. Doing so may result in tipping over, or abrupt acceleration, once the blocked wheel breaks free.
Maneuverability
●Practice riding in large open areas, free of pedestrians, vehicles, and obstacles.
●Doorways can be a real nuisance, especially when they are spring-loaded. If possible, ask a nearby person to hold the
door open. Avoid using your feet to hold doors open while passing through them. Instead, power off the scooter and
push it through the door.
●Always slow down before changing direction or making hard turns.
●The TravelScoot is designed for use by one person only. Carrying passengers may affect the center of gravity and
may cause the TravelScoot to tip or fall. If you wish to carry an additional passenger, consider the Convertible Trailer.
●Do not start from a standstill with the front wheel sharply turned.
●If you tow by hand, keep in mind you can only operate one brake. Be sure to drive slowly and do not lean against the
backrest.
Pre-Ride Safety Check
Get to know the feel of your TravelScoot and its capabilities. We recommend you perform a safety check before each use to
ensure your scooter operates smoothly and safely. Please check the following:
●Battery connectors are connected.
●Battery is sufficiently charged.
●Locking pin is fully engaged.
●Brakes are working properly.
●Parking brakes are disengaged before use.
●No wiring is wrapped around the steering column.
The TravelScoot is a personal mobility device. As such, you are permitted to use it wherever pedestrian traffic is sanctioned.
Before driving on public streets, be sure to check local laws as regulations may vary.
Indoor Use
In general, you are permitted to use the TravelScoot inside buildings such as airports, shopping malls, stores, theatres, etc.
However, you are obligated to adjust your speed to match walking traffic. Do not ride on escalators!
Outdoor Use
You can drive across short sections of grass or gravel surfaces as long as they are level and reasonably firm. Approach them
with moderate speed. Depending on your weight, you may not be able to restart on these types of surfaces from a stop.
Prolonged riding under such conditions could quickly exhaust your battery.
The electric motor, wiring, connectors, batteries, and controls on the TravelScoot can be damaged if exposed to water. Avoid
driving through large puddles. If you cannot avoid puddles, cross them at an extremely low speed in order to avoid splashing
water on the controller and motor. Once indoors, dry your scooter with a towel and use a hairdryer to apply warm air to all
electrical connections to dry thoroughly. See the
Maintenance
section of this manual
for further details.
Securing the TravelScoot
The TravelScoot does not come with a lock and key. Due to its ultra-light weight, a key would not prevent a thief from stealing
the scooter and running off with it. Any locksmith could make a key for the scooter, negating the purpose of including a lock.

8
For answers to your questions, call 1-877-339-7505
Therefore, it is recommended that you buy a simple chain or cable-type bicycle lock to be placed around either rear fork on
the TravelScoot.

9
For answers to your questions, call 1-877-339-7505
Assembling your TravelScoot
Each TravelScoot has been test-driven before shipment. The wheels may show signs of this.
For a video of initial setup, please type in the following address into your search bar: https://youtu.be/wFGhS9gDuWg .
Attaching the Front Wheel
Unfolding your TravelScoot
To unfold your TravelScoot, push the steering column forward slightly while pushing on the locking pin. Doing so will relieve
pressure on the pin and allow it to engage easier. When the scooter is fully unfolded, you will hear an audible click to signify
that the scooter is in the unfolded position. There are three locking pin stages.
Stage 1: Folded position (2a)
Stage 2: Limbo position (2b)
Stage 3: Unfolded position (2c)
Handlebar Height Adjustment
3a: Locate the lever clamp.
3b: Open the lever clamp.
3c: Adjust to the desired height and close the lever clamp.
Attach the front wheel to the main frame of the TravelScoot by inserting it into the
steering column. Make sure that the spring-loaded button (1) locks into the
corresponding hole. If you are met with resistance, raise the handlebars slightly and try
again.
1
2a
2b
2c
3a
3b
3c

10
For answers to your questions, call 1-877-339-7505
Footrest Assembly
The only assembly required in setting up the TravelScoot is the footrest. Using the largest Allen wrench in the included toolkit:
5a) Position the footrest assembly with the cane holders either facing towards or away from the scooter
5b) Place the cane holders underneath and behind the mounting block
5c) Raise the footrest assembly to the mounting block
5d) Tightly screw in place, first by hand, then using the Allen wrench
Battery Installation
4a): Place the battery into the Velcro-lined tray between the rear wheels of the scooter with the battery plug facing the
rear-left wheel.
4b): Connect the battery plug to the corresponding receptacle situated in front of the left wheel.
Cane Holders
5a
5b
5c
5d
5e
4a
4b
11
For answers to your questions, call 1-877-339-7505
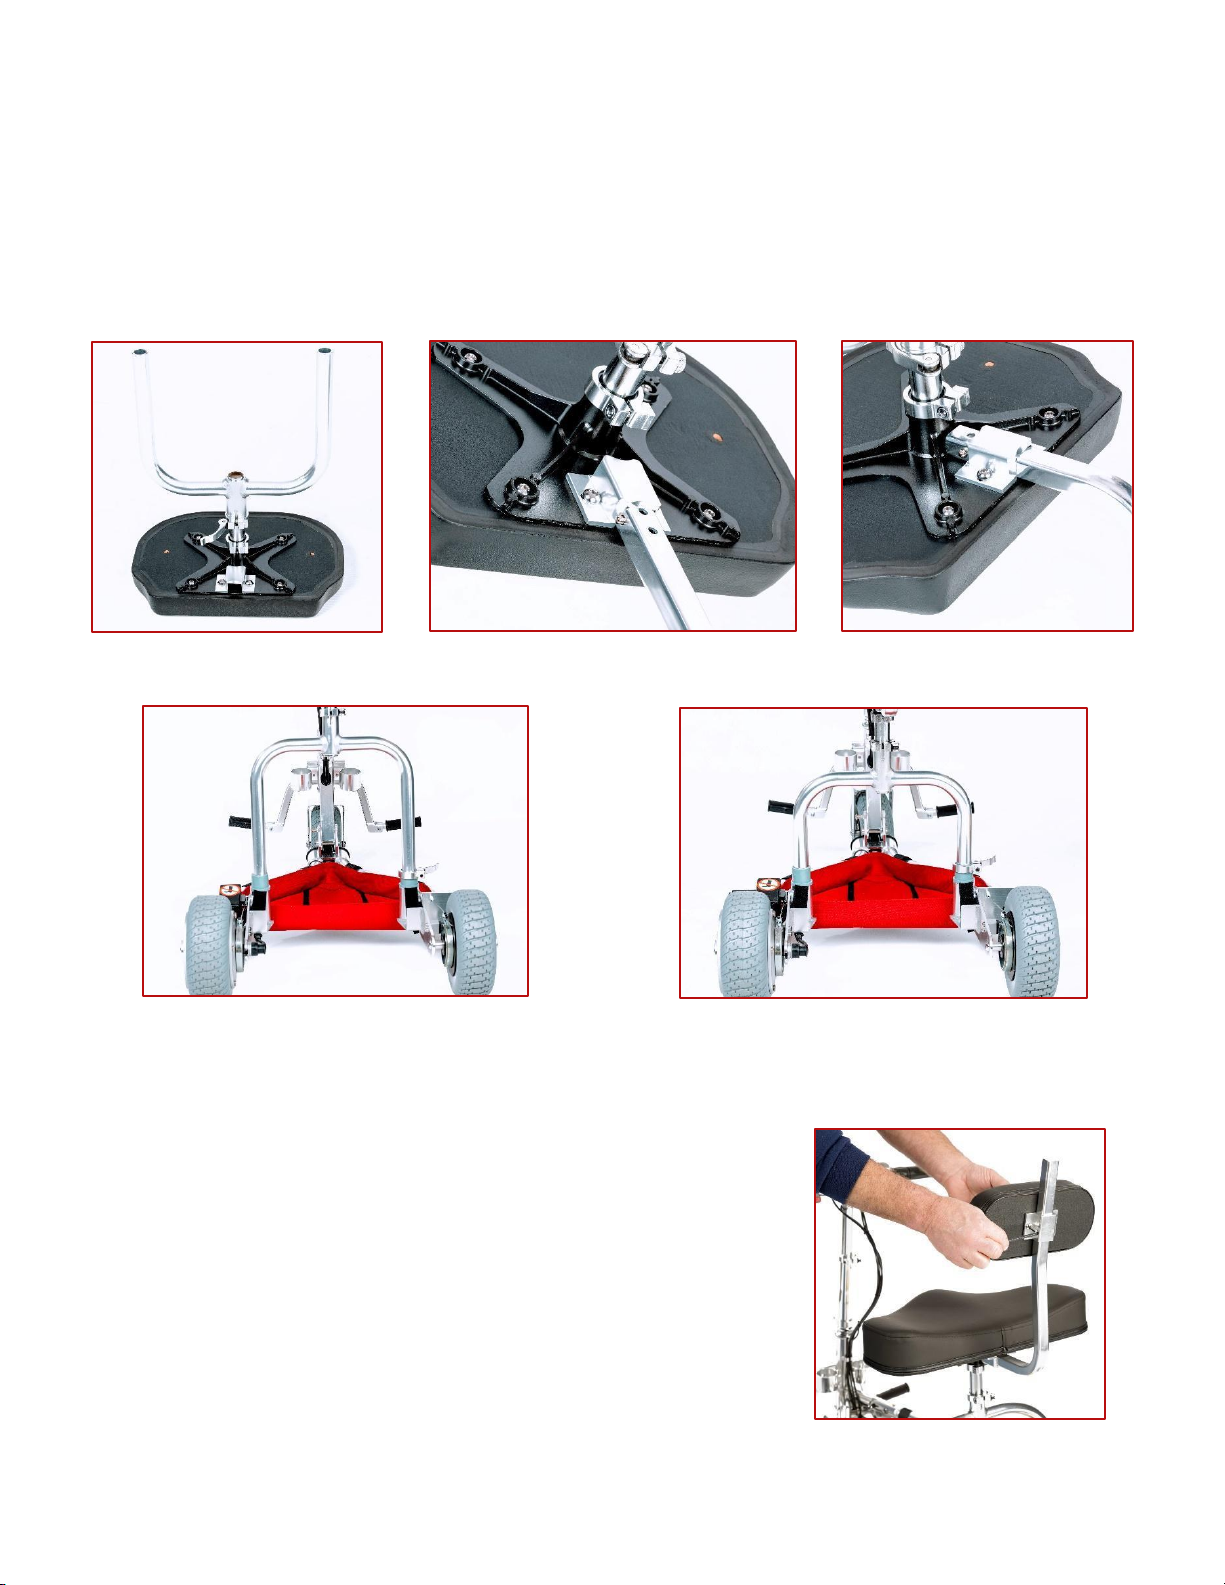
Seat Assembly
a. Place the seat cushion face down on an elevated surface and insert the yoke upside down into the seat post until the
yoke is fully inserted then tighten the yoke clamp.
b. Insert the backrest elbow into the seat bracket receptacle and depress the spring lock.
c. Slide in place until the spring lock is through and you hear an audible click.
d. While holding the seat, insert the yoke evenly into the seat receptacles (plastic bushings).
e. Once the yoke is in place, tighten the lever clamp.
Backrest Height Adjustment
The backrest on the TravelScoot can be adjusted to your comfort. Using the largest
Allen wrench in the included toolkit, simply loosen the two bolts holding the
backrest cushion to the backrest stem, move the cushion to the desired height and
re-tighten the bolts.
5a
5b
5c
5d
5e

12
For answers to your questions, call 1-877-339-7505
Seat Spacers
Included with your TravelScoot are two seat spacers. They are to be used to raise the seat up to maintain seat height. When
attaching the yoke, ensure that there are no gaps between the seat post and the bottom receptacle of the yoke (all they
should be, at most, flush for your safety).
Installing the Fabric Caddy
The machine-washable Fabric Caddy is ideal for carrying light-weight items such as jackets, cameras, etc. To fasten the
fabric caddy to your TravelScoot:
a) Align the Velcro straps on the fabric caddy with the corresponding six Velcro rings on the TravelScoot trailing arms
b) Secure firmly.
c) There is a pouch on the caddy for your tool kit.
Folding your TravelScoot
●Ensure that the power button (located on the left handlebar) is in the “OFF” position.
●Open the steering column lever clamp, lower the steering column to the desired height and tighten.
●Remove the seat assembly by releasing the lever clamp holding the yoke.
●With one hand on the steering column, apply slight forward pressure to relieve tension on the locking pin.
●Press the locking pin and collapse the scooter until you hear an audible click.
Battery Charging Procedures
The battery smart charger supplied with your TravelScoot is proprietary to your lithium-ion battery. Do not attempt to use it
with other batteries nor attempt to charge your TravelScoot battery with a non-TravelScoot-issued charger. To charge the
battery:
●Plug the power cord into an AC outlet then plug it into the battery charger.
●A solid red light will appear. The solid red light indicates your AC outlet works (7a).
●Plug the charger into the battery.
6a
6b
6c

13
For answers to your questions, call 1-877-339-7505
7a
7b
7c
●(7b) You will now see either two solid red lights (indicating that the battery is charging), or (7c) you will see one red
light and one green light (indicating that the battery is fully charged).
Additional Battery Information
Unlike traditional batteries, TravelScoot lithium-ion batteries have no memory. This means that the battery can be charged, or
“topped off”, at any time. Likewise, the charging process can be interrupted at any time without negatively affecting the
battery. Typical charging time for a completely discharged battery is 4 to 6 hours.
Note: We recommend unplugging the battery charger from the AC outlet when not in use.
Battery Info for Foreign Travel
The TravelScoot lithium-ion battery charger is universal, and will operate on 100-240 VAC, 50/60 Hz. This allows it to be used
internationally in conjunction with a plug adaptor which can be found at most department and electronic stores.
Battery Tips
●Disconnect the battery when not using your TravelScoot.
●Do not expose your battery to excessive heat or cold.
●Avoid excessive exposure to water.
●Do not drop.
●The battery should only be charged with a METCO charger: RL07-16XX.
●We recommend charging the battery once the battery is used.
●For storage purposes, it is recommended to fully charge the battery at least every 3 months.
●Store the battery in a cool, dry place when not in use.
●Monitor the battery indicator lights, located on the throttle to best gauge your personal battery consumption.
Remember that
each light represents roughly 1/3 of the battery’s total charge
. Consumption will vary depending on
how much you travel on uneven terrain.
●If possible, try to avoid total discharge of the battery. Repeatedly draining the battery all the way can shorten its
lifespan.
Getting On and Off of the TravelScoot
Before getting on or off of your scooter, please ensure that the parking brakes (see pages 13 and 14) are engaged and the
power is off. Be sure to center your weight on the TravelScoot for support when mounting or dismounting.
Operating your TravelScoot
Connecting the Battery

14
For answers to your questions, call 1-877-339-7505
Connect the battery connector into the black plastic receptacle at the front of the left-rear wheel fork (disconnect by pressing
both sides of the battery
connector).
Throttle
The throttle is located on the inside half of the right-hand grip. To get used to operating the throttle, turn the twist-grip slowly
and smoothly towards yourself, similar to a motorcycle. Use the same twisting motion for both forward and reverse operation.
Turning the throttle too quickly can result in unexpected acceleration or even tipping over. The throttle on the TravelScoot has
an electronic delay from the moment you engage it until power is applied. This safety feature prevents
uncontrolled acceleration.
The TravelScoot features battery charge indicator lights, located on the throttle display. There are two green lights and one
red light, each light representing roughly 1/3 of the battery’s total charge. It is a good idea to monitor how soon each light
goes out so as to better estimate how long your battery will last. Keep in mind that the terrain over which you travel will
greatly determine overall mileage.
Brake Levers
The TravelScoot does not have automatic brakes. Instead, it uses band brakes. Band brakes are very effective, even on
downhill grades. Each rear wheel has its own band brake that is controlled by the corresponding lever. For maximum
stopping power, both brake levers must be applied. Safety dictates, however, that while driving downhill, to never exceed a
speed faster than you could walk. Caution is also advised on steeper uphill grades when forced to stop. The band brakes are
less effective when rolling backwards. Therefore, it is advisable to avoid riding up or down steep inclines and, instead, get off
and push the TravelScoot to a more level location.
Do not apply the throttle while engaging the brakes.
This could result in
tipping.
The On/Off switch and Forward/Reverse selector are found on the left handlebar. To turn the
scooter on, simply press the red button. Repeat to turn the scooter off.
As a safety measure, always check the forward/reverse selector to ensure you are traveling
in the desired direction before engaging the throttle. Position the selector upwards to go
forwards, and downwards to go backwards.
Caution: Do not move the scooter in the opposite direction of the desired movement selection
(e.g., do not push the scooter in reverse if you have the scooter in the forward position and
vice versa).

15
For answers to your questions, call 1-877-339-7505
Parking Brakes
Both brake levers are equipped with a parking brake. It is strongly advised to use the parking brakes before getting off or on
your scooter. There are two positions the parking brake lever can be in. Position 1 can be used on level surface. Position 2
should be used if the scooter is on an incline.
To engage the parking brakes:
a. With one hand, apply pressure to the parking brake
b. With your other hand, squeeze the brake lever until you hear an audible click for position 1
c. Continue to squeeze if you would like to set the brake lever for position 2
Turning with your TravelScoot
Left turns (9a):Because the drive motor is located on the left-rear wheel of the TravelScoot, left turns from a stopped position
are only possible with the front wheel turned no more than 45 degrees. If you attempt to accelerate from a stopped position
with the front wheel turned more than 45 degrees to the left, this will result in blocking the drive and “pushing” the front
wheel. If this is done on any sort of uneven terrain, it could result in an uncontrolled situation. Turning left with the front
wheel less than 45 degrees still provides an adequate amount of maneuverability similar to that of a four-wheeled scooter.
However, when already in motion, tighter turns are possible.
8a
8b
8c

16
For answers to your questions, call 1-877-339-7505
Right Turns (9b):Right turns on the TravelScoot are where its agility and nimbleness really shine. Right turns of up to 90
degrees from a stopped position are possible, but be sure to use very little throttle when doing so. The TravelScoot virtually
turns on the spot. Practicing your turns on the TravelScoot will be invaluable in situations where there may not be much room
such as on elevators or in public restrooms. You will learn to approach these confined spaces so that you can exit with a right
turn.
Maintenance
Due to the innovative design of the TravelScoot, it is nearly maintenance free. A small tool kit is included with the scooter
which can be used to tighten the bolts of your TravelScoot. It is recommended that you follow the steps below every six
months (or as needed) to ensure that your scooter performs flawlessly for years to come.
Cleaning Tips
Keeping your TravelScoot clean and dry is important. Remove dust and dirt from the frame components with a mild dish soap
solution or water-resistant silicone spray (preferred). Do not use abrasive or alkaline cleaners as these will attack the finish.
Using a microfiber cloth, wipe any accumulated moisture from the frame and components after riding in damp conditions.
These simple measures will help maintain the reliability and safety of your TravelScoot. For more on cleaning and maintaining
the TravelScoot, check out our videos at www.travelscootusa.com.
Brakes
The brakes can be adjusted at three different locations:
●At the hand brake lever
●Cable conduit (front of rear-wheel fork)
●At the band brake itself (8mm wrench required).
Lubrication
For lubrication we recommend a dry, water-resistant silicone or Teflon spray. Avoid oils and greases as they attract dirt.
Light lubrication should be applied periodically to the following areas:
●Steering column
●Locking pin
*All wheel bearings are sealed and do not require lubrication.
Tightening
Please inspect and tighten the following fasteners:
45°
90°
9a
9b

17
For answers to your questions, call 1-877-339-7505
●Rear left axle nut (make sure this is as tight as possible)
●Seat and backrest screws
Travel Tips
Air Travel
Policies and handling practices differ from one airline to another. We recommend that you contact your airline’s Special
Needs Coordinator, or equivalent, well in advance for specific information regarding air travel for passengers with mobility
devices. Request your approval confirmation in writing if possible. Do not expect each airline agent to be familiar with the
many policies and regulations that pertain to mobility devices.
Note: Customers have been traveling by air using the TravelScoot since 2004. The TravelScoot was designed with air travel in
mind.
TIP: Battery documentation for air travel can be found online at https://www.travelscoot.com/air-travel-with-an-
electric-mobility-scooter.html.
At the Airport
At the security checkpoint you can usually bypass the waiting crowd by asking for assistance. Security may ask you whether
or not you can stand. To avoid being subjected to a body search, stand up (if possible) and walk the few feet through the x-ray
frame. They will perform a security check on your scooter. After you are cleared you can drive your TravelScoot to the gate.
At the check-in desk, remain seated so that an employee will understand that you have walking problems. Your attendant at
the boarding gate will give you your “Gate Delivery” tags for your scooter. While you wait to board your plane, be sure to listen
for the pre-boarding announcement for people with disabilities and families with small children. They are asked to board
before the rest of the passengers so that baggage handlers have enough time to store medical equipment and strollers in the
luggage compartment. Therefore, we suggest that you arrive at the airport early.
Once at the door of the airplane, lower the handlebars, remove the battery, and hand the scooter over to the baggage
attendant. If you wish to fold up your scooter, be sure to securely attach the seat before handing it off to the attendant.
Scooter components will get lost if not kept together. We also suggest covering the handlebars of the scooter with padding or
the TravelScoot Travel Set to protect the controls from possible damage due to careless baggage handlers.
International Air Transport Association (IATA) Lithium Guidance Battery Document
The following documentation consists of the most recent regulations relating to Airline Travel with Lithium-ion batteries. If
you are travelling by air, bring this manual with you or photocopy this page, as not all airline representatives may be familiar
with the most up-to-date battery regulations.
(Official Excerpt)
2.3.3.2
Lithium-ion battery powered wheelchairs or other similar mobility aids for use by passengers whose mobility is restricted by
a disability, their health or age, or a temporary mobility problem (e.g. broken leg), are permitted in air transport but subject to
the following conditions:
(a) the batteries must be of a type which meets the requirements of each test in the UN Manual of Tests and Criteria, Part
III, subsection 38.3;
(b) the operator must verify that:
(1) battery terminals are protected from short circuits, e.g. by being enclosed within a battery container,
(2) the battery must be securely attached to the wheelchair or mobility aid; and
(3) electrical circuits have been inhibited.

18
For answers to your questions, call 1-877-339-7505
(c)the mobility aids must be carried in a manner such that they are protected from being damaged by the movement of
baggage, mail, or other cargo;
(d)where a battery-powered or other similar mobility aid is specifically designed to allow its battery(ies) to be removed by
the user (e.g. collapsible)
(e) the battery must be removed. The wheelchair / mobility aid may then be carried as checked baggage without
restriction;
(f) the battery must be protected from short circuit by insulating the terminals (e.g. by taping over exposed terminals);
(g) the removed battery must be protected from damage (e.g.) by placing each battery in a protective pouch. The battery
must be carried in the passenger cabin;
(h) removal of the battery from the device must be performed by following the instructions of the manufacturer or device
owner;
(i) the battery must not exceed 300 Wh
(j) a maximum of one spare battery not exceeding 300 Wh or two spares each not exceeding 160 Wh may be carried; and
(k)the pilot-in-command must be informed of the location of the mobility aid with an installed battery or the location of
the lithium battery when removed and carried in the cabin.
(l) It is recommended that passengers make advance arrangements with each operator.
Cruise Ship Travel
Ahoy TravelScoot! The TravelScoot is the number one choice for travelers venturing out to sea. With its compact size and
maneuverability, you would think the TravelScoot was custom-built for cruising. The TravelScoot should fit through all doors
on whichever cruise you choose.
In Your Cabin
Let's face it, cruising is a fantastic way to see the world, but the cabins can be a little on the small side. For safety reasons,
cruise lines prohibit you from leaving your mobility scooter outside your room in the hall. You must store it inside your cabin.
With other scooters, this can be a real nuisance as you try to maneuver around an already small space. With the TravelScoot,
however, you can fold it up and store it in a closet, in a corner of your cabin, or park it right under the desk in your room.
On the Ship
Most cruise ships nowadays seem to be the size of a small city! Exploring the ship can be adventurous but tiring. Quite
often there are many different levels on these ships which can pose a problem for someone with difficulties getting
around. The TravelScoot makes small work of these vast ships. Whether you are scooting to the pool, on the Lido deck, or
to the Fiesta deck for an evening of fine dining at a formal dinner, the TravelScoot will take you wherever you want to go.
On-Shore Excursions
Exploring the many different ports and excursions a cruise ship has to offer is a wonderful way to travel the world. In some
ports, cruise ships have to anchor offshore and tender the passengers to shore. Most cruise lines won't allow mobility devices
over 50 lbs./22.7kg on these tenders. But at a mere 34 lbs./15.87kg, the TravelScoot is no problem.
Specifications
Dimensions (in inches):
Folded
Unfolded
Length = 29.5 or 34 (w/front wheel)
Length = 36.25
Width = 21.25
Width = 21.25
Height = 10.25
Height = between 28 and 34.5
Weight (lbs.)
Scooter Frame
21

19
For answers to your questions, call 1-877-339-7505
Front Wheel
3.2
Seat Assembly
6.3
274 Wh Battery
4
151 Wh Battery
3.1
Maximum Speed
4.5 mph
Distance per charge
Distance will vary on terrain, rider weight, and
frequency of stop-and-go operation.
274 Wh Battery
12-15 miles
151 Wh Battery
8-10 miles
Warranty Weight Limit
350 lbs.
Motor
24V, 200 Watt DC
Tire Size
Front 8x2.86 inches, Rear 8x2.5 inches
Charger
100/240VAC, 50/60Hz 24VDC/2Ah
Charging Time
3-4 hours
Brakes
Levers
Manual
Brake Type
Mechanical band brake w/ parking brake
Drive
Rim motor inside the rear left wheel

20
For answers to your questions, call 1-877-339-7505
TravelScoot Components & Controls
1. Throttle
2. Bell
3. Forward/Reverse Selector
4. Manual Brake
5. On/Off Switch
6. Steering Column Clamp
7. Basket Rail
8. Cane Holder
9. Foot Peg
10. Locking Pin
11. Battery Charging Port
12. Drive Motor (inside hub)
13. Brake Band
14. Seat Clamps
15. Backrest Elbow
16. Adjustable Backrest
1
2
3
4
5
6
7
10
12
11
13
14
15
9
8
16
This manual suits for next models
2
Table of contents
Other TravelScoot Scooter manuals


