TravelScoot Disclaimer User manual
Pat.
Owner’s Manual
DISCLAIMER
This Vehicle is NOT recommended for persons who are confined to a
wheelchair, mentally disabled and/or in need of constant personal care.

2
READ FOR YOUR SAFETY !
This product is not a toy and is not recommended for use
by persons younger than 14 years of age.
To prevent misuse by children or others, disconnect the
battery when the vehicle is unattended.
Always ensure that the power is turned OFF before getting
on or off the seat for any reason.
The design allows for use by one person only.
Check all locking pins and clamps before use.
As with bicycles, it is strongly recommended to wear a
helmet.
Practice riding in a large, open area, free of vehicles, pe-
destrians and obstacles.
Do not operate at night, unless adequate front and rear
lights are attached.
Driving in wet conditions is not recommend.
Always slow down before turning.
The TravelScoot should only be ridden on smooth, hard
and flat surfaces. It is not designed for off-road or off-
road-like conditions.
Use common sense. Reckless driving can result in an acci-
dent!
Please take your time and read Important Safety Adviso-
ries For Driving The TravelScoot (pages 14-17).
The TravelScoot is designed for persons who have walking difficulties, but
who are otherwise still fairly mobile, able to lift 25 lbs, load and unload and
able to set it up or fold it together. Persons who are confined to a wheelchair
and/or require constant personal care, should not use the TravelScoot.
LEGAL:
Because electric vehicles with more than two wheels and for one person only
are considered as handicapped vehicles, you are permitted and entitled to use it
wherever you would walk.
Before driving on public streets, check the law with your local authorities. The
regulations for street use for such vehicles differ from state to state.

3
FOLDING AND UNFOLDING
Note: Left and Right refer to the vehicle’s left and right as viewed from the
driving position. Images in this booklet may differ from your actual scooter.
First, familiarize yourself with the folding trailing arm mechanism. When you
press the spring-loaded locking pins, the trailing arms are released. Keep in
mind that tension on the trailing arm will cause the locking pin to bind. So be
sure that the trailing arms are relaxed before pressing the locking pins.
Variations in manufacturing tolerances may make the locking pins a little tight
at the beginning. Feel free to grease the locking pins with e.g. Vaseline as
needed.
Folding and unfolding on a carpeted floor or grass can cause friction and may
require manual aid for the trailing arms’ opening and closing.
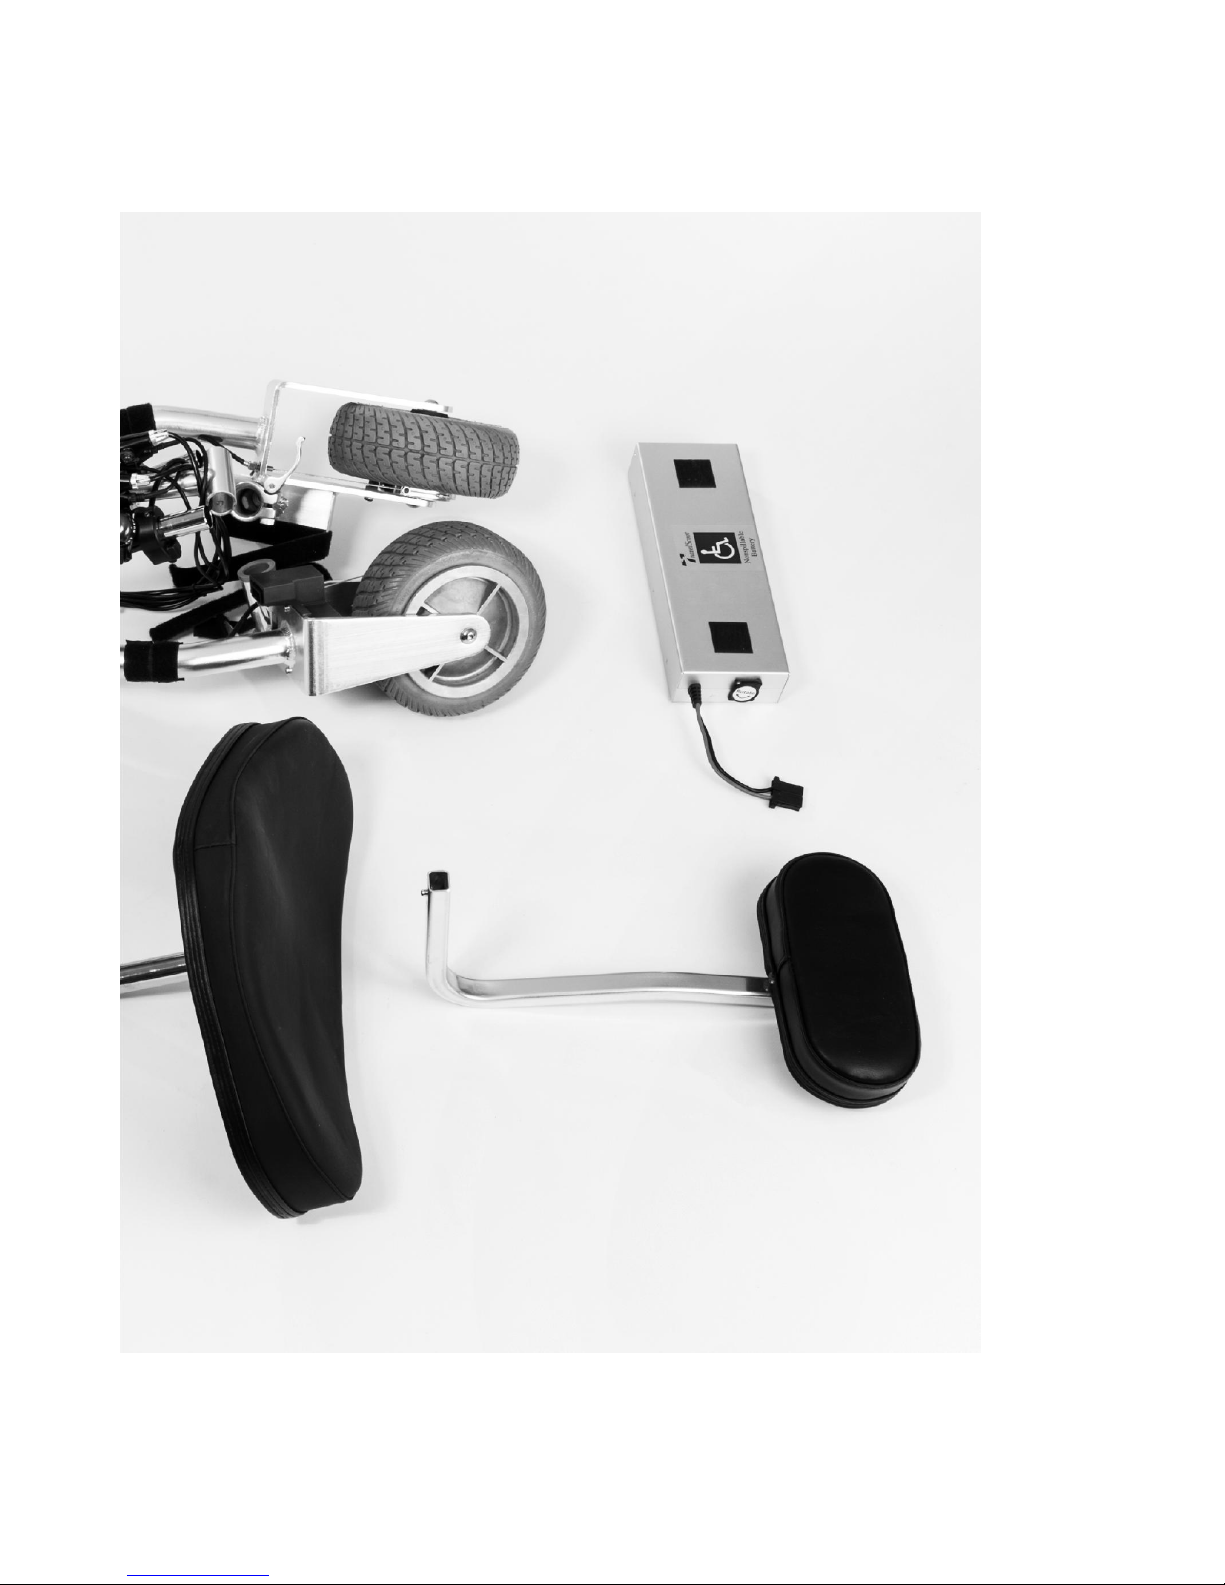
UNFOLDING:
Attach the front wheel by inserting
it into the receptacle of the steering
column. The spring snapper must
lock into the corresponding hole.
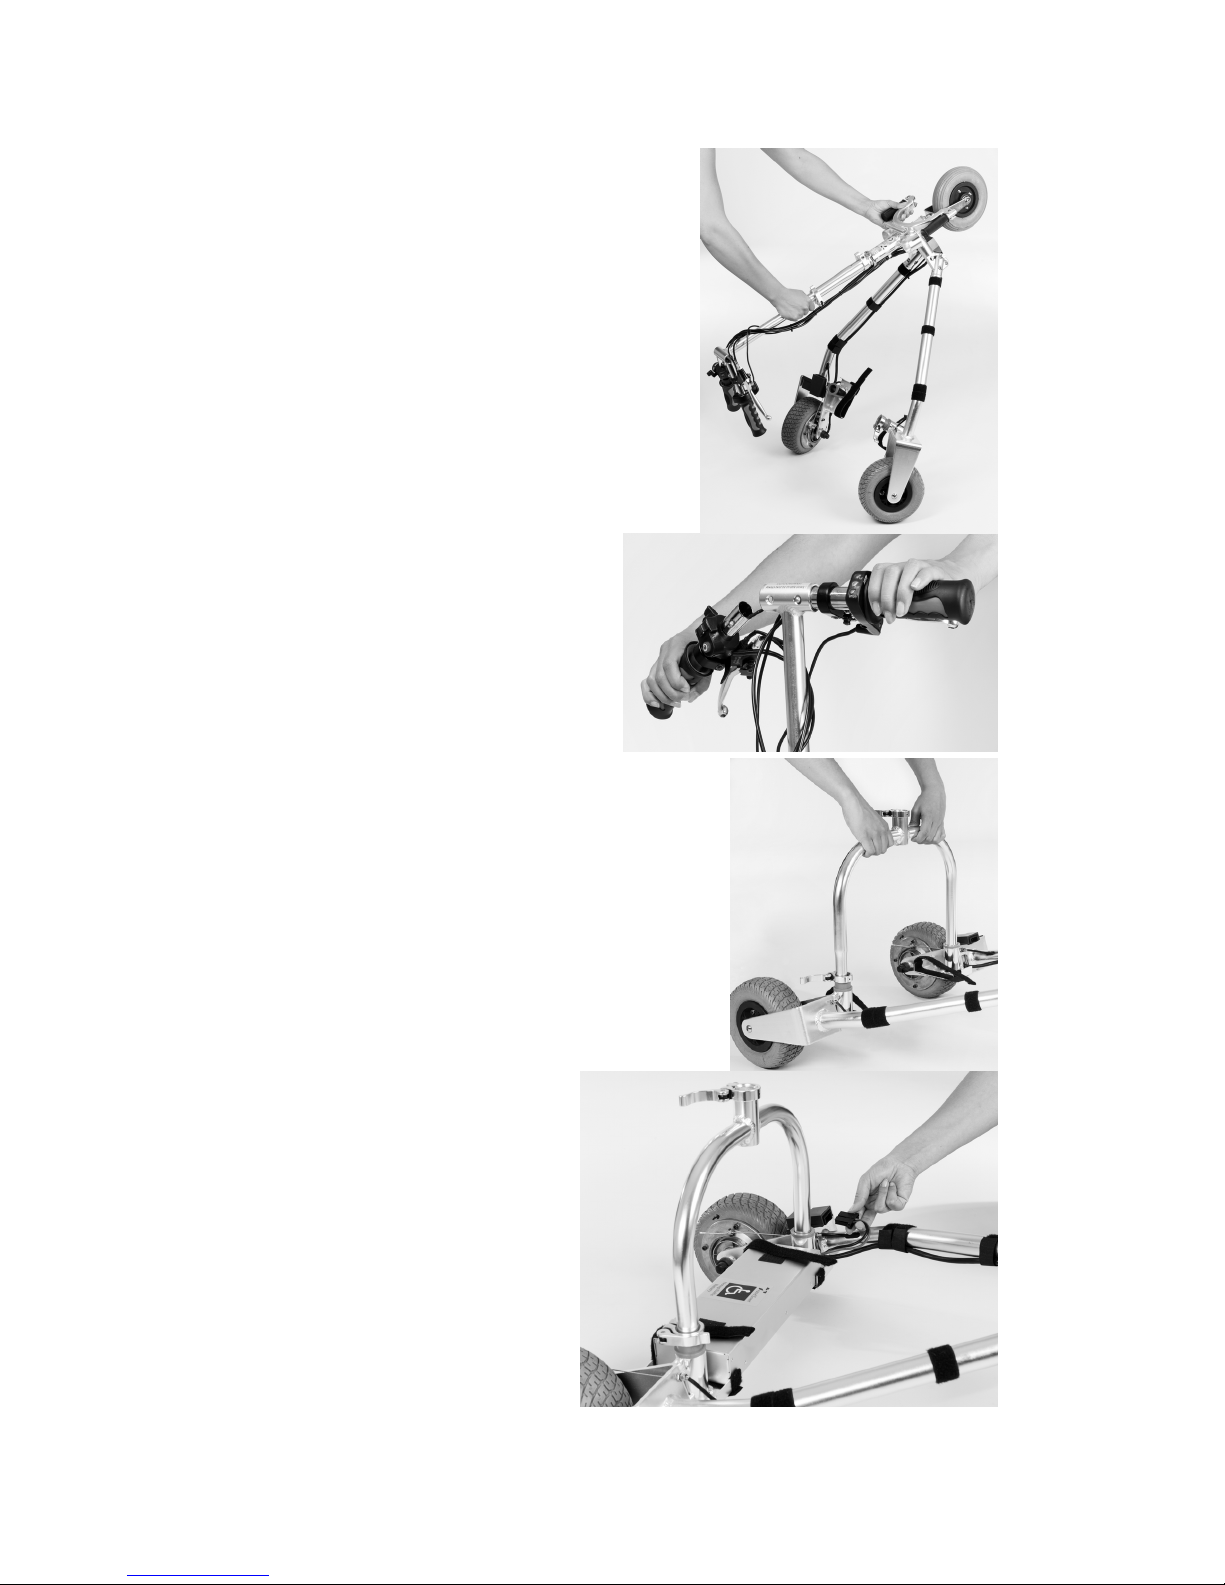
Hold the folded unit by the steering column with
one hand, upright, with the rear wheels resting on
the ground; With the other hand, press one lock-
ing pin until the trailing arm is released.
Rotate the steering column a little so that the pin
does not snap back into the locked position.
Repeat this step with the other trailing arm.
Fig. 1
Fig. 2
4
Lay the unlocked frame down, while rotating
the steering column upward. The trailing arms
will automatically swing apart until the locking
pins snap into the locked position with an audi-
ble click. If for some reason the pins don’t snap
in, wiggling or shaking the steering column a
little should do the trick.
Insert the handle bars into the T-handle
so that both spring snappers lock into
place.
Insert the yoke into the plastic receptacles by the
battery tray. Insert the tapered stem of the yoke in
the right-side receptacle. Insert both stems at the
same time, otherwise they will bind. If this hap-
pens, do not use force, but remove the yoke com-
pletely and try it again. Once in place, tighten the
lever clamp on the right receptacle.
Place the battery in the tray, secure
it by placing the Velcro “tails” over
the Velcro pads on the battery.
This Velcro will hold the battery
firmly in the tray when driving
over bumpy terrain. Connect the
battery to the TravelScoot.
(disconnect by pressing on both
sides of the battery connector).
An optional second battery pack
can be stacked on top of the pri-
Fig. 4
Fig. 5
Fig. 6
Fig. 3

5
mary battery in the same way.
(Images show SLA batteries.
No bag is used for Li –Ion
batteries)
Insert the backrest by depress-
ing the spring snapper and slid-
ing elbow all the way into the
seat mounting bracket.
First Set-up Only:
There are two backrest positions.
The elbow is factory-assembled with
the spring snapper in the first hole
from the elbow’s end and should fit
for most people. However, if you
want the backrest further forward,
remove the spring snapper, cut off
the first hole and, and using a hack-
saw, cut off the first hole section
5/8” or 16mm from center 2nd hole.
De-burr the edges.
You can also bend the elbow slightly to a more comfortable position A small
amount of bending already makes a big difference. Before bending, draw a
template on a piece of paper Attention: Multiple bending back and forth re-
sults in weakening of the elbow structure. Note:
Bending requires some force.
In any case, before you bend or cut off anything, test your seating position
extensively.
The seat height can be adjusted with the enclosed spacer rings. Once the
desired height has been determined, the rings can be permanently attached on
the seat stem using adhesive tape, Loctite, silicone, epoxy, etc.
ATTENTION! Keep the seat as low as is still comfortable. The higher the
seat is mounted, the higher the center of gravity and centrifugal forces, and
turns will have to be negotiated at a lower speed.
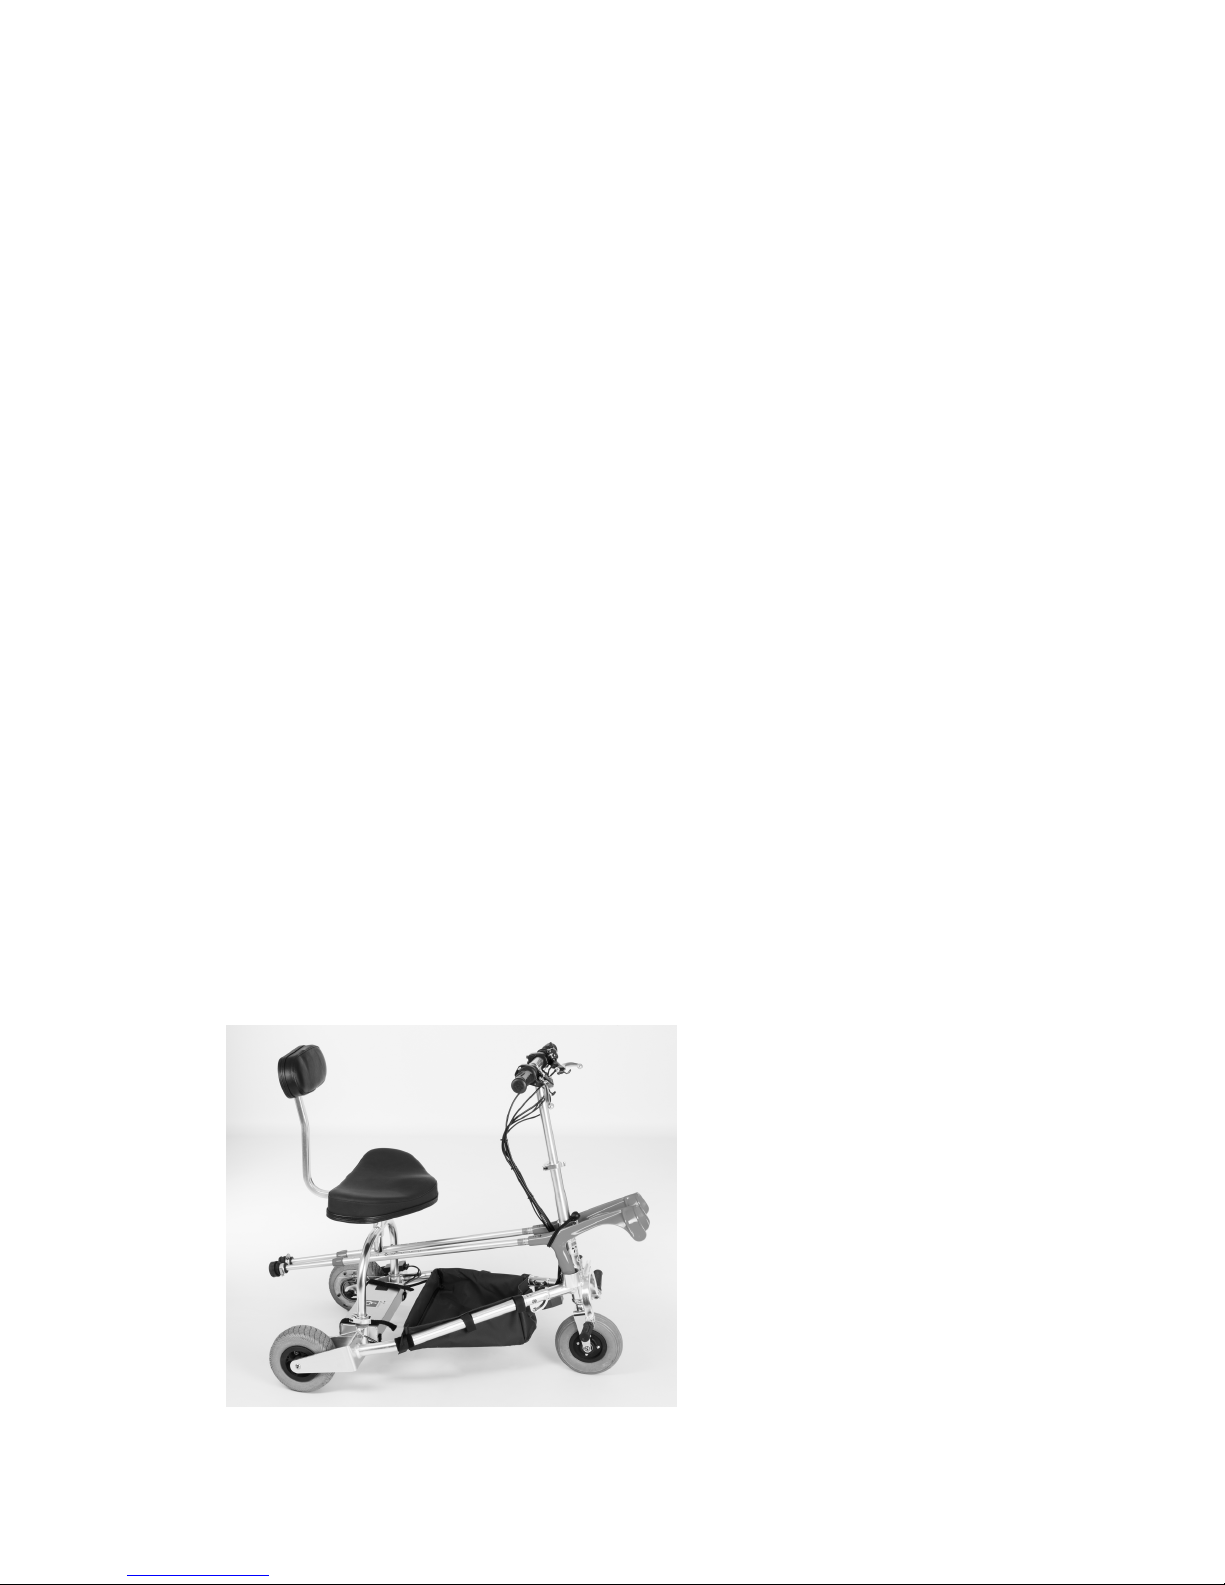
Now with the backrest attached and the seat spacers in place, insert the seat
Fig. 7
Fig. 8

6
post into the yoke’s receptacle and tighten the
lever clamp.
Note: If you have problems getting seated on the
vehicle when the seat is locked in the driving
direction, loosen the lever clamp, apply the park-
ing brakes, rotate the seat to the left or right, sit
down and rotate yourself into the driving posi-
tion, then tighten the lever clamp.
Adjust the handlebar to the desired height and
tighten the lever clamp.
To carry light-weight items you can install the
fabric caddy between the trailing arms by at-
taching it to the six Velcro rings around the
trailing arms. The small pocket in front can
hold your tool kit etc.
When traveling, you can place a small suitcase (of the size permitted by air-
lines for carry-on luggage) across the trailing arms. It will fit neatly under the
seats and your legs. For shopping, you can also place a suitable cardboard box
across the trailing arms. Loaded like this, getting on and off the vehicle might
be difficult. Simply remove the backrest and get onto the seat like on a men’s
bicycle. .
Fig. 10
Fig. 9
Fig. 11 Fig. 12
7
FOLDING
(Option 1)
Extend the steering column up to the maximum height and keep the handlebar
assembled.
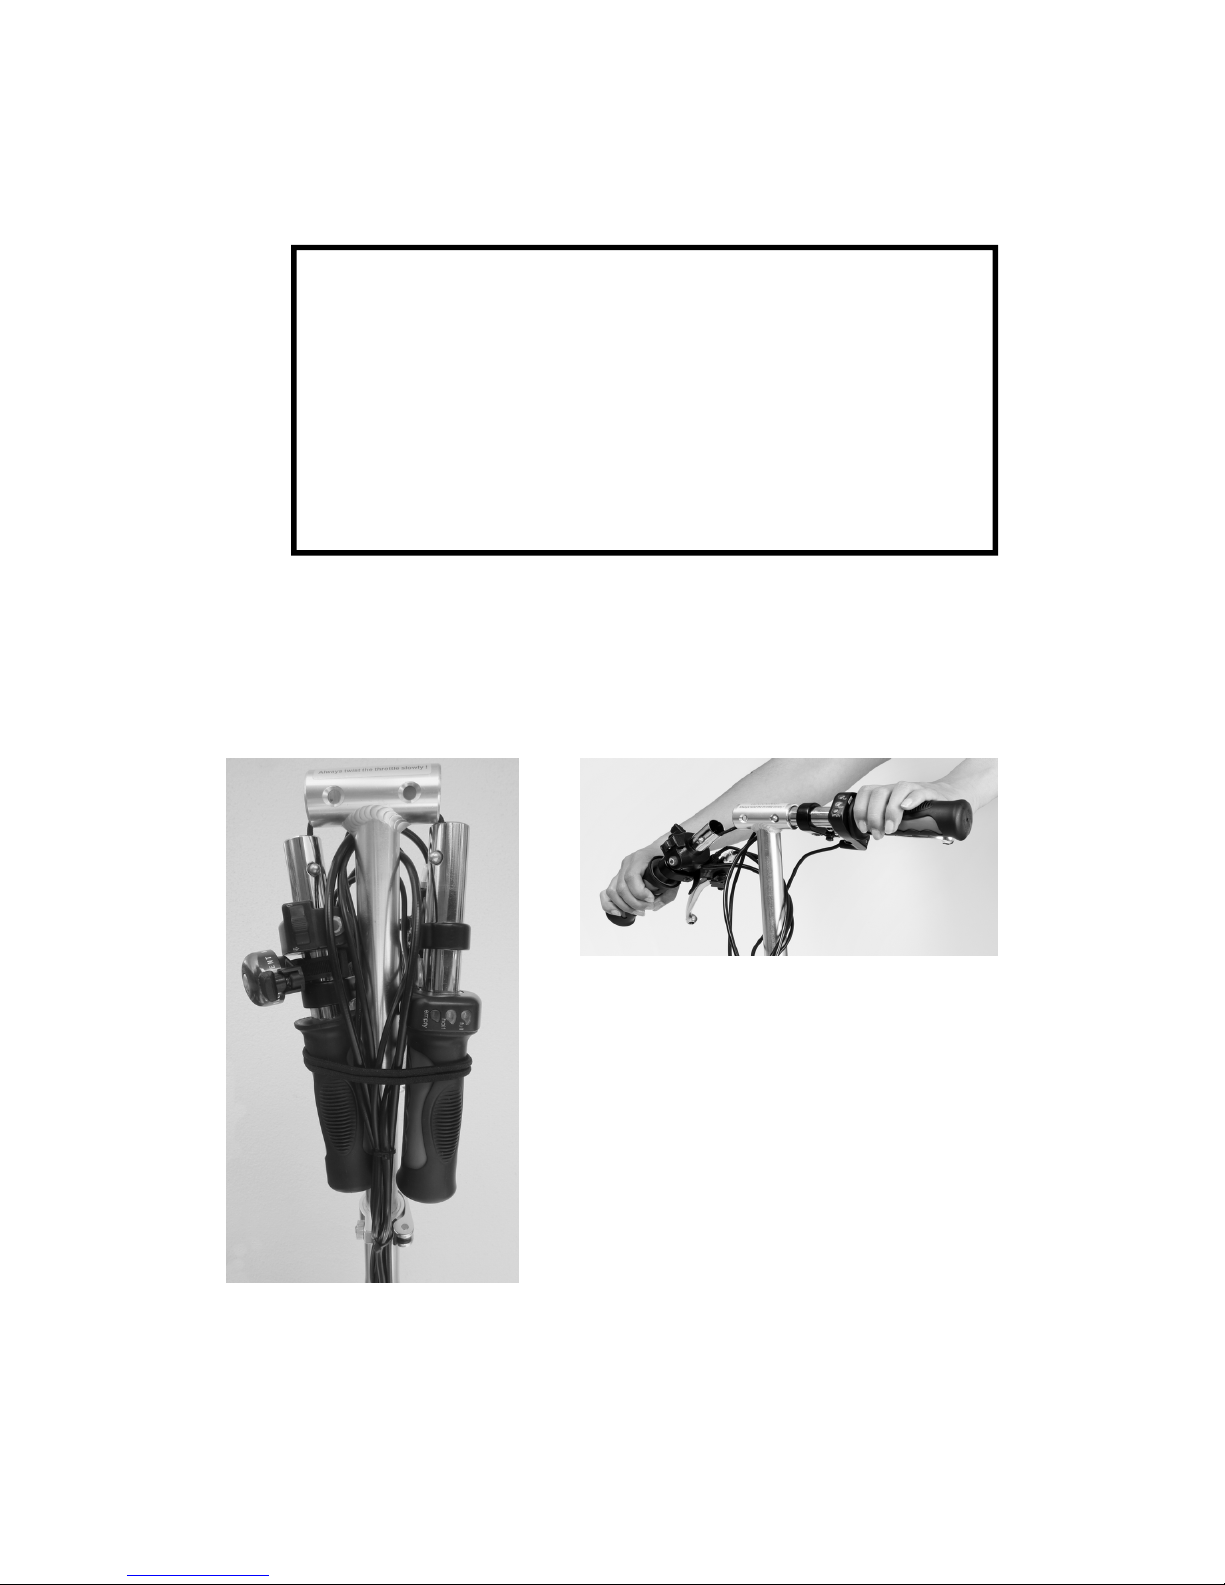
(Option 2)
Slide the steering column down to the mini-
mum height and remove both handlebars from
the T-handle so that they hang down. Tie them
with a bungee cord.
(The bungee cord can also be used to secure canes and crutches to your
scooter)
Option 1) Keep the frame folded,
but uncovered in the trunk for faster set-up.
or
(Option 2) Store everything in the
compact carrying bag.
Fig. 13
Fig. 14

8
(Option 1 and 2)
Remove the seat with the
backrest.
Disconnect the battery from
the TravelScoot and remove
it from the tray.
Release the clamp on the
right yoke receptacle.
Pull the yoke out of the plas-
tic bushings evenly, using
both hands so that it doesn’t
bind.
Press on one of the locking pins
with one hand and, with the
other hand, slightly rotate the
steering colum sideways and
down until the pin is prevented
from snapping back into the
locked position. Repeat this
procedure on the other trailing
arm. Fig. 16
Fig. 15
9
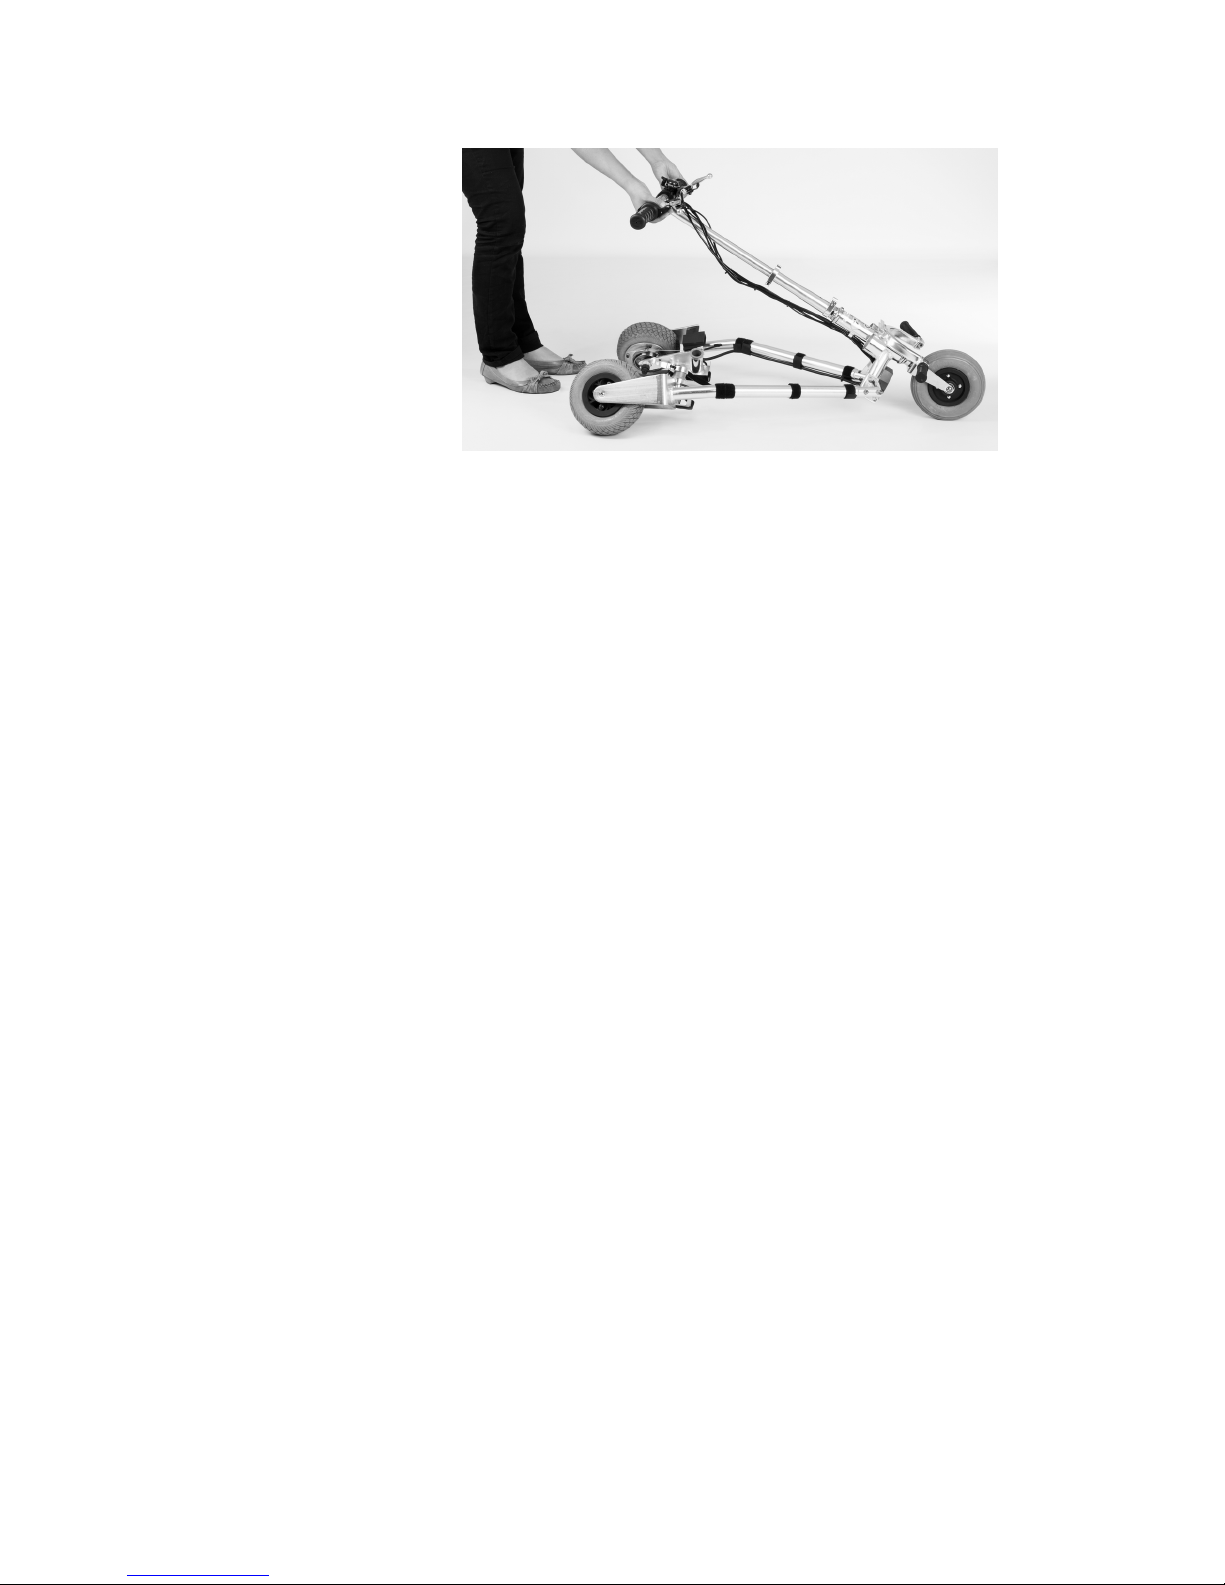
Slowly rotate the steer-
ing column downward
until the pins lock with
an audible click. As
you do, the trailing
arms will come to-
gether automatically.
You may gently assist
this motion.
Now you can use the steering column as a carrying handle.
(Option 2)
Place the battery into the center of the carrying bag and secure it with the
Velcro straps. Observe that the connector is sidewise and not under the battery.
When the bag is dropped for some reason, the weight of the battery could de-
form or shatter the connector.
Note: At this point you may lay the bag with the battery in the trunk of your car
and continue to pack inside the trunk. This eliminates the need to lift or carry
the complete compact unit.
Detach the front wheel from its receptacle (see also Fig. 1), lift the folded
frame by the steering column and lower it into the bag, so that the rear wheels
are positioned on the bag’s end. The frame’s cavity between the trailing arms
will fit perfectly over the battery. Place the front wheel into the front section
of the bag. Separate the backrest from the seat and place the seat in the front of
the bag, to the right of the frame, seat post pointing inward, front (point)
pointing up. Lay the backrest face down on top of the rear wheels with the
elbow pointing down between the folded frame. The yoke will fit on top of the
backrest.
The total weight of the complete vehicle with the SLA battery is about 50
pounds (22 kg). If this compact pack is still too heavy for you to lift or carry,
simply leave the 20 pound SLA battery pack out to reduce the weight by al-
most half.
Fig. 17

10
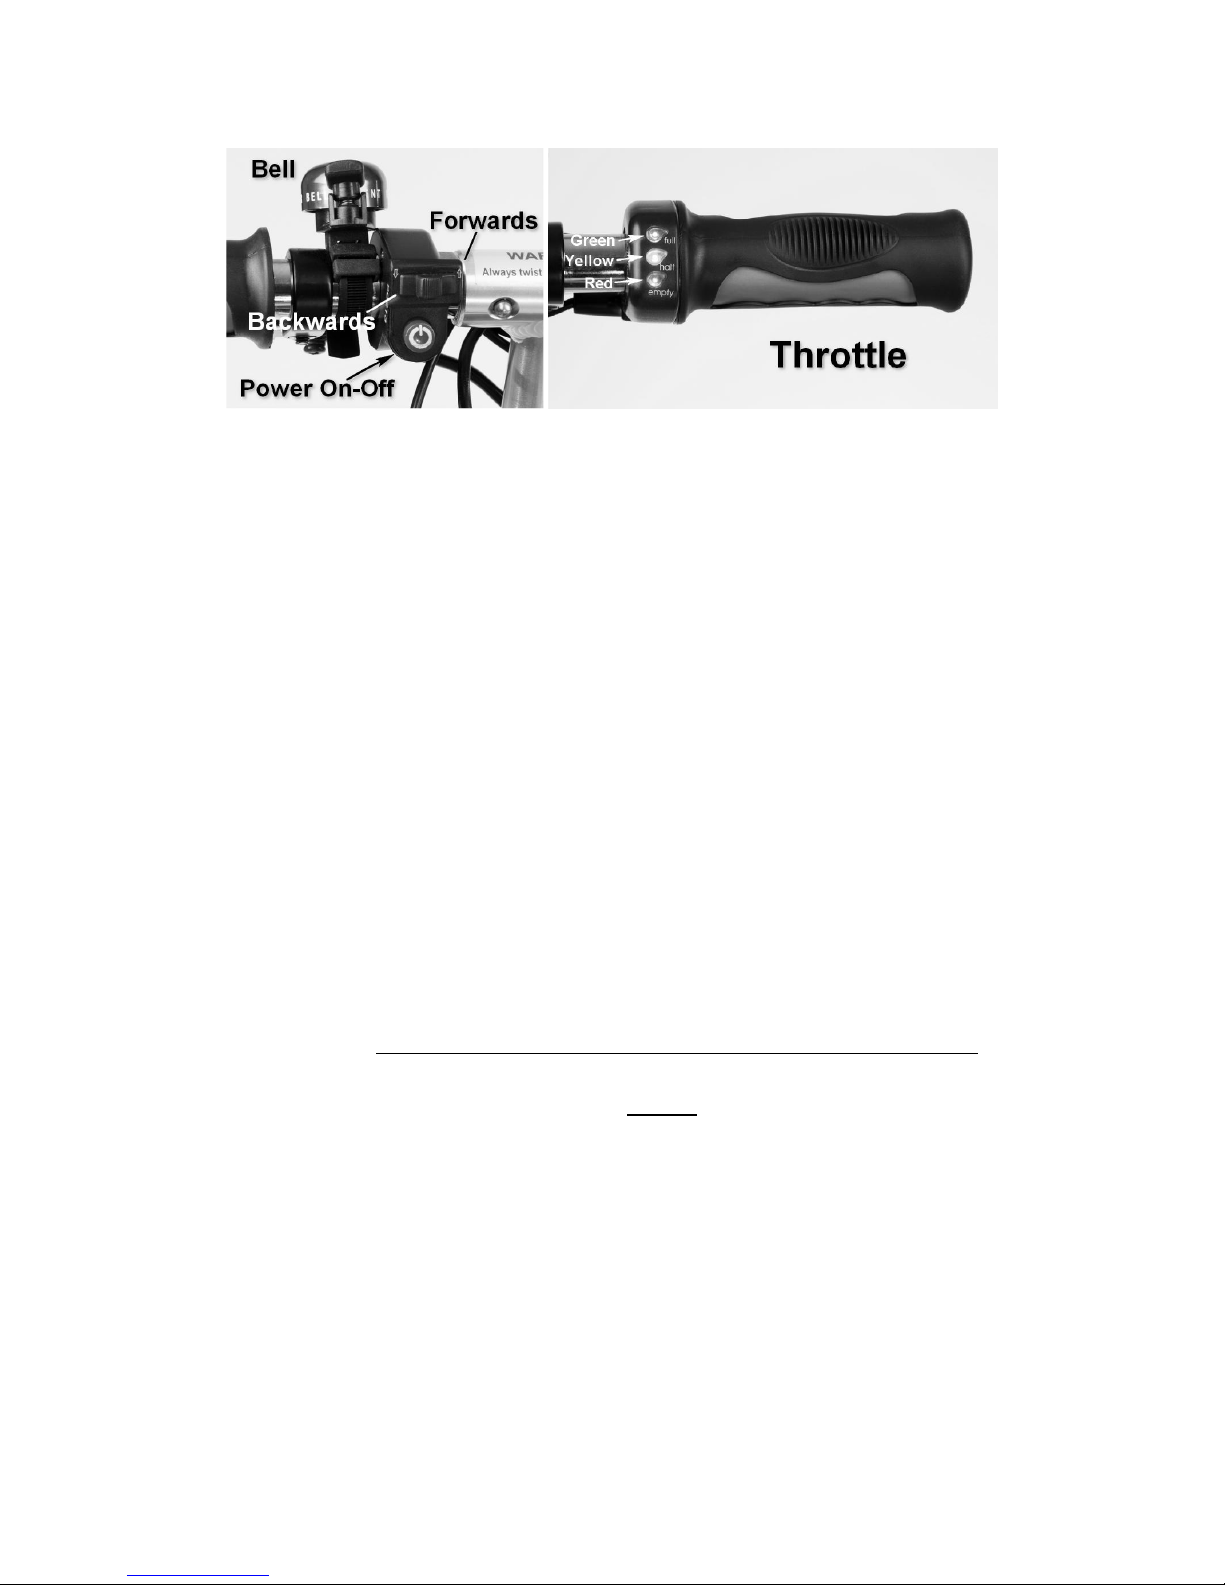
HOW TO INTERPRET THE BATTERY
INDICATOR LIGHTS (SLA Battery)
Green-Yellow-Red: Indicates a good charge.
Yellow-Red: Indicates 10-30% of usable charge remaining.
Red: Avoid driving and charge or change battery as soon as possible.
Attention: The battery indicator lights are only accurate while driving the
vehicle. When not driving, the lights can show a false, higher remaining
charge.
SLA BATTERY CARE
For the Li-Ion battery see the specific manual/instruction sheet
Keep in mind that the decay process of any battery begins virtually immedi-
ately after it is manufactured. Its life span depends greatly on proper treatment.
The best practice is to keep the battery fully charged at all times. A discharged
battery is subject to accelerated deterioration. Make it a routine practice to
recharge the battery as soon as possible when you see the yellow battery indi-
cator light. Try to avoid extreme deep cycles to a point where the electric sys-
tem shuts off by itself. After approximately 35 full charge/discharge cycles
the battery’s capacity is permanently reduced by 50%! For longer trips,
have a second battery handy. See Accessories And Spare Parts (page 20) for
high-performance battery options.
Also read About Batteries (page 21). A battery not in use is subject to slow
discharge and should be recharged every 4 to 6 weeks and stored in a cool
place. If you do not intend to use your TravelScoot for more than 3 days, dis-
connect the battery from the motor. Even with the power shut off, a small
amount of electrical current will continue to flow. This will completely drain
the battery, thereby possibly ruining it. It may not be possible to recharge a
completely drained battery
CHARGING THE SLA BATTERY
The battery has no “Memory” effect and can be charged at any stage.
When you plug in the battery charger to AC current without being connected to
the battery, the indicator light is red. Once you connect a battery, charging be-
gins and the light turns orange/yellow. After charging is complete, the light
turns green. It is normal for your battery charger to get quite warm. In order to
allow sufficient heat transfer, do not cover the charger with anything while
charging!

11
BRAKES
The TravelScoot is equipped with two independent band brakes, one on each
rear wheel. Both brake levers are equipped with a parking brake. To engage,
apply the brake lever and depress parking brake lever until it locks the hand
brake lever in position. To release, simply apply the brake lever again.
Band brakes are very effective, even on downhill grades. However, safety dic-
tates never exceeding the maximum level-ground speed. Caution is also ad-
vised on steeper uphill rides when forced to stop. The band brakes are only
marginally effective when rolling backwards. For this reason, an electronic
motor brake is installed. This brake engages operate when the drive wheel is
stopped or turning backwards, and operates only when power is on. However,
even this feature’s effectiveness decreases as slope increases. Therefore it is
advisable to avoid riding up or down steep inclines, and instead get off and
push.
BASIC MAINTENANCE
Because of its modular construction, the TravelScoot nearly maintenance free.
There are a few parts which may require periodic lubrication using grease .
These parts are: The receptacle of the seat post, the back rest elbow bracket
underneath the seat, the T-handle and telescope of the steering column, the
trailing arm locking pins and the front wheel shaft. Once any of these parts
begin to bind, lubricate them immediately. Continued sliding in and out under
these conditions can quickly damage or ruin the sliding surfaces. The best (and
cleanest) greasing compound is Vaseline, available in every drugstore.
The brakes can be adjusted at three different locations: By hand-only at the
hand brake levers, or, using an 8mm wrench, at either the cable conduit on the
wheel fork or at the band brake itself.

12
Front Wheel
Main Frame
Yoke
Fig. 18

13
Seat
Main Frame
Yoke
14
Battery
Backrest
Seat

15
IMPORTANT SAFETY ADVISORIES
FOR DRIVING THE TravelScoot
Never leave the power switch in the ON position when not prop-
erly seated. See also page 17
It is essential that you understand the characteristics of a mobility scooter.
Typically, in order to maneuver in tight spaces or crowded areas, their
width and length are close to that of a seated human body. This configu-
ration provides reasonable safety on flat, level surfaces but is not entirely
fool-proof on uneven, slanted or inclined surfaces. The center of gravity
( hereafter referred to as C.G.) is relatively high and can shift considera-
bly under such conditions. As a general rule, always shift your upper
body toward the high side of the terrain.
To avoid critical situations, follow these guidelines.
Unlike a two-wheeled vehicles, three- and four wheeler cannot be “leaned”
into a curve. Therefore, it is essential to slow down to a reasonably low speed
before turning. Even at slower speed you may still feel some slight centrifugal
force. Use extreme caution when turning on slanted or uneven surfaces! Oc-
casionally you may find yourself negotiating a curve or corner too fast and the
inner rear wheel starts losing ground contact. If that happens, immediately
shift your upper body into the curve and lessen the steering angle in order to
restore weight on the lifting or airborne wheel.
Inclines require special attention to avoid mishaps. The following is a
list of do’s and don’ts.
The C.G. on an incline (such as ramps) is shifted toward the rear, and in con-
junction with some other events, tipping over backwards is possible, but can
be easily avoided.
Always shift your upper body toward the handlebar in order to move
your C.G. forward.
Always twist the throttle slowly, even on level ground! The motor has
high torque. Quickly twisting the throttle, causing excessive acceleration,
could tip you over backwards.
Avoid starting on an incline from a full stop. Approach a ramp with rea-
sonable speed and utilize the vehicle’s momentum.

16
Approach an incline only if you are sure that you will reach the top with-
out having to stop. If you are forced to stop along the way, restart by
shifting your upper body forward and accelerating gently.
When negotiating an incline, do not zigzag or drive at an angle up the face
of the incline. Drive your scooter straight up. This will greatly reduce the
possibility of tipping or falling.
Never travel up or down a potentially hazardous incline (i.e., areas cov-
ered with ice, snow, cut grass, wet leaves, gravel). Do not drive in snow
and mud.
When driving down a ramp, keep the throttle at idle and both hands ready
to apply the brakes to ensure a safe, controlled descent.
If you drive the vehicle down a longer slope, apply brakes continously
and under no circumstances allow it to gain more than walking speed.
Otherwise you may not be able to stop quickly enough, or - in the worst
case - at all.
Speed bumps, lowered curbs and other slightly uneven condi-
tions are generally no problem, but they should be taken at a reduced speed
and in a direct frontal direction. Never approach them at a slant angle, and
observe the same precautions as on inclines.
Keep in mind that the small wheels cannot roll over objects much higher than 1
inch (3 cm), and you may fall if you attempt to do so. Lower objects should
be approached with moderate speed. If you are at a stop and one of the wheels
is blocked by such an object, do not apply throttle, doing so may result in flip-
ping over backwards.
You should not tow anything by the backrest. This could create
additional leverage forces against the backrest with the potential of flipping
over backwards. If you tow something anyway , (like your wheeled suitcase)
be aware that you can operate one brake only. Drive slowly and do not lean
against the backrest.
Doors: Doors can be a real nuisance, especially when they are spring-
loaded. A good option is to ask a nearby person to hold the door open for you.
If you are on your own, avoid any acrobatic actions like using your feet to
hold doors open while passing through them. This could also create additional
leverage forces against the backrest with the potential of flipping over back-
ward. Instead, get off the vehicle and walk it through the door.
In summary, as with every other vehicle, use common sense. It is completely
up to you to judge the drivability of a chosen terrain. Reckless driving can
result in an accident!

17
The TravelScoot requires some skill to operate safely. Before enter-
ing crowded areas for the first time, familiarize yourself with the
operation of the vehicle in a large open area, free of vehicles, pedes-
trians and obstacles.
Throttle: To become accustomed to operation and response, turn the
twist grip slowly, similar to a motorcycle.
Because the drive is located on the left rear wheel, left turns from a stop are
only possible with the front wheel turned no more than about 45 degrees. This
still provides an adequate amount of maneuverability, similar to a four-
wheeled scooter. More than 45 degrees will gradually block the drive. Tighter
turns are possible.once you are in motion However, right turns are possible
virtually on the spot and must be conducted carefully and with very little
throttle applied. Whenever you are riding into confined spaces, like small
elevators, approach them so that you can exit safely with a right turn or in re-
verse.
Indoor use: In general you are permitted to use the TravelScoot inside of
buildings such as airports, shopping malls, stores, theaters, etc. However you
are obligated to adjust your speed to that of the walking traffic. Do not ride on
escalators!
Outdoor use: You may drive across short sections of grass or gravel sur-
faces as long as they are level and reasonably firm. Approach them with mod-
erate speed. Depending on your weight, you may not be able to restart on
these types of surfaces from a standstill. Also, keep in mind that prolonged
riding under such conditions will quickly drain your battery.
The electric motor, wiring, connectors, batteries and controls can be damaged
if exposed excessively to water. Light rain is also no problem. Avoid driving
the TravelScoot in heavy rain or through puddles of water. If you cannot avoid
puddles, cross them with extremely low speed in order to avoid splashing wa-
ter.
18
Getting started
Plug the battery connector into the black plastic receptacle at the front
of the left rear wheel fork (unplug by pressing both sides of the battery
connector).
Attention! Before turning on battery power, sit down firmly in
driving position and with both your feet on the footrest. Turn off
power before leaving the seated position! Accidental twisting of the
throttle while the power is still ON and the vehicle not properly
loaded can cause the scooter to rotate upwards and endanger
yourself and others.
Press the ON- OFF button on the left side of the handlebar. A some-
what charged battery will cause all three lights on the throttle lit to light
up.
.
The direction of travel is selected with the sliding switch above the ON-
OFF button; Slide to the right for FORWARD, and left for REVERSE.
Always twist the throttle rearward slowly (as with a motorcycle).
Avoid jerking the throttle because it would also cause the vehicle to
jerk. If this happen, just release the twist grip and the scooter will
settle down and stop.
19
HINTS FOR THE WALKING IMPAIRED
AIR TRAVELLER
Arrive early at the airport. When checking in your luggage, simply remain
seated on your TravelScoot and you will be allowed to drive directly to the
departure gate. As with wheelchairs, you will receive preferred treatment at the
security checkpoints.
Passengers with children’s strollers or mobility devices are usually asked to
board the airplane first, so that airline handlers have enough time to store such
items in the baggage compartment. While you wait for boarding, park yourself
and your TravelScoot near the airline desk so that airline personal can see
you.
Once you have prepared your TravelScoot for loading in the cargo bay, (see
www.travelscoot.com/tips), airline personnel will attach a label for gate deliv-
ery at the destination airport. After arrival, just stay seated until most passen-
gers have disembarked; When you leave the plane, your TravelScoot should be
waiting for you at the door of the airplane. With most passengers already gone,
you have enough space to set up your scooter.
Attention! The jetway often is rather long and/or steep, with bumps at the tele-
scope joints. In addition, there is virtually no suitable run-up space, which
could makes driving hazardous. If you encounter these conditions, put your
luggage on the vehicle and walk it up the jetway, and begin driving from once
you are past the end (see pages 14 - 17 for handling incline conditions).
Large airports often use trains to transfer passengers to multiple terminals.
Usually, you can easily board such trains with your TravelScoot,, but be
aware that the train’s frequent stops and starts can make you roll back and forth
involuntarily. It is advisable to park across to the train’s direction of travel .
Apply both parking brakes and hold onto a handrail or bar.
If you are using walking aids
such as a cane or a pair of
crutches, there is a designated
place for them on the Travel-
Scoot. You can place your
walking aids either upright or
lying down in the cups near the
footrests. Secure them with a
bungee cord
Fig. 19

20
SPECIFICATIONS
Weight 30 lbs or 14 kg (without battery)
Maximum Speed 4mph (6km/h )*
Distance per charge 12 km with SLA, 16 km with Li-Ion *
Carrying capacity 320 lbs or 145 kg on the seat plus
some carry-on luggage
Motor 24V, 200 Watt DC
Tire size Front 8” x 2.” Rear 8” x 2.50”
foam filled
Battery 24V, 12Ah Sealed Lead-Acid (SLA)
or 25,2 V 11,25 Ah Li-Ion
Charger 110/240VAC, 50/60Hz
24VDC/2Ah
Charging time ~ 5 hours SLA 8 hours Li-Ion
Brake Band brakes on both rear wheels
with dual parking brakes
Drive Rim motor inside the rear left wheel
* Speed and distance were ascertained by GPS with a new battery and a 220
pound person on a paved level surface and only few stops
Keep in mind that uphill conditions as well as frequent stops and starts will
reduce the distance per charge.
Therefore, as with every battery-operated device, the purchase of a second
battery pack is strongly recommended.
Dimensions:
Folded and inside the bag Unfolded and assembled
Length = 87 cm ( 33.5" ) Length = 96 cm ( 37” )
Width = 30 cm ( 12" ) Width = 58 cm ( 23” )
Height = 25 cm ( 10" ) Height = Variable, depends
on adjustments
Table of contents
Other TravelScoot Scooter manuals


