Clearwell Mobility Aguna Ultralight User manual

MOBILITY SCOOTER
USER MANUAL
Aguna Ultralight

www.clearwellmobility.co.uk
2
Contents
Intended Use of the Vehicle
Dashboard Controls
Freewheeling the Scooter
Tiller Adjustments
Disassembly
Assembly
Baery Charging
Simple Maintenance
Hazards
Troubleshoong
Warranty
Technical Specicaon
Intended Use Of The Vehicle
This vehicle is designed to help a single person (up to the maximum recommended
weight) who requires a scooter for their mobility. The scooter is intended for indoor use
in large areas and outside use up to a maximum speed of 4mph. It is not intended to be
used for towing or in use in muddy or so areas of ground. Users could endanger
themselves and others if they are not capable of driving the scooter safely. It is up to
the users to ensure that they have the manual dexterity to drive the vehicle, adequate
sight and hearing to perceive danger in me, and can at all mes operate the scooter
safely. If in doubt we suggest you consult a healthcare professional for advice.
Modicaons
Any modicaons to the specicaons will invalidate the warranty and may render the
vehicle dangerous.
Clearwell Mobility
Technical Support Helpline
Contents and Introducon
Page
2
3
4
5
6
7
8
9
10-11
12-13
14
15
MODEL:
SERIAL NUMBER:
DATE OF PURCHASE:
01444 253 300

@clearwellmobility @clearwellmob 3
Dashboard Controls
Before driving your vehicle it is important to familiarise yourself with the controls.
Do not a empt to drive the vehicle un l you have understood these instruc ons.
To Turn On: Insert the key and turn clockwise.
To Turn O : Turn key back an -clockwise.
To Operate: The thro le control lever (Wig-Wag) allows you to control the forward and
reverse speed of your scooter. Place your hands on the ller handle.
To move forward, either use your le thumb to push the le side of the thro le control
lever or use your right hand to pull back on the right side of the thro le control lever.
To reverse, either use your right thumb to push the right side of the thro le control
lever or use your le hand ngers to pull back on the le hand side of the thro le
control lever.
Ba ery Indicator: When the scooter is powered up, this meter indicates the
approximate ba ery strength. The gauge will beep when the ba ery is out of charge.
Note: The vehicle must be sta onary in order to get an accurate reading.
Speed Adjustment Dial: This dial allows you to preselect and limit the scooters top
speed. The image of the snail represents the slowest speed se ng. The image of the
hare represents the fastest speed se ng,
Horn: The horn will sound when the bu on is depressed.
Charging Port: The Tiller Charging port allows the ba ery to be charged without
having to charge from the ba ery box.
Light
Switch
Charging
Port
Fuse

www.clearwellmobility.co.uk
4
Freewheeling the Scooter
The freewheel lever is located on the rear sec on of the scooter. Before driving the
scooter needs to be put into the drive posi on. The two posi ons are:
1. Drive Mode- is indicated by 'Closed'. Pull the lever backwards for this posi on.
2. Freewheel Mode- is indicated by 'Open'. Push the lever forwards for this posi on.
WARNING: Before placing your scooter into or taking it out of freewheel mode,
remove the key from the key switch. Never sit on the scooter when it is in freewheel
mode and never put your scooter in freewheel mode on any incline.
Drive Mode (Closed) Freewheel Mode (Open)

@clearwellmobility @clearwellmob 5
Tiller Adjustments
Tiller Adjustment Knob
• Loosen the ller adjustment knob by turning
an -clockwise- see diagram.
• Raise the ller to the required posi on.
• Fully ghten the adjustment knob by turning
clockwise making sure the ller is securely
posi oned with the teeth fully engaged
together.
Tiller Lock
• The scooter has been provided with a ller lock which makes transpor ng and
carrying the scooter easier. It is only to be used when the scooter is dismantled, either
for transporta on or storage.
• To unlock- fully press the ller lock bu on down then quickly release your nger. The
bu on will spring up to the unlocked posi on. The ller will now move sideways.
• To lock- set the wheels to be directly facing forward, press the ller lock bu on down
rmly and release your nger. The bu on will stay down in the locked posi on.
Tiller Adjustment
Knob
Tiller Lock in unlocked position Tiller Lock in locked position
WARNING: Never operate the scooter unless the ller is raised, the teeth are fully
engaged and the ller adjustment bolt is fully ghtened and securely posi oned.
WARNING: Never drive the scooter with the ller lock in the locked posi on.

www.clearwellmobility.co.uk
6
Disassembly
Disassembly
You can disassemble the scooter into ve main pieces: the basket, the front secon,
rear secon, seat and baery box as shown:
Disassembly Procedure
1. Remove the seat- Stand behind the scooter and fold the seat back down, then with
both hands li seat directly upwards.
2. Remove the baery box- Grip the baery box handle rmly and li directly upwards
and o the scooter.
3. Remove the basket- Stand in front of the scooter and li basket directly upwards o
the basket bracket.
4. Fold down the ller- Loosen the ller adjustment knob by turning an-clockwise and
carefully lower the ller. With the ller in its lowered posion, ghten the adjustment
knob by turning clockwise making sure the ller is securely posioned and locked (see
page 5).
Basket Front Secon Rear
Secon
Seat Baery Box
Disconnecng Front & Rear Secon
• Li the ller splier knob as shown on
the diagram. The front and rear secons
will then be disconnected.
CAUTION: Liing weight beyond your
physical capability may result in
personal injury. Ask for assistance when
necessary.

@clearwellmobility @clearwellmob 7
Assembly
Connec ng Front & Rear Sec ons
• Connect the front and rear sec on by aligning them and gently li ing the front
sec on onto the two hooks of the rear sec on. Make sure the rear sec on is pping
back to allow the front sec on to lower into the correct posi on.
• Make sure the front and rear sec ons are securely and correctly connected.
Seat Post
• Adjust seat post to your required height by using the seat post pin provided. Then
securely ghten the seat post retaining screw.
Fi ng Ba ery Box and Basket
• Carefully lower the ba ery box into posi on on the scooter making sure the box is
securely and fully connected to the ba ery connector.
• Place basket onto bracket and make sure it is securely xed.
Fixing Seat
• Stand behind the scooter and with both hands lower the seat onto the seat post
making sure the seat is straight above the seat post. If the seat is not straight on the
seat post you will not be able to fully lock the seat.
• Fix arm rests and adjust to the required width, then ghten arm rest retaining screws
securely.
Assembly
NOTE: Ensure you have suffi cient room when disassembling or assembling your
scooter to move the parts around. No tools are required to disassemble or assemble
your scooter.
CAUTION: Make sure the seat is fully locked onto the seat post before si ng.

www.clearwellmobility.co.uk
8
Charging Your Baeries
• Turn o the scooter power and remove the
key
• Slide away the cover of the charger outlet
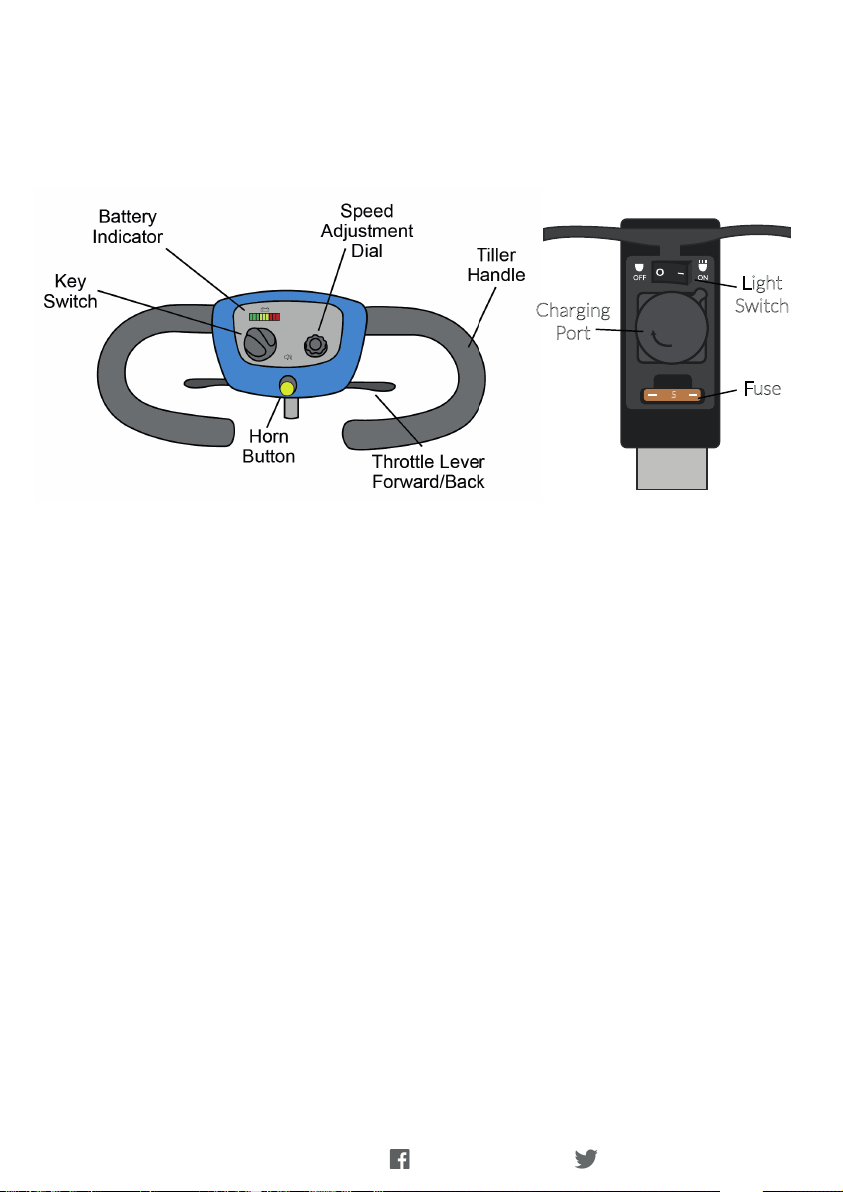
point posioned on the front of the baery box
or ller charging port as shown.
• Put the charger plug into the outlet point.
• Do not switch on the baery charger unl all
the plugs are in posion.
• The LED light on the baery charger will show
amber when charging. The LED light on the
baery charger will show green when the
baeries are fully charged.
Baery Charging
• Turn o the mains power to the charger before removing the charger plug from the
charging outlet.
WARNING: Never aempt to open or disassemble the charger, risk of explosion and
electric shock if baeries are charged when incorrectly wired. Also, risk of electric
shock and damage to the baery if it gets wet.
General Informaon
• Your scooter requires 1x lithium baery that is sealed and maintenance free. Is it
recharged by the supplied o-board charging system or via the ller charging port.
•Fully charge your travel scooters baery 10-12 hours before using it for the rst me.
Charge the baery daily aer every discharge even aer partly discharge.
• If the baery indicator has reached the red LED, charge the baery for 16 hours
minimum, ignoring the charge complete display.
• Even if the scooter is unused for a long period of me, the baery should have a 24
hour charge once a week to ensure it is fully charged.
• Do not charge your baery under extreme temperatures, high temperatures above
30ºc are not recommended as well as low temperatures under 10ºc.
EMI/RFI
All electrically powered vehicles, including scooters are suscepble to
Electromagnec Interference / Radio Frequency Interference (EMI / RFI). This
interference could result in abnormal, unintended movement of your scooter. The FDA
has determined that each make and model of scooter can resist EMI / RFI to a certain
level. This product has been tested and has passed an immunity level of 20 V/m.

@clearwellmobility @clearwellmob 9
Simple Maintenance
Maintenance should only be carried out by a quali ed engineer.
You should check the following before each journey:
1. Visually check the tyres for damage.
2. Check the steering moves freely.
3. The ller knob is ght.
4. The seat is located correctly and locked.
5. Check the armrests are secure.
6. Ba eries are fully charged.
7. The front basket is secure.
Circuit Breaker
There is one bu on for the circuit breaker (located on the ba ery pack) if the power
switch is 'ON' and the ba ery gauge does not move, it is possible an electric current has
overloaded the scooter. Reset the circuit breaker by pressing this bu on.
An - p Wheels
These are factory ed and should not be removed. The an - p assembly is bolted
to the rear frame of the scooter. Never use the scooter without the an - p wheels
ed.
Inspec ng Tyres
The condi on of the tyres depends on how you drive and use your scooter.
Please check the tread depth regularly. Replace the tyres when the tread depth is less
than 0.5 mm.
Important- Possible Faults
As you get used to your vehicle you will get a feel for how it behaves. If something feels
unusual, for instance the vehicle does not accelerate or brake smoothly, the brakes are
not holding on a slope or the steering feels di erent; contact Clearwell immediately
and explain to an engineer what the problem is, as this will help diagnose the problem.
Cleaning the Scooter
Ensure the controller is switched o before cleaning.
The scooter should be wiped over once per week with a slightly damp (not wet) cloth.
Make sure to dry thoroughly a er cleaning.
IMPORTANT: Do not use a hose or pressure or steam washer to clean your scooter.
Cleaning the Control System
Clean the control system and the keypad with a cloth dampened with diluted detergent.
Be careful not to use excessive water or force when cleaning the control keypad.
Simple Maintenance

www.clearwellmobility.co.uk
10
Hazards
Geng On and O the Vehicle
• When geng on, make sure that the vehicle is on level ground and not in freewheel
mode.
• Ensure that the armrests are secure.
• When geng o, park on level ground, turn o the ignion and remove the key
before leaving your seat.
Tiller Lock Knob
• Never drive with the ller lock knob in the locked posion, as injury could result from
not being able to turn.
Kerbs and Obstacles
• Do not ride up kerbs or obstrucons higher than that in the Technical Specicaon
Sheets.
• Always tackle kerbs and obstacles head on.
• The an-p rollers at the rear of the scooter may contact the kerb as you descend,
this may cause a noise, which is normal.
• Take great care to avoid pping.
• Never make sharp turns on slopes.
Try to avoid crossing slopes - always try to drive straight up and down the slope -
never reverse down a slope.
Going Up a Hill
• Lean forward when going up hill.
• Make sure you have enough speed to climb the slope.
• Do not stop or turn the vehicle around.
• If you have to turn whilst going up an incline keep going unl you reach a level area.
• If you have to start on an incline, lean forward and apply power slowly.
• Consider adjusng your seat forward if you’re not comfortable with the gradient.
Going down a hill
• When going down a hill lean back in the seat, and turn the speed control dial to low.
• If you are not comfortable with the hill gradient, consider adjusng your seat posion
further back.
Ramps
• When using a ramp for access, please ensure that it is capable of taking the combined
weight of the scooter and yourself and ensure that the ramp is stable and properly
secured.

@clearwellmobility @clearwellmob 11
Stowed Transport
•Follow the disassembly instruc ons to correctly dismantle your scooter for stowed
transport.
Transporta on in Vehicles
• This scooter is not suitable to use as a seat in a vehicle, it has not been crash tested.
• For transporta on by road, rail, sea or air, please contact the appropriate carrier.
Turning
• Slow down and look in the direc on you are travelling.
• Sound the horn on blind corners.
Bad Weather
• This product should not be used in snowy or icy condi ons.
• Ice, snow and slippery surfaces such as manhole covers, wet grass and drains can
a ect braking and steering.
Solid Tyres
• Your vehicle is ed with solid tyres. Regularly check them for signs of damage or
wear.
Front Basket
• The basket mounted on the front has a weight limit of 10lbs (5kgs). Do not
exceed this as it could a ect the steering.
Handlebars
• Do not carry or a ach anything to the handlebars. Anything a ached to the
vehicle handlebars will a ect the control of the vehicle.
Floor Area
• Do not use the oor area to carry addi onal items.
Other Items
• Only t approved products or accessories.
Child Safety
• This product is designed to be operated by adults.
• Children should not be allowed to tamper with the controls or play on the vehicle.
• Do not carry children as passengers, this product is designed for single person use
only.
Hazards

www.clearwellmobility.co.uk
12
Troubleshoong
Troubleshoong Guide
This table is a guide to fault nding. The diagnosc ash codes for your scooter are
designed to help you perform basic troubleshoong quickly and easily. A diagnosc
ash code ashes from the Power light in the event one of the condions listed below
develops.
Flash
Codes
Condion Soluon
1Baery charge is too low Charge baeries
2Baery charge is depleted Charge baeries
3The scooters baery voltage is too high to
operate the scooter
Unplug charger and/or turn key o, then
back on again. If traveling down a slope,
reduce scooter speed to the minimum
seng
4Power me exceeded Turn the scooter o for a few minutes
then turn it back on
5 Brake error Ensure the manual freewheel lever is in
the drive posion and restart the scooter.
There is a fault with the magnec brake
or wiring - contact your authorised dealer
for assistance.
6Throle control lever not at centre posion
at start up
If the baeries are fully charged, then
return the throle control lever to centre
posion, turn scooter o and back on.
7 Speed pot error Contact Clearwell Mobility for assistance
8Motor voltage error Contact Clearwell Mobility for assistance
9 Other internal errors Contact Clearwell Mobility for assistance

@clearwellmobility @clearwellmob 13
Troubleshoo ng
Symptom Possible Solu on
Scooter does not move 1. Key switch is not 'ON'
2. Main circuit breaker tripped
3. Brake release lever in 'Freewheel
Mode'
4. Charger connected to outlet
5. Ba ery power low
6. Scooter shuts down to conserve
ba ery
7. Controller error
1. Turn key switch 'ON'
2. Reset circuit breaker
3. Place lever in 'Drive Mode'
4. Disconnect charger
5. Recharge ba ery
6. Turn key switch 'OFF' then 'ON'
7. Check power light for Flash Code
(see previous page)
Range less than
expected
1. Charging too infrequently
2. Defec ve or worn out ba ery
3. Cold weather reduces ba ery life
4. Defec ve charger
1. Charge scooter more o en
2. Load test ba eries, if necessary
replace
3. Allow ba eries to reach room
temperature and then fully recharge
4. Contact your scooter dealer
Brake squeals 1. Dirt in brake pad 1. Blow dirt out with air pressure hose
Brake release lever
s cks
1. Rust and corrosion 1. Spray ball detent area with
lubrica on oil

www.clearwellmobility.co.uk
14
Warranty
Repairs- Aer Sales Service
Your original receipt acts as your
guarantee and conrms your guarantee
period. Please make sure you retain it.
The guarantee does not cover you against
faults caused by accidental damage or
misuse. For further details visit www.
clearwellmobility.co.uk/warranty-
informaon. If your purchase is not
working correctly, please refer to the
‘troubleshoong’ chapter in this manual.
If a fault occurs which you cannot resolve
through following the advice and
informaon contained within this
instrucon manual, the next step is to
contact Clearwell Mobility on 01444 253
300.
When you contact Clearwell Mobility you
will need to give the following details:
1. Your name, address and post code
2. Your telephone number
3. Clear and concise details of fault
4. The purchase date as found on your
receipt
5. The model and serial number of your
scooter (These can be found on the label
stuck to the outside of your scooter pack).
IMPORTANT: If you call out an engineer
to a fault listed under the heading
‘troubleshoong’ or to repair a fault
caused by incorrect use, a call out charge
will be made even if the scooter is under
guarantee.
Spare Parts
Always insist on genuine spare parts.
An authorised Clearwell Mobility
engineer should service this product and
only genuine spare parts should be used.
Under no circumstances should you
aempt to repair the product yourself.
Repairs carried out by inexperienced
persons may cause injury or further
damage to the equipment.
One Year Warranty
Clearwell Mobility warrants its products
against defects in materials and
workmanship for a period of one year,
providing the products are operated and
maintained in accordance with the vehicles
owners manual. This warranty is limited to
the original purchaser.
If a defect appears within the warranty
period and the purchaser has given
Clearwell Mobility immediate noce, the
company will repair or replace the part. Any
descripon, specicaons, samples,
models, bullens or similar materials used
in connecon with the sales of Clearwell
Mobility products are for the purpose of
idenfying the equipment and are not to be
construed as expressed warranes.
Clearwell Mobility shall not be liable for
any indirect or consequenal damages.
Clearwell Mobility’s liability on any claim
of any kind including negligence for any
loss or damage arising out of, connected to,
or resulng from the design, manufacture
or use of the equipment shall in no case
exceed the price paid by the purchaser for
the equipment.
This limited warranty does not cover
normal maintenance service, or periodic
adjustments necessitated by normal wear
and tear.

@clearwellmobility @clearwellmob 15
Technical Specifi ca on
Weight capacity 20st (125kg)
Overall length 41" (103.5cm)
Overall width 19" (49cm)
Overall height 36" (92cm)
Total mass (without ba eries) 28kg
Total mass (with ba eries) 30.7kg
Mass of the heaviest part 9.9kg
Max angle capacity 10º
Max. speed forward 4mph (6km/h)
Suspension Full Ac ve Front & Rear
Seat height 40-48cm
Seat width 46cm
Turning radius 54" (137cm)
Range Up to 10 miles (16km)
Ba ery charger 2 Amp
Ba ery type 10Ah 240Wh Lithium
Charging type Ba ery box/Tiller
Motor 120W
Brake Automa c Electromagne c
Ground clearance 2" (5.5cm)
Tyres 190mm (7.5") Solid Puncture Proof
Lights Front LED
Aguna Ultralight Speci ca ons

www.clearwellmobility.co.uk
16
Aguna Endurance Specicaons
Weight capacity 20st (125kg)
Overall length 41" (103.5cm)
Overall width 19" (49cm)
Overall height 36" (92cm)
Total mass (without baeries) 28kg
Total mass (with baeries) 30.7kg
Mass of the heaviest part 9.9kg
Max angle capacity 10º
Max. speed forward 4mph (6km/h)
Suspension Full Acve Front & Rear
Seat height 40-48cm
Seat width 46cm
Turning radius 137cm (54")
Range Up to 20 miles (32km)
Baery charger 2 Amp Lithium
Baery type 21Ah 504Wh
Charging type Baery box/Tiller
Motor 120W
Brake Automac Electromagnec
Ground clearance 2" (5.5cm)
Tyres 7.5" (19cm) Solid Puncture Proof
Lights Front LED
The Aguna Endurance comes with all the features of, and funcons in the same way
as, the Aguna Ultralight. With a 21Ah baery, it also has increased range of up to 20
miles on a single charge.

@clearwellmobility @clearwellmob 17

Clearwell Mobility
21 Albert Drive
Burgess Hill
West Sussex
RH15 9TN
Call Us: 01444 253 300
www.clearwellmobility.co.uk
Table of contents
Other Clearwell Mobility Scooter manuals

Clearwell Mobility
Clearwell Mobility Aguna Comfort User manual

Clearwell Mobility
Clearwell Mobility Admiral Mk3 User manual

Clearwell Mobility
Clearwell Mobility Helios HD User manual

Clearwell Mobility
Clearwell Mobility Skipper User manual

Clearwell Mobility
Clearwell Mobility Argent User manual

Clearwell Mobility
Clearwell Mobility Mazarine User manual