Clearwell Mobility Argent User manual

MOBILITY SCOOTER
USER MANUAL
Argent

www.clearwellmobility.co.uk
2
Contents
Intended Use of the Vehicle
Dashboard Controls
Freewheeling the Scooter
Adjustments
Battery Charging and Simple Maintenance
Hazards
Troubleshooting
Guarantee & Warranty
Technical Specication
Intended Use Of The Vehicle
This vehicle is designed to help a single person (up to the maximum recommended
weight) who requires a scooter for their mobility. The scooter is intended for indoor use
in large areas and outside use on pavements up to a maximum speed of 4mph. It is not
intended to be used for towing or in use in muddy or soft areas of ground. Users could
endanger themselves and others if they are not capable of driving the scooter safely.
It is up to the users to ensure that they have the manual dexterity to drive the vehicle,
adequate sight and hearing to perceive danger in time, and can at all times operate the
scooter safely. If in doubt we suggest you consult a healthcare professional for advice.
Modications
Any modications to the specications will invalidate the warranty and may render the
vehicle dangerous.
Clearwell Mobility
Technical Support Helpline
Contents and Introduction
Page
2
3
4
5-6
7
8-9
10
11
12
MODEL:
SERIAL NUMBER:
DATE OF PURCHASE:
01444 253 300

@clearwellmobility @clearwellmob 3
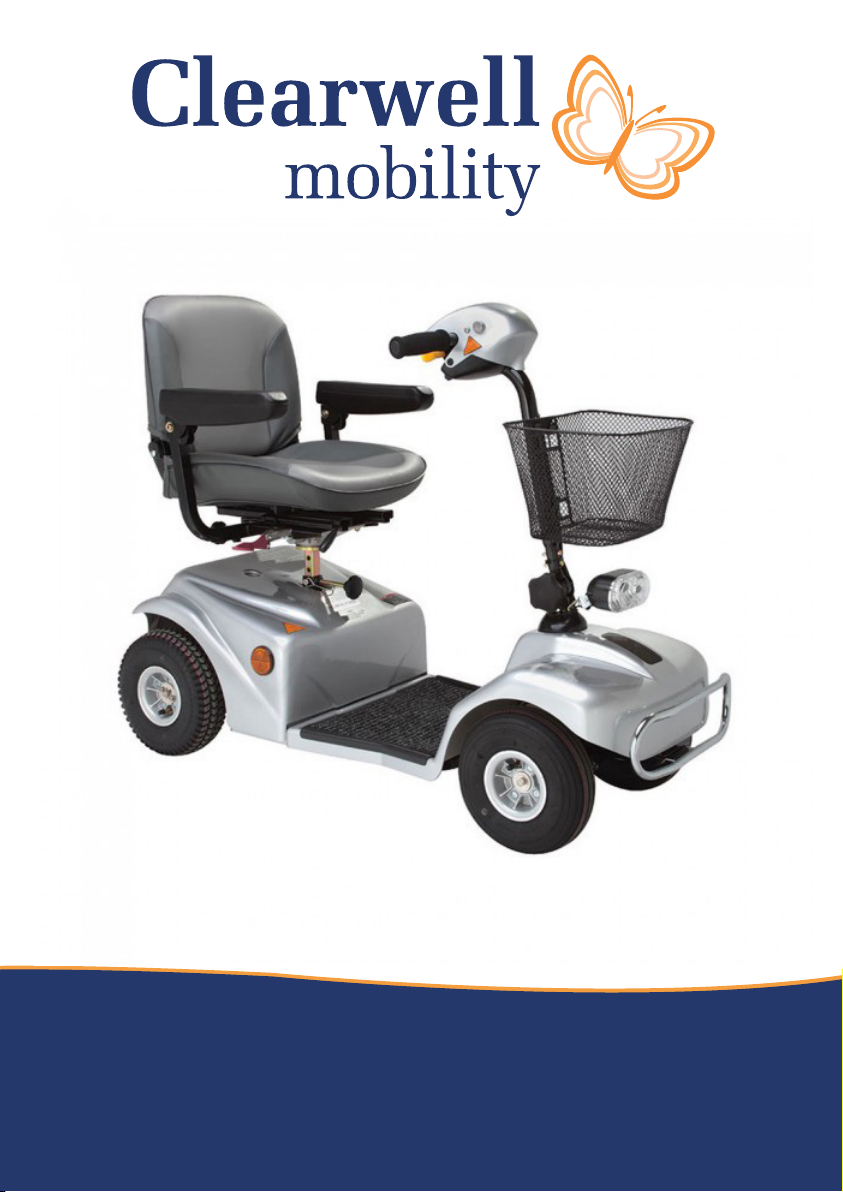
Dashboard Controls
Before driving your vehicle it is important to familiarise yourself with the controls.
Do not attempt to drive the vehicle until you have understood the instructions
Argent
Forward LeverReverse Lever
LightsHorn
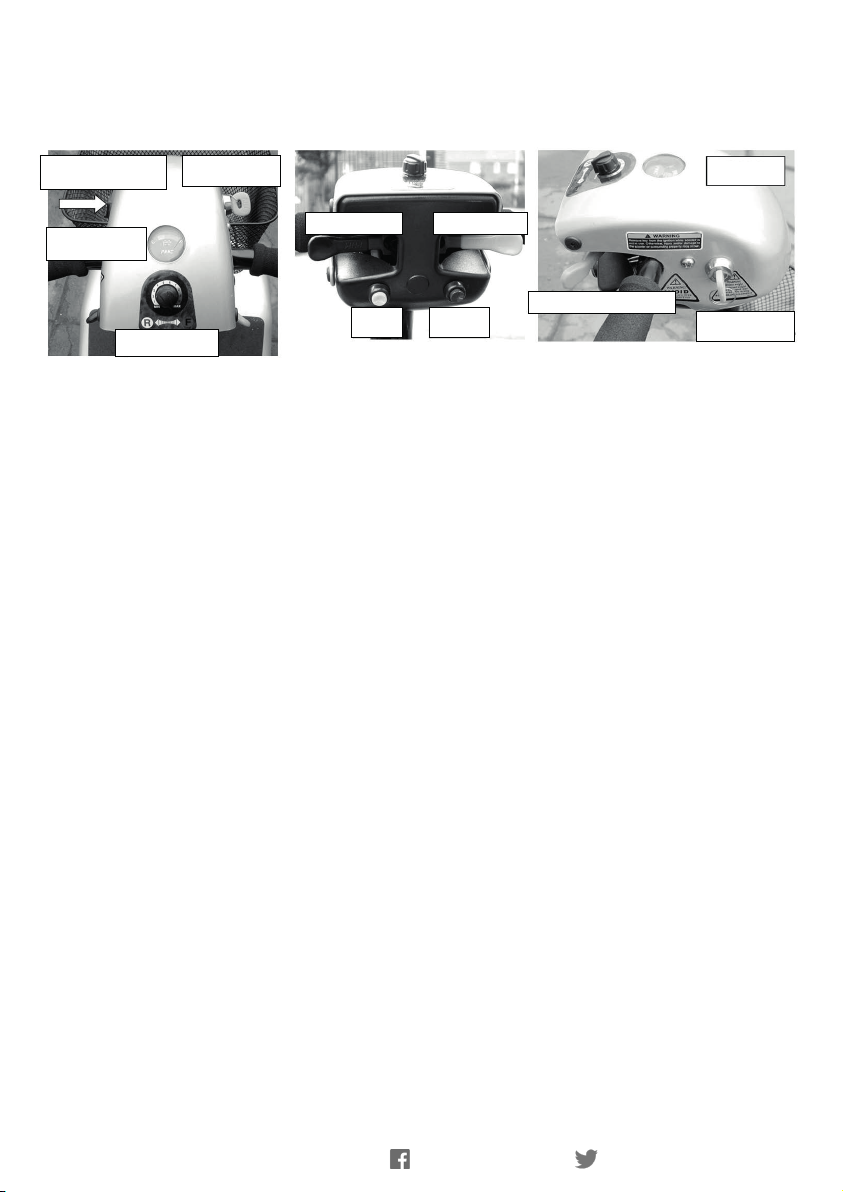
Forward Control Lever
Ignition Switch
Ignition Switch
Battery Charger
Socket
Battery
Indicator
Speed Control
To Operate: Turn on the ignition
Finger Control: Push on the right hand lever and the machine moves forward. The more
you push the lever the faster the scooter goes. To brake, release the lever. Again the
faster the lever is released the quicker you will stop. To reverse, push in the left lever. Do
not push both levers at once.
When the vehicle comes to a stop the automatic handbrake will engage. Do not turn off
the ignition when the vehicle is moving. It will damage the braking
system.
Description of Dashboard Controls
Battery Indicator: When the ignition is switched on, the needle will move from left to
right. This instrument shows the level of charge in the batteries. When in the green area,
the batteries are fully charged. When in the yellow area, the batteries need charging
and when in the red area, the batteries urgently need recharging.
Note: When the vehicle is climbing a steep incline or starting off , the level may drop
momentarily, this is normal.
Warning Buzzer: This will sound if the battery charger is left in or the freewheel is not
engaged. If you checked both of these, turn off the ignition and turn it on again, the
buzzer should stop and the vehicle should work correctly. If the buzzer continues to
sound, there is a problem with the vehicle, contact Clearwell Mobility.
Horn: Press the button and the horn will sound. Release and the horn will stop.
Ignition Switch: Always remember to remove the key when not in use. Do not leave the
ignition on when not in use, especially when charging the vehicle.
Lights: To switch on the lights, press the button and release. To switch off, press again.

www.clearwellmobility.co.uk
4
Freewheeling the Scooter
When the vehicle is switched off the brakes are automatically engaged. This is called
“Fail-safe Braking”. If the batteries are at, the same thing happens.
There may be occasions where you may wish to move the vehicle without power. To do
this there is a freewheel lever.
The Freewheel lever allows the vehicle to be pushed without power. The lever is located
on the right hand side of the rear of the vehicle when standing behind it.
• Move the lever to the down position. The vehicle can now be pushed in Freewheel.
• Move the lever up to engage. The vehicle is now braked - This is the normal operating
position.
• Do not sit on the machine at any time when the braking is disengaged.
Unlocked Locked

@clearwellmobility @clearwellmob 5
Adjustments
Armrest Adjustment
When getting seated on the scooter, lift the
armrest up. When riding, always have the
armrest in the down position.
If you require more room in the width of the
seat, undo the black knobs as shown. Slide the
armrests in or out to suit. Tighten both knobs
to clamp, (one on each armrest). To ensure that
the user is sitting centrally, the armrests should
always be adjusted to be equidistant from the
centre of the seat.
Check the knobs are tight regularly.
Seat Adjustment
CAUTION: Make sure the seat is locked
in the forward position before driving the
vehicle.
Revolving Seat
To aid access a revolving seat is tted. To
access the seat, pull the red lever up at the
bottom of the base of the seat and turn so
the seat is facing you and is locked. (This is
automatic). Sit on the seat, pull the lever up
and turn to the forward position.
Seat Height Adjustment
Remove the seat by lifting the revolving seat
adjustment lever, turn the seat and lift off.
Undo the height adjustment knob until the
mounting can be lifted. Move the seat into
the desired position and tighten the knob.

www.clearwellmobility.co.uk
6
Adjustments
Tiller Adjustment
To adjust the tiller undo the black
knob as shown. Move the tiller to the
desired position and tighten the knob.
Transporting Your Scooter
If you need to transport your vehicle follow these instructions.
NOTE: The machine is heavy and you will need assistance when removing the batteries
and loading it into a vehicle.
Preparation: Turn off the ignition and remove key. Remove the front basket by lifting.
Press down on the revolving seat lever to turn the seat slightly and lift it upwards.
(When reassembling the seat make sure it is placed correctly and turn until it locks.)
Rear Cover: The rear cover is held on with Velcro, to remove; pull upwards.
Battery: Pull the Velcro retaining strap apart to release the batteries. There is a red
connector and a black connector. Both of these must be disconnected before removal.
Tiller Clamp: Fold down the tiller by releasing the tiller clamp and folding down to its
lowest position.
Separating Front & Rear Section: Split the main connector, this is coloured orange.
Hold both parts of the connector, press down on the plastic lock and pull the
connector apart. Remove the locating pin that holds the two halves of the frame
together. Separate the frame by pulling apart. Move the two halves of the frame up and
down as you move apart.

@clearwellmobility @clearwellmob 7
Charging Your Scooter
The charging socket is located on the
left side of the tiller head. Slide round
the protective cover and push in the
round silver plug.
CAUTION: Make sure the 3 pins line
up. Do not force the plug into the
socket and always close the protective
cover when not in use.
Battery Charger
When the charger is connected and switched on, the power lamp will indicate a steady
red. The green lamp will blink to indicate charging.
When the batteries are charged, the green lamp will change to steady green. If the
red lamp blinks there is a fault - contact Clearwell Mobility.
Always leave the charger on for a full cycle of 8-10 hours before disconnecting. This
should be done even if the charger indicates full charge.
Simple Maintenance
You should check the following before each journey:
1. Visually check the tyres for damage and their pressure. The tyres should be 35 psi all
round.
2. Check the steering moves freely.
3. The tiller clamp is tight.
4. The seat is located correctly and locked.
5. Check the armrests are tight.
6. Batteries are fully charged.
7. The front basket is secure.
Important- Possible Faults
As you get used to your vehicle you will get a feel for how it behaves. If something feels
unusual, for instance the vehicle does not accelerate or brake smoothly or the steering
feels different; contact Clearwell Mobility.
Power Overload Switch
Located under the seat is the overload switch. It acts as a resettable fuse should the
power requirement be too large. This will activate the brakes and the vehicle will stop.
Wait for a few minutes and push the button in.
Charging
Socket
Battery Charging & Simple Maintenance

www.clearwellmobility.co.uk
8
Hazards
Getting On and Off the Vehicle
• When getting on, make sure that the vehicle is on level ground and not in freewheel
mode.
• Ensure that the armrests are secure.
• When getting off, park on level ground, turn off the ignition and remove the key
before leaving your seat.
Handlebar Position
• Before driving, the handlebars should always be lowered into the driving position.
This correctly positions the headlight and ensures all the controls are in the right
positions for comfortable operation.
Tiller Position
•Never drive with the tiller in the unlocked position, as injury could result from
unintended tiller movement whilst driving.
Kerbs and Obstacles
• Do not ride up kerbs or obstructions higher than that in the Technical Specication
Sheets.
• Always tackle kerbs and obstacles head on.
• The anti-tip rollers at the rear of the scooter may contact the kerb as you descend,
this may cause a noise, which is normal.
• Take great care to avoid tipping.
• Never make sharp turns on slopes.
Going Up a Hill
• Lean forward when going up hill.
• Make sure you have enough speed to climb the slope.
• Do not stop or turn the vehicle around.
• If you have to turn whilst going up an incline keep going until you reach a level area.
• If you have to start on an incline, lean forward and apply power slowly.
• Consider adjusting your seat forward if you’re not comfortable with the gradient.
Going Down a Hill
• When going down a hill lean back in the seat, and turn the speed control dial to low.
• If you are not comfortable with the hill gradient, consider adjusting your seat position
further back.
Try to avoid crossing slopes - always try to drive straight up and down the slope -
never reverse down a slope.

@clearwellmobility @clearwellmob 9
Turning
• Slow down and look in the direction you are travelling.
• Sound the horn on blind corners.
Bad Weather
• This product should not be used in snowy or icy conditions.
• Ice, snow and slippery surfaces such as manhole covers, wet grass and drains can
affect braking and steering.
Pneumatic tyres
• Your vehicle is tted with pneumatic tyres to give you a smoother ride over uneven
ground.
• Repair of tyres or wheels should be carried out by Clearwell Mobility.
• If you are worried about punctures contact Clearwell for advice on puncture proong
your tyres.
Front Basket
• The basket mounted on the front has a weight limit of 10lbs (5kgs). Do not
exceed this as it could affect the steering.
Handlebars
• Do not carry or attach anything to the handlebars. Anything attached to the
vehicle handlebars will affect the control of the vehicle.
Floor Area
• Do not use the oor area to carry additional items.
Other Items
• Only t approved products or accessories.
Child Safety
• This product is designed to be operated by adults.
• Children should not be allowed to tamper with the controls or play on the
vehicle.
• Do not carry children as passengers.
• The product is designed for single person use only.
Hazards

www.clearwellmobility.co.uk
10
Troubleshooting
Troubleshooting Guide
This table is a guide to fault nding. The fault may be a simple x. If you have any doubts
call Clearwell Mobility.
Symptom Solution
• Unit does not move.
Check: Does the battery level indicator
work when the ignition is switched on?
• Freewheel is engaged.
• Batteries at- Check level.
• Steering is loose or wobbly when
driven.
Check: Have you hit a kerb or obstacle
hard? Are the handlebars straight when
riding in a straight line?
• Check for tyre damage.
• Damaged steering - Contact Clearwell
Mobility
• Loose seat- Contact Clearwell Mobility
• Vehicle behaves erratically when
driven.
Check: Does the vehicle judder or cut
out?
• Possible electronic problems- Contact
dealer
• Short Range
Check: If the red charging lamp is
blinking after all night charging, it could
be a defective battery.
• Binding front wheels.
• Binding rear wheel- Emergency brake.
Switch into freewheel and the vehicle
should move easily. If not contact
Clearwell Mobility.

@clearwellmobility @clearwellmob 11
Warranty
Repairs- After Sales Service
Your original receipt acts as your
guarantee and conrms your guarantee
period. Please make sure you retain it.
The guarantee does not cover you against
faults caused by accidental damage or
misuse. For further details visit www.
clearwellmobility.co.uk/warranty-
information. If your purchase is not work-
ing correctly, please refer to the ‘trouble-
shooting’ chapter in this manual. If a fault
occurs which you cannot resolve through
following the advice and information
contained within this instruction manual,
the next step is to contact Clearwell
Mobility on 01444 253 300.
When you contact Clearwell Mobility you
will need to give the following details:
1. Your name, address and post code
2. Your telephone number
3. Clear and concise details of fault
4. The purchase date as found on your
receipt
5. The model and serial number of your
scooter (These can be found on the label
stuck to the outside of your scooter pack).
IMPORTANT: If you call out an engineer
to a fault listed under the heading
‘troubleshooting’ or to repair a fault
caused by incorrect use, a charge will be
made even if the scooter is under
guarantee.
Spare Parts
Always insist on genuine spare parts
An authorised Clearwell Mobility
engineer should service this product and
only genuine spare parts should be used.
Under no circumstances should you
attempt to repair the product yourself.
Repairs carried out by inexperienced
persons may cause injury or serious
malfunctioning.
One Year Warranty
Clearwell Mobility warrants its products
against defects in materials and
workmanship for a period of one year,
providing the products are operated and
maintained in accordance with the vehicles
owners manual. This limited warranty is
limited to the original purchaser.
If a defect appears within the stated limited
warranty period and the purchaser has
given Clearwell Mobility immediate notice,
the company will repair or replace the part.
Any description, specications, samples,
models, bulletins or similar materials used
in connection with the sales of Clearwell
Mobility products are for the sole purpose
of identifying the equipment and are not to
be constructed as expressed warranties.
Clearwell Mobility shall not be liable for
any indirect or consequential damages.
Clearwell Mobility’s liability on any claim of
any kind including negligence for any loss
or damage arising out of, connected to, or
resulting from the order of the performer
thereof the design, manufacture, sale
delivery, resale, direction and instructions,
inspection, repair or use of any equipment
covered by or furnished by, under this
order, shall in no case exceed the price paid
by the purchaser for the equipment.
This limited warranty does not cover
normal maintenance service, or periodic
adjustments necessitated by normal wear
and tear.

www.clearwellmobility.co.uk
12
Description of information provided Type of information Argent Specications
Scooter class Class 2 or 3 Class 2
Overall dimensions fully assembled Length x Width x Height in mm (in) 1250 (49) x 540 (21) x 1040 (41)
Dimensions seat removed tiller folded Length x Width x Height in mm (in) 1250 (49) x 540 (21) x 570 (22)
Maximum carry capacity Kg, (st) 136kg (21.4 St)
Mass (weight) including batteries Kg, (lb) 83kg (183lbs)
Battery voltage and capacity Volts and ampere hours Two 12V 33 Ah
Type of seat Description Adjustable swivel and adjustable height
Mass (weight) Kg, (lb) 10.9 kg (24lbs)
Mass (weight) of drive train Kg, (lb) 12.6 kg (27.8 lbs)
Mass (weight) of front section Kg, (lb) 20.3 kg (44.8lbs)
Mass (weight) of rear section Kg, (lb) 17.7kg (39lbs)
Wheel size Front/rear mm (in) 255 x 77.5 (10” x 3”)
Type of tyres Type Pneumatic
Tyre pressure normal Front/rear p.s.i (bar) 35p.s.i (2.41 bar)
Maximum speed Kmph (mph) 6.4 kmph (4mph)
Minimum braking distance from maximum speed Metres 1.5m
Range on full charge and at ground Km (miles) 32 km (20 miles)
The turn around width Metres and ft 2.87m (9ft 5”)
The maximum safe slope Degrees 8 °
The maximum climbing ability facing upwards (rider
weighs less than 85kg or 189lbs)
Degrees of slope 8 °
Ground clearance In mm (in) 100mm (4”)
The maximum obstacle climbing ability In mm (in) 50mm (2”)
The maximum height of kerb which vehicle can
descend safely
In mm (in) 50mm (2”)
Technical Specication

@clearwellmobility @clearwellmob 13

www.clearwellmobility.co.uk
14

@clearwellmobility @clearwellmob 15

Clearwell Mobility
21 Albert Drive,
Burgess Hill
West Sussex
RH15 9TN
Call Us: 01444 253 300
www.clearwellmobility.co.uk
Table of contents
Other Clearwell Mobility Scooter manuals

Clearwell Mobility
Clearwell Mobility Aguna Comfort User manual

Clearwell Mobility
Clearwell Mobility Helios HD User manual

Clearwell Mobility
Clearwell Mobility Skipper User manual

Clearwell Mobility
Clearwell Mobility Mazarine User manual

Clearwell Mobility
Clearwell Mobility Aguna Ultralight User manual

Clearwell Mobility
Clearwell Mobility Admiral Mk3 User manual