manuals.online logo
Brands
  1. Home
  2. •
  3. Brands
  4. •
  5. Traxxas
  6. •
  7. Motorized Toy Car
  8. •
  9. Traxxas 7885 User manual

Traxxas 7885 User manual

Kit Contents:
• High-Voltage Power Amplifier*
• 3x12mm button-head screws (2)
• Front LED light bar*
• 3x8mm cap-head screws (2)
• Rear LED light bar mount*†
• 3x10mm flat-head screws (2)
Tools needed (all not included and sold separately):
• Tapered body reamer
(part #3433 or #3433X)
• 1.5mm hex wrench
• 2.0mm hex wrench
• 2.5mm hex wrench
Covers Part #7885
LED Light Bar Kit Installation Instructions
TRAXXAS.com
Traxxas, 6250 Traxxas Way, McKinney, TX 75070,
Phone: 972-549-3000, Fax: 972-549-3011, e-mail: [email protected]
HKC18090-R04 Rev 221110
• Rear LED light bar*
• 3x8mm button-head screws (2)
• Extension harness (long)*
• Extension harness (short)*
• 3x10mm button-head screws (2)
• Zip ties (10)
#6590*
#7882*
#7882*
#7884* #7883*
*parts also available separately †not required for XRT
#7883*†
XRT™ Body Modification
Using a tapered body reamer, carefully cut a
small 8mm hole in the truck body. The hole
needs to be large enough for the rear light
bar harness connectors to pass through (note
the hole diameter measurements on the body
reamer).
Install the high-voltage power amplifier on the truck chassis. Ensure that
the connectors on the amplifier face the front of the vehicle. Secure with
the 3x12mm button-head screws.
Tapered Body Reamer
Diameter Measurements
REAR
X-Maxx® Body Modification
Install the included template on the truck body. Align the arrows with
the roof line and rear window as shown. Using a tapered body reamer,
carefully cut the holes in the truck body for the screw bosses on the
rear LED light bar mount and the rear light bar connectors (note the
hole diameters indicated on the templates and the corresponding diameter
measurements on the body reamer).
1 X-MAXX
2 X-MAXX
3 X-MAXX
4 X-MAXX
2 XRT
3 XRT
4 XRT Plug the 8-pin connector
from the high-voltage
power amplifier into the
accessory port on the
ESC. The amplifier and
lights will turn on when
the ESC is powered on.
CAUTION: RISK OF INJURY!
Use care with
hobby knives, tapered reamers, and other cutting tools as they are
extremely sharp and can cause severe injury, deep cuts, and/or punctures.
CAUTION: RISK OF DAMAGE TO
ELECTRONICS!
To prevent damage to the electronic
speed control (ESC) and/or the high-voltage power amplifier, ensure the
battery is disconnected before plugging the amplifier into the ESC.
Visitez Traxxas.com/manuals pour télécharger
les instructions dans votre langue.
Visite la página Traxxas.com/manuals para
descargar el instrucciones en su idioma.
Auf Traxxas.com/manuals, können Sie
anleitung in Ihrer Sprache downloaden.
Compatible with the following Traxxas
electronic speed controls (sold separately):
Velineon® VXL-6s (part #3485)
Velineon® VXL-8s (part #3496)
FRONT
8mm Hole
BODY UNDERSIDE VIEW
Remove the 3x25mm button-
head screws (2) from the
electronic speed control (ESC)
to remove the cooling fan cover.
Remove the accessory port
cover; then, reinstall the cooling
fan cover on the ESC using the
3x25mm button-head screws.
Be careful not to pinch the ESC
wires during reinstallation.
3x25mm BCS
Accessory Port
Cover
1 XRT
FRONTFRONT
3x12mm
BCS 3x12mm BCS
XRT Wiring Diagram
Remove the 4x16mm button-head cap screws (2) to remove the front
bumper from the bumper mount. Install the front LED light bar on
the front bumper using the included 3x8mm cap screws (2); reinstall
the front bumper. Plug the connector into the high-voltage power
amplifier port A (white).
Route the connectors from
the rear light bar through
the 8mm reamed hole
to the inside of the truck
body. Reinstall the roof
skid. Plug the connectors
(red and blue) into the
long #7882 extension
harness.
Plug the short #7882 extension harness into
the high-voltage power amplifier ports (red
connector to C, blue connector to D).
Plug the other end (large black connector)
into the long #7882 extension harness.
Use the supplied zip ties to secure all wiring to the chassis.
Remove 3x12mm
cap screws (8) to
remove the roof
skid from the truck
body. Attach the
rear LED light bar to
the roof skid using
the included 3x8mm
button-head cap
screws (2).
5 XRT
7 XRT 8 XRT
9 XRT
6 XRT
Front LED Light Bar (white)
Rear LED Light Bar (tail lights) (red)
Rear LED Light Bar (reverse lights) (blue)
Not used (yellow)
3x8mm
CS
3x8mm
CS
3x8mm
BCS
3x12mm
CS
3x12mm
CS
4x16mm
BCS
From Long Extension Harness /
Rear LED Light Bar on Body
High-VoltageHigh-Voltage
Power AmplierPower Amplier
WiringWiring
Front LED LightFront LED Light
Bar WiringBar Wiring
X-Maxx Wiring Diagram
3x10mm
FCS
3x10mm
BCS
3x8mm
CS
3x8mm
CS
3x10mm
BCS
3x10mm
FCS
Install the front LED light bar on
the front bumper using the two
included 3x8mm cap screws.
Plug the connector into
the high-voltage power
amplifier port A (white).
Route the connectors from the rear
light bar through the larger reamed
hole to the inside of the truck body.
Plug the short #7882 extension harness into
the high-voltage power amplifier ports (red
connector to C, blue connector to D).
Plug the other end (large black connector)
into the long #7882 extension harness.
Use the supplied zip ties to secure all wiring to the chassis.
5 X-MAXX 6 X-MAXX 7 X-MAXX
8 X-MAXX 9 X-MAXX
10 X-MAXX
FRONT
Rear LED Light
Bar Mount
Rear LED
Light Bar
Attach the rear LED
light bar to the mount
using the two included
3x10mm button-head
cap screws. Plug the
connectors (red and
blue) into the long #7882
extension harness.
Install the rear LED light bar mount
on the truck body using the two
included 3x10mm flat-head screws.
Rear LED
Light Bar
Front LED Light Bar (white)
Rear LED Light Bar (tail lights) (red)
Rear LED Light Bar (reverse lights) (blue)
Not used (yellow)
From Long Extension Harness /
Rear LED Light Bar on Body
High-VoltageHigh-Voltage
Power AmplierPower Amplier
WiringWiring
Front LED LightFront LED Light
Bar WiringBar Wiring
Warranty Information
Traxxas electronic components are warranted to be free from defects
in materials and workmanship for a period of 30 days from the date of
purchase.
Limitations: Any and all warranty coverage does not cover replacement
of parts and components damaged by abuse, neglect, improper or
unreasonable use, crash damage, water or excessive moisture, chemical
damage, improper or infrequent maintenance, accident, unauthorized
alteration or modification or items that are considered consumable.
Traxxas will not pay for the cost of shipping or transportation of a defective
component to us.
Traxxas Lifetime Electronics Warranty
After the expiration date of the warranty period, Traxxas will repair
electronic components for a flat rate. Please visit Traxxas.com/support
for a current schedule of warranty costs and fees. The covered repairs are
limited to non-mechanical components that have NOT been subjected
to abuse, misuse, or neglect. Products damaged by intentional abuse,
misuse, or neglect may be subject to additional charges. Traxxas liability,
in no case, shall be greater than the actual purchase price of this product.
For replacement, product must be returned in brand new condition, with
packaging and itemized sales receipt.
If you have questions or need technical assistance, call Traxxas at
1-888-TRAXXAS
(1-888-872-9927) (U.S. residents only)
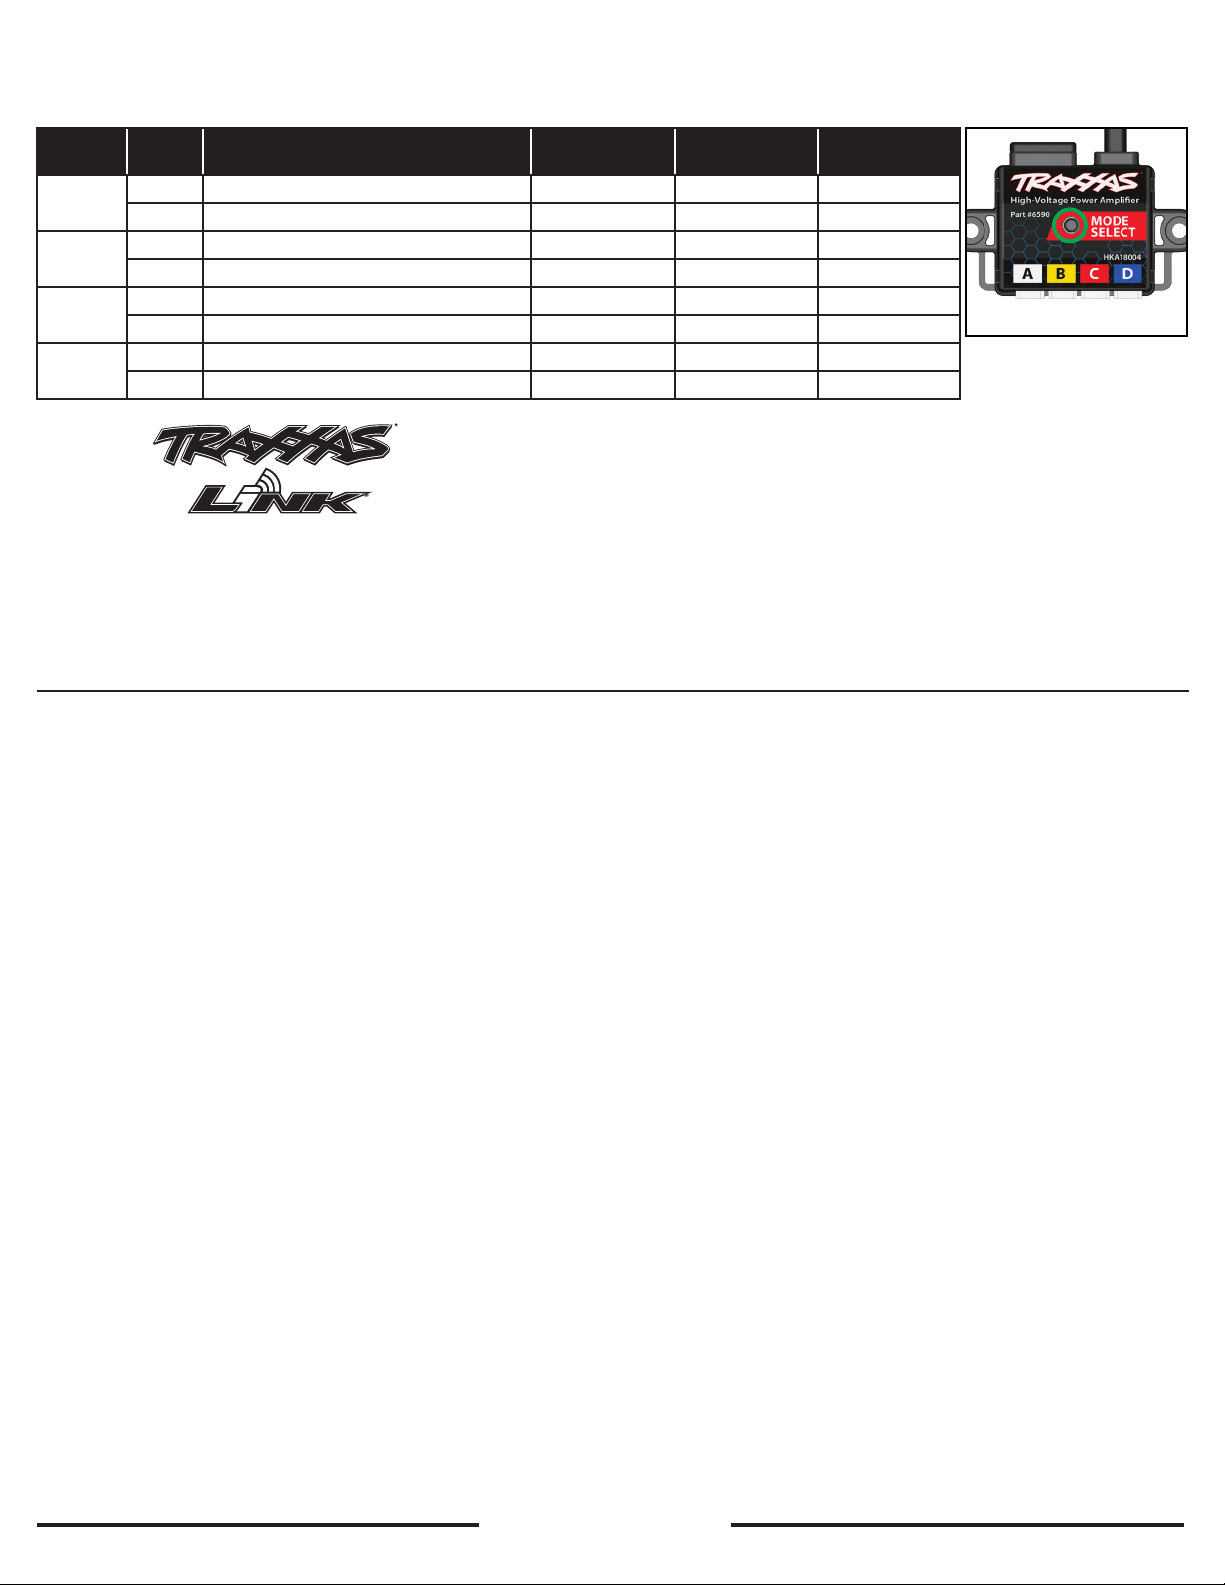
High-Voltage Power Amplifier Operation
The high-voltage power amplifier and lights will turn on when the ESC is powered on. Press the Mode Select button on the amplifier to toggle through
the three lighting modes (Mode 1: Low Beam (default), Mode 2: High Beam, Mode 3: Daytime). The chart below indicates how the lights will function in
each mode.
Connector
Channel
Default Connection
Mode 1
Low Beam Mode
Mode 2
High Beam Mode
Mode 3
Daytime Mode
A1 Low Beam Headlights (front bumper light bar) On O O
2 High Beam Headlights (front bumper light bar) O On O
B3 Low Beam Headlights (front roof light bar) On O O
4 High Beam Headlights (front roof light bar) O On O
C5 Tail Lights On On O
6 Brake Lights On when braking On when braking On when braking
D7 Reverse Lights On when reversing On when reversing On when reversing
8 Not used N/A N/A N/A
Change the high-voltage power amplier settings and gain access to
additional functions using the Traxxas Link App (available in the Apple
App StoreSM or on Google Play™). The TQi transmitter with the Traxxas
Link Wireless Module (part #6511, sold separately) are required.
This device complies with FCC Part 15 & IC RSS-210 rules subject to the following
conditions: (1) This device may not cause harmful interference, and (2) This device must
accept all interference received, including interference that may cause undesired operation.
App Store is a service mark of Apple Inc. Google Play is a trademark of Google Inc.
Replacement Parts
Part # Description
6590 High-Voltage Power Amplier
7882 Extension harness, LED lights (high-voltage)
7883 LED light bar, rear, red (with white reverse light) (high-voltage)
(24 red LEDs, 24 white LEDs, 100mm wide)/ light bar mount
7884 LED light bar, front (high-voltage) (40 white LEDs (double row),
82mm wide)
Mode Select Button
TRAXXAS.com
Traxxas, 6250 Traxxas Way, McKinney, TX 75070,
Phone: 972-549-3000, Fax: 972-549-3011, e-mail: [email protected]

Other Traxxas Motorized Toy Car manuals

Traxxas Slash VXL 58076-1 User manual

Traxxas

Traxxas Slash VXL 58076-1 User manual

Traxxas E-Maxx 3905 User manual

Traxxas

Traxxas E-Maxx 3905 User manual

Traxxas E REVO VXL User manual

Traxxas

Traxxas E REVO VXL User manual

Traxxas Rally 7407 User manual

Traxxas

Traxxas Rally 7407 User manual

Traxxas 58064-2 User manual

Traxxas

Traxxas 58064-2 User manual

Traxxas TRX4M Cheyenne 10 User manual

Traxxas

Traxxas TRX4M Cheyenne 10 User manual

Traxxas Monster Jam 3602 User manual

Traxxas

Traxxas Monster Jam 3602 User manual

Traxxas Slash4x4 68086-1 User manual

Traxxas

Traxxas Slash4x4 68086-1 User manual

Traxxas 4810 User manual

Traxxas

Traxxas 4810 User manual

Traxxas Robby Gordon DAKAR TRUCK EDITION Series User manual

Traxxas

Traxxas Robby Gordon DAKAR TRUCK EDITION Series User manual

Traxxas DRAG SLASH 94076-4 User manual

Traxxas

Traxxas DRAG SLASH 94076-4 User manual

Traxxas TRX4 Cheyenne 10 HIGH TRAIL EDITION User manual

Traxxas

Traxxas TRX4 Cheyenne 10 HIGH TRAIL EDITION User manual

Traxxas TRX4 82056-4 User manual

Traxxas

Traxxas TRX4 82056-4 User manual

Traxxas TRX82056-4SAND User manual

Traxxas

Traxxas TRX82056-4SAND User manual

Traxxas Velineon RUSTLER VXL User manual

Traxxas

Traxxas Velineon RUSTLER VXL User manual

Traxxas Velineon RUSTLER VXL BRUSHLESS User manual

Traxxas

Traxxas Velineon RUSTLER VXL BRUSHLESS User manual

Traxxas Nitro Slash 44054 User manual

Traxxas

Traxxas Nitro Slash 44054 User manual

Traxxas RUSTLER VXL User manual

Traxxas

Traxxas RUSTLER VXL User manual

Traxxas 67086-4 User manual

Traxxas

Traxxas 67086-4 User manual

Traxxas BANDIT VXL User manual

Traxxas

Traxxas BANDIT VXL User manual

Traxxas REVO 5411 User manual

Traxxas

Traxxas REVO 5411 User manual

Traxxas Nitro 4-Tec 3.3 48077 User manual

Traxxas

Traxxas Nitro 4-Tec 3.3 48077 User manual

Traxxas Nitro Sport 45104-1 User manual

Traxxas

Traxxas Nitro Sport 45104-1 User manual

Traxxas 82044-4 User manual

Traxxas

Traxxas 82044-4 User manual

Popular Motorized Toy Car manuals by other brands

Associated Electrics RC8T4 Team Kit manual

Associated Electrics

Associated Electrics RC8T4 Team Kit manual

Kogan KAS1000RRRA user guide

Kogan

Kogan KAS1000RRRA user guide

Jamara 460226 Instruction

Jamara

Jamara 460226 Instruction

EB Excalibur XC9980 user guide

EB Excalibur

EB Excalibur XC9980 user guide

Fisher-Price V2503 owner's manual

Fisher-Price

Fisher-Price V2503 owner's manual

REVELL BMW Z8 Assembly manual

REVELL

REVELL BMW Z8 Assembly manual

Jamara 405165 instruction manual

Jamara

Jamara 405165 instruction manual

Jamara Ice Tiger EP 2,4 GHz Instruction

Jamara

Jamara Ice Tiger EP 2,4 GHz Instruction

Dexton DX-20136 Assembly manual & user guide

Dexton

Dexton DX-20136 Assembly manual & user guide

Team Losi BAJA REY instruction manual

Team Losi

Team Losi BAJA REY instruction manual

Pinghu City Xiao Ming Xing Children's Products Mercedes-Benz GLC 63 S owner's manual

Pinghu City Xiao Ming Xing Children's Products

Pinghu City Xiao Ming Xing Children's Products Mercedes-Benz GLC 63 S owner's manual

Tamiya MAN TGX 18.540 user manual

Tamiya

Tamiya MAN TGX 18.540 user manual

Kyosho turno optima manual

Kyosho

Kyosho turno optima manual

Mattel THE WORLD OF Cars Tru Lightning Storm... instructions

Mattel

Mattel THE WORLD OF Cars Tru Lightning Storm... instructions

Jamara Dakar EP 2,4 GHz Instruction

Jamara

Jamara Dakar EP 2,4 GHz Instruction

Ansmann Racing Short Course 4wd Nitro Technical data

Ansmann Racing

Ansmann Racing Short Course 4wd Nitro Technical data

Serpent 950 instruction manual

Serpent

Serpent 950 instruction manual

GL GLF-1 Assembly guide

GL

GL GLF-1 Assembly guide

manuals.online logo
manuals.online logoBrands
  • About & Mission
  • Contact us
  • Privacy Policy
  • Terms and Conditions

Copyright 2025 Manuals.Online. All Rights Reserved.