TRD MS343-18001 User manual

No. 1201-T1018001 1/8
MS343-18001/MS343-18002
Rear Bumper Spoiler
Attaching and Handling Procedures
Thank you for buying TRD’s rear bumper spoiler, which is applicable to 86 car models.
This document describes procedures and notes for assembling and handling the above product.
Before attachment, be sure to read this document, in order to become familiar with attaching and
handling work.
Be sure to present this document to the customer.
List of product numbers and applicable cars
Product No. Paint color Remarks
MS343-18001-A0 Satin white pearl (37J)
MS343-18001-C0 Crystal black silica (D4S)
MS343-18002-00 No coat (treatment with primer)
These apply to all grades of Toyota 86
to be released in April 2012 and later.
Bill of materials
No.
Part name Part No. Qt. Remarks
1) Rear bumper spoiler 1
2) Clip 4
3) Tapping screw 4 M5 and 16 mm long
4) J nut 4 M5
5) Rubber washer 2
6) Band clamp 82711-16820 1
7) PAC primer 1 K-500
8) Template 1
9) Assembling and handling
procedures 1 This document
The following parts are included in only MS343-18002-00 (uncoated product).
No.
Part name Part No. Qt. Remarks
10) Molding (1 each)
Black/gray, 2,370 mm long,
and supply No.: 76877-SP000
11) Molding 1 Black and 650 mm long
12) Tow hook cover 2 Finished by surfacer
13) PAC primer 1 K-500
1) 2) 3) 4) 5) 6) 7) 8) 9)
Components included in only MS343-18002-00 (uncoated product)
10) 11) 12) 13)
Assemble this product after you register your car.
If you attach the spoiler before registration, you are required to deliver your
car to a factory for new inspection.

No. 1201-T1018001 2/8
Notes to assembly and handling
Check: As soon as you receive this product, confirm that it is not damaged and that all the accessories are included.
Caution: Replace with this product at a special maintenance factory.
Caution: When assembling this product, be sure to follow the repair book of your car (issued by Toyota Motor Corp.)
and the precautions appearing in this document.
Warning: Before attachment, stop your car at a flat place, turn the engine OFF, and set the parking brake. If you work at
an unstable place or do not set the parking brake, a serious accident may occur.
Warning: When you work near the engine compartment or muffler, take care not to suffer from a burn or serious injury.
Warning: Neither modify this product nor attach it to cars other than the applicable models, otherwise a fracture or
accident may occur.
Caution: This product conforms to the structural standards, so an official inspection can be conducted as usual except
when you attach it to cars other than the applicable models or modify any other parts.
Check: This product can be attached to the applicable cars if they have not encountered any accident in the past.
Caution: The uncoated product (MS343-18002-00) requires coating to be consistent with the exterior color of your car.
If you use forced drying, fix the product without deformation and dry it at less than 70°C.
Caution: If you degrease the uncoated product before coating, use IPA or white gasoline rather than Silicon Off or
thinner.
Caution: During baking, take great care not to increase the temperature to more than 70°C, otherwise the product may
be deformed or cracked.
Caution: Do not remove any car parts except the ones indicated in this document.
Caution: When you remove car parts, keep clips in order to prevent them from being lost or from being confused
during replacement.
Caution: Be sure to prepare a protection sheet and work on it in order to prevent a rear bumper spoiler from being
scratched during attachment.
In addition, take great care not to damage any car parts during assembly.
Caution: The bonding strength of double-sided adhesive tape reduces at outdoor temperatures of less than 15°C. In this
case, use a dryer to heat the tape and contact surface until the temperature is about 40°C.
Warning: Securely tighten the bolts at given torque. Insufficient torque causes them to become loose with time and
eventually come off, resulting in a serious accident or failure.
Warning: The bolts are apt to be loose for a while after attachment, so tighten them further after your car travels several
kilometers.
Warning: Check whether this product interferes with any other parts after the attachment. If you find any interference,
contact your dealer. Running your car as is could cause a fracture or failure.
Warning: If a strong shock such as a collision is given to the product after assembly, it or its joint may be deformed,
broken, or fail. In this case, immediately stop using the product.
Warning: If you feel abnormal shaking or noises during traveling, immediately park your car at a safe place and ask a
maintenance factory to conduct an inspection.
Driving your car as is could cause a fracture or accident.
Warning: This product is designed to be used with cars traveling on paved roads. Do not run it on an unimproved or
snow-covered road, otherwise the product may be broken.
Warning: This product has sufficient strength and durability, but it may be broken or fail under certain keeping,
handling, or running conditions. Pay great attention to storage, attachment, and usage.
Caution: Do not use any organic solvents, such as thinner and gasoline, for maintenance because they may cause
discoloration or deformation.
Caution: If you damage your car or this product during assembly or running, we will not accept any complaint.
Be sure to follow the precautions mentioned above and the assembling procedures shown in this document.
These assembling and handling procedures display the following symbols to show precautions the
user shall follow for safe use.
Warning
If you attach or handle the product wrongly without following this
warning, you may be killed or seriously injured.
Caution
If you attach or handle the product wrongly without following this
caution, you may be disabled or the product may be physically damaged.
Advice
This advice helps you work quickly.

No. 1201-T1018001 3/8
How to assemble the uncoated product
This document describes work before and after coating necessary for the uncoated product
(MS343-18002-00). Follow the procedures shown below.
Coating the real bumper spoiler
1. Coat the real bumper spoiler 1) and the tow
hook cover 12) as shown in Figure 1.
Caution: For degreasing, use IPA or white
gasoline rather than Silicon Off
or thinner, otherwise the
surfacer may melt.
Caution: Do not coat the molding contact
surface and double-sided
adhesive tape, otherwise the
bonding strength may decrease.
To a d d r e s s t h i s p r o b l e m, u s e
masking tape in the coating
process.
Caution: Take great care not to increase
the baking temperature to more
than 70°
°°°C in the coating process,
otherwise the product may be
deformed or cracked.
If you use forced drying, fix the
product without deformation.
Fig. 1
Masking
area
Masking
area
Masking
area
Masking
area
Coating
area
Coating
area
Coating
area
Coating
area
Rear bumper
spoiler 1)
Tow hook
cover 12)
2. Mask part of the rear bumper spoiler 1) as
shown in Figure 2 and coat it with matte black
(Gloss 10).
Rounded
corner end
Coating area with matte
black (Gloss 10)
Rear bumper
spoiler 1)
Right angle
Masking
area
Hole for masking
Coating area with matte
black (Gloss 10)
Rounded
corner end
Masking
area
Rounded
corner end
Fig. 2

No. 1201-T1018001 4/8
Attaching the molding
1. As shown in Figure 3, clean up the molding
contact surface, degrease it with IPA or white
gasoline by means of one-way wiping, and
apply the PAC primer K-500 13) to it.
Caution: Do not use solvents other than
those mentioned above for
degreasing, otherwise the
remaining fat may cause the
tape to come off. In addition,
take care not to spill out the
primer, otherwise it may cause a
stain.
Advice: Dry the product for more than 10
minutes after each of the
degreasing and primer applying
processes.
Degreasing and
primer application
area
Apply primer along
the stepped surface.
Difference
in level
Rear bumper
spoiler 1)
Degreasing and
primer application
area
Fig. 3
Difference
in level
Difference
in level
Difference
in level
2. As shown in Figure 4, put the moldings 10) and
11) to the rear bumper spoiler 1) while
removing the separator from the double-sided
tape, and press the former at a force of at least
49 N (5 kgf).
The moldings are redundant, so cut them to
appropriate length with scissors.
Caution: The molding 10) has two colors.
Select one suitable to the paint
color.
Caution: The bonding strength of
double-sided adhesive tape
reduces at outdoor temperatures
of less than 15°
°°°C. In this case,
use a dryer to heat the tape
surface until the temperature is
about 40°
°°°C.
3. Attach the coated tow hook cover 12) to the
rear bumper spoiler 1) as shown in Figure 4
while inserting the strap for removal protection
into the latter.
Fig. 4
Cross-secti
onal view
Take care n ot to
damage this part.
Bond without
gap, taking care
of engagement.
Mold
ing
s (10)
and (11)
Mold
ing
attachment line
Difference
in level
Part F
Part F
Difference
in level
Difference
in level
Difference
in level
Difference
in level
Molding 10) contact surface
Tow hook
cover 12)
Tow hook
cover 12) Rear bumper
spoiler 1)
Molding 11) contact surface
No. 1201-T1018001 5/8
Preparations for attachment
1. Bond the template 8)A to a piece of cardboard,
cut it off, apply it to the rear bumper as shown
in Figure 5, and put a piece of tape to show the
product attachment height. (1 place)
2. Remove the rear bumper.
3. Remove the harness only from the left hand of
the rear bumper for cutting.
Caution: See the service manual of your
car to remove the bumper while
taking care not to damage any
parts.
4. Cut off the template 8)B, apply it to the back of
the rear bumper as shown in Figure 6, draw a
cutting line (1 place at each of the right and left
hands), and put a hole mark (1 place at the left
hand only) for the band clamp 6).
Caution: Do not tear the template, because
it will be used at the right hand.
Rear
bumper
Align with rear
bumper’s center.
Put height mark
with tape.
Template
8)A
Rear
bumper
Fig. 5
Fig. 6
Template
8)B
Contact
portion
Contact portion
Put mark by
connecting rear
bumper seat and
template.
Mark (1 place
in LH only)
Mark (1 place in each
of RH and LH)

No. 1201-T1018001 6/8
Fig. 7
5. Use a 3 mm diameter drill to make a pilot hole
at the marked position on the back side as
shown in Figure 7.
(1 place in the LH only)
6. Use a 7 mm diameter drill to expand the hole
and remove burrs as shown in Figure 7.
(1 place in the LH only)
Caution: Wear goggles during the work.
Advice: Apply the drill perpendicular to
the surface and take care not to
deviate from the marked
position.
7. Connect the mark positions of the rear bumper
referring to the hatched part shown in Figure 8,
use an air saw to cut it off, and remove burrs.
(1 place in each of RH and LH)
Caution: Remove burrs with a file while
taking care not to increase the
hole diameter.
Rear
bumper
Pilot hole 3 mm in dia.
Final hole 7 mm in dia.
(1 place in LH only)
Fig. 8
Rear
bumper Cutting area on
rear bumper
Cut at rounded
corner end.
Band clamp 6)
Air saw
Take care n ot to cu t
protrusion for harness clip!
Cutting area on
rear bumper
Cut at rounded
corner end.
Fig. 9
Rear
bumper
8. Insert the band clamp 6) into the resultant hole.
(1 place in the LH only)
Caution: Take care not to hurt yourself
during cutting operation.
In addition, take care not to
scratch it.
Car’s
harness clip
About 280 mm
About 230 mm
Band clamp
6)
Corrugated
tube
Car’s
harness
Car’s
harness clip
* Reinsert harness clip facing up.
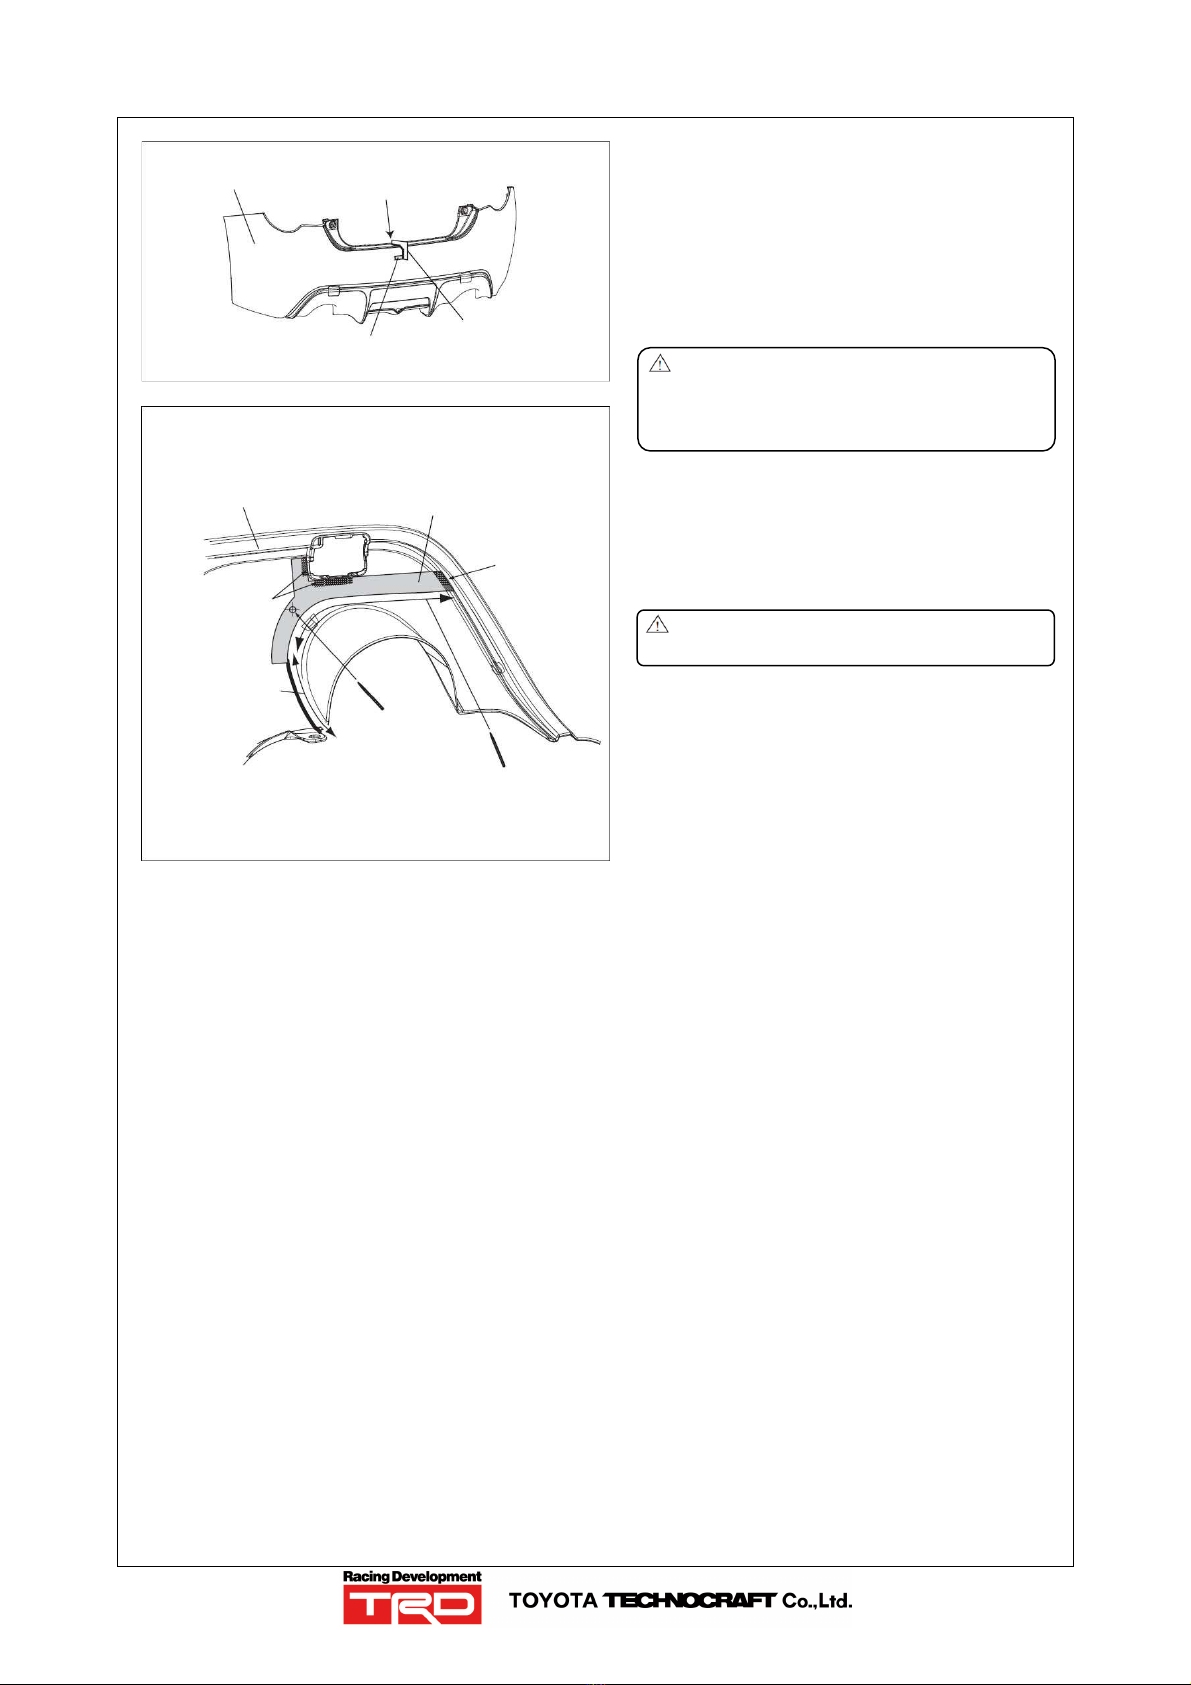
9. As shown in Figure 9, change the inserting
direction of the car’s harness clip to arrange the
corrugated tube over the muffler.
10. See the dimensions shown in Figure 9 to
assemble the car’s harness so that it is not
loose.
Caution: Make sure that the car’s harness
is fixed securely and is not loose.
11. Remove the car’s tow hook cover and replace
the rear bumper.
Caution: See the service manual of your
car to replace the bumper while
taking care not to break any
parts.
Caution: Do not reuse the removed tow
hook cover (1 place in each of the
right and left hands).

No. 1201-T1018001 7/8
12. Insert the J nut 4) into the wheelhouse of the
rear bumper as shown in Figure 10.
(2 places in each of RH and LH)
Caution: Figure 10 shows the inserting
direction of the J nut 4). Reverse
insertion makes it impossible to
assemble the tapping screw 3).
Fig. 10
Rear
bumper
J nut 4)
(2 places in each
of RH and LH)
J nut 4)
Pay attention to orientation.
Fig. 11
Bottom surface
of rear bumper Degrease
this part.
Rear
bumper
Bond to center of second
hole from wheelhouse on
bottom. Rubber washer 5)
Rubber
washer 5)
PAC p ri mer 7)
application area
PAC p ri mer 7)
application area
15 mm
5 mm from
rounded corner end
5 mm from
rounded corner end
15 mm
15 mm
from end
Fig. 12
Fig. 13
Rear bumper
spoiler 1)
Separator
Separator
Masking tape
Rear
bumper
Rear bumper
spoiler 1)
Clip 2)
Clip 2)
Clip 2)
13. As shown in Figure 11, clean up the surface of
the rear bumper that makes contact with the
rear bumper spoiler 1) and the rubber washer
5), degrease them with IPA or white gasoline
by means of one-way wiping, and bond the
washer (1 place in the right and left hands).
Degrease the hatched area—grained part of
your car—with IPA or white gasoline by means
of one-way wiping and apply the PAC primer
K-500 7) to it.
Warning: If an additional coat is given to
the your car, be sure to use a
compound to remove it while
taking care not to damage the
main coat, and then degrease it.
Caution: Carry out degreasing operation
with IPA or white gasoline
rather than a parts cleaner,
because the latter does not
remove fat, resulting in removal
of the tape. In addition, take
care not to spill out the primer,
otherwise it may cause a stain.
Advice: Dry the product for more than 10
minutes after each of the
degreasing and primer applying
processes.
14. As shown in Figure 11, remove the separator
from the double-side tape of the rear bumper
spoiler 1) about 30 mm outside from the center
and put the removed separator to the front
surface with masking tape.
(6 places in each of RH and LH)
Caution: Completely removing the
separator from the tape makes it
difficult to attach the product to
the correct position.
Assembling procedures
1. Cover the rear bumper with the rear bumper
spoiler 1) and fix both with the clip 2).
(2 places in each of RH and LH)
No. 1201-T1018001 8/8
Inspections and precautions after assembly
1. Make sure the rear bumper spoiler is securely fixed to your car with the screws and clips.
2. Check whether the rear bumper spoiler or any other car parts have scratches.
Fig. 14
Fig. 15
Fig. 16
Rear
bumper
Rear bumper
spoiler 1)
Tapp ing
screw 3)
Rear
bumper
Rear bumper
spoiler 1)
Make spoiler
flush with
height mark.
Align molding
end with
bumper’s rounded
corner end.
Cross-sectional view of the center
Rear
bumper
Rear bumper
spoiler 1)
Tighten
securely.
* Further tighten the screw fastened temporarily in Figure 14.
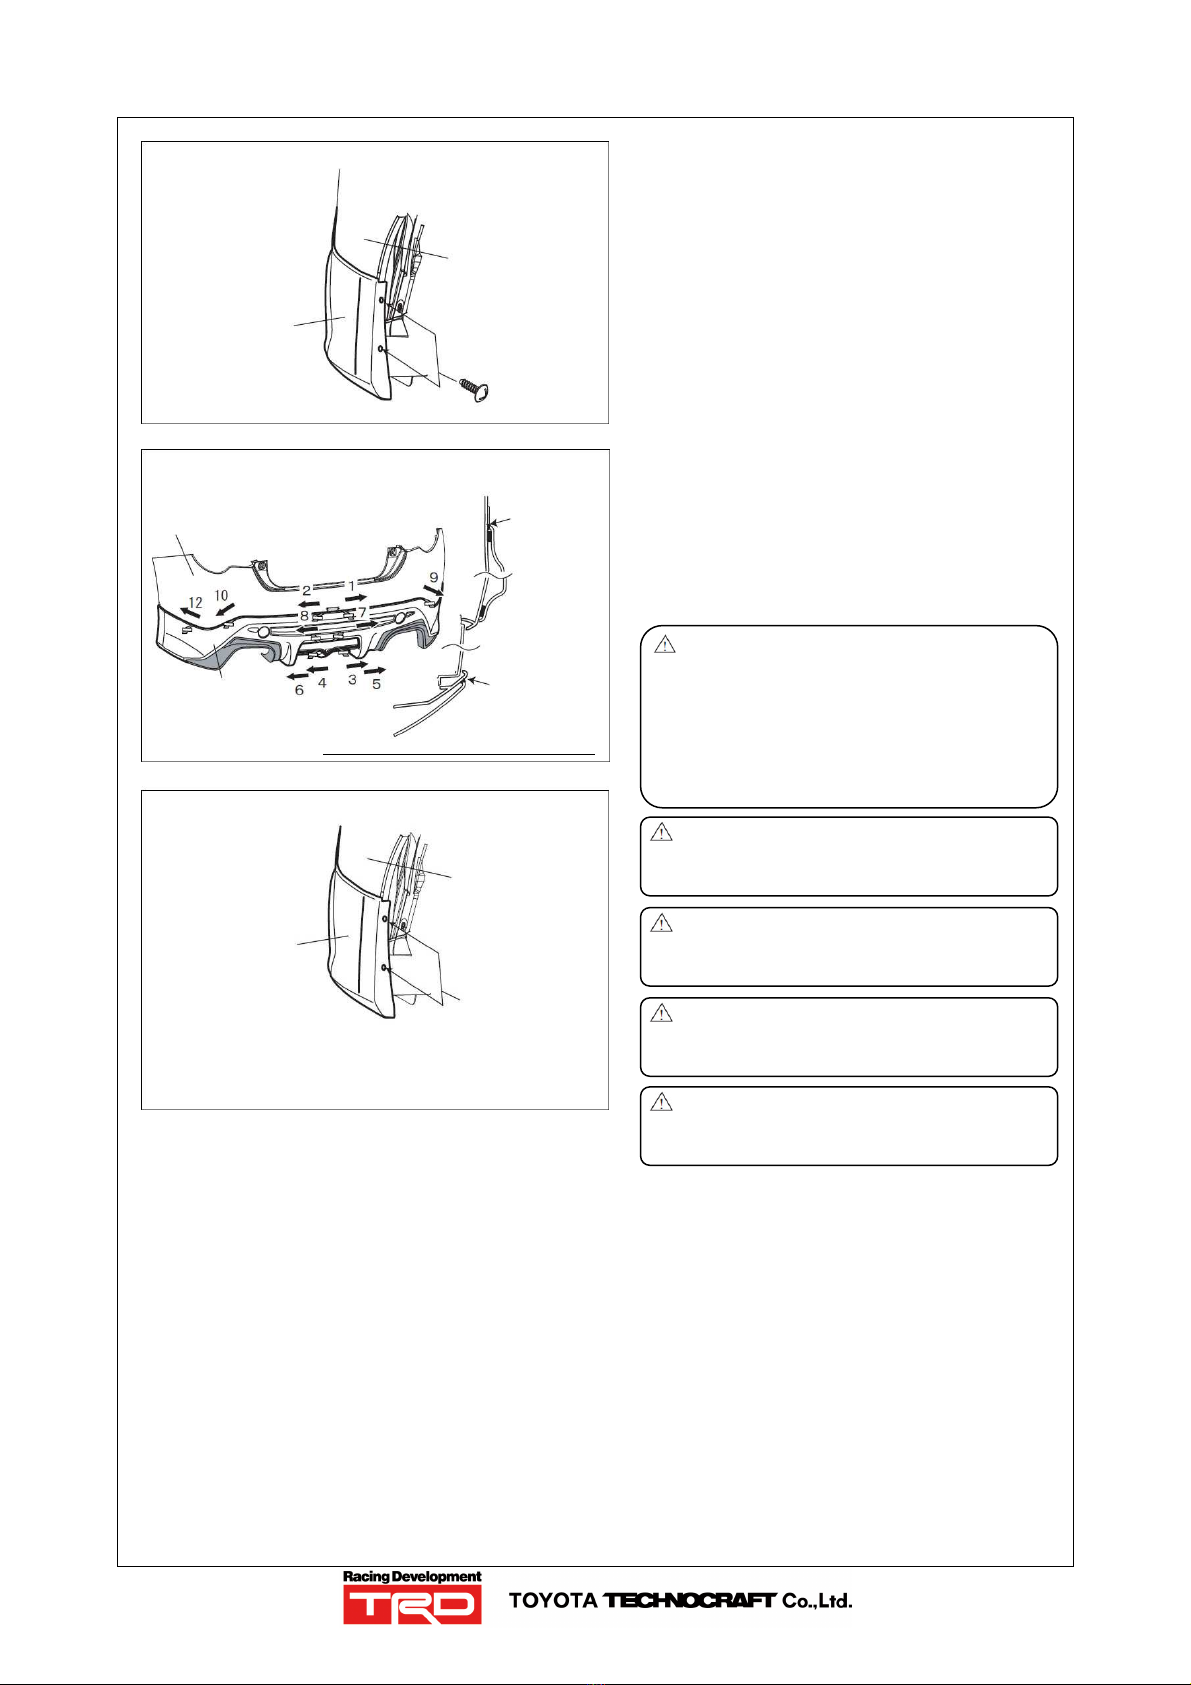
2. As shown in Figure 14, align the rear bumper
spoiler 1) with the rear bumper and temporarily
fix the wheelhouse with the tapping screw 3).
(2 places in each of RH and LH)
3. See Figure 15 to make the rear bumper spoiler
1) flush with the height mark and press it while
removing the separator from the double-sided
tape (6 places in each of the right and left
hands) in the order shown in the figure. Note
that the pressing force shall be at least 49 N (5
kgf).
Caution: The bonding strength of
double-sided adhesive tape
reduces at outdoor temperatures
of less than 15°
°°°C. In this case,
use a dryer to heat the tape
surface until the temperature is
about 40°
°°°C.
Caution: Remove the separator from the
double-sided tape while taking
care not to cut off the former.
Caution: If you do not follow the separator
removing order, a gap may be
produced.
Caution: Press the double-sided tape
sufficiently, otherwise it may lift
or come off.
Caution: Do not wash your car within 24
hours after you bond the
double-sided tape.
4. Fix the rear bumper spoiler 1) securely by
further tightening the tapping screw 3) fastened
temporarily.
(2 places in each of RH and LH)
This manual suits for next models
1
Table of contents
Other TRD Automobile Accessories manuals

Popular Automobile Accessories manuals by other brands


ULTIMATE SPEED
ULTIMATE SPEED 279746 Assembly and Safety Advice

SSV Works
SSV Works DF-F65 manual

ULTIMATE SPEED
ULTIMATE SPEED CARBON Assembly and Safety Advice

Witter
Witter F174 Fitting instructions

WeatherTech
WeatherTech No-Drill installation instructions

TAUBENREUTHER
TAUBENREUTHER 1-336050 Installation instruction