Trebs Comfortcook 21126 User manual

Comfortcook
Model 21126
Handleiding Volautomatische pasta machine
Manual Fully automatic pasta maker
Mode demploi de Machine à pâtes entièrement
automatique
Bedienungsanleitung Vollautomatische
Pastamaschine

(NL) Trebs Comfortcook; volautomatische pastamachine
Deze gebruiksaanwijzing eerst geheel doorlezen en bewaren om later nog eens te kunnen raadplegen.
Controleer of de netspanning in de woning overeenkomt met die van het apparaat (220 Volt).
De Trebs Comfortcook pastamachine is een volautomatische pastamachine voor huisgemaakte pasta. De
krachtige motor maakt in een handomdraai de mooiste pasta. Voorzien van 10 verschillende inzetstukken
die het mogelijk maken om diverse soorten pasta te bereiden. Het apparaat is bovendien gemakkelijk
schoon te maken en de meeste* losse onderdelen zijn vaatwasser bestendig.
*Echter wij raden af de mengcontainer in de vaatwasser te reinigen, daar de mogelijk bestaat dat de
voorkant van de mengcontainer verkleurd. Het is beter de mengcontainer met een mild afwasmiddel te
reinigen.
Beschrijving onderdelen pastamachine
1. Behuizing/ motorhuis
2. Aan/uit-schakelaar
3. Sluitschuif
4. Ontgrendelingsknop deksel
5. Deksel
6. Roermechanisme
7. Ontgrendelingsknop mengcontainer
8. Mengcontainer
9. Persdrukkamer
10.Deegtransport-spiraal
11. Sluitring
12. Pastavorm
12

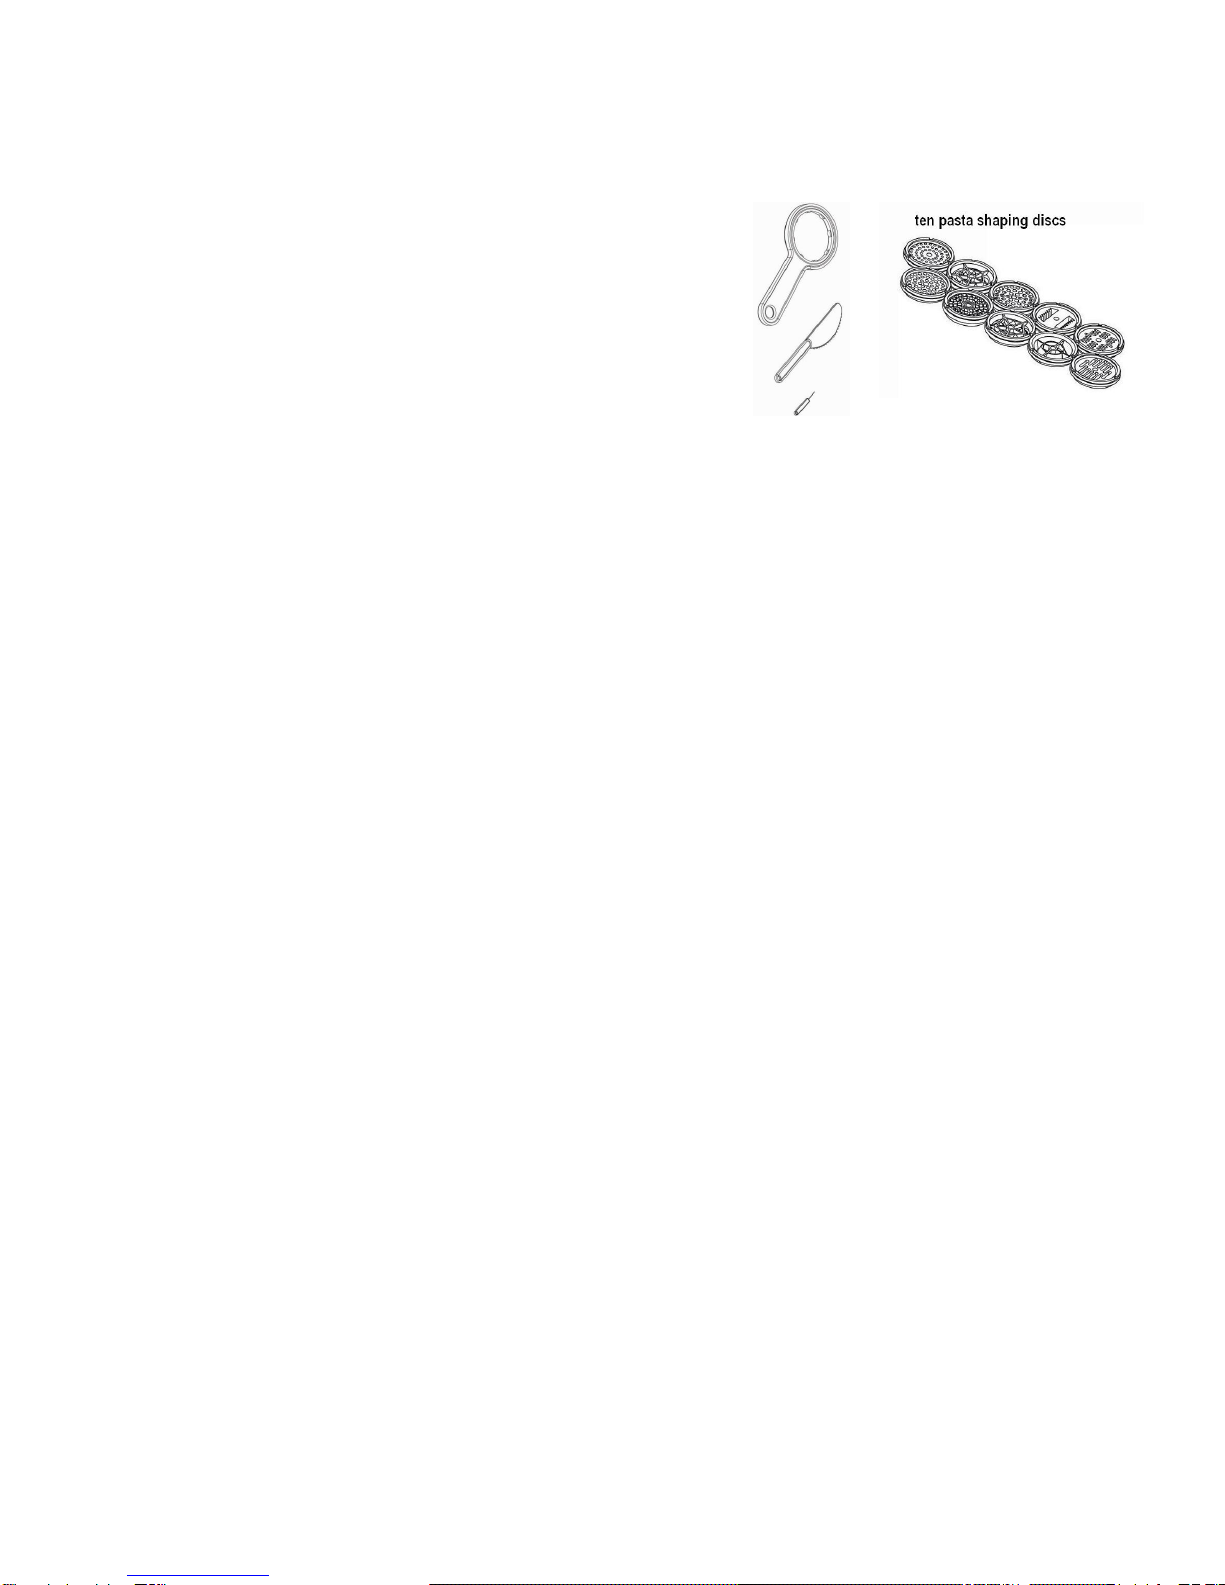
Wanneer u het apparaat voor het eerst uitpakt, dient u verder nog onderstaande accessoires
aan te treffen:
- Een ringsleutel
- Een kunststof mes, dat ook als schraper te gebruiken is
- Een reinigingsattribuut
- Tien verschillende pastavorm-inzetstukken
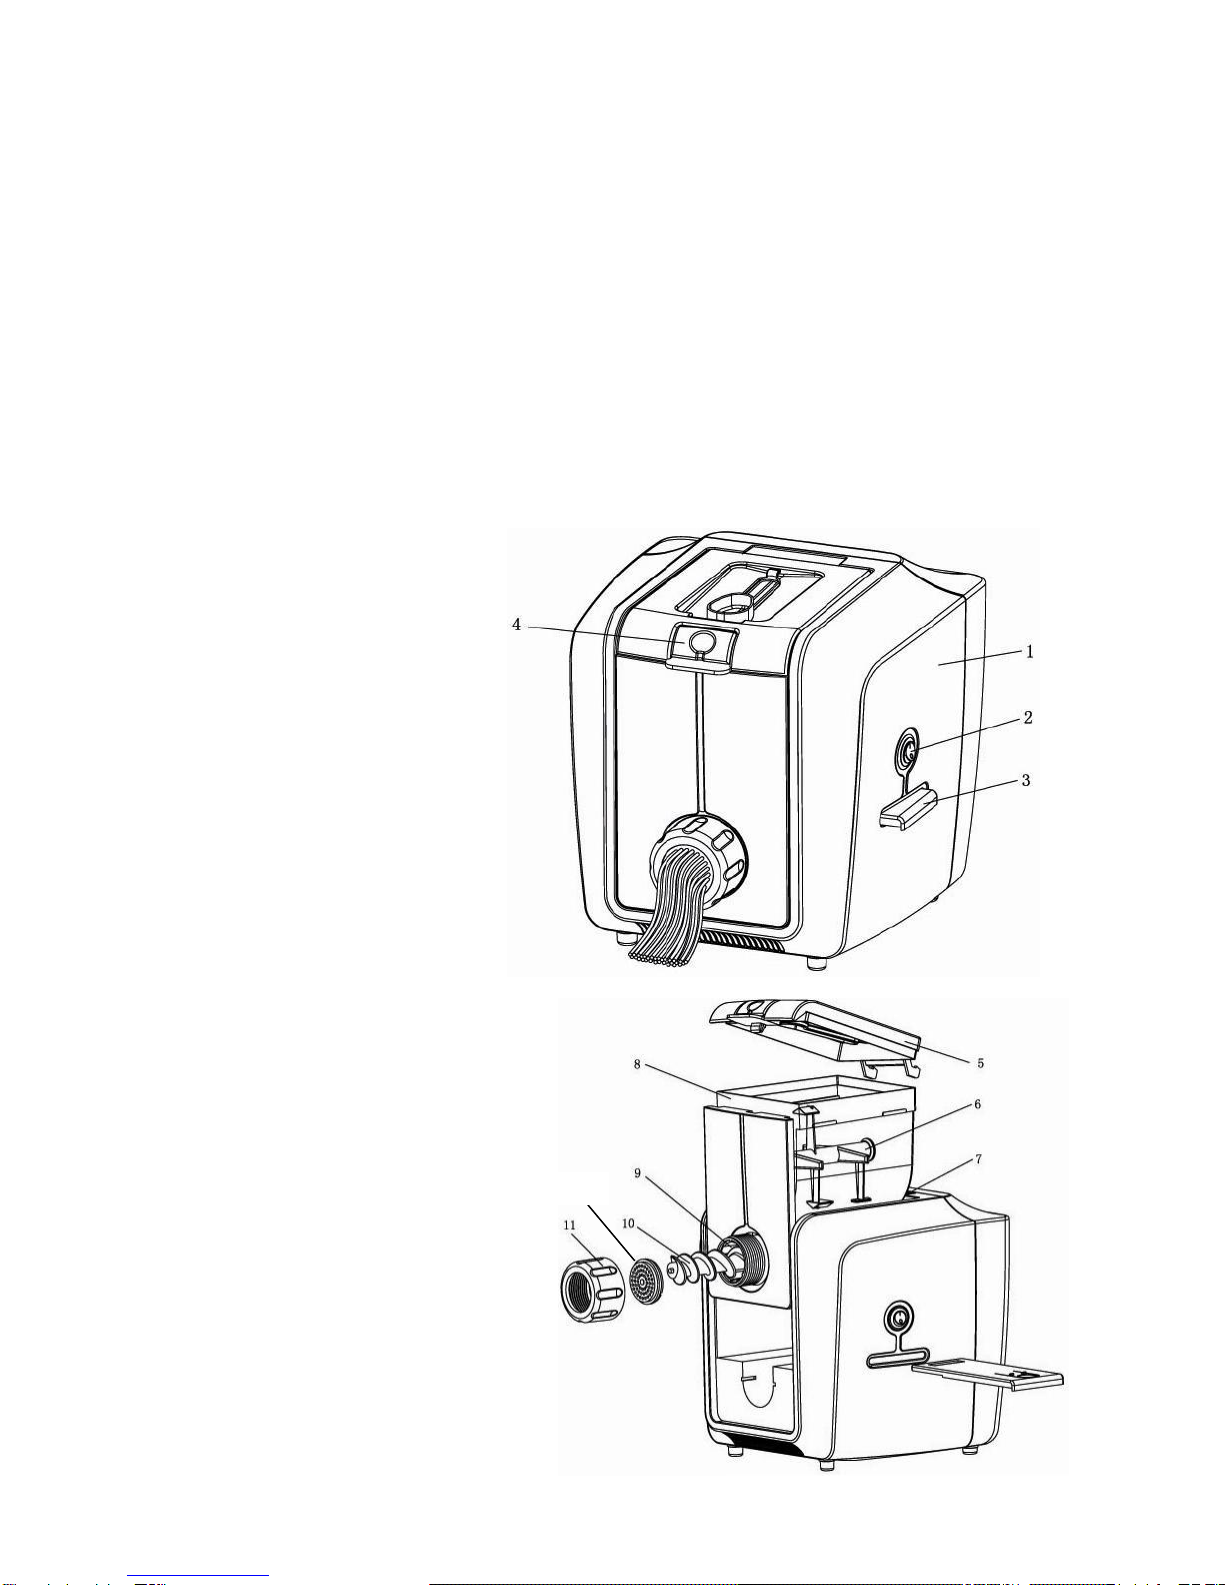
Uw pastamachine komt volledig gemonteerd van de fabrikant. Let op onderstaande aanwijzingen voor de
montage en demontage van het apparaat.
DEMONTAGEAANWIJZINGEN
1. Controleer of de pastamachine niet is aangesloten.
2. Verwijder de sluitring (11) samen met het pasta-inzetstuk. Gebruik indien nodig hiervoor de
ringsleutel. Het kan zijn dat na gebruik van het apparaat de sluitring erg stevig vast zit. Dit komt door
de kracht van het apparaat.
3. De deegtransport-spiraal (10) voorzichtig verwijderen. Indien na gebruik de spiraal aan de achterkant
vol zit met kleverig deeg, deze eerst demonteren volgens onderstaande aanwijzingen. U kunt de
spiraal losmaken door zachtjes op het aseinde te tikken en hem dan verwijderen.
4. Trek de sluitschuif (3) helemaal uit het apparaat door zachtjes op de vastzetknop, die zich bovenop
de sluitschuif bevind, te drukken.
5. Druk de deksel-ontgrendelingsknop (4) aan de voorkant van het deksel (5) op de mengcontainer (8)
naar beneden door deze zachtjes naar voren te trekken en til het deksel omhoog.
6. Aan de scharnierkant van het deksel, bij de behuizing (1) bevindt zich de mengcontainer-
ontgrendelingsknop (7) voor het verwijderen van de mengcontainer (8).
7. Druk op de ontgrendelingsknop en verwijder de mengcontainer door deze naar voren te trekken.
8. De verchroomde aandrijfas van het roermechanisme (6) naar buiten trekken en deze uit de
mengcontainer verwijderen.
9. Reinig nu zorgvuldig alle onderdelen die met het deeg in aanraking komen, met de hand of in de
vaatwasser (*zie bovenstaande aanwijzing over het reinigen in de vaatwasser).
MONTAGEAANWIJZINGEN
1. Controleer eerst of de pastamachine niet is aangesloten op de netstroom.
2. Plaats het roermechanisme (6) in de mengcontainer (8) met de grootste opening naar de voorkant
van de mengcontainer.
3. Plaats het roermechanisme (6) zo, dat de openingen in de as van het roermechanisme aansluit aan
de openingen in de container.
4. Steek de verschroomde aandrijfassen met de inkerving in de bovenste aandrijfopening van het
motorhuis (1).
5. Druk de ontgrendelingsknop (7) aan het motorhuis naar beneden en schuif de mengcontainer (8)
samen met het roermechanisme over de verchroomde aandrijfas in het motorhuis. Het kan
noodzakelijk zijn enigszins aan het roermechanisme (6) te draaien zodat alles goed op zijn plaats
komt te zitten. Dan laat u de ontgrendelingsknop (7) los en controleert u of de vergrendeling goed
vastzit door voorzichtig aan de mengcontainer te trekken.
6. Schuif de sluitschuif (3) in de gleuf van de behuizing (onder de aan/uit-schakelaar (2)) helemaal in de
mengstand. Dit is de stand waarbij de sluitschuif zover mogelijk in de behuizing wordt geschoven.
7. Schuif de deegtransport-spiraal (10) in de persdrukkamer (9) tot deze in de zeskantige opening van
het motorhuis (1) zit. Door de deegtransport-spiraal voorzichtig te draaien komt deze op de juiste plek
terecht, zodat hij niet boven het schroefgedeelte van de persdrukkamer uitsteekt.

8. Kies het gewenste pastavorm-inzetstuk en plaats dit op de persdrukkamer (9), zodat de drie
uitstulpingen van de persdrukkamer passen in de 3 inkervingen van het pastavorm-inzetstuk.
9. Klik het pasta-inzetstuk vast of houdt deze met een vinger in de juiste positie en schuif, terwijl u
gelijkertijd met de wijzers van de klok meedraait, de sluitring (11) over de schroef van de
persdrukkamer (9). De sluitring enkel met de hand vastdraaien. Daartoe niet de ringsleutel gebruiken,
omdat anders het risico op doordraaien bestaat.
10. Plaats nu het deksel (5) op de mengcontainer (8). De montage is gereed.
BEREIDING VAN DE PASTA
Basis recept pastadeeg
Ingrediënten:
- 500 gr bloem (45) (verkrijgbaar in iedere supermarkt)
- 3 eieren Jumbo (225 gr in schaal, nauwkeurig afwegen)
- 1 theelepel zout
- 40 ml water
- Nauwkeurig afmeten met behulp van de standaard maatschep; NB 1 tl=5ml
LET OP: Deze hoeveelheid vocht klopt precies met de bloragen wat
meer of minder vocht. Zie
Bereiding:
1. Kies de pastavorm voor de gewenste pastasoort.
2. Leg de gekozen pastavorm in heet water met olie. Laat het 1-2 minuten ondergedompeld liggen.
3. Controleer of de sluitschuif van het apparaat gesloten is.
4. Monteer de pastavorm en draai de sluitring er met de hand op (punt 8/ 9 in de montageaanwijzing).
5. Schep de bloem in de mengcontainer en sluit het deksel.
6. Zet de machine aan en giet de drie losgeklopte eieren rustig in de vulopening.
7. Voeg zout en water toe.
8. Laat de machine 4 à 5 minuten draaien. Het deeg moet uit klontjes bestaan zo groot als erwten.
9. Trek de sluitschuif open tot u een hoort.
10. Na ongeveer 1 minuut draaien zal de pasta uit de pastavorm komen.
11. Snijdt de pasta af op de gewenste lengte met het bijgeleverde kunststof mes.
12. Binnen 10 minuten heeft u ongeveer 500 gr. verse pasta.
13. De pasta hoeft niet te drogen en kan direct worden gekookt.
ATTENTIE:
-
plegen.
- Op het apparaat zit een beveiliging. Wanneer de machine aanstaat en u de deksel openmaakt zal
het apparaat automatisch stoppen.
- In onderstaande afbeelding kunt u de juiste consistentie van het deeg zien.

Te nat; voeg meel toe te droog; voeg water toe Deeg is goed!
WAT TE DOEN BIJ STORINGEN
Wanneer de pasta langzamer naar buiten komt, ondanks het feit dat er voldoende deeg in de
mengbak zit, kan het zijn dat er deeg is vastgekoekt aan de opening van de sluitschuif. Duw de schuif
dan in de mengstand en trek deze weer terug.
Tijdens het maken van de pasta kan het zijn dat u het apparaat moet uitschakelen en eventueel
aangekoekt deeg van het roermechanisme en hoeken van de mengcontainer moet verwijderen
voordat u het apparaat weer in werking kunt zetten.
Wanneer het apparaat tikkende geluiden maakt of wanneer u denkt dat de motor overbelast klinkt,
schakelt u het apparaat uit en sluit u de sluitschuif. Verwijder vervolgens de sluitring, de pastavorm en
het deeg uit de persdrukkamer. Voeg wat vloeistof toe, laat het deeg enkele minuten kneden en begin
opnieuw met pasta maken.
Wanneer het deeg veel te droog is, kan er druk ontstaan die de motor niet aankan, waardoor het
apparaat stilvalt en sterk beschadigt. Uw pastamachine is uitgerust met een antislipkoppeling die de
motor
hoorbaar langzamer.
Let op: wanneer er abusievelijk droog meel in de persdrukkamer terecht is gekomen, dient u
onmiddellijk de sluitschuif in de mengpositie te zetten door deze volledig naar binnen te schuiven. U
dient vervolgens al het aangekoekte meel te verwijderen uit sluitring, pasta-inzetstuk, deegtransport-
spiraal en persdrukkamer. Als u het apparaat weer in elkaar heeft gezet, kunt u verdergaan met het
maken van de pasta.
Mocht u na het lezen van deze gebruikshandleiding nog vragen hebben over deze pastamachine kunt
u contact opnemen met onze klantenservice op het telefoonnummer: 0900-TREBSbv (= 0900-873 27
28). Kosten voor dit n
AANWIJZINGEN VOOR DE REINIGING
1. Apparaat van stroomnet halen door de stekker uit het stopcontact te trekken.
2. Sluitring (11) en pastavorm verwijderen.
3. Alle deegresten uit de perskamer (9) verwijderen en de deegtransport-spiraal (10) eruit trekken.
4. Deeg verwijderen uit de pastavorm met behulp van het schoonmaakprikker of met een tandenstoker.
Attentie: Laat het deeg eerst drogen, alvorens dit te verwijderen. Het werk wordt gemakkelijker als u
de pastavorm in het diepvriesvak legt, zodat de deegresten bevriezen, en daarna pas met het
verwijderen van het deeg begint.

5. Open het deksel (5) van de mengcontainer (8) en laat de deegresten enkele uren drogen, eventueel
de gehele nacht.
6. Nadat het deeg volledig droog is, kan het apparaat uitgeborsteld worden.
7. Demonteer de pastamachine volgen de demontageaanwijzingen.
8. Plaats de inzetstukken in de vaatwasser (*zie bovenstaande aanwijzing over het reinigen in de
vaatwasser) of was deze met de hand af in warm water met mild afwasmiddel.
ATTENTIE: Het motorhuis (1) nooit in water dompelen.
9. Veeg het motorhuis uitsluitend met een enigszins vochtige doek af.
10. Droog alle delen zorgvuldig en zet het apparaat weer in elkaar volgens de montageaanwijzingen.
Veiligheidsvoorschriften
- Plaats de pastamachine niet op plaatsen, waar het vochtig is of waar damp vrijkomt.
- Nooit het motorhuis of de netkabel in het water dompelen.
- Indien kinderen op de werkplek aanwezig zijn, is toezicht van volwassenen vereist.
- Bij reiniging, demontage of montage van onderdelen van het apparaat of indien de pastamachine niet
wordt gebruikt, altijd de stekker uit het stopcontact halen.
- Stroomkabel niet in aanraking brengen met hete oppervlakten.
- De pastamachine alleen gebruiken als het met het deksel is afgesloten.
- Het apparaat eerst uitschakelen en wachten tot de deegmenger gestopt is voordat het deksel eraf
genomen kan worden.
- Nooit draaiende delen aanraken.
- Niet gebruiken als het apparaat of het snoer beschadigd is. Stuur het naar onze servedienst om
risico's te vermijden. Bij dit type apparaat kan een beschadigd snoer alleen door onze servicedienst
worden vervangen met behulp van speciaal gereedschap.
- Alleen originele onderdelen en accessoires gebruiken.
- De pastamachine nooit buiten gebruiken.
- De pastamachine is een huishoudelijk apparaat en niet bedoeld voor professioneel gebruik.
CE

RECEPTEN
Voor de recepten die hieronder worden beschreven, heeft u olie nodig. U kunt plantaardige olie of olijfolie
gebruiken. Wij raden olijfolie aan vanwege de authentieke smaak.
Houd er rekening mee dat de kooktijd van zelfgemaakte pasta korter is dan die van droge pasta. De
kooktijd van de zelfgemaakte verse pasta is slechts 3 tot 4 minuten (afhankelijk van de dikte van de pasta
en uw eigen smaak).
BASISRECEPTEN MET VERSCHILLENDE SOORTEN BLOEM
Bloem type “45” (verkrijgbaar in elke supermarkt “normale bloem”)
Ingrediënten:
-
- 3 eieren Jumbo (225 gr in schaal, nauwkeurig afwegen)
- 1 theelepel zout
- 40 ml water
- Nauwkeurig afmeten met behulp van de standaard maatschep; NB 1 tl=5ml
Bereiding:
1. Kies de pastavorm voor de gewenste pastasoort.
2. Leg de gekozen pastavorm in heet water met olie. Laat het 1-2 minuten ondergedompeld liggen.
3. Controleer of de sluitschuif van het apparaat gesloten is.
4. Monteer de pastavorm en draai de sluitring er met de hand op (punt 8/ 9 in de montageaanwijzing).
5. Schep de bloem in de mengcontainer en sluit het deksel.
6. Zet de machine aan en giet de drie losgeklopte eieren rustig in de vulopening.
7. Voeg zout en water toe.
8. Laat de machine 4 à 5 minuten draaien. Het deeg moet uit klontjes bestaan zo groot als erwten.
9. Trek de sluitschuif open tot u een hoort.
10. Na ongeveer 1 minuut draaien zal de pasta uit de pastavorm komen.
11. Snijdt de pasta af op de gewenste lengte met het bijgeleverde kunststof mes.
12. Binnen 10 minuten heeft u ongeveer 500 gr. verse pasta.
13. De pasta hoeft niet te drogen en kan direct worden gekookt.
Bloem type “00” (Pastabloem, verkrijgbaar in (kook)speciaalzaken)
Ingrediënten:
- 500 gr bloem 00
- 3 eieren Jumbo (225 gr in schaal, nauwkeurig afwegen)
- 1 theelepel zout
- 60 ml water
- Nauwkeurig afmeten met behulp van de standaard maatschep; NB 1 tl=5ml
Bereiding:
1. Kies de pastavorm voor de gewenste pastasoort.
2. Leg de gekozen pastavorm in heet water met olie. Laat het 1-2 minuten ondergedompeld liggen.
3. Controleer of de sluitschuif van het apparaat gesloten is.
4. Monteer de pastavorm en draai de sluitring er met de hand op (punt 8/ 9 in de montageaanwijzing).
5. Schep de bloem in de mengcontainer en sluit het deksel.
6. Zet de machine aan en giet de drie losgeklopte eieren rustig in de vulopening.
7. Voeg zout en water toe.
8. Laat de machine 4 à 5 minuten draaien. Het deeg moet uit klontjes bestaan zo groot als erwten.
9. Trek de sluitschuif open tot u een hoort.
10. Na ongeveer 1 minuut draaien zal de pasta uit de pastavorm komen.
11. Snijdt de pasta af op de gewenste lengte met het bijgeleverde kunststof mes.

12. Binnen 10 minuten heeft u ongeveer 500 gr. verse pasta.
13. De pasta hoeft niet te drogen en kan direct worden gekookt.
Bloem type “Semola fine” (Pastabloem, verkrijgbaar in (kook)speciaalzaken)
Ingrediënten:
-
- 3 eieren Jumbo (225 gr in schaal, nauwkeurig afwegen)
- 40 ml water
- Nauwkeurig afmeten met behulp van de standaard maatschep; NB 1 tl=5ml
Bereiding:
1. Kies de pastavorm voor de gewenste pastasoort.
2. Leg de gekozen pastavorm in heet water met olie. Laat het 1-2 minuten ondergedompeld liggen.
3. Controleer of de sluitschuif van het apparaat gesloten is.
4. Monteer de pastavorm en draai de sluitring er met de hand op (punt 8/ 9 in de montageaanwijzing).
5. Schep de bloem in de mengcontainer en sluit het deksel.
6. Zet de machine aan en giet de drie losgeklopte eieren rustig in de vulopening.
7. Voeg het water toe.
8. Laat de machine 2 à 3 minuten draaien. Het deeg moet uit klontjes bestaan zo groot als erwten.
9. Trek de sluitschuif open tot u een hoort.
10. Na ongeveer 1 minuut draaien zal de pasta uit de pastavorm komen.
11. Snijdt de pasta af op de gewenste lengte met het bijgeleverde kunststof mes.
12. Binnen 10 minuten heeft u ongeveer 500 gr. verse pasta.
13. De pasta hoeft niet te drogen en kan direct worden gekookt.
Harde tarwebloem van het merk Cecco (Pastabloem, verkrijgbaar in (kook)speciaalzaken)
Ingrediënten:
- 500 gr harde tarwebloem (Cecco)
- 3 eieren Jumbo (225 gr in schaal, nauwkeurig afwegen)
- 1 theelepel zout
- 1 theelepel olijfolie
- 2 theelepel water
- Nauwkeurig afmeten met behulp van de standaard maatschep; NB 1 tl=5ml
Bereiding:
1. Kies de pastavorm voor de gewenste pastasoort.
2. Leg de gekozen pastavorm in heet water met olie. Laat het 1-2 minuten ondergedompeld liggen.
3. Controleer of de sluitschuif van het apparaat gesloten is.
4. Monteer de pastavorm en draai de sluitring er met de hand op (punt 8/ 9 in de montageaanwijzing).
5. Schep de bloem in de mengcontainer en sluit het deksel.
6. Zet de machine aan en giet de drie losgeklopte eieren rustig in de vulopening.
7. Voeg zout, olie en water toe.
8. Laat de machine 4 à 5 minuten draaien. Het deeg moet uit klontjes bestaan zo groot als erwten.
9. Trek de sluitschuif open tot u een hoort.
10. Na ongeveer 1 minuut draaien zal de pasta uit de pastavorm komen.
11. Snijdt de pasta af op de gewenste lengte met het bijgeleverde kunststof mes.
12. Binnen 10 minuten heeft u ongeveer 500 gr. verse pasta.
13. De pasta hoeft niet te drogen en kan direct worden gekookt.
PASTAVARIATIES
Pasta verde (met spinazie)
Pasta verde is door spinazie groen gekleurd. Voeg samen met de eieren een klein beetje (± 25 gram)
gekookte, goed uitgedrukte, fijn gehakte spinazie toe.
Zwarte pasta

Deze wordt met inktvisseninkt gemaakt. Roer per 100 g bloem, één koffielepel inktvisinkt door de eieren.
Rode pasta
Hiervoor wordt kookvocht van rode bieten gebruikt. Voeg het vocht (± 25 gram) samen met de eieren door
de bloem.
RECEPTEN
Pasta met gehakt en groente - Aantal personen: 4
Ingrediënten:
- 500 gram pasta
- 500 gram rundergehakt
- 3 halve paprika's (groen, geel en rood )
- 250 gram champignons
- 2 dikke uien
- 3 teentjes knoflook
- 1 blik gepelde tomaten
- 1 klein blikje tomatenpuree
- 10 groene olijven
- 5 bouillonblokjes
- 2 laurierblaadjes
- 2 eetlepels paprikapoeder
- 3 eetlepels Italiaanse kruiden
- 2 eetlepels groene pesto
- Peper/ zout
Bereiding:
Pasta al dente koken in licht gezouten water ondertussen gehakt rul bakken met peper en zout klein
gesneden ui en knoflook toevoegen even meebakken dan bouillonblokjes verkruimelen, laurierblaadjes,
paprikapoeder, Italiaanse kruiden en pesto toevoegen.
In blokjes gesneden paprika en in plakjes gesneden champignons en gepelde tomaten kleingesneden,
olijven en de tomatenpuree toevoegen. De pasta afgieten en door de groente-gehaktmengsel mengen.
Romige pasta met zalm - Aantal personen: 4
Ingrediënten:
- 4 à 6 rijpe tomaten
- 1 potje ricotta/mascarpone
- 500g pasta (bijv. tagliatelle of fetuccine)
- 400g gerookte zalm
- kruiden (peper, zout, basilicum)
Bereiding:
Kook de pasta al dente, ondertussen snijdt u de tomaten in blokjes en laat u deze even bakken in olijfolie.
Ondertussen heeft u de zalm in snippers gesneden en roert u ze onder de tomaten. Laat erg kort
meebakken en voeg er dan -al roerend- de ricotta of mascarpone bij. Kruiden met peper, zout (zoals u het
zelf graag hebt) en de saus nog even laten doorkoken, als de saus te dik is kunt u er nog een beetje lichte
room of melk aan toevoegen. Dien op met de pasta en eventueel verse kruiden zoals basilicum. U kunt de
tomaten ook vervangen door paprika's, courgettes ect.
Pasta met gamba's, knoflook, tomaat en rucola - Aantal personen: 1

Ingrediënten:
- 4 gamba's, gepeld en schoongemaakt
- ca. 125 gram spaghetti
- 2 tenen knoflook, fijngesneden
- 3-4 zongedroogde tomaten, op olie
- 25 gram rucola, heel grof gesneden
- Peper/ zout
- vers geraspte parmezaan
Bereiding:
Kook de pasta al dente. Verhit wat olijfolie in een wok en als die goed heet is de gamba's toevoegen en
kruiden met peper en zout. Als 1 kant gaar is omdraaien en dan de knoflook en tomaat toevoegen,
meebakken tot de gamba's gaar zijn. Goed op smaak brengen met peper en zout en dan de pasta
toevoegen, goed mengen eventueel nog wat extra virgin olijfolie erbij gieten. Dan de rucola erbij, dit kan er
op of er door geroerd worden. Aan tafel eventueel de parmezaan toevoegen.
Pasta met kruidenkaas en spekjes - Aantal personen: 3
Ingrediënten:
- 400 gr pasta naar keuze (maar geen lange soorten)
- Kruidenkaas met knoflook
- 250 gr spekjes
- room kruidenmix bestaande uit bieslook, basilicum, peterselie (+/- 20 gr) paprikapoeder
- Parmezaanse kaas
- peper
- zout
Bereiding:
Kook pasta al dente, bak de spekjes goed knapperig en voeg room toe. Laat het geheel opwarmen en
voeg dan de kruidenkaas toe (een soeplepel of 2-3, naar smaak), en ook een klein beetje Parmezaanse
kaas. Breng het geheel lichtjes aan de kook en strooi er een kleine beetje paprikapoeder over. Als de
saus te dik is, voeg er dan een klein scheurtje melk aan toe. Vergeet ook niet om aan de saus peper &
zout naar smaak toe te voegen. Neem de pan af het vuur en overgiet de pasta met de saus, roer het
geheel even om en strooi de kruiden erover. U kunt tevens ook wat riccota toevoegen voor een vollere
smaak en een romige saus. De kruidenmix kunt u ook vervangen door 1/3 bouillonblokje.

(GB) Trebs Comfortcook; Fully automatic pasta maker
First read through these instructions carefully and keep for future reference. Check whether the mains
voltage in your home is the same as that of the appliance (220 Volt). The Trebs Comfortcook pasta maker
is an excellent, fully automatic pasta machine for homemade pasta. The powerful motor makes the most
beautiful pasta within a short time. Equipped with 10 different attachments that allow you to make different
types of pasta. The appliance is also easy to clean and most of the detachable parts are dishwasher-
resistant. *However, we do not recommend cleaning the mixing container in the dishwasher, as the front
panel of the mixing container may change color. We recommend washing the mixing container manually
with a mild detergent.
Description of the components of the pasta machine
1. Casing/motor casing
2. On/Off switch
3. Closing slide
4. Unlocking button for the cover
5. Cover
6. Stirring mechanism
7. Unlocking button for the mixing container
8. Mixing container
9. Extrusion chamber
10. Dough transport coil
11. Sealing washer

When you open the appliance for the first time, you will find the following accessories:
- a ring spanner
- a plastic knife that can also be used as a scraper
- a cleaning attachment
- ten different pasta-shaping attachments
Your pasta machine is supplied fully assembled by the manufacturer. Carefully follow the instructions
given below for the installation and dismantling of the appliance.
DISMANTLING INSTRUCTIONS
1. Check to ensure that the pasta machine is not connected to the mains.
2. Remove the locking washer (11) together with the pasta attachment. If necessary, use the ring
spanner for this purpose.
3. Carefully remove the dough transport coil (10). If after use, the back of the coil is full of sticky dough,
first dismantle the coil according to the following instructions. You can remove the coil by lightly
tapping the end of the shaft and then removing the same.
4. Pull the closing slide (3) fully out of the appliance by gently pushing the locking button located above
the closing slide.
5. Press the unlocking button (4) for the cover, located on the front side of the cover (5) on the mixing
container (8) downwards by pulling it gently forward and lift the cover.
6. The unlocking button (7) for removing the mixing container (8) is located on the hinging side of the
cover near the casing (1).
7. Press the unlocking button and remove the mixing container.
8. Pull the chrome-plated drive shaft of the stirring mechanism (6) outward and remove it from the mixing
container.
9. Now carefully clean all the components that come into contact with the dough, either by hand or in the
dishwasher (*please read the instructions on the first page).
INSTALLATION INSTRUCTIONS
1. First check to ensure that the pasta machine is not connected to the mains.
2. Place the stirring mechanism (6) in the mixing container (8) with the largest opening facing the front
of the mixing container.
3. Place the stirring mechanism (6) in such a manner that the openings in the shaft of the stirring
mechanism coincide with the openings in the container.
4. Insert the chrome-plated drive shafts with the groove in the topmost drive opening of the motor
casing (1).
5. Press the unlocking button (7) on the motor casing downwards and push the mixing container (8)
together with the stirring mechanism over the chrome-plated drive shaft into the motor casing. It may
be necessary to turn the stirring mechanism (6) to some extent, so that everything falls properly in
place. Now unscrew the unlocking button (7) and check whether the locking has taken place properly
by carefully pulling the mixing container.
6. Push the closing slide (3) in the groove of the casing (on/off switch (2)) fully into the mixing position.
This is the position in which the closing slide is pushed as far as possible into the casing.
7. Push the dough transport coil (10) into the extrusion chamber (9) until it is in the hexagonal opening
of the motor casing (1). By carefully rotating the dough transport coil, it will come to rest in the proper
place, so that it will not project outside the threaded part of the extrusion chamber.
8. Select the desired pasta-shaping attachment and place it in the extrusion chamber (9), so that the

three projections of the extrusion chamber fit into the three grooves of the pasta-shaping attachment.
9. Hold the pasta-shaping attachment in place with a finger and push the sealing washer (11) over the
screw of the extrusion chamber (9) with simultaneous rotation in the clockwise direction. Only tighten
the sealing washer by hand. For this, use the ring spanner, otherwise there is a risk of stripping the
thread of the screw.
10. Now place the cover (5) on the mixing container (8). The installation is now complete.
PREPARATION OF PASTA
BASIC PASTA RECIPE (WITH EGGS)
Ingrediënt:
- 500 gr flour (available in all supermarkets, regular flour)
- 3 Jumbo eggs (225 gr in egg-shell, check carefully)
- 1 tablespoon salt
- 40 ml water
- Measure exactly with a scoop; NB 1 tl=5ml
NOTE: If you use other flour, the amount of liquid (eggs, oil, water) can be different. Under recipes
you will find some recipes with different types of flour.
Preparation:
1. Select the pasta-shaping attachment for the desired type of pasta.
2. Place the pasta-shaping attachment in a bowl with hot water and a few drops of Oil. Ensure that the
attachment is covered with water. Allow it to lie immersed for 1-2 minutes.
3. Check whether the closing slide is fully pushed into the appliance (mixing position).
4. Now place the pasta-shaping attachment as described in the installation instructions in point 8 and 9.
5. Add the required quantity of flour and close the lid.
6. Switch on the machine and add the eggs in the machine.
7. Add salt and water.
8. Run the motor for around 4-5 minutes. The dough may be said to be suitable if it consists of pea-
sized lumps.
9. As soon as the dough is suitable, pull out the closing slide slowly out of the appliance until you hear it
click.
10. After 1 minute the pasta will come out of the machine.
11. Continue with the preparation of the pasta and always cut it to the desired length directly at the
outlet of the pasta-shaping attachment.
12. Within 10 minutes you will have 500 gr. Fresh pasta.
13.
ATTENTION:
and look up the
.
The product have a security function. If you open the lid the machine will switch off automatic.
In below pictures you can see the right consistency of the dough.

Too wet; add some flour too dry; add some water correct!
TROUBLESHOOTING
If the pasta is extruded more slowly, in spite of there being a sufficient amount of dough in the mixing
container, it may be that the dough has hardened around the opening of the closing slide. In such
case, push the slide into the mixing position and pull it back again.
While making the pasta, you may have to switch off the appliance and remove the hardened dough
out of the stirring mechanism and the corners of the mixing container before you can start the
appliance again.
If the appliance makes tapping sounds or if you think that the motor sounds as if it is overloaded,
switch off the appliance and close the closing slide. Then remove the locking washer, the pasta
attachment and the dough from the extrusion chamber. Add a little liquid, allow the dough to be
kneaded for a few minutes and again commence preparing pasta.
Excessively dry dough may generate such high pressure that the motor may fail and the appliance will
suffer heavy damage and come to a stop. Your pasta machine is equipped with an anti-slip coupling
motor run more slowly. For this reason, you should always ensure that the dough is wet enough.
Please note: If excessively dry flour finds its way into the extrusion chamber, you should immediately
place the closing slide in the mixing position by pushing it sufficiently inward. You should thereafter
remove all the hardened flour from the locking washer, pasta attachment, dough transport coil and
extrusion chamber. After reassembling the equipment, you may continue making pasta.
CLEANING INSTRUCTIONS
1. Disconnect the appliance from the mains network by pulling out the plug.
2. Remove the sealing washer (11) and the pasta-shaping attachment.
3. Remove all the remaining dough from the extrusion chamber (9) and pull out the dough transport coil
(10).
4. Remove the dough from the pasta-shaping attachment using the cleaning attachment or with a
toothpick.
Attention: First allow the dough to dry before removing it. The work will be easier if you place the
attachment in the deep freezer to freeze the remaining dough before you start removing the dough.

5. Open the cover (5) of the mixing container (8) and allow the remaining dough to dry for a couple of
hours, if necessary, overnight.
6. After the dough is fully dry, you may brush out the appliance.
7. Dismantle the pasta machine in accordance with the dismantling instructions.
8. Place the attachments into the dishwasher (*please read the instructions on the first page) or wash
them by hand in hot water using a washing solution.
ATTENTION: Never immerse the motor casing (1) in water.
9. Wipe down the motor casing only with a slightly moist piece of cloth.
10. Carefully dry all the components and again switch on the appliance according to the installation
instructions.
ATTENTION
- Do not install the machine in wet locations or where there is exposure to steam.
- Never immerse the motor casing of the mains cable into the water.
- If there are children present at the workplace, the supervision of adults is necessary.
- Always remove the plug from the socket outlet during cleaning, dismantling or installing appliance
components, or if the pasta machine is not in use.
- Do not let the power cable touch hot surfaces.
- Only use the pasta machine when the cover is closed.
- First switch off the equipment and wait until the dough mixture has stopped before you remove the
cover.
- Never touch moving parts.
- Do not use the appliance if it is damaged or if the power cable is damaged. Send it to our Service
department to reduce risks. With this type of appliance, a damaged cable should only be replaced by
our service department using special tools.
- Only use original components and accessories.
- Never use the pasta machine outdoors.
- The pasta machine is intended for home use and not for professional use.
CE
U.K. WIRING INSTRUCTIONS
The wires in the mains lead are colored in accordance with the following code:
BLUE NEUTRAL
BROWN LIVE
GREEN/YELLOW EARTH
As the colours of the wire in the mains lead of this appliance may not correspond with the colour
markings identifying the terminals on your plug, proceed as follows:
The wire which is coloured BLUE must be connected to the terminal which is marked with the
letter N or coloured black.
The wire which is coloured BROWN must be connected to the terminal which is marked with the
letter L or coloured red.
The wire which is coloured GREEN/YELLOW must be connected to the terminal which is marked with
the letter E or and is coloured GREEN or GREEN/YELLOW
WARNING: THIS APPLIANCE MUST BE EARTHED

RECIPES
For the recipes described below, you will need oil. You may use either olive oil or vegetable oil. We
recommend olive oil due to its authentic taste.
The cooking time of dried fresh pasta may vary between 3 and 4 minutes, depending on the thickness.
Always make sure to cook your pasta in plenty of boiling water, together with some salt. As a rule of
thumb, use approximately 1 liter of water per 100 g pasta for cooking and add a full teaspoon of salt to the
cooking water.
BASIC PASTA RECIPE WITH DIFFERENT TYPES OF FLOUR
Flour type “45” (available in every supermarket)
Ingrediënt:
- 500 gr flour
- 3 Jumbo eggs (225 gr in egg-shell, check carefully)
- 1 tablespoon salt
- 40 ml water
Preparation:
1. Select the pasta-shaping attachment for the desired type of pasta.
2. Place the pasta-shaping attachment in a bowl with hot water and a few drops of Oil. Ensure that the
attachment is covered with water. Allow it to lie immersed for 1-2 minutes.
3. Check whether the closing slide is fully pushed into the appliance (mixing position).
4. Now place the pasta-shaping attachment as described in the installation instructions in point 8 and 9.
5. Add the required quantity of flour and close the lid.
6. Switch on the machine and add the eggs in the machine.
7. Add salt and water.
8. Run the motor for around 4-5 minutes. The dough may be said to be suitable if it consists of pea-
sized lumps.
9. As soon as the dough is suitable, pull out the closing slide slowly out of the appliance until you hear it
click.
10. After 1 minute the pasta will come out of the machine.
11. Continue with the preparation of the pasta and always cut it to the desired length directly at the
12. outlet of the pasta-shaping attachment.
13. Within 10 minutes you will have 500 gr. Fresh pasta.
14. You
Flour type “00” (Pasta flour, available in specialty shops)
Ingrediënt:
- 500 gr flour
- 3 Jumbo eggs (225 gr in egg-shell, check carefully)
- 1 tablespoon salt
- 60 ml water
Preparation:
1. Select the pasta-shaping attachment for the desired type of pasta.
2. Place the pasta-shaping attachment in a bowl with hot water and a few drops of Oil. Ensure that the
attachment is covered with water. Allow it to lie immersed for 1-2 minutes.
3. Check whether the closing slide is fully pushed into the appliance (mixing position).
4. Now place the pasta-shaping attachment as described in the installation instructions in point 8 and 9.
5. Add the required quantity of flour and close the lid.
6. Switch on the machine and add the eggs in the machine.

7. Add salt and water.
8. Run the motor for around 4-5 minutes. The dough may be said to be suitable if it consists of pea-
sized lumps.
9. As soon as the dough is suitable, pull out the closing slide slowly out of the appliance until you hear it
click.
10. After 1 minute the pasta will come out of the machine.
11. Continue with the preparation of the pasta and always cut it to the desired length directly at the
12. outlet of the pasta-shaping attachment.
13. Within 10 minutes you will have 500 gr. Fresh pasta.
14.
Flour type “Semola fine” (Pasta flour, available in specialty shops)
Ingrediënt:
- 500 gr flour
- 3 Jumbo eggs (225 gr in egg-shell, check carefully)
- 40 ml water
Preparation:
1. Select the pasta-shaping attachment for the desired type of pasta.
2. Place the pasta-shaping attachment in a bowl with hot water and a few drops of Oil. Ensure that the
attachment is covered with water. Allow it to lie immersed for 1-2 minutes.
3. Check whether the closing slide is fully pushed into the appliance (mixing position).
4. Now place the pasta-shaping attachment as described in the installation instructions in point 8 and 9.
5. Add the required quantity of flour and close the lid.
6. Switch on the machine and add the eggs in the machine.
7. Add water.
8. Run the motor for around 2-3 minutes. The dough may be said to be suitable if it consists of pea-
sized lumps.
9. As soon as the dough is suitable, pull out the closing slide slowly out of the appliance until you hear it
click.
10. After 1 minute the pasta will come out of the machine.
11. Continue with the preparation of the pasta and always cut it to the desired length directly at the
12. outlet of the pasta-shaping attachment.
13. Within 10 minutes you will have 500 gr. Fresh pasta.
14.
PASTA VARIATIONS
Pasta verde (with spinach)
Pasta verde is made with spinach to turn it green. Together with the eggs, add a small amount (± 25 g) of
cooked, well squeezed, finely chopped spinach.
Black pasta
This variety is made with squid ink. Add one teaspoonful of squid ink per 100 g flour / 1 egg and mix it with
the eggs.
Red pasta
Red pasta is made with beetroot juice (beetroot cooking water). Add the water (± 25 g), together with the
eggs, to the flour.

Pasta with ground meat and vegetables –number of persons: 5
Ingredients:
- 500 g pasta
- 500 g ground beef
- 3 pepper halves (green, yellow, and red)
- 250 g champignon mushrooms
- 2 large onions
- 3 cloves of garlic
- 1 can of whole peeled tomatoes
- 1 small tin of tomato purée
- 10 green olives
- 5 bouillon cubes
- 2 bay leaves
- 2 tablespoonfuls of paprika powder
- 3 tablespoonfuls of Italian spices
- 2 tablespoonfuls of green pesto
- Pepper/ salt
Preparation:
together with pepper and salt. Add the finely chopped onion and garlic and fry it all together briefly; then
crumble the bouillon cubes and add the bay leaves, the paprika powder, the Italian spices, and the pesto.
Add the cut-up paprika, the sliced-up champignon mushrooms, and the peeled tomatoes (chopped), as
well as the olives and the tomato purée. Drain the pasta and mix it with the vegetable/hamburger mix.
Creamy pasta with salmon –Number of persons: 4
Ingredients:
- 4 to 6 ripe tomatoes
- 1 pot of ricotta/mascarpone
- 500g pasta (such as tagliatelle or fetuccine)
- 400g smoked salmon
- seasoning (pepper, salt, basil)
Preparation:
In the meantime, cut up the tomatoes into little cubes and fry them briefly in
olive oil. While you are doing this, shred the salmon and mix it with the tomatoes. Fry briefly; then add the
ricotta or mascarpone while stirring. Season with pepper and salt (to taste) and allow the sauce to cook for
a little while longer. If it gets too thick, you can always add some light cream or milk. Serve together with
the pasta, possibly also with fresh herbs, such as basil. Peppers or zucchinis etc. may be used instead of
tomatoes.
Pasta with king prawns, garlic, tomato and arugula –Number of persons: 1
Ingredients:
- 4 king prawns, peeled and cleaned
- approx. 125 g spaghetti
- 2 cloves of garlic, finely chopped
- 3 to 4 sun-dried tomatoes in oil
- 25 g arugula, very coarsely chopped
- pepper
- salt

- freshly grated Parmesan cheese
Preparation:
Heat up some olive oil in a wok; as soon as it is hot, add the king prawns and
salt and pepper to taste. As soon as one side is done, turn over the prawns and add the garlic and the
tomato; fry the mixture until the prawns are done. Pepper and salt to taste and then add the pasta; mix
well. You may wish to add some extra virgin olive oil. Now add the arugula; it may either be mixed in or
placed on top. Parmesan cheese may be sprinkled on top when serving the meal.
Pasta with herb cheese and bacon –number of persons: 3
Ingredients:
- 400 g pasta according to choice (not the long varieties, though)
- Herb cheese with garlic
- 250 g bacon bits
- cream herb/seasoning mixture with chives, basil, parsley (+/- 20 g) paprika powder
- Parmesan cheese
- pepper
- salt
Preparation:
Cook the pasta, fry the bacon bits until crisp, and add the cream. Heat up the mixture and add the herb
cheese (2 to 3 tablespoonfuls, to taste). Also add a very small amount of Parmesan cheese. Bring the
mixture to the boil (slightly) and sprinkle a small amount of paprika powder on top. If the sauce is too thick,
add a small amount of milk. Do not forget to add salt and pepper to taste. Take the pan off the stove and
douse the pasta with the sauce. Stir briefly and sprinkle the herbs on top of it. You may add some riccota
to enhance the flavor and get a creamy sauce. Instead of the herb / seasoning mixture, you may also add
1/3 of a bouillon cube.

(FR) Trebs Comfortcook; Machine à pâtes entièrement automatique
Lisez attentivement ce mode d'emploi et conservez-le afin de pouvoir le consulter ultérieurement si
nécessaire. Assurez-vou
La Comfortcook machine à pâtes entièrement automatique est une superbe machine à faire les pâtes
fraîches, entièrement automatique, pour faire ses pâtes soi-même. Le moteur puissant
les plus belles pâtes fraîches en un tour de main. Pourvue de dix accessoires différents permettant de
produire toutes sortes de pâtes fraîches. La machine à pâtes fraîches se nettoie en outre très facilement.
*Nous déconseillons toutefois -vaisselle pour laver le récipient de pétrissage, car la façade
de ce dernier pourrait perdre sa couleur. Nous conseillons de laver le récipient de pétrissage à la main et
Descriptif de la machine à pâtes fraîches
-moteur
2. Interrupteur Marche/Arrêt
3. Glissière
4. Bouton de déblocage du couvercle
5. Couvercle
6. Mécanisme rotatif
7. Bouton de déblocage du récipient pétrisseur
8. Récipient pétrisseur
9. Chambre de compression
10.Spirale de transport de la pâte
11. Rondelle de blocage
Table of contents
Languages:
Other Trebs Pasta Maker manuals
Popular Pasta Maker manuals by other brands

Casselin
Casselin CCAP1G manual

CombiSteel
CombiSteel 7455.1655 user manual

Weston
Weston Roma 01-0601-W user manual

Giorik
Giorik 2CPG Instructions for installation, use and maintenance manual

Unold
Unold 68801 Instructions for use

Baron
Baron M90CPM/G400 Instructions for installation, operation and maintenance

MVP
MVP Axis AX-GPC1 GPC2 Installation, Operating and Maintenance Instruction

Pitco
Pitco and RSE14 Installation & operation

Philips
Philips HR2375 user manual

Lotus
Lotus CP-74ETX Installation and operating instructions

Univex
Univex Upasta-01 Operating and maintenance manual

Philips
Philips HR2660 user manual