Trekkrunner ES-409 User manual
HOME GYM
ES-409
ES-409

1. safety instructions...................................... 2
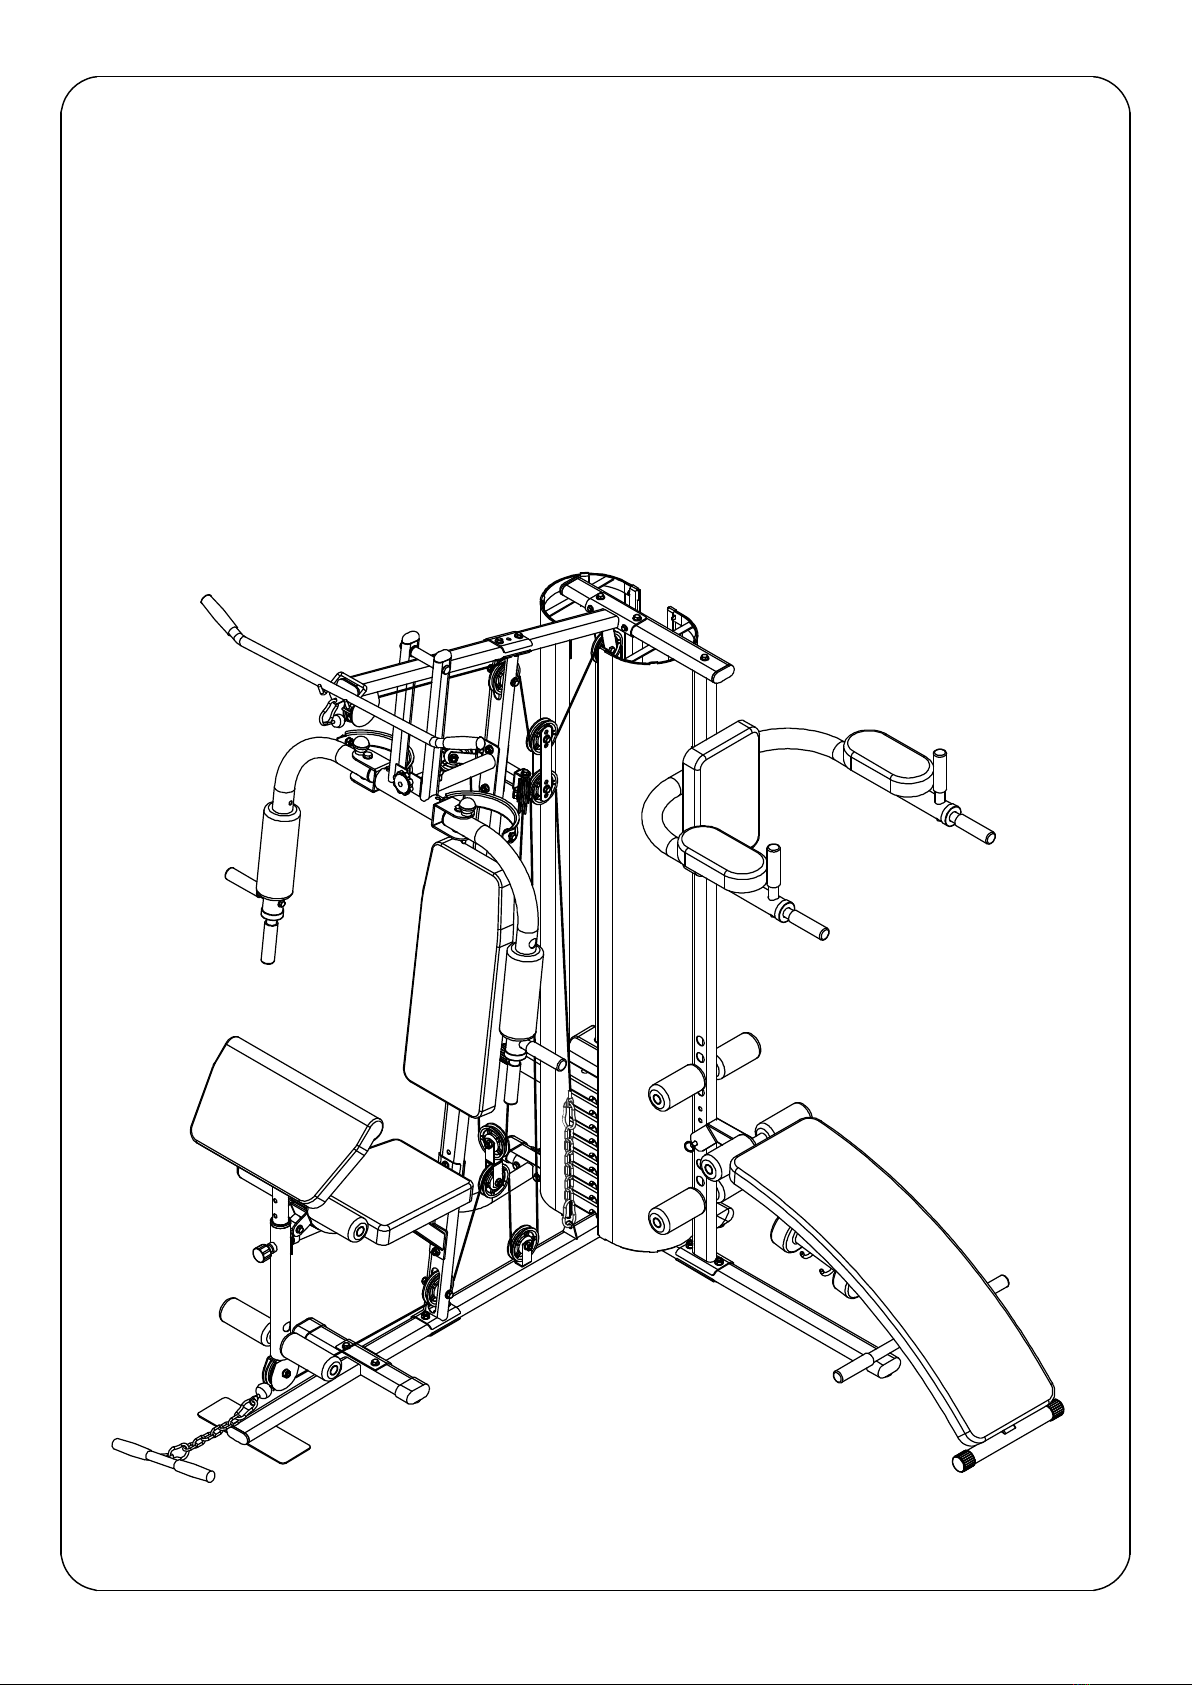
2. Product component details ....................... 3
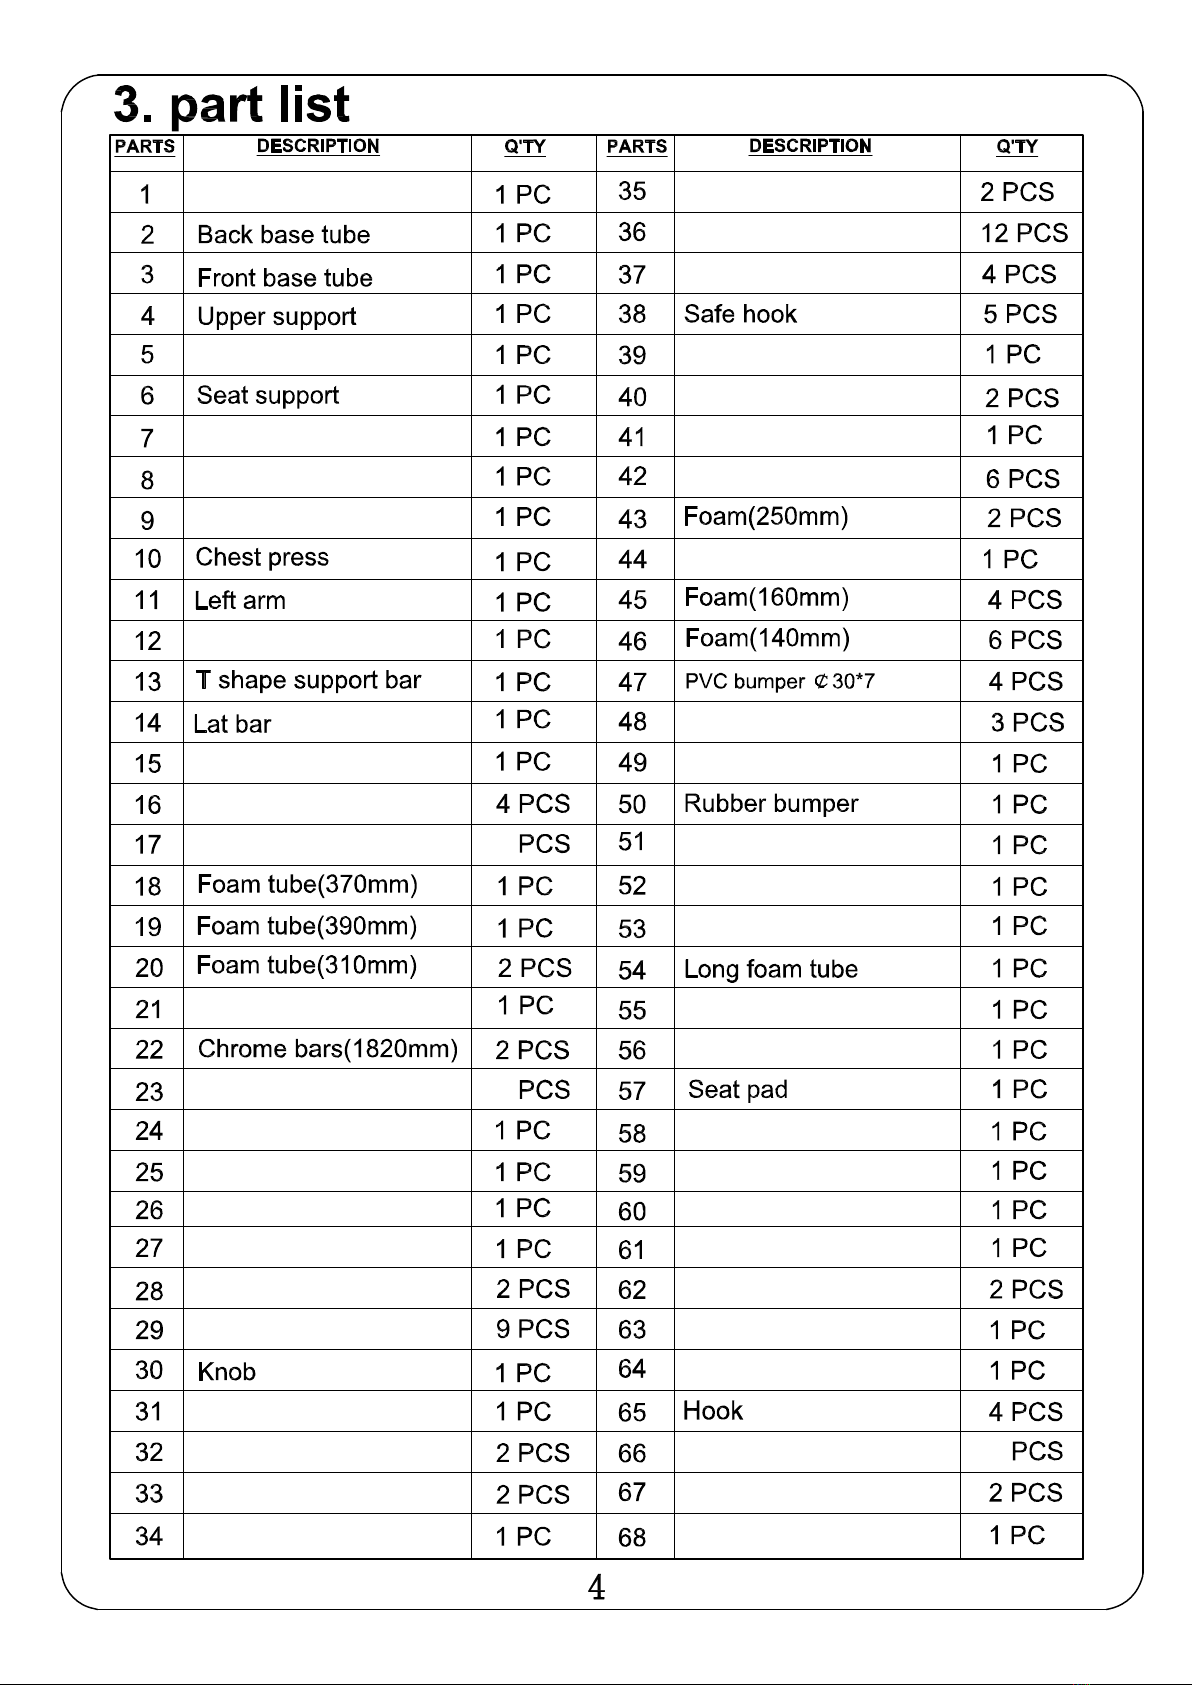
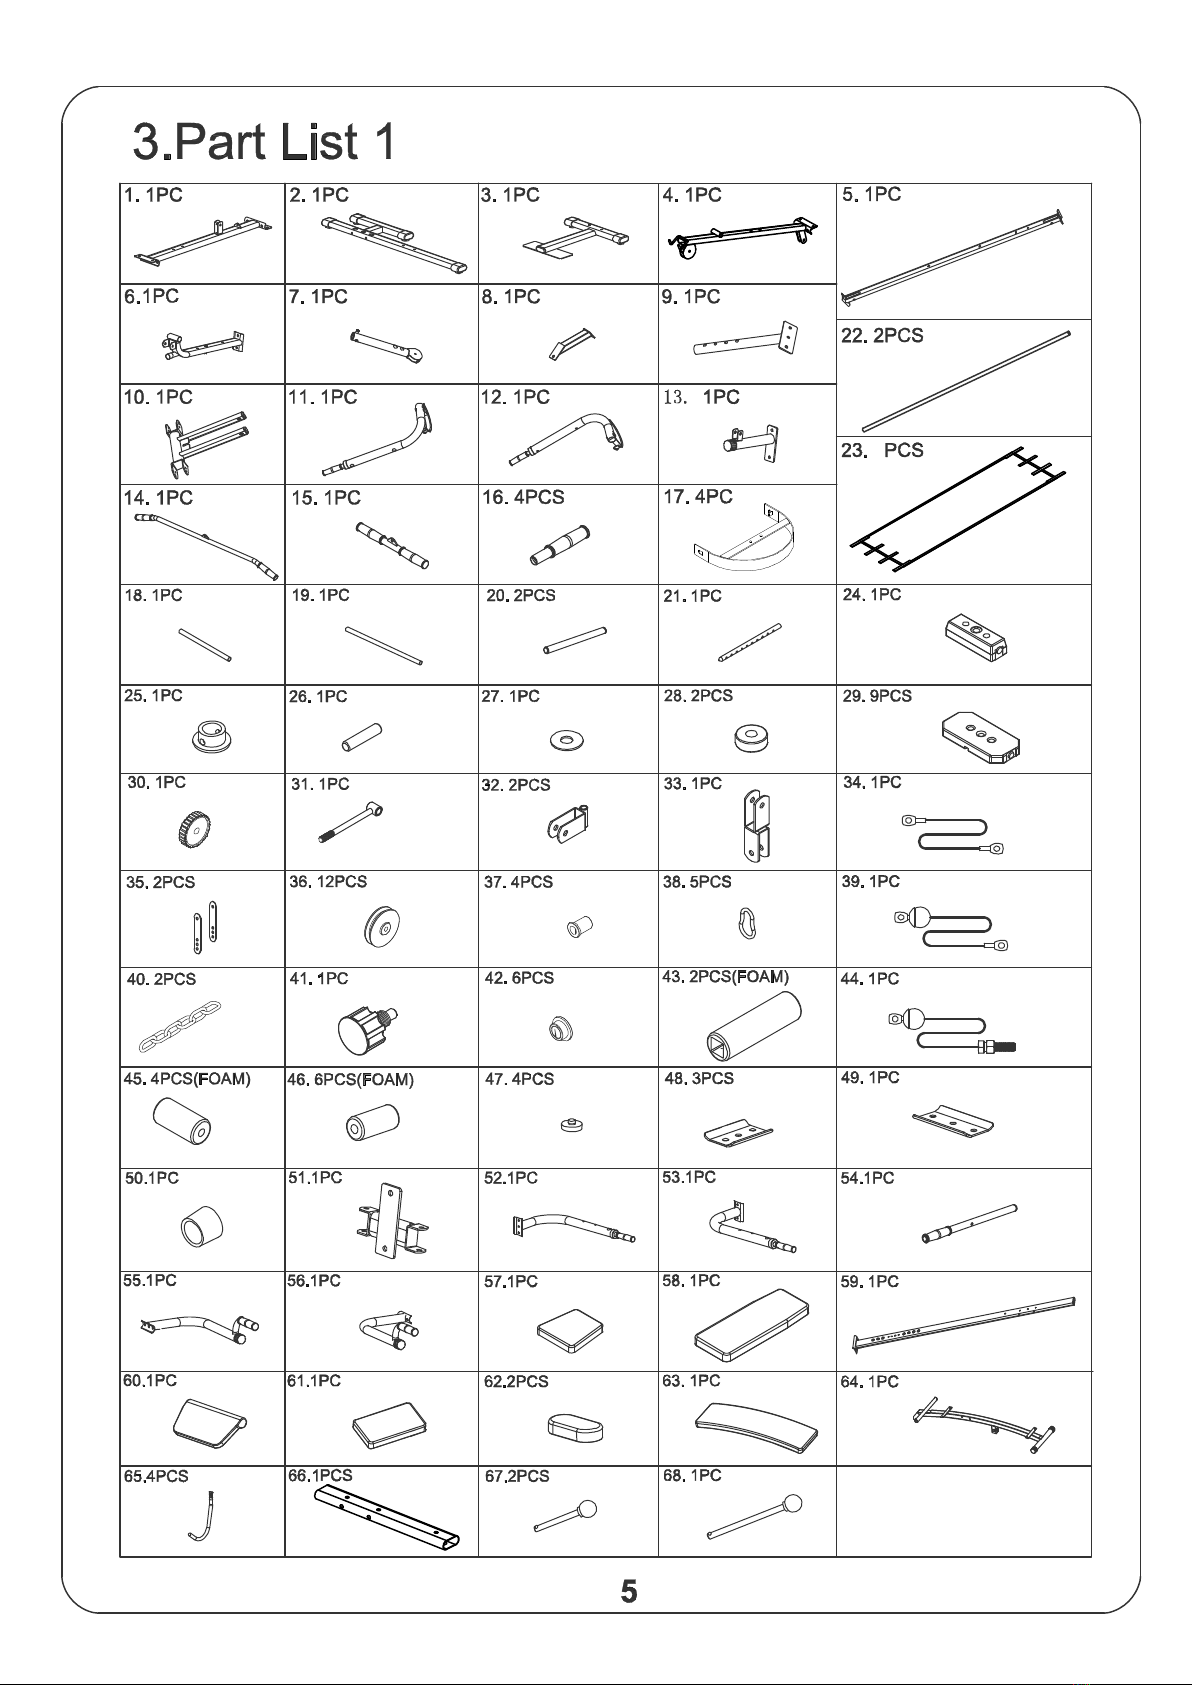
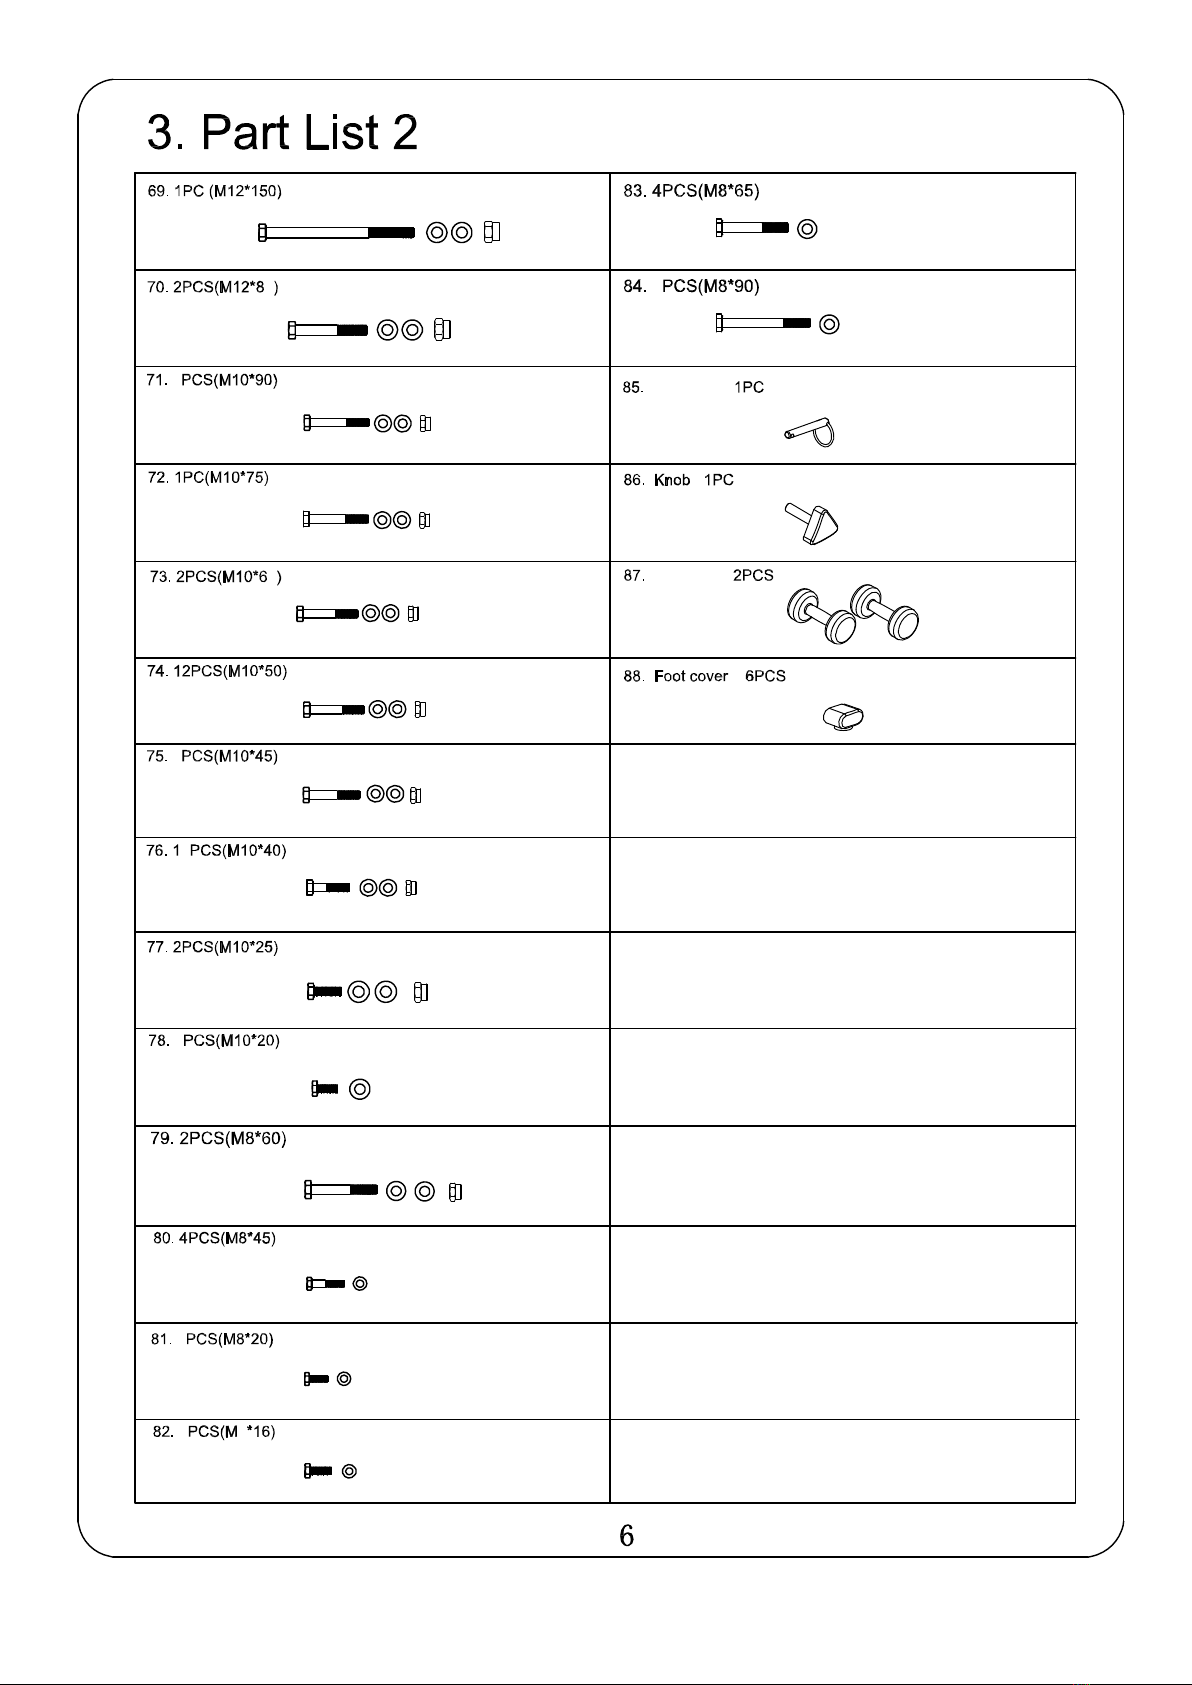
3. part list.....................................................4-5
4. installation ................................................. 6
4. installation ................................................. 7
4. installation ................................................. 8
4. installation ................................................. 9
4. installation ................................................10
4. installation ................................................11
4. installation ................................................12
5. operation and use of the item ..............13-15
6. cleaning and maintenance .......................15
7. disposal.....................................................15

1. safety instructions
This weight station is made for training in private environment. Only use
the appliance for the intended use.
It is not allowed to change anything which can have effects to the security
of the product.
Warning!
Pregnant or physical injured people should never use the weight station without
prior consultation with a doctor you trust.
Stop the training immediately when you do not feel comfortable or notice motoric,
sensory or mental changes / imitations.
Adapt your training style always to your personal fitness level and your health.
Before every training check the operability and safety.
Make sure before installation that the item is porperly and that all safety devices
are functional! Damages or alterations to the product in the course of the independent
modification lead to the exclusion of warranty. For problems resulting from the
modification or other restrictions, the seller is not responsible!
Any damage must be reported to the seller immediately after delivery, and access before
use / installation. Later complaints will not be considered.
Use only suitable tools for assembly.
Other than the people who run the Assembly have not stay in the immediate area.
The installation must always be made only by adults.
Children should not be present in the immediate environment.
In part, the package may consist of plastic bags - make this regard with particular care
and attention that this is not out of the reach of children. There is a risk of suffocation!
Make sure to mount that all connections are securely mounted before releasing the product for use.
Check all connections at regular intervals for damage, loose elements and other factors that can
lead to a loss of sufficient security.
Do not leave children unattended on the weight bench! It is not a toy!
Instruct them not to play or climb with or on the appliance.
This device consists partly of small parts-keep you particularly young children and babies away
from this unit (Choking hazard because of small parts)!
In case of damage or other abnormalities they break the installation immediately. If abnormalities
or damage after installation in day to day use or maintenance occur lock the bike to use in order
to prevent any risk of injury.
Let children or people with physical or mental limitations, or people who are not familiar with this
device, do not use this weight bench!
Please keep in mind that this manual and the safety can only draw your attention to eventual hazard.
Logical conclusions and prudent and to handle with this device around must therefore always be provided.
So always go with foresight and prudence.
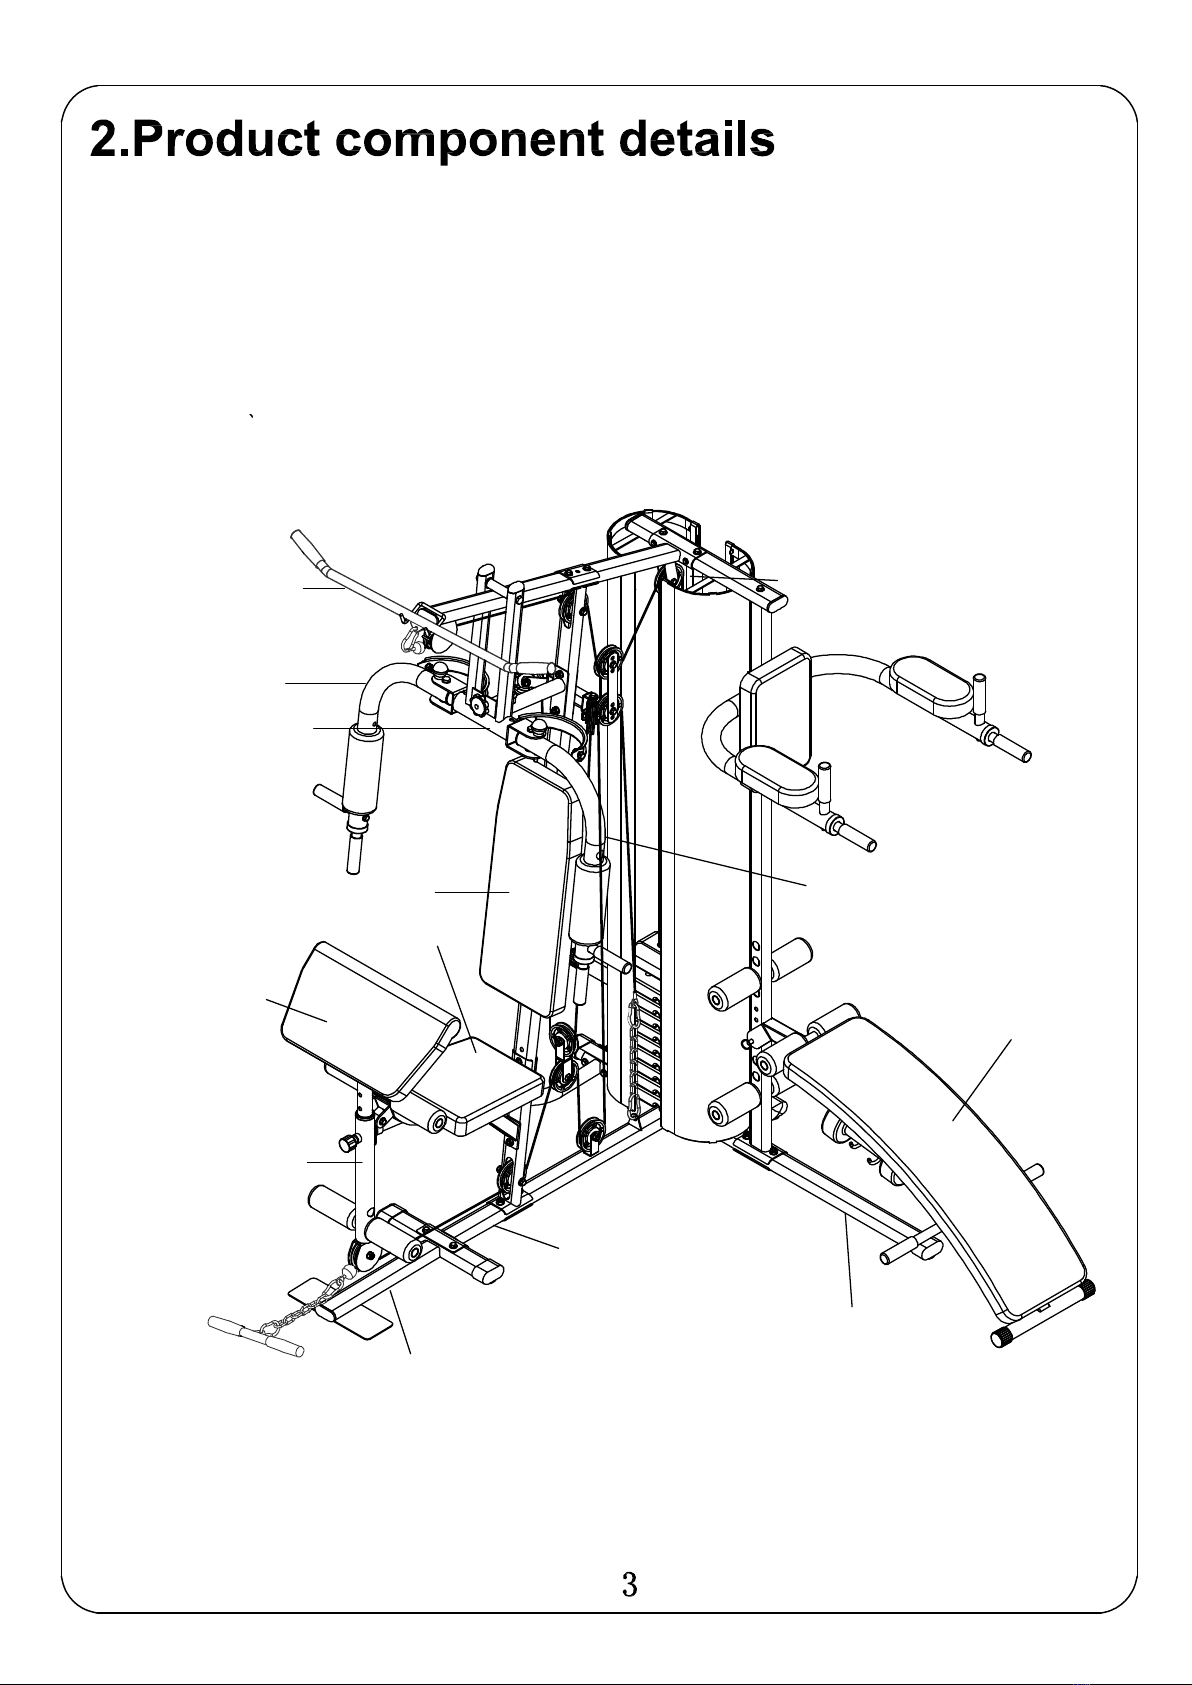
Lat bar
Chest press
Left arm
Back cushion
A
rm curl pad
Seat pad
Extension lever
Front base tube
Main base tube
Back base tube
Sit up bench
Right arm
Chrome bars
4
2
1
Main base tube
Vertical support
Leg Extension
Reinforced tube
Arm cushion support
Right arm
Curling bar
Handle bar
Weight cover support
Weight selector
Mesh cover
Upper weights
Weight block bushing
Pin Φ10
Big washer(Φ45)
Rubber cushion
Weight
T shape bolt
Pulley seat
Pulley bracket
Cable 1.
Adjusting plate
Pulley
Pulley bushing
Cable 2.
Chain
Locking knob (M16)
Steel bushing
Cable 3
Reinforced plate(100mm)
Reinforced plate(130mm)
Pulley shaft
Pull up left arm
Pull up right arm
Push up left arm
Push up right arm
Back cushion
Vertical tube
Arm cushion
Back cushion(small)
Arm cushion(small)
Sit up bench cushion
Sit up bench frame
Upper frame
Locking pin 10*85
Locking pin 10*150
2
S
8
8
0
9
4
5
4
6
2
Locking Pin
Dumbbell
0
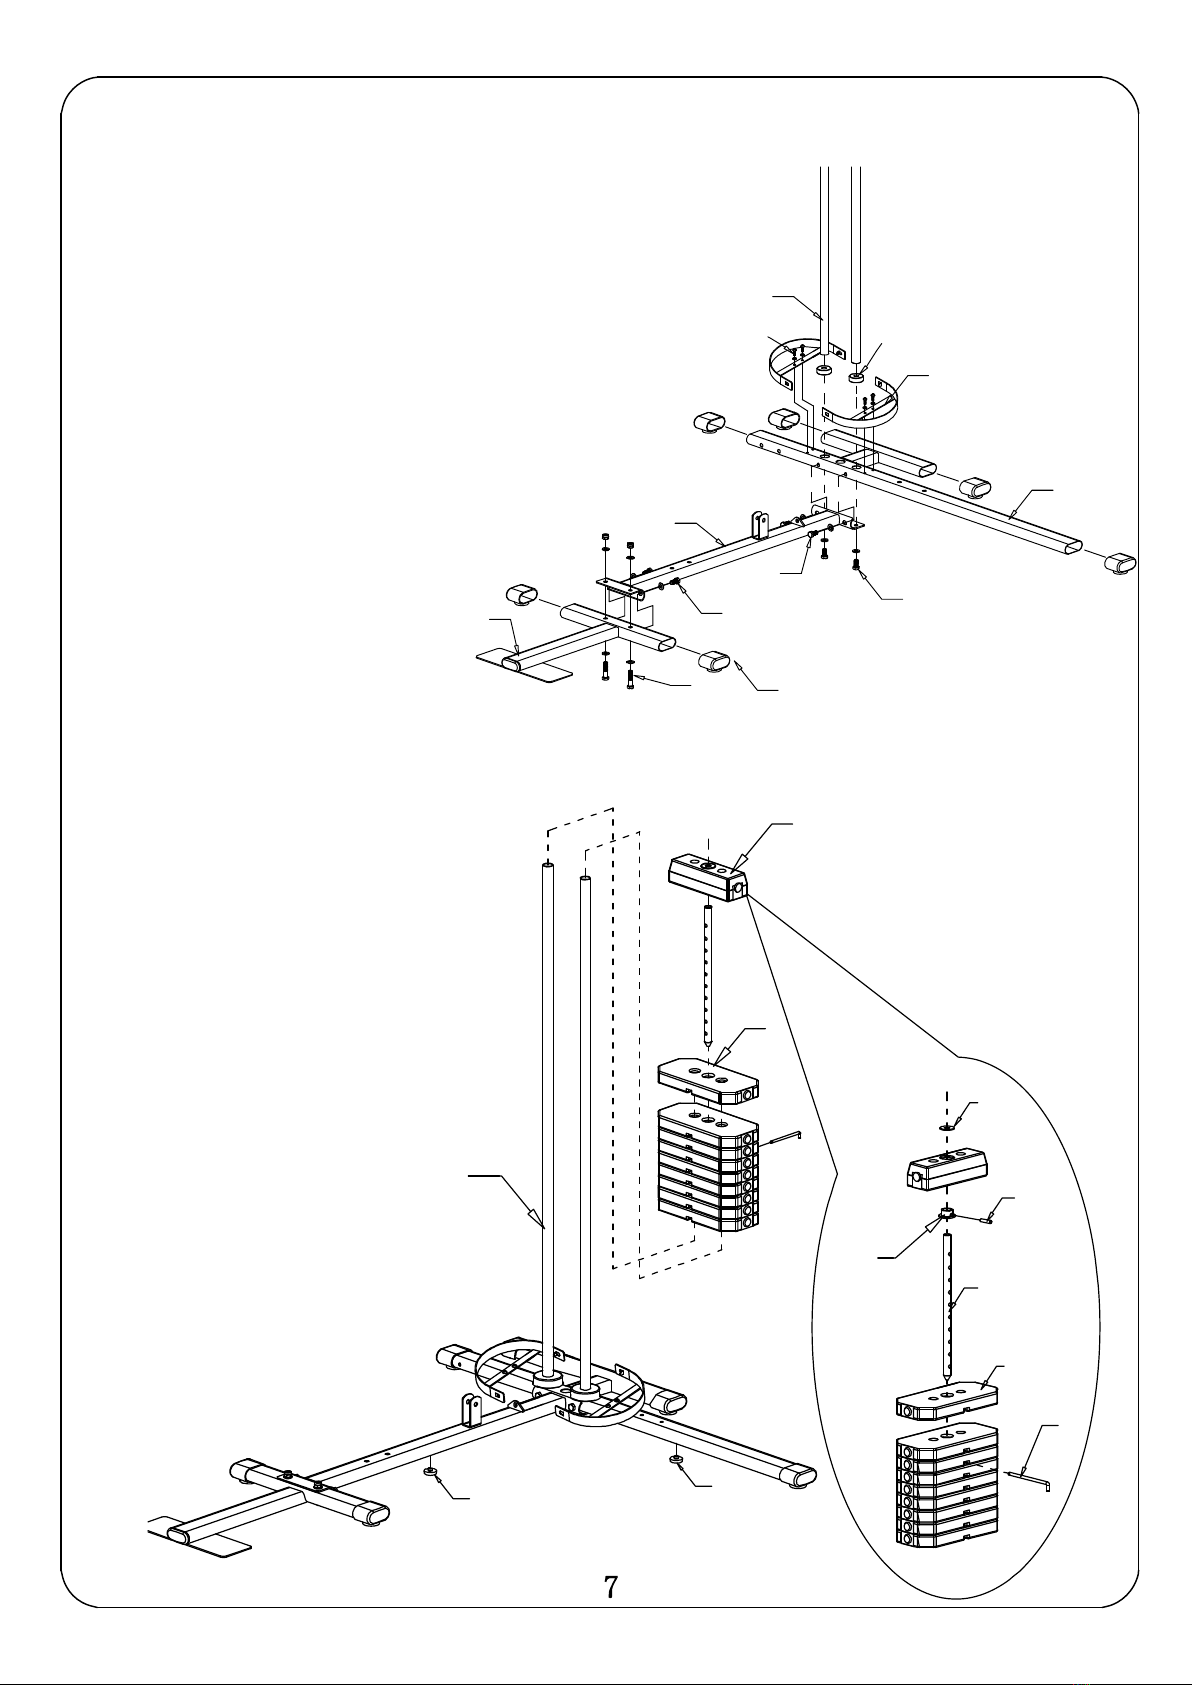
base tube(2),chrome bar(22)using Hex
bolts M10x20(78-2sets), washers and Hex
bolts M8x20 (81-2sets),washers.
2.Attach main base tube(1) to
4.Installation
STEP 1
1.Attach main base tube(1) to back
STEP 2
1.Attach weights(24, 29) to
chrome bars(22) as shown.
22
82 28
17
2
78
81
81
1
75
front base tube(3)using Hex bolts
M10x45(75-2sets), washers,nuts
and Hex bolts
M8x20(81-2sets),washers.
33..Atttach weight coovveerr ssuuppppoorrtt((1177))
ttoobbaacckkbbaasseettuubbee((22)) uussiinngg44sseettss
ssccrreeww&&wwaasshheerr((8822))
24
22
29
27
26
25
21
29
68
47 47
88
3
4. Attach foot cover(88) to front
base tube(3).
4.Installation
STEP 3
1.Attach Vertical support(5)to Main
base tube(1) using Hex bolts
M10x50(74-2sets) washers and nuts.
STEP 4
1.Attach Upper support(4)to Vertical
support(5) using reinforced plate
(48)and Hex bolts M10x50(74-2sets)
2.Attach seat support(6),reinforced
tube(8) to Vertical support(5) using
reinforced plate(48) and Hex bolts
M10x50 (74-2sets),bolts M10x45
(75-1set) washers and nuts.
3.Attach vertical tube(59) to
back base tube(2) using
reinforced plate(48)
and Hex bolts M10x50
(74-2sets),washers
and nuts.
4
4.
.a
at
tt
ta
ac
ch
h
u
up
pp
pe
er
r
f
fr
ra
am
me
e(
(6
66
6)
)
t
to
o
u
up
pp
pe
er
r
s
su
up
pp
po
or
rt
t(
(4
4)
),
,j
jo
oi
in
nt
t
c
ch
hr
ro
om
me
e
b
ba
ar
r(
(2
22
2)
),
,v
ve
er
rt
ti
ic
ca
al
l
t
tu
ub
be
e(
(5
59
9)
)
u
us
si
in
ng
g
3
3s
se
et
ts
s
s
sc
cr
re
ew
w&
&w
wa
as
sh
h(
(7
78
8)
),
,
2
2s
se
et
ts
s
s
sc
cr
re
ew
w&
&w
wa
as
sh
he
er
r(
(8
81
1)
)
74
48
74
2
8
1
75
6
48 74
5
22 59
17
78 78
74
48
82
81 66
4

5
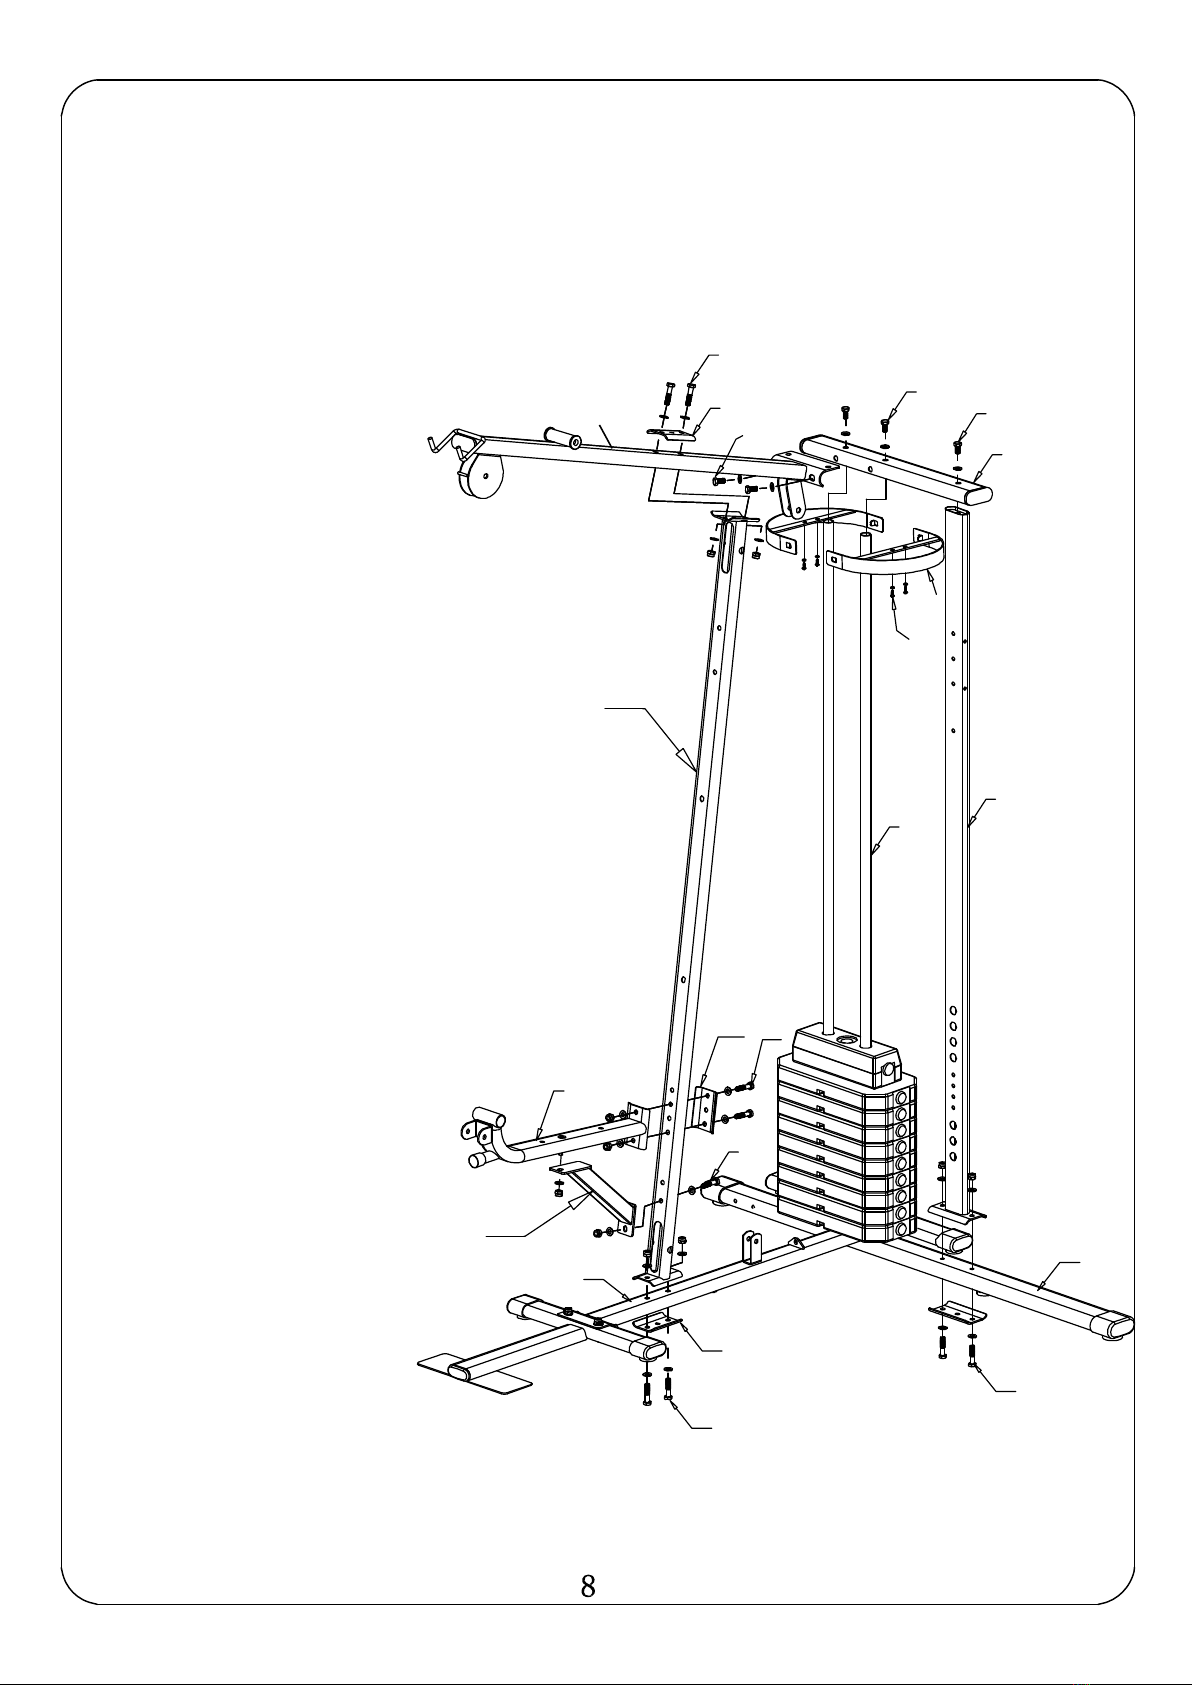
4.Installation
STEP 6
1.Attach left arm(12) to chest press(10)
using steel bushing(42) and Hex bolts
M12x80(70),washer and nut.
2.Insert handle bar(16) to holes
of left,right arm(12,11)
using Hex bolts
M10x20(78),washer.
STEP 5
1.Attach T shape support bar(13)
and pulley shaft(51)to Vertical
support using Hex bolts
M10x50(74),washer and nut.
2.Attach Chest press(10) to Upper
support(4) using Hex bolts
M12x150(69),steel bushing(42),
washer and nut.
3.Attach pulley seat(32) to pulley
shaft(51) using Hex bolts
M10x65(73),washer and nut.
4.Attach T shape bolt(31) to T shape
support bar(13) to using Hex bolts
M10x45(75),washer and nut.
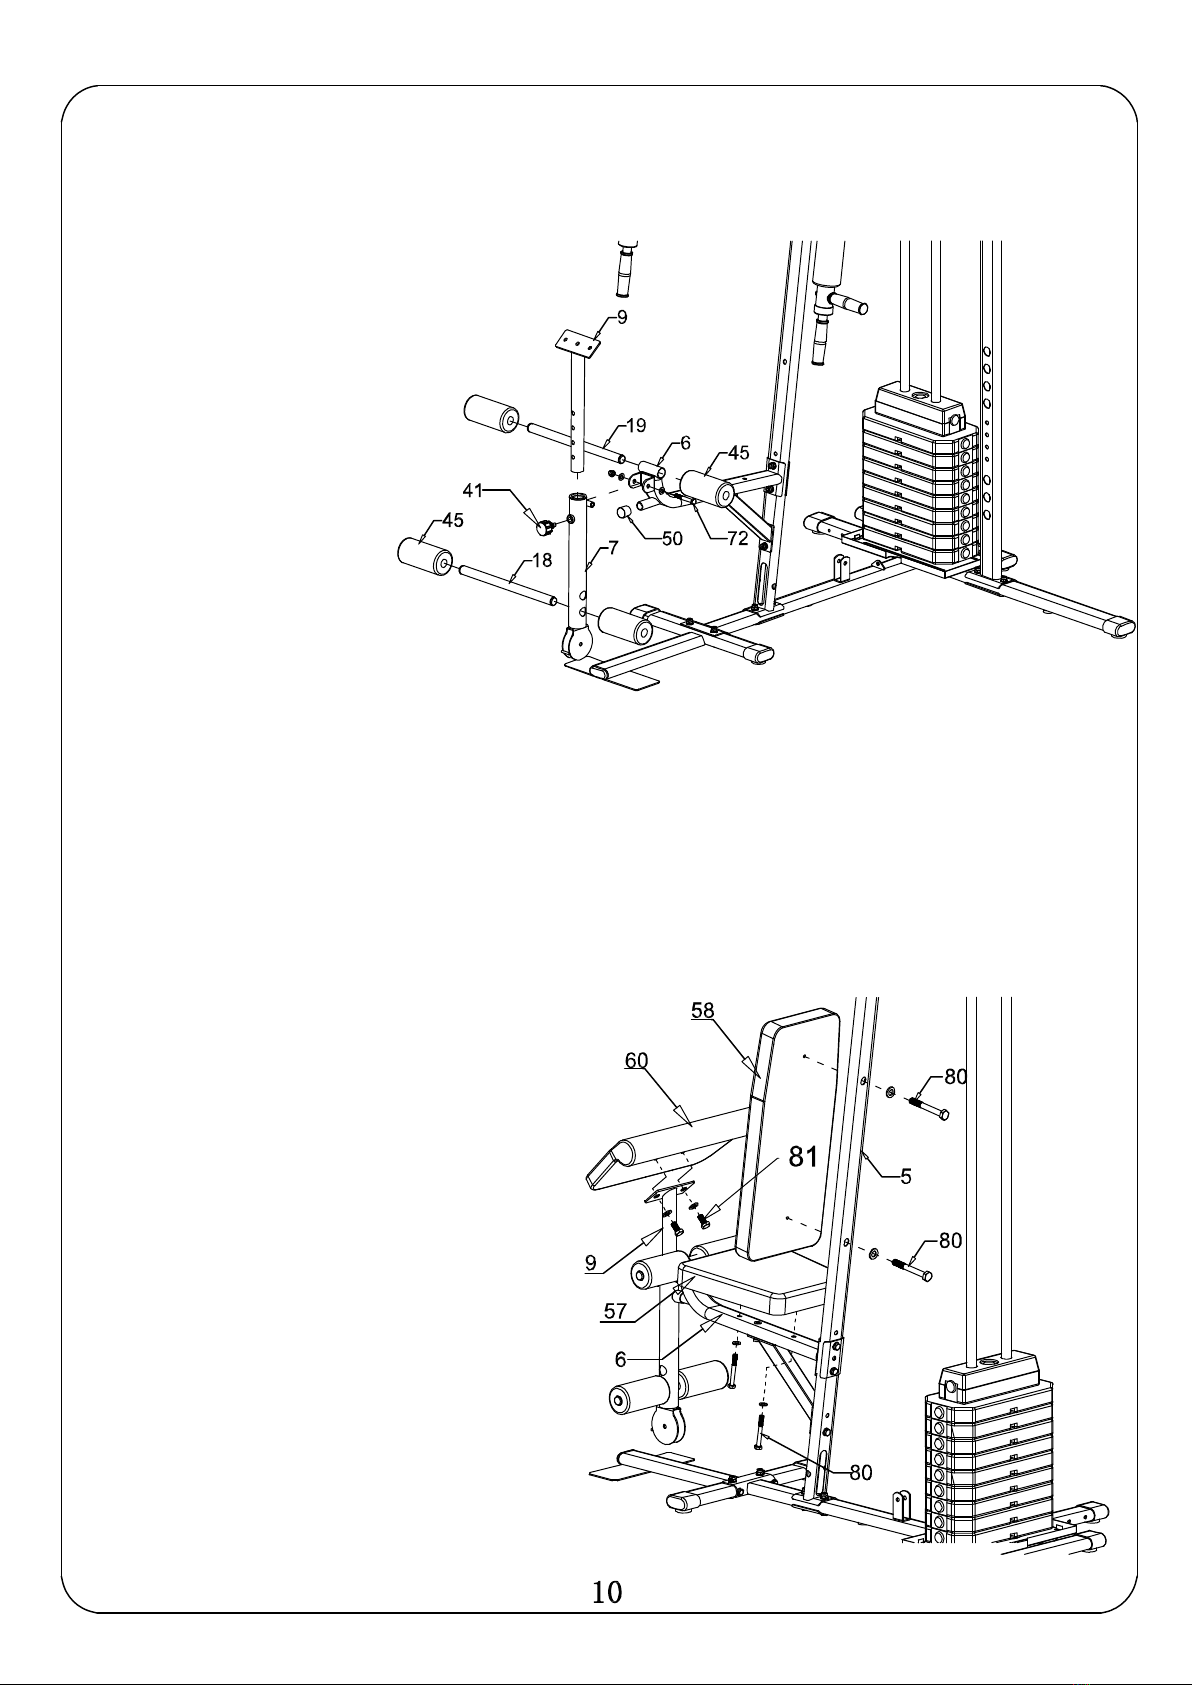
STEP 8
1.Attach back cushion(58) to vertical
support(5) using Hex bolts M8x45
(80-1sets) washers .
2.Attach seat pad(57)to seat support
(6)using Hex bolts M8x45(80-1sets)
washers .
3.Attach arm cushion(60) to arm
cushion support(9)using Hex
bolts M8x20(63-1sets) washers .
4.Installation
STEP 7
1.Attach leg extension(7) to seat
support(6) using Hex bolts M10x75
(72-1sets) washers and nuts.
2.Insert arm cushion support
(9) into leg extension(7)
using locking knob(41).
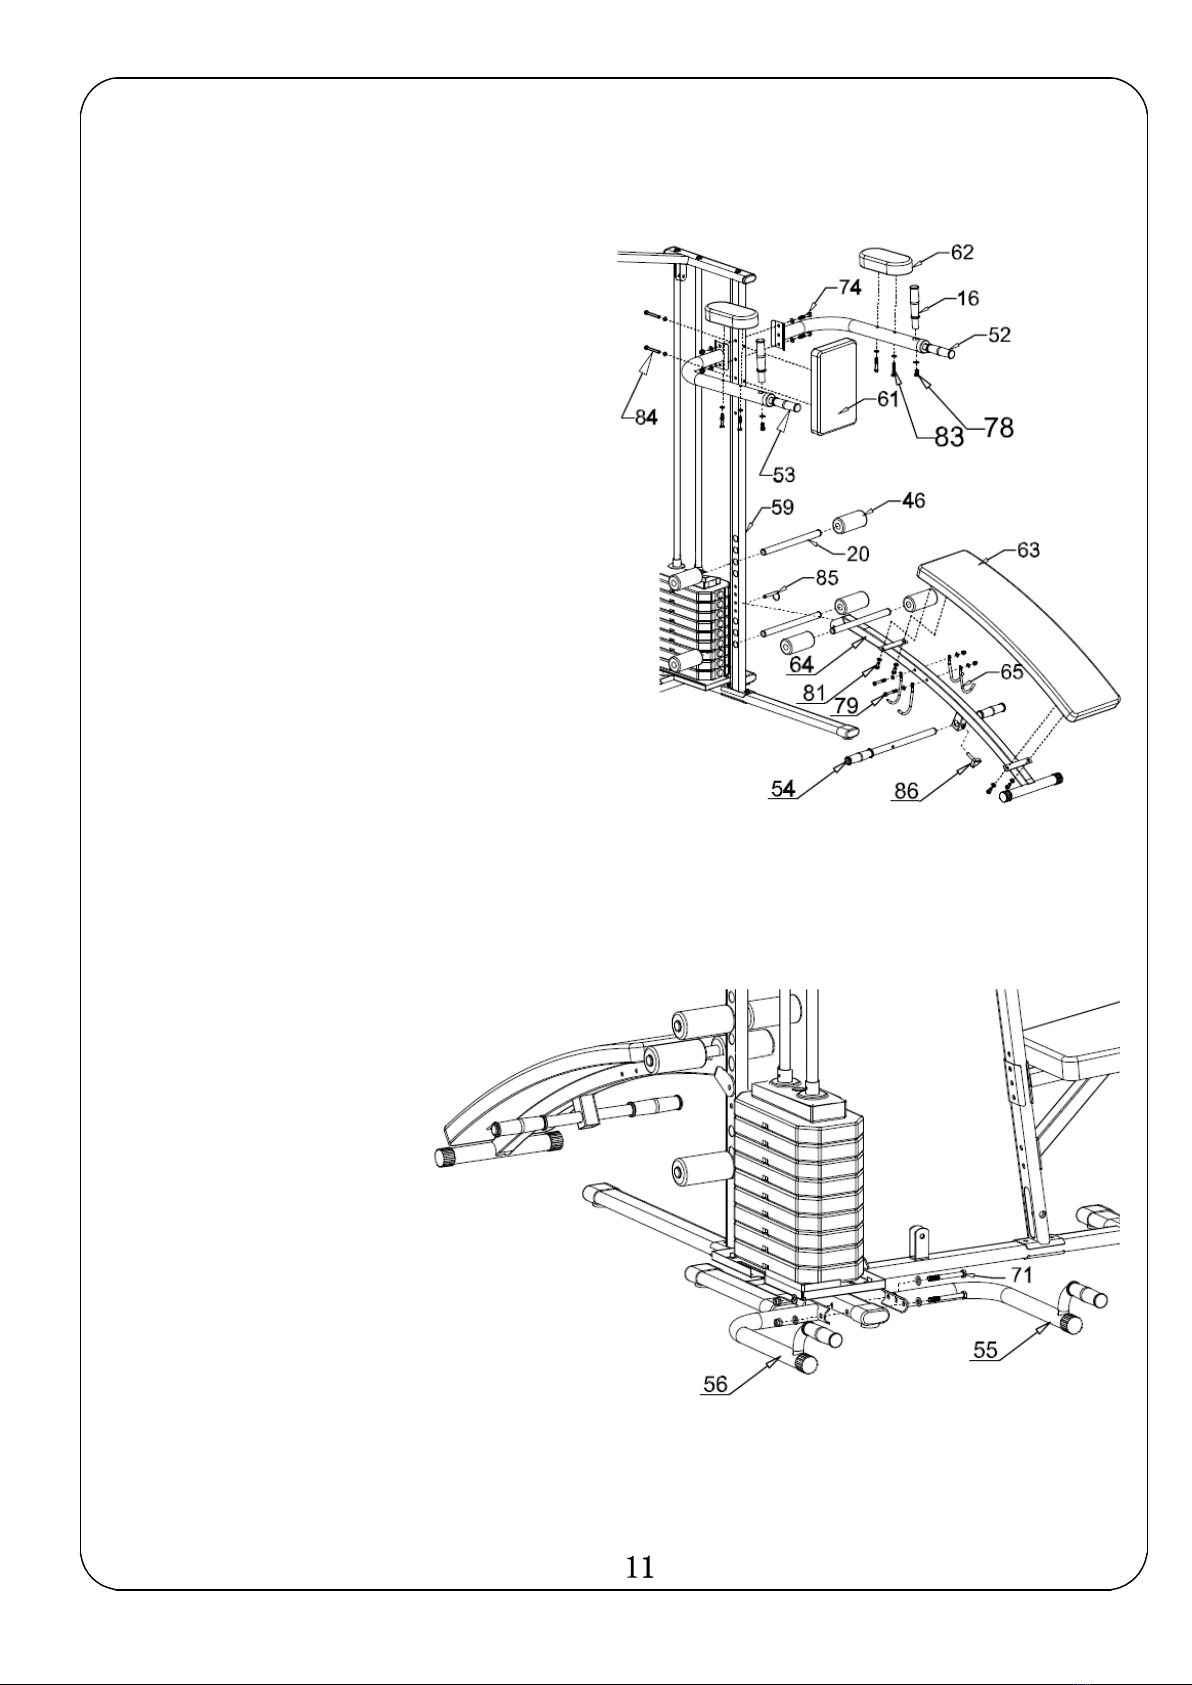
4.Installation
STEP 9
1.Attach pull up left,right arm(52,53)
to vertical tube (59) using Hex
bolts M10x50(74-2sets)
washers and nuts.
2.Insert handle bar(16) into pull up
left,right arm(55,56) using Hex
bolts M10x20 (78-2sets)
washers and nuts..
1.Attach sit up bench frame(64) to
vertical tube (59) using locking
pin(85)
STEP 10
1.Attach push up left,
right arm(55,56) to
back base tube (2)
using Hex bolts
M10x90(71-2sets)
washers and nuts.

4.Installation

4.Installation

4.Installation
23
23
15
5. operation and use of the item
5.1 location
Use the equipment on a solid, flat level surface with a protective cover for your floor or carpet. For safety the
equipment should have at least 0.5 meters of free space all around it.
Use a protective pad before you place the appliance. That should safe the floor regarding damages.
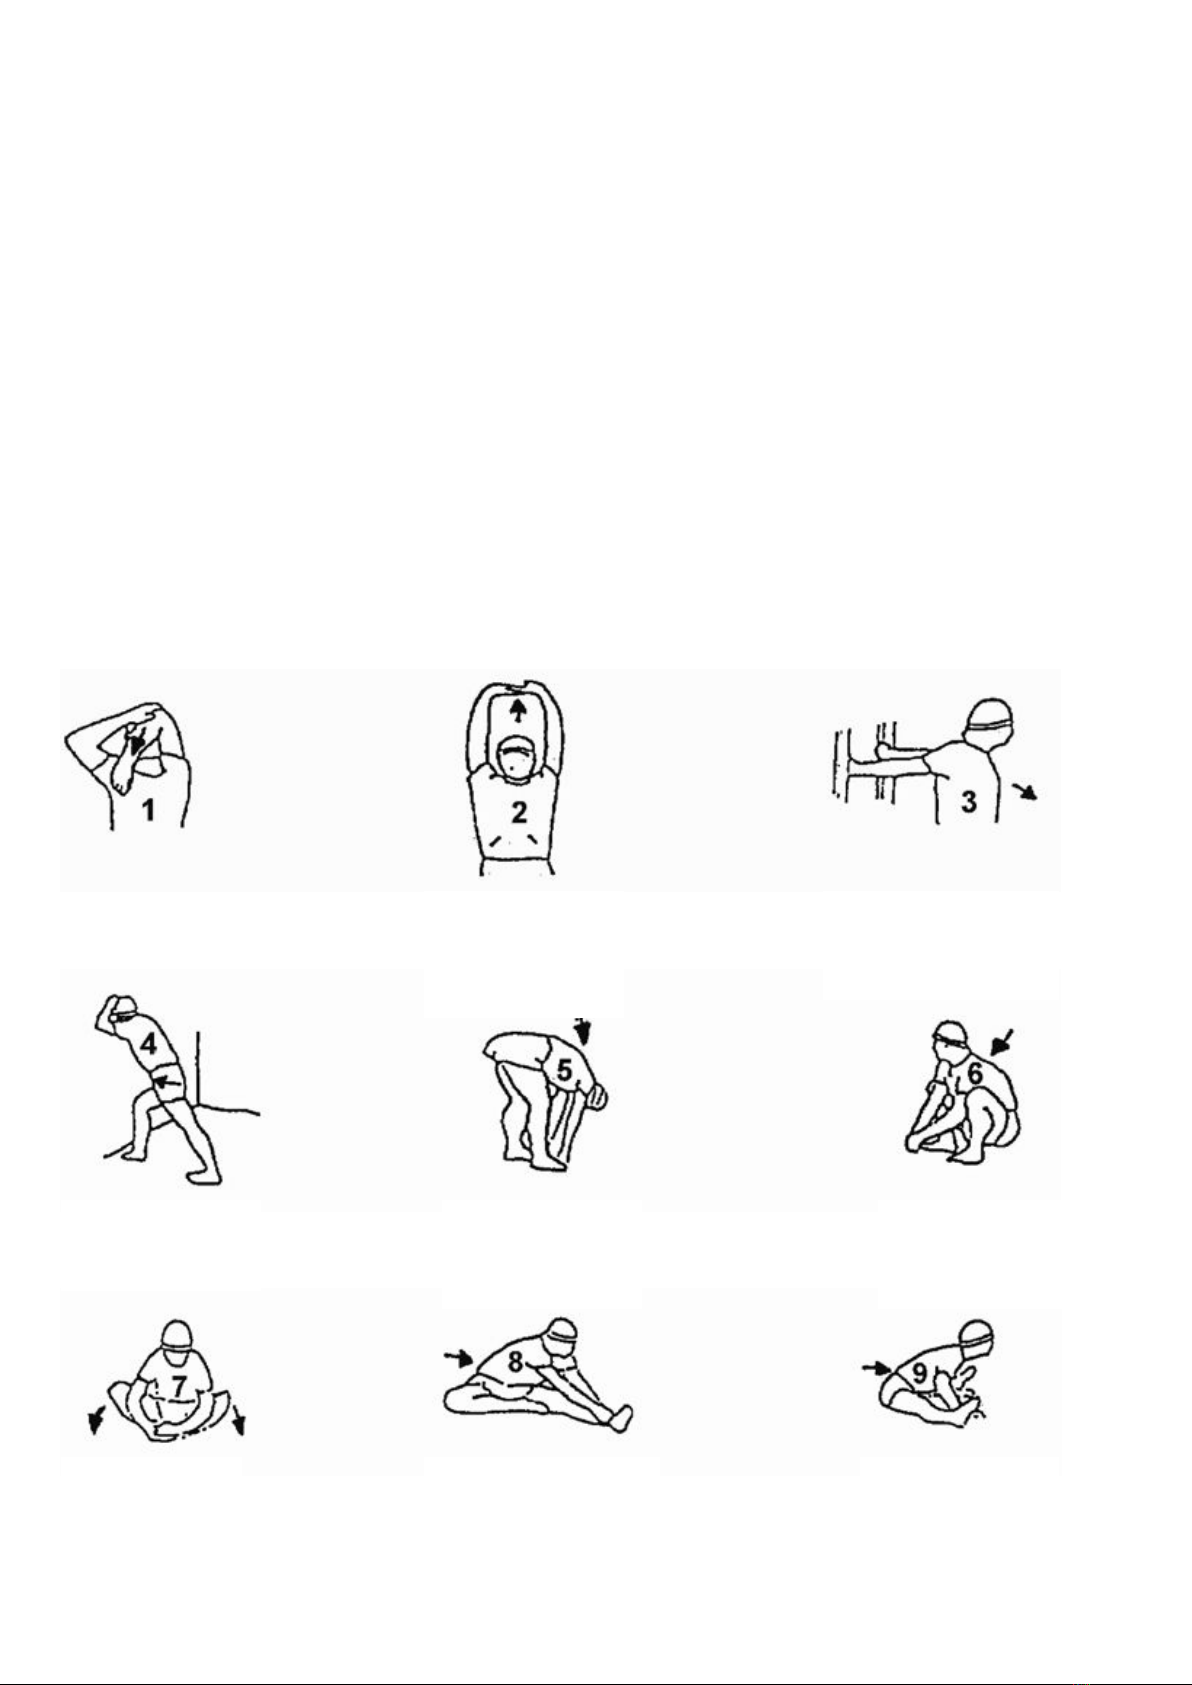
5.2 before training
Warm-up before you start the training. Plan stretching exercise before you start and repeat the stretching
exercise after your training to avoid injury.
Allways pay attention on a well-balanced training.
Below we show some suggestions on in terms of stretching exercises.
Repeat each exercise 3 times.
Stretch each arm
15 sec. Hold this position
20 sec. Hold this position 20
sec.
Hold this position
25 sec. Hold this position
20 sec. Hold this position
20 sec.
Hold this
position 30
sec.
Stretch every leg 25
sec. Hold this position
30 sec.

16
5.3 the training
WARNINGS
PRIOR TO UNDERTAKING ANY PROGRAM OF EXERCISE THAT REQUIRES A MAJOR INCREASE IN PHYSICAL ACTIVITY,
CONSULTATION WITH A COMPETENT MEDICAL AUTHORITY IS STRONGLY RECOMMENDED. IN ADDITION, ANYONE WHO
HAS A PHYSICAL HANDICAP, SUFFERS FROM A PROLONGED ILLNESS, OR WHO HAS INCREASED RISK FACTORS SUCH AS
OBESITY, HYPERTENSION, CARDIO-CIRCULATORY PROBLEMS, ETC., SHOULD CONSULT A COMPETENT MEDICAL
AUTHORITY BEFORE UNDERTAKING ANY EXERCISE OR ENGAGING IN A CONTINUING PROGRAM OF EXERCISING,.
Hold this position
20 sec. Hold this position 5
sec. Hold this position
20 sec.
Stretch every leg
25 sec. Hold this
position 20
sec.
Hold this position
15 sec.
This manual suits for next models
1
Table of contents
Other Trekkrunner Home Gym manuals


