TrekStor Tv streamer User manual

TrekStor TV
www.trekstor.de
English
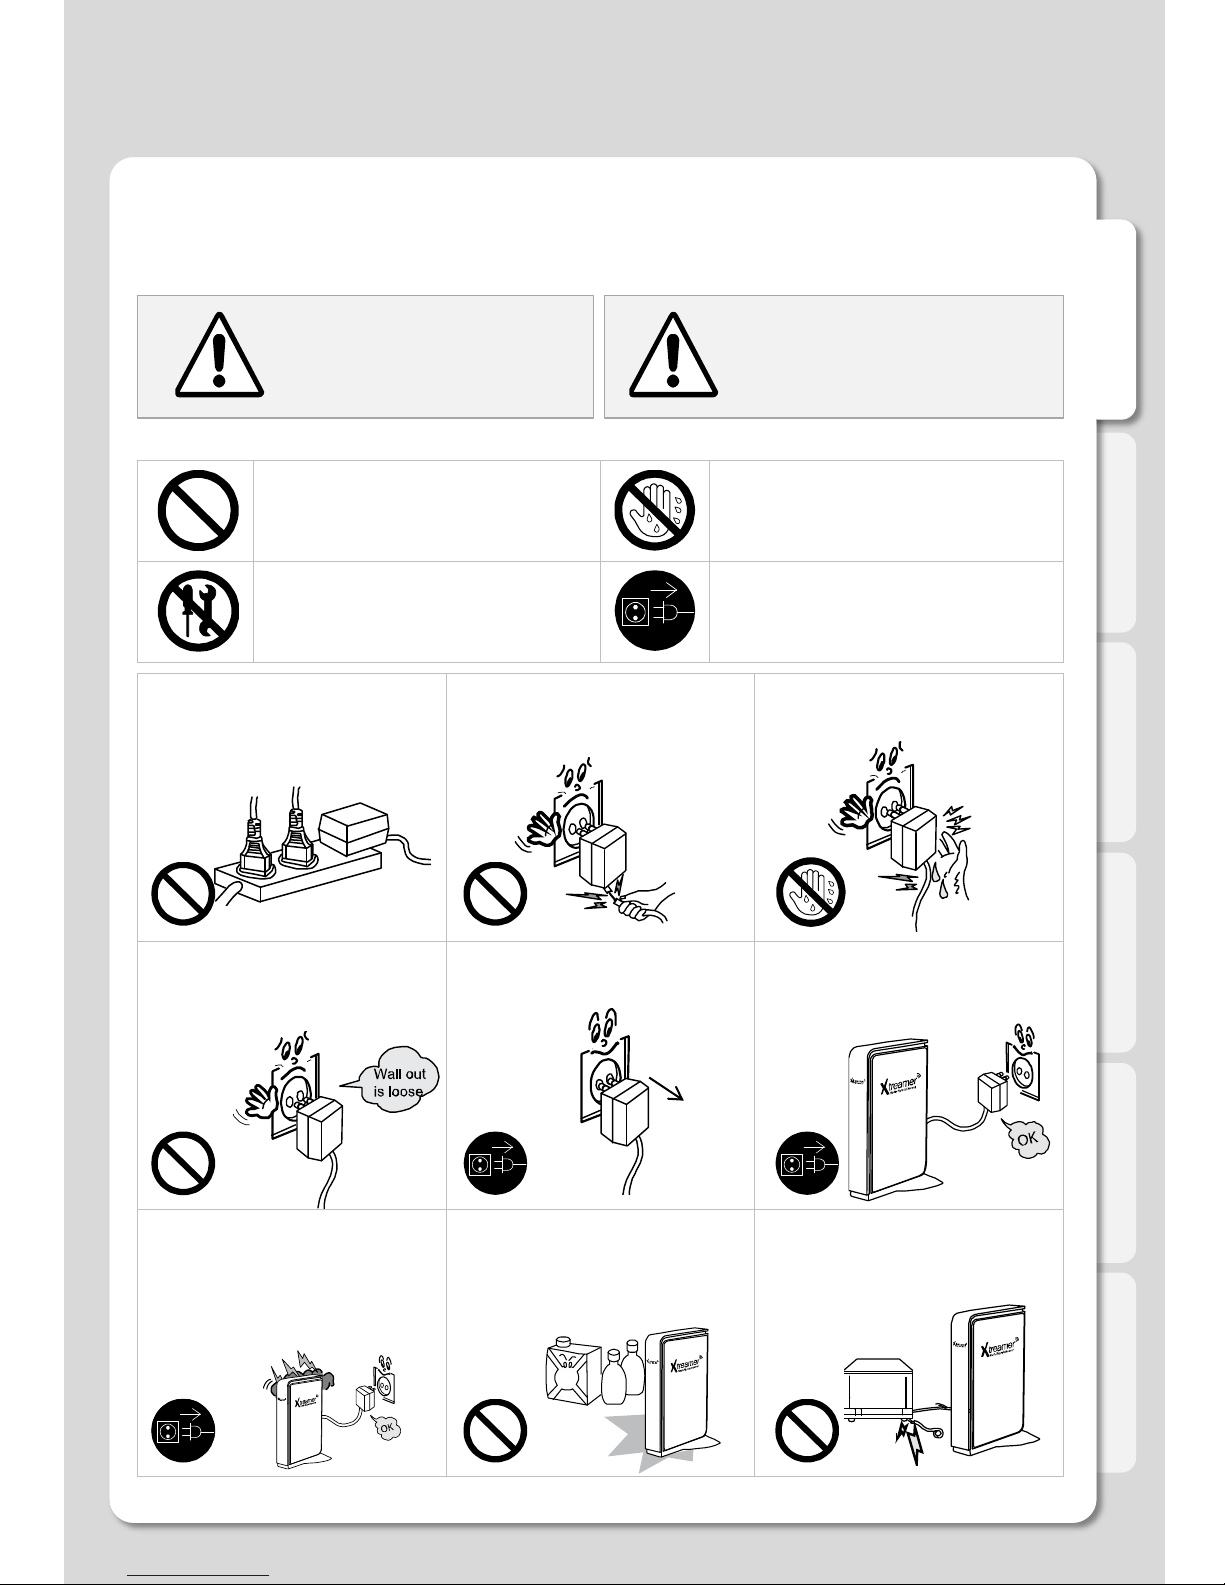
Safety Notes
Warning Caution
Act prohibited Contact by wet hand prohibited
Modification prohibited Power plug to be separated
from power outlet
The following information is important to ensure the safety of the user and to prevent damage to
property.
Read the following information carefully before using the TrekStor TV and always use it according to
the information given.
Do not connect a number of power
plugs at the same time. (This may
generate heat or cause fire.)
Do not forcefully pull out power cord.
(Breakage of power cord may cause
fire and electric shock.)
Do not insert or pull out power plug
with wet hand. (This may cause
electric shock.)
Do not insert power plug if it does not
fit the power outlet properly, e.g. if it is
loose or too tight. (This may cause fire
or electric shock.)
Make sure to turn off power switch
and pull out power plug when moving
the TrekStor TV.
It is advisable to switch off the
TrekStor TV and pull out the power
plug if you don't use it for a while (e.g.
when you go on a holiday)!
Clean the outside of product by
wiping it with lightly with a dry towel.
Remove the plug before cleaning the
TrekStor TV! (Do not use detergent or
thinner etc. for grease removal, or a
wet towel, as this may cause serious
harm!)
Do not store the TrekStor TV close to
any liquids or flammable liquids! Do not forcefully bend the connected
power cord or have it pressed down
by heavy objects. (This may cause
fire or electric shock.)
Violating instructions
may lead to serious
injury or death.
Violating instructions may
lead to slight injury or
damage to the product.
Instructions
English
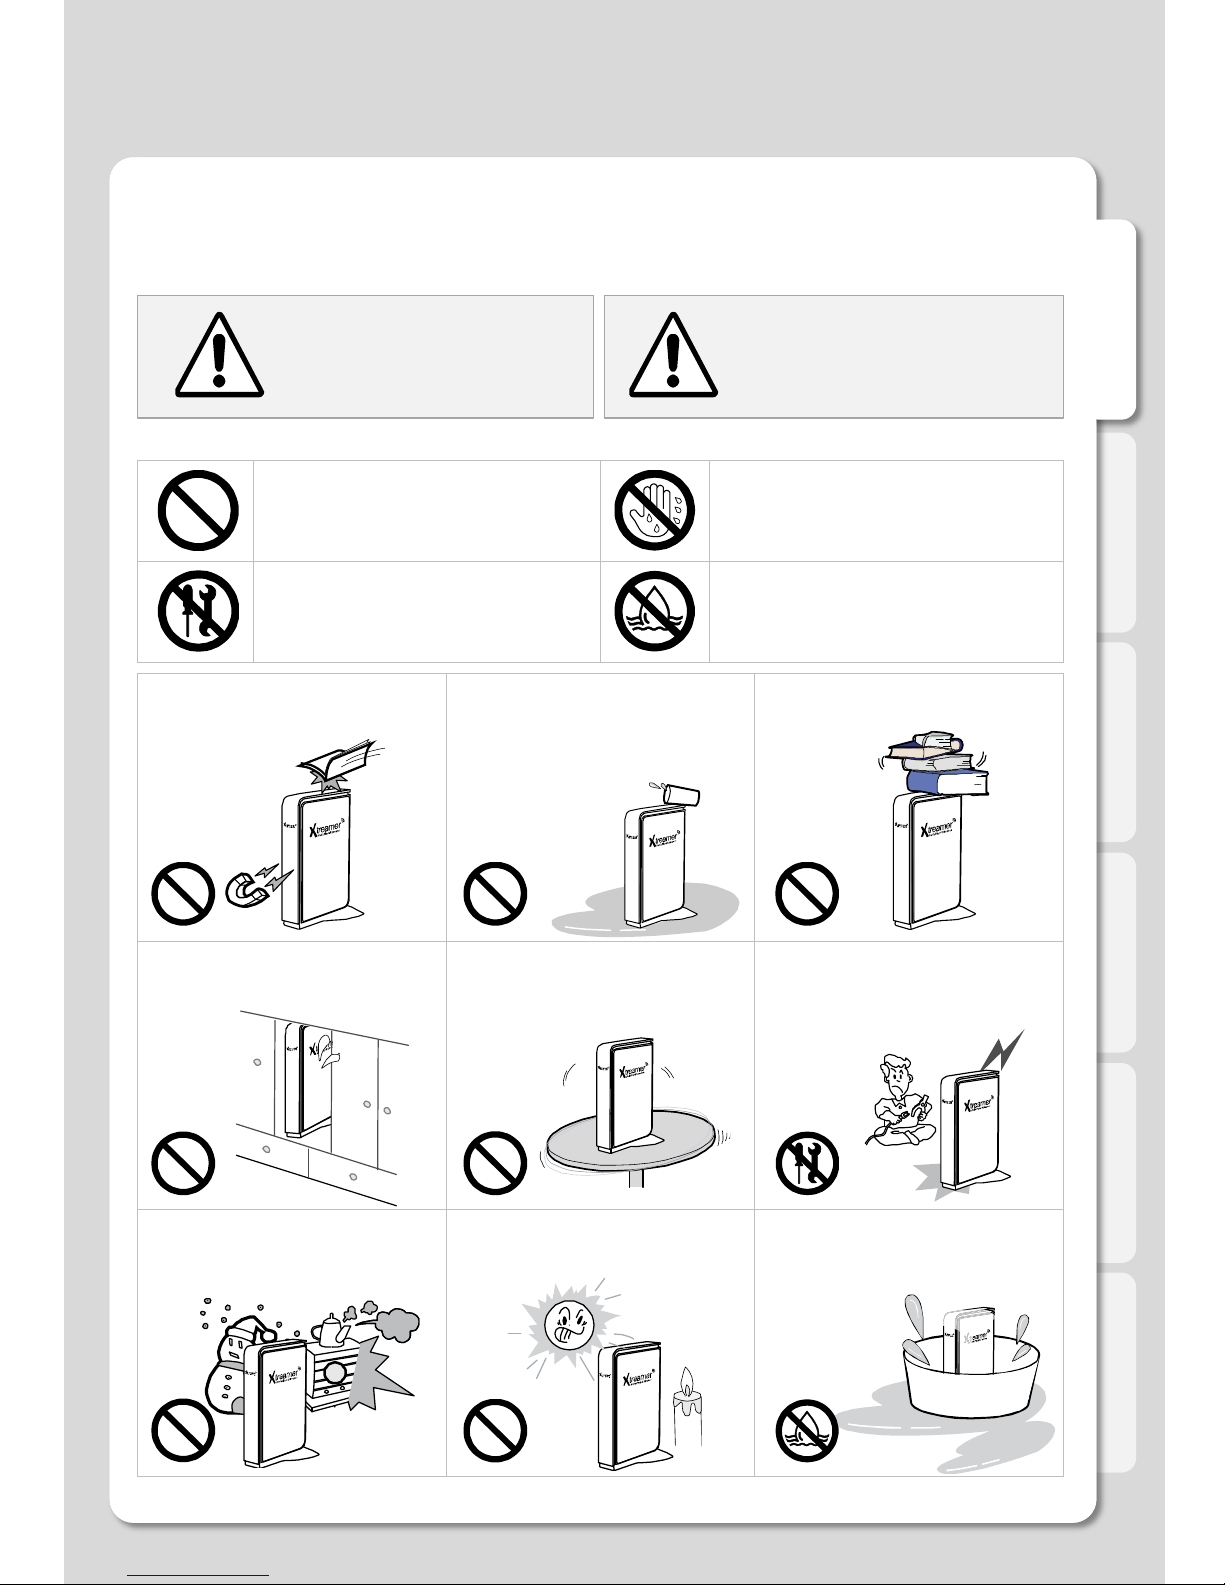
Safety Notes
Act prohibited Contact by wet hand prohibited
Modification prohibited Soaking prohibited
Do not drop objects on top of the
TrekStor TV or expose it to sudden
impacts. Keep it away from vibrations
or magnetic objects.
Do not place plant pots, cups or
containers filled with water, chemicals
or other liquids on top of the TrekStor
TV. (This may cause fire or electric
shock. Falling objects may also cause
injury.)
Do not place heavy objects on top of
the TrekStor TV. (Falling objects may
cause injury.)
Do not cover up product or install it in
places with poor ventilation, such as a
wall closet, etc.
Install product on a level and stable
surface. (Otherwise product may not
operate normally.)
Product must not be disassembled,
repaired or modified. Take caution not
to have foreign substances inserted
into products. (This may cause
breakdown of product or electric
shock.)
Do not install product in places where
temperature is too high (35˚ or higher)
or too low (5˚ or less) or where the
humidity is high
Do not install product under direct
sunlight or near objects that produce
heat, such as lit candles, cigarettes,
radiators etc.
Do not place product in water. (This
may cause breakdown of product or
electric shock.)
Instructions
Warning Caution
The following information is important to ensure the safety of the user and to prevent damage to
property.
Read the following information carefully before using the TrekStor TV and always use it according to
the information given.
Violating instructions
may lead to serious
injury or death.
Violating instructions may
lead to slight injury or
damage to the product.

English
Safety Notes
Introduction
About the TrekStor TV
Part names and functions
Specifications
Hard-Disk Installation
Connections
1. Video & Audio output connections
2. Connecting to the Network
3. Connecting to your PC
Remote Control Functions
Settings
1. HDD Formatting
2. System
3. Playback
4. A/V
5. Network
5-1. Wired LAN Setup
5-2. Wireless LAN Setup
6. Application
6-1. Using the TrekStor TV as a network drive
Major Functions
Main Menu
1. Media Library Menu
1-1. Movie Playback Functions of the Media Library
1-2. Photos Functions of the Media Library
1-3. Music Functions of the Media Library
2. Internet
2-1. Xtreamer Live Introduction
2-2. How to use the “YouTube” function
2-3. How to use the “Picasa (Google)” function
2-4. How to use the “Weather” function
2
6
7
9
10
11
12
12
14
15
16
19
19
22
24
26
30
30
31
33
33
34
34
35
37
41
42
43
43
43
45
45
Contents
English
Contents
3. File Manager
4. Internet Radio
5. How to add Movie Subtitle TTF Fonts
6. How to use the “Lock System” function
7. How to use the “iPhone remote” function
8. How to use the “Auto run” function
Advanced Users Guide
1. Web Server
1-1. Initial Settings for Web Server connection
1-2. How to use the “Set-up menu” of the Web Server
1-3. How to use the “Web GUI File Manager” of the Web Server
1-4. How to use the “File Upload & File Download” functions
2. Using the TrekStor TV as a NAS (Network Attached Storage)
3. How to set-up Folder Sharing in Windows® 7
4. How to set-up Folder Sharing in Windows® Vista™
5. If folder accessing in Windows® XP isn’t available.
6. How to configure Folder Sharing Permission in Windows® XP
7. How to create a Network PC Shortcut
8. What can I do when the network function isn’t working
9. Firmware upgrade
Troubleshooting
46
47
49
50
52
55
57
57
57
58
59
60
61
63
70
78
79
84
85
86
88

English
Introduction
Congratulation on your purchase of the TrekStor TV, a state-of-the-art consumer electronic
device that will enhance and enrich your home multimedia experience.
The TrekStor TV is a portable streamer that allows you to bring your favorite movies, music,
photos and online content to your living room from various sources such as your PC, an optional
internal SATA hard disc, external USB storage devices and so on.
The player has been designed for high performance networking and top quality playback.
Due to the rapid development of our product we cannot possibly guarantee that this user manual
will include all features of the TrekStor TV. So if you have questions please feel free to browse
the Xtreamer Knowledge base or contact our support team (see back cover of this manual for
contact details).
Please make sure to visit our site www.trekstor.de for news about our products, official
announcements and firmware upgrades.
You can find many tips and FAQs in the official Xtreamer forum under http://forum.xtreamer.net/
(English) and http://forum.xtreamer.net/viewforum.php?f=14 (German).
Please note that TrekStor is not responsible for the forum contents. Furthermore, TrekStor is not responsible for the
contents of web pages, whose links can be found in the forum.

English
About the TrekStor TV
Multimedia library
Easy playback of High Resolution HD-level files: The TrekStor TV supports the max. of
1920X1080 progressive scan to provide clear and high resolution picture quality.
Support for many movie formats
TrekStor TV supports a variety of HD files, such as TP, TS ,TRP and M2T, M2TS, MTS files,
but also MPEG1/2/4, Divx (3/4/5/6), Xvid, DAT, ISO, DVD (VOB, IFO) and MKV (X.264), AVC
HD, WMV9, ASF, H.264, MOV, MP4, RMVB, FLV, etc. You can conveniently enjoy watching
movies anywhere as long as you have access to a display device, such as TV.
Convenient copy
TrekStor TV allows you to copy a media file to a network-connected PC.
Also, you can copy files via Hi-Speed USB 2.0 or the network from a PC to the TrekStor TV
HDD (optional) or to USB storage device connected to the TrekStor TV.
Support for many music file formats
The TrekStor TV supports a variety of music sources, such as AAC, MPEG audio MP1/2/3/A,
WMV, WMA, FLAC, OGG, AC3, DTS and many more. As the player supports fast rewind/
forward functions, you can quickly find the desired part you want to listen to.
Digital photo album
TrekStor TV supports the high resolution JPEG and BMP image files. The entire family can
enjoy watching the files on the TV. Photos in portrait orientation can be rotated on screen for
viewing without requiring any modification.
Network-shared file play
Files shared on a network can be accessed and played back via a wired or wireless network
without having to move them to the TrekStor TV hard disk (optional).
NAS (Network Attached Storage)
The TrekStor TV can access Windows® network drives and the contents of the optional
internal HDD can also be accessed from a computer thanks to the SAMBA server function.
Built-in USB host connections
TrekStor TV has 2 Hi-Speed USB 2.0 host ports. By connecting USB external storage devices,
you can easily add additional storage to the TrekStor TV and play the files on the external
USB devices. A USB type memory card reader can also be used.
Support for UPnP clients
TrekStor TV supports UPnP server functions. TrekStor TV supports free DDNS so that you
can connect to the optional internal HDD of the TrekStor TV not only from your local PC, but
also from any PC with an Internet connection. This function can also be used from other
external devices that support UPnP client functions.

English
Manufactured under license from Dolby Laboratories. Dolby and the double-D symbol are trademarks of Dolby Laboratories
DTS is a registered trademark & the DTS logos and Symbol are trademarks of DTS, Inc.
HDMI, the HDMI Logo and High-Definition Multimedia Interface are trademarks or registered trademarks of HDMI Licensing LLC.
About the TrekStor TV
Support for High-Resolution HDMI
The HDMI terminal for digital signal output enables you to enjoy video content and photos
with better picture quality.
5.1CH audio output and downmixing function
TrekStor TV supports 5.1CH Dolby Digital audio, DTS and many other digital surround sound
formats. The newest firmware version (available for download soon) even supports the pass-
through of 7.1 surround sound formats via HDMI and S/PDIF. If you don't want to connect a
surround receiver or other decoding device, the downmixing function lets you play 2CH audio
through TV or a stereo amplifier.
Support of free DDNS
TrekStor TV provides 1 DDNS entry (e. g. Yourname.myxtreamer.net) to connect to the built
in UPnP Web Server from a computer outside your home network or LAN environment.
(Network connection to a suitable router and Internet connection are necessary!)
Support of real time media streaming portals and free media channels
TrekStor TV provides real time searching and playing of media streaming portals (e.g.
YouTube) or other media files online without having to download the files in advance.
Internet
You can add your favorite RSS Internet feeds and enjoy custom online content.
Internet radio
Enjoy a vast variety of styles and genres with our Internet radio feature. Easily add any
number of your favorite stations.
Easy access to your favorite files
Add any file to your Favorites for easy access via the Main Menu and create playlists that can
be automatically run after startup.
iPhone and smartphone control
You can control your TrekStor TV via an iPhone or any phone capable of connecting to your
home network with a custom remote control application.

English
①
①
②
④
③
Front Panel
Back Panel
①USB host port (x 2)
②USB slave port
③Stereo RCA terminal
④Composite terminal
⑤Optical S/PDIF terminal
⑥HDMI terminal
⑦10/100 Mbps LAN port
⑧Power connector
①Top cover for installing a HDD
②Status LED
③IR sensor for remote control
④Detachable foot
Part names and functions
②③④⑤⑥⑦⑧

English
Specifications
Specifications subject to change without prior notice
Product Name TrekStor TV
Processor RTD1283DD 400Mhz
Operating System Linux
File System FAT16/FAT32/NTFS/UDF/EXT3
Supported File
& Formats
Video
Formats
ASF / AVI / DIVX / FLV / IFO / ISO / M2P / M2TS / M2V / M4V / MKV /
MOV / MP4 / MPEG / MPG / MTS / RMVB / TP / TRP / TS / VOB /
WMV
Video
Codecs
XVID SD/HD / MPEG1, VCD 1.0/2.0, SVCD / HD MPEG2 (up to
MP@HL1080i), ISO/IFO/VOB/TS / HD MPEG4
WMV9/VC-1 AP@L3 / RealVideo 8/9/10, up to 720@30P /
DviX3/4/5/6 (Licensee Only)
Audio
Formats AAC / AC3 / DTS / FLAC / FLC / M3U / M3U8 / M4A / MP1 / MP2 /
MP3 / MPA / MPC / OGG / PCM / RA / RM / WAV / WMA
Audio
Codecs
Dolby® Digital Plus, TrueHD / DTS HD Master Audio, High
Resolution, LBR / 7.1 down-mix / WMAWMA Pro, Dolby® Digital
AC3 and DTS® (Licensee Only) / MPEG I Layer 1, 2, 3 (2-CH) and
MPEG II Layer 1, 2 (Multi-Channel) / LPCM,ADPCM, FLAC, AAC,
WAV, and OGG Vorbis / RA1/RA-cook/RA-lossless
Image HD JPEG/BMP/GIF/MGIF(not act)/PNG/TIFF/TIF/
HD JPEG with unlimited resolution (40M-pixel tested) / Full-pixel
JPEG decode with high resolution zoom-in
Video Output Composite and HDMI1.3
Audio Output Analog Stereo RCA
Digital Optical S/PDIF & via HDMI
TV System NTSC, PAL or HDMI auto
Hi-Def Decoding HD HDMI (480p, 576p, 720p 50Hz/60Hz, 1080i 50Hz/60Hz, 1080p 50Hz/60Hz)
Networking Wired Ethernet (10/100) LAN via RJ-45 Port
Wireless Optional USB Wireless Adapter N connected to USB host port
Network Security Wireless : WEP, WPA
Network Protocol Wireless: IEEE802.11n, 3dBi USB antenna (Optional)
Wired : 10/100Mbps Fast Ethernet (RJ45)
TCP/IP (DHCP client mode, Manual IP mode)
Hard-Disk Type 2.5” Internal SATA I/II (9.5 mm height)
USB Interface Hi-Speed USB 2.0 host (x 2) and slave
Power DC 12V, 2A
Dimension 165 mm (W) X 29 mm (H) X 111 mm (D)
English
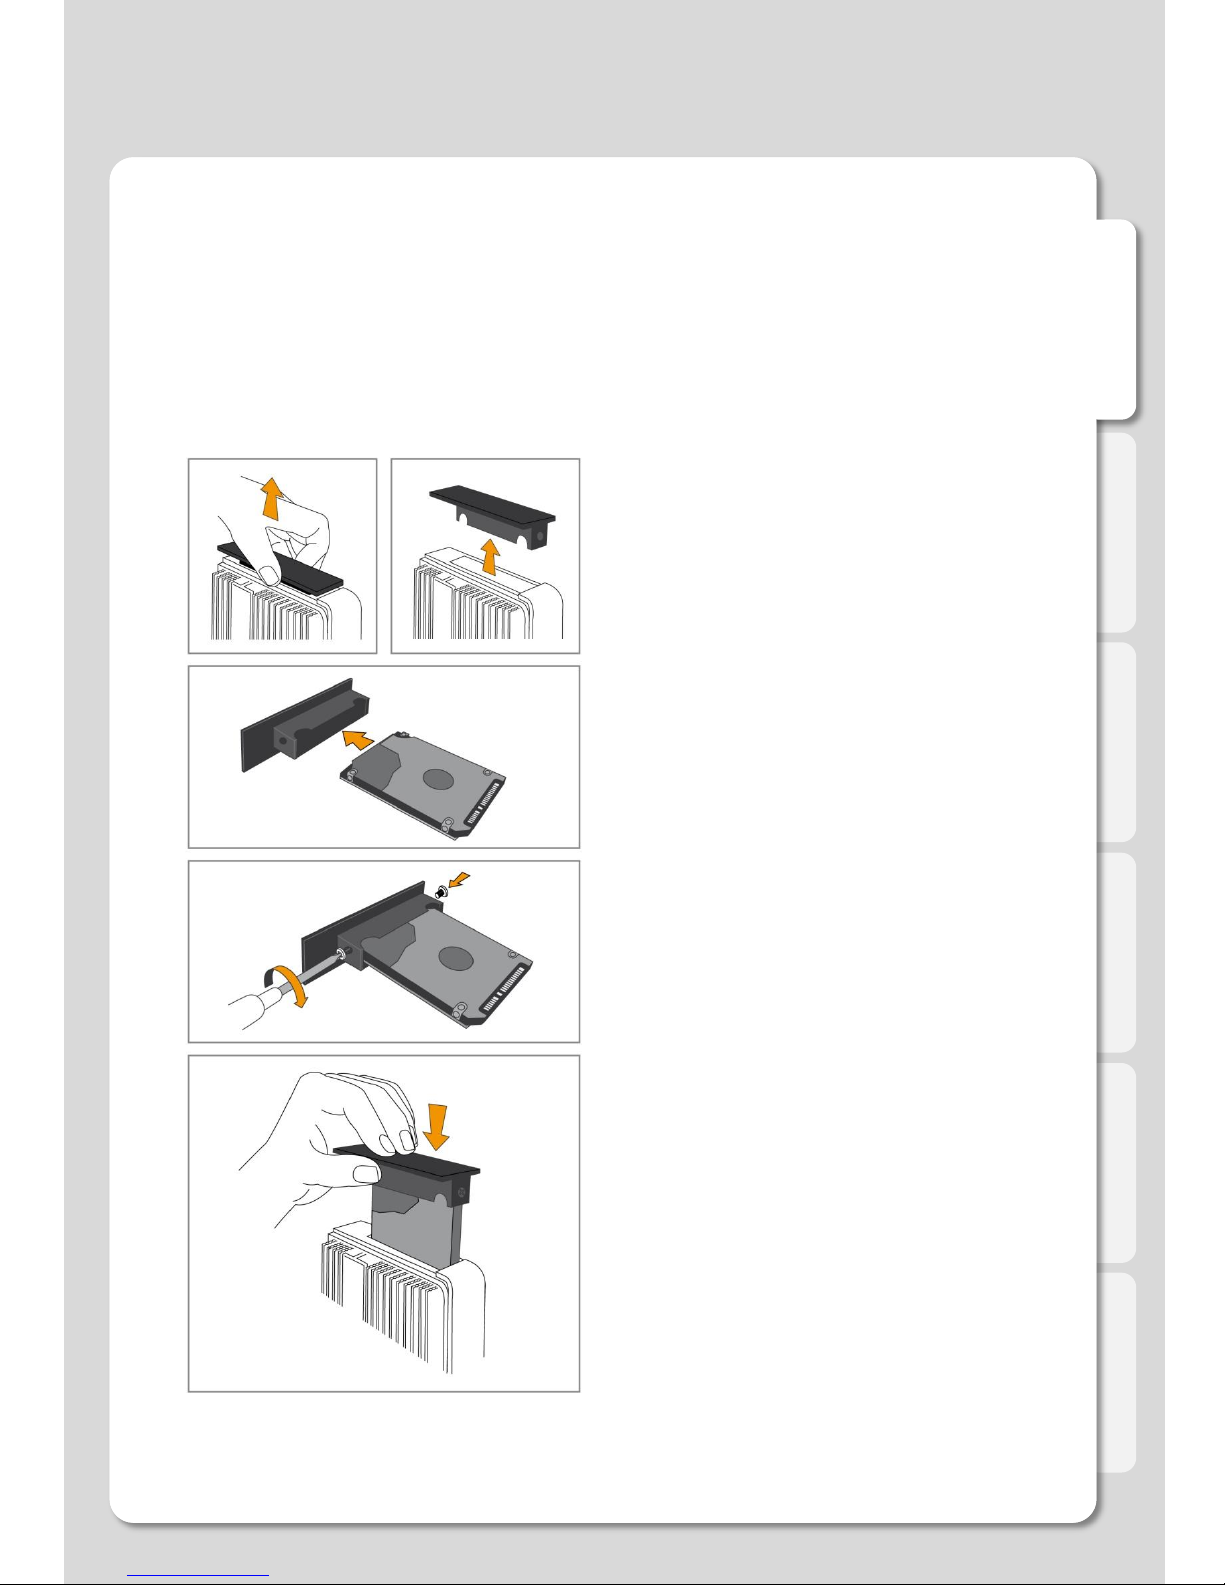
Hard-Disk Installation
Carefully remove the HDD bay cover,
as shown in the illustration, by pulling it
up and out of the housing of the
TrekStor TV.
Attach the 2.5“ SATA HDD (9.5 mm height)
to the cover of the hard drive bay as
shown in the illustration. Use the supplied
screws and pay attention that the label of
the HDD faces the side of the TrekStor TV
that has no heat sink.
Carefully insert the hard drive together with
the attached cover into the HDD bay. Do not
use force when you insert the HDD,
otherwise the SATA port may be permanently
damaged.
If you cannot easily insert the HDD, pull the
Hard drive out again and check the
connection to the cover before re-inserting it.
01.
02.
03.
Caution! Carry out the following steps only if there is no hard drive pre-installed in your
TrekStor TV! If there is a pre-installed hard drive in your TrekStor TV, opening the housing
may lead to a loss of warranty.
Caution! Hard drives can be seriously damaged by electrostatic discharges. It is necessary
that you touch a grounded piece of metal (e. g. a heating or water pipe) before you take the
hard drive out of its ESD bag.

English
1. Video & Audio output connection
ㆍHDMI cable connection
Connections
ㆍComposite cable connection
First, attach the HDMI cable to the port on the back of the TrekStor TV. Then connect the
other end of the cable to the HDMI port of your TV or your home entertainment system.
Use a suitable composite AV cable to connect the yellow video output jack and the audio jacks
(red and white) of your TrekStor TV with the corresponding jacks of your TV.

English
ㆍOptical cable connection
Connections
You can transmit multichannel sound to a suitable TV or home entertainment system via the
HDMI cable or via an optical S/PDIF cable. If you use an optical S/PDIF cable, connect it to
your TrekStor TV first, and then to the TV or receiver.

English
2. Connect to the Network
ㆍWired Network
ㆍWireless Network
Connections
English
Connections
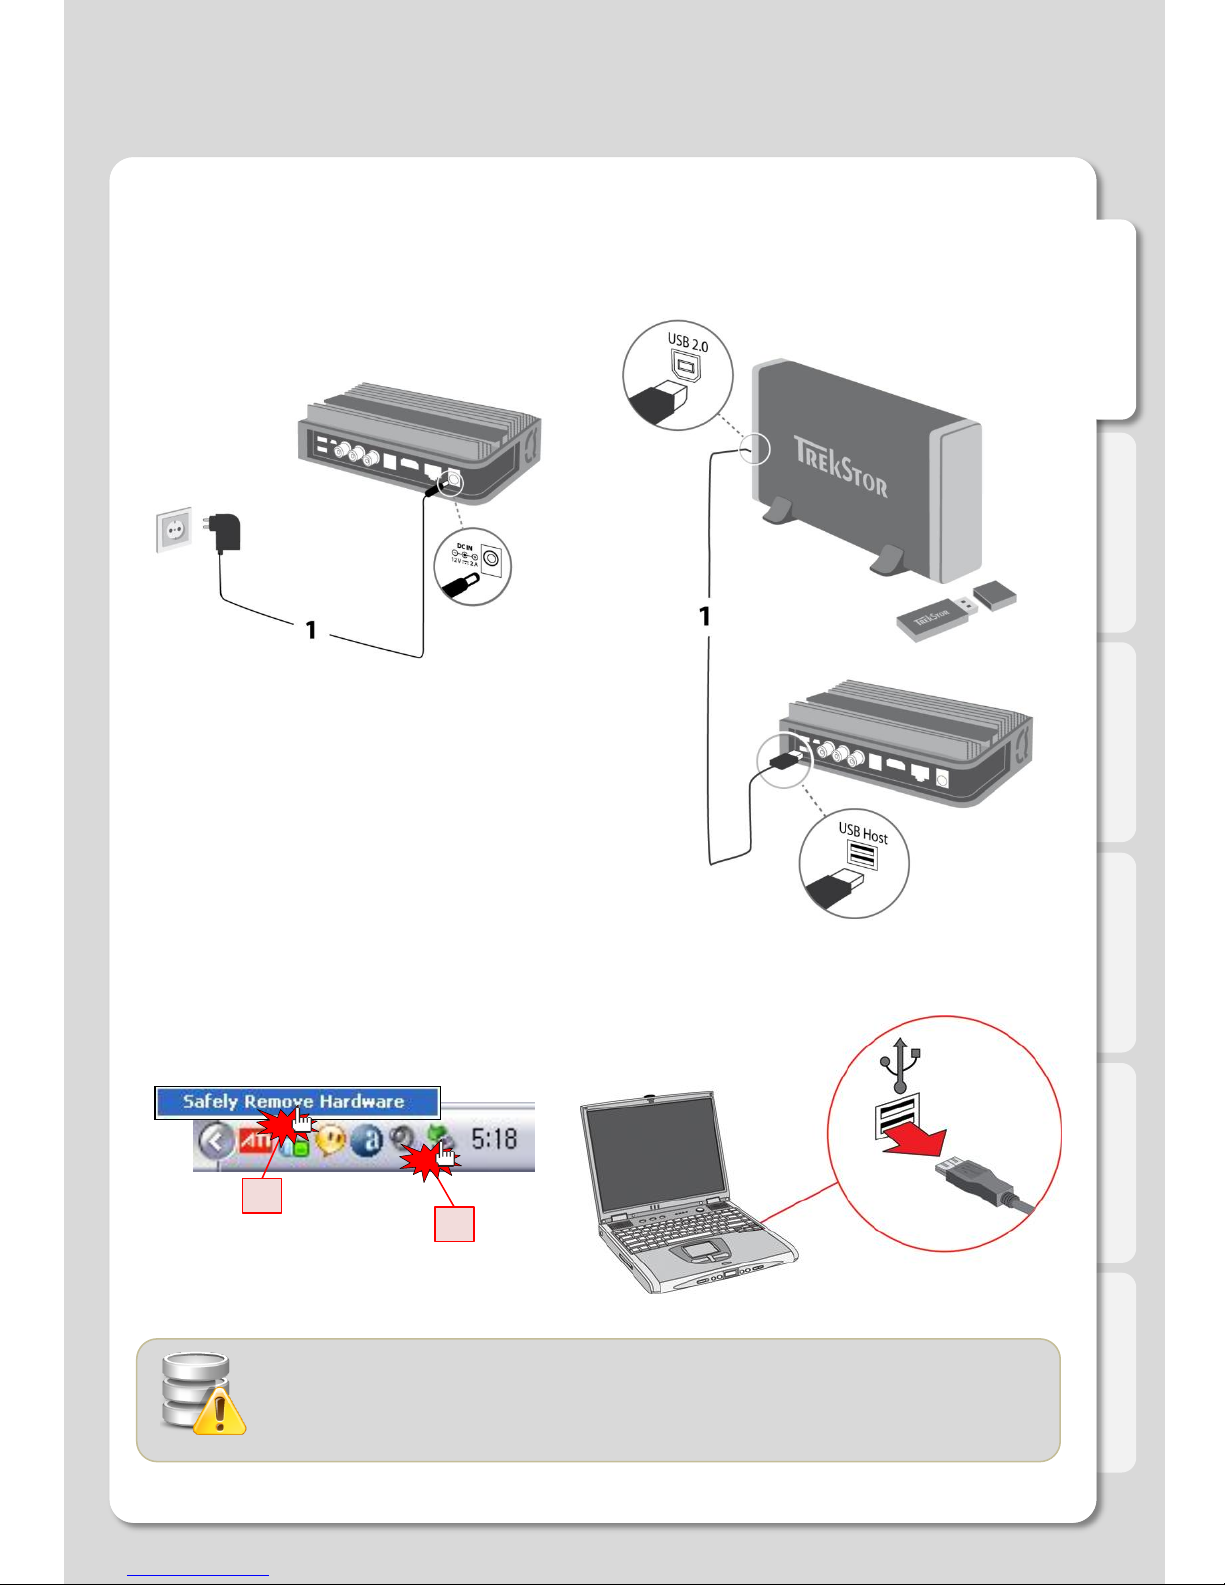
3. Connect to your PC
ㆍConnect the power adapter ㆍConnect the USB cable
ㆍDisconnecting the TrekStor TV
(1) Click on (2) Disconnect
1
2
Click
Click
You must eject before disconnecting USB. If you don’t eject before
disconnecting, copied files may be incomplete so that they cannot be
played back.
When you want to transfer data from your computer
to your TrekStor TV via USB, first connect the USB
cable to the Mini-USB slave connection of TrekStor
TV and then to the computer.
Make sure that the TrekStor TV is connected to its
power supply before you connect it to the computer!
English
1 2
46
7
9
10
13
15
17
19
21
23
26
27
28
5
8
11
14
16
18
20
22
24
25
29
3
12
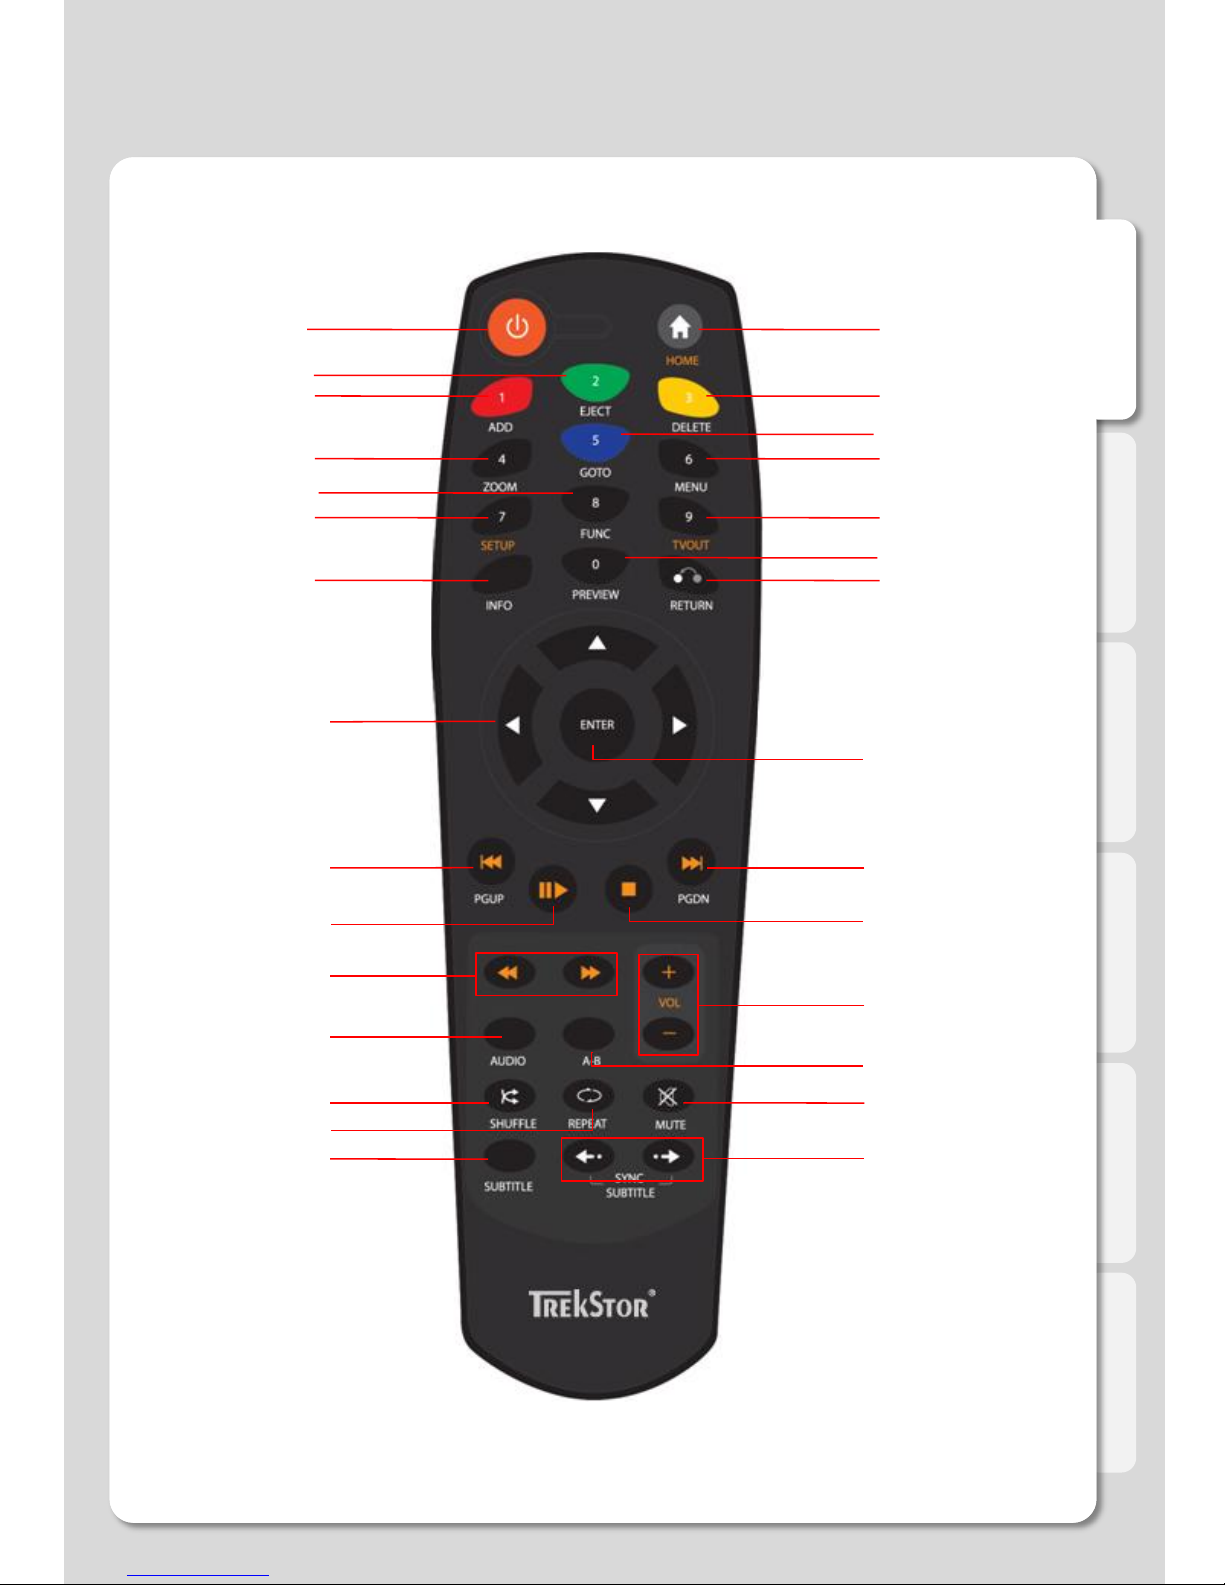
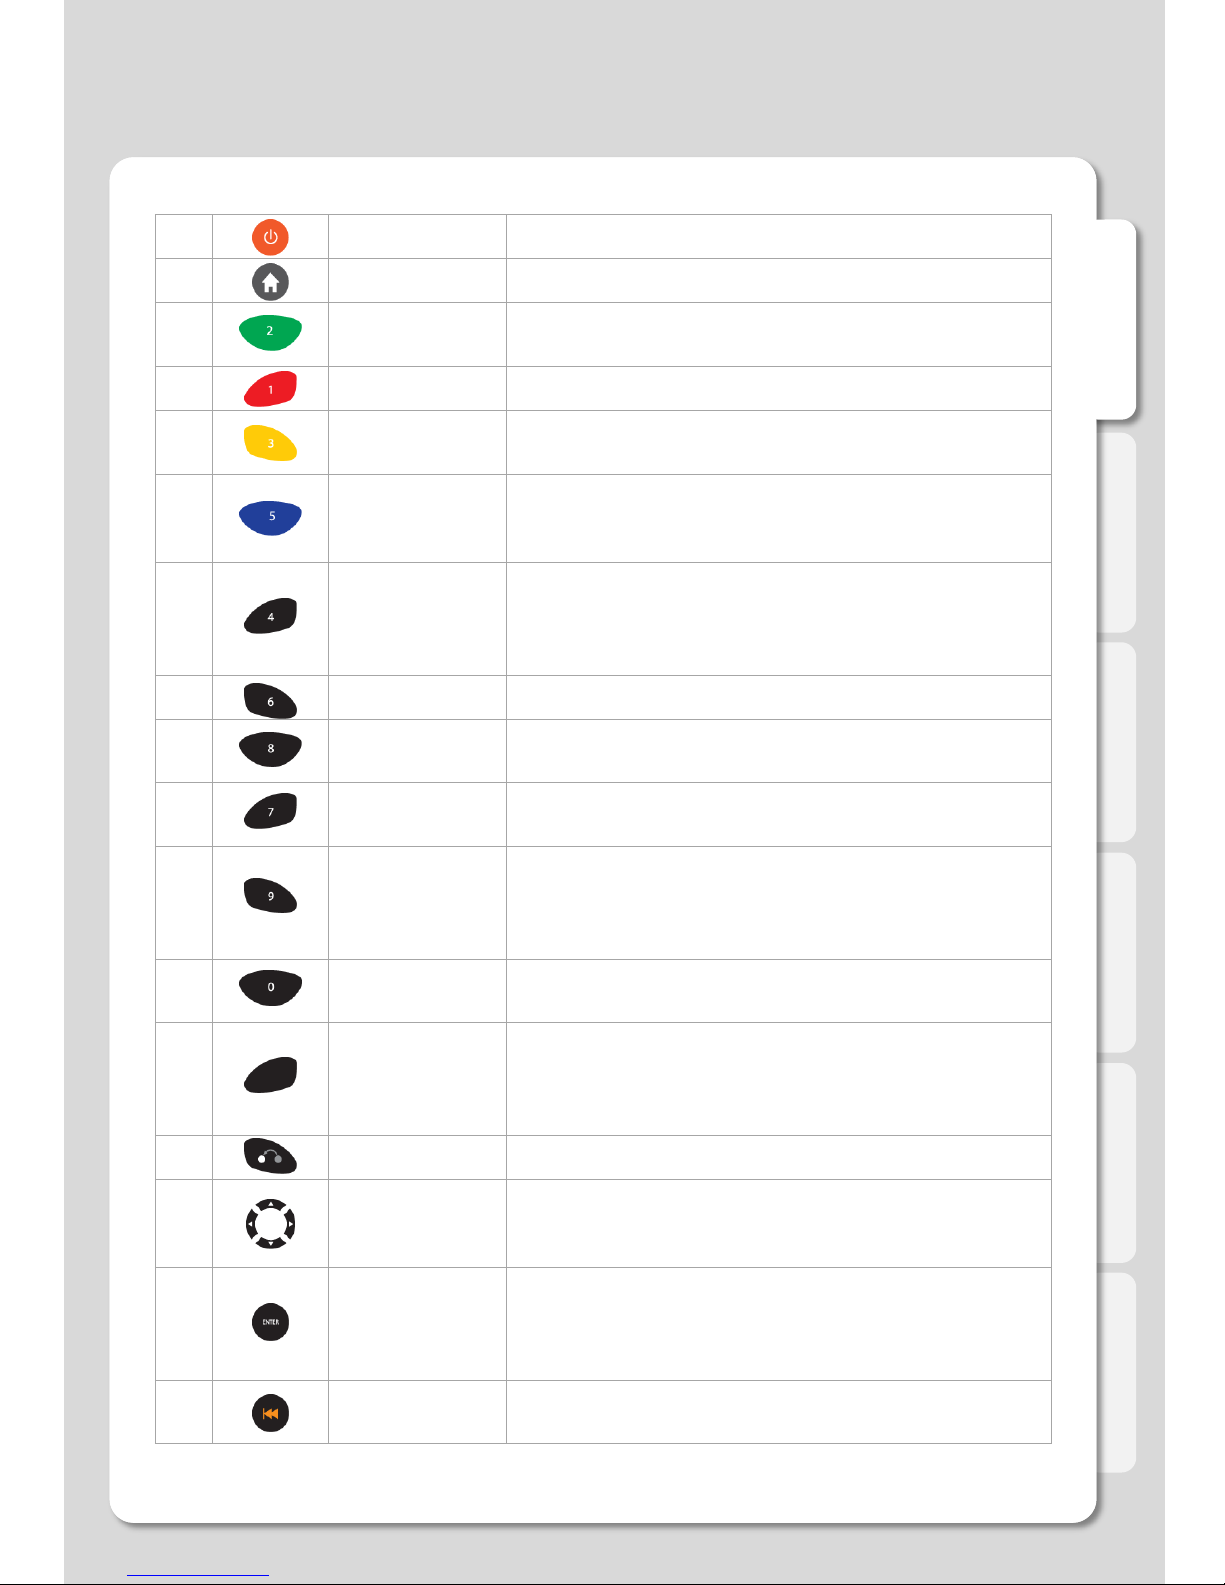
Remote Control Functions
English
Remote Control Functions
1 POWER Switches the device from standby to On (or back Off)
2 HOME Goes to Main Menu
3 EJECT - Adds the selected media file to Playlist
- Opens external USB 2.0 tray load DVD ROM
4 ADD Selects files and marks a file in Playlist or File Manager
5 DELETE - Deletes the selected files in Media Library
- Moves to the next step in File Manager
6 GOTO - Tile : Selects files on Playlists
- Chapter : Moves to the next chapter or file
- Time : Sets the time you want to play from
7 ZOOM
Use this button during playback
- Enlarges (or reduces) screen
- Adjusts zoom percentage and moves to position of
enlarged output by pressing arrow keys.
8 MENU Menu view of DVD Jukebox
9 FUNC Use for sub functions to each menu
[Lock Folder / Change names / Add to Favorites]
10 SETUP - Takes you to the Settings menu
- Alters and applies functions available during playback
11 TVOUT
- Toggles Video Output Modes by pressing more than
twice
- Use to cycle through the different video output modes
and resolutions (HDMI, AV)
12 PREVIEW - Selects the preview mode
[ Preview / File Lists / Thumbnail]
13 INFO
Displays the current status for playing media file
[Video Codec / Audio Codec / Resolution / FPS /
Running time / Playlists / File name / Repeat / Shuffle /
WiFi wireless signal strength / Running time progress bar]
14 RETURN Returns (or Cancels)
15 DIRECTION
KEY
- Skips chapters during playback
[LEFT - Forward 30 sec / RIGHT - Back 10 sec
UP - Forward 3 min / DOWN - Back 1 min]
16 ENTER
- Runs single file playback
- Moves forward frame by frame after pressing
[PLAY/PAUSE] button to pause.
- Selects files after pressing [ADD] button
17 PGUP - Moves to previous Chapter (or List)
- Play previous File

English
18 PGDN - Moves to next Chapter (or List)
- Play next File
19 PLAY/PAUSE Play or Pause playback
20 STOP Stop playback
21 FR/FF Fast forward or fast rewind during playback
[0.8 X/1.1 X/1.2 X/1.5 X/2 X/4 X/8 X/16 X/32 X/1X]
22 VOLUME Adjusts volume level
23 AUDIO If your video file contains multiple audio tracks, use this
button to switch between the audio tracks
24 A-B Chooses a segment to be repeated
25 MUTE Mutes the sound
26 SHUFFLE Random playback
27 REPEAT Plays files repeatedly
[Title repeat / Folder repeat / Repeat Off]
28 SUBTITLE Adjusts [Size / Outline / Position / Color / Advanced
Color] for subtitles
29 SYNC SUBTITLE Adjusts subtitle sync during playback
Remote Control Functions

English
1. HDD Formatting
How to Format the Internal HDD
1. Insert HDD you want to format into TrekStor TV, and then reboot.
2. Select [Settings].
3. Select [System] –[HDD Format].
Settings
If you install a new hard disk it’s highly advisable to format it with the TrekStor TV before using it. Please
follow exactly the instructions given in the leaflet that is included in the delivery of your TrekStor TV or the
instructions below.

English
4. Select available HDD.
5. Select [OK] after reading “Warning” message carefully.
If you don’t want to delete all data, do not format the HDD! All data on the HDD will be lost once you start
to format the HDD.
1. HDD Formatting (continued)
Settings
This manual suits for next models
1
Table of contents
Other TrekStor Media Player manuals

TrekStor
TrekStor i.Beat veo User manual

TrekStor
TrekStor MovieStation maxi t.u User manual

TrekStor
TrekStor MovieStation Antarius User manual

TrekStor
TrekStor MovieStation maxi t.uc User manual

TrekStor
TrekStor i.Beat rock User manual

TrekStor
TrekStor SmartTV Station User manual

TrekStor
TrekStor i.Beat censo User manual

TrekStor
TrekStor i.Beat veo User manual


