Trevi RC 827 D User manual

Per informazioni integrative e aggiornamenti di questo prodotto vedi: www.trevi.it
For additional information and updates of this product see: www.trevi.it
RC 827 D
RADIO SVEGLIA ELETTRONICA
MANUALE D’USO
MULTILANGUAGE USER GUIDE
ENG FRA DEU ESP

CAUTION
DANGER OF ELECTRIC SHOCK!
DO NOT EXPOSE TO
RAIN OR HUMIDITY
CAUTION: TO REDUCE THE RISK OF ELECTRIC SHOCK, DO NOT REMOVE
COVER OR BACK. NO USER SERVICEABLE PERTS INSIDE. REFER SERVICING
TO QUALIFIED PERSONNEL ONLY.
ATENCION
PELIGRO DE CHOQUES ELECTRICOS
NO EXPONER A LLUVIA Y
ATENCION: NO ABRIR EL APARATO, EN SU INTERIOR NO HAY MANDOS QUE
PUEDAN SER MANIPULADOS POR EL USUARIO NI PARTES DE REPUESTO.
PARA TODAS LAS OPERACIONES DE SERVICIO DIRIGIRSE A UN CENTRO DE
ASISTENCIA AUTORIZADO TREVI.
ATTENZIONE
RISCHIO DI SCOSSE
ELETTRICHE
NON ESPORRE
A PIOGGIA E UMIDITÀ
ATTENZIONE: NON APRIRE L’APPARECCHIO. ALL’INTERNO NON VI SONO
COMANDI MANIPOLABILI DALL’UTENTE NE PARTI DI RICAMBIO. PER TUTTE
LE OPERAZIONI DI SERVIZIO RIVOLGERSI AD UN CENTRO DI ASSISTENZA
AUTORIZZATO TREVI
ATTENTION
DANGER DE DECHARGES ELECTRIQUES
NE PAS EXPOSER A LA PLUIE
NI A L’HUMIDITE
ATTENTION: NE PAS OUVRIR L’APPAREIL. SON INTERIEUR NE CONTIENT AUCUNE
COMMANDEDESTINEEAL’UTILISATEURNIDEPIECESDERECHANGE.POURTOUTE
OPERATIOND’ASSISTANCE CONTACTERUNCENTRE
D’ASSISTANCEAGREETREVI.
ACHTUNG
GEFAHR ELEKTRISCHER SCHLÄGE
NICHT DER FEUCHTIGKEIT
UND DEM REGEN AUSSETZEN
ACHTUNG: DAS GERÄT NICHT ÖFFNEN. IM INNERN BEFINDEN SICH KEINE
VOM BENUTZER SELBST INSTANDSETZBAREN TEILE UND AUCH KEINE
ERSATZTEILE. FÜR JEGLICHE SERVICEARBEITEN, WENDEN SIE SICH BITTE
AN EINE TREVI AUTORISIERTEN KUNDENDIENSTSTELLE.
UKPLUG ONLY
WIRES CONNECTIONS TO A THREE-PIN
PLUG
The wires in this mains lead are coloured in accordance
with the following wiring codes:
Blue:...........................................................Neutral
Brown:.......................................................Live
The wires in this mains lead must be connected to the
terminals in the plug as follows:
Blue wire:.................................................N or Black
Brown wire:.............................................L or Red
Neither wire is to be connected to the earth (E or W)
terminal of three-pin plug.
Should the fuse fail in the plug remove the plug form
the wall socket and replace the fuse with a 3Amp.ASTA
approved BS 1362 fuse.
CAUTION! - ATTENZIONE!

RC 827 D FM ALARM CLOCK
3
NOTE D'USO
Ascoltare a volume alto per lungo tempo, potrebbe danneggiare il vostro udito.
Questo apparecchio è uno strumento elettronico di alta precisione, evitate quindi di utilizzarlo nei seguenti casi:
• Vicino a campi magnetici.
• Vicino a fonti di calore come caloriferi e stufe.
• In luoghi molto umidi come stanze da bagno, piscine, ecc...
• In luoghi molto polverosi.
• In luoghi soggetti a forti vibrazioni.
• Non avvicinare l’orecchio all’altoparlante durante le fasi di messa punto e regolazioni del volume, e in particolare di tenere il volume
al minimo nella fase di accensione.
• Posizionare l’apparecchio in modo che ai suoi lati ci sia sempre abbastanza spazio per la libera circolazione di aria (almeno 5 cm).
• Se dei liquidi penetrano all’interno dell’apparecchio scollegare immediatamente la spina dalla presa e portare l’apparecchio al più
vicino centro assistenza autorizato TREVI.
• Controllare sempre prima di ricaricare l’apparecchio, che i cavi di alimentazione e di collegamento siano installati correttamente.
• Nessuna sorgente di fiamma nuda, quali candele accese, dovrebbe essere posta sull’apparecchio.
• L’apparecchio non deve essere esposto a stillicidio o a spruzzi d’acqua e nessun oggetto pieno di liquido, quali vasi, deve essere
posto sull’apparecchio.
• Conservare il presente manuale per futuri riferimenti.
CURA E MANUTENZIONE
Per la pulizia si consiglia l’ uso di un panno morbido, leggermente inumidito. Evitate solventi o sostanze abrasive.
IMPORTANTE
Questo dispositivo e' progettato per uso domestico non professionale. La buona costruzione di questo apparecchio ne garantisce per
lungo tempo il perfetto funzionamento. Se tuttavia dovesse presentarsi qualche inconveniente, sarà opportuno consultare il più vicino
Centro Assistenza autorizzato TREVI.
TREVI persegue una politica di continua ricerca e sviluppo. Pertanto i prodotti possono presentare caratteristiche diverse da quelle
descritte.
NOTES ON USE
This is a precision electronic appliance; avoid using it in the following cases:
• Near strong heat sources, such as central heating plants or stoves.
• Listening to high volume for a long time could damage your hearing.
• In very humid places such as bathrooms, swimming pools, etc.
• In very dusty places.
• In places subject to strong vibrations.
• Position the appliance in such a way that there is always enough room for free air circulation (at least 5 cm).
• Do not block the air inlets.
• Keep the ear speaker during the steps of focusing point and volume adjustments, and in particular to keep the volume
to a minimum in the ignition phase.
• If any liquid enters the appliance, unplug it immediately from the socket and take it to the nearest TREVI authorised
service centre.
• Before switching on the appliance, always check that the power cable and the connection cable are properly installed.
• The apparatus shall not be exposed to dripping or splashing water. No objects filled with liquid, such as vases, should
be placed on the unit.
• No naked flame sources, such as lighted candles, should be placed on.
• Keep this manual.
CARE AND MAINTENANCE
Use a slightly damp soft cloth for cleaning. Do not use solvents and abrasive substances.
IMPORTANT
This device is designed for home use (not professional use). This appliance has been carefully built to ensure long-lasting
perfectperformance.However,shouldanyinconvenienceoccur,pleasecontactyourlocalauthorisedTREVIServiceCentre.
TREVI follows a policy of ongoing research and development. Therefore products may have different features from
those described.

RC 827 D FM ALARM CLOCK
4
ITALIANO
1. Tasto Accensione-Standby/Spegnimento allarme
2. Tasto PRESET / MEMORY +
3. Tasto TUN+/MINUTE, ricerca stazioni radio/regolazione minuti
4. Tasto VOL+/Alarm, regolazione volume/attivazione allarme
5. Tasto SNOOZE
6. Vano batterie
7. Display
8. ZZZ, indicazione funzione SLEEP attiva
9. Tasto TUN-/ HOUR ricerca stazioni radio/regolazioni ora
10.Tasto SLEEP
11.Tasto TIME SET
12.Indicazione allarme attivo (Radio/Buzzer)
13.Altoparlante
14.Tasto VOL -, regolazione volume
INSTALLAZIONE
Inserire la spina del cavetto di alimentazione in una presa di corrente
230V - 50Hz.
Per mantenere in funzione l’orologio e la memorizzazione dell’orario anche
durante una momentanea mancanza di energia elettrica, inserire due batterie
AAA(nonfornite)nell’appositovano (6)sulfondo dell’apparecchioseguendo
le indicazioni di polarita’ stampate sul mobile.
REGOLAZIONE OROLOGIO
1. In modalita Standby, premere a lungo il tasto TIME(11), si attivera’ la
funzione di regolazione data/ora (il display lampeggera’).
2. Tramite i tasti Hour(9) e Min(3) regolare rispettivamente l’ora e i minuti
correnti
3. Confermare con il tasto TIME(11).
Nota: se durante la fase di regolazione (display lampeggiante) non viene
premuto nessun tasto per un certo tempo, la radio sveglia si riporta auto-
maticamente in standby (display fisso).
RADIO
1. Accendete la radio premendo il tasto Accensione/Standby(1); premete
lo di nuovo per spegnerla.
2. Sintonizzatevi sulla vostra stazione preferita selezionando la giusta
frequenzaconitastiTUN+(3)e TUN-(9).Durantel’operazione sul
display viene visualizzata la frequenza sintonizzata.
3. Premendo i tasti TUN+ e TUN- a lungo si attiva la ricerca automatica,
laradioeffettuaunascansionedella frequenzafinoa fermarsialla
prima stazione radio trovata.
COMANDI Ascolto di stazioni radio memorizzate e memorizzazione di una stazione
radio
E’ possibile memorizzare fino a 10 stazioni radio in banda FM:
1. Selezionate la frequenza desiderata.
2. Per salvare una stazione radio in memoria:
- premere a lungo il tasto M+(2) fino a quando il display lampeggera’.
- tramite i tasti VOL+(4) e VOL-(14) selezionare la locazione di memoria.
- premere di nuovo il tasto M+(2) per confermare la memorizzazione.La
radio e’ ora salvata.
3. Per ascoltare una stazione radio salvata in memoria premere il tasto
M+(2) fino a visualizzare il numero di memoria desiderato.
REGOLAZIONE VOLUME
Durante l’ascolto della radio premere i tasti VOL+(4) e VOL-(14) per regolare
il volume di ascolto.
SVEGLIA
1. In modalita Standby, premere a lungo il tasto ALARM(4), si attivera’ la
funzione di regolazione data/ora (il display lampeggera’).
2. Tramite i tasti Hour(9) e Min(3) regolare rispettivamente l’ora e i minuti
in cui attivare l’allarme sveglia.
3. Confermare con il tasto ALARM(4), il display smettera’ di lampeggiare
e tornera’ a mostrare l’ora corrente.
4. Premere piu’ volte il tasto ALARM per attivare in sequenza l’allarme
consuoneriabuzzer(siaccendel’indicazione allarmebuzzer), l’allar
meconsuoneriaradio(siaccende l’indicazioneallarme radio)odisat
tivare entrambi gli allarmi (indicazione allarme spente).
Il volume e la stazione riprodotta della sveglia con radio sara’ quello
impostato durante l’ultimo ascolto della stessa.
SPEGNIMENTO DELLA SVEGLIA
Se desiderate spegnere momentaneamente la sveglia, premere il pulsante
SNOOZE (5); l’interruzione dura 9 minuti, trascorsi i quali la sveglia si riac-
cende. L’operazione puo’ essere ripetuta diverse volte entro un’ora di tempo.
Perspegneredefinitivamentel’allarme-svegliapremereiltastoSPEGNIMENTO
ALLARME(1).
L’allarme rimane comunque attivo per ripetersi 24 ore dopo.
Per disattivarlo agire sul tasto ALARM(4) fino allo spegnimento della indi-
cazione di allarme(12).
FUNZIONE SLEEP
IlpulsanteSLEEP(10)vipermettedi programmarelospegnimentoautomatico
della radio fino ad un massimo di 90 minuti.
Regolare il tempo di spegnimento premendo il tasto SLEEP (10) piu’ volte;
inizialmente verra’ mostrato il tempo massimo di 90 minuti, premendo piu’
volte il tasto SLEEP questo tempo si abbassera’ a passi di 10 minuti fino
alla comparsa della scritta OFF (funzione SLEEP disattivata).
Quando la funzione SLEEP viene attivata, sul display si attiva l’indicazione
ZZZ(8).
SPECIFICHE TECNICHE
Alimentazione: .................................................................230V 50Hz
Batterie tampone(non fornite):..................................2 batterie “AAA” 1.5V
Gamma frequenza FM: ........................................................87.5-108MHz
Consumo:...........................................................................................5W
Dimensioni:................................................................... 140*114*44 mm
Peso:............................................................................................ 310 gr.

RC 827 D FM ALARM CLOCK
5
RC 827D FM ALARM CLOCK ENGLISH
COMMAND
1. Power-Standby / Alarm Power Off Key
2. PRESET / MEMORY + button
3. TUN + / MINUTE button, search for radio stations / minute setting
4. VOL + / Alarm button, volume control / alarm activation
5. SNOOZE button
6. Battery compartment
7. Display
8. ZZZ, SLEEP function indication active
9. TUN- / HOUR button searches for radio stations / settings now
10. SLEEP button
11. TIME SET button
12. Active alarm indication (Radio / Buzzer)
13. Speaker
14. VOL button -, volume adjustment
INSTALLATION
Insert the plug of the power cable into a power outlet 230V - 50Hz.
Tokeepthe clockandthetimememorizationrunningevenduringamomentary
power failure, insert two AAA batteries (not supplied) into the appropriate
compartment (6) on the bottom of the appliance, following the polarity
indications printed on the mobile.
CLOCK ADJUSTMENT
1. In Standby mode, long press the TIME key (11), the date / time adjustment
function will be activated (the display will flash).
2. Using the Hour (9) and Min (3) keys, adjust the current time and minutes
respectively
3. Confirm with the TIME key (11).
Note: if during the adjustment phase (display flashing) no key is pressed for a
certain time, the alarm clock automatically returns to standby (fixed display).
RADIO
1. Turn on the radio by pressing the Power / Standby button (1); press it
again to turn it off.
2. Tune into your favorite station by selecting the right frequency with the
TUN + (3) and TUN- (9) buttons. During the operation, the tuned frequency
is shown on the display.
3. Pressing the TUN + and TUN- long keys activates the automatic search,
the radio scans the frequency until it stops at the first radio station found.
Listening stored radio stations and storing a radio station
Up to 10 FM band stations can be stored:
1. Select the desired frequency.
2. To save a radio station in memory:
- press the M + key (2) for a long time until the display flashes.
- use the VOL + (4) and VOL- (14) keys to select the memory location.
- press the M + key (2) again to confirm the memorization. The radio is
now saved.
3. To listen to a radio station saved in memory, press the M + key (2) until
the desired memory number is displayed.
VOLUME ADJUSTMENT
While listening to the radio, press the VOL + (4) and VOL- (14) buttons to
adjust the listening volume.
WAKE UP
1.In Standbymode, longpresstheALARM key(4),thedate/ timeadjustment
function will activate (the display will flash).
2. Using the Hour (9) and Min (3) keys, adjust the time and minutes to
activate the alarm clock, respectively.
3. Confirm with the ALARM key (4), the display will stop flashing and will
return to show the current time.
4.PresstheALARMkeyseveraltimestoactivatethe buzzeralarminsequence
(the buzzer alarm indication lights up), the alarm with radio signal (the radio
alarm indication lights up) or deactivate both alarms ( alarm indication off).
The volume and the station played by the radio alarm will be the one set
during the last listening to it.
TURNING OFF THE ALARM
If you wish to switch the alarm off temporarily, press the SNOOZE button (5);
the interruption lasts 9 minutes, after which the alarm is switched on again.
The operation can be repeated several times within an hour.
Toextinguish thealarm-alarm permanently, pressthe ALARM OFFbutton (1).
The alarm is still active to repeat itself 24 hours later.
To deactivate it, press the ALARM button (4) until the alarm indication
(12) goes out.
SLEEP FUNCTION
The SLEEP button (10) allows you to program the automatic turning off of
the radio up to a maximum of 90 minutes.
Set the switch-off time by pressing the SLEEP button (10) several times;
initially the maximum time of 90 minutes will be shown, by pressing the
SLEEP key several times, this time will be lowered in 10 minute steps until
the word OFF appears (SLEEP function deactivated).
When the SLEEP function is activated, the indication ZZZ (8) is activated
on the display.
TECHNICAL SPECIFICATIONS
Power supply: ........................................................................ 230V 50Hz
Buffer batteries (not supplied): ............................... 2 “AAA” 1.5V batteries
FM frequency range: ..........................................................87.5-108MHz
Consumption: ....................................................................................5W
Dimension: ................................................................... 140*114*44 mm
Weight: ..... .................................................................................310 gr

6
RC 827D FM ALARM CLOCK
6
6
SOURCES D'ÉNERGIE
AC POWER
S'ilvousplaît vérifierattentivementlatensionnominaledevosmatchsappareil
à la tension locale.
Branchez le cordon d'alimentation dans la prise de courant domestique
standard.
BATTERIE DE SECOURS
L'horloge et les paramètres d'alarme peuvent être protégés contre une panne
de courant AC par 2 pile "AAA" (non inclus).
Dans le cas d'une panne de courant, l'écran est vide, l'horloge continuera de
fonctionner et le temps réel sera maintenu. L'affichage de l'heure et d'autres
fonctions reprendront une fois que le courant est rétabli.
1. Retirez le couvercle du compartiment à piles (Situé au bas de l'appareil).
2. Connect 2 pile "AAA" à la borne de batterie à l'intérieur du compartiment.
3. S'il vous plaît batterie connectée dans le compartiment et remettez le
couvercle.
NOTE:
- Alarme, Radio et Affichage ne fonctionne pas sur batterie
- Retirez la batterie si l'appareil ne doit pas être utilisé pendant une longue
période de temps.
TEMPS DE PRISE
1. Appuyez sur et tenez le bouton TIME(11) pendant environ 2 secondes
jusqu'à ce que le flash d'affichage.
2. Appuyez sur HOUR ou MIN jusqu'à l'heure correcte s'affiche à l'écran.
3. Appuyez sur TIME(11) pour confirmer.
FONCTIONNEMENT DE LA RADIO
1. Allumez la radio en appuyant sur le Marche / Veille (1), appuyez à nouveau
pour l’éteindre.
2. Branchez-vous sur votre station préférée en sélectionnant la bonne
fréquence en utilisant la TUN+(3) et TUN-(9).
3. En appuyant sur le TUN+/ TUN- ou tout au long de la recherche auto-
matique est activée, la radio balaie la plage de fréquence allant de s’arrêter
à la première station de radio trouvée.
Écoutedesstations deradiomémoriséesetstockaged’unestationderadio
Jusqu’à 10 stations de bande FM peuvent être stockées:
1. Sélectionnez la fréquence souhaitée.
2. Pour enregistrer une station de radio en mémoire:
-appuyezlonguementsurla toucheM+(2)jusqu’àceque l’affichageclignote.
- utilisez les touches VOL + (4) et VOL- (14) pour sélectionner l’emplace-
ment de la mémoire.
- appuyer à nouveau sur la touche M + (2) pour confirmer la mémorisation.
La radio est maintenant enregistrée.
3. Pour écouter une station de radio enregistrée en mémoire, appuyez sur
la touche M + (2) jusqu’à ce que le numéro de mémoire souhaité s’affiche.
SLEEP TIMER
La fonction sommeil permet de jouer dans des blocs de 10, 20, 30, 40, 50,
60 70, 80 ou 90 minutes avant de s'éteindre automatiquement.
Lorsque dans le mode radio appuyez sur la touche SLEEP jusqu'à ce que
le temps de présélection désiré apparaît à l'écran (90, 80, 70, 60, 50, 40,
30, 20 ou 10 minutes). Chaque poussée, l'affichage change comme suit:
SPÉCIFICATIONS
Alimentation :...................................................................230V 50Hz
Batterie de secours: ................................................. 2 batterie “AAA” 1.5V
Gamme de frequence FM: ...................................................87.5-108MHz
Consommation electrique:...................................................................5W
RÉGLAGE DU VOLUME
Tout en écoutant la radio, appuyez sur la touche VOL + (4) et VOL-(14) pour
ajuster le volume d'écoute.
ALARME
1. En mode veille, appuyez sur le bouton ALARM (4), il activera «fonction
de réglage maintenant (l'affichage clignote).
2. Utilisez la touche Heure (3) et Min (9), respectivement réglementer les
heures et les minutes, dans lequel pour activer le réveil.
3. Validez en appuyant sur la touche ALARM (4), l'affichage cessera de
«clignoter et sera de retour» pour afficher l'heure actuelle.
4.ToucheALARMPlusde presse"deuxfois pouractiverlaséquence d'alarme
avecbuzzer(voyantsindiquantlebuzzer), leradio-réveilavecfonctionsnooze
(feux de signalisation d'alarme jusqu'à la radio) ou de désactiver les deux
alarmes (indication d'alarme off).
Le volume et la station a joué le radio-réveil «fixera au cours de la
dernière audience le même.
DESACTIVER L'ALARME
Si vous voulez temporairement désactiver l'alarme, appuyez sur le bouton
SNOOZE (5), l'interruption dure 9 minutes, après quoi l'alarme à nouveau.
L'opération peut "être répétée plusieurs fois dans une heure de temps.
Pour définitivement éteindre le réveil appuyez sur la touche ALARM OFF
(1). L'alarme reste active en cas de récidive de 24 heures plus tard. Pour
désactiverl'action toucheALARM (4)pouréteindrel'indicationd'alarme(12).
1. Bouton On/Standby/Al Off
2. Bouton PRESET/MEM+
3. Bouton Tun+/MINUTE
4. Bouton Vol+/Alarm
5. Bouton Snooze
6. Compartimentdelabatterie
7. Display
8. Indication SLEEP
9. Bouton Tun-/HOUR
10. Bouton SLEEP
11. Bouton TIME SET
12. Indication Buzzer/Radio Al.
13. Haut-parleur
14. Bouton Vol-
FRANCAISE

RC 827 D FM ALARM CLOCK
7
DEUTSCH
STROMQUELLEN
AC POWER
Bitte überprüfen Sie sorgfältig die Nennspannung des Gerätes Spiele
Ihrer lokalen Netzspannung.
Schließen Sie das Netzkabel in den haushaltsüblichen Steckdose.
BATTERY BACKUP
Die Uhr und Alarm-Einstellungen können gegen Stromausfall um 2 "AAA"-
Batterien (nicht mitgeliefert) geschützt werden.
Im Falle eines Stromausfalls, das Display dunkel ist, wird die Uhr weiter
betrieben und die tatsächliche Zeit aufrechterhalten werden. Die Uhr
LCD-Anzeige und weiteren Funktionen wird fortgesetzt, sobald elektrische
Stromversorgung wiederhergestellt ist.
1. Entfernen Sie den Deckel des Batteriefachs (an der Unterseite des Geräts).
2. Verbinden Sie 2 "AAA" Batterie an den Batterieanschluss im Batteriefach.
3. Bitte angeschlossenen Batterie in das Batteriefach und setzen Sie die
Abdeckung.
HINWEIS:
- Wecker, Radio und Display nicht auf Batterie arbeiten
- Nehmen Sie den Akku, wenn das Gerät nicht für längere Zeit nicht benutzt
werden.
ZEIT EINSTELLEN
1. Drücken und halten Sie die Taste TIME(11) für etwa 2 Sekunden, bis im
Display blinken.
2. Drücken Sie HOUR oder MIN bis das richtige Zeit erscheint im Display.
3. Drücken Sie zur Bestätigung auf TIME(11)
VOREINSTELLUNG LIEBLINGSBESCHÄFTIGUNG
RADIO STATION
1. Schalten Sie das Radio durch Drücken der Taste On / Standby (1), drücken
Sie sie erneut, um sie auszuschalten.
2. Tune in Ihren Lieblings-Station durch Auswahl der richtigen Frequenz, die
das TUN + (3), und TUN-(9).
3. Drücken Sie die TUN + oder TUN-langen automatische Suche aktiviert
ist, scannt das Radio den Frequenzbereich bis an die erste Funkstation
gefunden zu stoppen.
Gespeicherte Radiosender anhören und einen Radiosender speichern
Bis zu 10 UKW-Sender können gespeichert werden:
1. Wählen Sie die gewünschte Frequenz.
2. Um einen Radiosender im Speicher zu speichern:
- Drücken Sie die Taste M + (2) so lange, bis das Display blinkt.
- Wählen Sie mit den Tasten VOL + (4) und VOL- (14) den Speicherplatz.
-DrückenSieerneutdieTasteM+(2),umdenSpeichervorgangzubestätigen.
Das Radio ist jetzt gespeichert.
3. Um einen gespeicherten Radiosender anzuhören, drücken Sie die Taste M
+ (2), bis die gewünschte Speichernummer angezeigt wird.
EINSCHLAF-TIMER
Die Schlaf-Funktion erlaubt es, in Blöcken von 10, 20, 30, 40, 50, 60 70, 80
oder 90 Minuten vor dem Abschalten automatisch abgespielt.
Wenn im Radio Modus, drücken Sie die Taste SLEEP(10) wiederholt, bis
die gewünschte voreingestellte Zeit erscheint auf dem Display (90, 80, 70,
60, 50, 40, 30, 20 oder 10 Minuten). Jeder Tastendruck ändert sich die
Anzeige wie folgt:
TECHNISCHE DATEN
Stromversorgung: ........................................................... 230V 50Hz
Backup-Batterie:.......................................................2 batterie “AAA” 1.5V
FM Frequenzbereich: ...........................................................87.5-108MHz
Leistungsaufnahme:............................................................ 5W
LAUTSTÄRKEREGULIERUNG
Während Sie Radio hören, drücken Sie die VOL + (4) und VOL-(14), um
die Lautstärke einzustellen.
ALARM
1.ImStandby-Modus drückenundhaltenSie ALARM(4),wird eszuaktivieren
"Einstellung Funktion jetzt (das Display blinkt ').
2. Mit der Taste Hour (3) und Min (9) bzw. regulieren die Stunden und Mi-
nuten, in denen auf den Wecker aktivieren. 3. Bestätigen Sie mit der ALARM
(4), wird die Anzeige zu stoppen 'zu blinken, und kommen wieder ", um die
aktuelle Uhrzeit anzuzeigen.
4.MehrPresse'ALARM-Tastezweimal, umdenAlarm-SequenzmitSummton
(Lichter, die den Alarm-Summer), der Radiowecker mit Snooze-Funktion
(Alarm-Anzeige leuchtet im Radio) zu aktivieren oder zu deaktivieren beide
Alarme (Alarm Indication aus).
Das Volumen und die Station gespielt Der Radiowecker 'während der
letzten mündlichen Verhandlung das gleiche.
AUSSCHALTEN DES ALARMS
Wenn Sie vorübergehend den Alarm auszuschalten, drücken Sie die Taste
SNOOZE (5), dauert die Unterbrechung 9 Minuten, nach dem der Alarm
wieder an. Die Operation kann 'mehrmals innerhalb einer Stunde wiederholt
werden. Um dauerhaft ausschalten der Wecker drücken Sie die ALARM
OFF-Taste (1). Der Alarm bleibt für 24 Stunden später wiederholt. Um die
ALARM-Taste Aktion (4) Schalten Sie die Alarmanzeige (12) zu deaktivieren.
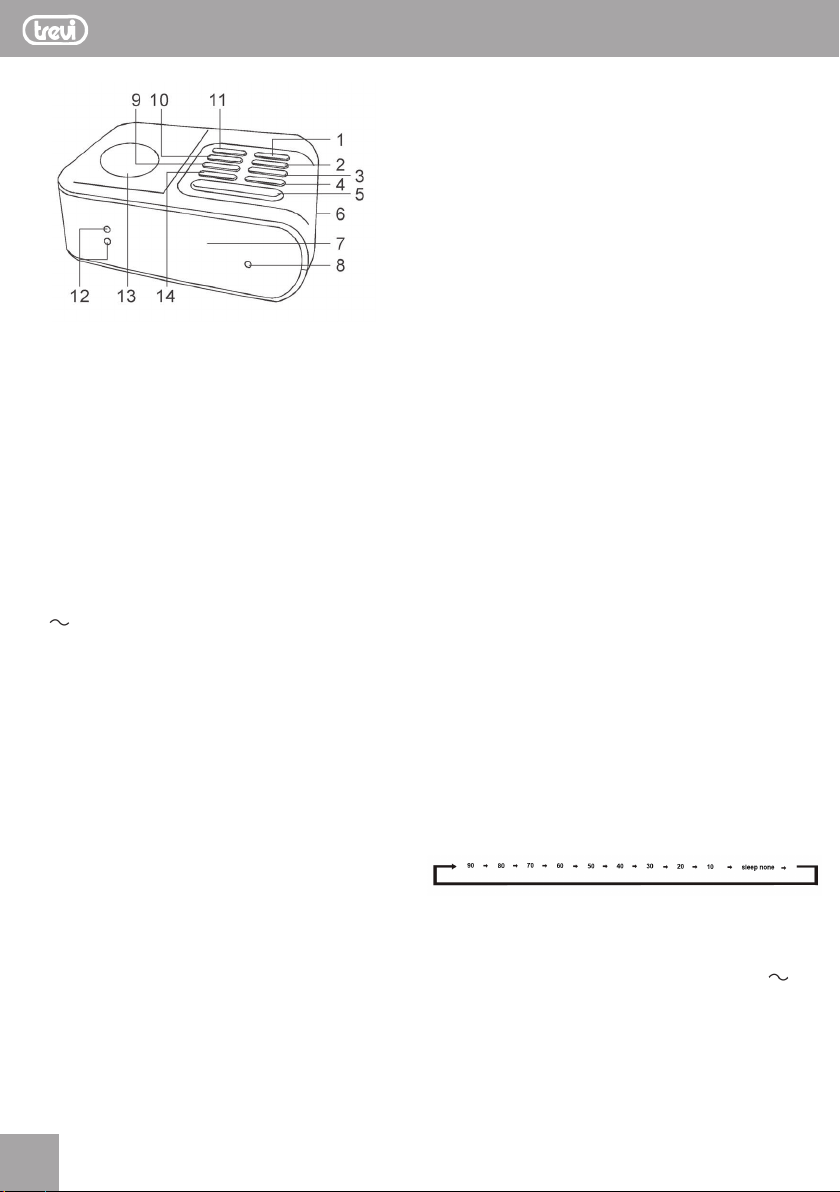
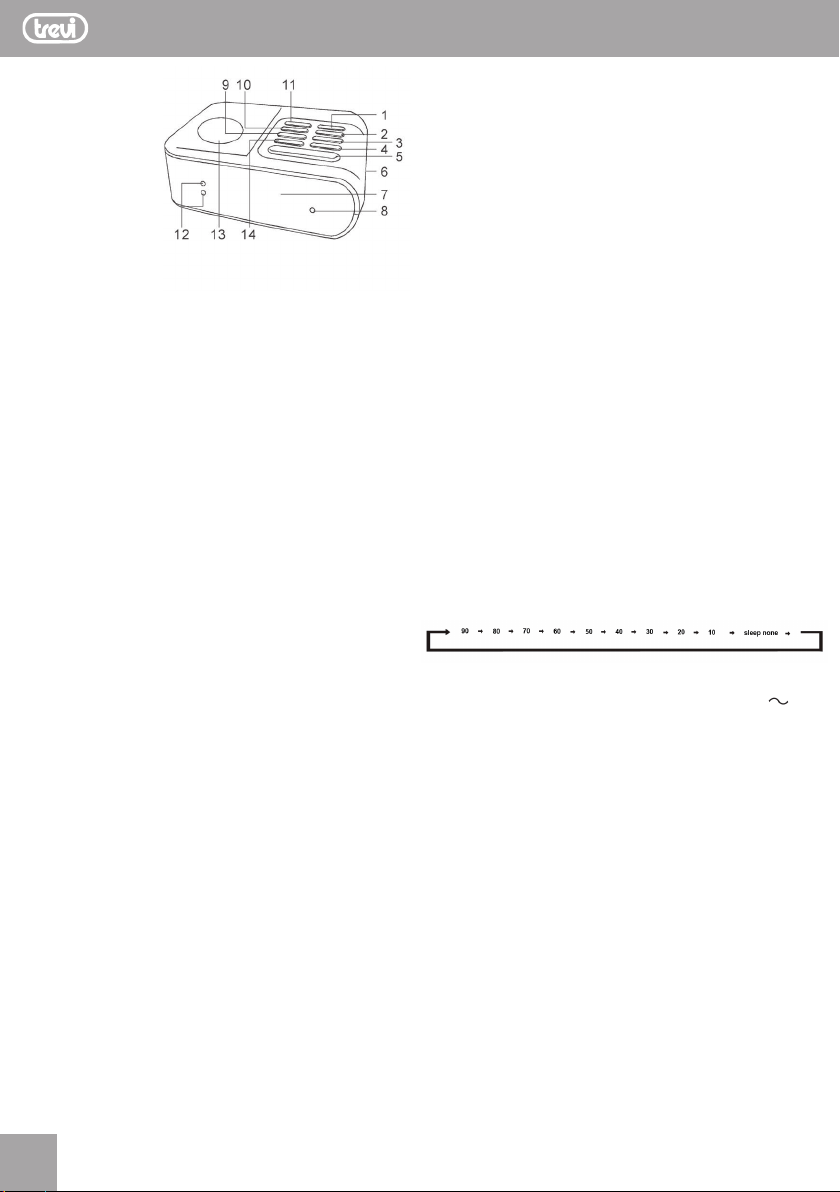
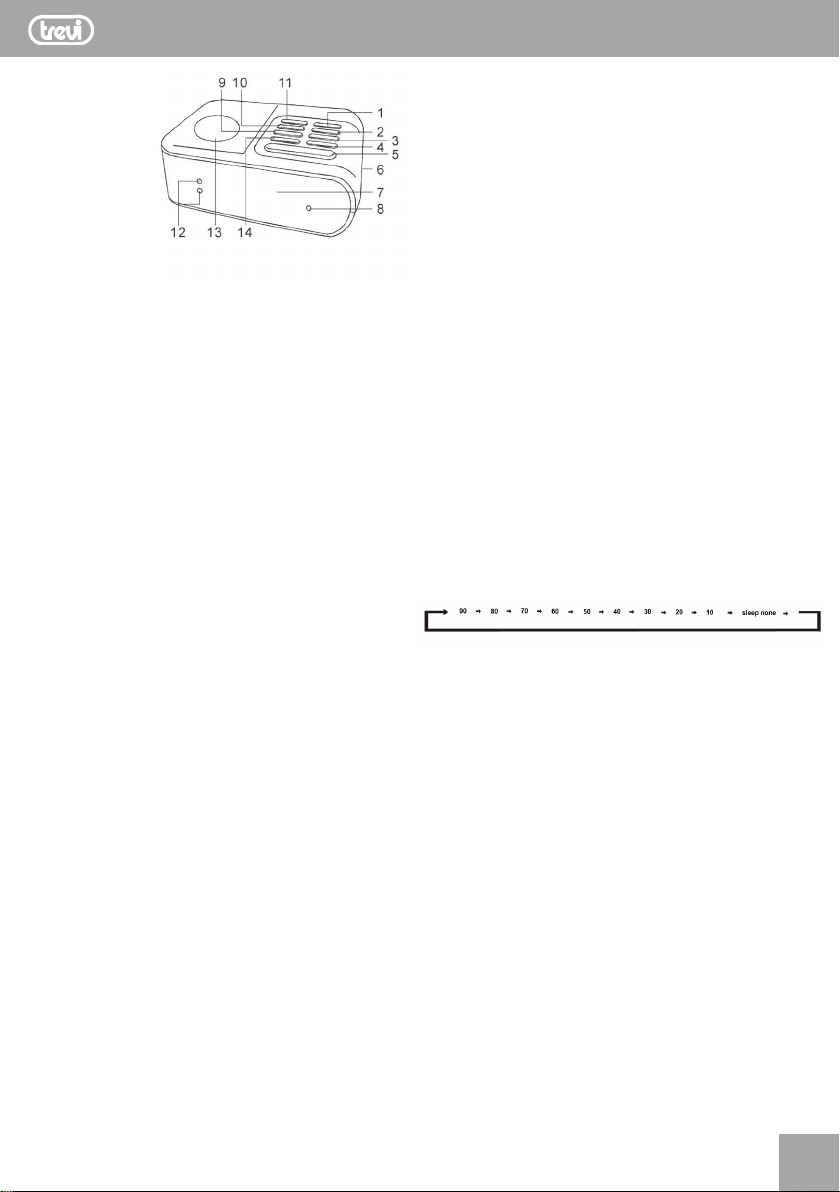
1. Taste On/Standby/Al Off
2. Taste PRESET/MEM+
3. Taste Tun+/MINUTE
4. Taste Vol+/Alarm
5. Taste Snooze
6. Batteriefach
7. Display
8. Anzeige SLEEP
9. Taste Tun-/HOUR
10. Taste SLEEP
11. Taste TIME SET
12. Anzeige Buzzer/Radio Al.
13. Lautsprecher
14. Taste Vol-

RC 827 D FM ALARM CLOCK
8
RC 827D FM ALARM CLOCK ESPANOL
FUENTES DE ENERGÍA
CORRIENTE ALTERNA
Por favor, revise cuidadosamente la tensión nominal de los partidos de sus
electrodomésticos.
Conecte el cable de CA en la toma de corriente eléctrica estándar.
BATERÍA DE RESPALDO
El reloj y los ajustes de alarma pueden ser protegidos contra la falta de
alimentación con 2 pilas "AAA" (no incluidas).
En el caso de una falla de energía, la pantalla está en blanco, el reloj seguirá
funcionando y el tiempo real se mantendrá. La pantalla LCD del reloj y otras
funciones se reanudarán una vez que se restablezca la energía eléctrica.
1. Retire la tapa del compartimiento de la batería (ubicado en la parte
inferior de la unidad).
2.Conectar2 pilas"AAA"alaterminalde labateríadentrodel compartimiento.
3. Por favor, deje la batería conectada en el compartimiento y vuelva a
colocar la cubierta.
NOTA:
- Alarma, radio y la pantalla no funcionan con la batería
- Retire la batería si la unidad no se va a utilizar durante un largo periodo
de tiempo.
FIJAR HORA
1. Pulse y mantenga pulsado el botón TIME(11) durante unos 2 segundos.
2. Pulse HOUR o MIN hasta que aparezca la hora correcta en la pantalla.
3. Pulse TIME(11) para confirmar.
FUNCIONAMIENTO DE LA RADIO
1. Encienda la radio pulsando el botón On / Standby (1), pulse de nuevo
para apagarlo.
2. Sintonice su emisora favorita mediante la selección de la frecuencia
correcta con las teclas TUN+ (3) y TUN-(9).
3. Al pulsar el TUN+/TUN-, la búsqueda automática está activada, la radio
escanea el rango de frecuencia hasta detenerse en la primera estación de
radio encontrado.
Escuchar estaciones de radio almacenadas y almacenar una estación
de radio
Se pueden almacenar hasta 10 estaciones de banda FM:
1. Seleccione la frecuencia deseada.
2. Para guardar una estación de radio en la memoria:
- presione la tecla M + (2) durante un tiempo prolongado hasta que la
pantalla parpadee.
- use las teclas VOL + (4) y VOL- (14) para seleccionar la ubicación de
la memoria.
- presione la tecla M + (2) nuevamente para confirmar la memorización.
La radio ahora está guardada.
3. Para escuchar una estación de radio guardada en la memoria, presione la
tecla M + (2) hasta que aparezca el número de memoria deseado.
TEMPORIZADOR
La función de apagado automático permite jugar en bloques de 10, 20,
30, 40, 50, 60 70, 80 o 90 minutos antes de apagarse automáticamente.
Cuando en el modo de radio pulse el botón SLEEP(10) repetidamente hasta
que la hora deseada aparece en la pantalla (90, 80, 70, 60, 50, 40, 30, 20 o
10 minutos). Cada impulso cambia la pantalla como sigue:
ESPECIFICACIONES
Fuente de alimentación:....................................................230V 50Hz
Backup de la batería:................................................ 2 batterie “AAA” 1.5V
Banda de frecuencia FM:....................................................87.5-108MHz
Consumo de energía: ..........................................................................5W
AJUSTE DE VOLUMEN
Mientras escucha la radio, pulse el botón VOL + (4) y VOL-(14) para ajustar
el volumen de escucha.
ALARMA
1. En modo de espera, mantenga pulsada la tecla ALARMA (4), se activará
"la función de ajustar la hora (la pantalla parpadeará").
2. Utilice Hora clave (3) y Min (9), respectivamente, regular las horas y los
minutos en que para activar la alarma del reloj.
3. Confirme pulsando la alarma (4), la pantalla dejará de "parpadear y estará
de regreso" para mostrar la hora actual. 4. Tecla de función Más de prensa
'ALARMA dos veces para activar la secuencia de alarma con timbre de
alarma (laslucesqueindicanel timbrede laalarma),el radiodespertador con
función snooze (las luces de indicación de alarma de la radio) o desactivar
las dos alarmas (indicación de alarma off).
El volumen y la estación jugó la alarma de radio 'se fijará durante la
última audiencia de la misma.
APAGAR LA ALARMA
Si desea desactivar temporalmente la alarma, pulse el botón SNOOZE (5), la
interrupción dura 9 minutos, tras lo cual la alarma de nuevo. La operación
"se puede repetir varias veces en una hora de tiempo. Para desactivar
permanentemente la alarma presione la tecla ALARM OFF (1). La alarma
permaneceactivaduranterepitió24 horasdespués.Paradesactivarlaacción
clave ALARMA (4) para apagar la indicación de alarma (12).
1. Boton On/Standby/Al Off
2. Boton PRESET/MEM+
3. Boton Tun+/MINUTE
4. Boton Vol+/Alarm
5. Boton Snooze
6. Compartimiento de la
bateria
7. Display
8. Indicacion SLEEP
9. Boton Tun-/HOUR
10. Boton SLEEP
11. Boton TIME SET
12. IndicacionBuzzer/RadioAl.
13. Altavoz
14. Boton Vol-

RC 827 D FM ALARM CLOCK
9
FONTES DE ENERGIA
CORRENTE ALTERNADA
Por favor, verifique cuidadosamente a tensão nominal dos jogos dos seus
aparelhos.
Conecte o cabo de CA na tomada elétrica padrão.
BATERIA DE BACKUP
O relógio e as configurações de alarme podem ser protegidos contra falta
de energia com 2 pilhas “AAA” (não incluídas).
No caso de uma falha de energia, a tela fica em branco, o relógio continuará
funcionando e o tempo real permanecerá. A tela LCD do relógio e outras
funções serão retomadas assim que a energia for restaurada.
1. Remova a tampa do compartimento da bateria (localizada na parte
inferior da unidade).
2. Conecte 2 pilhas “AAA” ao terminal da bateria dentro do compartimento.
3.Porfavor,deixea bateriaconectadanocompartimentoerecoloqueatampa.
NOTA:
- Alarme, rádio e display não funcionam com a bateria
-Removaabateriase aunidadenãoforusadaporumlongoperíododetempo.
SET TIME
1. Pressione e segure o botão TIME (11) por cerca de 2 segundos.
2. Pressione HOUR ou MIN até que a hora correta apareça na tela.
3. Pressione TIME (11) para confirmar.
OPERAÇÃO DO RÁDIO
1. Ligue o rádio pressionando o botão On / Standby (1), pressione nova-
mente para desligá-lo.
2. Sintonize sua estação favorita selecionando a freqüência correta com as
teclas TUN + (3) e TUN- (9).
3. Quando o TUN + / TUN- é pressionado, a busca automática é ativada,
o rádio varre a faixa de freqüência até que ela pare na primeira estação de
rádio encontrada.
Ouvir estações de rádio armazenadas e armazenar uma estação de rádio
Até 10 estações de banda FM podem ser armazenadas:
1. Selecione a frequência desejada.
2. Para salvar uma estação de rádio na memória:
- pressione a tecla M + (2) por um longo tempo até que a tela pisque.
- use as teclas VOL + (4) e VOL- (14) para selecionar o local da memória.
- prima novamente o botão M + (2) para confirmar a memorização. O
rádio está agora salvo.
3. Para ouvir uma estação de rádio armazenada na memória, pressione a
tecla M + (2) até que o número da memória desejada apareça.
TEMPORIZADOR
A função de desligamento automático permite tocar em blocos de 10, 20,
30, 40, 50, 60, 70, 80 ou 90 minutos antes de desligar automaticamente.
Quandoestivernomododerádio, pressioneobotãoSLEEP(10)repetidamente
até que o tempo desejado apareça na tela (90, 80, 70, 60, 50, 40, 30, 20
ou 10 minutos). Cada pulso muda a tela como segue:
ESPECIFICAÇÕES
Fonte de alimentação: ............................................................ 230V 50Hz
Backup da bateria: ..................................................2 batterie “AAA” 1.5V
Faixa de freqüência FM: ......................................................87,5-108MHz
Consumo de energia: ......................................................................... 5W
AJUSTE DE VOLUME
Enquanto estiver ouvindo o rádio, pressione o botão VOL + (4) e VOL- (14)
para ajustar o volume de audição.
ALARME
1. No modo de espera, pressione e segure a tecla ALARM (4), a “função
de ajuste de tempo (a tela piscará”) será ativada.
2. Use Key Time (3) e Min (9), respectivamente, para regular as horas e
minutos para ativar o alarme do relógio.
3. Confirme pressionando o alarme (4), a tela irá parar de “piscar e voltará”
para mostrar a hora atual. 4. Tecla de função Pressione ‘ALARM duas vezes
para ativar a seqüência de alarme com campainha de alarme (as luzes que
indicam a campainha de alarme), o rádio despertador com função snooze
(as luzes indicadoras de alarme do rádio ) ou desativar os dois alarmes
(indicação de alarme desligada).
O volume e a estação tocados no alarme de rádio ‘serão definidos
durante a última audiência do mesmo.
DESLIGUE O ALARME
Se você quiser desativar temporariamente o alarme, pressione o botão
SNOOZE (5), a interrupção dura 9 minutos, após o qual o alarme novamente.
A operação “pode ser repetida várias vezes em uma hora. Para desativar
permanentemente o alarme, pressione a tecla ALARM OFF (1). O alarme
permanece ativo durante 24 horas depois. Para desativar a ação da tecla
ALARM (4) para desligar o alarme. indicação de alarme (12).
1. Botão On / Standby / Al Off
2. botão PRESET / MEM +
3. Botão Tun + / MINUTE
4. Botão Vol + / Alarm
5. Botão Snooze
6. compartimento da bateria
7. Exibir
8. indicação SLEEP
9. botão Tun- / HOUR
10. botão SLEEP
11. Botão TIME SET
12. Buzzer / Radio Al.
13. Alto-falante
14. Botão Vol.
PORTUGUÊS

RC 827 D FM ALARM CLOCK
10
NOTE

11
11
INFORMAZIONIAGLIUTENTIaisensidelDecreto
Legislativo N° 49 del 14 Marzo 2014
“Attuazione della Direttiva 2012/19/UE sui rifiuti di appa-
recchiature elettriche ed elettroniche (RAEE)”
Il simbolo del cassonetto barrato riportato sull’apparec-
chiatura indica che il prodotto alla fine della propria vita
utile deve essere raccolto separatamente dagli altri rifiuti.
L’utente dovrà, pertanto, conferire l’apparecchiatura integra
dei componenti essenziali giunta a fine vita agli idonei centri
diraccoltadifferenziatadeirifiutielettroniciedelettrotecnici,
oppurericonsegnarlaalrivenditorealmomentodell’acquisto
di nuova apparecchiatura di tipo equivalente, in ragione di
uno a uno, oppure 1 a zero per le apparecchiature aventi
lato maggiore inferiore a 25 cm. L’adeguata raccolta diffe-
renziataperl’avviosuccessivodell’apparecchiaturadimessa
al riciclaggio, al trattamento e allo smaltimento ambientale
compatibile contribuisce ad evitare possibili effetti negativi
sull’ambiente e sulla salute e favorisce il riciclo dei materiali
dicuiècompostal’apparecchiatura.Losmaltimentoabusivo
del prodotto da parte dell’utente comporta l’applicazione
delle sanzioni amministrative di cui al D.Lgs n. Decreto
Legislativo N° 49 del 14 Marzo 2014.
Precautions for correct disposal of the product.
The symbol shown on the equipment indicates that waste must
be disposed of in “separate collection” and so the product must
not be disposed of together with urban waste.
Theuser musttaketheproducttospecial“separatewastecollection
centres” provided by local government, or deliver it to the retailer
against the purchase of a new product.
Separate collection of waste and subsequent treatment, recycling
and disposal operations promotes the production of equipment
withrecycledmaterialsandlimitsnegativeeffectsontheenvironment
and on health caused by improper handling of waste.
Illegal disposal of the product leads to the enforcement of admi-
nistrative penalties.
Recommandations pour l’élimination correcte
du produit.
Le symbole figurant sur l’appareil indique que le produit fait l’objet
d’une “ collecte séparée “. C’est pourquoi, le produit ne doit pas
être éliminé avec les déchets urbains.
L’utilisateur doit remettre le produit auprès de “ décharges spécia-
lisées de collecte séparée “ prévues par les autorités locales, ou
bien le rendre au revendeur quand il achètera un nouvel appareil
équivalent.
La collecte séparée du produit et les opérations successives de
traitement, recyclage et élimination favorisent la production d’ap-
pareils composés par des matériaux recyclés ainsi que permettent
d’éviter des effets négatifs sur l’environnement et sur la santé des
personnes suite à une gestion impropre du déchet.
Toute élimination abusive du produit entraîne l’application de
sanctions administratives.
Hinweise zur ordnungsgemäßen Entsorgung des
Produkts.
Das auf dem Gerät angebrachte Symbol weist darauf hin, dass
das Altgerät “getrennt zu sammeln” ist und das Produkt daher
nicht zusammen mit dem Gemeindeabfall entsorgt werden darf.
Der Benutzer muss das Produkt zu den entsprechenden, von der
Gemeindeverwaltungeingerichteten“Wertstoffsammelstellen”brin-
gen oder dem Händler beim Kauf eines neuen Produkts übergeben.
Diegetrennte MüllsammlungundanschließendeAufbereitung,Wie-
derverwertungundEntsorgungförderndieHerstellungvonGeräten
unter Verwendung wiederverwerteter Materialien und vermindern
die negativen Auswirkungen auf die Umwelt und Gesundheit in
Folge einer falschen Müllverwaltung.
Die widerrechtliche Entsorgung des Produkts führt zur Auferlegung
von Verwaltungsstrafen.
Advertencias para la correcta eliminación del
producto.
El símbolo que aparece en el aparato indica que el residuo debe ser
objeto de “recogida selectiva” por tanto el producto no se debe eliminar
junto con residuos urbanos.
El usuario deberá entregar el producto a los “centros de recogida
selectiva” creados por las administraciones municipales o bien al
distribuidor cuando adquiera un nuevo producto.
La recogida selectiva del residuo y las sucesivas operaciones de trata-
miento,recuperación yeliminaciónfavorecenlafabricacióndeaparatos
con materiales reciclados y limitan los efectos negativos en el medio
ambiente y la salud causados por una gestión incorrecta del residuo.
La eliminación abusiva del producto da lugar a la aplicación de san-
ciones administrativas.
CORRECT DISPOSAL OF PRODUCT

DICHIARAZIONE DI CONFORMITÀ UE SEMPLIFICATA
Il fabbricante TREVI dichiara ch eil tipo di apparecchiatura radio
RC 827 D è conforme alla direttiva 2014 / 53 / UE.
Il testo completo della dichiarazione di conformità EU è disponibile al
seguente indirizzo Internet
https://www.trevi.it/dms/zidi/TREVI/DOCRC827D.pdf
SIMPLIFIED EU DECLARATION OF CONFORMITY
Hereby TREVI Spa declares that the radio equipment type RC 827 D
is in compliance with directive 2014 / 53 / EU.
The full text of the EU declaration of conformity is available at the
following internet address
https://www.trevi.it/dms/zidi/TREVI/DOCRC827D.pdf
Trevi S.p.A.
Strada Consolare Rimini-San Marino, 62 47924 Rimini (RN) Italy
Tel. 0541/756420 - Fax 0541/756430 - www.trevi.it - e-mail:
Made in CHINA
EN If you will not find your language on the instruction manual,
please go on our website www.trevi.it to find it
FR Si vous ne trouverez pas votre langue sur le mode d’emploi,
veuillez vous visiter sur notre site Web www.trevi.it de le trouver
DE Wenn Sie Ihre Sprache auf die Bedienungsanleitung nicht finden,
gehen Sie bitte auf unsere Webseite www.trevi.it zu finden
ES Si no encuentras tu idioma en el manual de instrucciones,
por favor vaya a nuestra página web www.trevi.it se encuentra
PT Se você não vai encontrar sua língua sobre o manual de instruções,
por favor, vá em nosso site www.trevi.it para encontrá-lo
Table of contents
Languages:
Other Trevi Clock Radio manuals
Popular Clock Radio manuals by other brands

Coby
Coby CRA54 - Digital Alarm Clock Specification sheet

HoMedics
HoMedics SoundSpa IB-SS4000B Instruction manual and warranty

Emerson Research
Emerson Research SMARTSET CKS3029C user manual

RCA
RCA RP3722 operating instructions

Sangean
Sangean RS-332 operating instructions

Electrohome
Electrohome EAAC500 user manual