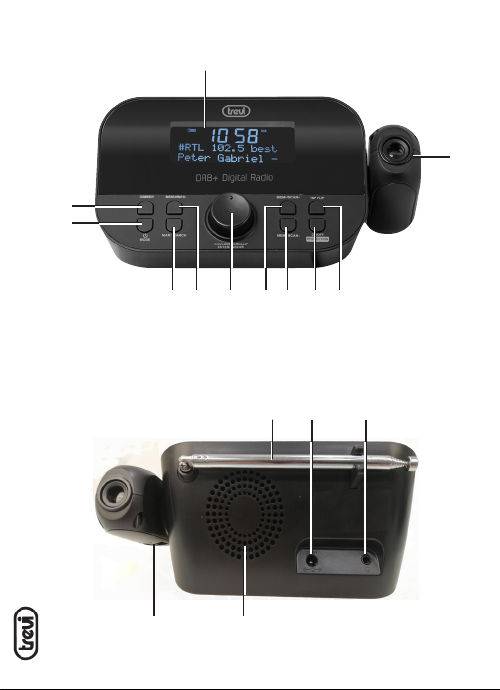
Trevi RC 85D8 DAB User manual

RC 85D8 DAB
Guida d’uso - User guide
RADIO SVEGLIA CON SISTEMA DAB/ DAB+/ FM
Manuale d'uso e collegamento
CLOCK RADIO ALARM WITH DAB/ DAB + / FM SYSTEM
User Manual
ALARME RADIO AVEC SYSTÈME DAB/ DAB+/ FM
Manuel utilisateur
RADIOALARM MIT DAB/ DAB+/ FM-SYSTEM
Benutzerhandbuchl
ALARMA DE RADIO CON SISTEMA DAB/ DAB+/ FM
Manual de usuario
* Per informazioni integrative e aggiornamenti di questo prodotto vedi: www.trevi.it
*For additional information and updates of this product see: www.trevi.it
Italiano - English - Française - Deutsch - Español
PRESA
CUFFIA
BIG
DISPLAY
DAB/FM
RADIO
DUAL
ALARM


RC 85D8 DAB
11
1
2
3
4 6 8 9 1075
12 13 14
15 16

RC 85D8 DAB
Note d’uso
Non usare alimentatori con un voltaggio superiore a 5V , causa il danneggia-
mento dell’apparecchio.
• Ascoltare a volume alto per lungo tempo,potrebbe danneggiare il vostro udito.
• Evitare di posizionare il riproduttore:
- Vicino a campi magnetici.
- Vicino a fonti di calore come caloriferi e stufe.
- In luoghi molto umidi come stanze da bagno,piscine, ecc...
- In luoghi molto polverosi.
- In luoghi soggetti a forti vibrazioni.
• Posizionare l’apparecchio in modo che ai suoi lati ci sia sempre abbastanza
spazio per la libera circolazione di aria (almeno 5cm).
• Se dei liquidi penetrano all’interno dell’apparecchio scollegare
immediatamente la spina dalla presa e portare l’apparecchio al più vicino
centro assistenza autorizato TREVI.
• Controllare sempre prima di collegare l’apparecchio,che i cavi di alimentazione
e di collegamento siano installati correttamente.
• Nessuna sorgente di amma nuda, quali candele accese, dovrebbe essere posta
sull’apparecchio.
• L’apparecchio non deve essere esposto a stillicidio o a spruzzi d’acqua e nessun
oggetto pieno di liquido,quali vasi, deve essere posto sull’apparecchio.
• Conservare il presente manuale per futuri riferimenti.
Cura e manutenzione
Per la pulizia si consiglia l’uso di un panno morbido,leggermente inumidito.Evitate
solventi o sostanze abrasive.
Importante
La buona costruzione di questo apparecchio ne garantisce per lungo tempo il
perfetto funzionamento. Se tuttavia dovesse presentarsi qualche inconveniente,
sarà opportuno consultare il più vicino Centro Assistenza autorizzato.
TREVI persegue una politica di continua ricerca e sviluppo. Pertanto i prodotti
possono presentare caratteristiche diverse da quelle descritte.
Italiano
Per evitare possibili danni all’udito,limitare il tempo di ascolto a
volumi elevati.

RC 85D8 DAB
1. Display
2. Tasto DIMMER
3. Tasto : Stand-by/MODE
4. Tasto PRESET/SCAN
5. Tasto MENU/INFO
6. VOLUME/ SCROLL/ ENTER/ SNOOZE
7. Tasto P+/ TUNE+
8. Tasto P-/ TUNE-
9. Tasto Projection ON/OFF
10.Tasto 180° FLIP
11. Proiettore
12. Antenna telescopica
13. Presa di alimentazione
14. Presa Cufa
15. Controllo rotativo per messa a
fuoco della proiezione.
16. Altoparlante
Descrizione comandi
Italiano
Installazione
Inserire la spina dell’alimentatore in dotazione nella presa di alimentazione (13) e
collegare l’alimentatore ad una presa di corrente 110-230V~ 50/60Hz.
Funzionamento
Accensione/Standby:
1. Premere il tasto Stand-by/MODE (3) per accendere l’apparecchio;
2. Tenere premuto nuovamente per 2 secondi il tasto Stand-by/MODE (3) per
portare l’apparecchio in modalità Stand-by (sul display rimane visualizzata l’ora
e la data).
Regolazione Volume
Ruotare la manopola VOLUME/SCROLL/ENTER/SNOOZE (6) per aumentare o
diminuire il volume.
Regolazione Ora
L’ora si imposterà automaticamente accendendo l’apparecchio in modalità DAB,se
volete impostarla manualmente:
1. Premere il tasto Stand-by/MODE (3) per accendere l’apparecchio;
2. Tenere premuto per 2 secondi il tasto MENU/INFO (5);
3. Ruotare la manopola VOLUME/ SCROLL (6) e selezionare la voce“System”,
premere la manopola VOLUME/ SCROLL (6) per selezionarla;
4. Ruotare la manopola VOLUME/ SCROLL (6) e selezionare la voce“Time”,
premere la manopola VOLUME/ SCROLL (6) per selezionarla;
5. Ruotare la manopola VOLUME/ SCROLL (6) e selezionare la voce“Set Time/
Date”, premere la manopola VOLUME/ SCROLL (6) per selezionarla;
6. Ruotare la manopola VOLUME/ SCROLL (6) per regolare l’ora e premere la
manopola VOLUME/ SCROLL (6) per confermarla e passare alla regolazione dei
minuti;
7. Regolare anche la data utilizzando sempre la manopola VOLUME/ SCROLL (6).

RC 85D8 DAB Italiano
Impostazione Sveglia
Per impostare l’allarme 1 o 2,seguire i passi successivi:
1. In modalità orologio (Stand-by), tenere premuto per 2 secondi il tasto MENU
INFO (5), alla voce“System” premere la manopola VOLUME/ SCROLL (6);
2. Ruotare la manopola VOLUME/ SCROLL (6) e selezionare la voce“Alarm”,
premerla per selezionarla;
3. Ruotare la manopola VOLUME/ SCROLL (6) e selezionare“Alarm 1”o “Alarm 2”,
premerla per confermare;
4. Ruotare la manopola VOLUME/ SCROLL (6) per regolare l’ora e premerla per
confermarla e passare alla regolazione dei minuti;
5. Ruotare la manopola VOLUME/ SCROLL (6) per regolare la durata e premerla
confermarla;
6. Ruotare la manopola VOLUME/ SCROLL (6) per selezionare il tipo di suoneria
(FM, DAB o BUZZER) e premerla per confermarla;
7. Ruotare la manopola VOLUME/ SCROLL (6) per selezionare la frequenza (una
volta, giornaliero, settimanale,solo week end) e premerla per confermare;
8. Ruotare la manopola VOLUME/ SCROLL (6) per regolare la data di avvio e
premerla confermarla;
9. Ruotare la manopola VOLUME/ SCROLL (6) per regolare il volume e premerla
per confermare;
10.Ruotare la manopola VOLUME/ SCROLL (6) per attivare o disattivare la sveglia
e premerla per confermare.
Una volta attivata la sveglia sul display comparirà il simbolo della campanella con
il numero 1 per la prima sveglia e numero 2 per la seconda sveglia.
Spegnimento della sveglia
Per arrestare completamente il suono della sveglia (suoneria o radio) premere il
tasto Stand-by/ MODE (3).
Per arrestare momentaneamente il suono della sveglia,premere la manopolaVOLU-
ME/ SCROLL (6); l’interruzione dura 9 minuti,trascorsi i quali la sveglia si riaccende.
Radio DAB/DAB+
Scansione automatica
1. Regolare l’estensione dell’antenna e l’angolo per ottenere la migliore ricezione;
2. Tenere premuto per qualche secondo il tasto PRESET/ SCAN (4) per avviare
la scansione automatica delle stazioni DAB.Durante la scansione, il display
mostrerà la barra di avanzamento e il numero di stazioni memorizzate;
3. Tenere premuto per qualche secondo il tasto P+/ TUNE+ (7) oppure il tasto P-/
TUNE- (8), ruotare la manopola VOLUME/ SCROLL (6) per selezionare la stazio-
ne desiderata; premere la manopola VOLUME/ SCROLL (6) per confermare e
avviare l’ascolto della stazione.
Note:
- Potrebbe essere necessario attendere qualche secondo che l’unità si sintonizzi sul
nuovo canale.

RC 85D8 DAB
- In modalità DAB la data e l’ora del dispositivo vengono sincronizzati con quelli
della stazione che si stà ascoltando.
Scansione manuale
1. Tenere premuto per 2 secondi il tasto MENU/ INFO (5);
2. Ruotare la manopola VOLUME/ SCROLL (6) e selezionare la voce“Manual Tune”,
premere la manopola VOLUME/ SCROLL (6) per selezionarla;
3. Ruotare la manopola VOLUME/ SCROLL (6) per selezionare il canale desiderato
(es: 5A-13F), premere la manopola VOLUME/ SCROLL (6) per selezionarlo.
Nota: Si possono memorizzare no a 30 stazioni. Una frequenza memorizzata può
essere cancellata dalla memoria memorizzando un’altra frequenza al suo posto.
Informazioni trasmissione DAB/DAB+
In modalità DAB,sul display,verranno visualizzate una serie di informazioni relative
alla stazione in ascolto.
1. Premere ripetutamente il tasto MENU/ INFO (5) per cambiare le informazioni
visualizzate.
Nota: non tutte le stazioni DAB forniscono informazioni visualizzabili all’apparecchio.
DLS: visualizza informazioni relative al brano musicale trasmesso (artista, titolo
brano, ecc...).
Potenza segnale:visualizza le informazioni relative alla potenza del segnale
tramite una barra sul display, più il segnale è forte, più la barra risulterà piena.
Tipo programma:visualizza le informazioni relative al tipo di programma
trasmesso.
Nome trasmittente:visualizza le informazioni relative al trasmittente del
servizio.
Numero/Frequenza trasmittente:visualizza le informazioni relative a numero
e frequenza della stazione DAB/DAB+ trasmessa.
Bit Rate: visualizza informazioni relative al rapporto di compressione della
trasmissione corrente.Più è alto il valore,migliore è la qualità della
trasmissione.
Ora/Data:visualizza informazioni relative all’orario e alla data della
trasmissione corrente.
Menu DAB/DAB
+
1. In modalità DAB,tenere premuto per qualche secondo il tasto MENU/ INFO (5);
2. Ruotare la manopola VOLUME/ SCROLL (6) per selezionare la voce desiderata
tra: Full Scan, Preset Recall, Preset Store, Manual tune, DRC, Prune,TA, System;
3. Premere la manopola VOLUME/ SCROLL (6) per selezionare la voce desiderata
ed entrare nelle sue impostazioni:
A)Full scan (Ricerca completa): permette di scansionare l’intera banda DAB/
DAB+.
B)Preset Recall (richiamo stazione memorizzata):selezionare una stazione
Radio tra quelle memorizzate.
C)Preset Store: permette di memorizzare una stazione.
Italiano

RC 85D8 DAB
D)Manual tune (Sintonizzazione manuale): permette di scansionare
manualmente una singola frequenza DAB/DAB+.
E) DRC: permette di abilitare/disabilitare la funzione DRC per migliorare il suono
durante l’ascolto in ambienti rumorosi.È possibile impostare il livello di DRC in
alto (high), basso (low) o OFF (spento).
F) Prune (Elimina): permette di eliminare dalla lista delle stazioni memorizzate
tutte le radio trovate ma non disponibili (scarso segnale o inattive). Ruotare la
manopola VOLUME/ SCROLL (6) su Y (YES) e confermare l’eliminazione
premendo la manopola VOLUME/ SCROLL (6).
G)TA: On, Off.
H)System (Sistema):Permette di accedere al sottomenù di sistema:
1. Sleep: Per impostare l’autospegnimento (Sleep off, 15min, 30min, 45min,
60min e 90min).
2. Alarm: Per impostare Alarm1 e Alarm 2.
3.Time:
- Set Time/Date: Impostazione data/ora.
- Auto Update: Aggiornamento data e ora automatico da sorgente
oppure Off.Si consiglia di tenerlo impostato “Aggiornamento da DAB”
per evitare spostamenti continui d’orario.
- Set 12/ 24 hour: Impostazione formato ora 12/24 ore.
- Set data format: Impostazione formato data.
4. Language: E’possibile scegliere la lingua dei menù;sono disponibili Inglese
(default), Italiano, Deutsch, Francais, Nederlands, Espanol, Dansk.
5. Factory Reset (Ripristino valori di fabbrica): permette di ripristinare le
impostazioni di fabbrica dell’apparecchio.
6. SW version (Versione del software): permette di visualizzare la versione del
software dell’apparecchio.
Radio FM
1. Regolare l’estensione dell’antenna e l’angolo per ottenere la migliore ricezione;
2. Premere il tasto Stand-by/ MODE (3) per accendere l’unità;
3. Premere ripetutamente il tasto Stand-by/ MODE (3) e selezionare la moda-
lità FM.
Scansione automatica:
4. Tenere premuto per 3 secondi il tasto PRESET/ SCAN (4) per avviare la scansio-
ne e memorizzazione automatica delle stazioni;
5. A ne scansione utilizzare i tasti P+/ TUNE+ (7) e P-/ TUNE- (8) per selezionare
una stazione radio memorizzata.
Nota: La sensibilità della scansione automatica è regolabile nel Menu.
Scansione manuale e memorizzazione:
1. Tenere premuto per qualche secondo il tasto P+/ TUNE+ (7) o P-/ TUNE- (8) e
rilasciare,per sintonizzarsi sulla stazione radio successiva o precedente;
2. Per memorizzare una stazione radio:
Italiano

RC 85D8 DAB
- Portarsi sulla frequenza da memorizzare e premere il tasto PRESET/ SCAN (4);
- Ruotare la manopola VOLUME/ SCROLL (6) per selezionare il numero dove
memorizzare la stazione;
- Premere la manopola VOLUME/ SCROLL (6) per per confermare.
Informazioni trasmissione FM
In modalità FM, sul display verranno visualizzate una serie di informazioni relative
alla stazione in ascolto.
1. Premere ripetutamente il tasto MENU/ INFO (5) per cambiare le informazioni
visualizzate.
Nota: non tutte le stazioni FM forniscono le informazioni visualizzabili
dall’apparecchio.
Informazioni RDS: visualizza informazioni relative alla stazione FM.
PTY,Tipo programma: visualizza le informazioni relative al tipo di programma
trasmesso.
Frequenza di trasmissione: visualizza la frequenza di trasmissione.
Ricezione: visualizza sel la ricezione è Mono o Stereo.
Ora: visualizza informazioni relative all’orario della trasmissione corrente.
Data: visualizza informazioni relative alla data della trasmissione corrente.
Menu
FM
1. In modalità FM,tenere premuto per qualche secondo il tasto MENU/ INFO (5);
2. Ruotare la manopola VOLUME/ SCROLL (6) per selezionare la voce desiderata
tra: Preset Recall, Preset Store, Scan Setting, Audio setting, System;
3. Premere la manopola VOLUME/ SCROLL (6) per selezionare la voce desiderata
ed entrare nelle sue impostazioni.
A)Preset Recall (richiamo stazione memorizzata):selezionare una stazione
Radio tra quelle memorizzate
B)Preset Store: permette di memorizzare una stazione.
C)Scan setting (impostazioni scansione):permette di scegliere il tipo si
scansione:
- All stations: Scansione di tutte le stazioni.
- Strong stations: Scansione delle sole stazioni con segnale più forte.
D)Audio setting: permette di selezionare tra trasmissioni Stereo o Mono.
E) System (Sistema):Permette di accedere al sottomenù di sistema:
1. Sleep: Per impostare l’autospegnimento (Sleep off, 15min, 30min, 45min,
60min e 90min).
2. Alarm: Per impostare Alarm1 e Alarm 2.
3.Time:
- Set Time/Date: Impostazione data/ora,
- Auto Update: Aggiornamento data e ora automatico,
- Set 12/ 24 hour: Impostazione formato ora 12/24 ore,
- Set data format: Impostazione formato data.
4. Language: E’possibile scegliere la lingua dei menù;sono disponibili Inglese
Italiano

RC 85D8 DAB
(default), Italiano, Deutsch, Francais.
5. Factory Reset (Ripristino valori di fabbrica): permette di ripristinare le
impostazioni di fabbrica dell’apparecchio.
6. SW version (Versione del software): permette di visualizzare la versione del
software dell’apparecchio.
Proiezione
Accensione/ Spegnimento e regolazione
1. Premere il tasto Projection ON/OFF (9) per accendere la proiezione;
2. Premere il tasto 180° FLIP (10) per ruotare di 180° la proiezione se necessario;
3. Regolare il fuoco con il controllo di messa a fuoco (15);
4. Premere il tasto Projection ON/OFF (9) per spegnere la proiezione.
Dimmer
Premere più volte il tasto DIMMER (2) per cambiare l’intensità luminosa del display.
CARATTERISTICHE TECNICHE
Alimentazione: .....................................5V 1000mA
Potenza Audio: .....................................1W
Ricezione banda in FM: .....................87.5 - 108 MHz
Ricezione banda DAB/DAB+:...........174.928 - 239.200 MHz
Dimensioni:............................................150x 80x 80mm
Peso: .........................................................332 gr.
INFORMAZIONIAGLIUTENTIaisensidel DecretoLegislativoN°49del14
Marzo 2014 “Attuazione della Direttiva 2012/19/UE sui riuti di apparecchiature
elettriche ed elettroniche (RAEE)”
Ilsimbolo delcassonettobarratoriportato sull’apparecchiaturaindicacheilprodotto
alla ne della propria vita utile deve essere raccolto separatamente dagli altri riuti.
L’utente dovrà,pertanto,conferire l’apparecchiatura integra dei componenti essen-
ziali giunta a ne vita agli idonei centri di raccolta differenziata dei riuti elettronici
ed elettrotecnici, oppure riconsegnarla al rivenditore al momento dell’acquisto di
nuova apparecchiatura di tipo equivalente,in ragione di uno a uno,oppure 1 a zero
per le apparecchiature aventi lato maggiore inferiore a 25cm. L’adeguata raccolta
differenziata per l’avvio successivo dell’apparecchiatura dimessa al riciclaggio, al
trattamento e allo smaltimento ambientale compatibile contribuisce ad evitare
possibili effetti negativi sull’ambiente e sulla salute e favorisce il riciclo dei materiali
di cui è composta l’apparecchiatura.Lo smaltimento abusivo del prodotto da parte
dell’utente comporta l’applicazione delle sanzioni amministrative di cui al D.Lgs n.
Decreto Legislativo N° 49 del 14 Marzo 2014.
Italiano

RC 85D8 DAB
Usage Notes
Donotusepowersupplywithavoltagehigherthan5V ,causedamagetotheplayer.
• Listen at high volume for long periods of time, may damage your hearing.
• Avoid using it in the following cases:
- Near strong heat sources, such as central heating plants or stoves.
- In very humid places such as bathrooms,swimming pools, etc...
- In very dusty places.
- In places subject to strong vibrations.
- Position the appliance in such a way that there is always enough room for free
air circulation (at least 5cm).
• Do not block the air inlets.
• If any liquid enters the appliance,unplug it immediately from the socket and
take it to the nearest TREVI authorised service centre.
• Before switching on the appliance, always check that the power cable and the
connection cable are properly installed.
• No naked ame sources, such as lighted candles, should be placed on this.
• The apparatus shall not be exposed to dripping or splashing water and no
object lled with water, such as vases, should be placed on the unit.
• Keep this manual for future reference.
Care and maintenance
For cleaning it is recommended to use a soft, slightly damp cloth. Avoid solvents
or abrasive substances.
Important
The construction of this device guarantees long awless operation. However, if
come some problem, you should consult your nearest authorized service center.
TREVI pursues a policy of continuous research and development. Therefore, the
products may show different characteristics from those described.
English
1. Display
2. DIMMER button
3. button: Stand-by/MODE
4. PRESET/ SCAN button
5. MENU/ INFO button
6. VOLUME/ SCROLL/ ENTER/ SNOOZE
7. P+/ TUNE+ button
8. P-/ TUNE- button
9. Projection ON/OFF button
10. 180° FLIP button
11. Projector
12. Antenna (Extend and reposition for
better reception)
13. DC-IN jack (Plug in appropriate AC
adaptor)
14. Headphone jack
15. Focus Thumbwheel
16. Speaker
To avoid possible hearing damage,limit the listening time at
hight volumes
Command

RC 85D8 DAB English
Installation
Insert the plug of the supplied power adapter into the power supply socket (13) and
connect the power supply to a 110-230V ~ 50/60Hz power socket.
OPERATION
Power On/ Standby:
1. Press Stand-by/ MODE (3) button to switch On the unit;
2. Press and hold for 2 seconds Stand-by/ MODE (3) button to put the unit in
Stand-by mode (the display shows time and date).
Volume adjustment
Turn the knob VOLUME/SCROLL/ENTER/SNOOZE (6) to increase or decrease the
volume.
Time Setting
The time will be set automatically by turning on the device in DAB mode, if you
want to set it manually:
1. Press Stand-by/ MODE (3) button to switch on the appliance;
2. Hold down the MENU/ INFO button (5) for 2 seconds;
3. Turn the VOLUME/ SCROLL knob (6) and select“System”; press the VOLUME/
SCROLL knob (6) to select it;
4. Turn the VOLUME/ SCROLL knob (6) and select“Time”; press the VOLUME/
SCROLL knob (6) to select it;
5. Turn the VOLUME/ SCROLL knob (6) and select“Set Time/Date”; press the
VOLUME/SCROLL knob (6) to select it;
6. urn the VOLUME/ SCROLL knob (6) to adjust the hour and press the VOLUME/
SCROLL knob (6) to confirm it and go to setting the minutes;
7. Also adjust the date using the VOLUME/ SCROLL knob (6).
Setting Alarm
To set alarm 1 or 2,follow the next steps:
1. In clock mode (Stand-by), press and hold for 2 seconds MENU/ INFO button (5);
select “System” and press the VOLUME/ SCROLL knob (6) to conrm;
2. Turn the VOLUME/ SCROLL knob (6) and select the“Alarm”item, press it to
select it;
3. Turn the VOLUME/ SCROLL knob (6) and select“Alarm 1” or“Alarm 2”, press it to
conrm;
4. urn the VOLUME/ SCROLL knob (6) to adjust the hour and press it to conrm it
and move on to the minute setting;
5. Turn the VOLUME/ SCROLL knob (6) to adjust the duration and press to
conrm;

RC 85D8 DAB
6. Turn the VOLUME/ SCROLL knob (6) to select the ringtone type (FM, DAB or
BUZZER) and press it to conrm it;
7. Turn the VOLUME/ SCROLL knob (6) to select the frequency (once, daily,weekly,
weekend only) and press it to conrm;
8. Turn the VOLUME/ SCROLL knob (6) to adjust the start date and press to
conrm it;
9. Turn the VOLUME/ SCROLL knob (6) to adjust the volume and press it to
conrm;
10. Rotate the VOLUME/ SCROLL knob (6) to activate or deactivate the alarm and
press it to conrm.
Once the alarm is activated,the bell symbol will appear on the display with the
number 1 for the rst alarm and number 2 for the second alarm.
Turn off the alarm
Tostopthealarm completely(ringtoneorradio)press Stand-by/MODE(3)button.
To temporarily stop the alarm sound, press the VOLUME/ SCROLL knob (6); the
interruption lasts 9 minutes,after which the alarm goes back on.
DAB/DAB+ Radio
Automatic Storage
1. Adjust the antenna extension and the angle to get the best reception;
2. Press and hold the PRESET/ SCAN button (4) for a few seconds to start the
automatic scan of the DAB stations.During the scan,the display will show the
progress bar and the number of stored stations;
3. Hold down the P+/ TUNE+ key (7) or the P-/ TUNE- key (8) for a few seconds,
turn the VOLUME/ SCROLL knob (6) to select the desired station; press the
VOLUME/ SCROLL knob (6) to conrm and start listening to the station.
Note:
- It may be necessary to wait a few seconds for the unit to tune to the new channel.
- In DAB mode the date and time of the device are synchronized with those of the
station being listened to.
Manual Scan
1. Hold down the MENU/ INFO button (5) for 2 seconds;
2. Turn the VOLUME/ SCROLL knob (6) and select the“Manual Tune”item, press
the VOLUME/ SCROLL knob (6) to select it;
3. Turn the VOLUME/ SCROLL knob (6) to select the desired channe (5A-13F),
press the VOLUME/ SCROLL knob (6) to select it.
Note: Up to 30 stations can be stored. A stored frequency can be erased from the
memory by storing another frequency in its place.
DAB/DAB+ information
In DAB function press the MENU/ INFO button (5) repeatedly to change the infor-
mation displayed:
English

RC 85D8 DAB
Top line:
Station channel and frequency for the current station will be shown on the top
line.
Bottom line:
a. Scrolling text broadcast by most DAB stations
b. DAB ensemble
c. Type of content being broadcast. E.g. Sport, Pop music.
d. DAB Station name
e. DAB frequency
f. Signal error
g. 80kbps/DAB
Nota: not all DAB stations provide information that can be viewed by the device.
DAB/DAB
+
Menu
1. In DAB mode, hold down the MENU/ INFO button (5) for a few seconds;
2. Turn the VOLUME/ SCROLL knob (6) to select the desired item from: Full Scan,
Manual tune, DRC, Prune, TA, System;
3. Press the VOLUME/ SCROLL knob (6) to select the desired item and enter its
settings.
A) Full Scan – Automatically scan DAB+ stations
B) Preset Recall - select a radio station from those stored.
C) Preset Store - allows you to store a station.
D)Manual Tune – manual tune
E) DRC – off, low, high
F) Prune – yes, no
G) TA - On, Off.
H) System –
1. Sleep – off, 15, 30, 45, 60, 90 (minutes)
2. Alarm - To set Alarm 1 and Alarm 2.
3.Time:
- Set Time/Date
- Auto update - Automatic update of date and time from source
or Off.It is advisable to keep it set to“Update from DAB” to avoid
continuous time shifts.
- Set 12/ 24 hour - Set AM/PM or 24 hour.
- Set date format - DD MM YYYY, MM DD YYYY
4. Language – English, Deutsch, Italiano, Francais, Nederlands, Espanol, Dansk.
5. factory reset – No or Yes
6. SW version
FM Radio
1. Extend the antenna and reposition for better reception;
2. Press Stand-by/ MODE (3) button to turn On the unit;
English

RC 85D8 DAB English
3. Press Repeatedly Stand-by/ MODE button (3) and select FM mode.
Automatic storage:
4. Press and hold for 3 seconds PRESET/ SCAN (4) button to start scanning and
automatic storage of the stations;
5. At the end of the scan, use the P+/ TUNE + (7) and P-/ TUNE- (8) keys to select a
memorized radio station.
Note: The automatic scan sensitivity is adjustable by Menu.
Manual search and storage:
1. Press and hold the P+/ TUNE+ (7) or P-/ TUNE- (8) key for a few seconds to tune
in to the next or previous radio station;
2. To store a radio station:
- Move to the frequency to be stored and press the PRESET/ SCAN button (4);
- Turn the VOLUME/ SCROLL knob (6) to select the number where to store the
station;
- Press the VOLUME/ SCROLL knob (6) to conrm.
FM broadcast information
Press MENU/ INFO (5) button to view:
Top line:
Station name,reception type.
Bottom line:
a. Information (provided by the radio station).
b. information relating to the type of program broadcast.
c. Frequency.
d. Stereo/mono.
e. Time.
f. Date.
FM
Menu
1. In FM mode, hold down the MENU/ INFO key (5) for a few seconds;
2. Turn the VOLUME/ SCROLL knob (6) to select the desired item from: Preset
Recall, Preset Store, Scan Setting, Audio setting, System;
3. Press the VOLUME/ SCROLL knob (6) to select the desired item and enter its
settings.
A)Scan setting
1. All Stations
2. Strong Stations
B)Audio setting
1. Stereo Allowed
2. Forced Mono
C) System
1. Sleep – Choose between OFF, 15,30,45, 60,90 minutes
2. Alarm - To set Alarm 1 and Alarm 2.

RC 85D8 DAB English
3.Time:
- Set Time/date
- Auto update - Automatic update of date and time from source
or Off.It is advisable to keep it set to“Update from DAB” to avoid
continuous time shifts.
- Set 12/ 24 hour - Set AM/PM or 24 hour.
- Set date format - DD MM YYYY, MM DD YYYY
4. Language – English, Deutsch, Italiano, Francais, Nederlands, Espanol, Dansk.
5. Factory reset – No or Yes
6. SW version
Projection
Power ON/OFF and adjustment
1. Press the Projection ON/OFF button (9) to switch on the projection;
2. Press the 180° FLIP button (10) to rotate the projection 180° if necessary;
3. Scroll Focus Thumbwheel (15) for setting the best projection clock image;
4. Press the Projection ON/ OFF button (9) to switch off the projection.
Dimmer
Press the DIMMER button (2) several times to change the display light.
TECHNICAL FEATURES
Power: ......................................................5V 1000mA
Power Audio: ........................................1W
FM band reception: ............................87.5 - 108 MHz
DAB/DAB+ band reception: ............174.928 - 239.200 MHz
Dimensions: ..........................................150x 80x 80mm
Weight: ....................................................332 gr.
Precautions for correct disposal of the product.
The symbol shown on the equipment indicates that waste must be disposed of in
“separate collection”and so the product must not be disposed of together with
urban waste.The user must take the product to special“separate waste collection
centres”provided by local government, or deliver it to the retailer against the
purchase of a new product.
Separate collection of waste and subsequent treatment,recycling and disposal
operations promotes the production of equipment with recycled materials and
limits negative effects on the environment and on health caused by improper
handling of waste.Illegal disposal of the product leads to the enforcement of
administrative penalties.

RC 85D8 DAB
Notes d’emploi
Ne pas utiliser les alimentateurs avec une tension supérieure à 5V . Cela cause
un endommagement du lecteur.
• Ne pas écouter à un volume trop élevé à plusieurs reprises. Cela pourrait
endommager votre ouïe.
• Éviter de placer le lecteur:
- Près de champs magnétiques.
- Près de sources de chaleur comme des radiateurs et des poêles.
- Dans des endroits très humides comme les salles de bains, les piscines,etc...
- Dans des endroits très poussiéreux.
- Dans des endroits exposés à de fortes vibrations.
• Placez l’appareil de sorte qu’il y ait toujours assez d’espace sur les côtés pour
permettre la libre circulation de l’air (au moins 5cm).
• Si des liquides pénètrent à l’intérieur de l’appareil, débranchez immédiatement
la fiche de la prise de courant et portez-le au centre de réparation TREVI le plus
proche.
• Avant de recharger l’appareil,vérifiez toujours que les câbles d’alimentation et
de connexion sont correctement installés.
• Aucune source de flamme nue, telle que des bougies allumées,ne doit être
placée sur l’appareil.
• L’appareil ne doit pas être exposé à des gouttes d’eau ni à des éclaboussures
d’eau et aucun objet contenant des liquides,tels que des vases,ne doit être
placé sur l’appareil.
• Conservez ce manuel pour référence ultérieure.
Maniement et entretien
Pourlenettoyage,il estconseilléd’utiliser unchiffondoux,légèrementhumide.Évitez
l’emploi de solvants ou de substances abrasives.
Important
La bonne fabrication de cet appareil garantit un fonctionnement parfait pour une
longue période.Si toutefois quelques inconvénients devaient se présenter,adressez-
vous au Centre d’Assistance agréé le plus proche.
TREVI poursuit une politique de recherche et de développement continus. C’est
pourquoisesproduits peuventprésenterdescaractéristiquesdifférentesparrapport
à celles qui sont décrites.
Française
Pour éviter d’éventuels dommages auditifs,limiter le temps
d’écoute à volume élevé.

RC 85D8 DAB Française
Installation
Insérez la che de l’adaptateur secteur fourni dans la prise d’alimentation (13) et
branchez-la à une prise 110-230V ~ 50/60Hz.
Opération
Marche/Standby:
1. Appuyez sur le bouton Stand-by/ MODE (3) pour mettre l’appareil en
marche;
2. Appuyez à nouveau sur le bouton Stand-by/ MODE (3) et maintenez-le
enfoncé pendant 2 secondes pour mettre l’appareil en mode Stand-by (l’heure
et la date restent afchées).
Réglage du Volume
Tournez le bouton VOLUME/SCROLL/ENTER/SNOOZE (6) pour augmenter ou
diminuer le volume.
Réglage du Temps
L’heure sera réglée automatiquement en allumant l’appareil en mode DAB, si vous
souhaitez le régler manuellement:
1. Appuyez sur le bouton Stand-by/ MODE (3) pour allumer l’appareil;
2. Maintenez le bouton MENU/ INFO (5) enfoncé pendant 2 secondes;
3. Tournez le bouton VOLUME/ SCROLL (6) et sélectionnez l’élément“System”,
appuyez sur le bouton VOLUME/ SCROLL (6) pour le sélectionner;
4. Tournez le bouton VOLUME/ SCROLL (6) et sélectionnez l’élément “Time”,
appuyez sur le bouton VOLUME/ SCROLL (6) pour le sélectionner;
5. Tournez le bouton VOLUME/ SCROLL (6) et sélectionnez l’élément “Set Time/
Date”, appuyez sur le bouton VOLUME/ SCROLL (6) pour le sélectionner;
6. Tournez le bouton VOLUME/ SCROLL (6) pour régler l’heure et appuyez sur le
bouton VOLUME/ SCROLL (6) pour le confirmer et passez au réglage des
minutes;
7. Réglez également la date à l’aide du bouton VOLUME/ SCROLL (6).
1. Afchage
2. Bouton DIMMER
3. Bouton : mise en marche/
Stand-by
4. Bouton PRESET/ SCAN
5. Bouton MENU/INFO
6. VOLUME/ SCROLL/ ENTER/ SNOOZE
7. Bouton P+/ TUNE+
8. Bouton P-/ TUNE-
9. Bouton Projection ON/OFF
10. Bouton 180° FLIP
11. Projecteur
12. Antenne (extension pour une
meilleure réception)
13. Prise DC-IN
14. Prise casque
15. Commande rotative FOCUS à la
projection ne mise au point.
16. Haut-parleur
Description de la commande

RC 85D8 DAB
Réglage de l’alarme
Pour régler l’alarme 1 ou 2,suivez les étapes suivantes:
1. En mode horloge (veille), maintenez le bouton MENU/ INFO (5) enfoncé pe
dant 2 secondes,appuyez sur le bouton VOLUME/ SCROLL (6) sous “System”;
2. Tournez le bouton VOLUME/ SCROLL (6) et sélectionnez l’élément“Alarm”,
appuyez dessus pour le sélectionner;
3. Tournez le bouton VOLUME/ SCROLL (6) et sélectionnez“Alarm 1” ou“Alarm 2”,
appuyez dessus pour conrmer;
4. Tournez le bouton VOLUME/ SCROLL (6) pour régler l’heure et appuyez dessus
pour la conrmer et passer au réglage des minutes;
5. Tournez le bouton VOLUME/ SCROLL (6) pour régler la durée et appuyez sur
pour la conrmer;
6. Tournez le bouton VOLUME/ SCROLL (6) pour sélectionner le type de sonnerie
(FM, DAB ou BUZZER) et appuyez dessus pour le conrmer;
7. Tournez le bouton VOLUME/ SCROLL (6) pour sélectionner la fréquence (une
fois, quotidiennement, hebdomadairement, le week-end uniquement) et
appuyez dessus pour conrmer;
8. Tournez le bouton VOLUME/ SCROLL (6) pour régler la date de début et
appuyez sur pour la conrmer;
9. Tournez le bouton VOLUME/ SCROLL (6) pour régler le volume et appuyez
dessus pour conrmer;
10.Tournez le bouton VOLUME/ SCROLL (6) pour activer ou désactiver l’alarme et
appuyez dessus pour conrmer.
Une fois que l’alarme est activée, le symbole de la cloche s’afche à l’écran avec le
numéro 1 pour la première alarme et le numéro 2 pour la deuxième alarme.
Éteindre l’alarme
Pour arrêter complètement l’alarme (sonnerie ou radio), appuyez sur le button
Stand-by/ MODE (3).
Pour arrêter le son de l’alarme, appuyez sur le bouton VOLUME/ SCROLL (6);l’inter-
ruption dure 9 minutes,après quoi l’alarme se rallume.
Radio DAB/DAB+
Stockage automatique
1. Réglez l’extension de l’antenne et l’angle pour obtenir la meilleure réception
possible;
2. Appuyez sur le bouton PRESET/ SCAN (4) et maintenez-le enfoncé pendant
quelques secondes pour démarrer le balayage automatique des stations DAB.
Pendant le balayage, l’écran afchera la barre de progression et le nombre de
stations enregistrées;
3. Maintenez la touche P+/ TUNE + (7) ou la touche P-/ TUNE- (8) enfoncée
pendant quelques secondes,tournez le bouton VOLUME/ SCROLL (6) pour
sélectionner la station souhaitée; appuyez sur le bouton VOLUME/ SCROLL (6)
pour conrmer et commencer à écouter la station.
Française

RC 85D8 DAB
Remarque:
- Il peut être nécessaire d’attendre quelques secondes pour que l’appareil syntonise
le nouveau canal.
- En mode DAB,la date et l’heure de l’appareil sont synchronisées avec celles de la
station en cours d’écoute.
Scan manuel
1. Maintenez le bouton MENU/ INFO (5) enfoncé pendant 2 secondes;
2. Tournez le bouton VOLUME/ SCROLL (6) et sélectionnez l’élément“Manual
Tune”, appuyez sur le bouton VOLUME/ SCROLL (6) pour le sélectionner;
3. Tournez le bouton VOLUME/ SCROLL (6) pour sélectionner le canal souhaité
(ex: 5A-13F), appuyez sur le bouton VOLUME/ SCROLL (6) pour le sélectionner.
Remarque: Vous pouvez enregistrer jusqu’à 30 stations. Une fréquence stockée peut
être effacée de la mémoire en stockant une autre fréquence à sa place.
Informations DAB/DAB+
En fonction DAB, appuyez sur le bouton MENU/ INFO (5) pour afcher:
Ligne du haut:
Le canal et la fréquence de la station en cours apparaissent sur la ligne du haut.
Ligne de fond:
a. Texte délant diffusé par la plupart des stations DAB
b. Ensemble DAB
c. Type de contenu diffusé. Par exemple.Sport,musique pop
d. Nom de la station DAB
e. Fréquence DAB
f. Erreur de signal
g. 80kbps/DAB
Remarque: toutes les stations DAB ne fournissent pas des informations pouvant être
visualisées par le périphérique.
Menu DAB/DAB
+
1. En mode DAB, maintenez enfoncé le bouton MENU/ INFO (5) pendant quelques
secondes;
2. Tournez le bouton VOLUME/ SCROLL (6) pour sélectionner l’élément souhaité
parmi: Full Scan, Manual tune, DRC, Prune,TA, System;
3. Appuyez sur le bouton VOLUME/ SCROLL (6) pour sélectionner l’élément
souhaité et entrez ses paramètres.
A)Full Scan – Scanner automatiquement les stations DAB.
B) Preset Recall - sélectionnez une station de radio parmi celles enregistrées.
C) Preset Store - vous permet de mémoriser une station.
D)Manual Tune – réglage manuel.
E) DRC – teint, bas, haut.
F) Prune – Oui, Non.
G)TA – On, Off.
Française
Table of contents
Languages:
Other Trevi Clock Radio manuals