manuals.online logo
Brands
  1. Home
  2. •
  3. Brands
  4. •
  5. TREX
  6. •
  7. Automobile Accessories
  8. •
  9. TREX ZROADZ Series User manual

TREX ZROADZ Series User manual

GRILLE Assembly - Complete
Page 1
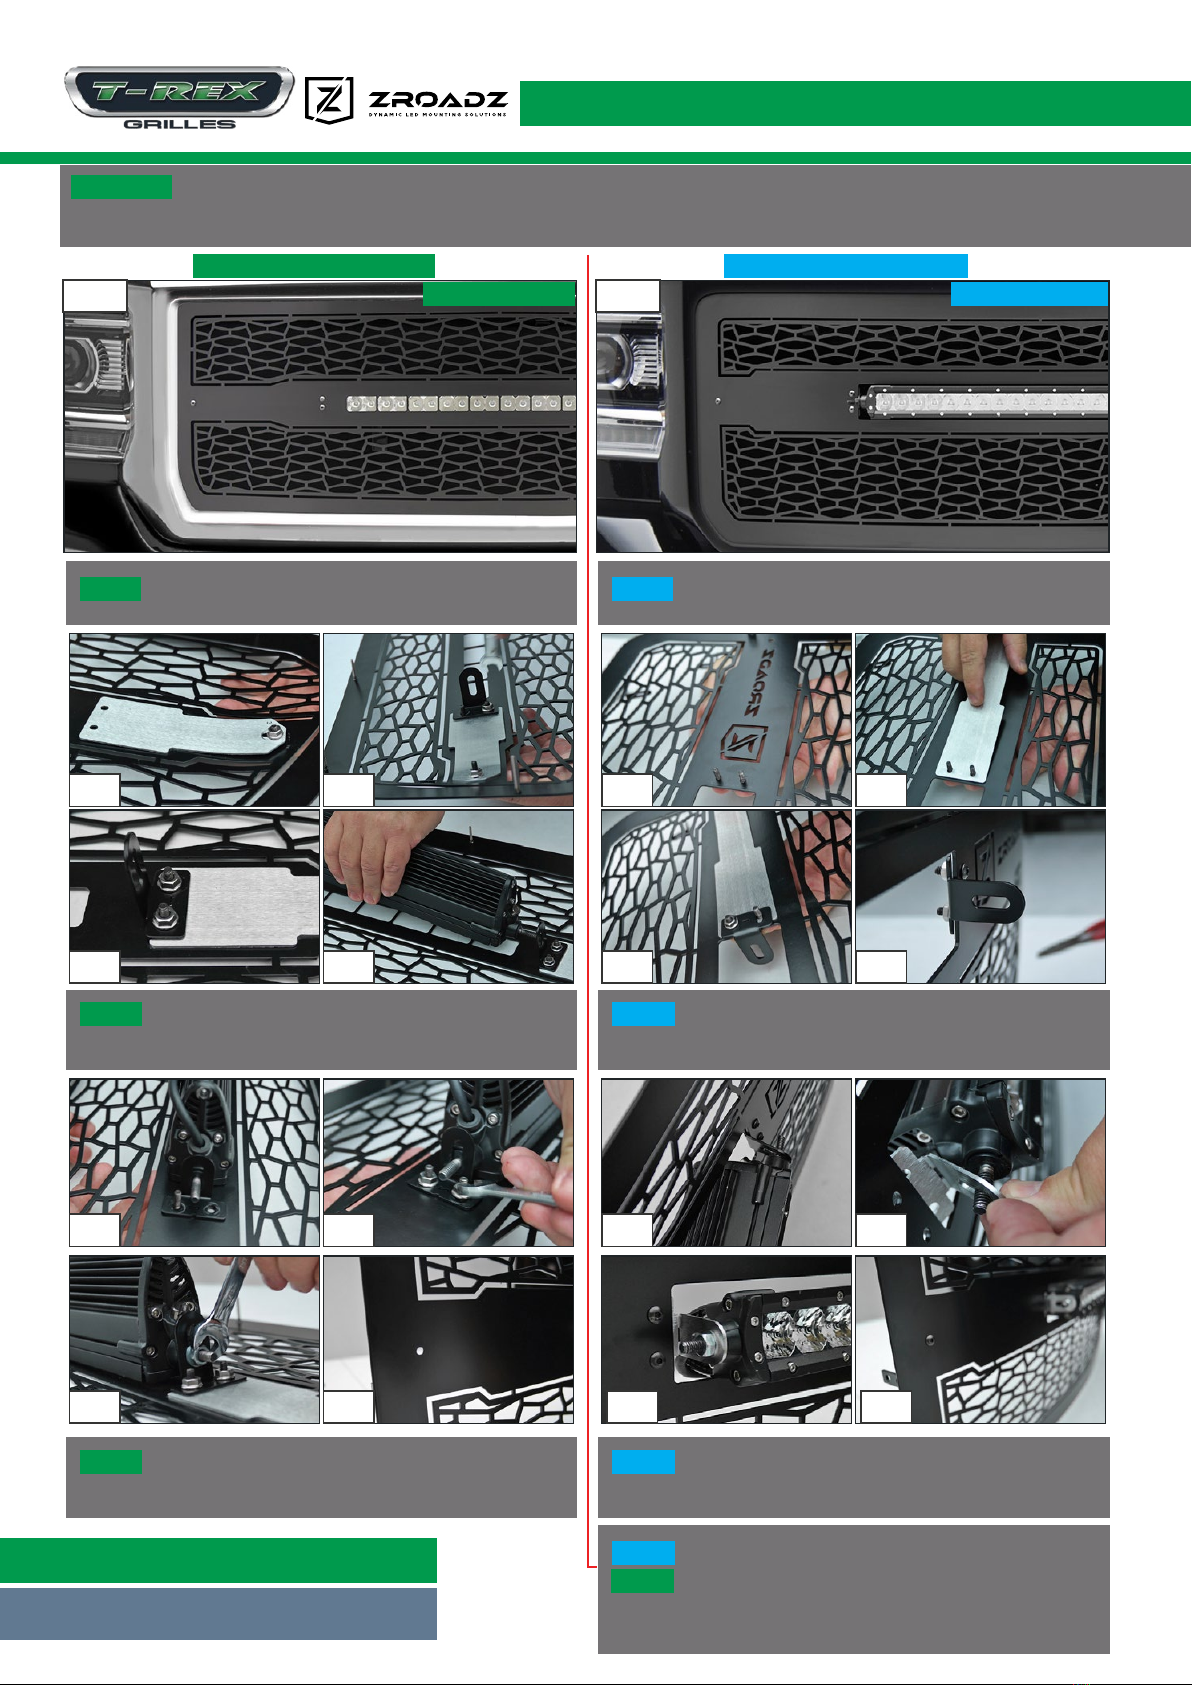
The ZROADZ Series Grilles comes into 2 different configurations. One style features the LED Light Bar mounting hidden on the backside, while
the other style has exposed mounting provisions on the face side of the grille. Please note this and identify your ZROADZ Grille Series configuration and follow the
instruction version that corresponds with your grille.
START HERE
STEP 1
STEP 2
STEP 3
STEP 4
STEP 1
STEP 2
STEP 3
STEP 4
GRILLE CONFIGURATION STYLE 2
EXPOSED LED LIGHTHIDDEN LED LIGHT
GRILLE CONFIGURATION STYLE 1
ZROADZ Grille series - LED Installation Guide
FIG 1 FIG 2
FIG 1
FIG 5
FIG 7
FIG 1
FIG 5
FIG 7
FIG 3 FIG 3
FIG 2
FIG 6
FIG 8
FIG 2
FIG 6
FIG 8
FIG 4 FIG 4
Lay out your parts. From the backside of the grille, put
into place the ZROADZ Logo Backing Plate.
Put into place one of the Bracket Tabs and seucre with
provided Hardware as seen in Fig. # 2-4 and then from the
backside of grille position LED Light Bar.
With LED Light placement set, put into position the
remaining bracket and the finally tighten LED and all
Mounting Brackets into their final secured position.
Lay out your parts. From the backside of the grille, put
into place the ZROADZ Logo Backing Plate.
Put into place one of the Bracket Tabs and seucre with
provided Hardware as seen in Fig. # 1-4.
From the face side of grille slip the LED Light bar into
place. On the opposite side, position the remaining
bracket and finally tighten LED and Brackets into position.
There is a final step for both styles of ZROADZ Grilles. See
both of the Figure #8 Images and note that there is an
exposed hole. Use the Provided Hardware Button Head
Screw and fill the hole and tighted down with Nut. This
will create symetrical look from side to side.
Continued on Page 2
10-13 TOYOTA TUNDRA
ZROADZ Series Grille
Z319631
10-13 TOYOTA
TUNDRA
PLEASE READ AND UNDERSTAND ALL INSTRUCTIONS BEFORE INSTALLATION. Auto makers offer varied models
to each vehicle and occasionally manufacture more than one body style of the same model. To assure your part is correct;
our tech department can be contacted at [email protected] to verify fitment or assist with tech questions. All other inquires
can be directed to [email protected]. In the event you do not have internet access please call 1-800-287-5900.
TOOLS REQUIRED:
Flat / Slotted Screwdriver
8mm 10mm Socket and Ratchet
Plastic Pry Bar
Grinding Wheel / Grinder / Jigsaw
Maskng Tape
PARTS LIST:
(1) Torch Grille
(8) 6-32 Nylon Lock Nuts
(2) #10 U-Nuts
(8) 1/2” L-Brackets
(1) Latch Mounting Bracket
Step 2 Grille Cutting
Cover the front outer edge of the factory grille with masking tape to prevent any scratches. Use a jigsaw to cut the bars
from the center of the factory grille by cutting along the top/bottom and sides (Fig 4). Use a sanding wheel to smooth
down where the cuts were made (Fig 5). Turn the factory grille over so you are looking at the backside. Now remove the
2nd and 3rd from the left phillips screws from the bottom edge of the factory grille (Fig 6).
Step 1 Factory Grille Removal
Remove the trim along the top of the factory grille shell using a plastic pry bar (Fig 1) being careful not to scratch the grille.
With the trim removed, use a phillips screwdriver to remove the ve phillips bolts under the trim. Now open the hood and
remove the ten 10mm nuts holding the factory grille to the hood and bracket (Fig 2). Remove the two 10mm bolts that hold
the hood latch to the bracket at the bottom of the factory grille (Fig 3). Remove the bracket on the backside of the factory
grille where the hood latch mounts by removing the phillips screws. Remove the factory grille and place it on a workbench.
Fig 1 Fig 2 Fig 3
Fig 4 Fig 5 Fig 6
Page 1
Z319631
10-13 TOYOTA
TUNDRA
Thank you for purchasing a T-REX Grille. 10/17/16
Z319631
10-13 TOYOTA
TUNDRA
Step 4 Grille Installation
Now turn the factory grille facing upward and insert the mesh grille into the factory grille (Fig 10). Holding the factory
grille and mesh grille together, turn over the factory grille so you can see the backside. Take the eight 1/2” L-Brackets
and install them onto the eight threaded studs and place a 6/32” nylon lock on top and tighten (Fig 11). Now take the
factory grille and reinstall it onto the vehicle using the factory hardware. DO NOT CLOSE THE HOOD UNTIL AFTER
YOU REATTACH THE HOOD BRACKET/LINKAGE! Install the factory hood latch and linkage from under the hood to the
hood latch that you installed in step 3 with the factory hardware. Reinstall the grille top trim using the factory hardware.
Installation complete.
Step 3 Bracket Installation
Now take the latch mounting bracket that came with the mesh grille kit and palce it on the factory grille where you removed
the two phillips screws, reuse the phillips screws to secure the bracket to the factory grille, the angled edge should be on the
left side (Fig 7). Install the u-nuts on the bracket where the two holes are at the top, the barbed side will be toward the front
side of the grille (Fig 8). Now take the factory hood latch bracket that you removed in step 1 and install it onto the new latch
mount bracket that you just installed. The side with the four holes will t against the new latch bracket, the end with the two
closer holes will be at the bottom (Fig 9). Use the factory phillips screws to secure the brackets together.
Fig 7 Fig 8 Fig 9
Fig 10 Fig 11
Page 2
Z319631
10-13 TOYOTA
TUNDRA

This manual suits for next models

1

Other TREX Automobile Accessories manuals

TREX Upper Class Grille User manual

TREX

TREX Upper Class Grille User manual

TREX TEX-51127 User manual

TREX

TREX TEX-51127 User manual

TREX 20568 User manual

TREX

TREX 20568 User manual

TREX 6311271 User manual

TREX

TREX 6311271 User manual

TREX 51214 User manual

TREX

TREX 51214 User manual

TREX BILLET Series User manual

TREX

TREX BILLET Series User manual

TREX Upper Class Series User manual

TREX

TREX Upper Class Series User manual

TREX ZROADZ  Series User manual

TREX

TREX ZROADZ Series User manual

TREX 20567 User manual

TREX

TREX 20567 User manual

TREX ZROADZ Series User manual

TREX

TREX ZROADZ Series User manual

Popular Automobile Accessories manuals by other brands

Cruz Optiplus Assembly instructions

Cruz

Cruz Optiplus Assembly instructions

Low Range Off-Road LROR-305815 installation instructions

Low Range Off-Road

Low Range Off-Road LROR-305815 installation instructions

G3 KRONO 240 manual

G3

G3 KRONO 240 manual

HUSKY LINERS 6921FR Care and use instructions

HUSKY LINERS

HUSKY LINERS 6921FR Care and use instructions

Metra Electronics CADILLAC 95-2004 installation instructions

Metra Electronics

Metra Electronics CADILLAC 95-2004 installation instructions

auris carmen user guide

auris

auris carmen user guide

Caltrend FD332 installation instructions

Caltrend

Caltrend FD332 installation instructions

Scosche SU2020 installation guide

Scosche

Scosche SU2020 installation guide

Whelen Engineering Company SL6 manual

Whelen Engineering Company

Whelen Engineering Company SL6 manual

Flaircomm Technologies BC9000 user manual

Flaircomm Technologies

Flaircomm Technologies BC9000 user manual

Aries AL235033 installation manual

Aries

Aries AL235033 installation manual

Jabra SP200 - QUICKSTART GUIDE 1 quick start guide

Jabra

Jabra SP200 - QUICKSTART GUIDE 1 quick start guide

AA Products RB0005 instruction manual

AA Products

AA Products RB0005 instruction manual

Fab Fours H4550 installation instructions

Fab Fours

Fab Fours H4550 installation instructions

Beeper MICRO CAMERA RX-32 manual

Beeper

Beeper MICRO CAMERA RX-32 manual

Kuda-Phonebase 095570 Installation instruction

Kuda-Phonebase

Kuda-Phonebase 095570 Installation instruction

Lightforce LFDLH User instructions

Lightforce

Lightforce LFDLH User instructions

MovaNext Lux Plus owner's manual

MovaNext

MovaNext Lux Plus owner's manual

manuals.online logo
manuals.online logoBrands
  • About & Mission
  • Contact us
  • Privacy Policy
  • Terms and Conditions

Copyright 2025 Manuals.Online. All Rights Reserved.