Triner Scale VersiPost VP-70 User manual

Model VP-70
Revision 1.1
8/13/2010
TM

©Triner Scale & Mfg. Co, Inc. 2009. All rights reserved.
The information contained herein is the property of Triner Scale and is supplied without
liability for errors or omissions. No part may be reproduced or used except as authorized
by contract or other written permission. The copyright and the foregoing restriction on
reproduction and use extend to all media in which the information may be embodied.
Contents subject to change without notice.
THIS EQUIPMENT CONTAINS NO USER SERVICEABLE COMPONENTS.
Servicing of the equipment must only be carried out by trained and authorized
personnel.
Use only the AC adapter supplied with the scale. Other adapters may cause
damage.
Routine maintenance
Harsh abrasives, solvents, scouring cleaners and alkaline cleaning solutions
should not be used; especially on the display window.
The outside of the product may be wiped down with a clean cloth, moistened
with water containing a small amount of soap.
General Guidelines
- Ensure that the scale is placed securely on a flat, firm and level surface.
- Avoid installing the scale in areas of direct sunlight and high humidity. Also avoid
drafts, vibrations and dusty conditions.
- To extend the life of your digital scale, do not drop items to be weighed onto the
platform or overload the scale beyond its rated capacity.
Federal Communications Commission (FCC) Statement
This equipment has been tested and found to comply with the limits for a Class A digital
device, pursuant to Part 15 of the FCC Rules. These limits are designed to provide
reasonable protection against harmful interference in a residential installation. This
equipment generates, uses and can radiate radio frequency energy and, if not installed
and used in accordance with the instructions, may cause harmful interference to radio
communications. However, there is no guarantee that interference will not occur in a
particular installation. If this equipment does cause harmful interference to radio or
television reception, which can be determined by turning the equipment off and on, the
user is encouraged to try to correct the interference by one or more of the following
measures:
- Reorient or relocate the receiving antenna.
- Increase the separation between the equipment and receiver.
- Connect the equipment into an outlet on a circuit different from that to which the
receiver is connected.
- Consult the dealer or an experienced radio / TV technician for help.

TABLE OF CONTENTS
Page
Chapter 1: Introduction.................................................................................................................. 1-1
1.1 Unpacking and Verifying Contents................................................................................ 1-1
Chapter 2: Getting Started............................................................................................................ 2-1
Chapter 3: Basics of Operation.................................................................................................... 3-1
3.1 Display........................................................................................................................... 3-1
3.2 Keyboard ....................................................................................................................... 3-2
3.2.1 Soft Keys .......................................................................................................... 3-2
3.2.2 Operator Keys .................................................................................................. 3-2
3.2.3 Numeric and Shortcut Keys ............................................................................. 3-3
3.3 General Scale Operation............................................................................................... 3-4
3.3.1 System Prompts ............................................................................................... 3-4
3.3.2 Mailing or Shipping an Item.............................................................................. 3-4
3.3.3 Advanced Country Code Operation ................................................................. 3-4
Chapter 4: Examples of Operation .............................................................................................. 4-1
4.1 Sending a First Class Mail Letter with Certified and Return Receipt............................ 4-1
4.2 Sending a First Class Mail Package with Delivery Confirmation and Insurance .......... 4-1
4.3 Sending a Priority Mail Flat Rate Envelope with Signature Confirmation ..................... 4-2
4.4 Sending an Express Mail Parcel ................................................................................... 4-2
4.5 Sending a Large Priority Mail Package Using Auto-Hold and the DIM Function.......... 4-3
4.6 Sending a First Class International Letter..................................................................... 4-4
Chapter 5: Advanced Features and Operation.......................................................................... 5-1
5.1 Programmable Shortcut Keys ....................................................................................... 5-1
5.1.1 How to Program Shortcuts ............................................................................... 5-1
5.1.2 How to Run a Shortcut ..................................................................................... 5-2
5.1.3 How to delete a Shortcut.................................................................................. 5-3
5.2 Country Favorites List ................................................................................................... 5-3
5.2.1 How to add countries to the Favorites List....................................................... 5-3
5.2.2 How to delete countries from the Favorites List............................................... 5-3
5.3 Auto Hold....................................................................................................................... 5-3
5.3.1 How to use Auto Hold ...................................................................................... 5-3
5.4 Piece Counting .............................................................................................................. 5-4
5.5 Manual Weight Entry..................................................................................................... 5-4
5.5.1 How to use Manual Weight Entry..................................................................... 5-4
5.6 Change Destination Zip/Country................................................................................... 5-5

5.6.1 How to Change the Destination ZIP or Country............................................... 5-5
5.7 USPS Price Categories (Retail and Commercial)......................................................... 5-5
5.7.1 How to Change between USPS Price Categories ........................................... 5-5
5.8 Adjust Price Feature...................................................................................................... 5-6
5.8.1 How to ADD a Fee to the Displayed Rate........................................................ 5-6
5.8.2 How to SUBTRACT an amount from the Displayed Rate................................ 5-6
5.9 Manual Meter Setting .................................................................................................... 5-7
Chapter 6: Setup Operations........................................................................................................ 6-1
6.1 Configure Menu............................................................................................................. 6-1
6.1.1 How to change the Origination ZIP Code ........................................................ 6-1
6.1.2 How to configure the F2 key menus ................................................................ 6-1
6.1.3 How to configure the Beeper............................................................................ 6-2
6.1.4 How to set up the Time and Date..................................................................... 6-2
6.1.5 How to configure Home Screen Default .................................................... 6-2
6.1.6 How to view System Information................................................................. 6-3
6.1.7 Latitude Zone (Factory Use Only).................................................................... 6-3
6.1.8 Load Rate Function (Future Use) .................................................................... 6-3
6.2 Service Menu (For Qualified Service Technicians Only) .............................................. 6-4
6.2.1 How to perform an Analog to Digital Conversion (A/D) Test ........................... 6-4
6.2.2 How to perform a LCD Test ............................................................................. 6-4
6.2.3 How to perform a Keyboard Test ..................................................................... 6-4
6.2.4 How to Enable the Postage Meter Interface .................................................... 6-5
6.2.5 How to perform a Postage Meter Test ............................................................. 6-5
6.2.6 How to set the Meter Type ............................................................................... 6-6
6.2.7 How to set the Meter Mode .............................................................................. 6-6
6.2.8 How to change the Scale Capacity / Resolution.............................................. 6-6
6.2.9 How to reset the Factory Defaults.................................................................... 6-7
6.2.10 How to clear the Favorites List......................................................................... 6-7
6.2.11 How to perform Scale Calibration (Call Triner Scale First!) ............................. 6-8
Chapter 7: Bulk Mailing and Counting Mode ............................................................................. 7-1
7.1 Display Screen .............................................................................................................. 7-1
7.2 Soft Key Descriptions .................................................................................................... 7-1
7.3 General Operation......................................................................................................... 7-2
7.3.1 Sample – How To Sample Pieces ................................................................... 7-2
7.3.2 Tare – How to Tare a Container ...................................................................... 7-2
7.3.2.1 Simple Tare......................................................................................... 7-3
7.3.2.2 Keyboard Tare .................................................................................... 7-3

7.3.2.2 Removing a Tare Weight .................................................................... 7-3
7.3.3 Mode – How to Change the Weighing Units .................................................... 7-3
7.3.4 Add – Memory Accumulator............................................................................. 7-4
7.3.5 Info – Weigh Session Information .................................................................... 7-4
7.3.6 Unit Weight – Entering a Unit Weight .............................................................. 7-4
7.3.7 Exit – Exit the Bulk Mailing and Counting Mode .............................................. 7-5
Appendix A: Specifications .............................................................................................................. A-1
Appendix B: Supported Rates and Special Services .................................................................. B-1
Appendix C: Rate and Special Service Abbreviations................................................................. C-1
C.1 USPS Retail .................................................................................................................. C-1
C.2 USPS Commercial ........................................................................................................ C-2
C.3 Special Services............................................................................................................ C-2
Appendix D: Country Code and Abbreviation Chart .................................................................... D-1
Appendix E: Rate Change Information .......................................................................................... E-1
E.1 Rate Card Updates ....................................................................................................... E-1
Appendix F: Error Messages .......................................................................................................... F-1
Appendix G: Latitude Zone Guide .................................................................................................. G-1
G.1 Locating your Latitude Zone.......................................................................................... G-1
Warranty Page

Page 1-1
1.0 INTRODUCTION
The Triner Model VP-70 Digital Postal Computing Scale is designed for USPS retail and
mailroom shipping applications. It is equipped with many helpful features that guide the
operator through the day-to-day mailing activities. It provides speedy, user-friendly
operation, and is fully updateable to future postal rates and zone changes. The scale
has a maximum weighing capacity of 70 pounds and is factory calibrated.
Prior to using the scale, please read this user’s guide carefully and completely. Store
the manual in a safe and convenient place so it will be available if you have questions
concerning the operation of the scale.
1.1. UNPACKING AND VERIFYING CONTENTS
The VP-70 is a sophisticated electronic instrument, designed specifically to meet
USPS requirements for accuracy in operation. When unpacking, be sure to guard
against dropping the scale.
Carefully unpack and inspect the carton contents:
• VP-70 Scale
• Weighing Platform
• AC adapter
• USB Computer Cable
• Operation Manual
• Warranty Registration Card
• Meter Interface Cable (If purchased separately)
PREPARING THE SCALE FOR OPERATION
After verifying and inspecting the carton contents, the
simple steps described in Section 2, “Getting Started”
must be followed in order to assure proper operation of
the scale.
Not following the specified steps can result in
INNACURATE WEIGHING AND RATING.

2-1
2.0 GETTING STARTED
After unpacking the scale, a small amount of preparation is required before the scale can be
used for mailing or shipping. Please refer to Figure 2-1 below as needed.
Figure 2-1: VP-70 Rear Panel
Step 1. Lift the stainless steel platform off the scale and discard the shipping cardboard.
Place the platform back onto the scale.
Step 2. Position the scale in its area of intended use. Observe the following guidelines
for suitable location.
1. Choose a firm and stable table, counter, or other surface.
2. Do not share an AC outlet with electrical noise producing equipment, such as
refrigeration units. This includes products with electrical motors and/or relays.
3. Do not place the scale in an area with changing ambient temperature and/or high
humidity.
4. Do not place the scale in an area prone to exposure to direct sunlight, wind, or dust.
5. Do not place the scale in an area with vibrating equipment.
Step 3. Install the AC Adapter.
1. After placing the scale in its area of use, locate the Model A41408 AC Adapter.
2. Connect the female end of the AC Adapter to the connector on the rear of scale,
and then plug the adapter into an AC outlet.
Step 4. Adjust the leveling feet so that the scale is level and not “rocking” corner to
corner.
Step 5. Turn the scale ON to begin the initialization.
Step 6. Initialization - The first time the scale is turned on you will be required to enter
your origination ZIP Code.
1. When the AC power switch is placed “ON” position, the scale prompts for your
“Origin ZIP Code”.
2. Enter the first three digits of the ZIP Code from which all items will be mailed. There
is no need to press the ENTER key.

Page 3-1
3.0 BASICS OF OPERATION
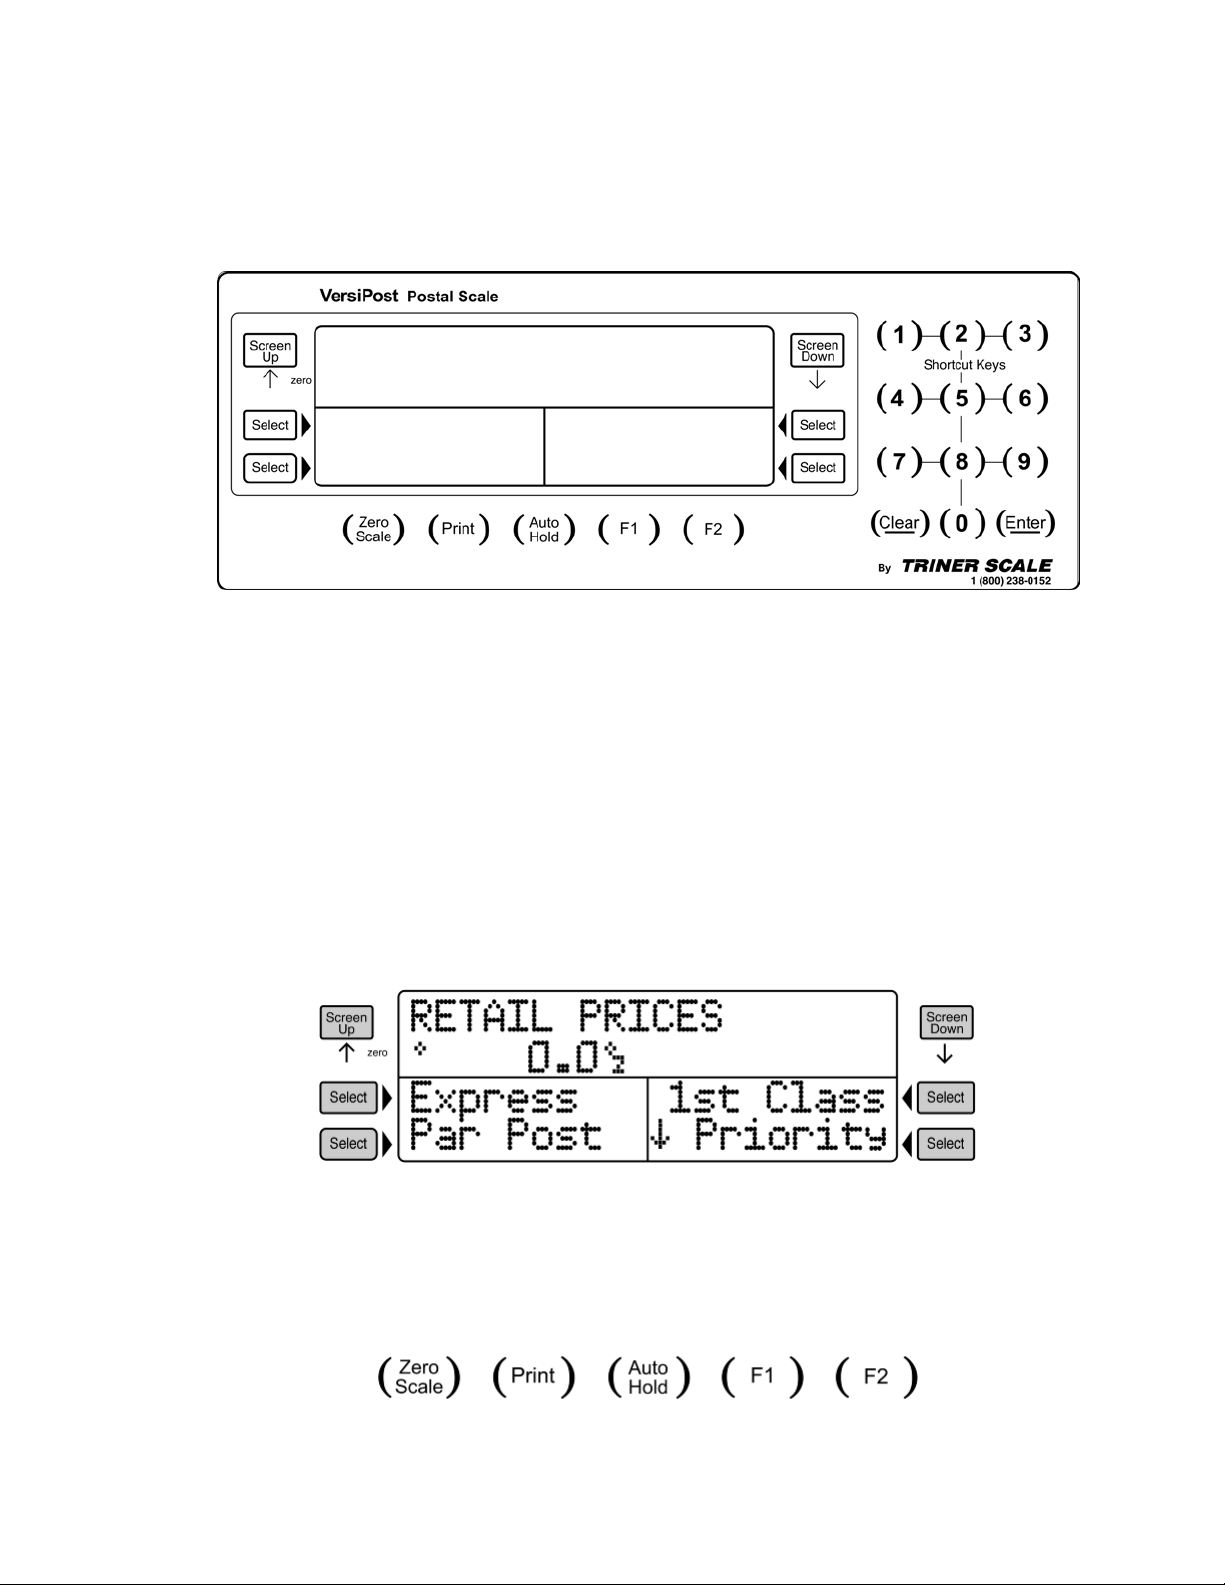
3.1 DISPLAY
The LCD display is divided into two main sections. The upper half is the status screen,
and the lower half is the selection screen.
When the scale is at “Home”, the status screen displays the rate table (Retail or
Commercial) and the weight on the scale. The selections screen displays the available
primary services. There are two screens for available primary services. See Figure 3-1
below.
Figure 3-1: Home Screen
After a primary service has been selected, the status screen then displays the primary
service along with the weight. The selection screen displays the available classes of the
primary service. See Fig 3-2 below.
Figure 3-2
After the class of mail has been selected, the status screen displays the class of mail,
the weight and the price. The selection screen displays the available special services.
See Figure 3-3 for details.

Page 3-2
Figure 3-3
After a special service has been added, a triangle arrow displays next to it, and its
abbreviation displays in the status screen. See Figure 3-4 below.
Figure 3-4
Figure 3-5 below identifies the soft keys and the elements of the display.
Figure 3-5
Page 3-3
3.2 KEYBOARD
The keyboard is composed of soft keys, operator keys, numeric keys and shortcut keys.
For more information on shortcut keys see section 5.1.
FIGURE 3-6: VP-70 Front Panel and Keyboard
3.2.1 SOFT KEYS
The LCD and the six bright green keys located next to the LCD make up the Soft
Keys. The soft keys are used to navigate through the menus and make
selections.
• Use the SCREEN DOWN key to scroll the selection page down. If more
screens are available a down arrow () will appear in the lower middle of
the screen.
• Use the SCREEN UP key to scroll the selection page up. If more screens
are available an up arrow () will appear in the lower middle of the screen.
• Use the SELECT keys to make your selection.
FIGURE 3-7: Soft Keys Layout
3.2.2 OPERATOR KEYS
The operator keys access certain scale functions. Pressing an operator key will
activate the chosen function or access additional functions.
FIGURE 3-8: Operator Keys Layout

Page 3-4
Zero Scale - This key is used to zero out the weight display.
Print - This key is used to send weight information out to the serial port. It is also
used to print and dispense a postage label when connected to a compatible
Postage Meter.
Auto Hold - This key is used to enable or disable the automatic weight hold
mode.
F1 – This key allows you to access the following functions:
• System Information
• Rate Table Information
• Price Categories (USPS Retail or Commercial). To change price categories
see section 5.7.
• Scale Configuration Menu
• Scale Service Menu
F2 - This key allows you to access the following functions:
• Manual Meter Value Entry (Used in conjunction with a postage meter)
• Adjust Price (rate) Entry
• Zip Code or Country Code Edit
• Manual Weight Entry
• Piece Counting Mode
• Remote Scale
3.2.3 NUMERIC AND SHORTCUT KEYS
The numeric keys are used to enter information into the scale when prompted.
They are also used as programmable Shortcut keys to save keystrokes (see sec-
tion 5.1 for more information on creating and using Shortcuts).
FIGURE 3-9: Numeric Keys Layout
The CLEAR key performs many useful and intuitive functions.
• Press and Hold the CLEAR key at any time to return to the Home Screen.
• Use the CLEAR key to return to the previous soft key screen level
• When entering data, use the CLEAR key to clear the current entry
• Use the CLEAR key to clear all special services selected at once
The ENTER key is used to accept and confirm a selection or entered data.

Page 3-5
3.3 GENERAL SCALE OPERATION
3.3.1 SYSTEMS PROMPTS
The VP-70 scale prompts for information in two ways.
1. Numeric Entry - This type of prompt appears as an “Enter Value” message.
Use the numeric keys to enter the requested data and press the ENTER key
to complete the entry. If you make a mistake during the entry, press the
CLEAR key to start over.
2. ZIP Code/ Country Code Entry - This type of prompt appears as a mes-
sage with three dash marks. Use the numeric keys to enter the requested
data. There is no need to press the ENTER key to complete the entry. If you
make a mistake during the entry, press the CLEAR key to start over.
3.3.2 MAILING OR SHIPPING AN ITEM
There are three basic steps to shipping a letter or package. Refer to the next sec-
tion for detailed examples.
1. Weigh the item you wish to mail
Remove all items from the platter, press the ZERO SCALE key and then
place the item on the weighing platter.
2. Select the desired mailing service by using the soft keys.
Use the soft keys to select a class of mail, making additional selections as
necessary. If the method of shipment and/or the weight of the item require a
ZIP Code or Country Code, the scale prompts for a three-digit code. Use the
numeric keys to enter the destination Zip Code or Country Code.
3. If desired, use the soft keys to select a special service (i.e. Insurance,
C.O.D., etc.).
When a value must be entered to determine the special service fee (e.g.
COD, Registered, and Insurance), the scale prompts for a numeric entry. Af-
ter the amount is entered, press the ENTER key to accept the input.
3.3.3 ADVANCED COUNTRY CODE OPERATION
If you don’t know the country code, there are two options:
1. List All – This selection lists all countries on the screen in alphabetical order.
Press the SCREEN UP or SCREEN DOWN key to page up or down thru the
list. Press and Hold the SCREEN UP or SCREEN DOWN key to quickly scroll
through the entire list. Press a soft key to select the desired country.

Page 3-6
Figure 3-10: Country Code Entry
2. Favorites – This selection displays an alphabetical user created list of
countries. The user may add up to 32 countries to this list. See section 5.2 for
more information on programming the Favorite Country List.
Press the SCREEN UP or SCREEN DOWN key to page up or down through
the list. Press and Hold the SCREEN UP or SCREEN DOWN key to quickly
scroll through the entire list. Press a soft key to select the desired country.

Page 4-1
4.0 EXAMPLES OF OPERATION
Calculating postal rates with the VP-70 is fast and easy. Follow the examples below to
become familiar with the process of weighing and rating an item.
4.1 Sending a First Class Mail Letter with Certified and Return Receipt
1. Place item on scale platform (3.5 oz or less).
2. Press the 1st CLASS soft key.
3. Press the LETTER soft key.
4. Press the CERT soft key. Certified is added and the selected arrow (W) appears next
to Cert.
5. Press the RET RCPT soft key. Return Receipt is added and the selected arrow (W)
appears next to Ret Rcpt.
6. The postage rate is displayed on the right middle side of the screen.
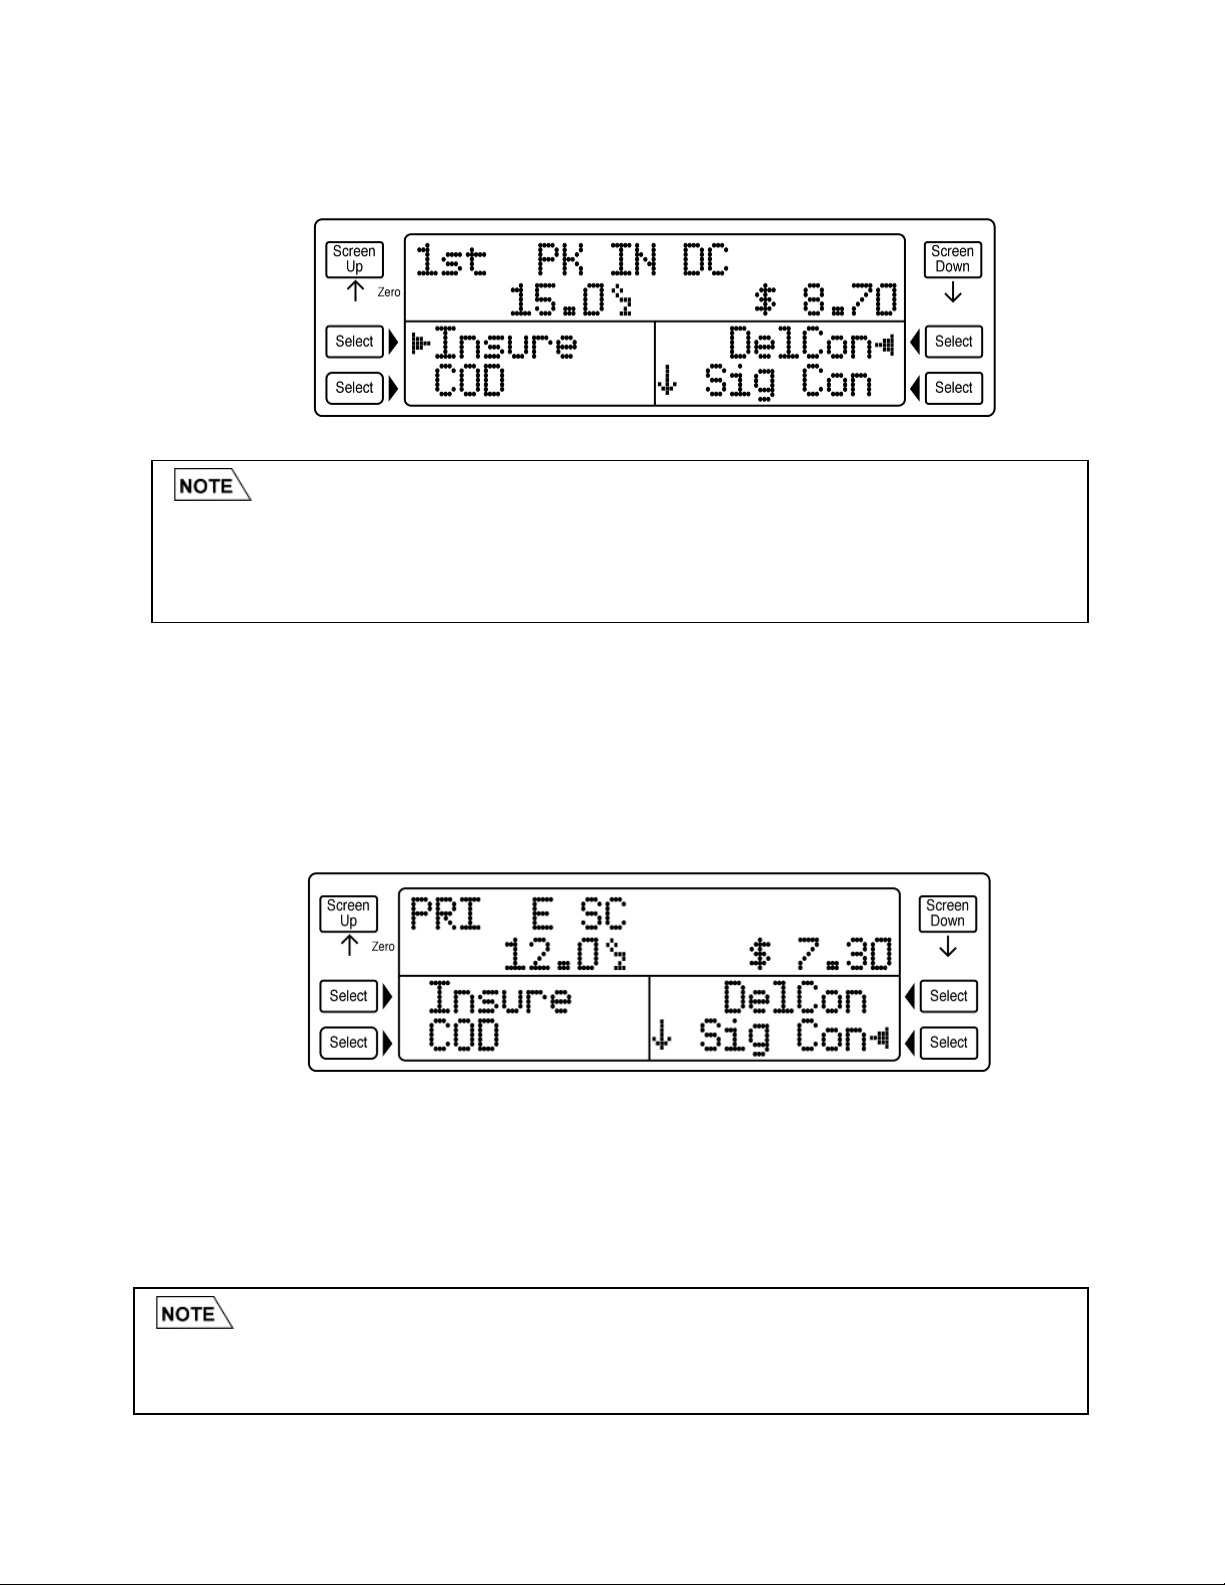
4.2 Sending a First Class Mail Package with Delivery Confirmation and
Insurance
1. Place item on scale platform (13 oz or less).
2. Press the 1st CLASS soft key.
3. Press the PACKAGE soft key.
4. Press the DEL CON soft key. Delivery Confirmation is added and the selected arrow
(W) appears next to Del Con.
5. Press the INSURE soft key and the scale will prompt for the insurance value.
Always make sure the scale weight display reads zero before placing an item
on the
p
latform. If the scale does not read zero
p
ress the ZERO SCALE ke
y
.
• To remove a single Special Service: Press the corresponding soft key.
• To remove all Special Services: Press the CLEAR key
• To return to the Home Screen: Press and Hold the CLEAR key until the scale double
beeps or remove the item from scale.
• If Return Receipt is selected before Certified the scale will display an “Invalid
Sequence” error. This is because Return Receipt is not valid without Certified.
• Likewise, if Certified is deselected before Return Receipt an “Invalid Sequence” error
will occur and both special services will be automatically deselected.
Page 4-2
6. Input the value of insurance desired and press the ENTER key. Insurance is added
and the selected arrow (W) appears next to Insure.
4.3 Sending a Priority Mail Flat Rate Envelope with Signature Confirmation
1. Place item on scale platform.
2. Press the PRIORITY soft key.
3. Press the SCREEN DOWN key.
4. Press the FLT ENV soft key.
5. Press the SIG CON. Signature Confirmation is added the selected arrow (W)
appears next to Sig Con.
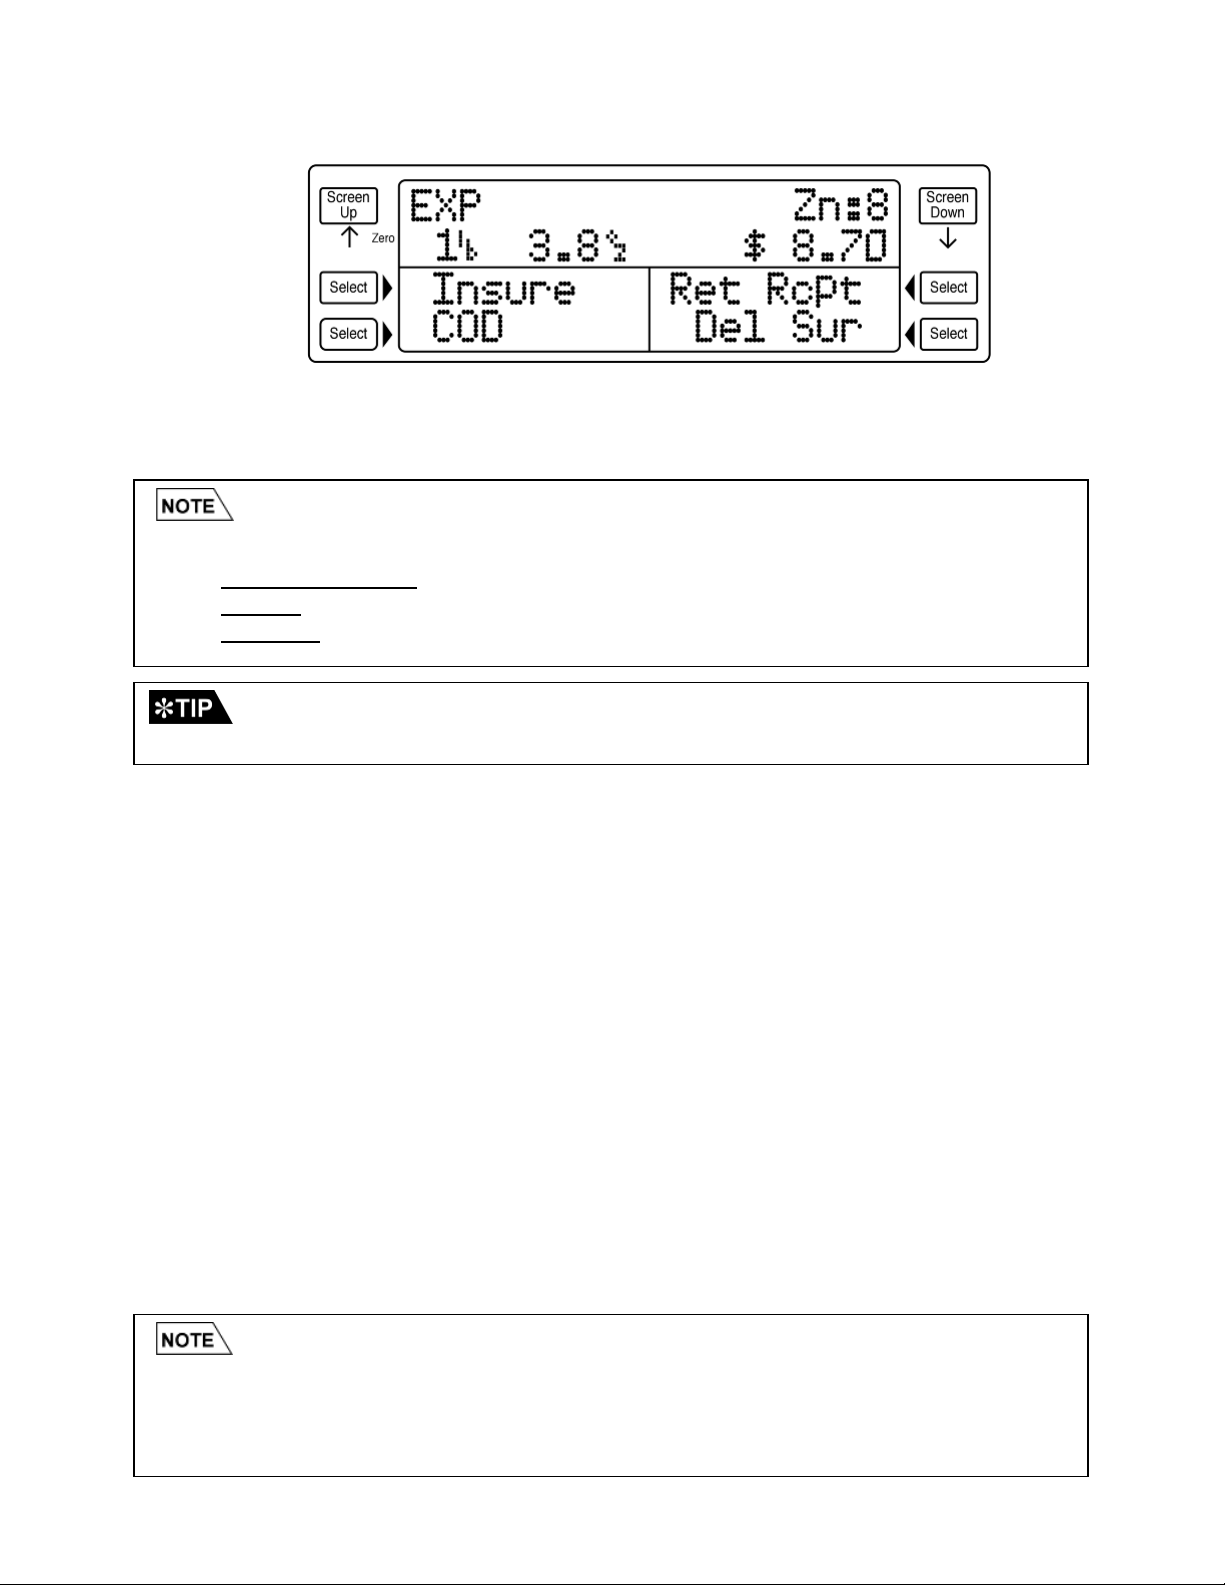
4.4 Sending an Express Mail Parcel
1. Place item on scale platform.
2. Press the EXPRESS soft key.
3. Press the PARCEL soft key.
4. Input the first three digits of the Destination Zip Code and the Express Mail rate is
displayed.
• If a mistake is made when entering an Insurance value press the CLEAR key to erase
the value.
• If a different Insurance value is desired, press the INSURE soft key to deselect
Insurance. Press the INSURE soft key again to prompt for a new Insurance value.
• If a mistake is made when entering a Zip Code press the CLEAR key to erase the entry.
• To change the Destination Zip Code or Country Code press the F2 key, then press the
ZIP/CNTRY soft ke
y
.
Page 4-3
4.5 Sending a Large Priority Mail Package Using Auto-Hold and the DIM
Function
1. Press the AUTO HOLD key. The message “Auto Hold Enabled”will briefly display
along with an “h” icon.
2. Place item on scale platform (20 lbs or less). After about 2 seconds the scale will
“Beep”.This indicates the weight is frozen.
3. Remove item from scale.
4. Press the PRIORITY soft key.
5. Press the PARCEL soft key.
6. Input in the first three digits of the Destination Zip Code.
7. Press the SCREEN DOWN key two times and then press the DIMS soft key.
8. Input the Length of the item in inches then press ENTER. Do the same for the Width
and Height. In this example lets use 20x 20 x 20.
9. The Destination Zone (Zn) is displayed in the upper right corner of the screen.
a. If the Zone is 1-4 go to step 12.
b. If the Zone is 5-8 go to step 10.
10. After entering the dimensions the scale will ask if the item is “Square/Rectangular”,
if it is press the YES soft key. If the item is odd shaped press the NO soft key.
11. Priority Dimensional weight rate will be calculated and the selected arrow (W)
appears next to Dims.
12. Priority Balloon weight rate will be calculated and the selected arrow (W) appears
next to Dims.
13. Press the AUTO HOLD key to disable the hold and return the scale to zero.
The DIM function allows the user to enter dimensions of an item to determine its
eligibility for:
• Dimensional Weight - Priority Mail
• Balloon - Priority Mail or Parcel Post
• Oversized - Parcel Post
Use the handy Auto Hold feature whenever a large package covers the display
screen.
• To change the Dimensions entered, press the DIMS soft key to deselect Dimensions.
Press the DIMS soft key again and the scale will prompt for the new dimensions.
• Dimensional weight only applies to packages mailing to destination zones 5-8. Items sent
to destination zones 1-4 will be charged the Balloon rate.

Page 4-4
4.6 Sending a First Class International Letter
1. Place item on scale platform (3.5 oz or less).
2. Press the SCREEN DOWN soft key.
3. Press the INTL soft key.
4. Press the 1ST CLASS soft key.
5. Press the LETTER soft key.
6. The scale will prompt for the three-digit country code. There are three ways to enter
a country code:
a. Input the three-digit numeric country code using the table in Appendix D.
b. Use the LIST ALL function to view all countries in alphabetical order and
select from the list.
c. Use the FAVORITES function to view the user created list of countries and
select from the list.
7. In this example press the FAVORITES soft key then select the CANADA soft key.
8. The First Class Int’l to Canada rate is displayed.
• When an item is too large to be mailed the message “Item Too Large” is displayed.
• When an item is too small the message “No Surcharge” is displayed.
• For more information on programming the Favorites List see chapter 5.2.
Page 5-1
5.0 ADVANCED FEATURES AND OPERATION
5.1 PROGRAMMABLE SHORTCUT KEYS
The scale contains 10 programmable shortcut keys, which are very powerful macros that
can be used to save keystrokes and valuable time. The shortcuts are stored and
retrieved by using the numeric keys 0-9.
All 10 shortcuts must be shared between the two USPS Price Categories (Retail and
Commercial). Therefore, a shortcut key programmed for a Priority Retail Package will
not apply for a Priority Commercial Package.
To use a shortcut, the user must first switch to the price category in which it was
originally created.
Out of the box there are six (6) preprogrammed factory shortcuts for USPS Retail. These
shortcuts can be changed, modified or deleted to suit your application.
Key Number Shortcut Description
1 First Class Letter
2 First Class Large Envelope
3 First Class Parcel
4 Priority Parcel
5 Express Package
6 Parcel Post
7 <OPEN>
8 <OPEN>
9 <OPEN>
0 <OPEN>
Factory Default USPS Retail Shortcuts
5.1.1 How to Program Shortcuts
1. Place a letter on the scale platform.
2. Select the class of mail and (if desired) special services.
3. Press and Hold a numeric key (0-9) of your choice.
4. When you hear the double beep and the screen says "Shortcut Saved" you
may release the numeric key
The most important thing to remember about shortcuts is that they will save you
time and are easy to program on the fly. To create a shortcut, simply place a letter on the
scale, navigate to the service then press and Hold a number key. When the scale double-
beeps and displays “Shortcut Saved”, you are done.
You can then run a shortcut at anytime by pressing a single number key!

Page 5-2
Example #1: Create a shortcut for a First Class Mail International Letter
1. Place a letter on the scale platform.
2. Press the SCREEN DOWN key.
3. Press the INTL soft key.
4. Press the 1ST CLASS soft key.
5. Press the LETTER soft key.
6. Input country code 337 (Canada).
When the shortcut is run the scale will prompt for a new country code.
7. Press and Hold the number “0” key until the screen says "Shortcut Saved"
then release the key.
Example #2: Create a shortcut for a First Class Letter with Certified and
Return Receipt
1. Place a letter on the scale platform.
2. Press the 1ST CLASS soft key.
3. Press the LETTER soft key.
4. Press the CERT soft key.
5. Press the RET RCPT soft key.
8. Press and Hold the number “0” key until the screen says "Shortcut Saved"
then release the key.
5.1.2 How to Run a Shortcut
Generally a shortcut can be run at any time by pressing the number key assigned
to that shortcut. The procedure is as follows:
1. Place item on scale platform.
2. Press the NUMBER (0-9) key of the shortcut to execute.
3. Shortcut runs then proceed with the weighing and rating session.
Below are some notes and tips for running shortcuts:
• To use a shortcut, make sure to switch to the price category (Retail or Commercial) in
which it was originally created.
• When a shortcut is run the scale will prompt for any additional information as needed (i.e.
Zip Code, Country Code, Insurance Value, etc).
• With the factory default shortcuts on keys 1,2, and 3 you can quickly switch between 1ST
Class Letters, Large Envelopes, and Packages.
• With the factory default shortcuts on keys 4,5,and 6 you can quickly rate shop between
Priority, Express and Parcel Post.

Page 5-3
5.1.3 How to delete a Shortcut
In most cases there is no need to delete a shortcut. If you wish to change a
shortcut simply create a new one and the old one will be overwritten. However if
you wish to totally remove a shortcut follow the steps below.
1. Press and Hold the CLEAR key until a double beep is heard to get to the
Home Screen.
2. Press and Hold the numeric key corresponding to the shortcut you wish to
erase until the screen says "Shortcut Saved".
5.2 COUNTRY FAVORITES LIST
The scale has a programmable Favorites List for destination countries used most often.
Save time by using the Favorites List to select a country instead of listing all the
countries.
5.2.1 How to add countries to the Favorites List
1. Place an item on the scale and select an International class of mail.
2. Press the LIST ALL soft key.
3. Press the SCREEN DOWN or SCREEN UP arrow keys to scroll to the page
that lists the destination country to be added.
4. Press and Hold the soft key next to the country to be added until the scale
displays “Country Saved”.
5. To view the newly added country, press the CLEAR key then press the
FAVORITES soft key.
5.2.2 How to delete countries from the Favorites List
1. Place an item on the scale and select an International class of mail.
2. Press the FAVORITES soft key.
3. Press the SCREEN DOWN or SCREEN UP arrow keys to scroll to the page
that lists the country to be deleted.
4. Press and Hold the soft key next to the country to be deleted until the scale
displays “Country Deleted”.
5.3 AUTO HOLD
This handy function is used to help rate an oversized item which, when placed onto the
scale, would block the display. This feature will not work for items weighing less than 5
oz.
5.3.1 How to use Auto Hold
1. Remove all items from the scale platform.
2. Press the AUTO HOLD key. The message “Auto Hold Enabled”will briefly
display along with an “h” icon.
3. Place oversized item on scale platform. After about 2 seconds the scale will
“Beep”.
4. Remove item from scale and the weight will be frozen.
5. Continue the normal rating process.
6. There are two ways to disable Auto Hold:
Table of contents
Other Triner Scale Scale manuals

Triner Scale
Triner Scale TS-PFS User manual

Triner Scale
Triner Scale TS-70MC User manual

Triner Scale
Triner Scale 600-ESeries Manual instruction

Triner Scale
Triner Scale 1200g High Precision Scale User manual

Triner Scale
Triner Scale TP-10 User manual

Triner Scale
Triner Scale 7600E User manual

Triner Scale
Triner Scale TS60-1010 User manual

Triner Scale
Triner Scale TS-70PX Installation manual

Triner Scale
Triner Scale TS-70PX User manual

Triner Scale
Triner Scale TSM Series User manual


