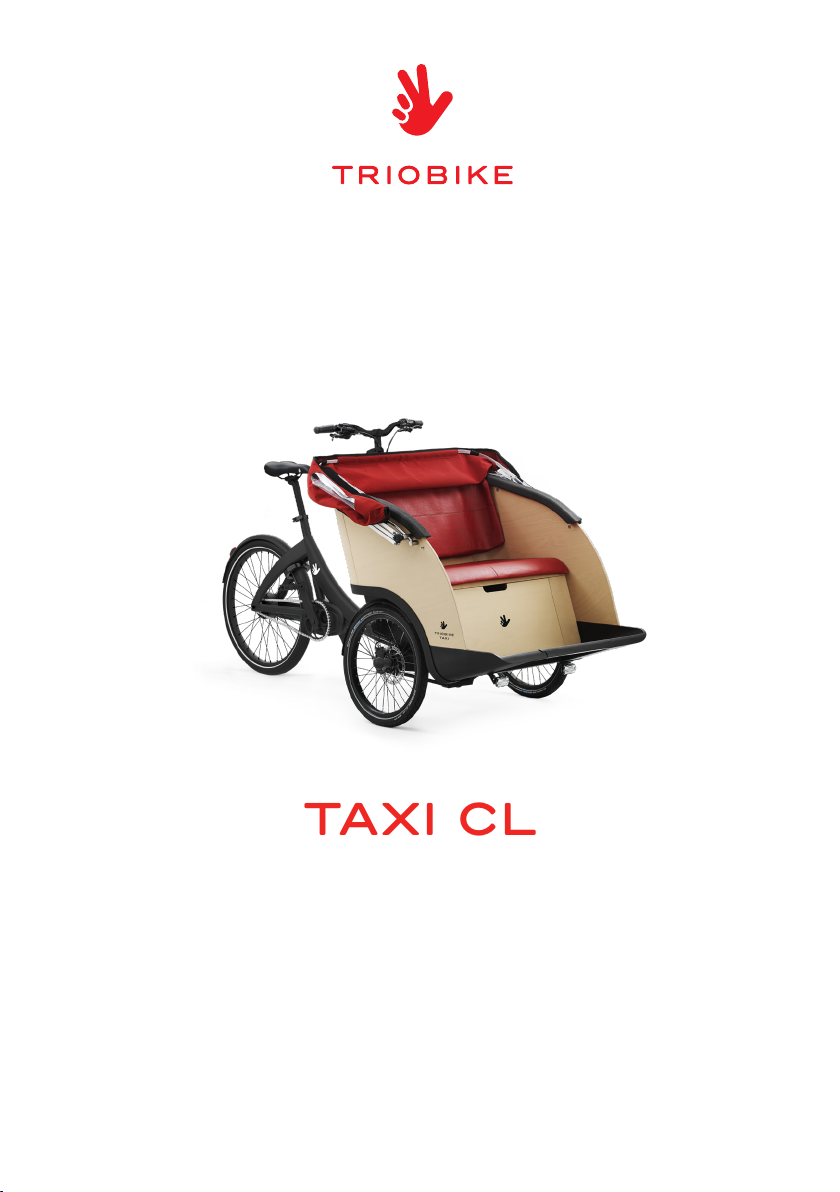
TRIOBIKE TAXI CL User manual
ORIGINAL INSTRUCTIONS
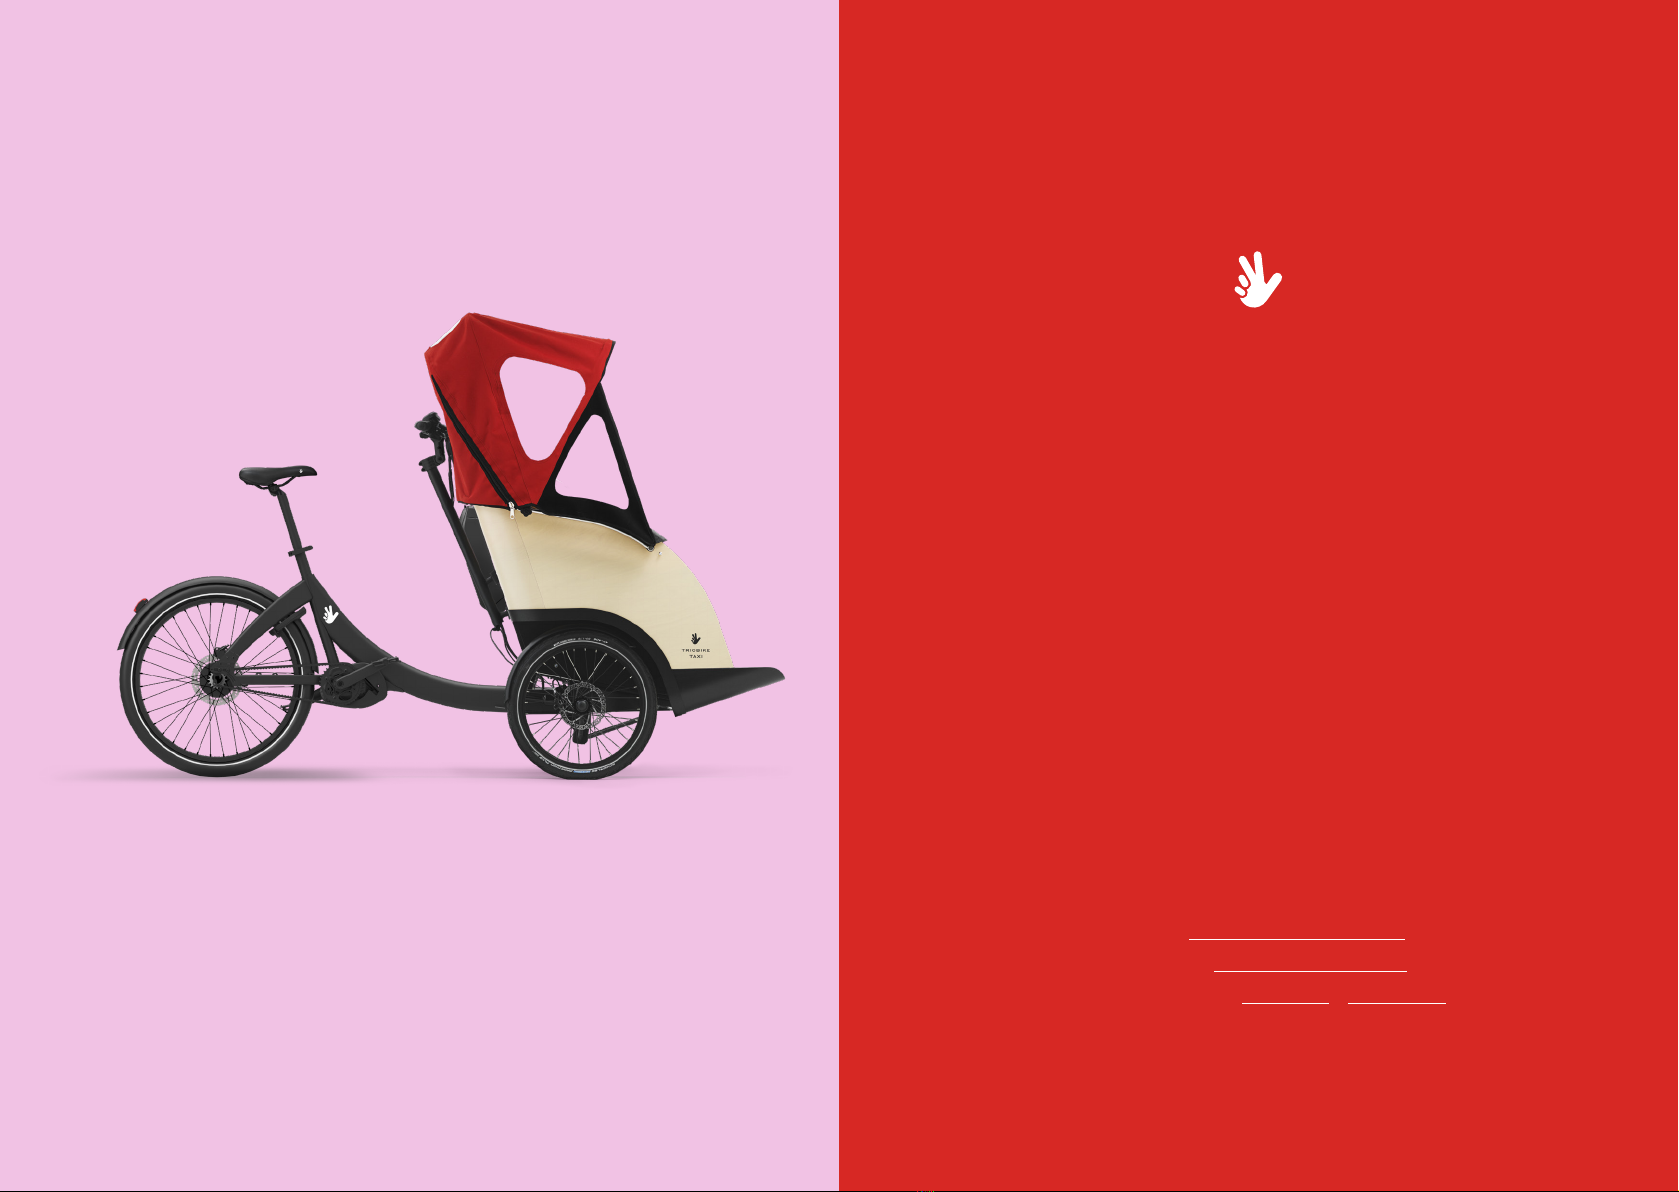
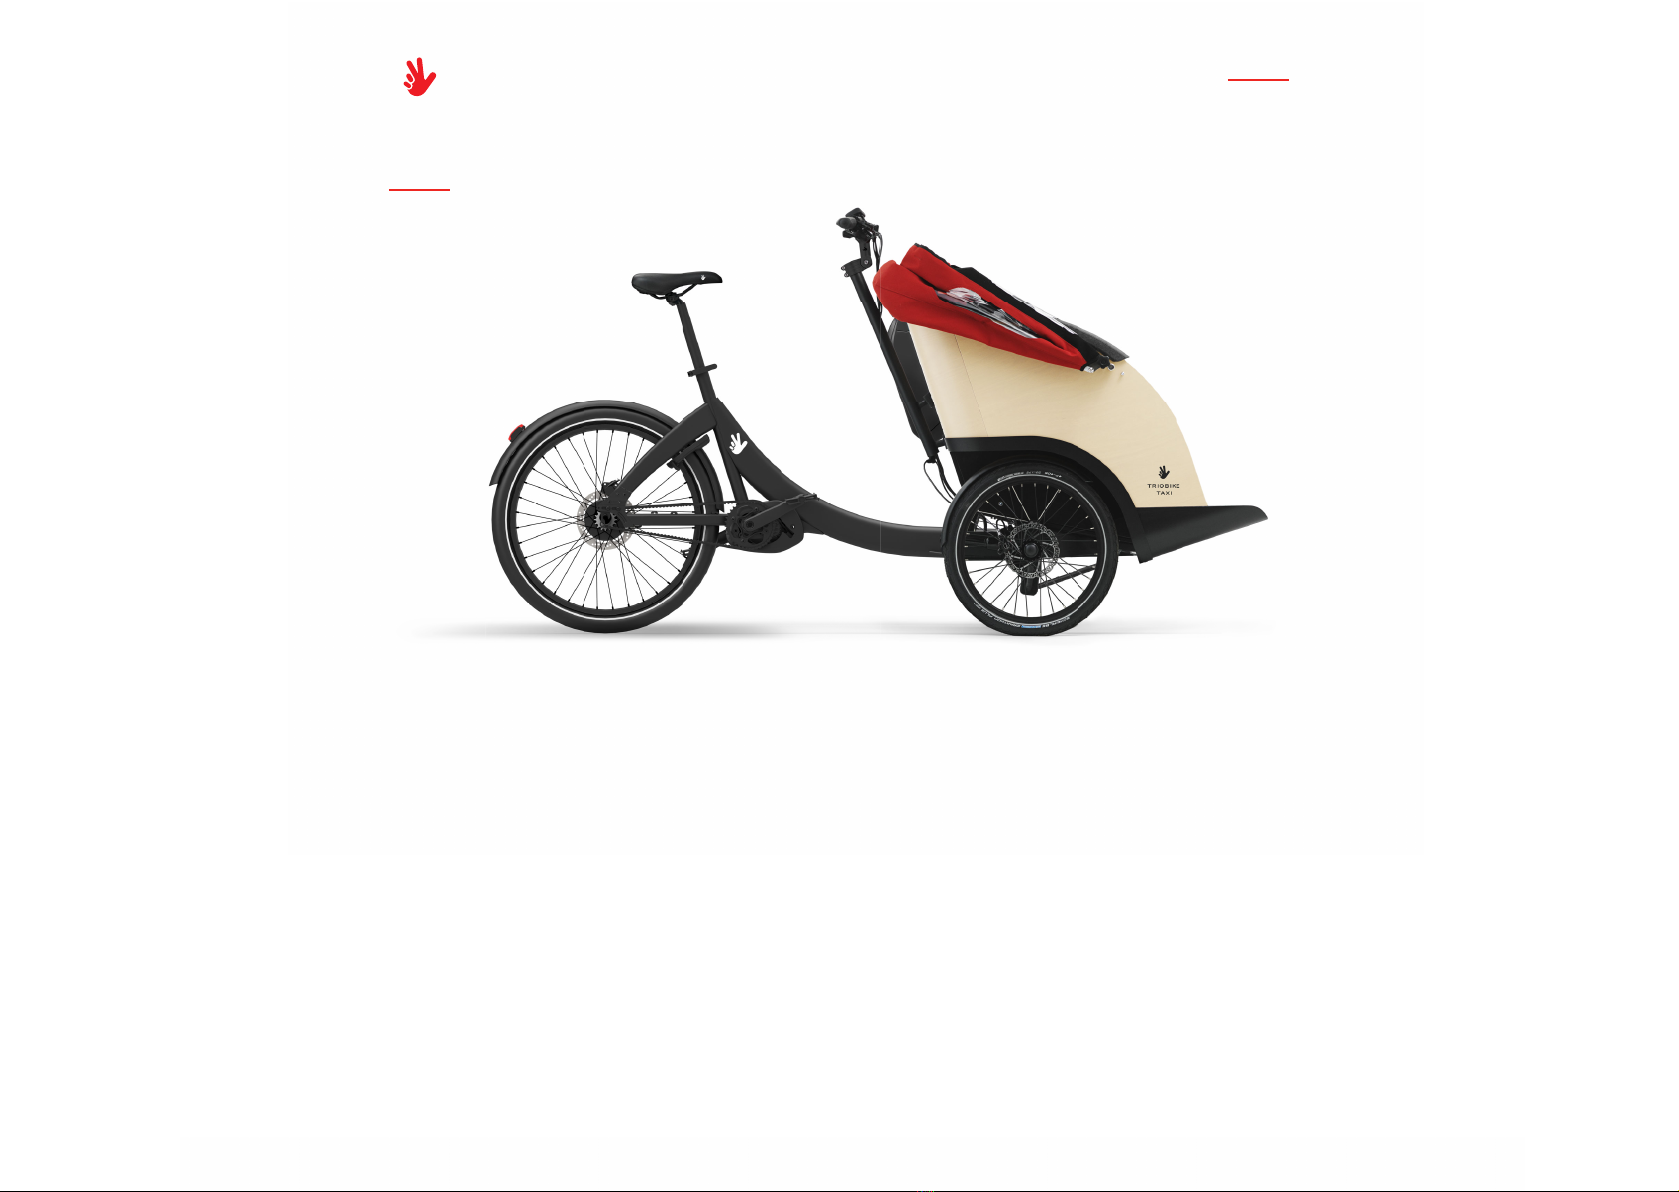
TAXI CL
ENGLISH V 1.0
Congratulations on your new bicycle! Proper assembling and
operation of your bicycle is important for your safety and
enjoyment. Our customer service department is dedicated to
your satisfaction with Triobike and its products. If you have
questions or need advice regarding assembly, parts, performance,
or returns, please contact the experts at Triobike.
Enjoy the ride!
phone: +45 36 70 00 70
email: [email protected]
website: www.triobike.com
social medias: youtube | facebook
hello new user
let's ride
our contacts
4
INDEX TITLE
ABOUT THIS MANUAL
REMINDER
WARNINGS
GENERAL SAFETY
SAFETY CHECKLIST
INSTRUCTIONS
QUICK RELEASE SEAT CLAMP
HANDLEBAR
GEARS
PARKING LOCK
MID DRIVE E-SYSTEM
REMOVABLE BOTTOM PLATE
BLANKET
SEAT BELT
HOOD
GENERAL SPECIFICATIONS
WARRANTY
MAINTENANCE
EC DECLARATION OF CONFORMITY
6
6
7
8
14
16
16
18
19
20
22
24
25
26
28
30
32
34
36

6
ABOUT THIS MANUAL WARNINGS
It is important that you understand your new bicycle. By reading this manual before you go
out on your first ride, you’ll know how to get better performance, comfort, and enjoyment
from your new bicycle. It is also important that your first ride on your new bicycle is in a
controlled environment, away from cars, obstacles and other cyclists.
This manual contains important information regarding safety, assembly, use, and
maintenance of the bicycle but is NOT intended to be a complete or comprehensive manual
covering all aspects concerning bicycle ownership.
We recommend consulting a bicycle specialist if you have any doubts or concerns
regarding your experience or ability to properly assemble and maintain the bicycle.
REMINDER
All persons assembling, using, and maintaining the bicycle must read and understand the
safety warnings and operating instructions in this manual before using the bicycle. It is
the responsibility of the user to ensure the bicycle is properly maintained and in proper
operating condition. Doing so will reduce the risk of injury.
Always conduct regular maintenance and inspection of your bicycle. Complete the Safety
Checklist at the end of this manual before each use.
DO NOT INSTALL ANY KIND OF ADDITIONAL ELECTRIC MOTOR
OR INTERNAL COMBUSTION ENGINE TO THE BICYCLE.
ADAPTING A BICYCLE IN THIS MANNER POSES AN EXTREME
SAFETY RISK TO RIDER AND COULD RESULT IN LOSS OF
CONTROL.
INABILITY TO SAFELY REACH THE HANDLEBARS AND
DISMOUNT THE BICYCLE MAY RESULT IN LOSS OF CONTROL
OF THE BICYCLE. IMPROPER SETUP OR MAINTENANCE OF THE
BICYCLE MAY RESULT IN AN UNEXPECTED MOVEMENT, LOSS OF
CONTROL, AND SERIOUS INJURY.
RIDING THE BICYCLE IN UNSAFE CONDITIONS, IN AN UNSAFE
MANNER, OR DISREGARDING TRAFFIC LAWS MAY RESULT IN AN
UNEXPECTED MOVEMENT, LOSS OF CONTROL, AND SERIOUS
INJURY.
7

8
GENERAL SAFETY
- Always follow the traffic laws in your country.
- Never ride while under the influence of alcohol, medication or drugs.
- If you suffer from any health conditions, please consult your doctor before riding.
- Never endanger yourself or others by reckless riding.
- The usage of bicycles or any accessories such as lamps, bells etc. is the user’s own
responsibility, and TRIOBIKE cannot be held responsible for any damage, accidents,
personal injury or fines caused by the usage of these products.
- Familiarize yourself with all the bicycle’s features before riding.
- Practice gear shifts, braking, and the use of the electric system.
- Always ride defensively in a predictable, straight line.
Inspect the entire bicycle before riding - ensure that there are no loose parts, bolts or
screws. Test the brakes and check if the pressure in the front tires is equal. Check rear tire
pressure too.
If you have any doubts or questions, contact your local bike dealer.
By not following these safety precautions, you may risk injuring yourself or others.
- Never ride against traffic.
- Expect the unexpected (e.g., opening car doors or cars backing out of concealed driveways).
- Take extra care at intersections and when preparing to pass other vehicles.
- Maintain a comfortable stopping distance from all other riders, vehicles and objects. Safe
braking distances and forces are subject to the prevailing weather conditions. Do not lock
up the brakes.
- When braking, always apply the rear brake first, then the front. The front brake is more
powerful and if it is not correctly applied, you may lose control and rise the rear wheel.
Always use the correct hand signals to indicate turning or stopping.
- Obey the traffic laws (e.g., stopping at a red light or stop sign, giving way to pedestrians).
- Wear proper riding attire, reflective if possible, and avoid open toeshoes.
- Do not use items that may restrict your hearing and vision.
- To maximize visibility, we suggest to ride the bike with folded hood.
GENERAL BIKE SAFETY PRACTICES
9

10
- When riding in wet weather always use safety lights to enhance visibility.
- Exercise extreme caution when riding in wet conditions.
- Ride at a slower speed. Turn corners gradually and avoid sudden braking.
- Brake earlier, it will take a longer distance to stop.
- Pot holes and slippery surfaces such as line markings and train tracks all become more
hazardous when wet.
- This bike is for on-road use only. Do not use the bike off-road or on rough terrain.
- Be aware of road conditions. Concentrate on the path ahead.
- Avoid pot holes, gravel, wet road markings, oil, curbs, speed bumps, drain grates and
other obstacles.
- Cross train tracks at a 90 degrees angle or walk your bicycle across.
- Do not ride the bike at night without lights on, both front and rear.
- If using battery powered lights, make sure batteries are well charged.
- Wear reflective and light colored clothing.
- Ride at night only if necessary. Slow down and use familiar roads with street lighting.
- Gear down before a climb and continue gearing down as required to maintain pedaling
speed. You will then obtain more power from each pedal revolution.
- If you reach the lowest gear and are struggling, don’t stand up on your pedals, since you
may loose control of the bike.
- On the descent, use the high gears to avoid rapid pedaling.
- Do not exceed a comfortable speed; maintain control and take additional care. Don’t go
faster than 32 Km/h. If the bike is loaded, limit even further your speed.
- Braking will require additional distance. Initiate braking slowly and earlier than usual.
Please consider that a fully loaded bike can reach 250 Kg and this will heavily effect the
braking distance.
WET WEATHER NIGHT RIDING
HILL TECHNIQUE
ROAD CONDITIONS
GENERAL SAFETY GENERAL SAFETY
11

12
- Brake slightly before cornering and prepare to lean your body into the corner.
- Decrease your riding speed, avoid sudden braking and sharp turns.
- When loading and unloading passengers on the front box, be sure that the parking lock is
activated.
- Load and unload only 1 passenger at a time.
- Don't step or stand on the front footerst since this will make the bike tip. The footrest is
meant only to hold the feet of the passengers when they’re already sitting on the seat.
- Always follow the specific instruction when loading and unloading passengers on the
front box.
- Don’t jump on the footrest.
- Don’t load heavy things in the front trunk.
- When mounting the blanket, be sure that all the fixing points are secured.
- When the hood is unfolded, be sure that the screw handles are firmly secured, and the
metal rings are firmly connected to the front rail supports.
CORNERING TECHNIQUE
FRONT BOX
GENERAL SAFETY

14
SAFETY CHECKLIST
Before every ride, it is important to carry out the following safety checks. Do not ride a
bicycle that is not in proper working condition!
ACCESSORIES
- The reflectors are properly placed and not obscured.
- All other fittings on the bike are properly and securely fastened, and functioning (e.g.:
lights).
- Rider’s and passenger’s clothing and items are properly constrained and not loose.
BEARINGS
- All bearings are lubricated, run freely and display no excess movement, grinding or
rattling.
BRAKES
- The front and rear brakes work properly.
- The brake control cables are lubricated, correctly adjusted and display no obvious wear.
- The brake control levers are lubricated and tightly secured to the handlebar.
CHAIN
- The chain is oiled, clean and runs smoothly.
CRANKS AND PEDALS
- The pedals are securely tightened to the crank arms.
- The crank arms are secured to the axle and are not bent.
FRAME
- The frame is not bent or broken.
- The quick-release clamps are locked in place.
STEERING
- The handlebar and post are correctly adjusted and tightened, and allow proper steering.
- The handlebar binder bolt is tightened.
WHEELS AND TIRES
- The wheels are properly attached to the bicycle and axle.
- The tires are properly inflated within the recommended pressures displayed on the tires
sidewall.
- The tires have the proper amount of tread, no bulges or excessive wear.
14 15

16
QUICK RELEASE SEAT CLAMP
- Unlock the quick-release lever
- Adjust the seat height up or down until the rider feels that he/she has control of the
bicycle and are comfortable.
IMPORTANT: be sure the minimum insertion marks do not go past
the top of the seat clamp and are not visible.
- Try to close the quick-release lever. If it closes easily, open it up and tighten the
adjustment nut further. If it’s too difficult to close, open the quick release lever up and
loosen the adjustment nut a little and try again.
DO NOT ATTEMPT TO TIGHTEN BY TURNING THE QUICK-
RELEASE LEVER. THE QUICK-RELEASE LEVER IS FOR CLOSING,
THE ADJUSTMENT NUT IS FOR ADJUSTING THE PRESSURE.
IMPORTANT: you should feel resistance when you close the quick-
release lever and should leave a temporary impression on your
fingers. Open and close the handle to ensure the seat is securely
locked in place.
17
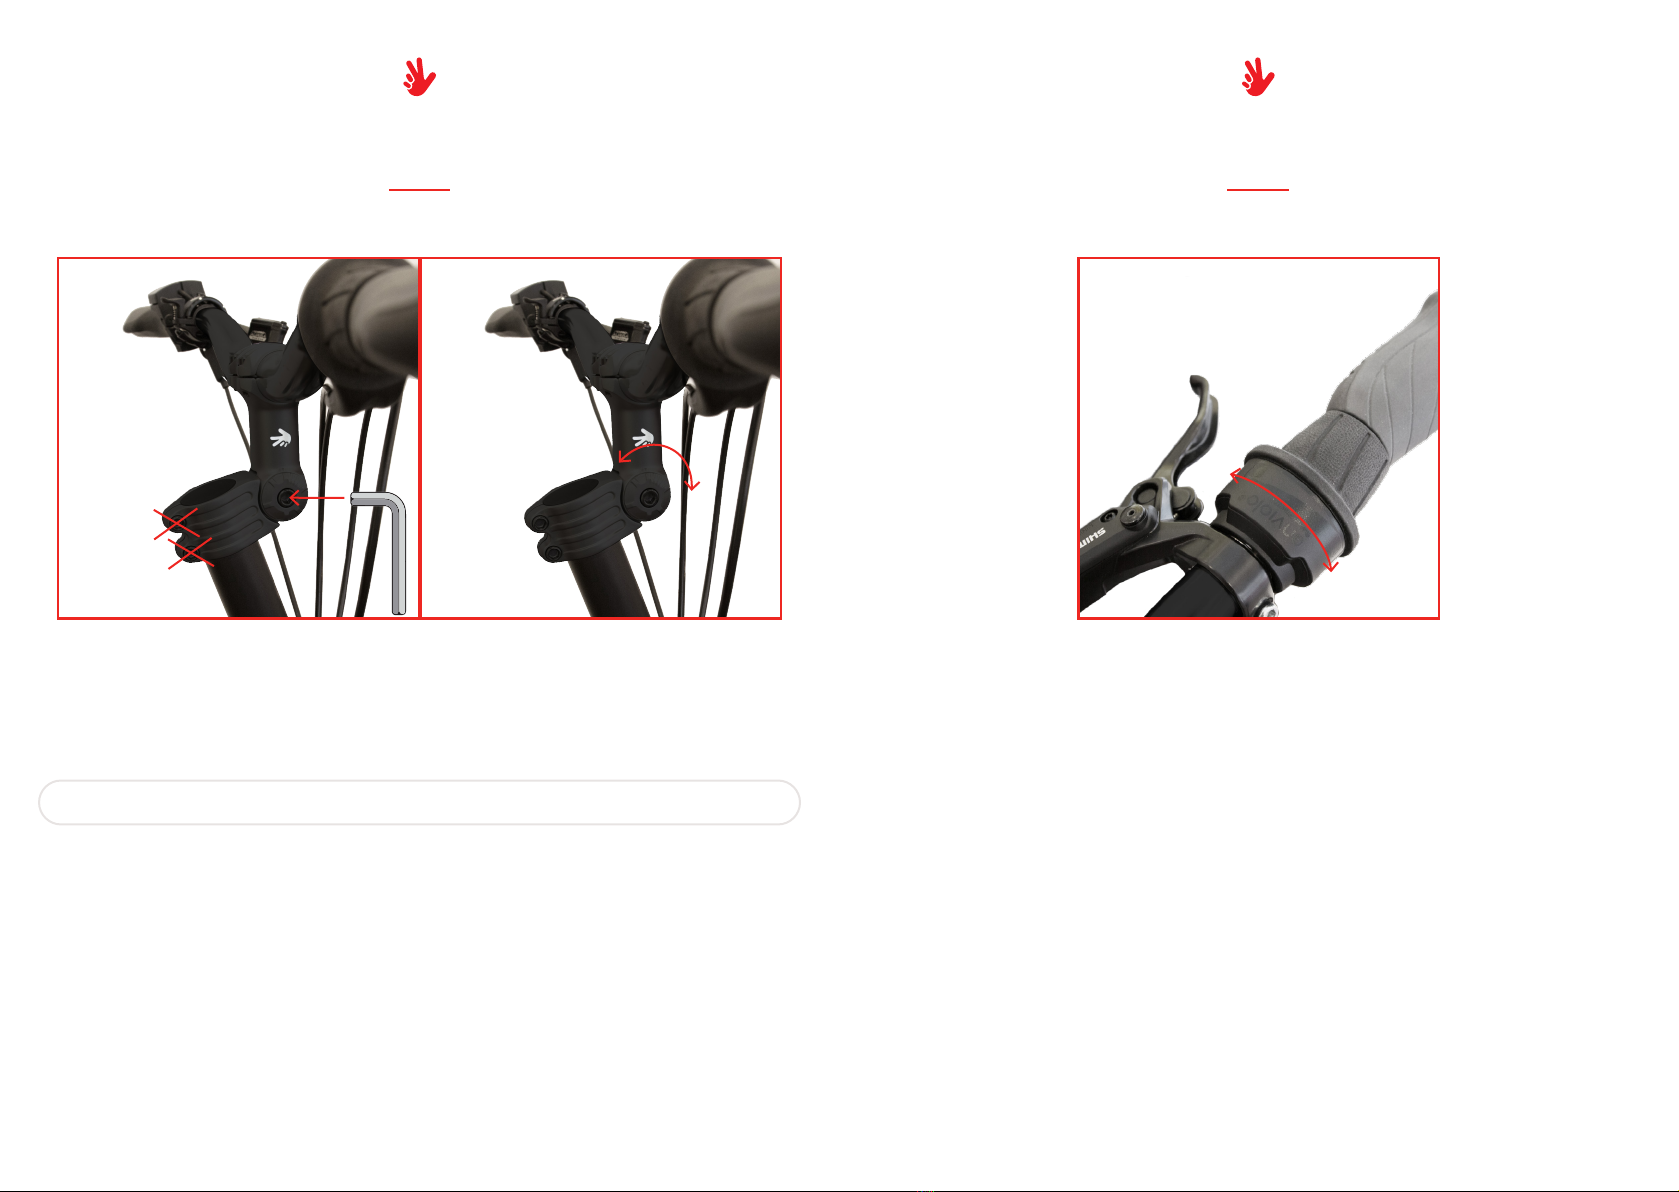
HANDLEBAR
18
- Using a 6 mm Allen wrench loosen the bolt at the front of the stem.
IMPORTANT: do not loosen the bolts on the side of the stem.
- Grasp the stem of the handlebar and rotate to the desired angle.
- Re-tighten the handlebar bolt at the front of the stem and check the
handlebar is securely attached and cannot move.
- Once you have adjusted the angle of the handlebar check the angle of the cables to be
sure they are facing forward.
ADJUSTING THE STEM ANGLE
Shifting with the Enviolo system, while riding:
- Shifting into low ratios for starting or climbing
- Using the Nfinity grip, rotate in the direction indicating more of a “hill”
- Shifting into high ratios for higher speeds
- Using the Nfinity grip, rotate in the direction indicating more of a “flat”
Shifting with the Enviolo system, while stopped:
- Enviolo Cycling CVPs cannot be shifted completely through the ratio range while
stopped: 50-70% of the shift range is typically accessible, with the remaining accessible
with very little pedal rotation
ENVIOLO TRANSMISSION
H
L
19
GEAR

The following steps are valid for the both the front and the rear brakes. The pictures show
the front brake only.
1- Move lever Ato the front
2- Brake with lever Cuntil you will hear 2-3 clicks.
NOW THE BRAKE LOCK IN ENGAGED: for increased safety you can
repeat steps 1 and 2 with the other brake lever.
LOCK
PARKING LOCK
UNLOCK
3- Join lever B(the red one) with lever A(the black one).
4- Keeping lever Aand Btogether, rotate both levers towards the back of the bike. The
brake lever Cwill disengage, popping back to its neutral position.
REMEMBER: a sticker placed on the mineral oil tank shows how to
operate the brake lock levers. Check it in case you are not sure.
3
4
12
A
B
C
20 21

FRONT BOX MOUNTED BATTERY
- To remove the battery, with the left hand insert the key in the lock and turn it clockwise,
while holding the battery with the right hand. For a secure grip, you can grab it in the top
handle.
- To connect the battery, first place the bottom of the battery on the docking, where you see
the connectors. Then push it against the wooden box, until you hear a “click” sound.
IMPORTANT: before stop holding the battery, always check it is
securely connected to the docking station.
- The battery can be charged both through the docking on the bike or detached from it:
in the first case, uncover the side rubber protection and plug the charger connector in the
specific socket. In the second case, plug the connector at the bottom of the battery.
LED on the battery will start blinking. When the charge is done all the 5 LEDs are on.
MID DRIVE ESYSTEM
INCREASE SUPPORT LEVEL
LIGHTS
BATTERY CHARGE LEVEL
POWER BUTTON
ASSISTANCE LEVEL
DECREASE SUPPORT LEVEL
WALK ASSIST
SELECT
INCREASE BRIGHTNESS
GO FORWARD
DECREASE BRIGHTNESS
GO BACKWARD
USING THE SYSTEM BOSCH LED REMOTE + KIOX 300 DISPLAY
- To turn on the system, press the power button.
- Choose the desired assist level by pushing the “+/-” on the handlebar control. Choose
between ECO, SPORT, CARGO and TURBO (the colors of the assitance level indicator will
change accordingly). To make the bike move with electric assistance you just have to pedal.
- To activate the walk assist, just press for more than 1 second the ”-” button, then push
the bike while keeping the walk assist button pressed.
- Integrated lights can be switched on and off pressing the specific button for more than 1
second.
- To turn off the system, press the power button. The Kiox display will show some statistics
about the trip. When the display is off, the complete system is off too.
IMPORTANT: to have a complete overview on the e-system, please
go to Bosch website and read the official manuals.
22 23

- Remove the footrest middle part.
- Drive the bike all the way to the passenger, who easily can sit down on the seat.
This gives and easy entry and exit. The idea is the same as in a wheelchair.
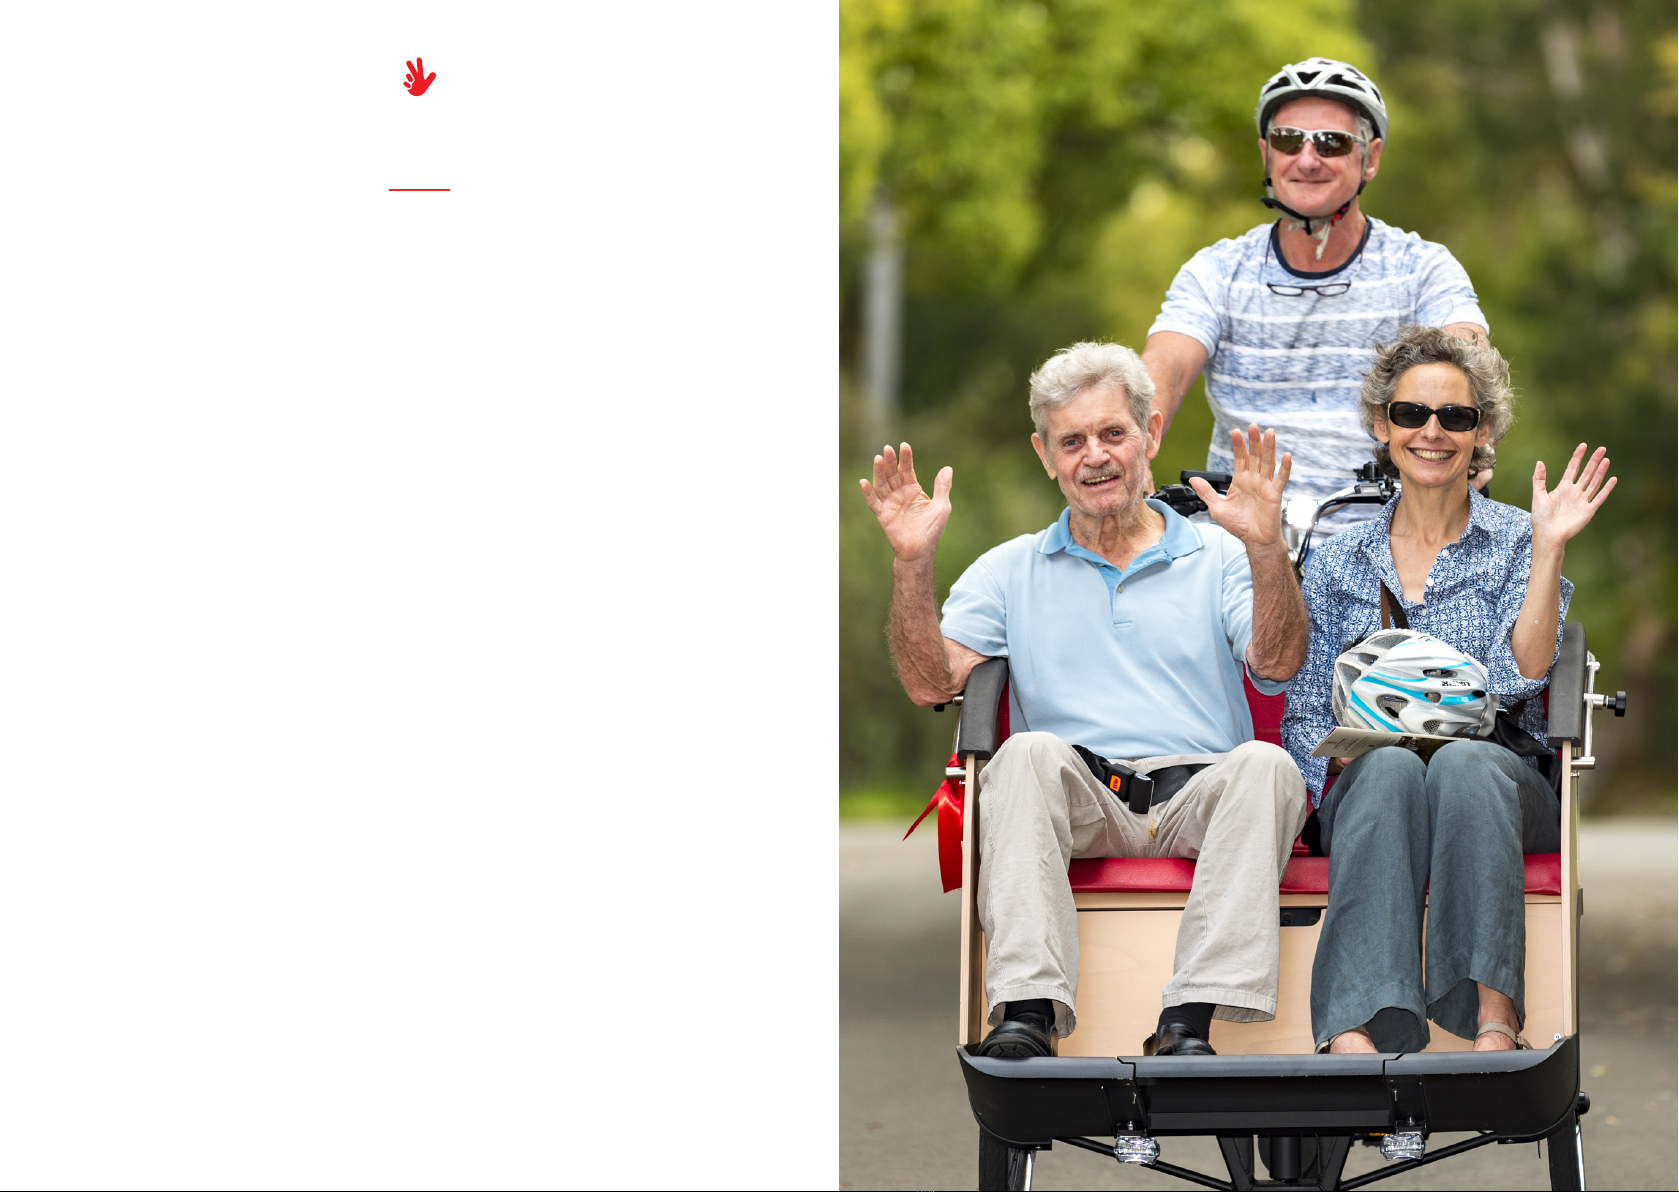
- Sit on the bench like on a normal chair. When the passengers are properly seated they
should raise their feet and place them on the footrest sides.
- Re-place the footrest middle part in its position.
- The passengers can place their feet on the complete footrest surface.
IMPORTANT: Stepping or standing on the front footrest will make
the bike tip.
the footrest mid part could stick
out of 4 mm from the footrest sides:
this is normal due to the nature of wood.
REMOVABLE BOTTOM PLATE
LOADING PASSENGERS
4
BLANKET
- Place the blanket over the passengers.
- On the bottom, attach the two lower corner elastic straps on the blanket to the nut below
each mudguard. Make sure the blanket covers the edge of the bottom plate.
- Attach the two upper corner straps on the blanket to the nut placed to the front rail
supports.
MOUNTING THE BLANKET
24 25
26
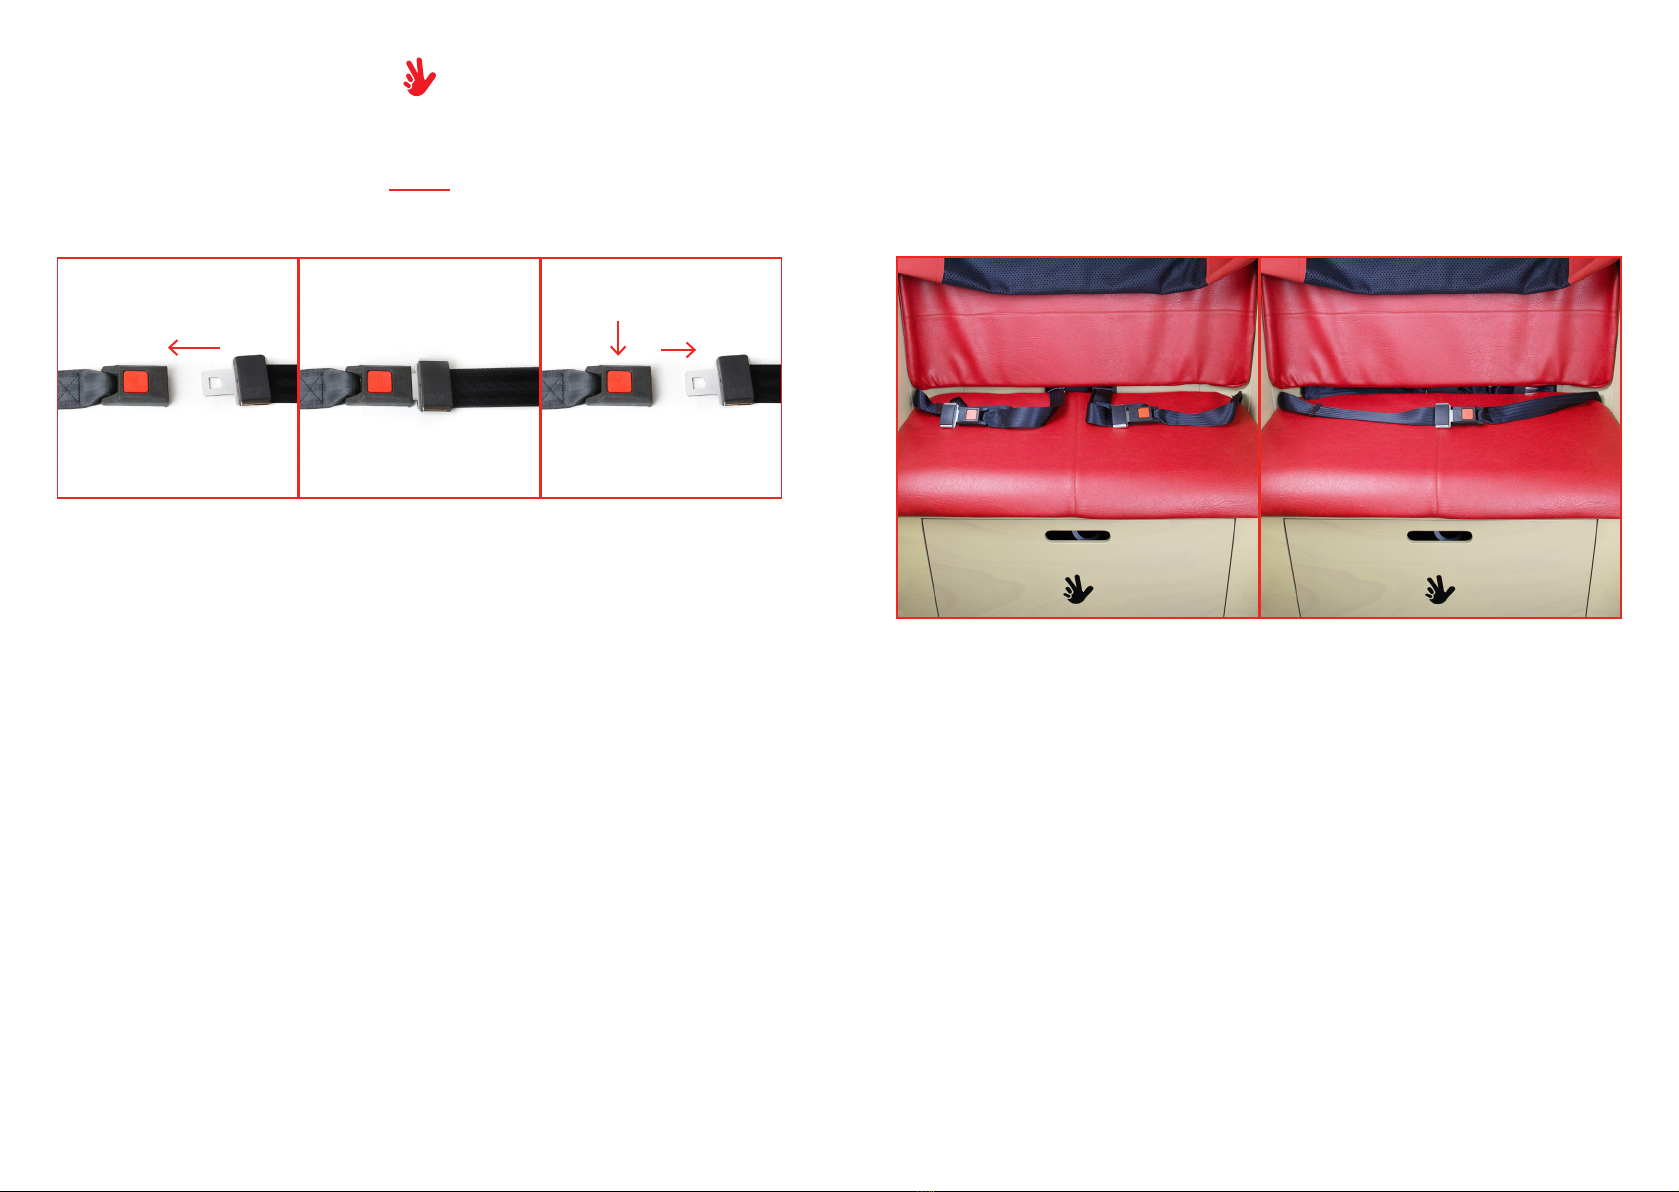
SEAT BELTS
FASTEN THE SEATBELT
- Hold the latch and pull the seat belt across the body without twisting the webbing.
- Insert the latch into the buckle. Listen for a click.
- Tug on the seat belt latch to make sure the belt is securely fastened.
RELEASE THE SEATBELT
- Press the orange button on the buckle to release the latch. Latch will eject from buckle.
SHORTENLENGTHEN THE SEAT BELT
- Turn the adjustable latch at a right angle to the webbing and pull away from the latch,
using the lower webbing strap.
- To shorten, pull the top webbing strap directly away from the adjustable latch.
- If needed for only one passenger of larger size, insert the latch from the left seat belt into
the buckle of the right seat belt.
27

28
HOOD
UNFOLDING THE HOOD
- Loosen the black screw handles on each rail.
- Slide the screw handles on each rail towards the handlebar, while unfolding the hood.
The sliders connected to the handles should touch the rear rail supports.
- Fasten the screw handles again at the end of the rail, closest to the handlebar.
- Zip the two zippers on each back corner of the hood.
FOLDING THE HOOD
- Unzip the zippers on each back corner of the hood.
- Loosen the black screw handles on each rail.
- Slide the screw handles on each rail towards the opposite end of handlebar, while folding
the hood. The sliders should touch the front rail supports.
- Fasten the screw handles again at the end of the rail, farthest from the handlebar.
29
build up
FRAME: aluminium 6061
BOX: beech plywood + aluminium
REAR WHEEL: 26” - 36 spokes
FRONT WHEELS: 20” - 32 spokes
e-system
MOTOR: Bosch Cargo Line | 250W – 85 Nm
DISPLAY: Kiox 300
BATTERY:
Bosch PowerPack 545 Wh
components
BRAKES: Tektro hydraulic disc brakes with parking lock,
160 mm rotors
GEARS / TRANSMISSION:
Enviolo HD manual groupset / Gates Carbon Drive
LIGHTS:
integrated LED front and rear lights
FRAME LOCK:
one AXA lock included
TIRES:
Puncture free Schwalbe Pick-Up 2.15”
SEAT POST:
Ø 31,6 mm
LENGTH 450 mm
STEERING DAMPER: two included
SADDLE: triobike gel
CRANKSET: Miranda aluminium
STEM: adjustable
equipment
RAIN PROTECTION: hood, waterproof blanket (optional)
SEAT: 2 passengers seat with cushions
HARNESS: two 2-point seat belts
dimensions
LENGTH: 22 cm
WIDTH: 106 cm
WEIGHT: 60 kg
MAX PAYLOAD ON THE FRONT BOX: 160 kg
MAX TOTAL WEIGHT: 250 kg
MAX OVERALL LOAD (RIDER+PASSENGERS): 190 kg
SPECIFICATIONS
TAXI CL HD SPECIFICATIONS

build up
FRAME: aluminium 6061
BOX: beech plywood + aluminium
REAR WHEEL: 26” - 36 spokes
FRONT WHEELS: 20” - 32 spokes
e-system
MOTOR: Bosch Cargo Line | 250W – 85 Nm
DISPLAY: Kiox 300
BATTERY:
Bosch PowerPack 545 Wh
components
BRAKES: Tektro hydraulic disc brakes with parking lock,
160 mm rotors
GEARS / TRANSMISSION:
Enviolo Extreme manual groupset / Gates Carbon Drive
LIGHTS:
integrated LED front and rear lights
FRAME LOCK:
one AXA lock included
TIRES:
Puncture free Schwalbe Pick-Up 2.15”
SEAT POST:
Ø 31,6 mm
LENGTH 450 mm
STEERING DAMPER: two included
SADDLE: triobike gel
CRANKSET: Miranda aluminium
STEM: adjustable
equipment
RAIN PROTECTION: hood, waterproof blanket (optional)
SEAT: 2 passengers seat with cushions
HARNESS: two 2-point seat belts
dimensions
LENGTH: 22 cm
WIDTH: 106 cm
WEIGHT: 60 kg
MAX PAYLOAD ON THE FRONT BOX: 160 kg
MAX TOTAL WEIGHT: 280 kg
MAX OVERALL LOAD (RIDER+PASSENGERS): 220 kg
TAXI CL EXTREME SPECIFICATIONS
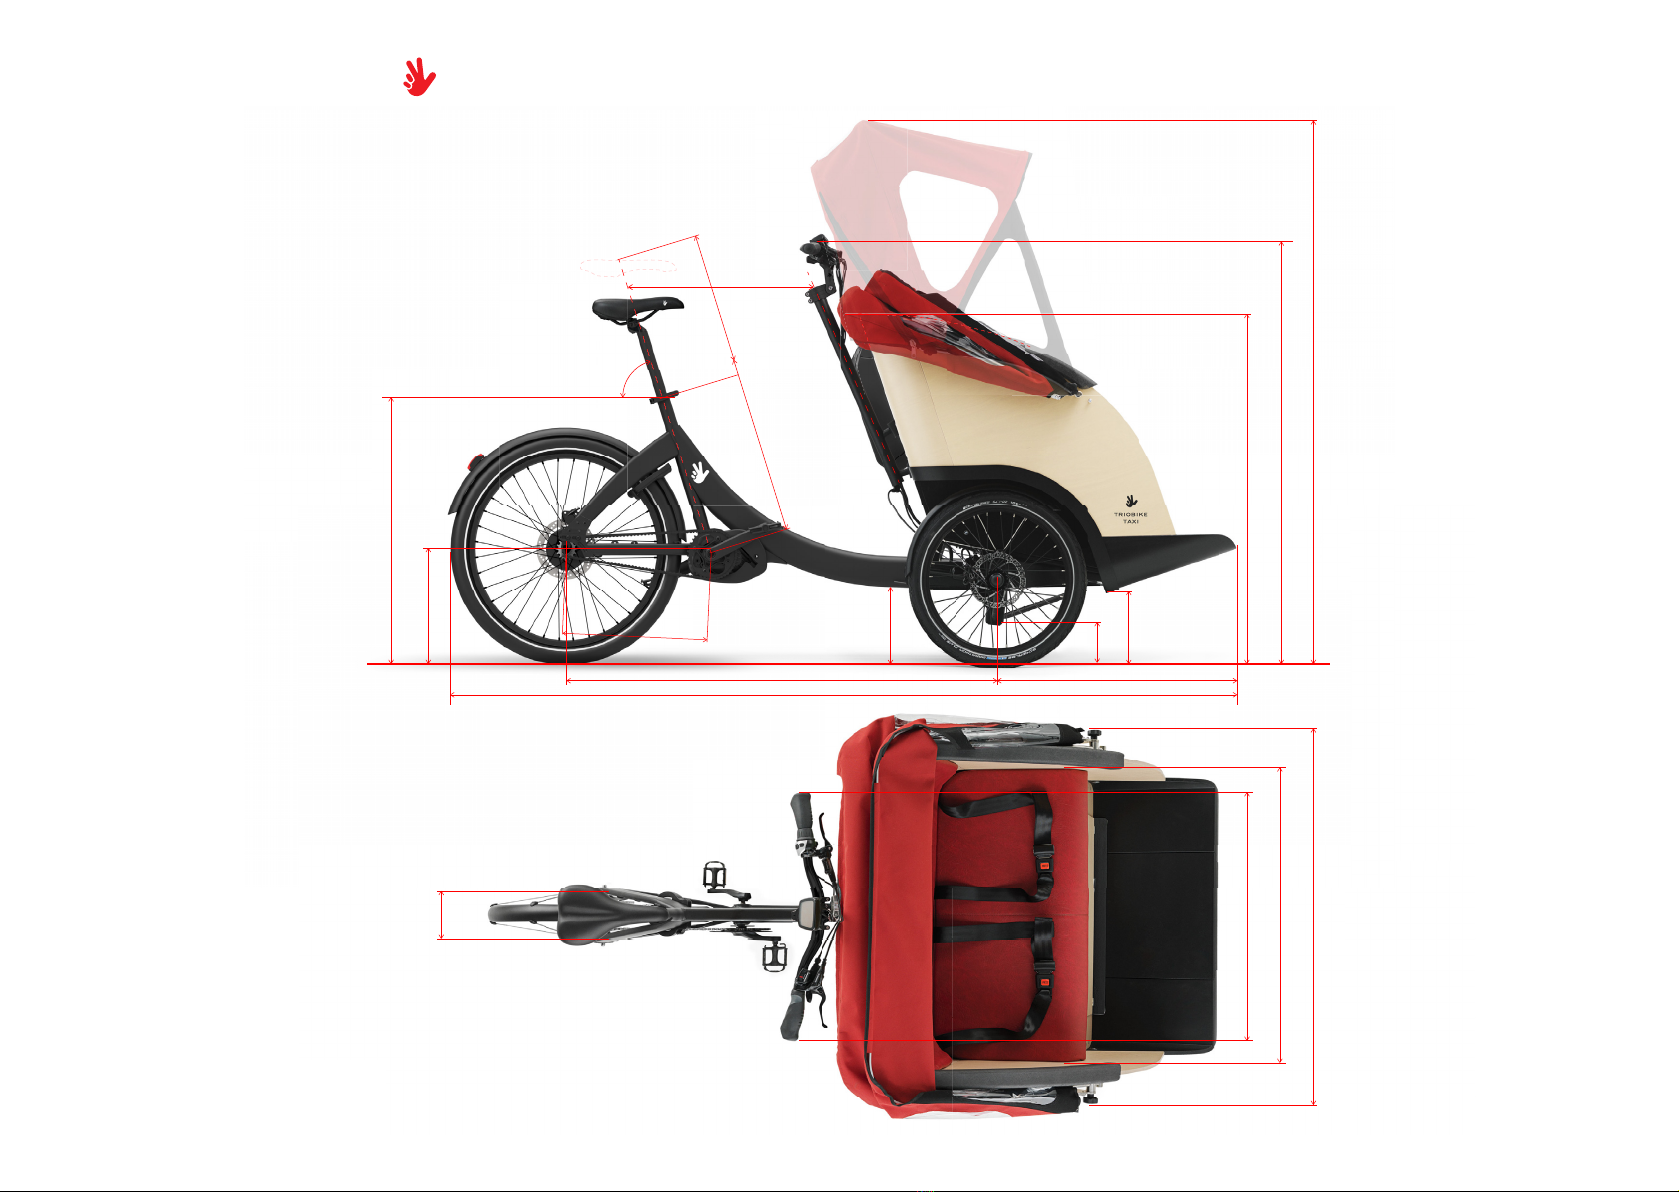
220
110
780
335
1307
400
490
445-460
568
72.8°
220
TRIOBIKE Taxi
Date: 20-12-2022
Copyright© TRIOBIKE A/S 2022
dimensions in mm
1010
2320
665
1595
1213
1060
886
660
135
Hub O.L.D.
135
DIMENSIONS

36
WARRANTY
Limited warranty of manufacture fail of 24 months. This warranty does not apply to gear
hubs, brakes and shifters which are covered directly with these manufacturers.
Failure due to accidents, abuse, neglect, normal wear & tear, improper assembly, wrong
assembling operation, changes of the original product, improper use and maintenance
by any other than authorized bicycle mechanics or use of parts inconsistent with the use
originally intended for the bicycle as sold are not covered by this warranty.
The bicycles are intended to be used for city biking. TRIOBIKE shall not be held responsible
for any accidents, injury, losses or damage caused by use of the bicycle, being that of
responsibility of the owner.
The above limited warranty is conditional upon the bicycle being properly maintained and
operated under normal conditions and use.
In case of warranty claim contact the original place of purchase, accompanied by an
original bill of sale or proof of purchase that identifies the bike or the frame by the serial
number.
Outside Denmark, the original owner is responsible for any and all labour and
transportation charges associated with the warranty repair or replacement of all parts.

38
MAINTENANCE
GENERAL ADVISE
Please remember to have your first check & fine tune after 3 months. Hereafter we
recommend a complete service and fine tuning of your bike every year/2000 km. Please
consultant your local dealer or local shop.
For specific control point for each service contact your local bike shop - this bike must be
serviced only by trained and quilified bike mechanic.
Specific control points for each service: brakes, gears, battery status, spokes, bearings.
TIRES
It’s important to have correct air pressure on tires. It improves control and handling, and it
doesn’t stress tires. Correct pressure is 4.5 Bar (65 PSI).
BATTERIES
Batteries have to be charged every 4 weeks, also when the bike is parked and not in use.
For complete instructions please check the e-system manufacturer manual.
SPOKES
The users must check the tension and eventually tighten the spokes after 100 km. The
same operation has to be repeated every month/1000 km.
REPEAT ONCE A YEAR OR 2000 KM (1240 MILES)
year/km
3 months
check
1 year
2000 km
1240 miles
2 years
4000 km
2480 miles
3 years
6000 km
3730 miles
4 years
8000 km
4970 miles
5 years
10 000 km
6210 miles
brakes
gears
bearings
spokes
brakes
gears
bearings
battery status
tires check
chain
spokes
brakes
gears
bearings
battery status
tires check
chain
spokes
brakes
gears
bearings
battery status
tires check
chain
spokes
brakes
gears
bearings
battery status
tires check
chain
spokes
brakes
gears
bearings
battery status
tires check
chain
spokes
operation
checklist
dealer stamp
39
Table of contents
Other TRIOBIKE Bicycle manuals

TRIOBIKE
TRIOBIKE Taxi User manual

TRIOBIKE
TRIOBIKE BOXTER User manual

TRIOBIKE
TRIOBIKE CARGO User manual

TRIOBIKE
TRIOBIKE HAFNIA User manual

TRIOBIKE
TRIOBIKE BOXTER User manual

TRIOBIKE
TRIOBIKE BOXTER CL User manual

TRIOBIKE
TRIOBIKE CARGO User manual

TRIOBIKE
TRIOBIKE CARGO User manual

TRIOBIKE
TRIOBIKE CARGO User manual

TRIOBIKE
TRIOBIKE BOXTER User manual

TRIOBIKE
TRIOBIKE MONO User manual

TRIOBIKE
TRIOBIKE Taxi User manual

TRIOBIKE
TRIOBIKE BOXTER User manual

TRIOBIKE
TRIOBIKE MONO User manual

TRIOBIKE
TRIOBIKE CARGO User manual

TRIOBIKE
TRIOBIKE CARGO BIG User manual

TRIOBIKE
TRIOBIKE BOXTER User manual

TRIOBIKE
TRIOBIKE CARGO User manual

TRIOBIKE
TRIOBIKE BOXTER Operation instructions

TRIOBIKE
TRIOBIKE Taxi User manual


