CamView IP Pro Series Combined User Manual 1
www.Triplett.com
1. INTRODUCTION
1.1 General Use
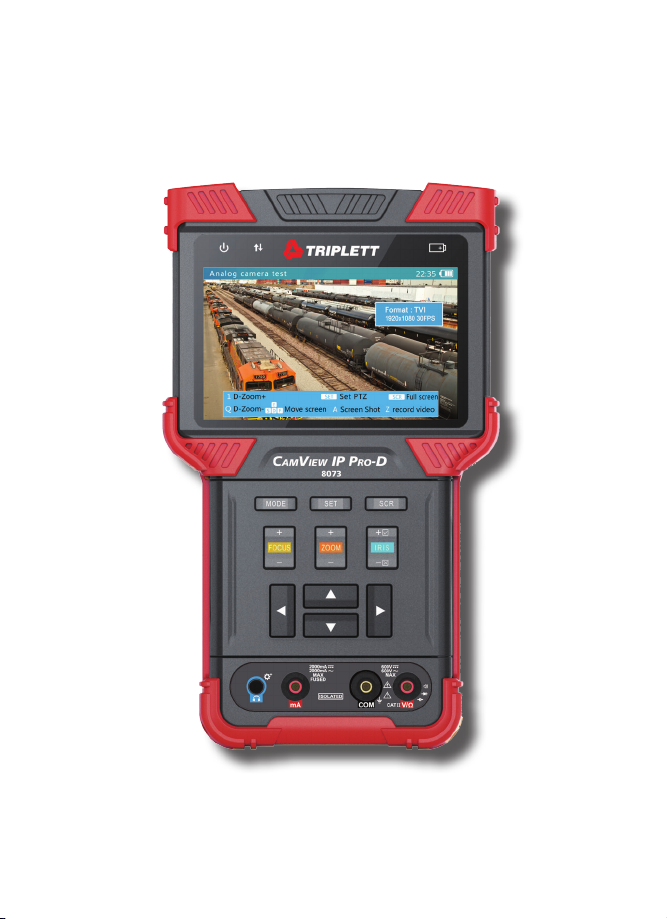
The CamView IP Pro, Pro-C, Pro+, and Pro-D are designed to facilitate the installation and mainte-
nance of surveillance video equipment. They can be used with Standard Definition analog NTSC/
PAL camera systems and High Definition ONVIF conformant IP (Ethernet) camera systems. They
provide an RS485 port for PTZ control of analog PTZ cameras, and can provide POE for operat-
ing IP cameras, or 12VDC (not to exceed 2A) to power analog cameras. They allow you to per-
form various IP camera tests, Ethernet and network tests, capture video (snapshots and video
recording), playback video, generate video test patterns for monitor checking, and perform analog
camera testing. They also allow you to check microphone/audio sources and even provide a bright
flashlight function. Recorded images and video can be transferred to PCs or other devices via USB
port connection.
The CamView IP Pro-C supports H.264 IP cameras and NTSC/PAL and HD-CVI 2.0 analog
video cameras. The Pro+ supports H.264 IP cameras, as well as NTSC/PAL and AHD 1.0 and
HD-TVI 2.0 analog video cameras. The Pro-D supports H.265 IP cameras, as well as NTSC/PAL,
AHD 2.0, CVI 3.0, and TVI 3.0 cameras. The Pro-C, Pro+, and Pro-D all include additional
Ethernet cable testing functions, including TDR (Time Domain Reflectometry) for length and fault
checking.
These products combine powerful features in a very portable, ergonomic design that will help you
perform your video systems installation and maintenance jobs quickly and efficiently.
1.2 Function Summary
1.2.1 ONVIF IP Camera Test
The Tester will guide you through a step-by-step process to test the functionality of IP cameras,
whether they are connected to an existing network or directly attached to the Tester. These steps
include:
Step 1: Testing Ethernet connections, POE, IP settings, DHCP status/request, or providing
DHCP service to a directly connected camera;
Step 2: Discovering camera(s), accessing camera settings, ONVIF report generation,
showing a snapshot from the currently selected camera; and
Step 3: Displaying live video from the camera, profile/stream settings, and controlling the
camera’s PTZ functions (if camera is capable of PTZ).