TriStar AC-5410 User manual

AC-5410
AC-5410BS_IM_A5.indd 1AC-5410BS_IM_A5.indd 1 16-7-2020 13:08:0416-7-2020 13:08:04

2
AC-5410BS_IM_A5.indd 2AC-5410BS_IM_A5.indd 2 16-7-2020 13:08:0516-7-2020 13:08:05

3
EN
Dehumidier
SAFETY WARNINGS
• When using the unit, please observe the
following safety precautions.
• This appliance can be used by children aged
from 8 years and above and persons with
reduced physical, sensory or mental capabilities
or lack of experience and knowledge if they
have been given supervision or instruction
concerning use of the appliance in a safe way
and understand the hazards involved.
• Cleaning and user maintenance shall not be
made by children without supervision.
• Children shall not play with the appliance.
• Unplug the power supply cord before cleaning
or storage.
• Do not submerge the unit in water, or place the
unit close to water.
• Do not put the unit close to heat-generating
devices or near ammable and dangerous
materials.
• Never put your ngers or objects into the intake
or discharge ducts.
• Do not sit or stand on the unit.
• Discard water that has collected in the tank as
required.
• Do not operate the dehumidier in a closed area
such as inside a closet, as it may cause a re.
• Install drain piping at a downhill grade to make
sure that condensed water can be drained
continuously.
• If the power supply cord is damaged it must
be replaced by the manufacture or a qualied
service agent.
PARTS DESCRIPTION
Unit
1. Front shell
2. Outlet
3. Handle
4. Control Panel
5. Filter box
6. Back shell
7. Tank
8. Rubber feet
9. Supply cord
Display
1. Water full led
2. Comp led
3. Defrost led
4. Timer led
5. Digit display
6. Power button
7. Down button
8. Up button
9. Timer button
1
5
6
234
7
8 9
1
6
3
8 5
2
7
4
9
AC-5410BS_IM_A5.indd 3AC-5410BS_IM_A5.indd 3 16-7-2020 13:08:0516-7-2020 13:08:05

4
Instruction manual
The digit display features 3 functions:
1. It will indicate the humidity that is selected.
2. When using the timer it will display the selected hours.
When the environment humidity is lower than 35% it will show “LO”, when
it is higher than 95% it will show “HI”
BEFORE THE FIRST USE
• Take the appliance and accessories out the box. Remove the stickers,
protective foil or plastic from the device.
• Before using your appliance for the rst time, wipe o all removable
parts with a damp cloth. Never use abrasive products.
• Place the device on a at stable surface and ensure a minimum of
20 cm. free space around the device. This device is not suitable for
installation in a cabinet or for outside use.
• Put the power cable into the socket. (Note: Make sure the voltage
which is indicated on the device matches the local voltage before
connecting the device. Voltage 220V~240V 50/60Hz)
OPERATION
• Press the Power button once to start operation. Press it again to stop
operation.
Draining the collected water
When the drainage tank is full, the tank full indicator light will turn on,
the operation will stop automatically and the buzzer will beep 15 times to
alert the user, that the water need to be emptied from the drainage tank.
Emptying the Drainage Tank
1. Lightly press on the sides of the tank with both hands and pull the tank
out gently.
2. Discard the collected water
1. Open the inlet grill (1)
2. Remove the air lter (2) from the
dehumidier
3. Remove the plastic bag of the carbon
lter (3)
4. Place the carbon lter (3) in the
dehumidier
5. Place the air lter (2) in the
dehumidier
6. Close the inlet grill (1)
AC-5410BS_IM_A5.indd 4AC-5410BS_IM_A5.indd 4 16-7-2020 13:08:0516-7-2020 13:08:05

5
EN
NOTE
• Do not remove the oat from the water tank. The water full sensor will
no longer be able to detect the water level correctly without the oat
and water may leak from the water tank.
• If the drainage tank is dirty, wash it with cold or lukewarm water.
Do not use detergent, scouring pads, chemically treated dust cloths,
gasoline, benzene, thinner, or other solvents, as these can scratch and
damage the tank and cause water leakage.
• When replacing the drainage tank, press the tank rmly into place
with both hands. If the tank is not positioned properly, the “TANK FULL”
sensor will be activated, and the dehumidier will not operate.
Continuous Water Drainage
The unit features a continuous drainage port. Using a plastic pipe (with an
inner diameter of 10mm). Take out the water tank and put the drainpipe
over the water outlet of the unit. Put the water tank back in place and guide
the drainpipe through the hole of the water tank. The water in the drainage
tank can be continuously drained out from the continuous port on the unit.
CLEANING AND MAINTENANCE
• Wipe it with a soft damp cloth.
• Open the inlet grill rstly and remove the air lter
• Run a vacuum cleaner lightly over the surface of the air lter to remove
dirt. If the air lter is exceptionally dirty, wash it with warm water and a
mild cleanser and dry thoroughly.
Dehumidier
AC-5410BS_IM_A5.indd 5AC-5410BS_IM_A5.indd 5 16-7-2020 13:08:0616-7-2020 13:08:06

6
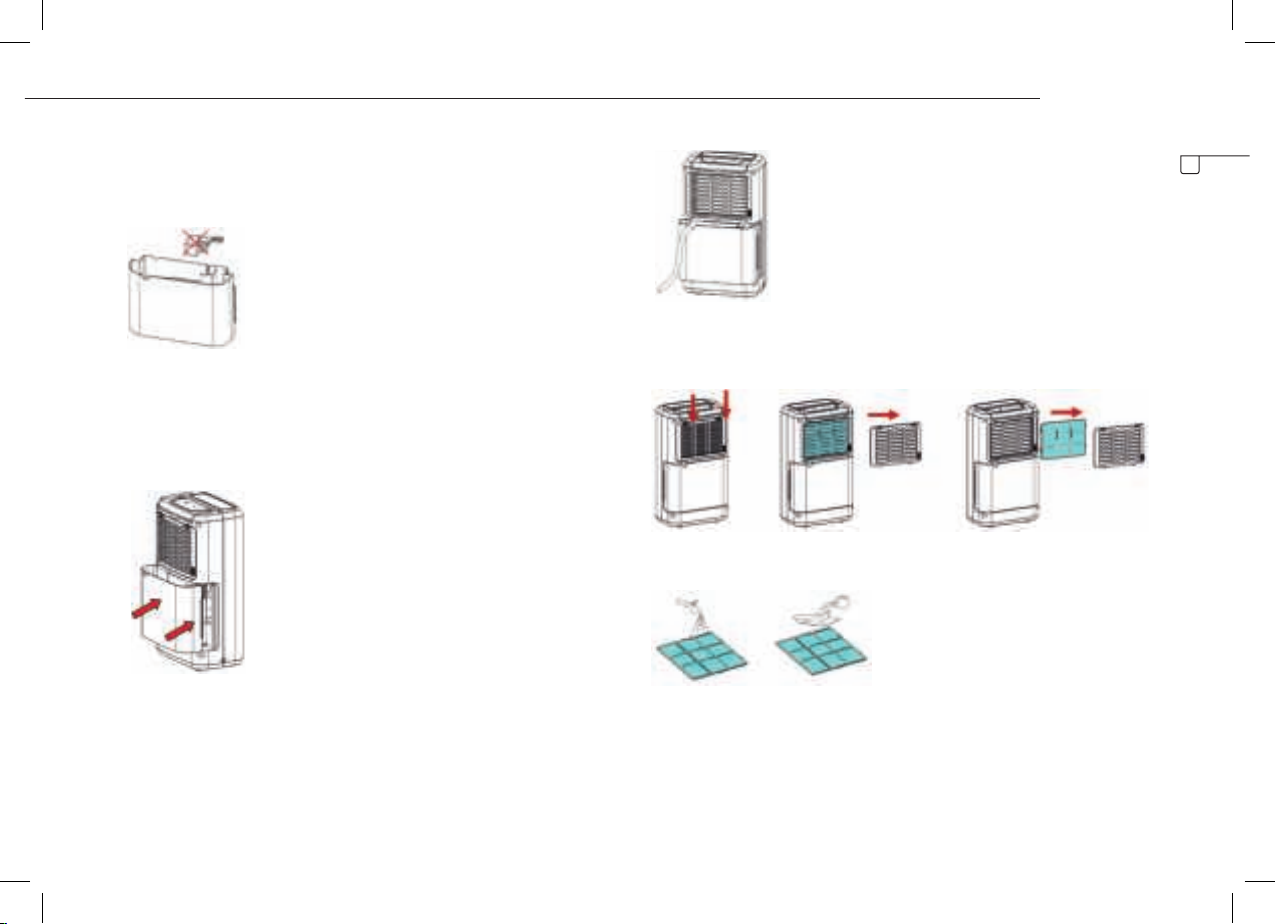
• Insert the lter into the grill smoothly, and place the inlet grill into right place.
STORING THE DEHUMIDIFIER
When the unit is not being used for a long period of time and you want to
store it note the following steps:
1. Empty any water left in the drainage tank.
2. Fold up the power supply cord and put it in the water tank.
3. Clean the air lter
4. Discard in a cool and dry place .
TROUBLESHOOTING
If a condition listed below occurs, please check the following items before
calling customer service.
Problem Possible Cause Solution
The unit
doesn't operate
Is the temperature of
the room above 35oC or
below 5oC?
The protection device is activated
and the unit cannot be started.
The
dehumidifying
function
doesn't work
Is the air lter clogged? Clean the air lter as instructed
under "Cleaning and maintenance".
Is the intake duct
or discharge duct
obstructed?
Remove the obstruction from the
discharge duct or intake duct.
No air is
discharged
Is the air lter clogged? Clean the air lter as instructed
under "Cleaning and maintenance".
Problem Possible Cause Solution
Operation is
noisy
Is the unit tilted or
unsteady?
Move the unit to a stable, sturdy
location.
Is the air lter clogged? Clean the air lter as instructed
under "Cleaning and maintenance".
E1 Code Pipe temperature
sensor failed
Replace pipe temperature sensor
GUARANTEE
• This product is guaranteed for 24 months granted. Your warranty is
valid if the product is used in accordance to the instructions and for
the purpose for which it was created. In addition, the original purchase
(invoice, sales slip or receipt) is to be submitted with the date of
purchase, the name of the retailer and the item number of the product.
• For the detailed warranty conditions, please refer to our service
website: www.tristar.eu
GUIDELINES FOR PROTECTION OF THE
ENVIRONMENT
This appliance should not be put into the domestic garbage at the
end of its durability, but must be oered at a central point for the
recycling of electric and electronic domestic appliances. This symbol on
the appliance, instruction manual and packaging puts your attention to
this important issue. The materials used in this appliance can be recycled.
By recycling of used domestic appliances you contribute an important
push to the protection of our environment. Ask your local authorities for
information regarding the point of recollection.
Instruction manual
AC-5410BS_IM_A5.indd 6AC-5410BS_IM_A5.indd 6 16-7-2020 13:08:0616-7-2020 13:08:06

7
AC-5410BS_IM_A5.indd 7AC-5410BS_IM_A5.indd 7 16-7-2020 13:08:0616-7-2020 13:08:06

Quality shouldn't be a luxury!
www.tristar.eu
Tristar Europe B.V. | Jules Verneweg 87 | 5015 BH Tilburg | The Netherlands
AC-5410BS_IM_A5.indd 8AC-5410BS_IM_A5.indd 8 16-7-2020 13:08:0616-7-2020 13:08:06
Other manuals for AC-5410
1
Table of contents
Other TriStar Air Cleaner manuals
Popular Air Cleaner manuals by other brands

NOVAERUS
NOVAERUS Protect 900 user manual

Honeywell
Honeywell enviracaire 18150 Series owner's manual

AtmosAir
AtmosAir 700 series installation guide

Advanced PureAir
Advanced PureAir Desk & Travel Pro 1500 owner's manual

deconta
deconta R 150 silent Original instruction manual

Airo
Airo Desk instruction manual