Tritech SeaHub User manual

SeaHub
0594-SOM-00001, Issue: 02 1 © Tritech International Ltd.
SeaHub
Product Manual
0594-SOM-00001, Issue: 02

SeaHub
0594-SOM-00001, Issue: 02 2 © Tritech International Ltd.
© Tritech International Ltd
The copyright in this document is the property of Tritech International Ltd. The document is supplied by Tritech International Ltd on
the understanding that it may not be copied, used, or disclosed to others except as authorised in writing by Tritech International Ltd.
Tritech International Ltd reserves the right to change, modify and update designs and specifications as part of their ongoing
product development programme.
All product names are trademarks of their respective companies.

SeaHub
0594-SOM-00001, Issue: 02 3 © Tritech International Ltd.
Table of Contents
Help & Support ........................................................................................................... 4
Warning Symbols ........................................................................................................ 5
Head Variations .......................................................................................................... 6
1. Introduction ............................................................................................................. 7
2. Specification ........................................................................................................... 8
2.1. SeaHub Dimensions (Desktop version) ......................................................... 8
2.2. SeaHub Dimensions (Rack mountable version) .............................................. 9
2.3. Physical ....................................................................................................... 9
2.4. Electrical and Communication ..................................................................... 10
2.5. SeaHub (Desktop version) Panel Connectors ............................................... 10
2.6. SeaHub (Rack mountable version) Panel Connectors ................................... 11
2.7. Pin-Out Diagrams ....................................................................................... 12
2.7.1. AIF (ARCNET) Port ......................................................................... 12
2.7.2. Ports A & B ..................................................................................... 12
2.7.3. Ports C & D .................................................................................... 13
2.7.4. Front Panel RAT ............................................................................. 13
3. Installation ............................................................................................................ 14
3.1. Software Installation ................................................................................... 14
3.2. Surface Hardware Installation and Configuration .......................................... 15
3.3. Driver installation for SeaHub and NavHub .................................................. 18
4. Operation .............................................................................................................. 22
4.1. SeaHub Front Panel ................................................................................... 22
4.2. SeaHub Setup ............................................................................................ 22
4.3. Setting Up the COM Ports .......................................................................... 26
5. Maintenance and Hardware Configuration .............................................................. 29
5.1. Opening the SeaHub .................................................................................. 29
5.2. Checking and Replacing Fuses ................................................................... 30
5.2.1. The AC Mains Fuse - Desktop version .............................................. 30
5.2.2. The AC Mains Fuse - Rack mount version ........................................ 31
5.2.3. The DC Output Fuse ....................................................................... 31
5.2.4. The DC Ext Output Fuses ................................................................ 32
5.3. Making a Pingsync link for Dual Profilers ..................................................... 33
5.4. Changing the DC Voltage output ................................................................. 33
5.5. Changing the ARCNET Termination resistor ................................................ 36
5.6. Changing the ARCNET Power Supply ......................................................... 37
5.7. Hardware Reset ......................................................................................... 37
5.8. Closing the SeaHub ................................................................................... 39
6. Troubleshooting .................................................................................................... 40
A. ARCNET Termination ........................................................................................... 44
Glossary ................................................................................................................... 45

SeaHub
0594-SOM-00001, Issue: 02 4 © Tritech International Ltd.
Help & Support
First please read this manual thoroughly (particularly the Troubleshooting section, if present).
If a warranty is applicable, further details can be found in the Warranty Statement, 0080-
STF-00139, available upon request.
Tritech International Ltd can be contacted as follows:
Mail
Telephone
Email
Website
Tritech International Ltd
Peregrine Road
Westhill Business Park
Westhill, Aberdeenshire
AB32 6JL, UK
+44 (0)1224 744111
www.tritech.co.uk
Prior to contacting Tritech International Ltd please ensure that the following is available:
1. The Serial Numbers of the product and any Tritech International Ltd equipment connected
directly or indirectly to it.
2. Software or firmware revision numbers.
3. A clear fault description.
4. Details of any remedial action implemented.
Contamination
If the product has been used in a contaminated or hazardous environment you
must de-contaminate the product and report any hazards prior to returning the
unit for repair. Under no circumstances should a product be returned that is
contaminated with radioactive material.
The name of the organisation which purchased the system is held on record at Tritech
International Ltd and details of new software or hardware packages will be announced at
regular intervals. This manual may not detail every aspect of operation and for the latest
revision of the manual please refer to www.tritech.co.uk
Tritech International Ltd can only undertake to provide software support of systems loaded
with the software in accordance with the instructions given in this manual. It is the customer's
responsibility to ensure the compatibility of any other package they choose to use.
SeaHub
0594-SOM-00001, Issue: 02 5 © Tritech International Ltd.
Warning Symbols
Throughout this manual the following symbols may be used where applicable to denote any
particular hazards or areas which should be given special attention:
Note
This symbol highlights anything which would be of particular interest to the reader
or provides extra information outside of the current topic.
Important
When this is shown there is potential to cause harm to the device due to
static discharge. The components should not be handled without appropriate
protection to prevent such a discharge occurring.
Caution
This highlights areas where extra care is needed to ensure that certain delicate
components are not damaged.
Warning
DANGER OF INJURY TO SELF OR OTHERS
Where this symbol is present there is a serious risk of injury or loss of life. Care
should be taken to follow the instructions correctly and also conduct a separate
Risk Assessment prior to commencing work.

SeaHub
0594-SOM-00001, Issue: 02 6 © Tritech International Ltd.
Head Variations
The SeaHub comes in the following configurations:
Desktop version
• Desktop interface for Tritech products
Rack mount version
• Rack mountable interface for Tritech
products

SeaHub
0594-SOM-00001, Issue: 02 7 © Tritech International Ltd.
1. Introduction
The Tritech SeaHub Surface Interface Module is designed to be a universal interface box
providing a single module solution for interfacing the range of Tritech International Ltd sub-
surface products (sonars, acoustic modems and other undersea sensors) into a PC computer
or Laptop.
The SeaHub can be powered from a standard Mains power supply, or through the input DC
socket at the rear of the unit and is available in either a 19" Rack mountable solution, or as
a desktop unit.
The SeaHub can be connected to devices through a variety of communication protocols:
ARCNET; RS232 (3 and 5 variants); RS422 (Full Duplex) and RS485 (Half Duplex). The
front of the SeaHub provides a LED status panel which displays the communications protocol
selected for each Port.
The SeaHub also provides a built in DC power supply that can power units. This is intended
for testing purposes, but could be used where an alternative power source is not available.
The two DIN connector ports have power automatically present, but there is also the three
4mm sockets at the rear of the unit.
Note
The DC power output level from the SeaHub is controlled by an internal variable
resistor. See Chapter 4, Operation for more details.
Note
When powering the SeaHub from a DC power supply, the SeaHub will connect
the DC output to this supply but with approximately a 2V voltage drop.
For sonar specific control, the front panel also contains provision for connection to a RAT.
RATs with a PS2 “Togglestick” mouse-controller and RS485 serial communications are
supported.
At the front of the SeaHub two USB Type-A sockets are also provided for user specific
peripherals to be connected. Each socket is capable of delivering 500mA of current (to a self-
powered hub), and is protected accordingly.
SeaHub
0594-SOM-00001, Issue: 02 8 © Tritech International Ltd.
2. Specification
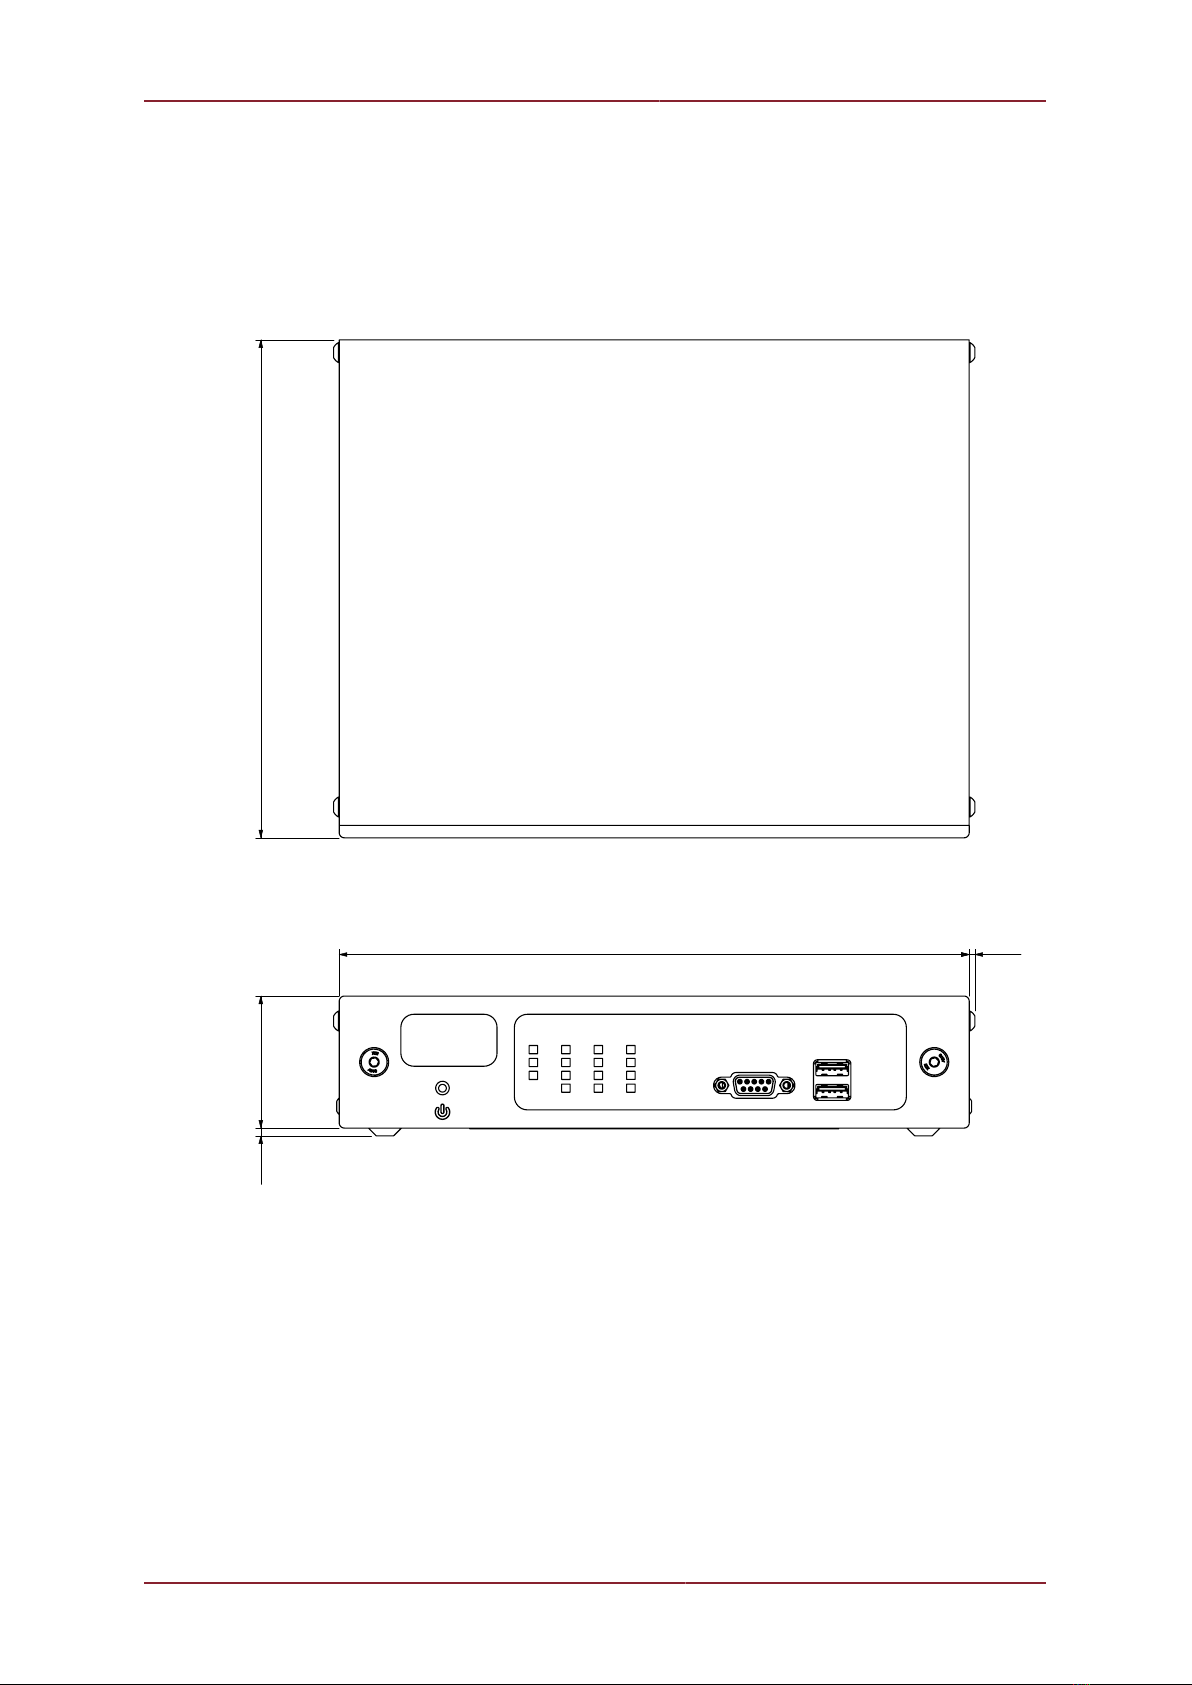
2.1. SeaHub Dimensions (Desktop version)
242.5
50.8
3. 0 TYP
2.2 TYP
191.7
All dimension shown in mm. Not to scale.

Specification SeaHub
0594-SOM-00001, Issue: 02 9 © Tritech International Ltd.
2.2. SeaHub Dimensions (Rack mountable version)
1.7
43.7
462.4
19.0
482.6
3.5 TYP
6.8 TYP
2.2 TYP
186.9
432.4
32.4 TYP
All dimension shown in mm [inches]. Not to scale.
2.3. Physical
Desktop version
Materials Stainless Steel housing with Anodised Aluminium front facia
Weight 1.3kg
Dimensions 242.5 x 191.66 x 53.81mm
(width x depth x height)
Temperature range 5 to 35°C (-20 to 50°C in storage)
Rack mountable version
Materials Stainless Steel housing with Anodised Aluminium front facia
Weight 3.4kg
Dimensions 482.6 x 219.3 x 43.7mm
(width x depth x height)
Temperature range 5 to 35°C (-20 to 50°C in storage)

Specification SeaHub
0594-SOM-00001, Issue: 02 10 © Tritech International Ltd.
2.4. Electrical and Communication
Power requirement 100 - 240V AC 50-60 Hz IEC-320 C14 socket (for C13 cord)
12 - 36V DC (5mm round, positive core)
Power output with AC input 28V DC (35W, 1.25A)
Power output with DC input The same as input voltage (maximum 1.25A)
Power output options Jumper options for fixed 5V or 12V DC
Rear ports USB 2.0 (Type B) female for PC interface
DA-15 ARCNET
3x banana plug DC out (Ground, +, -)
2x DE-9 male
2x DIN-45322 (6 pin) female
IEC C14 male AC power
5mm round, positive centre, DC in
Front ports 2x USB 2.0 (Type A) female
1x DE-9 Remote Access Terminal
Port A functionality RS232 with handshaking or RS485
Port B functionality RS232, RS422, RS485
Port C functionality RS232, RS485 or ARCNET (with power output)
Port D functionality RS232, RS485 or ARCNET (with power output)
2.5. SeaHub (Desktop version) Panel Connectors
Front Panel
123 4 5
USB
RAT
(PS2 V2-RAT)
SeaHub
Surface Interface
RS422
RS485
RS232
COMMS
ARCNET
ABCD
2
13 4 5
Power and status LED
Transmit (green) and receive (red) status LEDs
Communications port mode LEDs (blue)
RAT
Two USB (type A) ports
Rear Panel

Specification SeaHub
0594-SOM-00001, Issue: 02 11 © Tritech International Ltd.
DC power in
IEC AC power in
DE-9 ports A and B
DIN45322 ports C and D
DC power out
DA-15 AIF (ARCNET) connector
USB 2.0 (type B) for PC interface
2.6. SeaHub (Rack mountable version) Panel Connectors
Front Panel
23 4 5
USB
RAT
(PS2 V2-RAT)
RS422
RS485
RS232
COMMS
ARCNET
ABCD
12 3 4
Transmit (green) and receive (red) status LEDs
Communications port mode LEDs (blue)
RAT
Two USB (type A) ports
Rear Panel
SUPPLY AIF (ARCNET)
PC-USB DC OUT
COMMUNICATION PORTS DC IN
12-36V DC
40W (Max)
MAINS IN
100-240V AC
50-60Hz
85W (Max)
++
CDB
A
+
+
123456
DC power in
DE-9 ports A and B
DIN45322 ports C and D
DC power out

Specification SeaHub
0594-SOM-00001, Issue: 02 12 © Tritech International Ltd.
DA-15 AIF (ARCNET) connector
USB 2.0 (type B) for PC interface
The IEC Mains connector and power switch is located to the left hand side of the rear panel
connections.
2.7. Pin-Out Diagrams
2.7.1. AIF (ARCNET) Port
45
1 2 8
10
6
37
12
911 14
13 15
Pin Function Pin Function
1 n/c 9 +12v DC
2 COMMS GND 10 VCC
3 0V 11 LAN EN
4 LAN RX 12 RS232 RTS
5 RS232 CTS 13 RS232 RX
6 RS232 TX 14 LAN pulse 1
7 LAN pulse 2 15 LAN B
8 LAN A
2.7.2. Ports A & B
45
12
8
6
3
7
9
‡ = connected for handshaking only.
Port A and B Port B
Pin RS232 RS485 RS422
1 ‡ ‡ ‡
2 RX TX/RX.A TX.A
3 TX TX/RX.B TX.B
4 ‡ ‡ ‡
5 Communications Ground
6 ‡ ‡ ‡
7 RTS ‡ RX.B
8 CTS ‡ RX.A
9 ‡ ‡ ‡

Specification SeaHub
0594-SOM-00001, Issue: 02 13 © Tritech International Ltd.
2.7.3. Ports C & D
4
1
3
2
6
5
Pin RS232 RS485 ARCNET
1 RX TX/RX-A LAN A
2 TX TX/RX-B LAN B
3 + DC (max. 24V)
4 0V
5 Communications Ground
6 Screen
2.7.4. Front Panel RAT
45
12
8
6
3
7 9
‡ = connected for
handshaking only.
Pin Function Pin Function
1 0V 6 ‡
2 +5v DC 7 PS/2 SCLK
3 RAT RS485 B 8 PS/2 SDATA
4 RAT RS485 A 9 +12v DC
5 ‡
SeaHub
0594-SOM-00001, Issue: 02 14 © Tritech International Ltd.
3. Installation
3.1. Software Installation
Note
The hardware must not be connected to the PC prior to or during software
installation.
If any Seanet software is already installed on the PC this must be removed correctly using
Windows Control Panel - Add or Remove Programs (or Programs and Features
in Windows 7) prior to starting the software installation.
Note
The latest version of Seanet Pro can be obtained from www.tritech.co.uk
Insert the Seanet Pro installation CD into the PC CD-ROM drive - if autorun is enabled
a dialog will appear with installation options. If autorun is disabled then run the Setup.exe
from the CD.
When the installation program starts, click Next to continue.
Read the license agreement and if you agree to its terms select the YES option and click
Next to continue.
Confirm the installation destination directory (by default C:\Program Files\SeanetV2
but if you wish to change this click the browse button and select an alternative directory),
click Next to continue.
Installation will then copy files onto your computer and make entries in the Windows Registry,
this process may take several minutes. If any anti-spyware software is running this may warn
you that registry changes are being made, allow any changes to be made if prompted. Once
Installation SeaHub
0594-SOM-00001, Issue: 02 15 © Tritech International Ltd.
files are copied you will be prompted to restart the PC (if you wish to defer the restart select
No ), click Finish to continue.
If the installation has been successful two new icons will have been created on the desktop
for Seanet Pro and Seanet Setup.
3.2. Surface Hardware Installation and Configuration
Caution
The power should be turned off before making a connection between the sonar
head and surface controller (SCU or SeaHub).
Note
Prior to connecting the SeaHub to the computer, Seanet Pro must be installed
beforehand. See Section 3.1, “Software Installation” for more details.
• Connect the computer USB port on the rear panel of the SeaHub to a USB 2.0 port on the
User computer with the supplied USB cable assembly.
• Connect power to the SeaHub and switch on. The indicator LEDs on the front of the unit
will flash and the ports will auto-install on the computer - this will take a minute or so to
complete and you may be prompted to re-boot the computer.
• If the computer does not automatically load the drivers for the SeaHub some additional
steps may be required. See Section 3.3, “Driver installation for SeaHub and NavHub”
for more details.
Note
The Rack mount version of the SeaHub has a power switch located at the rear
of the unit, next to the IEC connector. There is also a power switch at the front
of the unit. Both of these must be activated when power is applied in order to
switch the unit on.
There should be 6 COM Ports detected by the computer once all the drivers have been fully
installed:
SeaHubMain This is the main port used to communicate and control with the SeaHub
and ARCNET interface.
SeaHubA This is the port used to communicate via PORT A of the SeaHub
SeaHubB This is the port used to communicate via PORT B of the SeaHub
SeaHubC This is the port used to communicate via PORT C of the SeaHub
SeaHubD This is the port used to communicate via PORT D of the SeaHub
SeaHubAUX This is the port used for additional communication options. It is not user
accessable.
The actual port numbers may vary from computer to computer.
Basic Setup
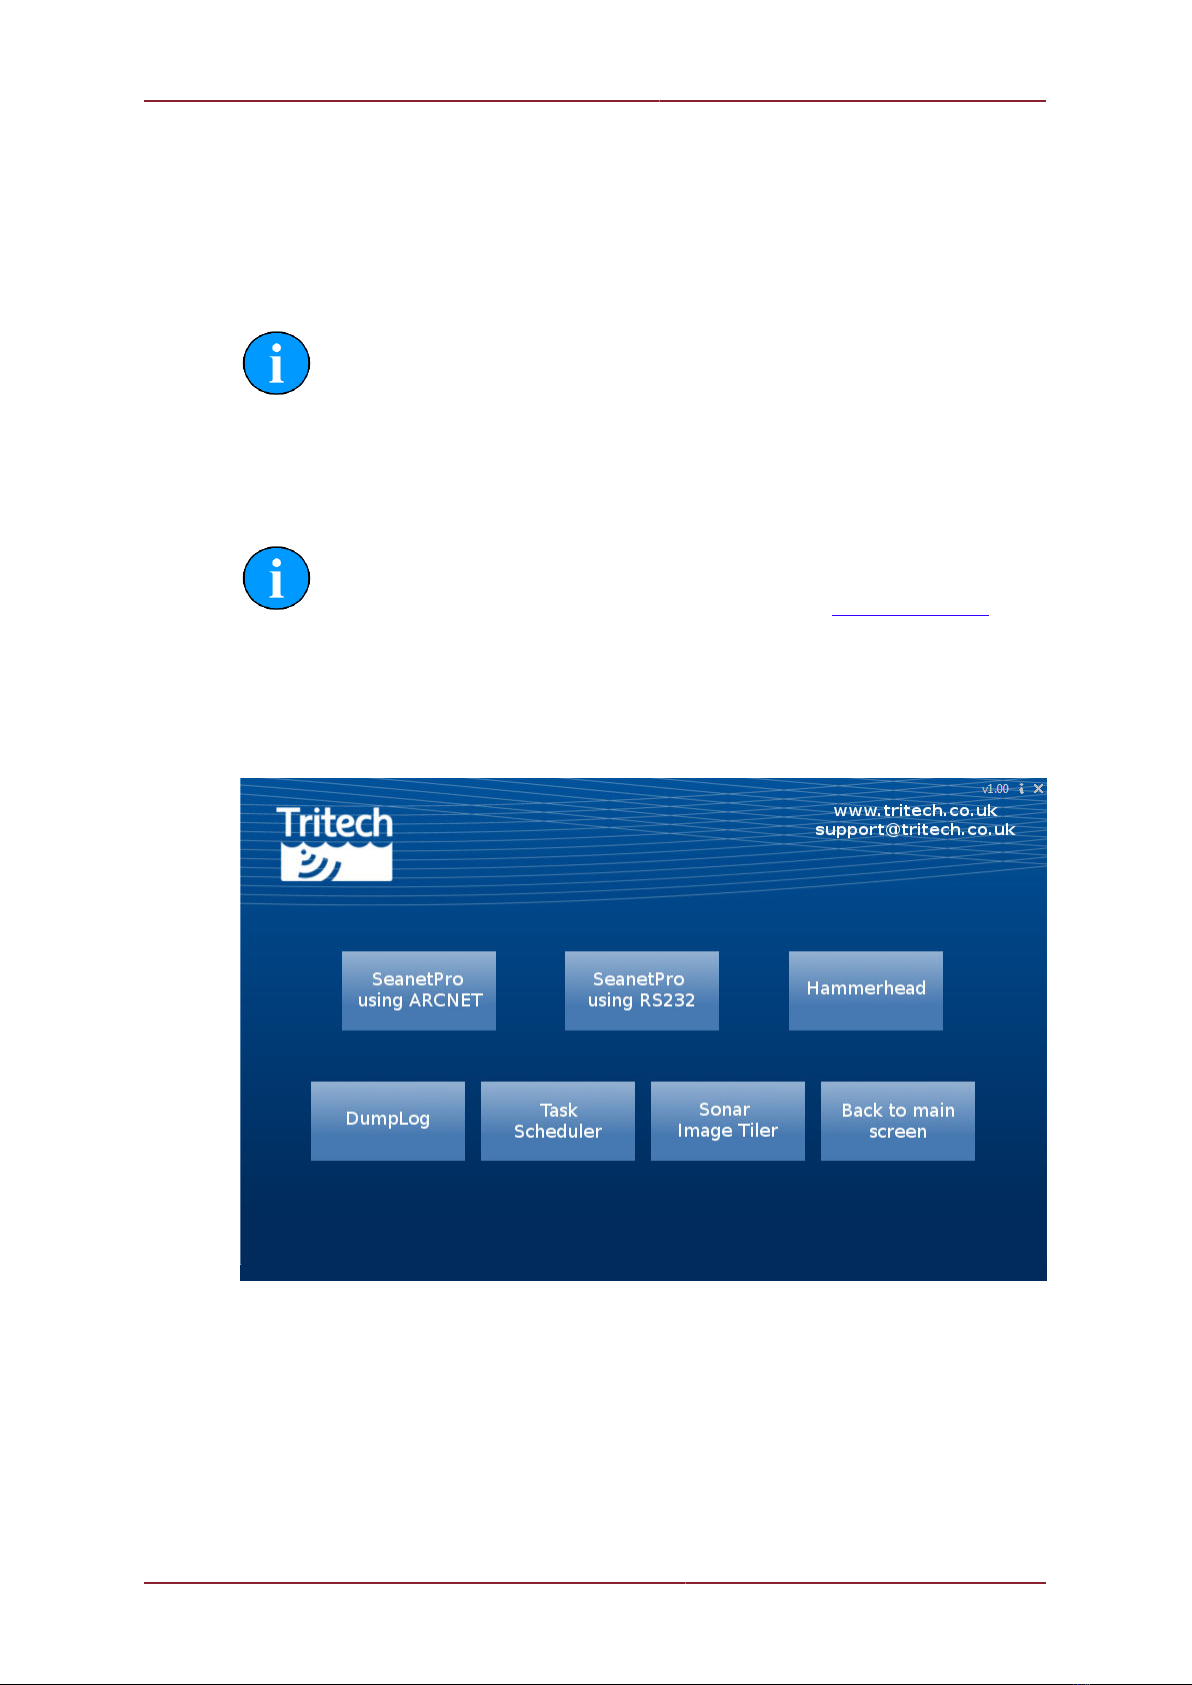
The Seanet software must now be configured for the SeaHub – click the Seanet Setup
icon on the desktop to run the Seanet setup program.
Installation SeaHub
0594-SOM-00001, Issue: 02 16 © Tritech International Ltd.
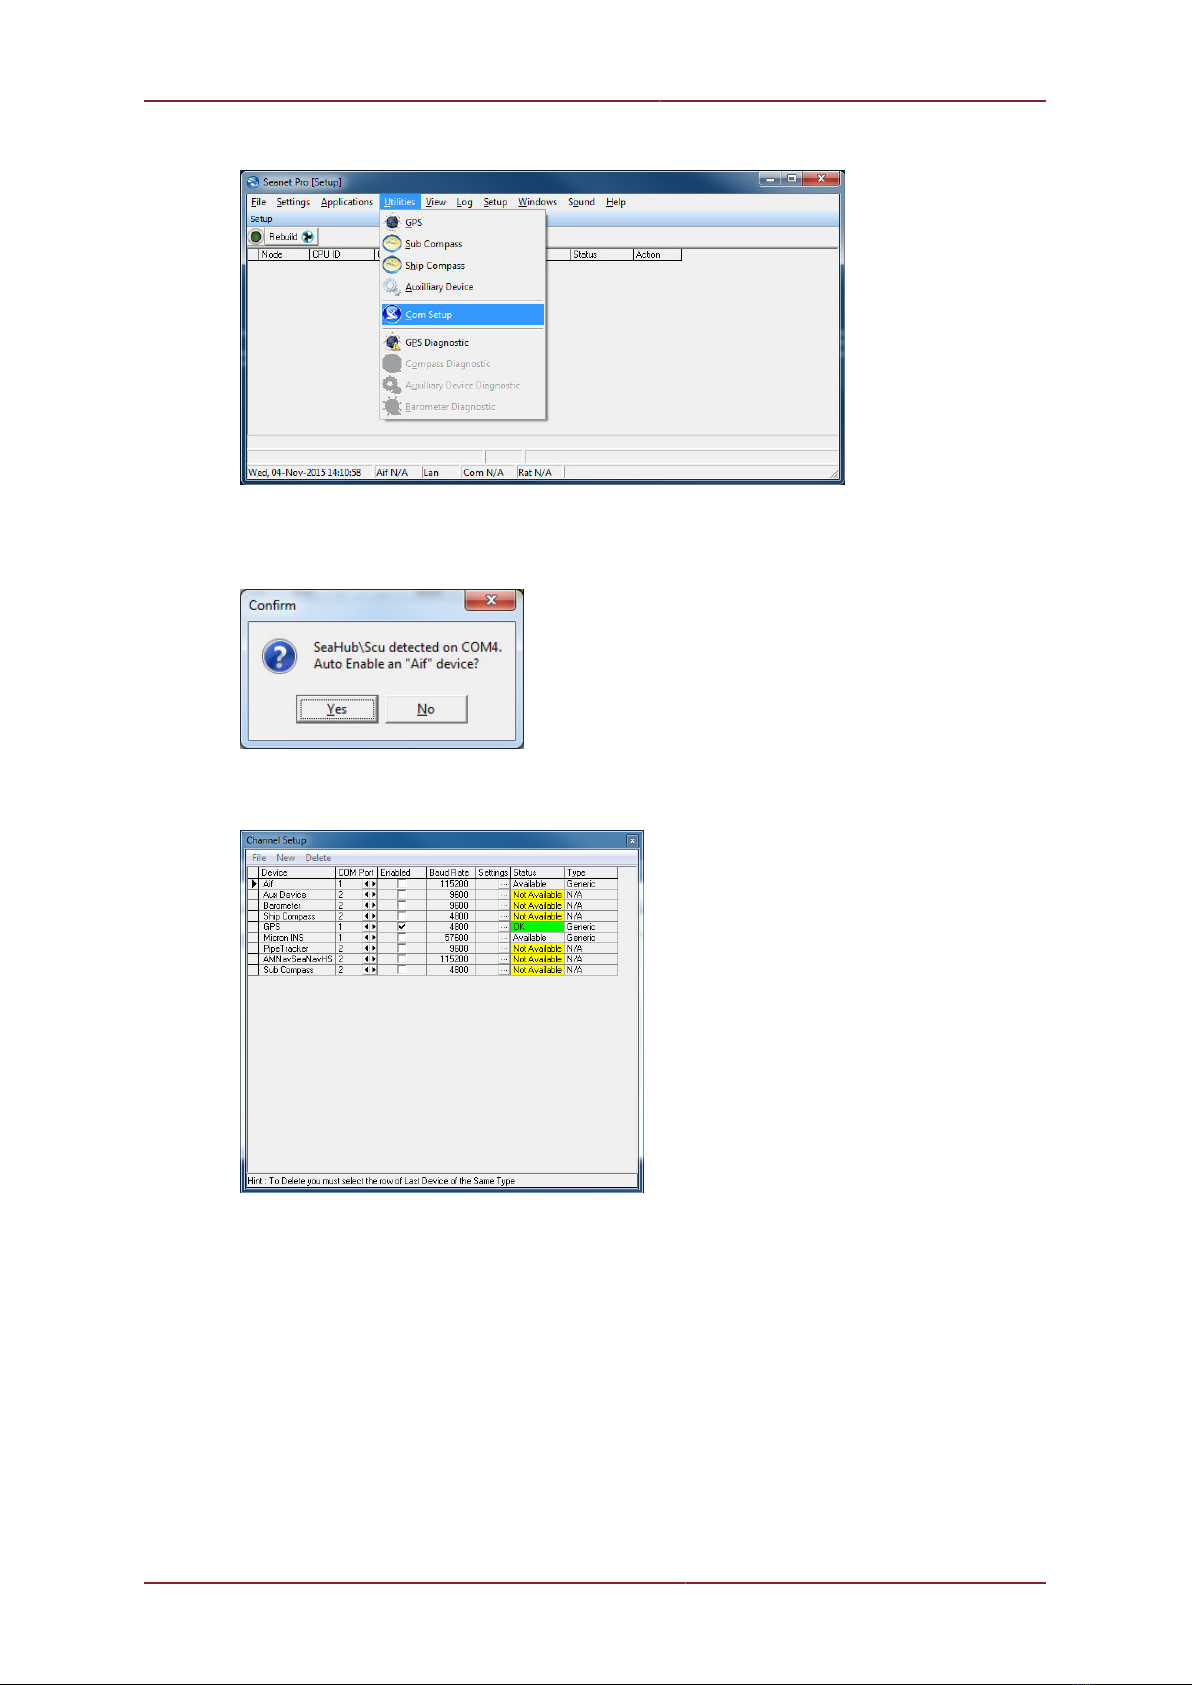
From the drop down menu at the top of the screen select Utilities then Com Setup.
The Channel Setup page will now be displayed on screen. If this is the first time the SeaHub
has been used on the computer an additional dialog box will be shown to indicate that a
SeaHub has been detected.
Click Yes on this pop up and the Channel Setup page will then automatically add and
enable the main COM Port for the SeaHub.
Adding Additional Devices
The Channel Setup page controls all the serial based information that is intended for use
by Seanet Pro. The initial setup will only enable the SeaHubMain port, so the remaining ports
will need to be manually configured.
From the drop down menu select New.

Installation SeaHub
0594-SOM-00001, Issue: 02 17 © Tritech International Ltd.
A list of all the potential devices that Seanet Pro can accept data from will be displayed.
To add a new Port from the SeaHub, select the AIF option. The new AIF device will be
added to the bottom of the list of available devices.
To allow for all four ports of the SeaHub, repeat this process a further three times.
Once the addition AIF devices have been added, use the left and right arrows within the COM
Port to identify the various ports on the SeaHub.

Installation SeaHub
0594-SOM-00001, Issue: 02 18 © Tritech International Ltd.
Once all the ports have been identified, the Enabled box can be checked for each port that
is required.
Note
Seanet Pro will expect a data stream from each enabled AIF device. If no data
stream is detected a ComAif Error TMO error will be reported.
Once all the required ports have been setup and enabled, close the Channel Setup page
using the close icon at the top right of the page.
3.3. Driver installation for SeaHub and NavHub
When connected to a computer for the first time, the computer will attempt to load the
drivers for the attached device. For Windows based computers the process is largely similar
regardless of the operating system being used.
Note
The screenshots shown are example ones for a Windows 7 installation. Later
editions of Windows OS may vary, but the same basic steps are still applicable.
If required, contact Tritech International Ltd for more advice and support.

Installation SeaHub
0594-SOM-00001, Issue: 02 19 © Tritech International Ltd.
Driver installation
The system Tasktray will display an icon indicating that it is attempting to load the drivers.
Click on the Tasktray icon and the Driver Installation Window will appear.
By default, Windows will try to load the latest drivers from the Windows Update service, but
this is not required as all the appropriate drivers are installed along with Seanet Pro. Click on
the Skip obtaining drivers from Windows Update link.
Click Yes to continue. Windows will now search for the appropriate drivers on the computer.
After a short delay it should start to load the drivers and update the display.
During this process it is possible to see the COM Ports being allocated to the device. Use
the scroll bar to locate the numbers being allocated.
Once the process has been fully completed the device will be fully functional.

Installation SeaHub
0594-SOM-00001, Issue: 02 20 © Tritech International Ltd.
Checking the COM Ports
If the drivers are already installed, but the allocated COM Ports were not noted down at
the point of installation it is possible to check which Ports are available by using the Device
Manager. The simplest method for loading the Device Manager is as follows.
On the My Computer icon on the desktop (or within the Start Menu) right click and select
Properties. This will display the System Information window.
Click on the Device Manager link that appears on the upper left hand side of the window.
This will now display the Device Manager.
Other manuals for SeaHub
1
Table of contents
Other Tritech Recording Equipment manuals

Popular Recording Equipment manuals by other brands


Sonifex
Sonifex avn AVN-AH8 manual

Maple Systems
Maple Systems HMC4043A-M Series quick start guide

Yamaha
Yamaha Silent Brass ST5 user manual

Extron electronics
Extron electronics Extron IPL T S4 Setup guide

Blackstar Amplification
Blackstar Amplification Carry-on FOLDING CONTROLLER 25 owner's manual

Sony
Sony XDCAM PDW-HR1 Operation manual


