Triz TZ3200C User manual

TZ3200C
ADSL Bridge/Router Ethernet Modem
User’s Guide

Doc. No. TZ3200C_MN_Ver1.0 Rev 0 2 / 22
TZ3200C ADSL Ethernet Modem User’s Manual
|Copyright |
CopyrightⓒTriz Communications Group All rights Reserved.
No Part of this book shall be reproduced, stored in a retrieval system, or transmitted by any means,
electronic, mechanical, photocopying, recording, or otherwise, without written permission from
the publisher.
The specifications and information regarding the products in this manual are subject to change
without notice.
|Trademark Credit |
Triz is registered trademark of Triz Communications Group.
Windows is registered trademark of Microsoft Corp.
Triz Communications Group.
1F Oh-Bok Bldg, 279-23 Seongsu 2-ga 3-dong,
Seongdong-gu, Seoul, Korea 133-832
Direct TEL:+82-2-2129-9200
Direct FAX:+82-2-2129-9292

Doc. No. TZ3200C_MN_Ver1.0 Rev 0 3 / 22
TZ3200C ADSL Ethernet Modem User’s Manual
Scope
This guide describes the procedure to configure TZ3200C and the usages of the
Web configuration pages.
Organization
This guide is organized as follows:
Chapter 1 Introduction, introduces the TZ3200C ADSL Bridge/Router Ethernet
modem, defines the scope of the document, and provides a brief overview of the
functions of the Windows driver.
Chapter 2 Installation and Setup, describes how to install TZ3200C ADSL
Bridge/Router Ethernet modem.
Chapter 3 Configuring the TZ3200C, provides the descriptions and usages for
the TZ3200C ADSL Bridge/Router Ethernet modem‘s Web configuration pages.
Appendix A Troubleshooting, describes some problems that you might have with
the TZ3200C and how to isolate and possibly solve these problems.
Appendix B Technical Specifications, lists the hardware and software
specifications for the TZ3200C.
Appendix C Factory Default Setting, lists the Factory default setting values of the
TZ3200C.

Doc. No. TZ3200C_MN_Ver1.0 Rev 0 4 / 22
TZ3200C ADSL Ethernet Modem User’s Manual
Table of Contents
Chapter 1 Introduction ……………………………….…… 5 ~ 8
1.1 Overview ……………………………………………………………... 5
1.2 System Requirement ..……………………………………………… 5
1.3 Important Safeguards ………………………………………………. 6
Chapter 2 Installations and Setup .……………………… 9 ~ 16
2.1 Unpacking the Box ……………………………………………….….. 9
2.2 Connectors & LED’s ……………….………………….…………….. 10
2.3 Installing the TZ3200C ……...…………………….………….. … 12
Chapter 3 Configuring the TZ3200C .………………… 13 ~ 19
3.1 Before Configuration ………………………...……………………… 14
3.2 Logging on to the Web Console …………………………………... 15
3.3 Configuring the Router (PPPoA/PPPoE) Mode ………..………… 16
3.4 Configuring the Bridge (RFC 1483) Mode ………………………… 18
Appendix A. Troubleshooting .…………………………………… 20
Appendix B. Technical Specifications ………………………… 21
Appendix C. Factory Default Setting …………………….…… 22
Doc. No. TZ3200C_MN_Ver1.0 Rev 0 5 / 22
TZ3200C ADSL Ethernet Modem User’s Manual
Chapter 1 Introduction
1.1 Overview
The TZ3200C ADSL Bridge/Router Ethernet Modem provides an “always-on”
high speed Asymmetric Digital Subscriber Line (ADSL) connection to the telephone
line. The TZ3200C solution hardware connects to the computer via the Ethernet
interface. The TZ3200C supports T1.413-1998, G.dmt (G.992.1) and G.lite
(G.992.2) ADSL and is designed to operate in LAN and WAN modes.
In addition, the TZ3200C software includes the Web Server to support the feature
of embedded graphics configuration for the TZ3200C products. Through the
Ethernet connection, the end-user can identify the current configuration on
the system.
1.2 System Requirements
☞Windows 95
☞Windows 98
☞Windows 98SE
☞Windows Millennium Edition
☞Windows 2000 Home Edition & Professional
☞Windows XP Home Edition & Professional
☞Macintosh, Linux, UNIX
System Specification (Recommended).
Internet speed depends on your system specification, so the following specifications are
recommended.
⊙OS : Windows 98/98SE or above
⊙CPU :Pentium II 233MHz or higher
⊙System Memory(RAM): 64MB or higher

Doc. No. TZ3200C_MN_Ver1.0 Rev 0 6 / 22
TZ3200C ADSL Ethernet Modem User’s Manual
1.3 Important Safeguards
Read all the instructions carefully. Follow all warnings and instructions marked on
the product.
Environment
yIn-house stationary use, desktop or wall-mounted; the maximum ambient
temperature may not exceed 45°C (113°F).
yIt must not be mounted in a location exposed to direct or excessive sunlight
and/or heat radiation.
yIt must not be exposed to heat trap conditions and must not be subjected to
water or condensation.
yIt must be installed in a Pollution Degree 2 environment.
Qualified Personnel Warning
Only trained and qualified personnel should be allowed to repair this equipment.
Do not Dismantle the Product
Dismantling this product can cause bodily injury and damage to the equipment
because of electric shock, failure, misoperation and static electricity. Do not
dismantle, repair or reassemble it without permission.
Keeping the Installation Area Tidy
The area of installation should be kept clean and tidy. Ensure also that no part of
the device is placed where it could cause an accident.
Cleaning
Unplug this product from your computer before cleaning. Do not use liquid cleaners
or aerosol cleaners. Use a damp cloth for cleaning.
Water and moisture
Do not place this product near water, for example, near a bathtub, wash bowl,
kitchen sink, laundry tub, in a wet basement or near a swimming pool.
Remove Metallic Jewellery
You must remove all your metallic jewellery including rings, necklace, and watch.
Metallic objects are conductors of electricity when the power is on. It can cause
serious burning and damage to the jewellery. Also, please avoid loose clothings
and neckties because they can cause accidents and damage the device.

Doc. No. TZ3200C_MN_Ver1.0 Rev 0 7 / 22
TZ3200C ADSL Ethernet Modem User’s Manual
Ventilation Warning
When you install the product, choose a well ventilated place in order to prevent
product failure or misoperation due to overheating and dust causing data loss,
product failure and human injury.
Electromagnetic Wave Warning
Electromagnetic wave has an adverse effect on the product/cable and causes
abnormal operation by disorganizing the signal system. Therefore do not install or
operate this product in a place where electromagnetic wave is present.
Lightning Warning
Lightning may bring about serious failures like product breakdown. In order to
prevent damage from lightning, ensure that the place of installation and the
connected cables are not susceptible to lightning. Installation of a surge suppressor
system will minimize any danger of a lightning strike.
Lightning Activity Warning
Do not work on, connect or disconnect this product and cables during periods of
lightning activity or when lightning is forecast.
Ground Connected Cable Warning
For all cables connected to the product, use ground connected cable to prevent or
minimize problems from surge. Also do not touch any uninsulated part of cables
disconnected from the product.
Recommended Installation Range Warning
In order to prevent falling off in performance caused by signal reduction, do not
exceed the recommended installation range.
Overheating Warning
Unless you secure enough space around the device when installing it, heat coming
out from other peripheral equipment affects the product and overheating can cause
product failure or misoperation. Therefore always secure enough space around the
place of installation to ensure that this does not happen. In order to prevent
overheating of this unit, do not operate this product in an area where the
temperature is 45℃(113℉) or above.
Working Space Warning
For easy maintenance and repair in case of problems , ensure that there is enough
working space around the product. This helps to prevent overheating.

Doc. No. TZ3200C_MN_Ver1.0 Rev 0 8 / 22
TZ3200C ADSL Ethernet Modem User’s Manual
Modem / Telephone use
yAvoid using a modem/telephone (other than a cordless type) during an electrical
storm. There may be a remote risk of electric shock from lightning.
yDo not use the telephone to report a gas leak in the vicinity of the leak.
yIf telephone service is required on the same line and for optimum ADSL
performance, distributed filters must be installed. Depending on your ADSL
configuration and type of filters, installation must be carried out by qualified
service personnel.
yConsult your Telephone Company or ADSL Service Provider for instructions.
Doc. No. TZ3200C_MN_Ver1.0 Rev 0 9 / 22
TZ3200C ADSL Ethernet Modem User’s Manual
Chapter 2 Installation and Setup
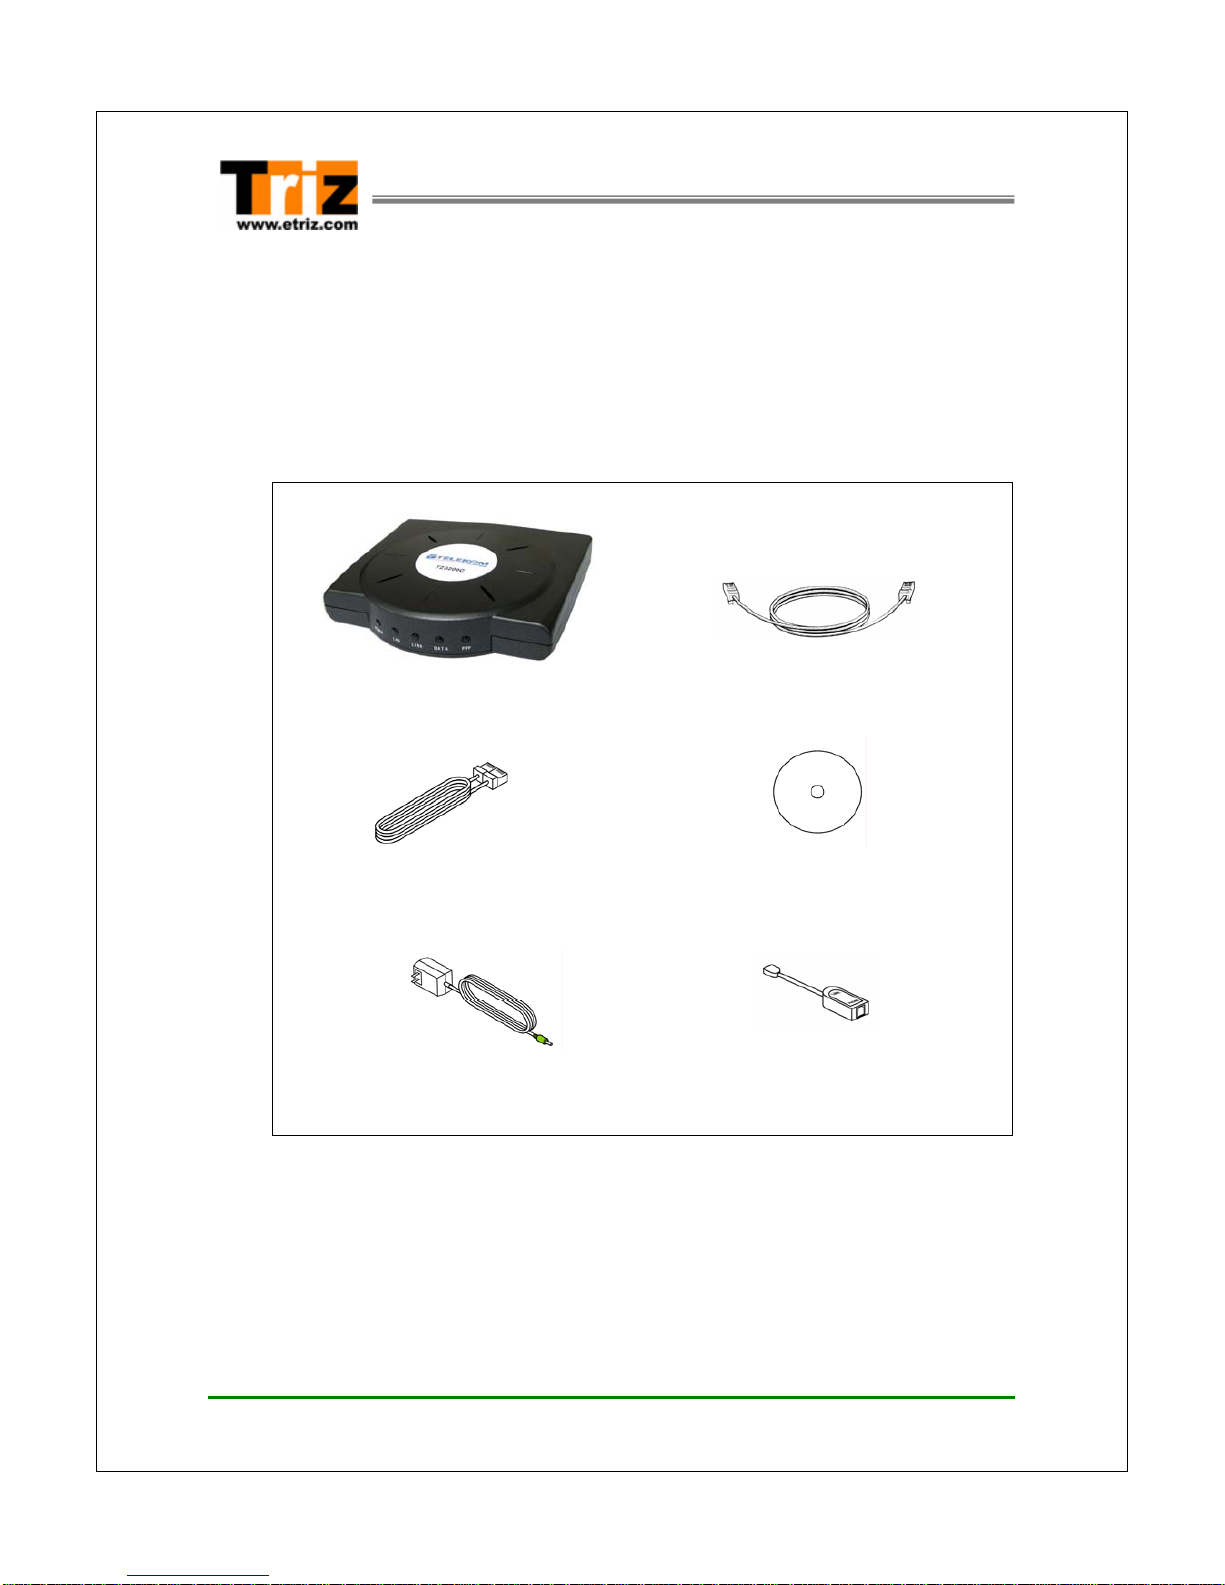
2.1 Unpacking the Box
Check the shipping carton carefully to ensure that the contents include the items
you ordered.
ADSL Modem (1) ADSL (Phone) Cable (RJ11 to RJ11) (1)
Direct UTP (LAN) Cable (RJ45 to RJ45) (1) User’s Manual CD-ROM (1)
AC Power Adaptor (1) External In-line Filter(1) (Option)
Note) The following hardware is not provided but is necessary to install and
configure the TZ3200C. Before installing the TZ3200C, prepare the
following hardware:
yExternal Micro-filter or splitter (provided separately by your service
provider)

Doc. No. TZ3200C_MN_Ver1.0 Rev 0 10 / 22
TZ3200C ADSL Ethernet Modem User’s Manual
2.2 Connectors & LED’s
TZ3200C (Front view)
LED Operations
LED Colour Status Meaning
POWER - Solid
- Off -DC Power is being supplied to the TZ3200C.
- Power Off
LAN - Flashing
- Solid - Data is transmitted or received to the LAN side
- Ethernet interface is active.(100M/10M)
LINK - Flashing
- Solid
- Trying to connect the ADSL line
- ADSL line has synchronized with your service
provider
DATA - Flashing - Data is transmitted to the ADSL line
PPP
Green
- Flashing
- Solid
- Trying to connect the PPP Mode
- Solid green when using PPPoE or PPPoA, if
the user has authenticated to the ISP’s server.

Doc. No. TZ3200C_MN_Ver1.0 Rev 0 11 / 22
TZ3200C ADSL Ethernet Modem User’s Manual
①②③④⑤⑥
TZ3200C (Rear view)
Port Descriptions
(Back Panel numbering from left side)
Location Label Port Function
①ADSL ADSL Line Port Connects telephone Line cable to ADSL line.
②PHONE Telephone Port Connects the telephone cable to your telephone.
③CONSOLE Console Port (Not for User) Connects serial Console Cable
④LAN Ethernet port Connects Ethernet cable from the LAN port in your PC.
⑤DC6V
800mA DC IN port Connects Adaptor
⑥POWER Power switch TZ3200C Ethernet Power On/Off
<<Notice >>
When you connect the telephone cable in your telephone, Micro filter must be attached.

Doc. No. TZ3200C_MN_Ver1.0 Rev 0 12 / 22
TZ3200C ADSL Ethernet Modem User’s Manual
2.3 Installing the TZ3200C
The TZ3200C is connected to any available Ethernet LAN port on the computer.
There are no option switches for the user to set. Once the modem is connected to
the Ethernet LAN port, connect the DSL line to the “ADSL” Port on the modem.
< ADSL Modem Installation Diagram >
1. Connect the ADSL (Phone) cable provided to the wall and then connect the
other end of the cable to the ADSL port of the TZ3200C.
2. Connect the LAN cable provided to the LAN port of the TZ3200C and then
connect the other end of the cable to the Ethernet LAN port on your PC.
3. Connect one end of the AC power adapter to the DC6V800mA port of the
TZ3200C and then plug the AC power adapter into a wall power socket.
Doc. No. TZ3200C_MN_Ver1.0 Rev 0 13 / 22
TZ3200C ADSL Ethernet Modem User’s Manual
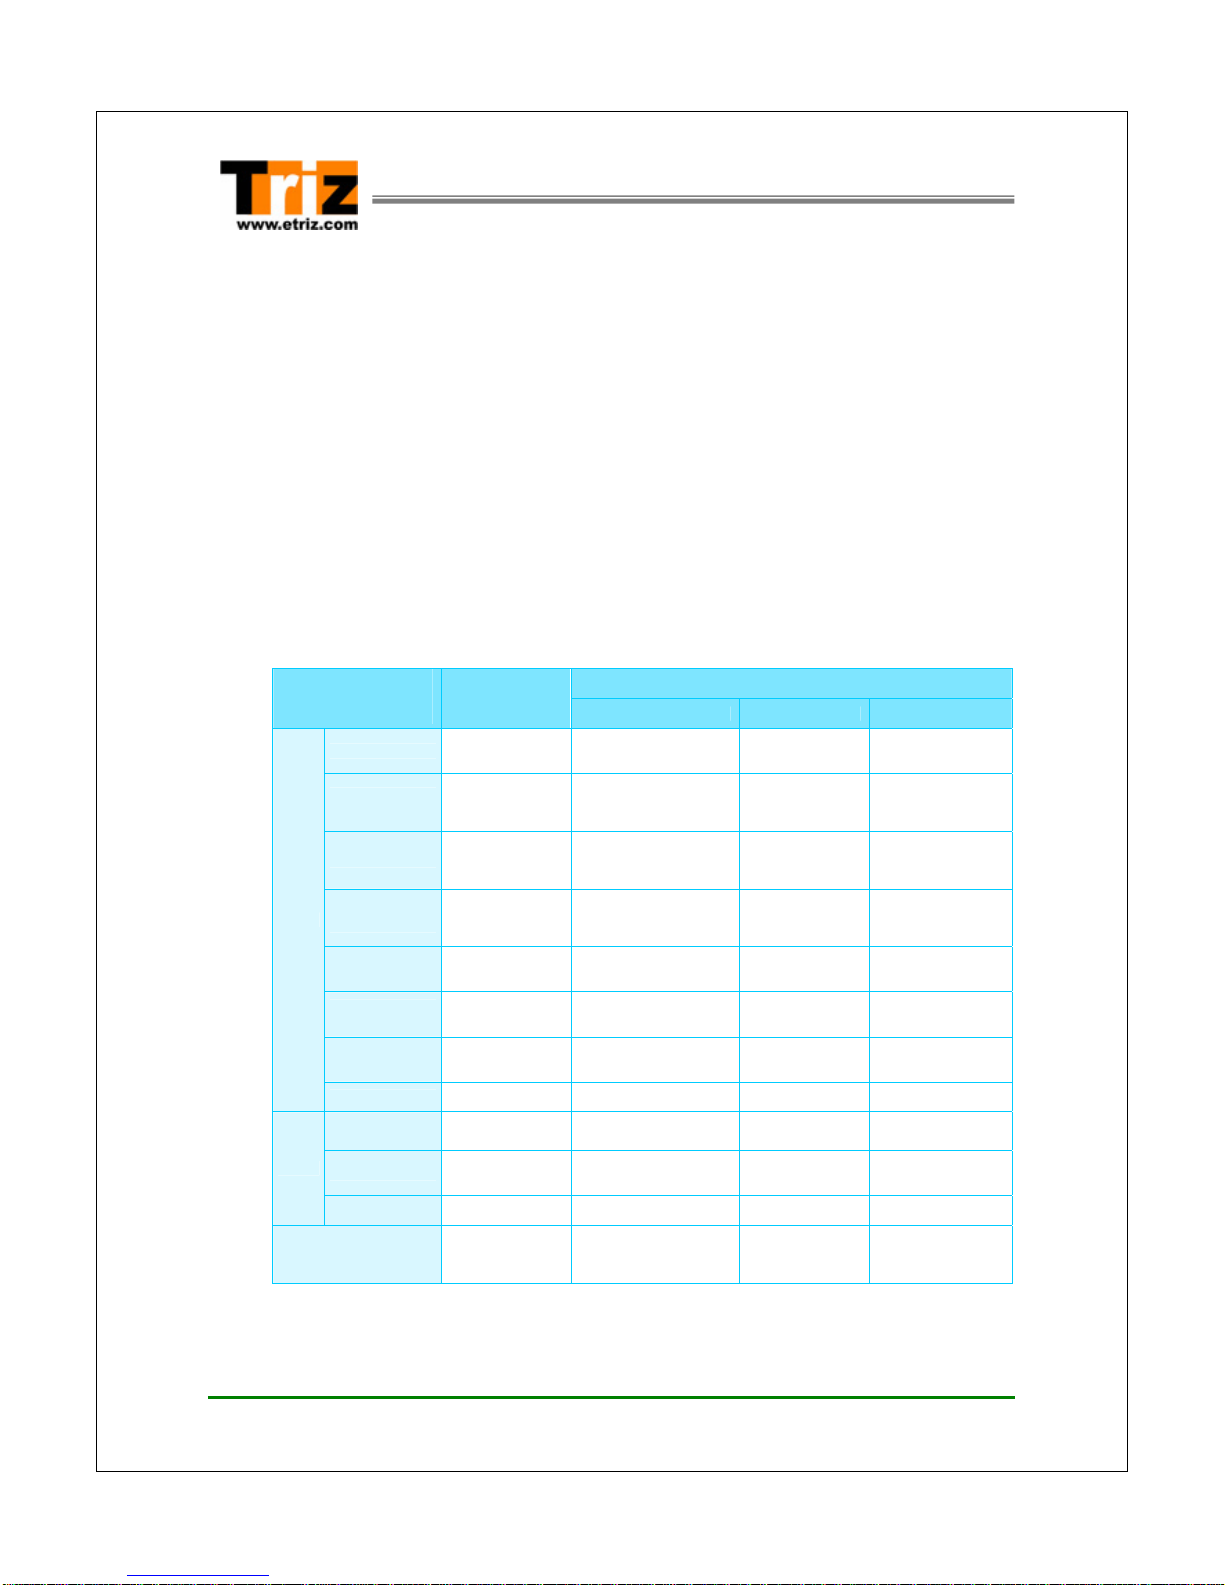
Chapter 3 Configuring the TZ3200C
After you have properly installed the TZ3200C, if you need to change a modem
setting for Router Mode or you want to review the current state of the modem, you
can change the TZ3200C settings with an ordinary web browser such as
Microsoft Internet Explorer.
When the TZ3200C operates in router mode, you must change the modem setting:
refer to the Router mode configuration table. The following table shows the typical
configuration for using the TZ3200C in router mode.
< Table 3.1 Mode Configurations >
Router Mode
ADSL Service
Configuration Bridge Mode PPPoA / PPPoE Static IP Dynamic IP
VPI/VCI Enter the value
provided by ISP Enter the value
provided by ISP Enter the value
provided by ISP Enter the value
provided by ISP
Static IP
Address N/A N/A (Automatically
Assigned by ISP) Enter the value
provided by ISP
N/A
(Automatically
Assigned by ISP)
Subnet Mask N/A N/A (Automatically
Assigned by ISP) Enter the value
provided by ISP
N/A
(Automatically
Assigned by ISP)
Default
Gateway N/A N/A (Automatically
Assigned by ISP) Enter the value
provided by ISP
N/A
(Automatically
Assigned by ISP)
Encapsulation 1483 Bridged IP
LLC PPPoA VC-Mux /
PPPoE LLC 1483 Bridged IP
LLC 1483 Bridged IP
LLC
PPP User
Name N/A Enter the name
provided by ISP N/A N/A
PPP
Password N/A Enter the password
provided by ISP N/A N/A
WAN
DHCP Client Disable Disable Disable Enabled
IP Address N/A 192.168.1.1 (Default) 192.168.1.1
(Default) 192.168.1.1
(Default)
Subnet Mask N/A 255.255.255.0
(Default) 255.255.255.0
(Default) 255.255.255.0
(Default)
LAN
DHCP Server Enable Enabled Enabled Enabled
DNS N/A N/A (Automatically
Assigned by ISP) Enter the value
provided by ISP
N/A
(Automatically
Assigned by ISP)
Note) When it is N/A, it means it does not apply to the encapsulation.

Doc. No. TZ3200C_MN_Ver1.0 Rev 0 14 / 22
TZ3200C ADSL Ethernet Modem User’s Manual
3.1 Before Configuration
Before you configure the TZ3200C modem, you will need the following information:
Connection Mode
The connection mode your Internet Service Provider (ISP) is supporting.
yBridge (RFC 1483) mode
yRouter (PPPoA/ PPPoE) mode
The default connection mode is PPPoA LLC.
VPI/VCI
The number of PVC your service provider is giving you together with their virtual
path identifiers (VPIs) and virtual channel identifiers (VCIs).
The default number of PVC is as follows:
yVPI : 0
yVCI : 35
User ID and Password
Point-to-Point Protocol (PPP) client name that is assigned as your login name and
PPP password to access your ISP account.
Check the Connection Status
Before you configure the TZ3200C modem, check the connection status of your
computer.
Check the Power LED
Check the Power LED is on.
Doc. No. TZ3200C_MN_Ver1.0 Rev 0 15 / 22
TZ3200C ADSL Ethernet Modem User’s Manual
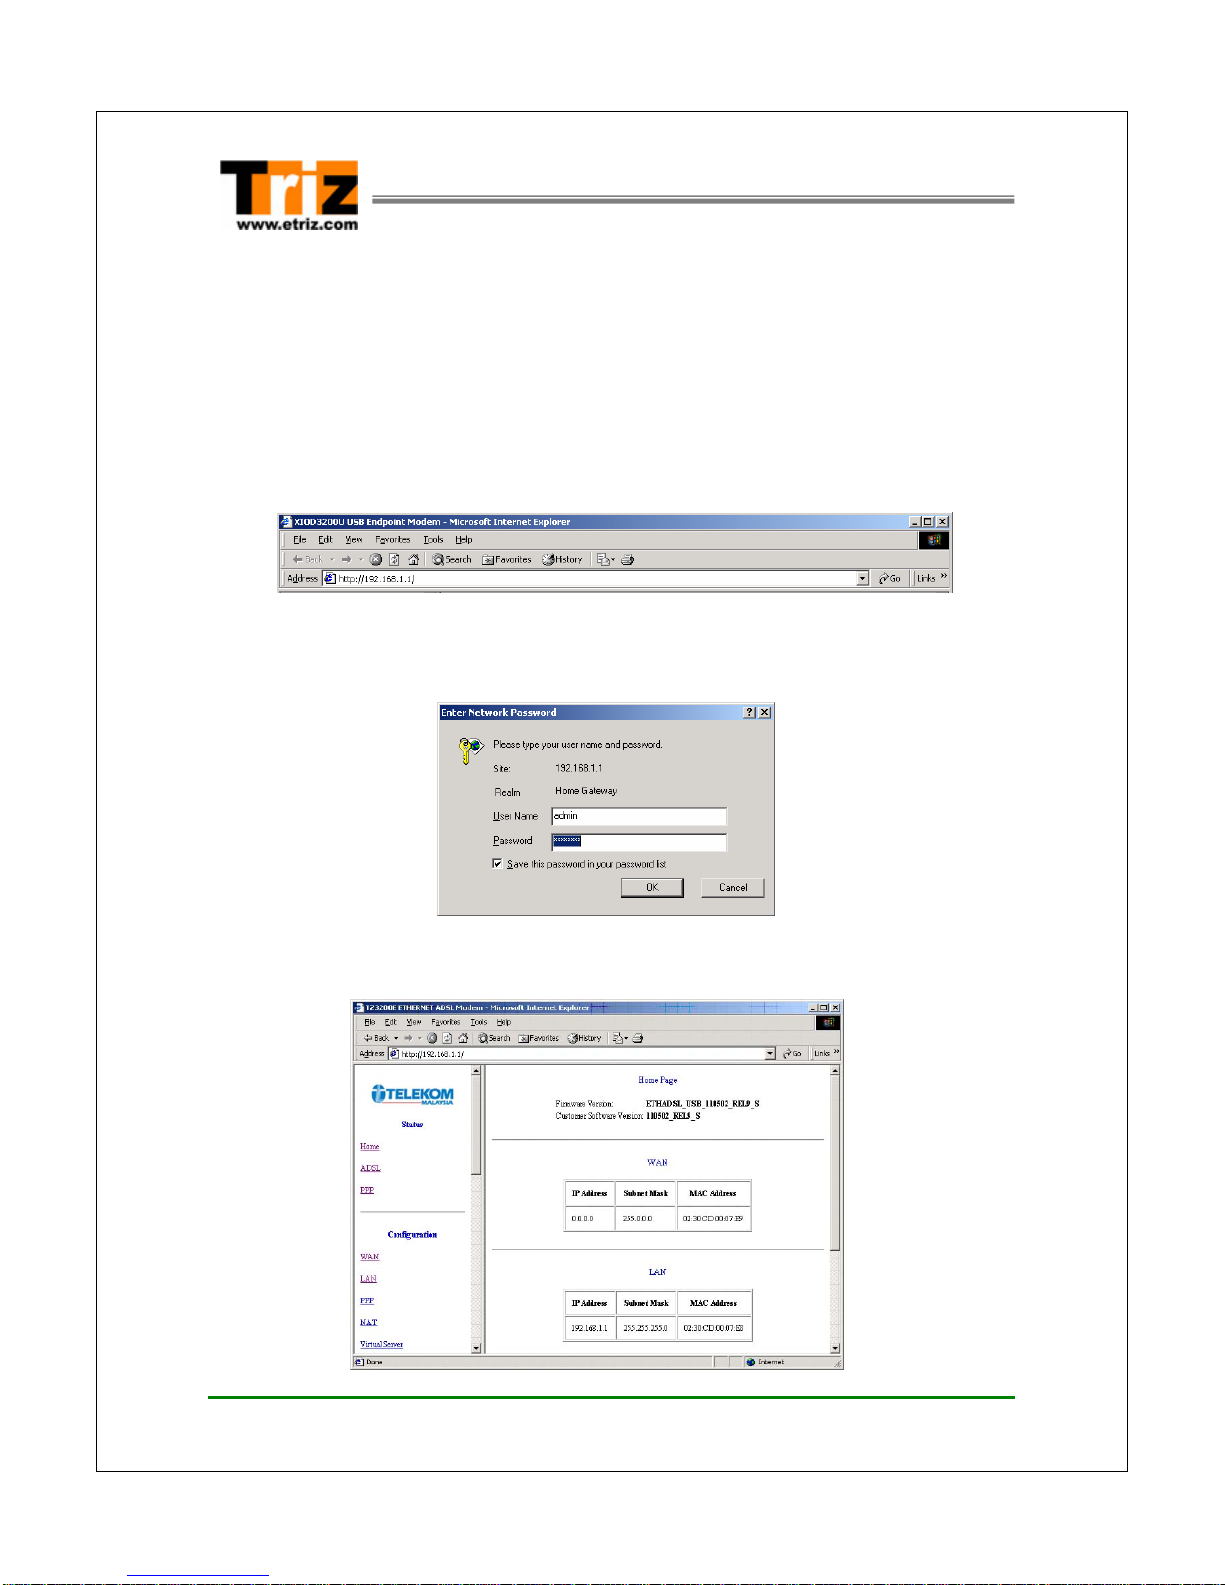
3.2 Logging on to the Web Console
Log on to the web console to configure the TZ3200C as follows:
1. Launch the web browser (ex. Internet explorer) installed in your PC.
2. Enter ‘http://192.168.1.1’for the web console page in the browser locator field
and press [Enter].
3. The following window appears for user authentication. Enter the user name
“admin” and the password “telekomst” and click OK.
4. When the user authentication is successful, the web console home page
appears.
Doc. No. TZ3200C_MN_Ver1.0 Rev 0 16 / 22
TZ3200C ADSL Ethernet Modem User’s Manual
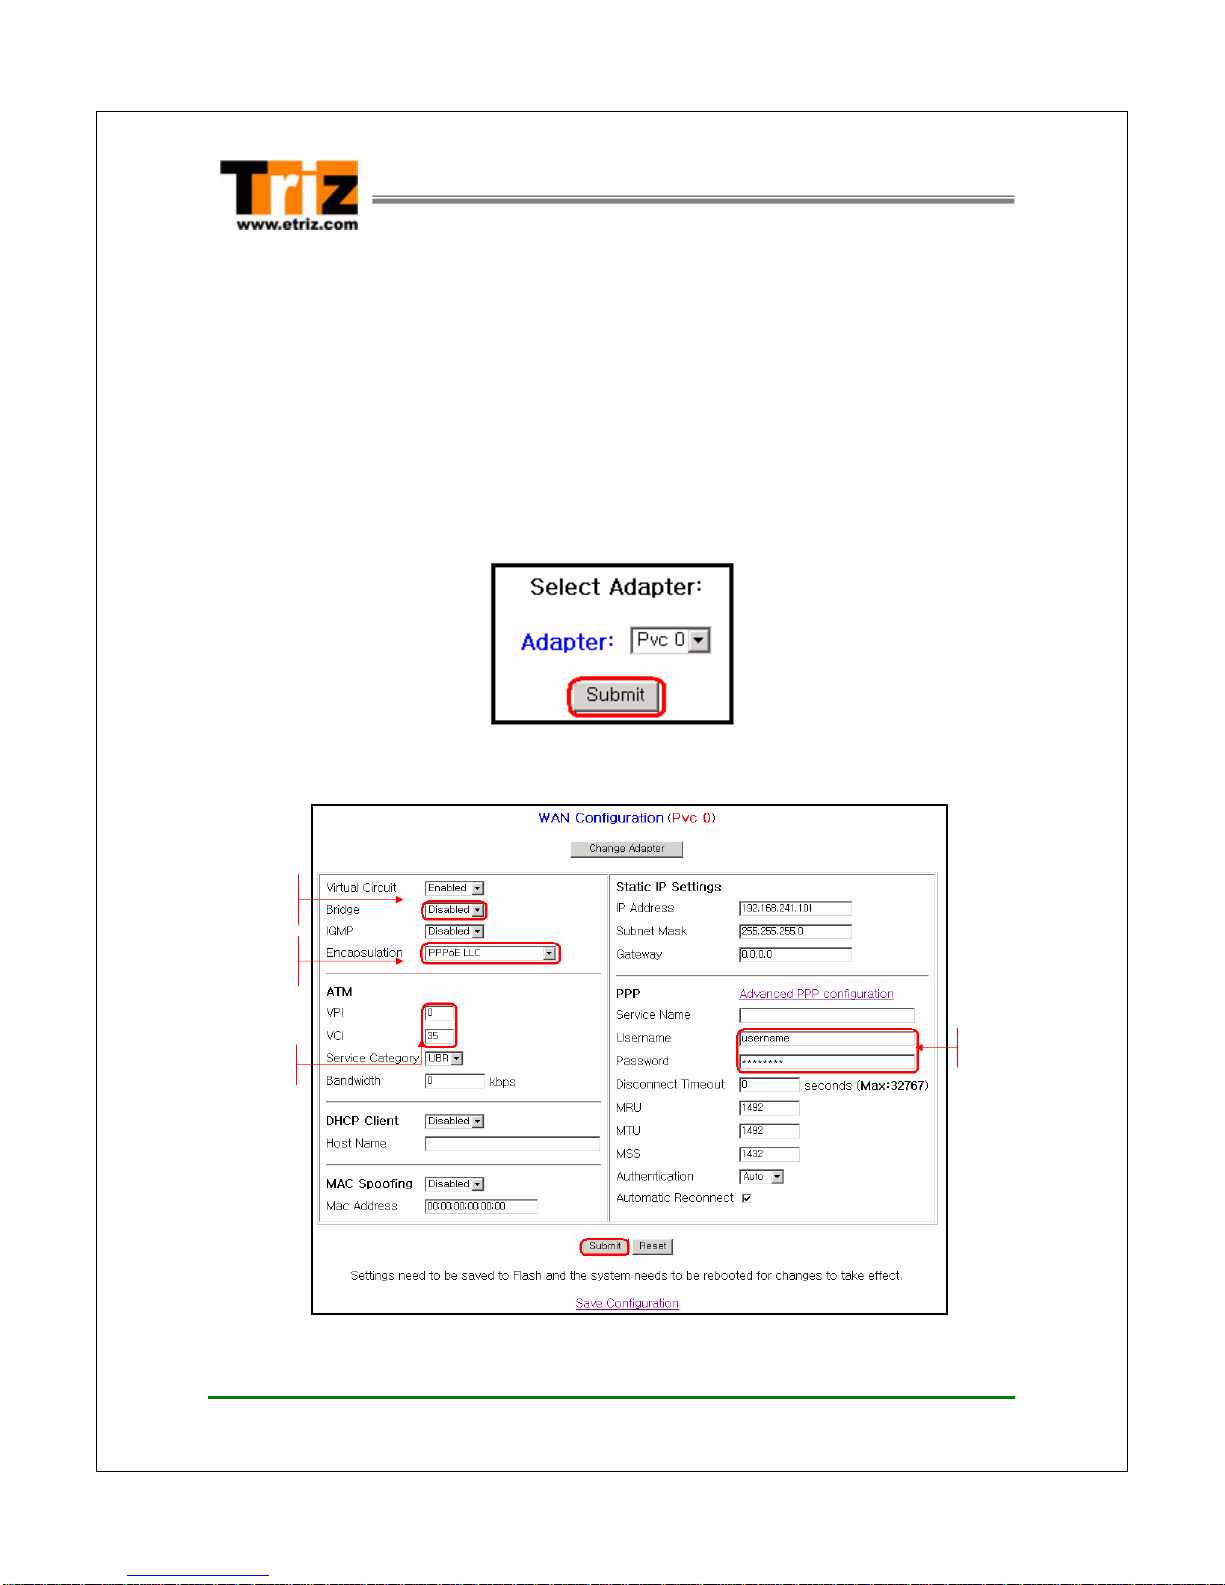
3.3 Configuring the Router (PPPoA/PPPoE) Mode
If your ISP supports the router (PPPoA/PPPoE) connection mode, configure the
TZ3200C as follows:
Note) This section describes only the parameters which have to be changed for
the router mode. There is no need to change the parameter values that are
not described in this section. To alter other parameter values, consult your
service provider.
1. Click the Configuration ÎWAN on the menu frame of the web console.
2. Click the Submit.
3. The <WAN Configuration> page appears. Enter the following information and
click Submit.
Select the ADSL route
r
service type of your ISP
Enter VPI and VCI value
Select the
“Bridged Enabled”
Enter user login ID
and password

Doc. No. TZ3200C_MN_Ver1.0 Rev 0 17 / 22
TZ3200C ADSL Ethernet Modem User’s Manual
Parameter Description
VPI Enter the VPI value specified by your ISP. The default VPI is ‘0’.
VCI Enter the VCI value specified by your ISP. The default VCI is ‘35’.
ENCAPSULATION Select ADSL router service type supported by your ISP.
yPPPoA LLC : When your ISP provides the PPPoA service.
yPPPoE LLC : When your ISP provides the PPPoE service.
Username Enter the user login ID associated with ADSL connection.
PPP Password Enter the user’s password.
3. To select whether you want to enable or disable DHCP, click the Configuration
ÎLAN on the menu frame of the web console.
4. The <LAN Configuration> page appears. Left click in the DHCP Server combo
box to Enabled and click Submit.
5. To apply changed configurations, click the Configuration ÎSave Settings /
Reboot on the menu frame of the web console.
6. The following page appears. Click Save & Reboot. After saving changed
configurations, the modem will be restarted to apply it.
Select the Enabled
Doc. No. TZ3200C_MN_Ver1.0 Rev 0 18 / 22
TZ3200C ADSL Ethernet Modem User’s Manual
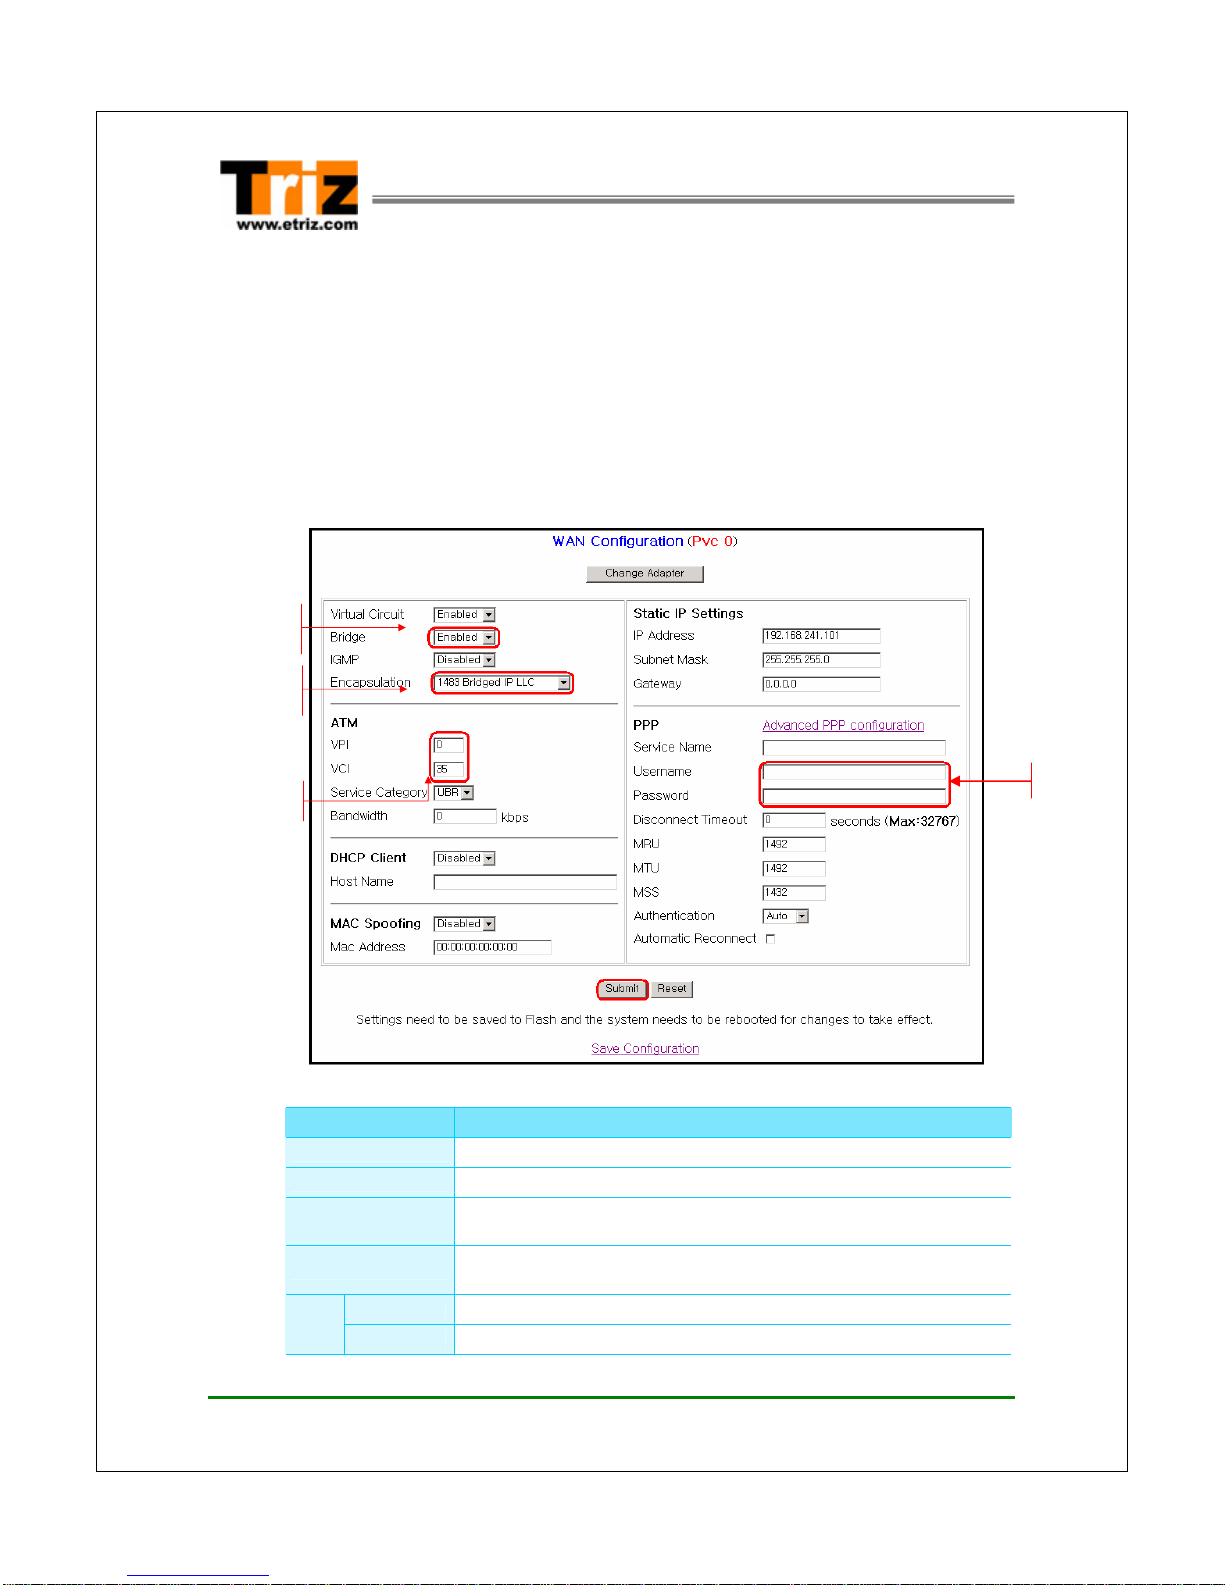
3.4 Configuring the Bridge (RFC 1483) Mode
If your ISP supports the bridge (RFC 1483) connection mode, configure the
TZ3200C as follows:
1. Click the Configuration ÎWAN on the menu frame of the web console.
2. Click the Submit.
3. The <WAN Configuration> page appears. Enter the following information and
click Submit.
Parameter Description
VPI Enter the VPI value specified by your ISP. The default VPI is ‘0’.
VCI Enter the VCI value specified by your ISP. The default VCI is ‘35’.
BRIDGED Select ADSL Bridge Mode
yEnabled
ENCAPSULATION Select ADSL bridge service type supported by your ISP.
y1483 Bridge IP LLC
Username Empty
PPP Password Empty
Empty
Select the
“1483 Bridged IP LLC”
Select the
“Bridged Enabled”
Enter VPI and VCI value

Doc. No. TZ3200C_MN_Ver1.0 Rev 0 19 / 22
TZ3200C ADSL Ethernet Modem User’s Manual
3. To select whether you want to enable or disable DHCP, click the Configuration
ÎLAN on the menu frame of the web console.
4. The <LAN Configuration> page appears. Left click in the DHCP Server combo
box to Enabled and click Submit.
5. To apply changed configurations click the Configuration ÎSave Settings /
Reboot on the menu frame of the web console.
6. The following page appears. Click Save & Reboot. After saving changed
configurations, the modem will be restarted to apply it.
Note) When using Bridge Mode, you should install PPPoE client software
(WinPoET, EnterNet300…Etc.). Please consult your service provider.
Select the Enabled

Doc. No. TZ3200C_MN_Ver1.0 Rev 0 20 / 22
TZ3200C ADSL Ethernet Modem User’s Manual
Appendix A. Troubleshooting
If you cannot connect to the ADSL network, please check the status of the LEDs on
the front panel, and then check the following:
1. Check the POWER LED
If the POWER LED is not on, check to make certain that the AC power adapter
is plugged securely into your computer.
2. Check the LINK LED
If the LINK LED blinks continuously and never stays constantly on, ensure
that the ADSL cable is firmly connected to the “ADSL port” on the TZ3200C . If the
LINK LED still blinks, contact your ADSL service provider.
If the LINK LED is not on, reconnect the TZ3200C to your computer using the
USB Cable. If the LINK LED still blinks, contact your ADSL service provider.
3. Check your PC’s IP address
If all LEDs operate normally and cables are firmly connected to the ports,
ensure that your PC’s IP address is properly assigned. Your PC’s IP address
setting must be dynamic IP (Obtain an IP automatically).
Check the Network Neighbourhood (for Windows 9x) or My Network Places
properties ÆLocal Area connection’s properties.
< Windows 2000 >
Table of contents
Other Triz Modem manuals


