TrojanLabel T3-OPX User manual

T3-OPX user guide
Version 1.2

T3-OPX installation
Page | 1
1 Specification and general information ...................................................................................................... 5
1.1 Certificate and Compliance ............................................................................................................... 5
1.1.1 Emissions ................................................................................................................................... 6
1.2 Warning Symbols............................................................................................................................... 7
1.3 Introduction....................................................................................................................................... 8
1.3.1 Original instructions .................................................................................................................. 8
1.3.2 Purpose...................................................................................................................................... 8
1.3.3 Accessibility ............................................................................................................................... 8
1.3.4 Knowledge ................................................................................................................................. 8
1.4 General Information .......................................................................................................................... 8
1.4.1 Manufacturer............................................................................................................................. 8
1.4.2 The machine’s designation ........................................................................................................ 8
1.4.3 Machine plate............................................................................................................................ 8
1.5 Specification and Application ............................................................................................................ 9
1.5.1 General description ................................................................................................................... 9
1.5.2 The machine’s purpose and intended use ................................................................................ 9
1.5.3 Warning about foreseeable misuse........................................................................................... 9
1.5.4 Specifications T3-OPX .............................................................................................................. 10
1.5.5 Specifications MailTable 1 (MT1) ............................................................................................ 13
1.5.6 Specifications MailTable 2 (MT2) ............................................................................................ 14
2 T3 OPX physical overview........................................................................................................................ 15
2.1 Front side......................................................................................................................................... 15
2.2 Backside ........................................................................................................................................... 16
2.3 Inlets detail ...................................................................................................................................... 17
2.4 Bottom............................................................................................................................................. 17
2.5 Media Entry side (feeder side) ........................................................................................................ 18
2.6 Media exit side ................................................................................................................................ 18
3 Installing the T3 OPX................................................................................................................................ 20
3.1 IMPORTANT: .................................................................................................................................... 20
3.2 Pre-requisites................................................................................................................................... 21
3.3 MailTable 1 or 2 setup..................................................................................................................... 21
3.4 T3 OPX Bracket system installation process.................................................................................... 22
3.5 Connect encoder and table controls (Trojan MT1 and MT2).......................................................... 28

T3-OPX installation
Page | 2
3.6 Remove service tray plastic protection ........................................................................................... 29
3.7 Connect T3-OPX power supply cord and network cables ............................................................... 29
3.8 Connect MT1/2 power supply cord................................................................................................. 29
3.9 Powering on..................................................................................................................................... 30
3.9.1 Safety Check ............................................................................................................................ 30
3.9.2 Power on process .................................................................................................................... 30
3.10 Calibrate the table position and level unit ...................................................................................... 30
3.11 Installing Ink Cartridges ................................................................................................................... 31
3.12 Purging the unit ............................................................................................................................... 31
3.13 Calibrate the print head optional .................................................................................................... 34
3.13.1 Nozzle alignment ..................................................................................................................... 34
3.13.2 Color Density ........................................................................................................................... 36
3.13.3 Nozzle health alignment .......................................................................................................... 36
4 General Settings (HOME tab) .................................................................................................................. 37
4.1 Overview menu ............................................................................................................................... 37
4.2 Settings menu.................................................................................................................................. 38
4.2.1 Consumables Button: .............................................................................................................. 38
4.2.2 Network Button ....................................................................................................................... 39
4.2.3 Updater Button........................................................................................................................ 40
4.2.4 User Preferences Button ......................................................................................................... 40
4.2.5 User Management button ....................................................................................................... 41
4.2.6 Printing prefrences button ...................................................................................................... 42
4.3 Statistics menu ................................................................................................................................ 43
4.3.1 Last Printed Jobs button: ......................................................................................................... 43
4.3.2 Engine & Printhead Usage button: .......................................................................................... 44
4.4 Shutdown......................................................................................................................................... 45
4.5 Exporting statistics data to a CSV file/ viewing statistics from a browser ...................................... 46
5 Transferring print jobs to the T3-OPX using the Xitron RIP..................................................................... 48
5.1 Starting the Xitron RIP Server.......................................................................................................... 48
5.2 Transferring a job from the web client............................................................................................ 48
5.2.1 Print direction.......................................................................................................................... 50
5.2.2 Rotation, offsetting and media size......................................................................................... 50
6 Printing a job from the Job Library.......................................................................................................... 54
7 Operations menu..................................................................................................................................... 55
7.1 Handling overview ........................................................................................................................... 55
7.1.1 Initialize height control............................................................................................................ 56

T3-OPX installation
Page | 3
7.1.2 Print unit height....................................................................................................................... 56
7.1.3 MailTable (MT1/2) controls..................................................................................................... 56
7.2 Maintenance overview .................................................................................................................... 57
7.2.1 Light clean................................................................................................................................ 58
7.2.2 Medium clean.......................................................................................................................... 58
7.2.3 Remove service tray ................................................................................................................ 58
7.2.4 Install service tray.................................................................................................................... 58
7.2.5 Go to Print ............................................................................................................................... 58
7.2.6 Uncap print head ..................................................................................................................... 58
7.2.7 Cap Print Head......................................................................................................................... 59
7.3 Media settings overview ................................................................................................................. 59
7.3.1 Profile control section ............................................................................................................. 59
7.3.2 Basic tab................................................................................................................................... 60
7.3.3 Advanced tab........................................................................................................................... 61
7.3.4 Fans tab ................................................................................................................................... 62
7.3.5 Setting up a media (job) profile in Media settings .................................................................. 62
8 Automatically calibrating the job/media height ..................................................................................... 63
9 Printing on uneven surfaces (die-to-die overlap feature)....................................................................... 65
10 Edge sensor (TOF control) ................................................................................................................... 66
10.1 Sensor overview .............................................................................................................................. 67
10.2 Adjusting the sensor to the media .................................................................................................. 67
11 User replaceable parts......................................................................................................................... 67
11.1 Ink cartridge part numbers.............................................................................................................. 67
11.2 Service tray replacement................................................................................................................. 67
11.2.1 Service tray replacement process ........................................................................................... 68
11.2.2 Moving the service tray manually ........................................................................................... 70
11.3 Fuse power inlet .............................................................................................................................. 70
11.3.1 Fuse replacement process....................................................................................................... 70
11.4 Aerosol filter .................................................................................................................................... 71
11.4.1 Aerosol filter replacement process ......................................................................................... 72
12 RIP installation (XITRON) ..................................................................................................................... 73
12.1 Link TrojanControl ........................................................................................................................... 73
12.2 Installing just the client ................................................................................................................... 74
13 Debugging connections. ...................................................................................................................... 75
13.1 Controls for T1030 (webpath board)............................................................................................... 76
14 Revision history ................................................................................................................................... 77

T3-OPX installation
Page | 4
T3-OPX installation
Page | 5
1Specification and general information
1.1 Certificate and Compliance
T3-OPX specific
CFR Title 47 Part 15 Subpart B (2020)
ISED ICES-003 Issue 6 Published 2016 Updated 2019
CENELEC EN 55024:2011+A1:2015, CISPR 35:2016Ed.1.0
CENELEC EN 55032:2015, CISPR 32:2015
CENELEC EN 61000-3-2:2014, IEC 61000-3-2 Ed 5:2018
CENELEC EN 61000-3-3:2008, IEC 61000-3-3 Ed 3.1:2017
Audio/Video, Information and Communication Technology Equipment - Part 1:
Safety Requirements (R2019) [CSA C22.2#62368-1:2014 Ed.2]
Audio/Video, Information and Communication Technology Equipment - Part 1:
Safety Requirements [UL 62368- 1:2014 Ed.2]
Audio/Video, Information and Communication Technology Equipment - Part 1:
Safety Requirements [IEC 62368- 1:2014 Ed.2+C1;C2]
Audio/Video, Information and Communication Technology Equipment - Safety
Requirements [EN 62368- 1:2014+C1;C2]
Mail Table specific
CFR Title 47 Part 15 Subpart B (2020)
ISED ICES-003 Issue 6 Published 2016 Updated 2019
CENELEC EN 55024:2011+A1:2015, CISPR 35:2016Ed.1.0
CENELEC EN 55032:2015, CISPR 32:2015
CENELEC EN 61000-3-2:2014, IEC 61000-3-2 Ed 5:2018
CENELEC EN 61000-3-3:2008, IEC 61000-3-3 Ed 3.1:2017
Motor-Operated Appliances [UL 73:2011 Ed.10+R:08Aug2018]
Motor-Operated Appliances (Household and Commercial) [CSA C22.2#68:2018
Ed.8]
Electrical Standard for Industrial Machinery [NFPA 79:2017 Ed.2018]
EN 60204-1:2006+A1;C1: Safety Of Machinery - Electrical Equipment Of
Machines - Part 1: General Requirements

T3-OPX installation
Page | 6
1.1.1 Emissions
T3-OPX installation
Page | 7
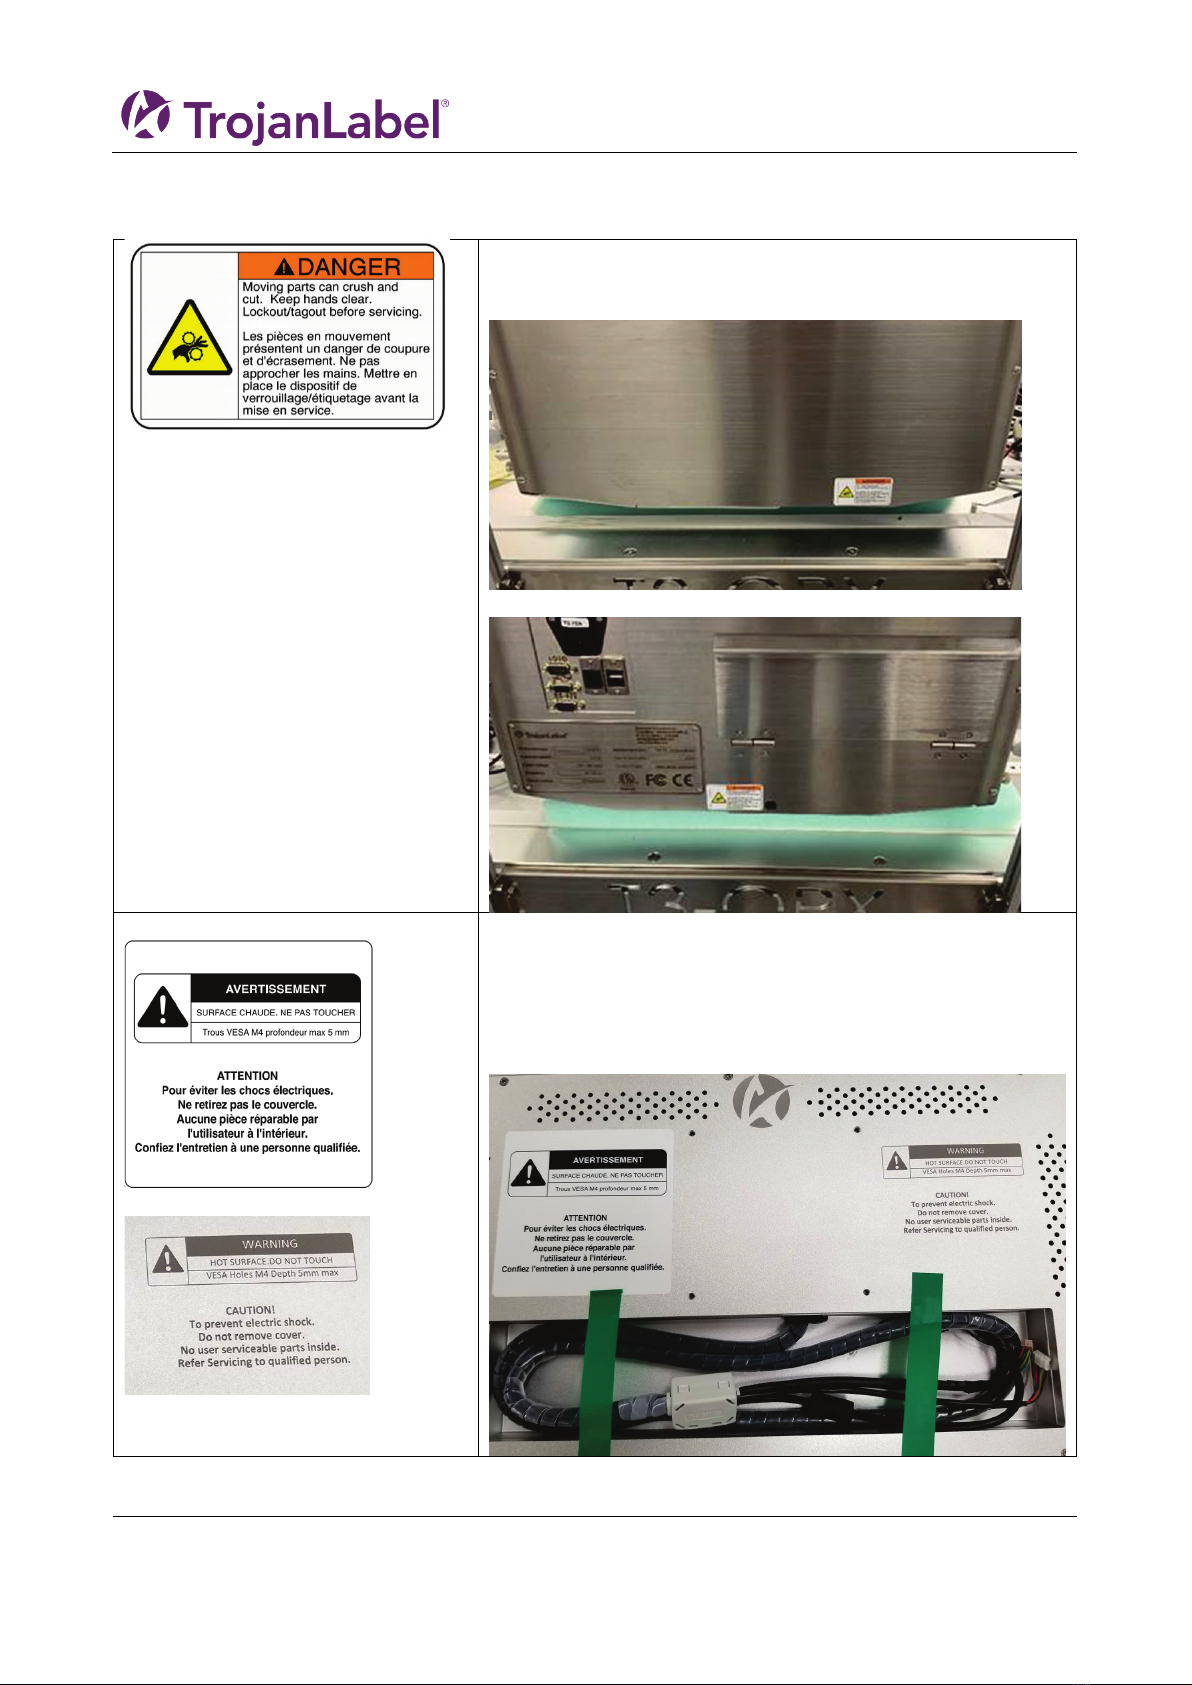
1.2 Warning Symbols
There are crush warning stickers placed on the front and back
side of the unit, as the unit can move down towards the table.
Front
Back
Sticker in French
Engravement in English
Warning stickers and engravements on the back side of the
touch screen, indicating the depth of the VESA holes (5mm),
that the screen can become hot on the back side and the used
should never open the cover of the screen, as this may only be
serviced by an experienced and product trained technician.

T3-OPX installation
Page | 8
1.3 Introduction
1.3.1 Original instructions
These instructions are original instructions made by Trojanlabel for the Trojanlabel digital
over-printer T3-OPX.
1.3.2 Purpose
The purpose of these instructions is to ensure correct installation, use, handling and
maintenance of the machine.
1.3.3 Accessibility
The instructions are to be kept in a location known to the staff and must be easily
accessible for the operators and maintenance personnel.
1.3.4 Knowledge
It is the duty of the employer (the owner of the machine) to ensure that anyone who is to
operate, service, maintain, or repair the machine have read the instructions. As a
minimum, they should have read the part(s) relevant for their work. In addition, anyone
who is to operate, service, maintain, or repair the machine is under obligation to look for
information in the instructions themselves.
1.4 General Information
1.4.1 Manufacturer
The machine has been manufactured by:
AstroNova, Inc.
600 E Greenwich Ave
West Warwick, RI 02893
USA
1.4.2 The machine’s designation
The machine’s complete designation is Digital Over-Printer type T3-OPX.
1.4.3 Machine plate
The machine plate is situated on the back side of the machine at the lower left corner:

T3-OPX installation
Page | 9
1.5 Specification and Application
1.5.1 General description
The machine consists of a metal cabinet, ink delivery system, service door, print engine,
embedded PC, touchscreen, media sensor, printhead and four ink cartridges.
If any changes or alterations are made to the machine, these changes or alterations must
be reflected in these instructions as necessary.
1.5.2 The machine’s purpose and intended use
Application: The machine is only to be used to print on materials which meet the material
specification requirements. The machine must not be used for any other purpose than the
purpose mentioned above.
1.5.3 Warning about foreseeable misuse
The T3-OPX may not be used with inks not endorsed by Trojanlabel. All inks purchased
from Trojanlabel or from official Trojanlabel distributors worldwide are endorsed by
Trojanlabel.
T3-OPX installation
Page | 10
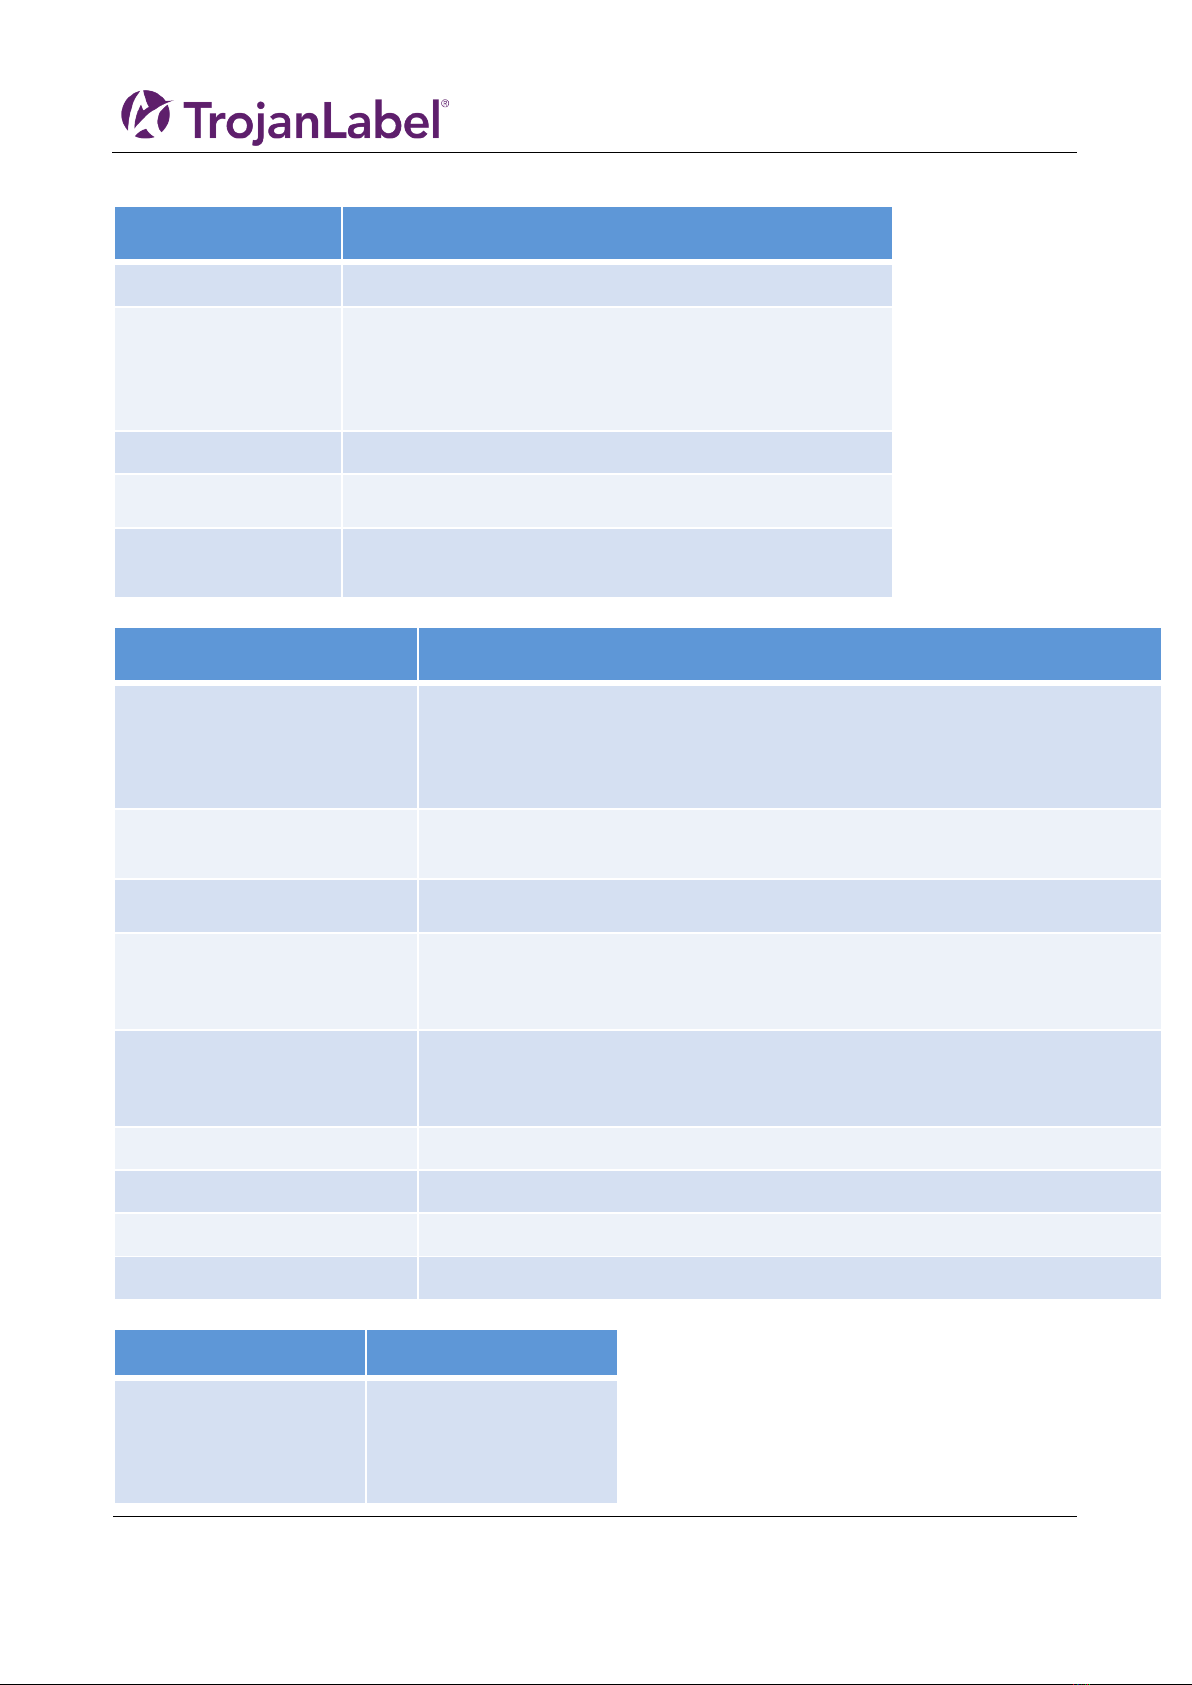
1.5.4 Specifications T3-OPX
Operation
Ink Type
Pigmented ink, 4 Individual CMYK cartridges
Resolution
High Resolution Mode:
1200 x 1200 optimized dpi from 600 x 600 input dpi.
Production Mode:
600 x 1200 optimized dpi from 300 x 300 input dpi.
Print speed
Up to 18 ips (27m/min)
Print Area
Width: 11.7” (297mm)
Media Sensors
- Optical TOF sensor, adjustable position
- Pressure sensor for height control
Environmental & Physical
Printer operation
Operation 20° to 30° C (59° to 86° F)
Transport –40° to 60° C (–40° to 140° F)
Relative humidity 20 to 80%
Altitude 0 to 3048 m
Power requirements
100-240V AC – 50/60
(9A power supply)
Power consumption peak
103.2 watts
Print unit dimensions
Width 518 mm
Length 516 mm
Height 290 mm (excluding height adjustable bracket)
Media cleaning unit
dimensions
Width 457.5 mm
Length 154 mm
Height 261 mm
Touchscreen
15.6”
Print unit weight
20 kg
Media cleaning unit weight
3.5 kg
Drop detection
Print then scan process, using offline scanner (Epson v600).
Supplies
Ink Cartridges
CMYK pigmented:
C: 238 ml
M: 233 ml
Y: 225 ml

T3-OPX installation
Page | 11
K: 498 ml
ISO pages:
K: 20.000 pages
CMY: 16.000 pages
Maintenance
Replaceable service tray
Ink Type:
Pigmented aqueous inks
Average drop volume
10 pl K, 8.5 pl CMY
Nozzle count
59136 (4224 x 14)
Material
Types
Uncoated Paper, Card board, paper
board, wooden boards, paper bags
Most porous materials
Width
Depends on transport/installation
600mm (Trojan standard table)
1000mm (Trojan wide table)
Supported image lengths
25,4 mm – 914,4 mm (1 in - 36 in)
Thickness
0 – 95mm (automatic height calibration)
Connectivity
Wired connection (802.3 LAN (10/100/1000) Ethernet port)
2 x serial ports (I/O and encoder)
USB for scanner
Wired LAN
Software:
TrojanControl Software
RIP
Hardware:
Windows PC

T3-OPX installation
Page | 12
T3-OPX installation
Page | 13
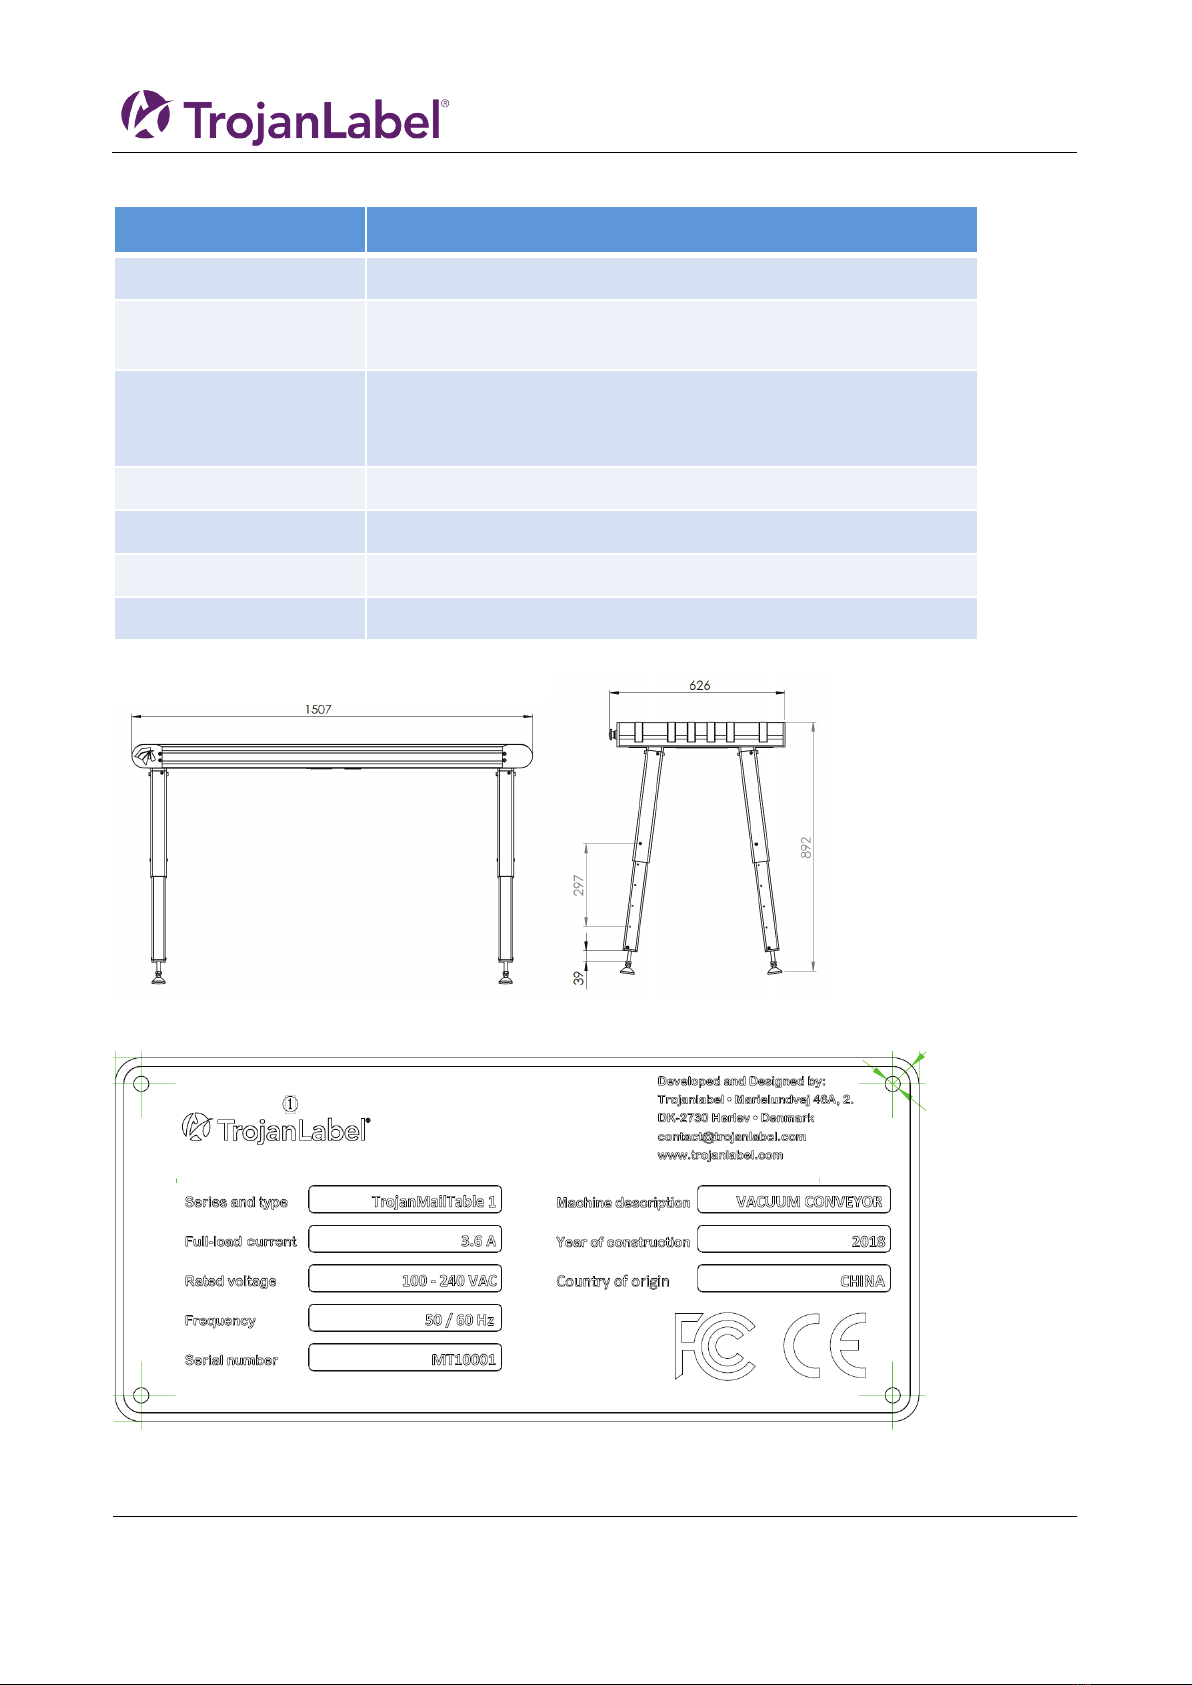
1.5.5 Specifications MailTable 1 (MT1)
MailTable 1 Standard
Speed
Up to 18 ips (27m/min)
Power requirements
100-240V AC – 50/60 Hz
(2.5A power supply)
Dimensions
Width: 626 mm (incl Emergency stop button)
Length: 1507 mm
Height: From 892 mm to 595 mm
Support material width
600 mm
Weight
75 kg/ 165 lbs without accessories
Suction
5 fans adjustable speeds
Belts
6
1.5.5.1 MT1 Machine plate
T3-OPX installation
Page | 14
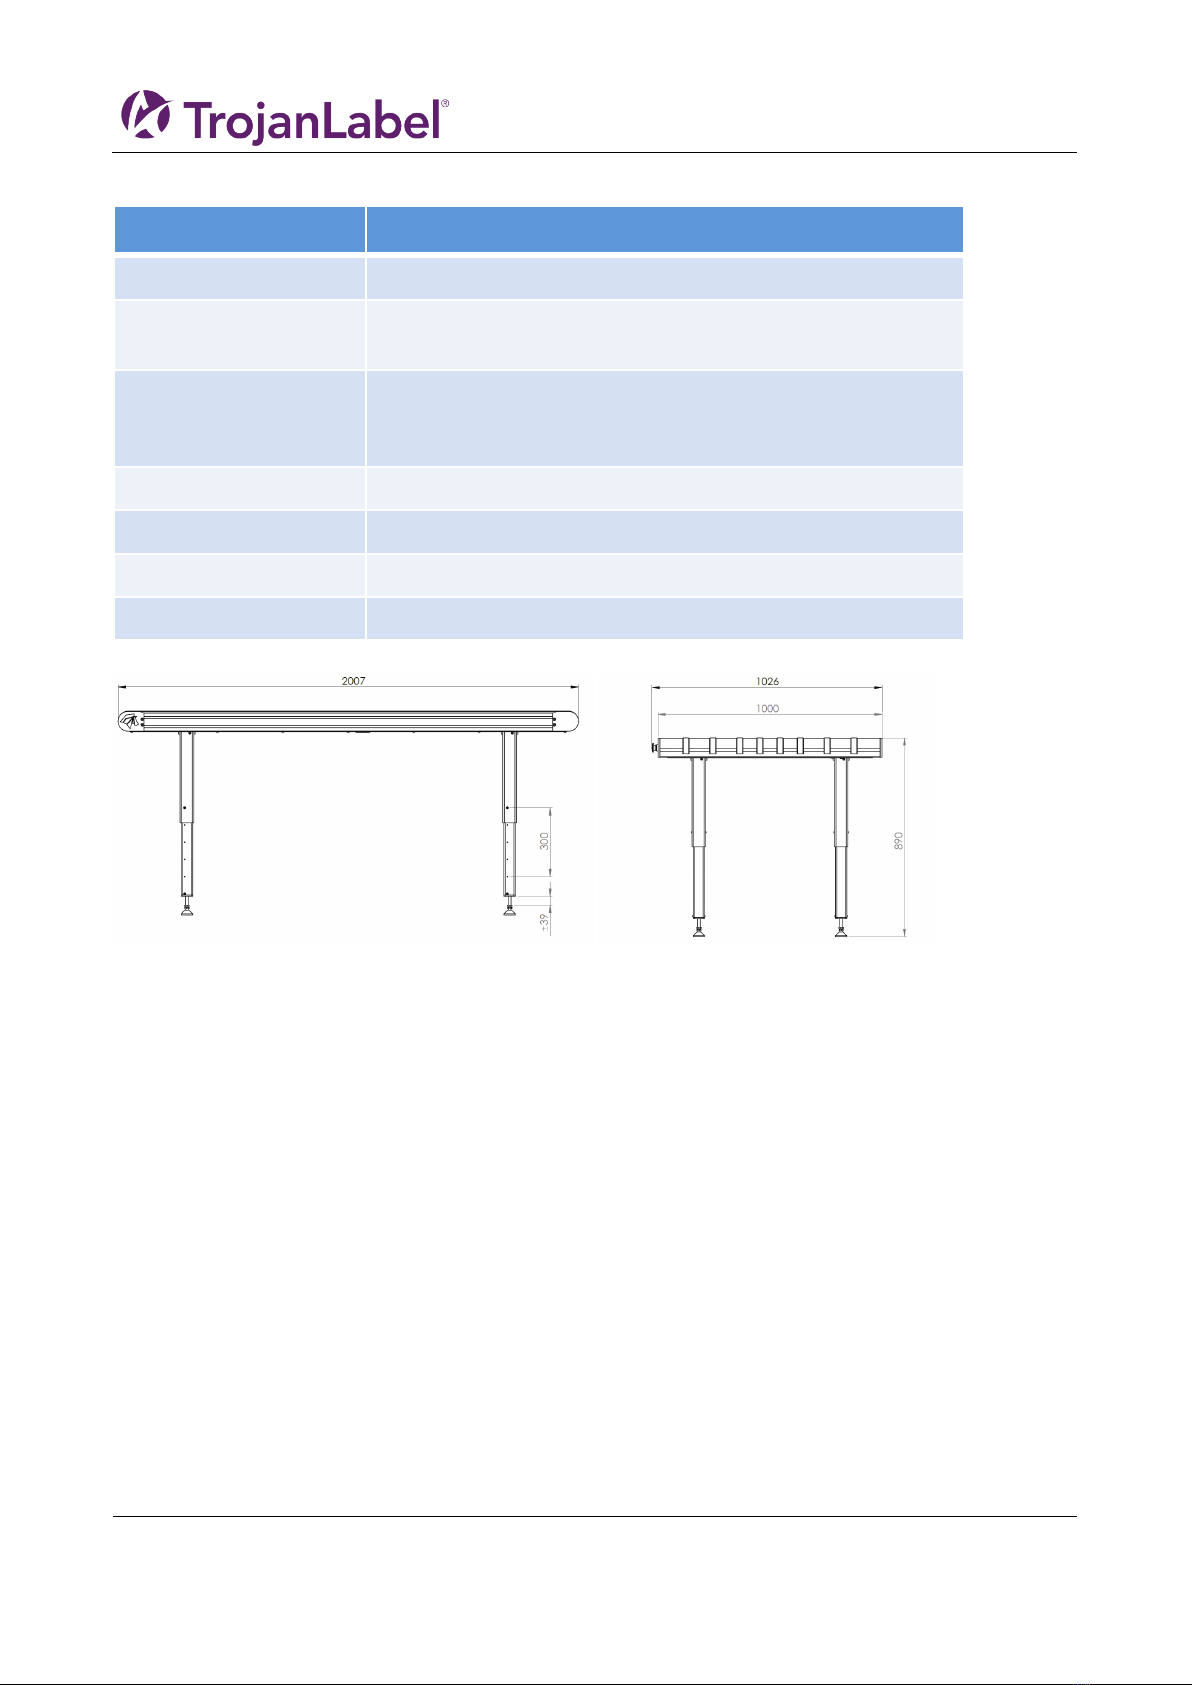
1.5.6 Specifications MailTable 2 (MT2)
MailTable 1 Wide
Speed
Up to 18 ips (27m/min)
Power requirements
100-240V AC – 50/60 Hz
(2.5A power supply)
Dimensions
Width: 1026 mm (incl Emergency stop)
Length: 2007 mm
Height: From 890 mm to 590 mm (5 positions)
Support material width
1000 mm
Weight
117 kg/ 258 lbs without accessories
Suction
5 fans adjustable speeds
Belts
8
T3-OPX installation
Page | 15
2T3 OPX physical overview
This is example
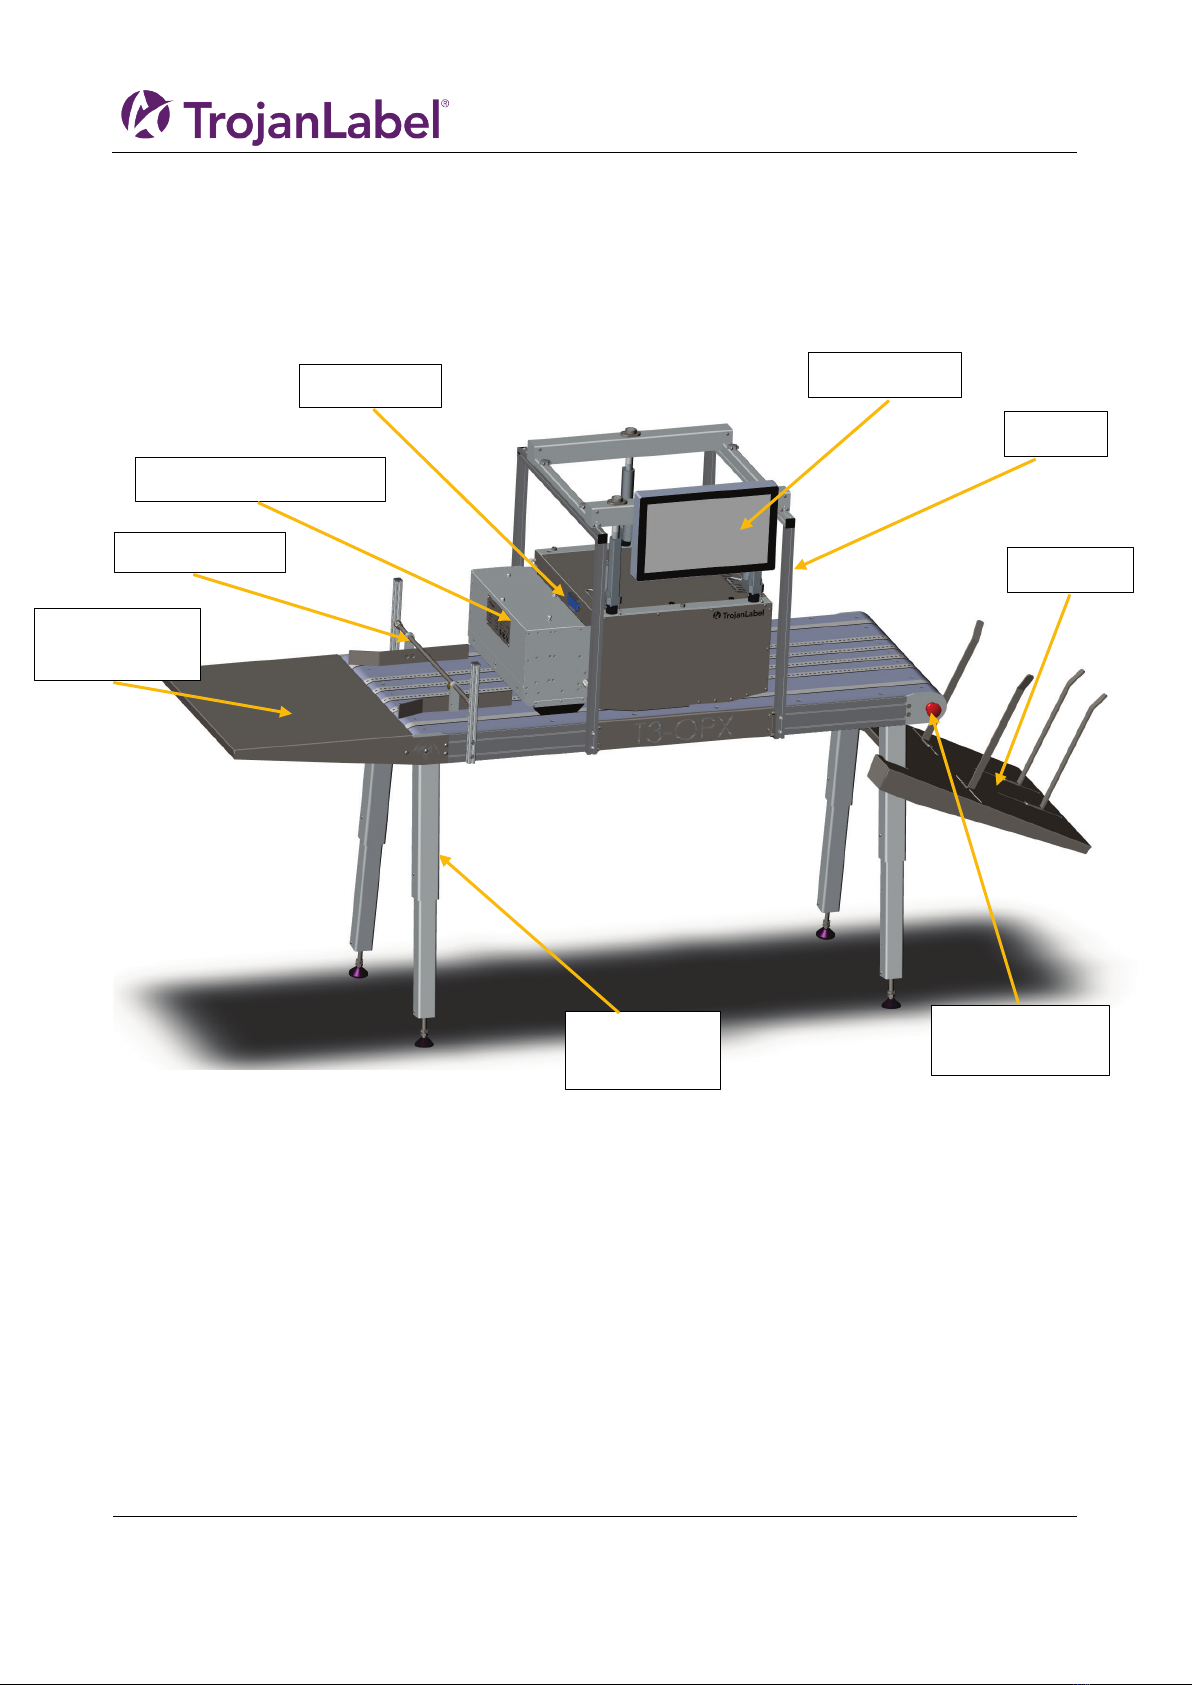
2.1 Front side
Edge Sensor
Adjustable
legs
Touch Screen
Feeder table
(optional)
Media Guides
Vacuum unit (optional)
Table
emergency stop
Catch tray
Bracket
T3-OPX installation
Page | 16
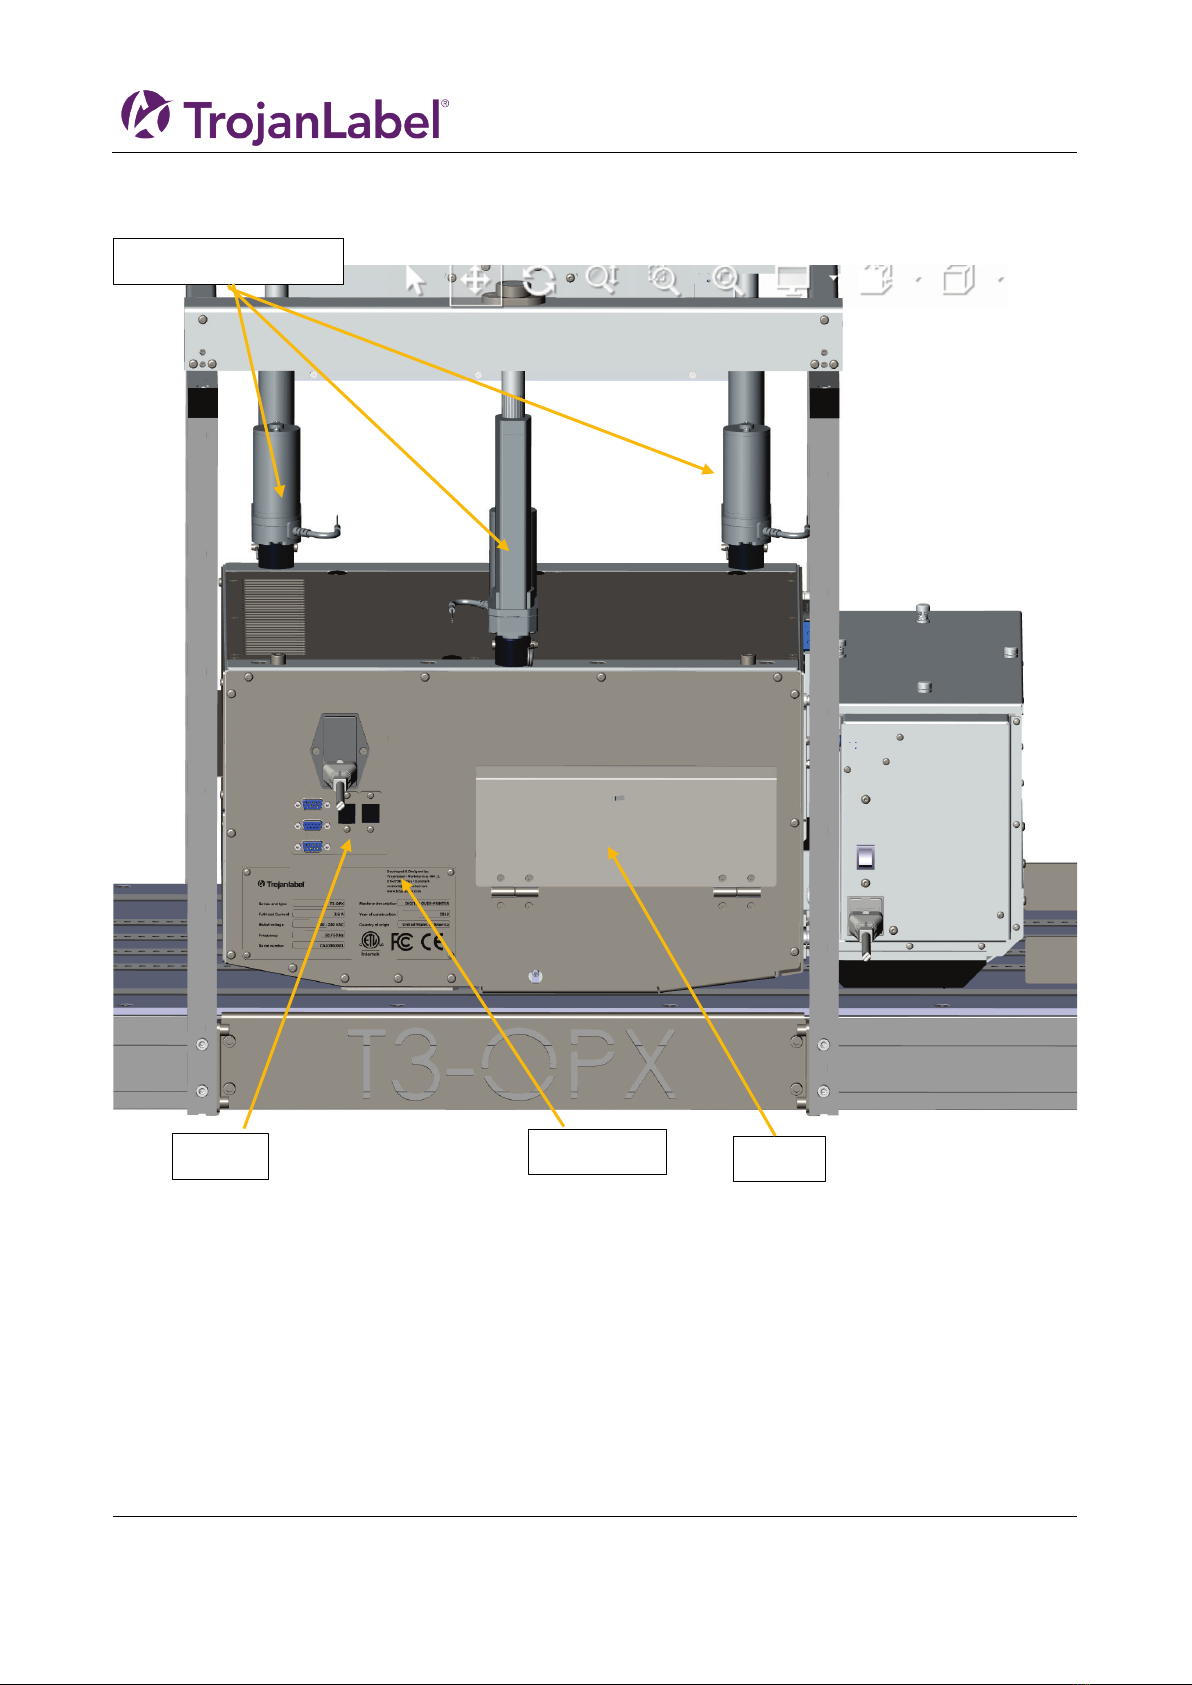
2.2 Backside
Height controllers (3)
Inlets
Ink lid
Serial plate
T3-OPX installation
Page | 17
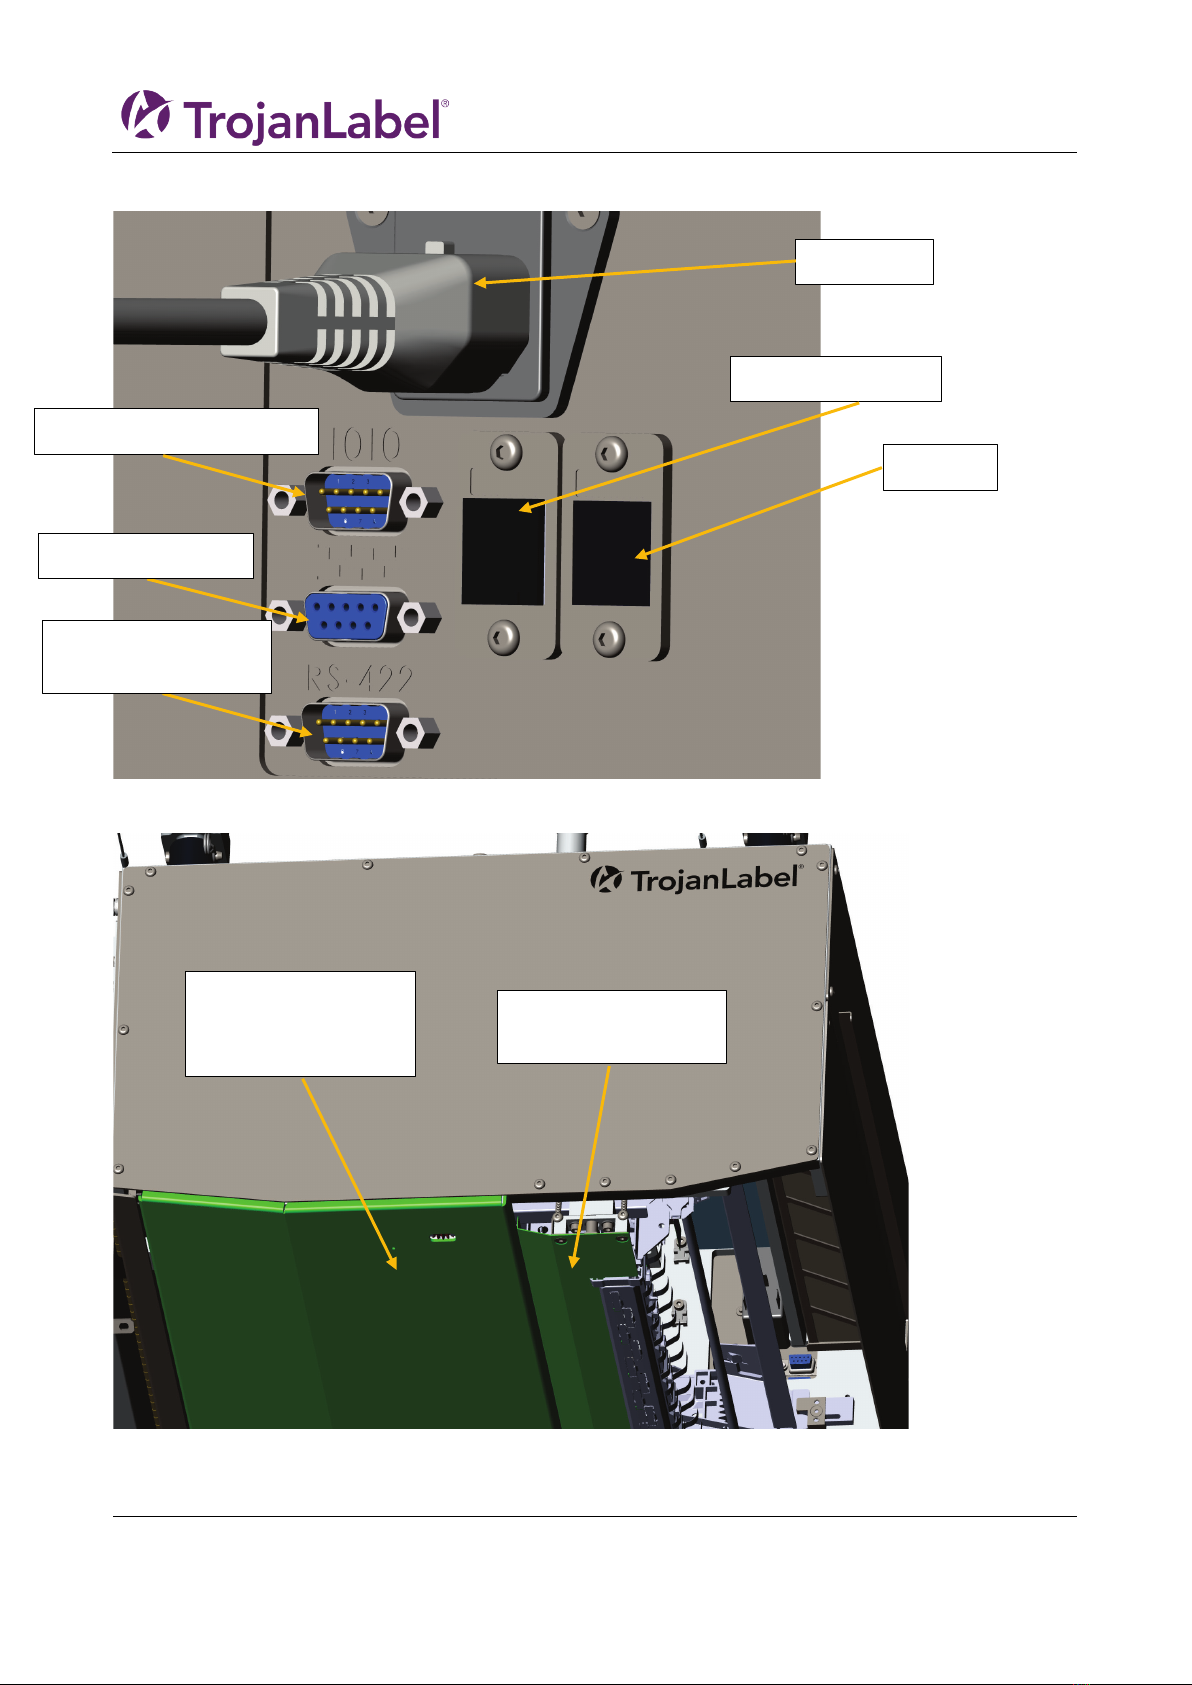
2.3 Inlets detail
2.4 Bottom
Power inlet
IO serial port (fx for feeder)
Encoder serial port
Table communication
port
Network (ethernet)
USB port
Pressure plate, area
that is used to detect
the media height
Crash plate. Protects
the print head.
T3-OPX installation
Page | 18
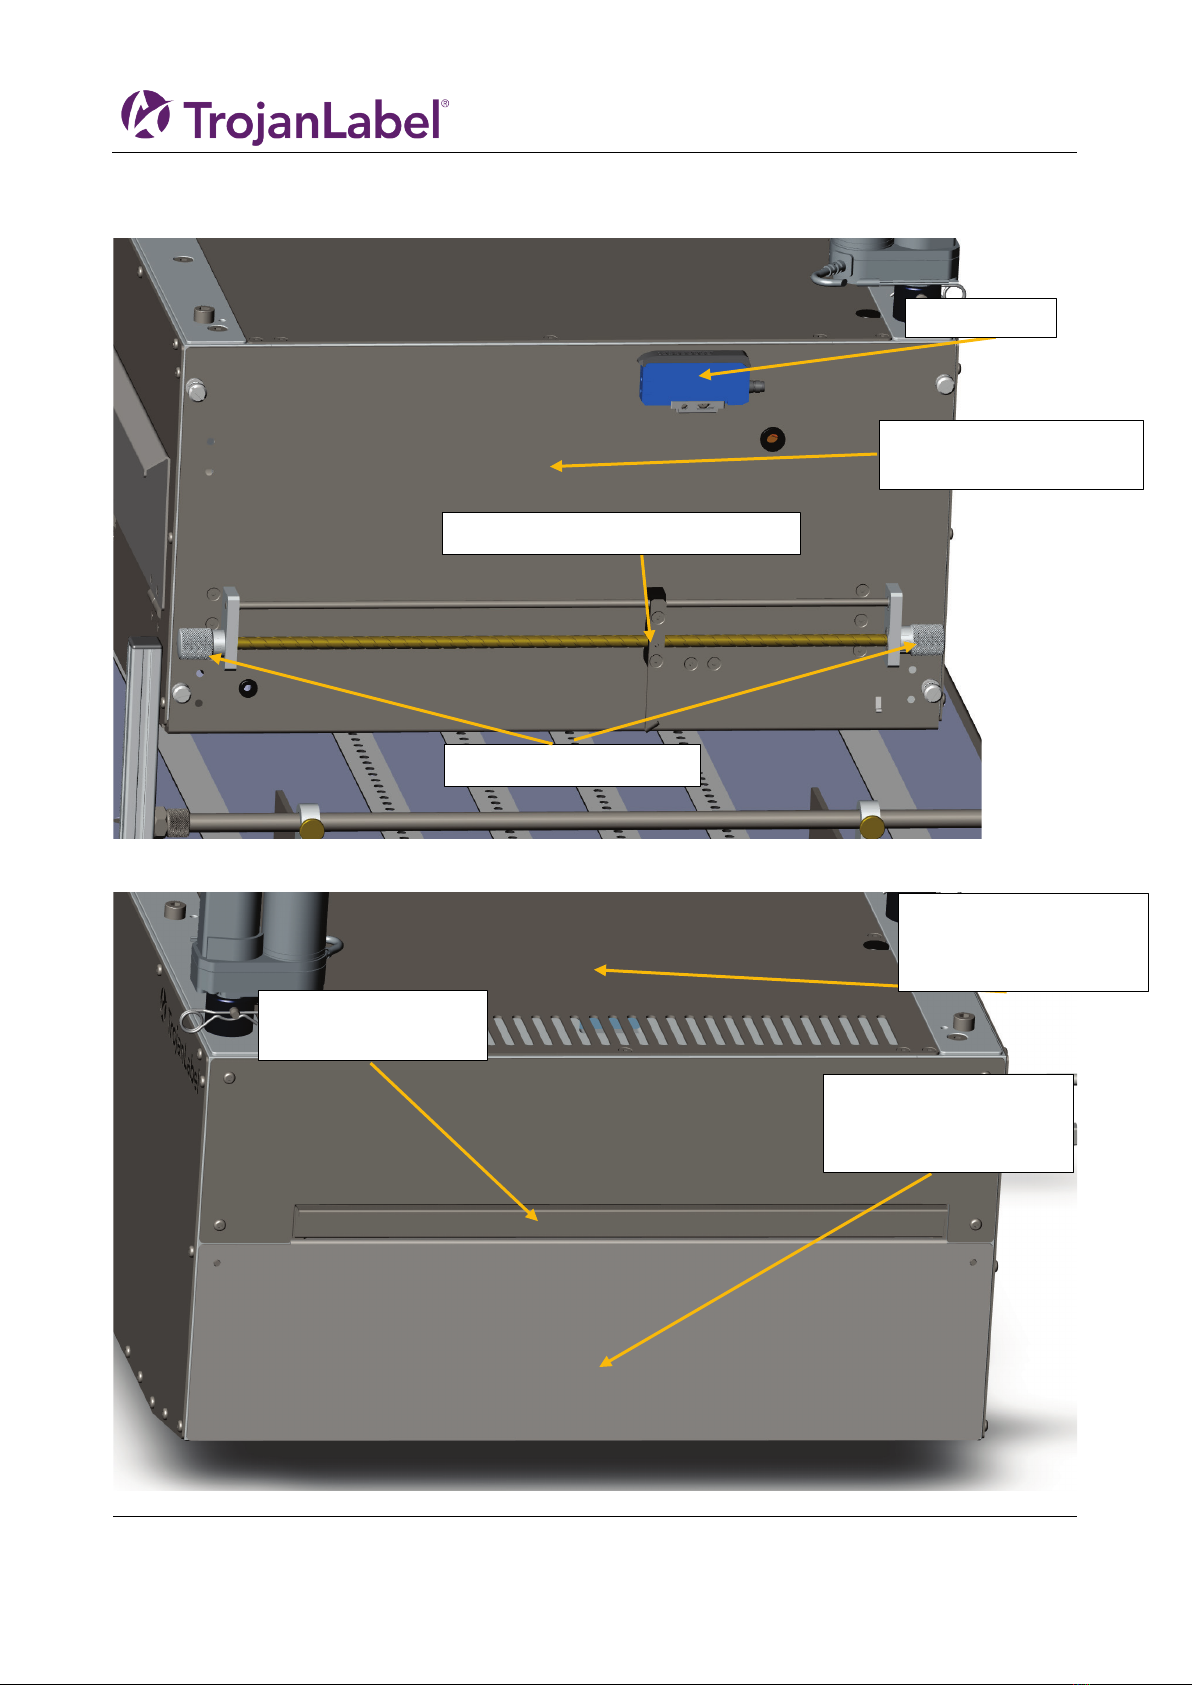
2.5 Media Entry side (feeder side)
2.6 Media exit side
Aerosol filter.
Replaceable filter
Front plate.
Removeable to access
print head area
Top lid.
Access to electronic
components
Edge Sensor
Knobs to move sensor
Edge sensor reflective light emitter
Service door, access to
print engine and service

T3-OPX installation
Page | 19
Table of contents
Other TrojanLabel Industrial Equipment manuals

Popular Industrial Equipment manuals by other brands


Diamond Products
Diamond Products CVG1 Operator's manual

Venture Industries
Venture Industries VMS ATEX Operating and assembly instructions

JUKI
JUKI KE-750 Setup guide

Jäger
Jäger Z62-H370.01 S5W2 manual

SCHUNK
SCHUNK SLD Assembly and operating manual

Samoa
Samoa LARIUS PNEUMATIC HOIST 30 LT Operating and maintenance manual