Tropic Creations Glamorca Roller clean 100 User manual

Glamorca Roller clean 100 – Instruction v2
Roller clean is a filtering device that mechanically
removes impurities from water, for proper operation,
please read the instructions carefully.
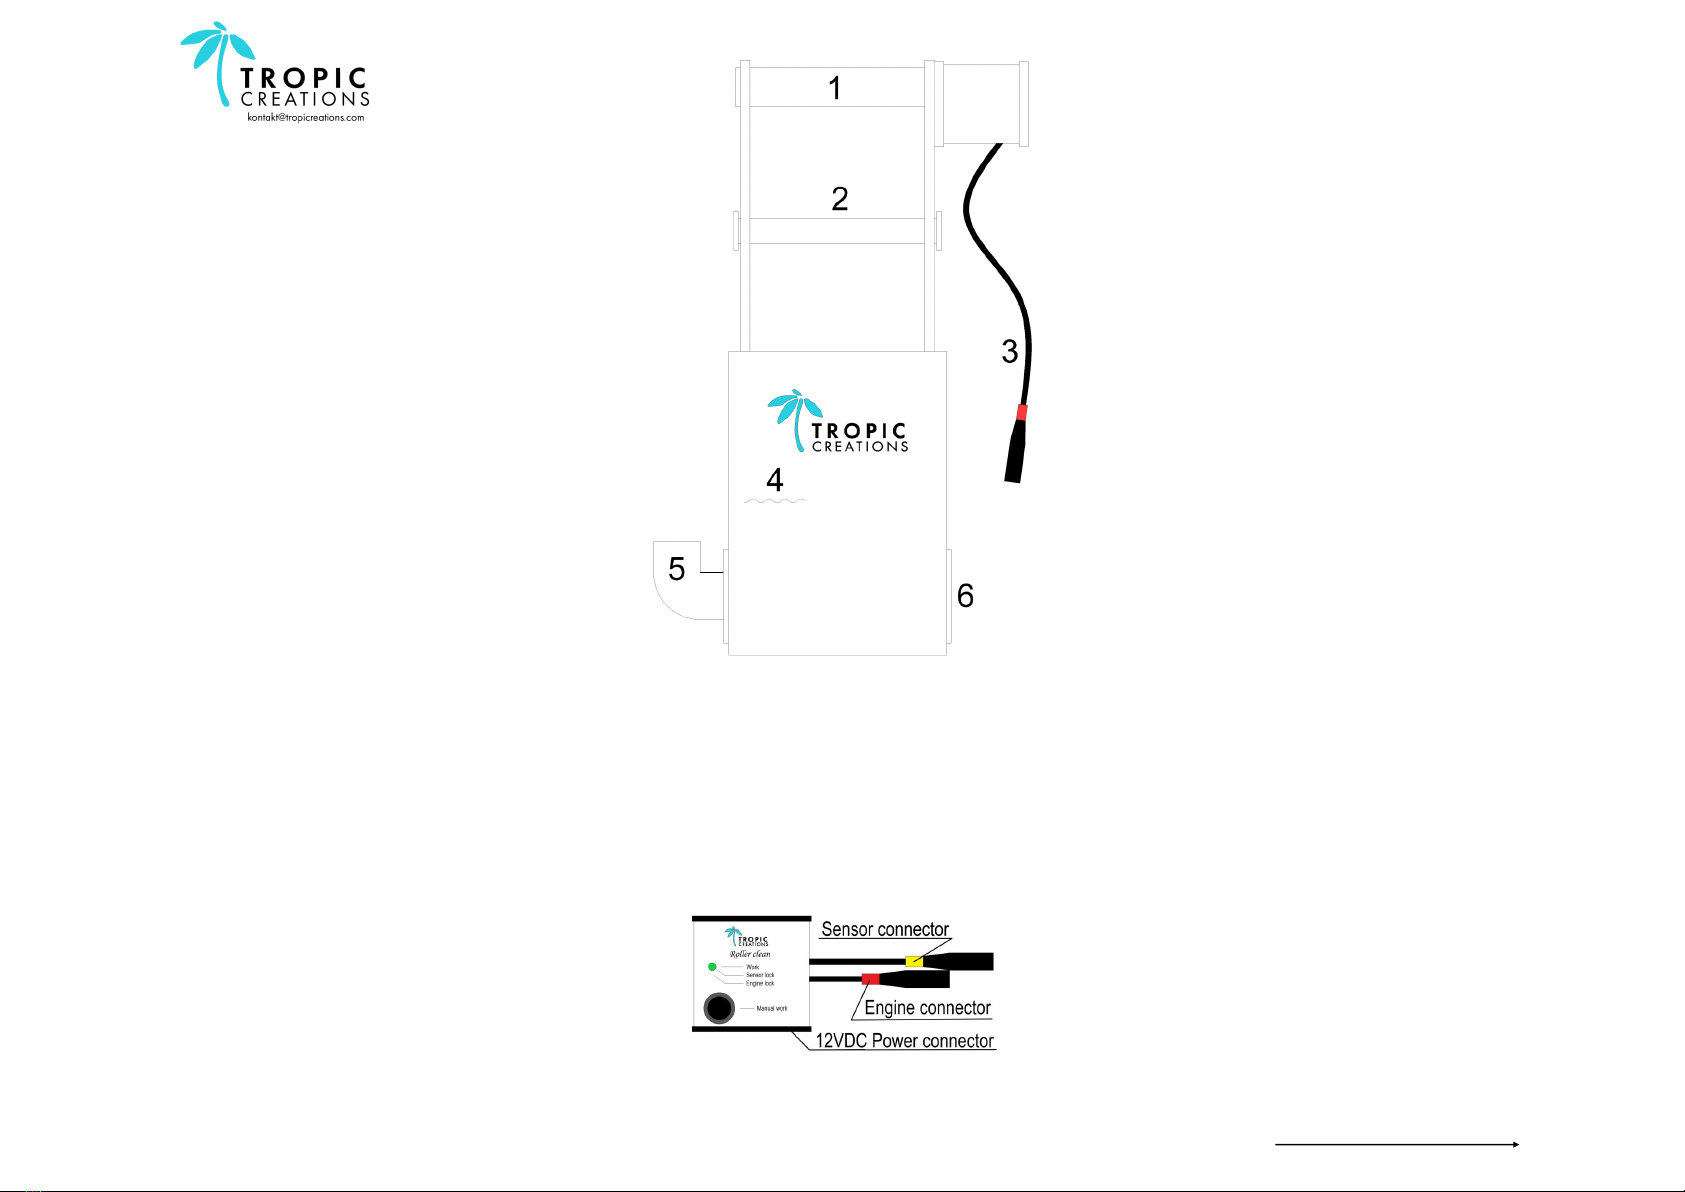
1. Roller consists of 2 main components:
a) the holder to which we connect the hydraulics
and hang it on the edge of the aquarium,
b) cassettes with filter fleece.
2. CAUTION!!! During transport:
• the roller (2) is inserted into the hole where
the water drain is mounted (between 5-6) and
secured with a tape, push it out, and then
eject the cassette safely,
• the roller's slings have been mounted the
other way round, unscrew the 4 black screws
on the side of the housing, turn the handles
and screw them back in.
3. Before installation, remove the cassette from the
holder. The immersion level of the device is marked
on the front. The slings on the side of the device
regulate the draft. For the device to work
properly, the water level must not exceed 10mm
from the marked line (4)
4. On the left or right side, we can install a 25mm
bend (5) to which we connect the water drain. On
the opposite side, screw the round cap (6).
Approximately 2 cm from the upper edge of the
handle, there is an overflow hole for safety.
5. After mounting the handle, we prepare a non-
woven cassette. On the side of the cassette there is
a diagram of the non-woven fabric routing between
the rollers. We put it on the lower handle with a
diameter of 16mm (2) and lead it between the
rollers, up to the upper roller with the motor (1).
6. After installing the fleece on the cassette, the
whole thing is put into the holder mounted on the
edge of the tank.
7. The next step is to connect the liquid level sensor
(yellow band), motor (red band) and the power
supply to the controller. The controller should be
placed in a dry place with humidity below 50%.
There are 3 pieces of information on the controller:
• green LED - operation, the controller, after
receiving the signal, rewinds the roll of non-woven
fabric,
• blue diode - sensor blocked, the controller has
received too long information that the sensor is
lifted, although it is scrolling the fabric,
• red diode - engine lock, the controller monitors
the engine power during operation, stops it when
it is overloaded
Any error is reset by disconnecting the power
supply from the 230V socket for 1 minute. Before
restarting, you should diagnose what caused it.
The engine lock error is saved in the controller
memory, the reason may be:
- installation of non-original non-woven fabric,
- too much water flow,
- failure to mount the roller in accordance with the
instructions or intended use,
- too many snails or other hard debris on the runoff.
Too many motor errors (red LED) can damage the
motor or the power output in the controller. After
reading the number of errors, the service decides
whether the device was used as intended and
decides on a warranty repair.
8. After initial setting and starting the roller, leave it
for a few hours and observe the dirt of the non-
woven fabric.
Attention! The non-woven fabric should be attached
to the roller with the motor with a sticker which is
attached to the new roller marked Roller clean 100,
the non-woven fabric should be placed on the roller
with the motor, and after turning the motor one full
turn, the fleece will tighten on the motor. The motor
itself can be mounted on the left or right side (3)

Non-woven contamination settings.
The first is to adjust the height of the sensor in the
cassette, if you lower it, the non-woven fabric should
scroll more often (the dirty non-woven fabric will be
lighter).
The second setting is the lower window on the left
side of the cassette, after opening some of the
water does not pass through the fleece. This
solution is important because after our tests we
noticed that after some time of using the roller, the
water becomes too poor, so in this case, you should
not pass 100% of the water through the filter fleece.
Attention!!! The roller with the motor is not
waterproof, therefore when replacing the dirty
fleece, unplug the motor plug and move the motor
with the dirty fleece to a safe place and remove it
there.
Use and maintenance.
After each used roll:
- check whether the drain strainer in the cassette is
inside and outside free of contamination (e.g. algae,
solid elements such as snail shells / snails, sand,
etc.),
- check that the rollers are clean,
- check if the float sensor works lightly and the axis
on which it moves (in case of problems, remove the
pin, remove the float and wash it thoroughly in RO
water),
- check for signs of corrosion / tarnish on the sensor,
- check if there is moisture from the plugs
connecting the motor and sensor with the controller,
- check if the fleece is rewound in accordance with
the diagram on the upper cassette,
- after installing the roller with the motor, pay special
attention to whether it fits well on the handles.
ATTENTION - the use of non-original reels,
driver, power supply, sensor is associated with
the loss of warranty! The maximum water flow is
4000L / h.
Solwing problems
Problem
Cause/ Solution
Motor fault (red LED)
Motor damage protection has tripped.
This is due to solid elements that have passed
through the strainer and blocked between the
fleece and the lower rear roller.
Solution - remove the cassette, open the drain
valve to 100% and clean the drain pipes / chim-
ney of small solids (snails, hard algae, etc.)
The engine does not rewind If the blue or red diode is lit, the controller is
blocked until the controller is restarted (the power
supply is turned off for 1 minute).
The engine only scrolls in the
manual mode
Check the cables, sensor plug connection with
the controller.
Check that the float sensor is clean and that it
responds to manual lifting.
Damp / wet fleece roll
Device mounted too low.
During a power failure to the circulation pump,
the water level in the small sump may rise high
enough to flood the fleece
The engine is spinning all the
time or it will rewind a clean roll
Check if the float sensor is blocked (dirt, snails),
Check if the sensor plug is properly plugged in,
the controller will rewind the reel for only about 5-
10 seconds and will show an error with a blue
LED.
Other problem
Please contact the service
Producer: Tropic creations
33-340 Stary Sącz, Popowice 120,
Poland
www.tropicreations.com,
kontak[email protected]

Glamorca Roller clean 100 – Manuel d'utilisation v2
Le Roller Clean est un dispositif de filtration qui
élimine mécaniquement les impuretés présentes
dans l'eau. Pour assurer son bon fonctionnement,
lisez attentivement cette notice.
1. Le Roller Clean se compose de 2 éléments
principaux :
a) le support auquel sera raccordée la plomberie et
qui sera accroché au rebord de l'aquarium ou de
la cuve technique,
b) La cassette avec le voile filtrant.
2. ATTENTION ! Pour le transport:
• le rouleau (2) est inséré dans le logement
prévu pour l'évacuation de l'eau (entre 5-6) et
fixé par un ruban adhésif, le faire sortir, puis
retirer la cassette en toute sécurité,
• Les accroches ont été fixées en sens inverse.
Il faut dévisser les 2 vis noires de chaque cô-
té, tourner les accroches puis revisser les vis.
3. Avant l’installation, la cassette doit être retirée du
support puis immerger celui-ci jusqu’au niveau indi-
qué sur la face avant en ajustant la hauteur à l’aide
des accroches sur les cotés. Pour que l'appareil
fonctionne correctement, le niveau d'eau ne doit
pas dépasser 10 mm de la ligne indiquée (4).
4. Sur le côté gauche ou droit, on installera le coude
de Ø 25 mm (5), auquel on raccordera la descente
d'eau. Sur le côté opposé, on vissera le cache rond
(6). A environ 2 cm du bord supérieur de la poignée,
se trouve le trop-plein pour plus de sécurité.
5. Après avoir installé le support, il faut préparer la
cassette accueillant le voile filtrant. De côté se
trouve le schéma de cheminement du voile. Le
rouleau de voile est mis sur le porte-rouleau de Ø
16 mm (2) et le voile est guidé entre les cylindres
jusqu’au tambour moteur (1).
6. Après avoir installé le voile sur la cassette, on
place le tout dans le support fixé au rebord de
l'aquarium ou de la cuve techhnique.
7. L'étape suivante consiste à connecter le capteur
de niveau (bague jaune), le moteur (bague rouge) et
l'alimentation électrique au contrôleur qui devra
être placé dans un endroit sec dont l'humidité
n'exède pas 50 %.
Il y a 3 indications sur le contrôleur :
• LED verte - le tambour moteur rembobine le voile
non-tissé après avoir eu l’ordre du contrôleur,
• LED bleue - capteur bloqué, le contrôleur détecte
une sollicitation trop longue du capteur pendant
l'enroulement du voile,
• LED rouge - moteur bloqué, le contrôleur analyse
la puissance du moteur pendant son
fonctionnement et l'arrête s'il est trop sollicité.
En cas d'erreur, il suffit de débrancher la prise de
courant durant 1 minute pour la réinitialisation.
Avant de rebrancher, il est conseillé de déterminer
la cause du problème.
Le défaut de blocage du moteur est enregistré dans
la mémoire du contrôleur, il peut être causé par :
• l'installation d'un voile filtrant non original,
• un débit d'eau trop élevé,
• une installation du rouleau non conforme aux
instructions ou à l'utilisation prévue,
• trop d'escargots ou autres débris durs sur sur le
filtre.
Un nombre excessif d'erreurs moteur (LED rouge)
peut endommager le moteur ou la puissance de
sortie du contrôleur. Après évaluation du nombre
d'erreurs, le service après-vente vérifie si l'appareil
a été utilisé correctement et décide s’il y a prise en
charge de la garantie ou non .
Il y a un bouton MANUAL WORK sur le contrôleur,
qui permet de faire défiler manuellement le rouleau
de voile non-tissé.
8. Une fois le Roller Clean réglé et en fonction,
laissez-le pendant quelques heures et observez
l'encrassement du voile non-tissé.
Remarque : Le voile doit être collé au tambour
moteur à l'aide du sticker apposé sur le nouveau
rouleau portant le marquage Roller clean 100 puis en
faisant tourner le tambour moteur d'un tour complet,
le voile filtrant se resserrera sur le tambour moteur
qui peut être placé à gauche ou à droite (3).

Producer: Tropic creations
33-340 Stary Sącz, Popowice 120,
Poland
www.tropicreations.com,
kontak[email protected]
Résolution des problèmes
Problème
Cause / Solution
Défaut moteur (LED rouge)
La protection contre les dommages moteur a été
déclenchée.
La cause en est des éléments solides qui ont
pénétré dans la grille et se sont bloqués entre le
voile et le rouleau arrière inférieur.
Solution : retirez la cassette, ouvrez la vanne de
vidange à 100 % et nettoyez les tuyaux de vidan-
ge/de raccordement de tous les petits débris
solides ( escargots, algues dures, etc.).
Le moteur ne rembobine pas
Si la LED bleue ou rouge est allumée, le con-
trôleur est verrouillé jusqu'à ce que celui-ci soit
réinitialisé (en coupant l'alimentation pendant 1
minute).
Le moteur ne fonctionne qu’en
mode manuel.
Vérifiez les câbles, la connexion de la prise du
capteur avec le contrôleur.
Vérifier que le flotteur est propre et qu'il réagit
lorsqu'on le relève manuellement.
Rouleau de voile humide/mouillé
Le Roller Clean est installé trop bas.
En cas de panne de courant et d'arrêt de la
pompe de remonté, le niveau d'eau dans la cuve
technique peut monter trop haut et détremper le
rouleau de voile.
Le moteur tourne sans arrêt ou
rembobine un rouleau propre.
Vérifiez si le flotteur est bloqué (débris, escar-
gots),
Vérifiez que la prise du capteur est correctement
branchée, le système ne rembobinera le rouleau
que pendant environ 5 à 10 secondes puis
indiquera une erreur par une LED bleue.
Autre problème
Merci de nous contacter
Règlage de l'encrassement du voile.
En descendant le capteur de niveau dans la
cassette, l'enroulement du voile est plus fréquent
(le voile sale sera plus léger).
En ouvrant la fenêtre inférieure sur le côté gauche
de la cassette, une partie de l'eau ne passe plus à
travers le voile. Ce réglage est très important car
suite à des tests nous avons remarqué qu'après un
certain temps d'utilisation du Roller Clean, l'eau
devient trop pauvre en nutriment et si c’est le cas, il
ne faut pas faire passer 100% de l'eau à travers le
voile filtrant.
Attention ! Le rouleau avec le moteur n'est pas
étanche, donc lors du remplacement du voile sale,
débranchez la fiche du moteur et emmenez le
moteur avec le voile sale dans un endroit sûr pour
remplacer le rouleau de voile sale.
Utilisation et maintenance.
Après chaque changement de rouleau de voile
usagé, veuillez vérifier :
• que grille d'écoulement de la cassette est
exempte de saletés à l'intérieur et à l'extérieur
(par exemple, des algues, des corps solides tels
que des coquilles d'escargots/de crevettes, du
sable, etc,)
• que les rouleaux sont propres,
• le bon fonctionnement du flotteur et l'axe sur
lequel il se déplace (en cas de problème, retirez
la goupille, enlevez le flotteur et lavez-le
soigneusement à l'eau osmosée),
• que le capteur ne présente pas de signes de
corrosion ou d’encrassement,
• que les fiches qui relient le moteur et le capteur
au contrôleur ne sont pas humides,
• que le voile est correctement enroulé comme sur
le schéma figurant sur la cassette,
• qu'en installant le rouleau avec le moteur, celui-ci
s'adapte parfaitement aux poignées.
ATTENTION- l'utilisation de rouleaux, de blocs
d'alimentation, de contrôleurs et de capteurs qui
ne sont pas d'origine entraîne une annulation de
garantie !
Le débit d'eau maximal est de 4000 L /h.
Glamorca Roller clean 100 - Anleitung v2
Der Roller Clean ist ein Filtergerät, das mechanisch
Verunreinigungen aus dem Wasser entfernt. Um ei-
nen reibungslosen Betrieb zu gewährleisten, lesen
Sie diese Anleitung bitte sorgfältig durch.
1. Der Roller Clean besteht aus zwei Hauptteilen:
a) eine Halterung, an der die Wasserleitungen ange-
bracht werden und die am Rand des Aquariums
oder des Sumpfes aufgehängt wird,
b) eine Kassette mit dem Filtervlies.
2. VORSICHT !!! Für den Transport wurde:
• wurde die Walze (2) in das Wasserablaufloch
(zwischen 5-6) eingeführt und mit Klebeband
gesichert, herausschieben und dann die Kas-
sette sicher entnehmen,
• die Halterungen in verkehrter Richtung befes-
tigt. Die 2 schwarzen Schrauben auf jeder Seite
müssen gelöst, die Aufhänger gedreht und die
Schrauben wieder befestigt werden.
3. Vor der Benutzung muss die Kassette aus der Hal-
terung entnommen werden. Danach die Halterung
bis zu dem auf der Vorderseite angegebenen Was-
serstand eintauchten, wobei die Höhe mit den Sei-
tenhalterungen angepasst wird. Damit das Gerät
richtig funktioniert, darf der Wasserstand nicht
mehr als 10 mm von der markierten Linie (4) ab-
weichen.
4. Auf der linken oder rechten Seite wird der 25 mm
Winkel (5) montiert, an dem der Wasserablauf
befestigt wird. Auf der Gegenseite wird die Rund-
Abdeckung (6) angeschraubt. Etwa 2 cm von der
Oberkante des Griffs befindet sich ein Überlauf aus
Sicherheitsgründen.
5. Nach dem Anbringen der Halterung wird die Kas-
sette mit dem Filtervlies vorbereitet. Auf der Seite
befindet sich eine Skizze, die zeigt, wie das Vlies
zwischen den Walzen verlegt wird. Die Vliesrolle wird
auf den Rollenhalter mit Ø 16 mm gesteckt (2) und
das Vlies wird zwischen den Walzen bis zur Motor-
trommel geführt (1).
6. Nachdem das Vlies in die Kassette eingelegt
wurde, wird das Ganze in die am Rand des Tanks
oder Sumpfes angebrachte Halterung eingesetzt.
7. Als nächstes werden der Füllstandssensor
(gelbes Band), der Motor (rotes Band) und die
Stromversorgung an den Controller angeschlossen.
Der Controller sollte an einem trockenen Ort mit
einer Luftfeuchtigkeit von nicht mehr als 50 %
platziert werden.
Es gibt 3 Anzeigen auf dem Controller:
• Grüne LED - Der Trommelmotor spult nach einem
erhaltenen Befehl des Controllers das Vlies auf,
• Blaue LED - Sensor verklemmt, der Controller
erkennt, dass der Sensor zu lange während des
aufrollen des vlieses betätigt wird,
• Rote LED - Motor blockiert, der Controller
analysiert die Motorleistung während des Betriebs
und stoppt ihn, wenn er zu stark belastet wird.
Bei einem Fehler genügt es, den Netzstecker für 1
Minute aus der Steckdose zu ziehen, um das Gerät
zurückzusetzen. Bevor der Stecker wieder
eingesteckt wird, sollten die Ursachen des Problems
ermittelt werden.
Die Motorfehlern werden im Controller gespeichert
und die Ursachen können folgende sein:
• Einbau eines nicht-originalen Filtervlieses,
• ein zu hoher Wasserdurchfluss,
• eine Installation der Rolle, die nicht den
Anweisungen oder dem Verwendungszweck
entspricht,
• zu viele Schnecken oder andere harte Trümmer
auf dem Vlies.
Eine zu hohe Anzahl an Motorfehlern (rote LED)
kann zu Schäden am Motor oder an der Leistungs-
Abgabe des Controllers führen. Nach Auswertung
der Fehlerzahl prüft der Kundendienst, ob das Gerät
ordnungsgemäß benutzt wurde und entscheidet ob
ein Garantieanspruch besteht oder nicht.
8. Nachdem der Clean Roller in Betrieb genommen
und eingestellt wurde, lassen Sie ihn einige Stunden
laufen und beobachten Sie die Verschmutzung des
Vliesstoffes.
Hinweis: Das Vlies muss mithilfe des Aufklebers,
der auf der neuen Rolle mit der Kennzeichnung
Roller clean 100 angebracht ist, an der Motortrommel
festgeklebt werden. Wenn dann die Motortrommel
um eine volle Umdrehung gedreht wird, zieht sich
das Filtervlies an der Motortrommel fest, die links
oder rechts platziert werden kann (3).

Producer: Tropic creations
33-340 Stary Sącz, Popowice 120,
Poland
www.tropicreations.com,
kontak[email protected]
Einstellung der Vliesverschmutzung.
Wird der Füllstandssensor in der Kassette nach
unten gesenkt, wird das Vlies häufiger aufgespult
(das verschmutzte Vlies ist leichter).
Wenn das untere Fenster auf der linken Seite der
Kassette geöffnet wird, dringt ein Teil des Wassers
nicht durch das Vlies. Diese Einstellung ist sehr
wichtig, da wir aufgrund von Tests festgestellt
haben, dass das Wasser nach einer gewissen
Betriebszeit des Roller Clean zu nährstoffarm wird,
so dass in diesem Fall nicht 100 % des Wassers
durch das Filtervlies gelangen sollten.
Achtung! Die Rolle mit dem Motor ist nicht
wasserdicht. Ziehen Sie daher beim Auswechseln
des verschmutzten Vlieses den Stecker des Motors
ab und bringen Sie den Motor zusammen mit dem
verschmutzten Vlies an einen sicheren Ort um die
Rolle auszutauschen.
Verwendung und Wartung.
Nach jedem Wechsel einer verschmutzten Vliesrolle
überprüfen Sie bitte :
• dass das Abflussgitter der Kassette innen und
außen frei von Schmutz ist (z. B. Algen, feste
Körper wie Schnecken-/Garnelenhäuser, Sand
usw.).
• ob die Rollen sauber sind,
• überprüfen Sie die Leichtgängigkeit des
Schwimmsensors und der Achse, auf der er sich
bewegt (wenn es Probleme gibt, ziehen Sie den
Stift ab, entfernen Sie den Schwimmer und
waschen Sie ihn gründlich in Osmosewasser) ,
• dass der Sensor keine Anzeichen von Korrosion
oder Verschmutzung aufweist,
• dass die Stecker, die den Motor und den Sensor
mit dem Controller verbinden, nicht feucht sind,
• dass das Vlies gemäß der Skizze oben auf der
Kassette richtig aufgespült ist
• dass bei der Installation der Rolle mit dem Motor
dieser perfekt in die Griffe passt.
ACHTUNG - die Verwendung von nicht
originalen Rollen, Controller, Netzteilen und
Sensoren führt zum Erlöschen der Garantie! Der
maximale Wasserdurchfluss beträgt 4000L / h.
Problemlösungen
Problem
Ursache / Lösung
Motorausfall (rote LED)
Der Motorschadenschutz wurde ausgelöst.
Die Ursache sind feste Elemente, die in das Sieb
eingedrungen sind und sich zwischen dem Vlies
und der unteren hinteren Walze verfangen haben.
Lösung: Kassette ausbauen, Ablassventil zu 100
% öffnen und Ablass-/Anschlussrohre von allen
kleinen festen Ablagerungen (Schnecken, harten
Algen usw.) reinigen.
Der Motor spult nicht auf.
Wenn die blaue oder rote LED leuchtet, ist der
Controller gesperrt, bis er neu gestartet wird
(durch Unterbrechung der Stromversorgung für 1
Minute).
Der Motor läuft nur im manuel-
len Modus.
Überprüfen Sie die Verbindung des
Sensorsteckers mit dem Controller.
Prüfen Sie, ob der Schwimmsensor sauber ist und
bei manuellem Anheben reagiert.
Feuchte/nasse Vliesrolle
Der Clean Roller ist zu niedrig installiert.
Bei Stromausfall und Stillstand der Förderpumpe
kann der Wasserstand im Technikbecken zu hoch
ansteigen und die Vliesrolle durchnässen.
Der Motor läuft ständig oder
spult eine saubere Rolle auf
Vérifiez si le flotteur est bloqué (débris, escar-
gots),
Überprüfen Sie, ob der Schwimmer blockiert ist
(Trümmer, Schnecken), Überprüfen Sie, ob der
Sensorstecker richtig eingesteckt ist. Das System
wickelt die Rolle nur etwa 5 bis 10 Sekunden lang
auf und zeigt dann mit einer blauen LED einen
Fehler an.
Sonstiges Problem
Nehmen Sie bitte Kontakt mit uns auf
Table of contents
Languages:
Other Tropic Creations Water Filtration System manuals

Popular Water Filtration System manuals by other brands


Thermo Scientific
Thermo Scientific EASYpure II RF Operating manual and parts list

Carel
Carel WTS large user manual

Watts Premier
Watts Premier WP-2 LCV Installation, operation and maintenance manual

Flurida
Flurida FDFB10501 installation instructions

Philips
Philips AC4143 Specifications

Litree
Litree LUSA1-1C user manual