Trotec bz30 User manual

TRT-BA-BZ30-TC2019-23-001-EN
BZ30
EN
OPERATING MANUAL
CO₂ AIR QUALITY DATA
LOGGER

2 EN
CO₂ air quality data logger BZ30
Table of contents
Notes regarding the operating manual.................................2
Safety .....................................................................................2
Information about the device................................................4
Transport and storage...........................................................5
Operation ...............................................................................6
Maintenance and repair ......................................................12
Disposal ...............................................................................12
Notes regarding the operating manual
Symbols
Warning of electrical voltage
This symbol indicates dangers to the life and health of
persons due to electrical voltage.
Warning
This signal word indicates a hazard with an average
risk level which, if not avoided, can result in serious
injury or death.
Caution
This signal word indicates a hazard with a low risk
level which, if not avoided, can result in minor or
moderate injury.
Note
This signal word indicates important information (e.g.
material damage), but does not indicate hazards.
Info
Information marked with this symbol helps you to carry
out your tasks quickly and safely.
Follow the manual
Information marked with this symbol indicates that the
operating manual must be observed.
You can download the current version of the operating manual
and the EU declaration of conformity via the following link:
BZ30
https://hub.trotec.com/?id=39963
Safety
Read this manual carefully before starting or using the
device. Always store the manual in the immediate vicinity
of the device or its site of use!
Warning
Read all safety warnings and all instructions.
Failure to follow the warnings and instructions may
result in electric shock, fire and/ or serious injury.
Save all warnings and instructions for future
reference.
This appliance can be used by children aged from
8years and above and persons with reduced physical,
sensory or mental capabilities or lack of experience
and knowledge if they have been given supervision or
instruction concerning use of the appliance in a safe
way and understand the hazards involved.
Children shall not play with the appliance. Cleaning and
user maintenance shall not be made by children
without supervision.
• Do not use the device in potentially explosive rooms.
• Do not use the device in aggressive atmosphere.
• Do not immerse the device in water. Do not allow liquids to
penetrate into the device.
• The device may only be used in dry surroundings and must
not be used in the rain or at a relative humidity exceeding
the operating conditions.
• Protect the device from permanent direct sunlight.
• Do not remove any safety signs, stickers or labels from the
device. Keep all safety signs, stickers and labels in legible
condition.
• Do not open the device.
• Observe the storage and operating conditions as given in
the Technical data chapter.

EN 3
CO₂ air quality data logger BZ30
Intended use
Only use the device for measuring and recording the air quality
(CO2level), indoor temperature and humidity within the
measuring range specified in the technical data. Observe and
comply with the technical data.
To use the device for its intended use, only use accessories and
spare parts which have been approved by Trotec.
Improper use
Do not use the device in potentially explosive atmospheres, for
measurements in liquids or at live parts. Trotec accepts no
liability for damages resulting from improper use. In such a
case, any warranty claims will be voided. Any unauthorised
modifications, alterations or structural changes to the device are
forbidden.
Personnel qualifications
People who use this device must:
• have read and understood the operating manual, especially
the Safety chapter.
Residual risks
Warning of electrical voltage
There is a risk of a short-circuit due to liquids
penetrating the housing!
Do not immerse the device and the accessories in
water. Make sure that no water or other liquids can
enter the housing.
Warning of electrical voltage
Work on the electrical components must only be
carried out by an authorised specialist company!
Warning of electrical voltage
Before any work on the device, remove the mains plug
from the mains socket and the battery from the device!
Hold onto the mains plug while pulling the power cable
out of the mains socket.
Warning of explosive substances
Do not expose the battery to temperatures above
45°C! Do not let the battery come into contact with
water or fire! Avoid direct sunlight and moisture. There
is a risk of explosion!
Warning
Risk of suffocation!
Do not leave the packaging lying around. Children may
use it as a dangerous toy.
Warning
The device is not a toy and does not belong in the
hands of children.
Warning
Dangers can occur at the device when it is used by
untrained people in an unprofessional or improper way!
Observe the personnel qualifications!
Caution
Lithium-ion batteries might catch fire in case of
overheating or damage. Ensure a sufficient distance to
heat sources, do not subject lithium-ion batteries to
direct sunlight and make sure not to damage the
casing. Do not overcharge lithium-ion batteries. Only
use smart chargers that switch off automatically when
the battery is fully charged. Charge lithium-ion
batteries in due time before they are discharged
completely.
Caution
Keep a sufficient distance from heat sources.
Note
To prevent damages to the device, do not expose it to
extreme temperatures, extreme humidity or moisture.
Note
Do not use abrasive cleaners or solvents to clean the
device.

4 EN
CO₂ air quality data logger BZ30
Information about the device
Device description
The CO2air quality data logger is a mains-powered measuring
device with additional battery and a comprehensive range of
measurement and analysis options.
It comes with the following functional properties and equipment
features:
• NDIRmeasurement of carbon dioxide concentrations in the
room air
• Simultaneous indication of CO₂values, room temperature,
humidity level, date and time
• Minimum and maximum value function for CO₂, air
temperature and humidity
• Carbon dioxide alarm function with acoustic alarm for
freely definable limit value
• Additional CO₂indicator icon (feel-good indication)
• Autonomous long-term recording of carbon dioxide
concentration, room temperature and humidity
• Memory for 50,000measured values
• Freely definable saving interval from 1second to 12hours
• USBinterface for measuring data transfer
• PCanalysis software
Device depiction
1
3
4
6
7
2
8
12
11
9
14
10
15
13
16
17
5
DC:6V/1A
No. Designation
1 Main display
2 USB interface
3 Date indication
4 Time indication
5 Power adapter input
6ESC button
7MAXMIN button
8 button
9 button
10 ALARM button
11 Relative humidity indication
12 Temperature indication
13 Battery compartment
14 button (switch-on/ switch-off)
15 / REC button
16 °C/°F button
17 Clock button
Main display
22
21
20
19
28
18
27
26
25
23
24
29
No. Designation
18 Measured CO2value
19 Unit measured CO2value (parts per million)
20 USB interface indication
21 Alarm activated indication
22 Feel-good indication: poor air quality
23 Feel-good indication: average air quality
24 Feel-good indication: good air quality
25 REC indication (measured value detection enabled)
26 HOLD indication (freezing displayed values)
27 MIN indication (display of minimum values)
28 CO2 indication (display of CO2 value)
29 MAX indication (display of maximum values)

EN 5
CO₂ air quality data logger BZ30
Technical data
Parameter Value
Model BZ30
Article number 3.510.205.015
Weight (packaging
excluded)
approx. 245g
Dimensions
(length x width x
height)
90 mmx 110 mmx 98 mm
Display LCD (monochrome)
Carbon dioxide (ppm)
Carbon dioxide
sensor
NDIRsensor (non-dispersive infrared)
Measuring range 0 to 9999ppm
Accuracy ±5% or ±75ppm
Resolution 1ppm
Relative humidity
Measuring range 0.0%RH to 99.9%RH
Accuracy ±5 %RH
Resolution 0.1 %
Air temperature
Measuring range -5°C to 50 °C or 23°F to 122 °F
Accuracy ±1 °C or ±1.8 °F
Measuring range
resolution
0.1°C/°F
Ambient conditions
Operation -5°C to 50°C or 23°F to 122°F
and 90%RH (non-condensing)
Storage -5°C to 50°C or 23°F to 122°F
and 90%RH (non-condensing)
Power supply 1x 3.7V Li-ion battery or 230V power
adapter
Memory organisation
Sampling interval > 1 s
Saving interval > 1 s
Memory 50,000measured values
Scope of delivery
• 1 x Measuring device BZ30
• 1x3.7V Li-ion battery
• 1 x Power adapter
• 1 x USB connection cable
• 1x CD-ROM with Smartgraph PCsoftware
• 1x Operating manual
Transport and storage
Note
If you store or transport the device improperly, the
device may be damaged.
Note the information regarding transport and storage of
the device.
Transport
The supplied Li-ion batteries are subjects to the requirements of
dangerous goods legislation.
Observe the following when transporting or shipping Li-ion
batteries:
• The user may transport the batteries by road without any
additional requirements.
• If transport is carried out by third parties (e.g. air transport
or forwarding company), special requirements as to
packaging and labelling must be observed. This includes
consulting a dangerous goods specialist when preparing
the package.
– Only ship batteries if their housing is undamaged.
– Mask open terminals with tape and pack the battery in
a way that it cannot move inside the packaging.
– Please also observe any other national regulations.
The manufacturer packed the device to the best of his abilities
to protect it against transport damage.
Storage
When the device is not being used, observe the following
storage conditions:
• dry and protected from frost and heat
• protected from dust and direct sunlight
• The storage temperature is the same as the range given in
the Technical data chapter.
• When storing the device for an extended period of time,
remove the battery/batteries.

6 EN
CO₂ air quality data logger BZ30
Operation
Inserting the battery
Insert the battery into the device before first use. The scope of
delivery includes a 3.7Vbattery. This battery is not intended for
long-term power supply, but merely for bridging short power
interruptions.
Proceed as follows to insert the battery:
1. Push the suspension bracket of the battery compartment
at the rear of the device to the right.
2. Insert the battery into the device with correct polarity(+/-).
3. Close the battery compartment by pushing the bracket on
the battery compartment in the opposite direction.
Connecting the power adapter
Prior to use, connect the device to the mains using the supplied
power adapter.
DC:6V/1A
Start-up
Press the button at the rear of the device for approx. 1second
to switch the device on. The device will then start a warm-up
phase lasting 120seconds.
Setting date and time
Press and hold the Clockbutton for approx. 4seconds to set
time and date. The day indication starts flashing. Press the
button again to switch between year, month, day, hours and
minutes. Press one of the buttons or to increase or
decrease the number flashing on the display. To exit the setting
mode and to save the entered value press the ESCbutton once
you have set the correct date and time.
Info
You can modify the order of day, month and year
within the supplied software. For more detailed
information please refer to the “Using the software”
section.
Hold function
Press the button(hold) to permanently indicate or "freeze"
the displayed values.
Info
In recording mode: Press and hold the / RECbutton
to stop recording.
Alarm function
The device features an alarm function that indicates when a
previously set CO2threshold is exceeded.
Please proceed as follows to enable the alarm function:
1. Press the ALARMbutton.
ðThe alarm function is enabled and the alarm symbol
appears on the display. As soon as the measured value
exceeds the previously set limit value, an acoustic alarm
signal will be emitted and the buttons below the display
start to flash in red.
2. Press the button again to exit or disable the alarm mode.
Setting the limit value for the alarm function
Please proceed as follows to set a new limit value:
1. Press and hold the ALARMbutton for approx. 5seconds.
ðThe previously set limit value appears on the display
and the displayed alarm symbol flashes.
2. Press or to increase or reduce the decrease the
displayed number.
3. Then you can press the ESCbutton to exit the mode and to
adopt the set value or to change the limit values for the
feel-good indication .

EN 7
CO₂ air quality data logger BZ30
Adjusting the limit values for the feel-good indication
Note:
This setting can only be adjusted in the setting mode for the
alarm threshold! After having set an alarm threshold, do not
press the ESCbutton but rather the ALARMbutton again for a
brief moment. The lower limit value for the feel-good indication
will be displayed and the icons of the feel-good indication
start to flash.
1. Press or to increase or reduce the lower limit
value for the feel-good indication.
2. Press the ALARMbutton to switch over to setting the upper
limit value.
3. Press or to increase or reduce the upper limit
value for the feel-good indication.
4. Press the ESCbutton to exit the mode and to adopt the set
value.
Displaying the minimum/ maximum value
The device saves the highest and lowest display values. To call
up these values, please proceed as follows:
1. Press the MAXMINbutton.
ðMAX appears on the display and the highest measured
values for carbon dioxide, temperature and relative
humidity will be displayed as well.
2. Press the button again to view the minimum values (MIN).
3. Press the ESCbutton to exit this mode.
Background illumination
The background illumination will be switched on in addition by
pressing either ALARM, MAXMIN, or . The background
illumination goes out after approx. 20seconds of non-use.
Press the ESCbutton to exit this mode.
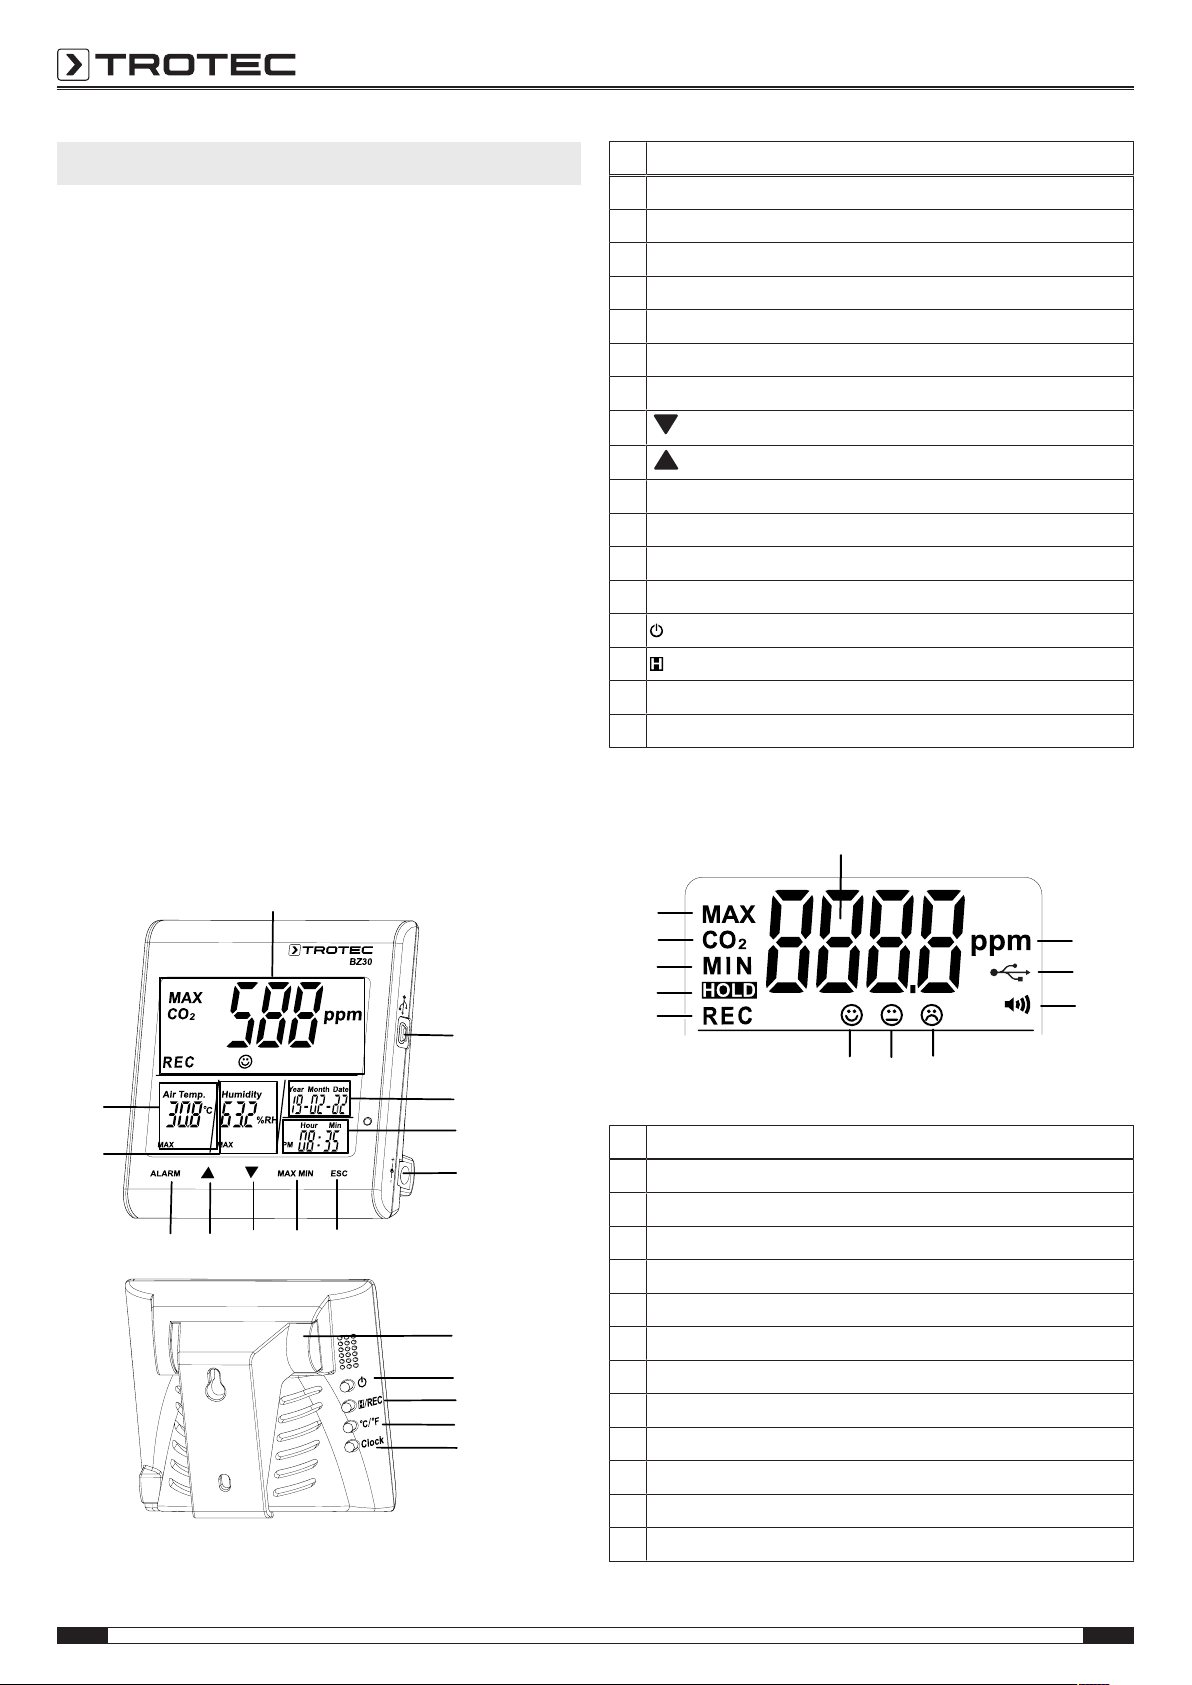
Setting the °C/°Findication
Press the °C/°Fbutton at the rear of the device to switch
between an indication in degrees Celsius and degrees
Fahrenheit.
Starting a recording
Press and hold the RECbutton at the rear of the device for
approx. 5seconds to record the measured values.
Note:
If you want to start a new recording, you first have to save or
delete measured values already saved on the device. For more
detailed information please refer to the “Using the software”
section.
Using the software
There is a multi-data logger software included in the scope of
delivery. You can use it to read and process measuring device
data when the device is connected to a computer or notebook.
Data can be graphically displayed directly in the software or
visualised in an Excel sheet or similar programme. The main
functions are all included in the main window.
Required operating system:
Windows2000/ WindowsXP/ Vista/ Windows7/ Windows8/
Windows10
Minimum hardware requirements:
PC or notebook with Pentium 90MHz or higher, 32MB RAM; at
least 7MB of free hard disk space for the installation of the
multi-data logger software. Recommended screen resolution:
1280x1024 with high colour resolution (32bit).
Establishing communication
1. Use the supplied cable to connect the logger to the
USBinterface of your PC. Several loggers can be
connected to one PC at the same time.
2. Run the multi-data logger software.
3. When the connection has been established successfully,
the respective icon for the logger is displayed in the
Instrumentfield.
Importing recorded data
Info
Prior to readout, the recording mode must be
terminated (RECbutton on the device)! To do so, follow
the instructions in the software.
There are two options to import recorded data from the logger:
1. Select the logger icon in the Instrument field. Right-click
your mouse to open a dialog box. There, select the Read
data logger data menu item to import the data.
2. Alternatively, you can click on the icon in the toolbar to
read data recorded by the logger.
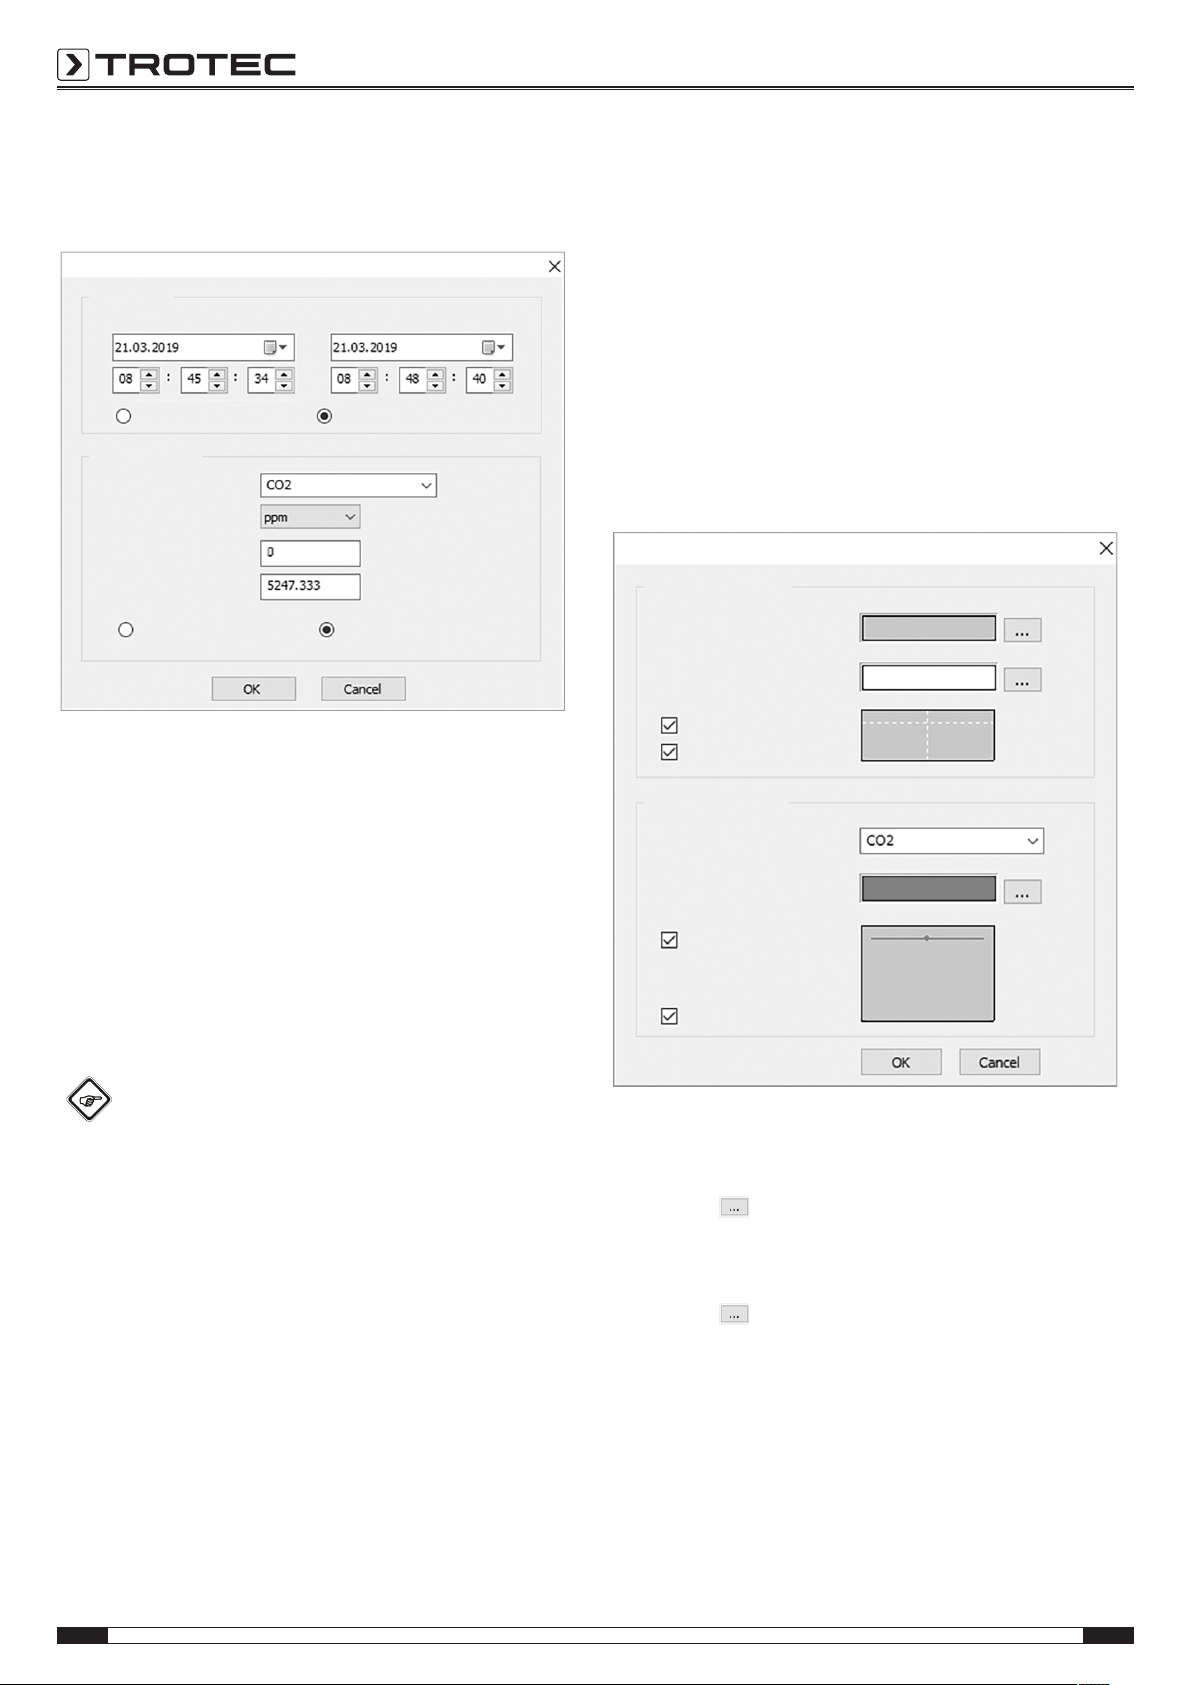
ðAfter the measured values have been successfully
transferred, the data graph window opens. The graph
shows three channels: CO2 (red), temperature (green)
and relative humidity (blue).

8 EN
CO₂ air quality data logger BZ30
Data graph window
File View Measuring device
Windows
Help
1
Data graph Data list
2
34
5
Setting the scale format
Data overview
Setting the graph format Undo zoom
[Temperature] [Relative humidity]
ppm [CO2]
°C
%RH
6
No. Designation
1Instruments section:
Displays the connected devices. You can left-click a device
to select it.
2Toolbar section:
For more detailed information please refer to the “Toolbar”
section.
3Main menu section:
For more detailed information please refer to the “Main
menu” section.
4Diagram control section:
For more detailed information please refer to the “Diagram
control” section.
5Data graph:
Displays the value trends for CO2, temperature and relative
humidity.
6Scales:
Displays the measuring ranges for relative humidity,
temperature and CO2-values.
Toolbar
In the following you will find information regarding the subitems
of the toolbar(2).
Button Function
Opens the dialog window for saving. Files are saved
in ".AsmData" and ".xls" formats.
Opens the dialog window for opening files. Files in
".AsmData" format can be opened.
Opens the dialog window for printing files.
Opens the dialog window for adjusting the settings.
Starts data import from the selected device.
Opens the help.
Main menu
In the following you will find information regarding the subitems
of the main menu(3).
File
Open Opens an existing file.
Save Saves recorded data to the hard disk.
Print Opens the dialog window for printing the graph,
list or data summary.
Print preview Opens the print preview for graph or list.
Print settings Opens the dialog window for changing printer
or print options.
Last file Calls the previously edited file.
Exit Exits the application. Prompts to save the docu-
ments.
View
Toolbar Shows or hides the toolbar.
Status bar Shows or hides the status bar.
Measuring
devices
Shows or hides the window for the measuring
instrument.
Measuring device
Read measuring
device data
Imports data from the data logger.
Windows
New window Opens a new window for the active document.
Cascade win-
dows
Arranges the windows of the open files over-
lapping.
Tile windows Arranges the windows of the open files side by
side without overlapping.
Help
About data
loggers
Shows details about the version of the multi-
data logger software.
Help topics Opens the software help.

EN 9
CO₂ air quality data logger BZ30
Diagram control
In the following you will find information regarding the subitems
of the diagram control section(4).
Data graph Data list
Setting the scale format
Data overview
Setting the graph format Undo zoom
[Temperature] [Relative humidity]
ppm [CO2]
°C
%RH
Button Function
Data graph Displays the graph with the recorded
values for CO2, temperature and relative
humidity.
Setting the scale
format
Opens the dialog window for adjusting
the horizontal and vertical scales of the
individual channels.
Data list Changes from the graphic display of the
measured values to a list indicating the
individual measuring points.
Data overview Displays a summary of the gathered
data.
Setting the graph
format
Opens the dialog window for adjusting
the background colour, grid lines and
depiction of the three channels.
Undo zoom Indicates the total view of the data
graph.
Zoom Allows to zoom into sections of the
graph.
Cursor Allows to select individual data points.
Adjusting the data logger settings
Click the icon on the toolbar(2) to open the Data logger
settings dialog window.
Data logger settings
Time settings
Current time
Date format DD/MM/YY
Sampling setting
Sampling rate Second
Recording time 1day 4hours 5minutes 36seconds
OK
Cancel
Starting recording
Automatically Manual
CO2 alarm settings
Limit value alarm
Alarm Value
1. Time settings
The current system time is displayed in the Current time
field.
The date format can be set as year/month/day, month/day/
year or day/month/year.
2. Sampling setting
The Sampling setting field prompts the device to record the
measured values at a certain frequency. In the combo box
on the left, you can enter a specific value for the sampling
rate. From the combo box on the right, you can select the
time unit. The Recording time combo box shows the
maximum recording time (depends on the set sampling
rate).
3. Starting recording
The Manual and Automatic selection options allow for the
user to start data logging immediately after exiting the
setting window (Automatic) or to manually start at a later
point in time by pressing the respective button (Manual).
4. CO2 alarm settings
If the Limit value alarm checkbox is checked, the user can
enter the alarm value (in ppm). If the respective measured
value is beyond the alarm limit, the device triggers an
alarm.
Info
Prior to setting the logger to recording mode, the
logger settings [Data logger settings] must always be
made first! In this process, it is irrelevant whether the
settings are changed or remain the same. All saved
data are permanently deleted when set-up is complete.
To save those data before they are deleted, click
Cancel and then download the data.

10 EN
CO₂ air quality data logger BZ30
Adjusting the scale setting
Click the Set scale format button to adjust the horizontal and
vertical graph scales. The Scale format dialog window opens.
Timescale
Start date and time End date and time
Automatic scale User-defined scale
Selecting a channel
Vertical scale
Unit
Minimum
Maximum
Automatic scale User-defined scale
1. Setting the horizontal scale
Scaling of the horizontal axis is executed in the Timescale
section. To determine the endpoints of the horizontal axis,
select the indicated endpoints from the drop-down menus
for date and time selection.
Automatic scale:
The starting point of the horizontal scale corresponds to the
start time of the logger data file; the endpoint
correspondingly being the end time of the logger data file.
User-defined scale:
Starting point and endpoint of the horizontal scale can be
adjusted through the respective user settings.
Info
When user-defined scaling is selected and the input
starting point is earlier than the start time of the logger
data file, the starting point of the graph time scale is
used as the start time for the logger data file.
When user-defined scaling is selected and the input
starting point is later than the end time of the logger
data file, the endpoint of the graph time scale is used
as the end time for the logger data file.
2. Setting the vertical scale
Scaling of the vertical axis is executed in the Vertical scale
section. First, select the measurement channel and then the
measuring unit. Set minimum and maximum value.
Automatic scale:
If you select this option, the vertical scale automatically
adjusts depending on the logged data.
User-defined scale:
If you select this option, the vertical scale is adjusted as per
the user settings.
Setting the graph format
Click the Set graph format button to adjust the graphing options
for the graph. The Graph format dialog window opens.
Graph format
Basic graph format
Selecting the background colour
Selecting the grid colour
Display horizontal axis
Display vertical axis
Data graph format
Selecting a channel
Select channel colour
Show data curve
Marks
The basic settings for all three channels are made in the Basic
graph format section.
1. Selecting the background colour:
Click the button to adjust the background colour. You
can choose a basic colour or create a new colour pressing
the Define colours button.
2. Adjusting the grid colour
Click the button to adjust the grid colour. You can
choose a basic colour or create a new colour pressing the
Define colours button.
3. Showing/hiding the grid lines
Check or uncheck the checkboxes to show or hide the
horizontal and vertical grid lines.

EN 11
CO₂ air quality data logger BZ30
The settings for the different channels are made in the Data
graph format section.
1. Selecting a channel
Select one of the three channels to make settings for that
channel.
2. Changing the channel colour
Click the button to adjust the channel colour. You can
choose from various basic colours or create a new colour
pressing the Define colours button.
3. Showing and hiding data curve and marks
Check or uncheck the checkboxes to hide and show the
data curve and the marks of individual data points.
Zooming
1. Zooming in
Click the button to select zoom mode. Define the
starting point of the zoom window by left-clicking. Left-click
again to define the endpoint of the zoom window. Use the
left and bottom scrollbars to shift the pane.
2. Zooming out
Click the Undo zoom button to show the total view.
Displaying individual data points
There are two options to display individual data points:
1. Selecting a data point
Click the button to enable the function. Then left-click
a data point to display the properties of that data point. If
you hold onto the mouse button while moving the cursor to
the right, left, upwards or downwards, the crosshairs
always remain on the respective measurement curve
section that has been selected with the mouse at the
beginning.
2. Calling the data list
Click the Data list button to display all data points of the
recording. The individual data points are numbered
consecutively. CO2 value, temperature and relative humidity
are indicated for every data point.
Displaying the data overview
Click the Data overview button to call a summary of the
measurement series.

12 EN
CO₂ air quality data logger BZ30
Maintenance and repair
Charging the battery
The battery should be charged within the scope of initial start-
up and when the battery is low. To do so, connect the supplied
power adapter to the device and to the mains. Information on
how to insert the battery into the device is provided in the
chapter Operation.
Cleaning
Clean the device with a soft, damp and lint-free cloth. Make
sure that no moisture enters the housing. Do not use any
sprays, solvents, alcohol-based cleaning agents or abrasive
cleaners, but only clean water to moisten the cloth.
Repair
Do not modify the device or install any spare parts. For repairs
or device testing, contact the manufacturer.
Disposal
The icon with the crossed-out waste bin on waste
electrical or electronic equipment stipulates that this equipment
must not be disposed of with the household waste at the end of
its life. You will find collection points for free return of waste
electrical and electronic equipment in your vicinity. The
addresses can be obtained from your municipality or local
administration. For further return options provided by us please
refer to our website https://de.trotec.com/shop/.
The separate collection of waste electrical and electronic
equipment aims to enable the re-use, recycling and other forms
of recovery of waste equipment as well as to prevent negative
effects for the environment and human health caused by the
disposal of hazardous substances potentially contained in the
equipment.
Li-Ion
In the European Union, batteries and accumulators must not be
treated as domestic waste, but must be disposed of
professionally in accordance with Directive 2006/66/EC of the
European Parliament and of the Council of 6September 2006
on batteries and accumulators. Please dispose of batteries and
accumulators according to the relevant legal requirements.

Trotec GmbH
Grebbener Str. 7
D-52525 Heinsberg
+49 2452 962-400
+49 2452 962-200
www.trotec.com
Other manuals for bz30
1
This manual suits for next models
1
Table of contents
Other Trotec Data Logger manuals
Popular Data Logger manuals by other brands

Simex
Simex SRD-99 user manual

Dwyer Instruments
Dwyer Instruments DW-USB-1 Specification and operating instructions

LogTag Recorders
LogTag Recorders USRIC-8 Product user guide

National Instruments
National Instruments NI 6110 CALIBRATION PROCEDURE

NexSens
NexSens SDL500 user manual

VOLTCRAFT
VOLTCRAFT DL-260A operating instructions