Tru-Test EziWeigh7i User manual

1
This guide takes you through your first use of the EziWeigh7i weigh scale indicator.
Contents
Unpacking the box ..................................1
Charging the battery................................2
Getting around........................................3
Installing .................................................4
Setting up the indicator ...........................5
Recording information .............................5
Viewing information ................................6
Putting information on.............................7
Getting information off............................8
Maintenance and servicing ......................9
Compliance ...........................................11
For further details, view the reference
information on the supplied USB flash drive or
visit www.tru-test.com
1
Unpacking the box
Check that you have all of these items. If anything is missing, contact your supplier.
EziWeigh7i weigh scale
indicator (the indicator)
USB cable
The USB cable is for charging
and also connects the indicator
to a PC.
Mains power adaptor and
power plug
Power plugs for different countries
are included.
Bracket mounting kit
USB flash drive
The flash drive contains Data Link
software and reference information.

2
2
Charging the battery
Use the mains power adaptor to charge the indicator’s internal battery from the
mains power supply.
For best results, do not charge the battery if the temperature is less than
0 °C (32 °F), or greater than 40 °C (104 °F).
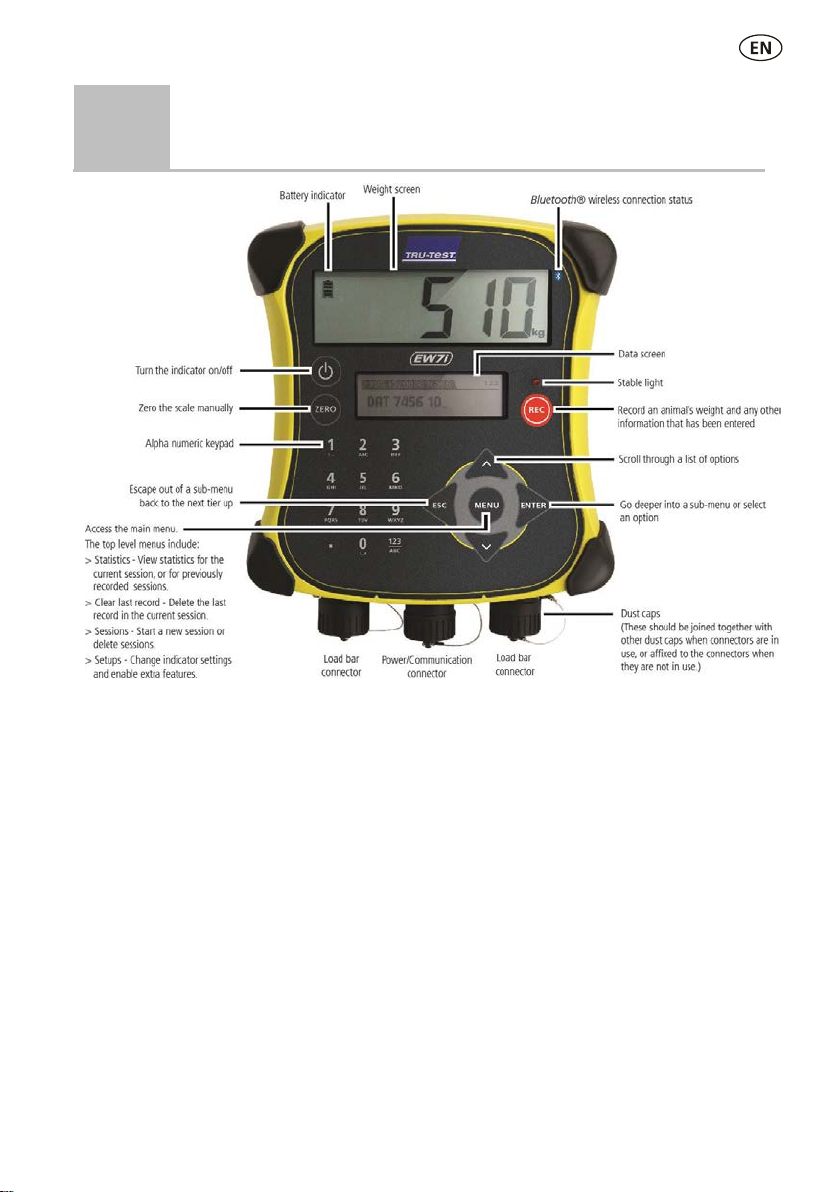
3
3
Getting around

4
4
Installing
Before you can weigh animals, you need to connect the indicator to some load bars or
load cells. To identify animals using electronic (EID) tags, you also need to connect
the indicator to an EID reader.
Installing the indicator and load bars
Connecting the indicator to an EID reader
Connecting via
Bluetooth
®
1. First, switch on the indicator.
2. Then, switch on the EID reader.
For further instructions on pairing the EID reader, see the EID Reader User
Manual.
Connecting via serial cable
Connect the EID reader to the indicator’s power/serial connector using a serial cable,
available from Tru-Test as an optional accessory.
5
5
Setting up the indicator
The first time that you turn on the indicator, follow the step by step instructions to set
the language.
When shipped, the indicator is set up to manually record animal weights and IDs,
without drafting. You should change the way the indicator is set up to suit the task
that you are about to perform.
Changing the indicator setup
To change the way that the indicator is set up:
Press , scroll down to Setups... and press .
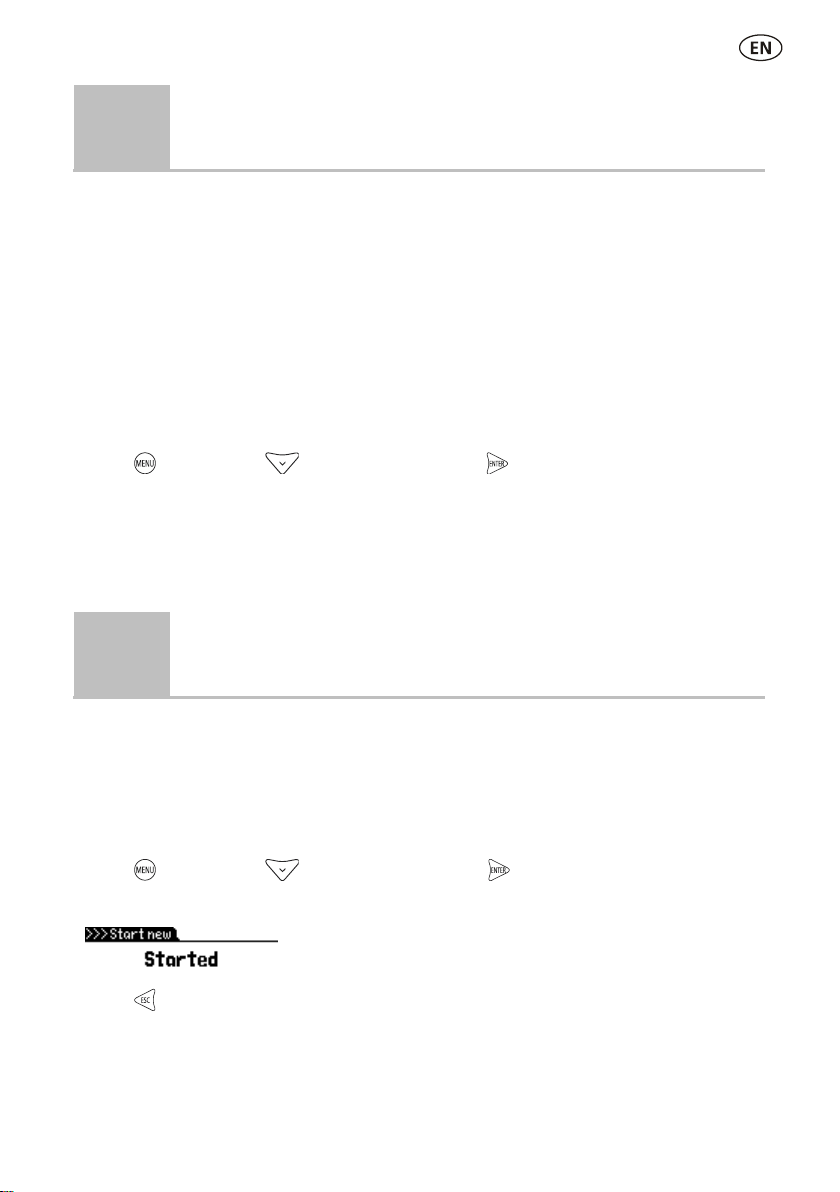
6
Recording information
Sessions
When you record information such as weight, it is stored in a ‘session’. A session is
like a file on a computer. We recommend that you start a new session each day or for
each group of animals.
Press , scroll down to sessions, and press twice.
The indicator will display "Started".
Press twice to navigate out of the menu.

6
Weighing an animal
Ensure that the indicator is displaying 0.0. If not, press .
1. Move the animal onto the platform.
2. If recording IDs, enter the animal’s VID or scan the EID tag using an EID reader.
VID
EID
3. If desired, press to enter a comment about the animal, using the alpha
numeric keypad.
4. When the stable light illuminates, press .
The indicator will record the weight along with any other information entered.
5. Move the animal off the platform.
If the indicator is not displaying 0.0 between animals or there are
problems with inaccurate or unstable weights, make sure that the bars are
firmly secured to the concrete floor and free from stones or dirt and that
the load bars are properly connected to the indicator.
7
Viewing information
After weighing, you can view statistics for the weighing session. Press to display
the Statistics option.
Press and press to scroll through the statistics.
7
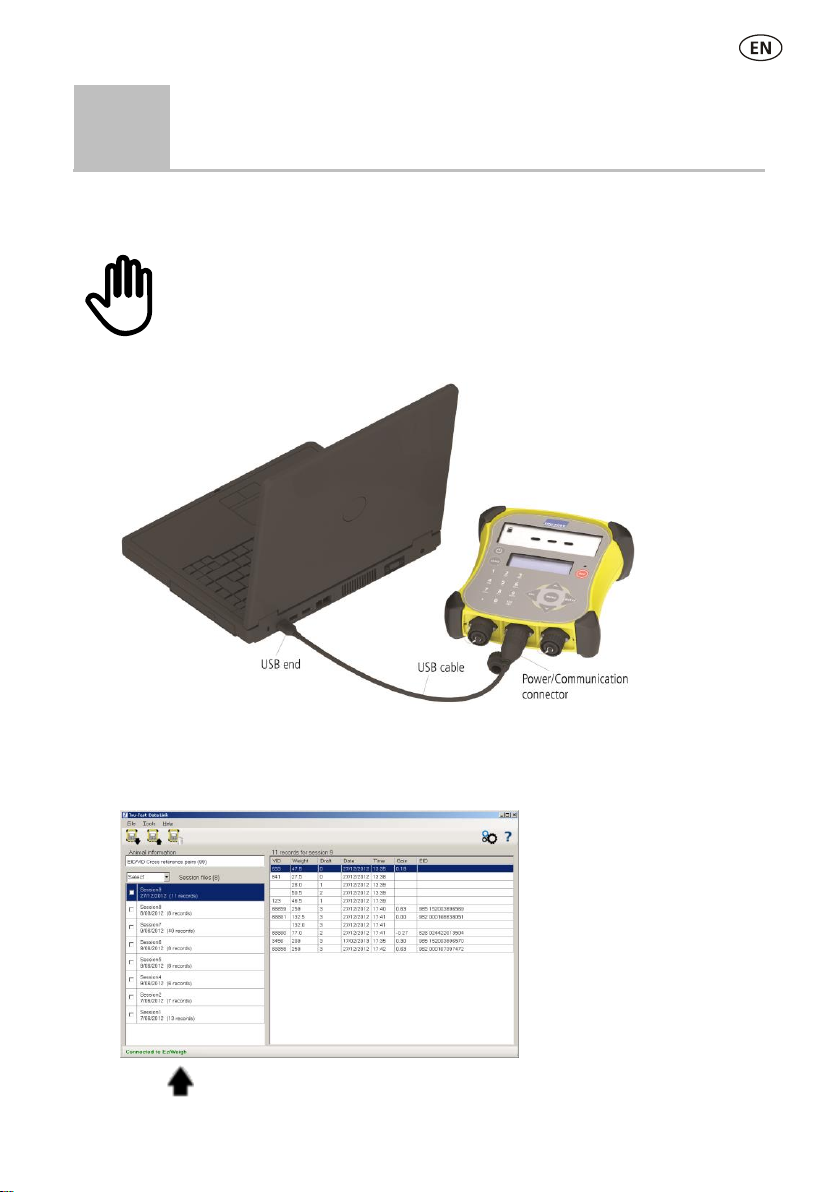
8
Putting information on
You can transfer session files or a cross reference file containing EID/VID pairs from a
PC to your indicator using the Data Link for PC software application.
If you haven't done so already, install Data Link on your PC. To do this,
insert the supplied USB flash drive into a USB port on your PC and follow
the instructions.
1. Connect the indicator to a PC using the cable supplied.
2. Launch Data Link on your PC.
3. Once Data Link has connected to the indicator, all the information on the
indicator will be displayed by Data Link.
4. Click to transfer session files or a cross reference file onto the indicator.
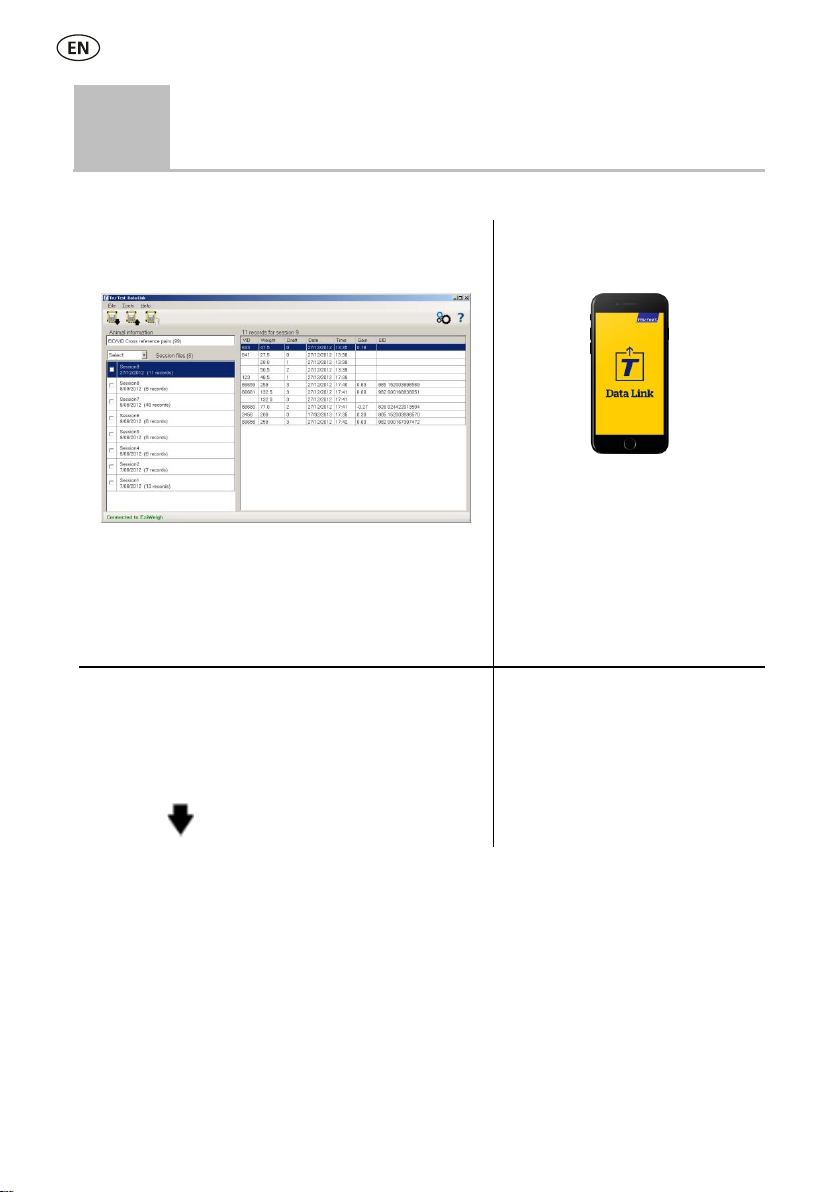
8
9
Getting information off
There are two ways to get information off the indicator.
Data Link for PC
Data Link app for mobile
devices
You can:
save session files
save cross reference information
You can:
email a session file
register a transaction with
NAIT or NLIS
To do this:
1. Connect the indicator to a PC using the cable
supplied.
2. Launch Data Link on your PC.
3. Click to get information off the indicator.
To do this:
Launch the Data Link app on
your mobile device and follow
the instructions.
Smartphone app
The Tru-Test Data Link app is available to download for free from the Google Play*
store (Android* devices) or the Apple App store* (Apple iOS*).

9
10
Maintenance and servicing
Backing up your information
We strongly recommend that you regularly back up the data on your indicator by
transferring it to a PC using Data Link.
Updating your software
We recommend that you regularly update the indicator software so that you keep up
with the latest features and improvements.
To update the indicator's software:
1. Connect the indicator to a PC using the cable supplied.
2. Launch Data Link on your PC.
3. Click Tools / Updates.
4. Follow the step-by-step instructions.
For more information, see the Data Link help.
When updating software, the data on your indicator will remain intact.
However, we strongly recommend that you transfer the information on
your indicator onto a PC
before
updating.
Caring for the indicator
Do not leave the indicator or load bars submerged in water. Store the indicator in a
cool, dry place.
Wipe the indicator using a damp cloth, warm water and soap. Other cleaners may
damage the case.
Fit the dust caps when there are no cables connected to the indicator. This will
prevent moisture and dirt from entering the connectors.

10
Europe –Instructions for disposal of product
This symbol on the product or its packaging indicates that this product (and
its battery) must not be disposed of with other waste. Instead, it is your
responsibility to dispose of your waste equipment by handing it over to a
designated collection point for the recycling of waste electrical and
electronic equipment. The separate collection and recycling of your waste
equipment at the time of disposal will help conserve natural resources and
ensure that it is recycled in a manner that protects human health and the
environment. For more information about where you can drop off your
waste equipment for recycling, please contact your local city recycling office
or the dealer from whom you purchased the product.
This product incorporates a lithium-ion (IFpR27/66) rechargeable battery.
For instructions on how to dismantle this product for recycling, email
11
11
Compliance
FCC notice
This device complies with part 15 of the FCC Rules. Operation is subject to the following two conditions: (1) This device may not cause
harmful interference, and (2) this device must accept any interference received, including interference that may cause undesired
operation.
This equipment has been tested and found to comply with the limits for a Class B digital device, pursuant to part 15 of the FCC Rules.
These limits are designed to provide reasonable protection against harmful interference in a residential installation.
This equipment generates, uses and can radiate radio frequency energy and, if not installed and used in accordance with the
instructions, may cause harmful interference to radio communications. However, there is no guarantee that interference will not occur
in a particular installation. If this equipment does cause harmful interference to radio or television reception, which can be determined
by turning the equipment off and on, the user is encouraged to try to correct the interference by one or more of the following
measures:
- Reorient or relocate the receiving antenna.
- Increase the separation between the equipment and receiver.
- Connect the equipment into an outlet on a circuit different from that to which the receiver is connected.
- Consult the dealer or an experienced radio/ TV technician for help.
- Any changes or modifications not expressly approved by Datamars could void the user's authority to operate the equipment
Responsible party in the USA
This product is supplied by:
Datamars Inc
528 Grant Road
Mineral Wells
Texas 76067
UNITED STATES
Toll free: 800 874 8494
Industry Canada notice
This device complies with Industry Canada licence-exempt RSS standard(s). Operation is subject to the following two conditions:
(1) this device may not cause interference, and
(2) this device must accept any interference, including interference that may cause undesired operation of the device.
EU declaration of conformity
Datamars Limited hereby declares that the EziWeigh7i indicator is in compliance with the essential requirements and other
relevant provisions of Directive 2014/53/EU. The declaration of conformity may be consulted at
http://livestock.tru-test.com/en/compliance
The
Bluetooth
®word mark and logos are registered trademarks owned by Bluetooth SIG, Inc and any use of such marks by Datamars
SA and its subsidiaries is under license. Other trademarks and trade names are those of their respective owners.
All trademarks with an * are neither owned by nor licensed to Datamars SA and belong to their respective owners.
"Made for iPhone" means that an electronic accessory has been designed to connect specifically to iPhone, and has been certified by
the developer to meet Apple performance standards. Apple is not responsible for the operation of this device or its compliance with
safety and regulatory standards. Please note that the use of this accessory with iPhone may affect wireless performance.

12
Esta guía le mostrará cómo usar el indicador de pesaje EziWeigh7i por primera vez.
Índice
Instrucciones de desempacado...............12
Cómo cargar la batería ..........................13
Vistazo general......................................14
Instalación.............................................15
Configuración del indicador ...................16
Registro de la información .....................16
Visualización de información..................17
Carga de información ............................18
Transferencia de datos...........................19
Mantenimiento y servicio .......................20
Cumplimiento normativo .......................21
Para mayor información, vea la información
de referencia en la unidad flash USB
suministrada o visite www.tru-test.com
1
Instrucciones de desempacado
Revise que cuente con todos estos artículos. Si falta algo, póngase en contacto con su
proveedor.
Indicador de pesaje
EziWeigh7i (el indicador)
Cable USB
El cable USB sirve para cargar
el dispositivo y también para
conectar el indicador a la
computadora.
Adaptador de corriente eléctrica y
enchufe
Se han incluido enchufes para distintos
países.
Abrazadera de montaje
Unidad flash USB
La unidad flash contiene el software
Data Link y la información de
referencia.

13
2
Cómo cargar la batería
Use el adaptador de corriente para cargar la batería interna del indicador desde un
tomacorriente.
Para mejores resultados, no cargue la batería si la temperatura es
menor que 0 °C (32 °F), o mayor que 40 °C (104 °F).

14
3
Vistazo general

15
4
Instalación
Antes de poder pesar animales, debe primero conectar el indicador a algunas barras
o celdas de carga. Para identificar animales con las etiquetas electrónicas (IDE),
tendrá que conectar el indicador a un lector IDE.
Instalación del indicador y las barras de carga
Conexión del indicador a un lector IDE
Conexión vía
Bluetooth
®
1. Primero, encienda el indicador.
2. Luego, encienda el lector IDE.
Si necesita más información acerca de cómo sincronizar el lector IDE, vea el
Manual del usuario del lector IDE.
Conexión con un cable serial
Conecte el lector IDE al conector serial / de corriente del indicador a través de un
cable serial, disponible en Tru-Test como accesorio opcional.

16
5
Configuración del indicador
Al encender el indicador por primera vez, siga las instrucciones paso a paso para
configurar el idioma.
El indicador se ha configurado en la fábrica para registrar manualmente el peso y los
ID, sin clasificación. Le recomendamos que cambie la configuración del indicador
según sus necesidades.
Modificación de la configuración del indicador
Para cambiar la configuración del indicador:
Pulse , desplácese hacia abajo hasta Configuraciones... y pulse .
6
Registro de la información
Sesiones
La información que registra, como el peso, se almacena en una "sesión". Una sesión
es como un archivo en una computadora. Recomendamos que comience una sesión
nueva cada día o para cada grupo de animales.
Pulse , desplácese hacia abajo hasta Sesiones, y pulse dos veces.
El indicador mostrará "Iniciado".
Pulse dos veces para salir del menú.

17
Pesaje de un animal
Asegúrese de que el indicador muestra 0.0. En caso contrario, pulse .
1. Suba el animal sobre la plataforma.
2. Si registra los ID, ingrese el IDV del animal o escanee la etiqueta IDE usando un
lector IDE.
IDV
IDE
3. Si desea ingresar un comentario acerca del animal, pulse y use el teclado
alfanumérico para hacerlo.
4. Cuando se ilumine la luz de "estable", pulse .
El indicador registrará el peso, además de cualquier otra información que
introduzca.
5. Retire al animal de la plataforma.
Si el indicador no muestra 0.0 entre animales o hay problemas de precisión
o pesos inestables, asegúrese de que las barras estén aseguradas con
firmeza al piso de concreto y que estén libres de sedimentos o depósitos;
además, revise que la conexión al indicador sea correcta.
7
Visualización de información
Luego de pesar, puede ver estadísticas de la sesión. Pulse para mostrar la opción
de Estadísticas.
Pulse y pulse para desplazarse por las estadísticas.
18
8
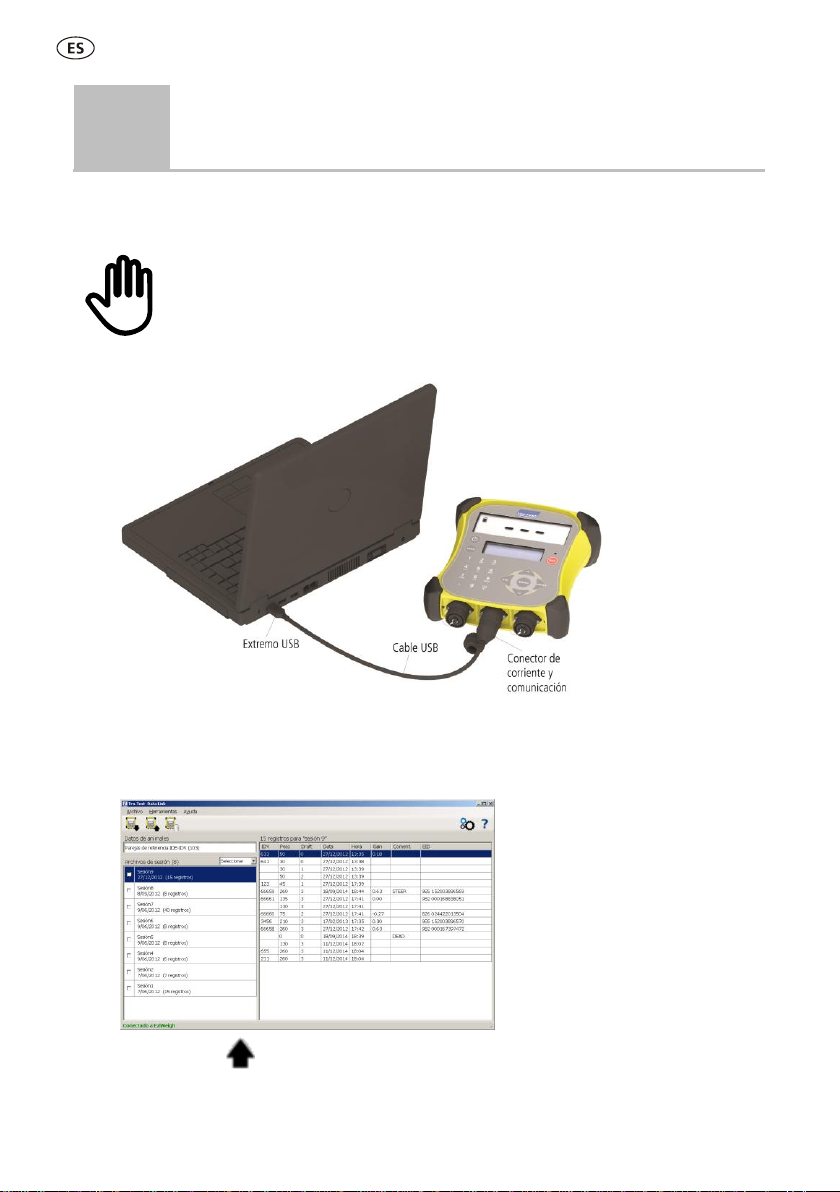
Carga de información
Puede transferir archivos de sesiones o de referencia con parejas IDE/IDV desde su PC
a su indicador usando el software Data Link en su computadora.
Si no lo ha hecho aún, instale Data Link en su PC. Para hacerlo, inserte la
unidad flash USB suministrada en el puerto USB de su PC y siga las
instrucciones.
1. Conecte el indicador a la PC con el cable USB suministrado.
2. Abra la aplicación Data Link en su PC.
3. Una vez que Data Link se haya conectado al indicador, se mostrará toda la
información del indicador en Data Link.
4. Haga clic en para transferir archivos de sesiones o de referencia al
indicador.

19
9
Transferencia de datos
Existen dos maneras de transferir datos del indicador.
Data Link para PC
Data Link app para
dispositivos móviles
Ud. puede:
guardar archivos de sesión
guardar información de referencia
Ud. puede:
enviar por correo electrónico
un archivo de sesión
registrar una transacción con
SNIG
Para hacer esto:
1. Conecte el indicador a la PC con el cable USB
suministrado.
2. Abra la aplicación Data Link en su PC.
3. Haga clic en para transferir datos del
dispositivo.
Para hacer esto:
Ejecute la aplicación Data Link en
su dispositivo móvil y siga las
instrucciones.
Aplicación para teléfonos inteligentes
La aplicación Tru-Test Data Link está disponible para descargar gratis en la tienda
Google Play* (para dispositivos Android*) o la Apple App Store* (para dispositivos
Apple iOS*).
20
10
Mantenimiento y servicio
Backup de su información
Le recomendamos que realice backups frecuentes de la información en su indicador
mediante transferencias a su PC con Data Link.
Actualización del software
Le recomendamos que actualice regularmente el software del indicador de manera
que esté al día con las últimas mejoras y funciones.
Para actualizar el software del indicador:
1. Conecte el indicador a la PC con el cable USB suministrado.
2. Abra la aplicación Data Link en su PC.
3. Haga clic en Herramientas/Actualizaciones.
4. Siga las instrucciones paso por paso.
Para mayor información, consulte la sección de Ayuda de Data Link.
Cuando actualice el software, los datos en su indicador permanecerán
intactos. Sin embargo, le recomendamos encarecidamente que transfiera la
información en su indicador a una PC
antes
de realizar la actualización.
Cuidado del indicador
No deje el indicador o las barras de carga sumergidos en agua. Guarde el indicador
en un lugar seco y fresco.
Limpie el indicador con un paño húmedo, agua caliente y jabón. Si utiliza otros
limpiadores, es posible que dañe la caja.
Reemplace los tapones protectores cuando tenga cables conectados al indicador, De
esta manera protegerá los conectores de la humedad y el sucio.
Other manuals for EziWeigh7i
1
Table of contents
Languages:
Other Tru-Test Scale manuals


