Truckman Retrax Series User manual

(2) 10-24 Black flathead Allen Screws
Passenger Side Rail
(has “Green” sticker under rail) (4) 10-32
Screws
(stainless)
Spiral Canister
Tailgate End
Cab End
Exploded View
Front Cover
Driver side rail
(2) 10-24 Black flathead Allen Screws
Passenger Side Rail
(has “Green” sticker under rail) (4) 10-32
Screws
(stainless)
Spiral Canister
Tailgate End
Cab End
Exploded View
Front Cover
Driver side rail
Table of Contents
Pre-assembly guidelines
Steps 1-4 (cover assembly)
Steps 5 & 6
(clamp install & measurements)
Steps 7 & 8
(adjustments & final steps)
Use and Maintenance / Care
Rack System
Warranty Statement
Pg. 1
Pg. 2
Pg. 3
Pg. 4
Pg. 5
Pg. 6
Pg. 7,8
UNCONTROLLED DOCUMENT
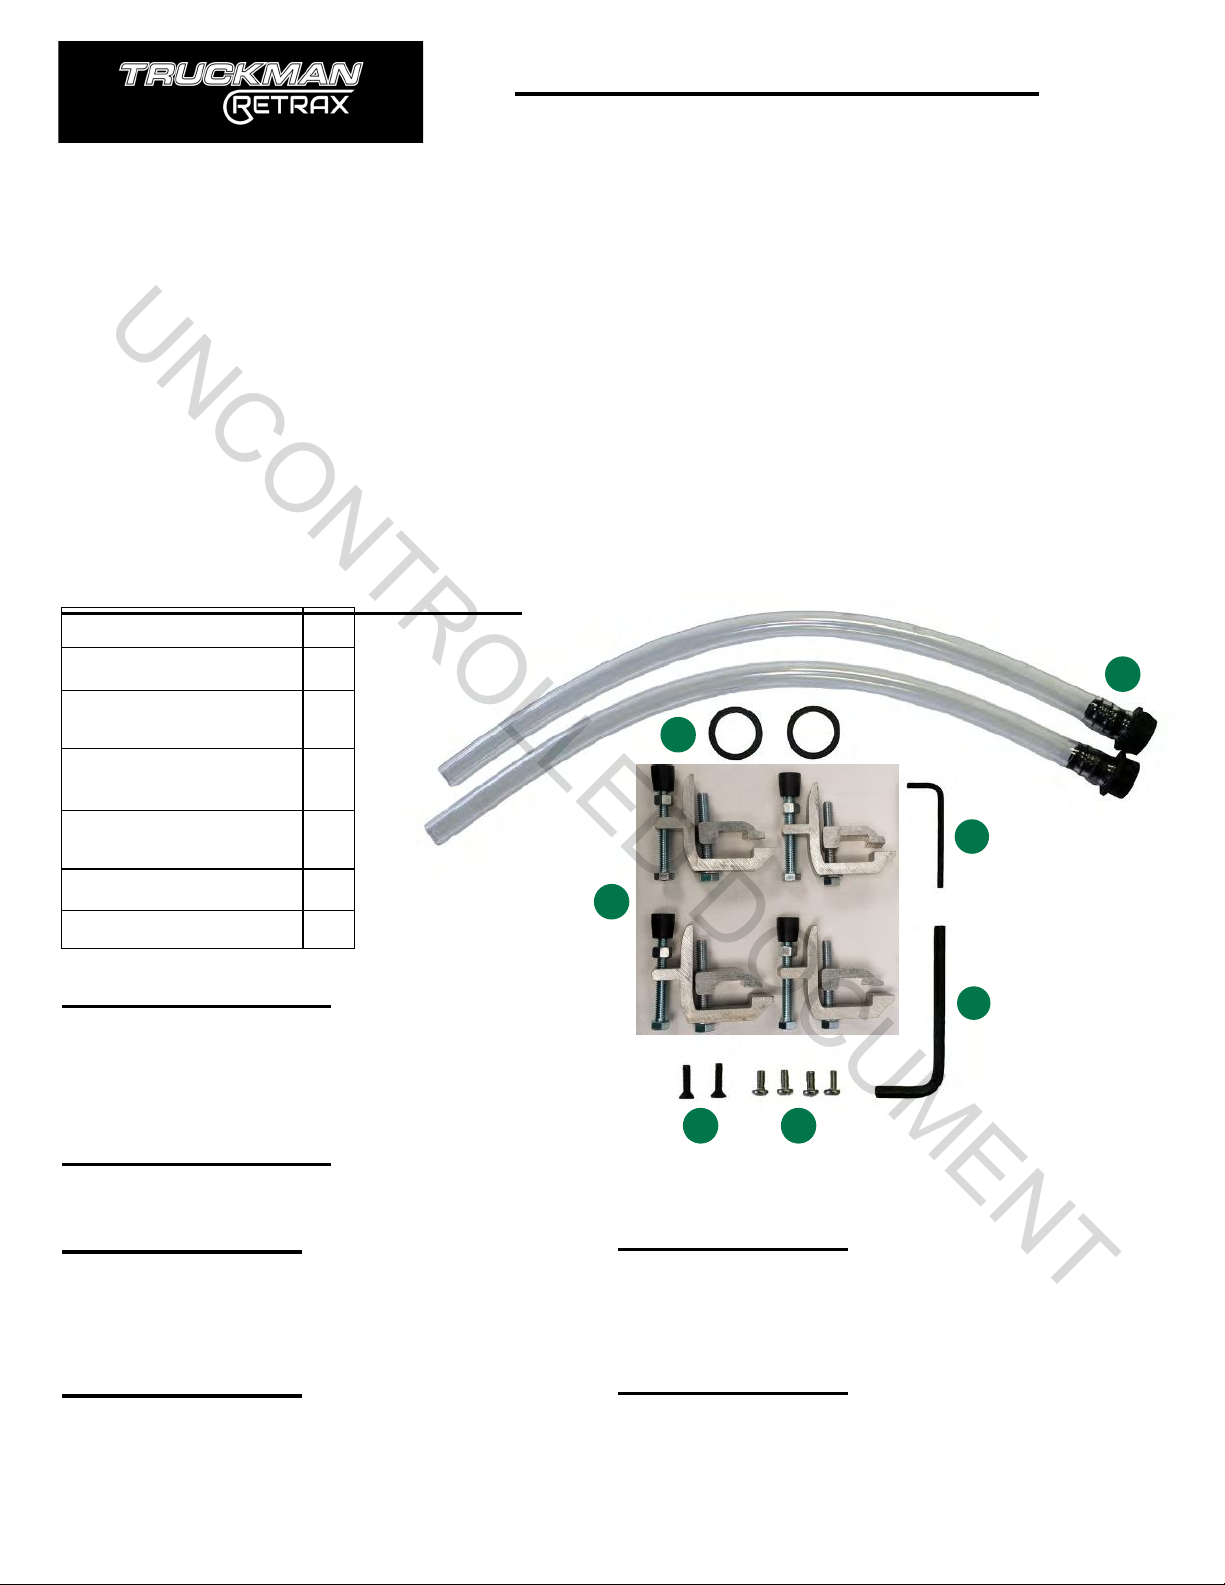
Pre-assembly Guidelines
F
E
G
D
A
B
Parts in large box
Parts in rail box
(2) rubber washers A
(2) drain tubes B
(4) clamps (6 clamps for 8’
beds)
C
(2) 10-24 x 3/4” font cover
mounting screws
D
(4) 10-32 x 7/16” rail to
canister mounting screws
E
6mm Allen wrench F
1/8” Allen wrench G
Tools Required
#2 Philips screwdriver
9/16” or 1/2” wrench (ratchet works best)
Pliers or vice grips
Pre-assembly Guidelines
F
E
G
D
CC
A
B
Parts in large box
Parts in rail box
DrDriivver ser side rail
PPasasssenengger ser side rail
CCllamamp bp boxox
(2) rubber washers A
(2) drain tubes B
(4) clamps (6 clamps for 8’
beds)
C
(2) 10-24 x 3/4” font cover
mounting screws
D
(4) 10-32 x 7/16” rail to
canister mounting screws
E
6mm Allen wrench F
1/8” Allen wrench G
Tools Required
#2 Philips screwdriver
9/16” or 1/2” wrench (ratchet works best)
Pliers or vice grips
Please read all instructions before assembling the bed cover.
Keep boxes and packaging until installation is complete. Unpack carefully to prevent
scratching. DO NOT remove protective films from cover and canister until after installation is
complete.
DO NOT LUBRICATE OR USE LOCTITE ON TRUCKMAN RETRAX ! ! (VOIDS WARRANTY) See
maintenance page for proper care.
Clamp Box and Drain Tube Kit
•Instruction packet
•Cover rolled into canister-spiral assembly
•Front cover for canister
•Keys
•Drain tube kit
Pg. 1
UNCONTROLLED DOCUMENT
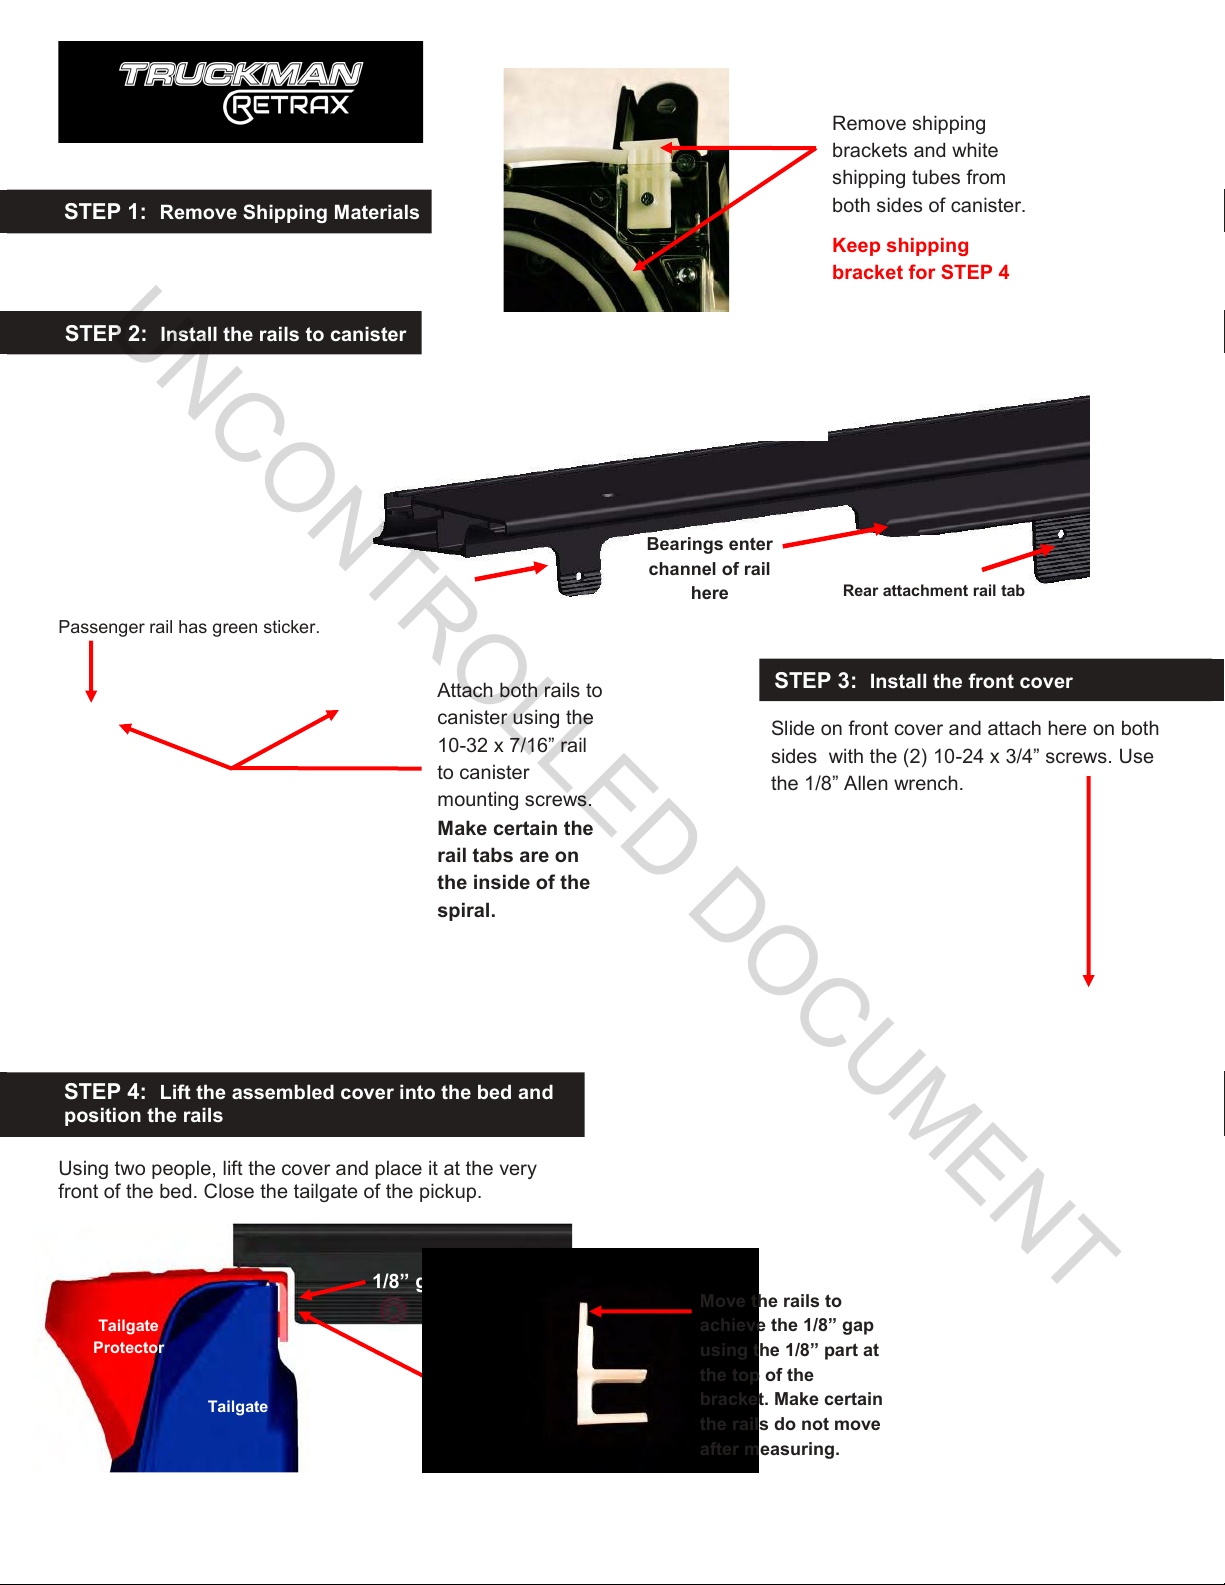
STEP 2: Install the rails to canister
Rear attachment rail tab
Bearings enter
channel of rail
here
STEP 3: Install the front cover
Slide on front cover and attach here on both
sides with the (2) 10-24 x 3/4” screws. Use
the 1/8” Allen wrench.
STEP 1: Remove Shipping Materials
Remove shipping
brackets and white
shipping tubes from
both sides of canister.
Keep shipping
bracket for STEP 4
STEP 4: Lift the assembled cover into the bed and
position the rails
Attach both rails to
canister using the
10-32 x 7/16” rail
to canister
mounting screws.
Make certain the
rail tabs are on
the inside of the
spiral.
Passenger rail has green sticker.
Using two people, lift the cover and place it at the very
front of the bed. Close the tailgate of the pickup.
1/8” gap
Tailgate
Protector
Tailgate
1/8” gap
Move the rails to
achieve the 1/8” gap
using the 1/8” part at
the top of the
bracket. Make certain
the rails do not move
after measuring.
STEP 2: Install the rails to canister
Rear attachment rail tab
Bearings enter
channel of rail
here
STEP 3: Install the front cover
Slide on front cover and attach here on both
sides with the (2) 10-24 x 3/4” screws. Use
the 1/8” Allen wrench.
STEP 1: Remove Shipping Materials
Remove shipping
brackets and white
shipping tubes from
both sides of canister.
Keep shipping
bracket for STEP 4
STEP 4: Lift the assembled cover into the bed and
position the rails
Attach both rails to
canister using the
10-32 x 7/16” rail
to canister
mounting screws.
Make certain the
rail tabs are on
the inside of the
spiral.
Passenger rail has green sticker.
Using two people, lift the cover and place it at the very
front of the bed. Close the tailgate of the pickup.
1/8” gap
Tailgate
Protector
Tailgate
Move the rails to
achieve the 1/8” gap
using the 1/8” part at
the top of the
bracket. Make certain
the rails do not move
after measuring.
Rear attachment rail tab
Front attachment rail tab
Bearings enter
channel of rail
here
STEP 3: Install the front cover
Slide on front cover and attach here on both
sides with the (2) 10-24 x 3/4” screws. Use
the 1/8” Allen wrench.
Remove shipping
brackets and white
shipping tubes from
both sides of canister.
Keep shipping
bracket for STEP 4
STEP 4: Lift the assembled cover into the bed and
position the rails
Attach both rails to
canister using the
10-32 x 7/16” rail
to canister
mounting screws.
Make certain the
rail tabs are on
the inside of the
spiral.
Passenger rail has green sticker.
Using two people, lift the cover and place it at the very
front of the bed. Close the tailgate of the pickup.
1/8” gap
Tailgate
Protector
Tailgate
Move the rails to
achieve the 1/8” gap
using the 1/8” part at
the top of the
bracket. Make certain
the rails do not move
after measuring.
Attachment rail tab
Pg. 2
Lift up lock cover, unlock and open by pressing release button.
Pull cover out 10" - 12". Ensure the cover remains rolled out at
all times when installing rails to canister to prevent lockout of
the cover after installation. DO NOT allow cover to roll
back into canister until rail is installed.
UNCONTROLLED DOCUMENT

NOTE: Plastic bed liners may have to be cut or notched at the front of the bed if they touch the rolling
canister. A jigsaw with medium tooth blade, Dremel™ or RotoZip® tool works well.
NOTE: The front cover weather-strip must lay flat across the
truck bed. Make certain it is pointed towards the cab. If it
extends past the bed rail cap, trim to fit right up to the cap on
truck bed.
Using a 9/16” or 1/2” wrench ( depending on your
clamps), tighten clamps.
When attaching rear clamps, push down on the rail as
you tighten the clamps for a better seal on the pickup
box rails.
The rear of the rail may need to be tilted up or down
for best fit over the tailgate.
Measure the distance at point A (above front cover).
Then measure at points B and C (above the clamps),
they must be the same as point A.
The rails must be parallel, if not then
adjustments are needed, proceed to step 7.
If parallel, proceed to step 8.
STEP 5: Install the front & rear set of clamps
STEP 6: Measure and record the distance
between the rails
A
A
Cover rolled into canister
Lock
Tailgate
B
B
Tailgate
Tailgate
C
C
Measurements B & C must be the same
as A or up to 1/16” smaller than A.
Rear Clamp
Front Clamp Canister
NOTE: Plastic bed liners may have to be cut or notched at the front of the bed if they touch the rolling
canister. A jigsaw with medium tooth blade, Dremel™ or RotoZip® tool works well.
NOTE: The front cover weather-strip must lay flat across the
truck bed. Make certain it is pointed towards the cab. If it
extends past the bed rail cap, trim to fit right up to the cap on
truck bed.
Using a 9/16” or 1/2” wrench ( depending on your
clamps), tighten clamps.
When attaching rear clamps, push down on the rail as
you tighten the clamps for a better seal on the pickup
box rails.
The rear of the rail may need to be tilted up or down
for best fit over the tailgate.
Measure the distance at point A (above front cover).
Then measure at points Band C (above the clamps),
they must be the same as point A.
The rails must be parallel, if not then
adjustments are needed, proceed to step 7.
If parallel, proceed to step 8.
STEP 5: Install the front & rear set of clamps
STEP 6: Measure and record the distance
between the rails
A
Cover rolled into canister
Lock
Tailgate
B
C
Measurements B & C must be the same
as A or up to 1/16” smaller than A.
Rear Clamp
Front Clamp Canister
1. Adjust stabilizer bolt to contact inner wall of
truck bed and have bolt rest in a level position
2. Tighten stabilizer bolt in level position
3. Tighten clamp bolt to secure rails
4. Repeat for each clamp
Pg. 3
UNCONTROLLED DOCUMENT

Remove plastic film from the canister.
Final notes: Open and close the cover to ensure it is rolling without rubbing or binding. Remove any remaining
plastic film. Be sure that all clamps and/or bolts are tight. Clamps must be periodically checked for tightness. The
top surface of the rails should be level. Loosen clamps or bolts, adjust the rail, and tighten if needed. On some models, a
better fit over the tailgate may be obtained if the rear of the rails are slightly tilted up or down.
Remove clamp and turn both of the white nylon adjustment
screws, using a 6 mm Allen wrench. One complete turn of
adjustment screws = 1/16” of adjustment.
Pull the cover closed and latch.
If there is less weather-strip exposed on one side,
adjust that rail towards the cab. Replace and tighten
the clamps and close the cover. Check again for
equal spacing at the front and readjust if needed.
STEP 7: Adjust the distance between the rails
STEP 8: Assemble and install drain tube
*Rails too far apart *Rails too close =
= clockwise counter clockwise
Tailgate end of passenger rail
Insert tubes
into the holes
in the bottom
of the canister
and turn to the
right. 2 clicks
means they
are secured.
On some trucks there are factory drain holes in both
front corners, on others there are plastic plugs that can
be drilled out for the tubes. You can enlarge existing
holes or drill new holes in the front wall or floor if
needed. Be careful of what is behind when you drill. If
using a plastic bed liner, then holes can be drilled
through the liner only. Cut the tubes to length to fit in
desired locations.
You can check for proper fit between front cover
and rolling cover
Pg. 4
UNCONTROLLED DOCUMENT
Other Truckman Automobile Accessories manuals

Popular Automobile Accessories manuals by other brands


ULTIMATE SPEED
ULTIMATE SPEED 279746 Assembly and Safety Advice

SSV Works
SSV Works DF-F65 manual

ULTIMATE SPEED
ULTIMATE SPEED CARBON Assembly and Safety Advice

Witter
Witter F174 Fitting instructions

WeatherTech
WeatherTech No-Drill installation instructions

TAUBENREUTHER
TAUBENREUTHER 1-336050 Installation instruction