TRUE METRIX RE4NPD03r5 User manual


INTRODUCTION:
TRUE METRIX™
Self Monitoring Blood Glucose System
TRUE METRIX is a simple, accurate way to test your
whole blood glucose (sugar) level, anytime, anywhere.
Our goal is to provide quality healthcare products and
dedicated customer service. For questions about TRUE
METRIX products, visit our web site at:
www.niprodiagnostics.com.
e TRUE METRIX Self Monitoring Blood Glucose
System is intended for the quantitative measurement of
glucose (sugar) in fresh capillary whole blood samples
drawn from the ngertip or forearm. e TRUE METRIX
Self Monitoring Blood Glucose System is intended to be
used by a single person and not to be shared.
e TRUE METRIX Self Monitoring Blood Glucose
System is intended for self-testing outside the body (in
vitro diagnostic use) by people with diabetes at home as
an aid to monitor the eectiveness of diabetes control.
e TRUE METRIX Self Monitoring Blood Glucose
System should not be used for the diagnosis or screening
of diabetes or for neonatal use. Alternative site testing
should be done only during steady-state times (when
glucose is not changing rapidly).
1

e TRUE METRIX Self Monitoring Test Strips are for
use with the TRUE METRIX Self Monitoring Meter to
quantitatively measure glucose (sugar) in fresh capillary
whole blood samples drawn from the ngertip or
forearm. e TRUE METRIX Self Monitoring Meter
measures the current, detects, analyzes and corrects for
hematocrit and temperature and calculates the glucose
result.
e TRUE METRIX Control Solution is for use with
the TRUE METRIX Self Monitoring Meter and TRUE
METRIX Self Monitoring Test Strips to check that the
meter and the test strip are working together properly and
the test is performing correctly.
Importance of Blood Glucose Monitoring
e more you know about diabetes, the better you will be
able to care for yourself. A Doctor or Healthcare
Professional determines how oen you should test and
what your target ranges are for blood glucose results.
Having most blood glucose results within your target
range shows how well your treatment plan is working to
control glucose levels. Keeping results within your target
range helps slow or stop complications from diabetes.
NEVER change your treatment plan without consulting a
Doctor or Healthcare Professional.
2

IMPORTANT INFORMATION:
For the most accurate results using TRUE METRIX:
• Read all product instructions for use before testing.
• Use of TRUE METRIX in a manner not specied in
this Owner’s Booklet is not recommended and may
aect ability to determine true blood glucose levels.
• TRUE METRIX is an in vitro (outside body)
quantitative system that is used for self-testing of
human whole blood only.
• Alternative site (forearm) testing should not be used to
calibrate continuous glucose monitors (CGMs).
• Alternative site (forearm) testing should not be used
for insulin dose calculations.
• Use only TRUE METRIX Self Monitoring Test Strips and
TRUE METRIX Control Solution with the TRUE METRIX
Self Monitoring Meter.
• Remove only one test strip at a time from test strip
vial. Recap vial immediately.
• NEVER reuse test strips. NEVER wipe test strips
with water, alcohol or any cleaner. DO NOT attempt
to remove blood or control solution from test strips
or clean test strips and re-use. Reuse of test strips will
cause inaccurate results.
• NEVER add a second drop of sample to test strip.
Adding more sample gives an error message.
• Perform Control Tests before performing a blood
glucose test for the rst time.
3

4
IMPORTANT INFORMATION (cont.):
• Perform Control Tests with more than one level of
control solution. ree levels of TRUE METRIX
Control Solution are available for Control Tests. Call
1-800-803-6025 for assistance in obtaining control
solution.
• e TRUE METRIX Self Monitoring Blood Glucose
System is for one person use ONLY. DO NOT share
your meter or lancing device with anyone, including
family members. Do not use on multiple patients!!
• ALL parts of your blood glucose monitoring system
could carry blood-borne pathogens aer use, even
aer cleaning and disinfecting.
2, 3
• Cleaning and disinfecting the lancing device and the
meter destroys most, but not necessarily all, blood-
borne pathogens.
• Wash your hands thoroughly with soap and warm
water before and aer handling the meter, lancing
device, lancets, or test strips as contact with blood
presents an infection risk.
• If the meter is being operated by a second person who
provides testing assistance, the meter and lancing
device should be disinfected prior to use by the second
person.
• It is important to keep the meter and the lancing
device clean and disinfected. For instructions on how
to clean and disinfect the meter and lancing device, see
Meter Cleaning and Disinfecting and Lancing Device
Cleaning and Disinfecting.

IMPORTANT INFORMATION (cont.):
• If you have symptoms of low or high blood glucose,
check your blood glucose immediately. If your result
does not match the way you feel, repeat the test. If your
results still do not match the way you feel, call your
Doctor or Healthcare Professional.
~ Low blood glucose (hypoglycemia) symptoms may
be trembling, sweating, intense hunger, nervousness,
weakness, and trouble speaking.
~ High blood glucose (hyperglycemia) symptoms may
be intense thirst, a need to urinate oen, dry mouth,
vomiting, and headache.
• Do not use for diagnosis of or screening of diabetes or
for neonatal use.
• Inaccurate results may occur in severely hypotensive
individuals or in dehydrated patients or patients in
shock. Inaccurate results may occur for individuals
experiencing a hyperglycemic-hyperosmolar state,
with or without ketosis.
5

6
Phone Number, Fast Test Guide, Expected Results ............Cover
Introduction and Important Information................................ 1
Know Your System
Meter ............................................................................................. 7
Test Strip ....................................................................................10
Control Solution ........................................................................12
Getting Started
Quality Control Solution..........................................................15
Automatic Self Test....................................................................15
Control Test ................................................................................16
How to Test Control Solution ..................................................17
Testing your Blood
Obtaining a Blood Sample........................................................21
How to Test Blood.....................................................................25
TRUE METRIX System and Laboratory Testing ..................29
System Out of Range Warning Messages ...............................30
Meter Set Up
Set Time and Date......................................................................31
Set Event Tags, Ketone Test Alert and Test Reminders.........33
Meter Memory
View Averages (7-, 14-, and 30-day)........................................36
View Results................................................................................37
Care, Cleaning/Disinfecting and Troubleshooting
Caring for TRUE METRIX ......................................................38
Changing Battery.......................................................................44
Troubleshooting.........................................................................45
Display Messages .......................................................................46
System Specications/Chemical Composition..........................49
Meter Warranty..............................................................................50
References.......................................................................................51
Notes ...............................................................................................52

7
Know Your System
Meter
①“ ▶ ” Button
Increase numbers in Meter Set Up; add ALT Symbol;
move forward by date/time when viewing results and
Averages in Memory; scroll through Event Tags to
mark results (if feature on).
②“ • ” Button
Turn meter on to view Average values, to view results
in Memory, to access Meter Set Up, to turn on Event
Tags in Meter Set Up.
③“ ◀ ” Button
Decrease numbers in Meter Set Up; remove ALT
Symbol; move backward by date/time when viewing
results and view Averages in Memory; scroll through
Event Tags to mark results (if feature on).
Top of Meter
1 32

①Display Screen
Shows results, messages, user prompts, information.
②Test Port
Insert TRUE METRIX Test Strip here, contact blocks
facing up.
③Strip Release Button
Releases test strip aer testing for disposal.
④Battery Door
Use one non-rechargeable 3V lithium battery
(#CR2032), positive (“+”) side up
(see Changing Battery).
⑤Meter Label
Contains serial number of meter.
⑥Data Contacts
Connects meter with computer for data upload.
Feature not available at this time.
8
2
1
Front of Meter
3
4
5
Back of Meter
6

9
Full Display Screen
1. Result is from Memory
2. Time, Date
3. Time is AM/PM
4. Event Tag Symbols
5. Result is from 7, 14, or 30 day Average
6. Test Result
7. Control Symbol
8. Battery Symbol
9. Alternate Site (ALT) Symbol
10. Drop Symbol - Apply blood or control solution
11. Temperature Symbol
12. Test Reminder Symbol
13. Ketone Test Alert Symbol
14. Unit of Measure (Note: Factory set to mg/dL,
cannot be changed by user.)
3
4
2
1
7
6
5
8910 11 12
13
14

10
①Contact End -
Insert into Test Port with contact
blocks facing up
.
②Sample Tip -
Bring Tip of test strip to top of sam-
ple drop (blood or control solution) aer Drop
Symbol appears in the Display.
Note: Insert test strip into meter before touching Sample
Tip to blood or control solution drop.
Sample Placement
Correct Incorrect
• Allow sample drop to be drawn into Sample Tip until test-
ing begins (meter beeps and dashes move across Display).
• Do not smear or scrape drop with test strip.
• Do not apply more sample to test strip aer testing begins.
• Do not apply blood or control solution to top of test strip.
Do not insert Sample Tip with sample into Test Port.
May damage meter.
Test Strip
12
Top of Test Strip
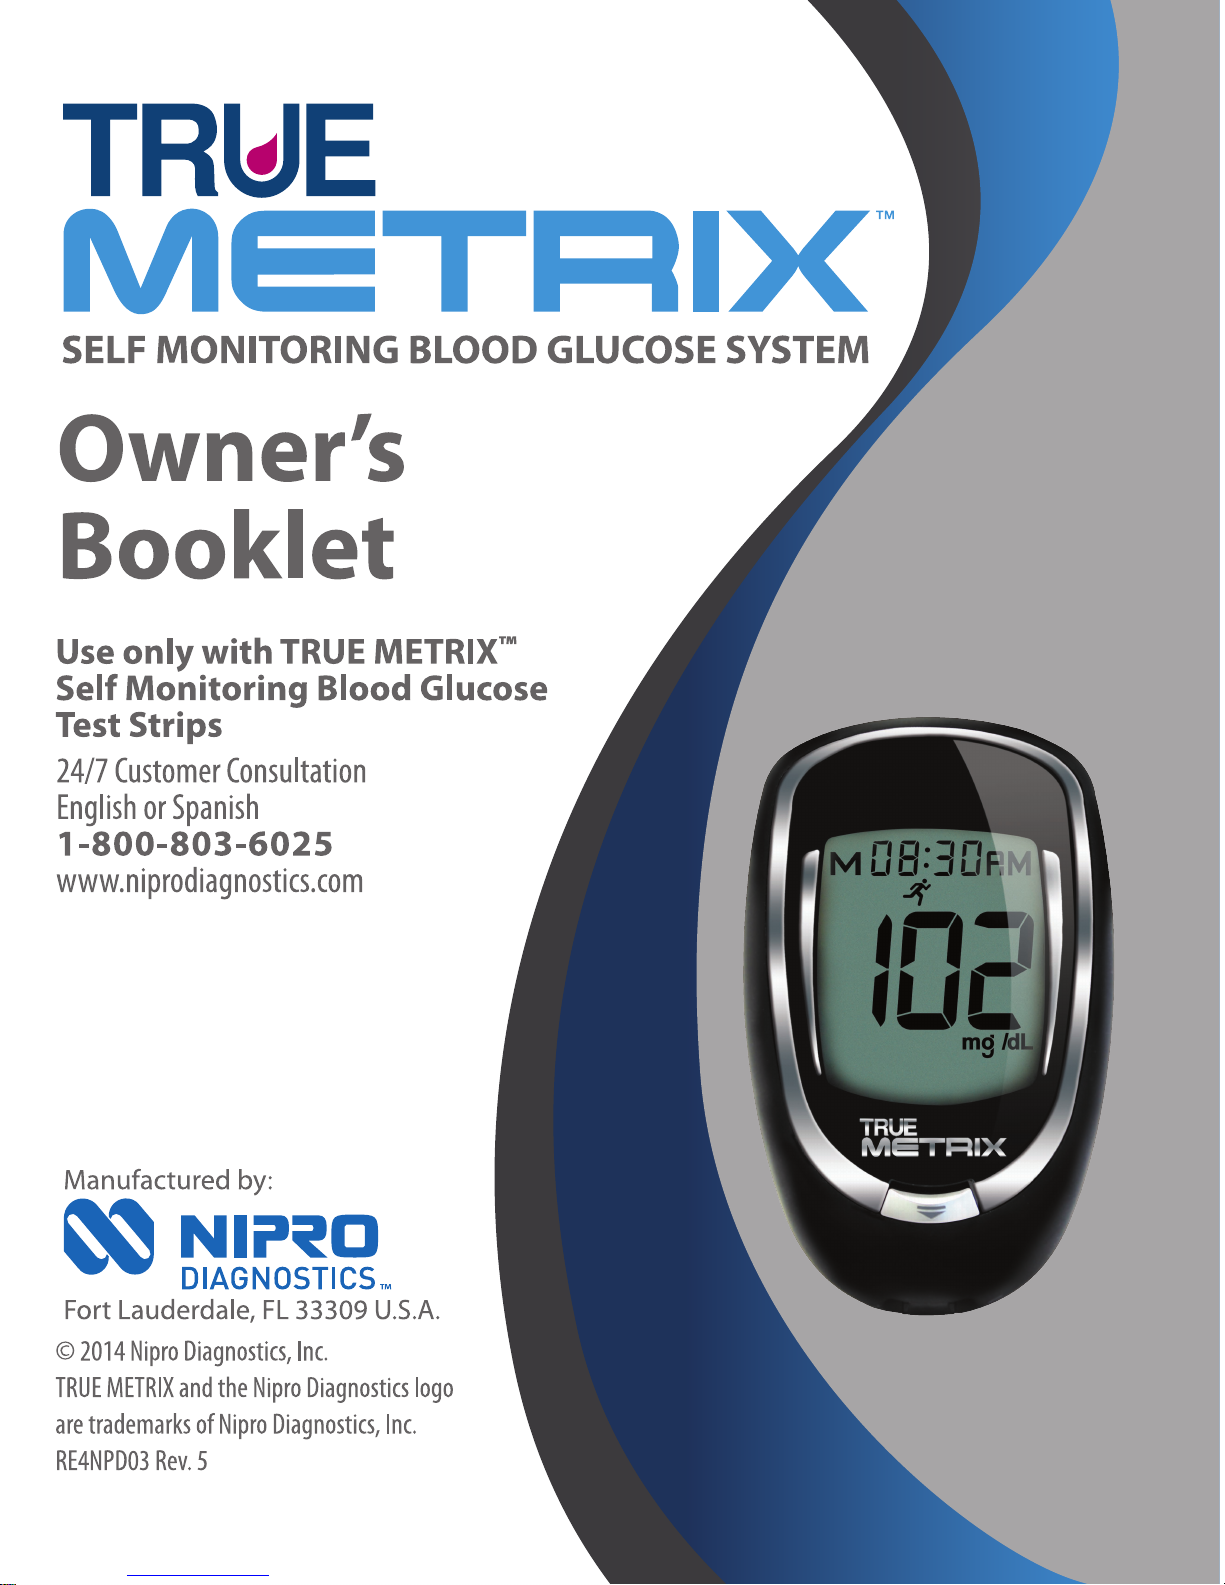
①Lot Number (LOT) - Used for identication
when calling for assistance.
②Expiration Dates (EXP) - Write date rst opened
on vial label. Discard vial and unused test strips if
either 4 months aer rst opening or date printed
next to EXP on vial label has passed, whichever
comes rst.
Caution! Use of test strips or control solution past the
Expiration Dates may give incorrect test
results. Discard out-of-date products and test
with new products.
③Control Test Range - Range of numbers in
which Control Test result must fall to assure the
system is working properly.
Note:
Examples only. Do not represent actual Control
Test ranges.
11
Test Strip Vial Label
1
2
2
3
May 30, 2015

12
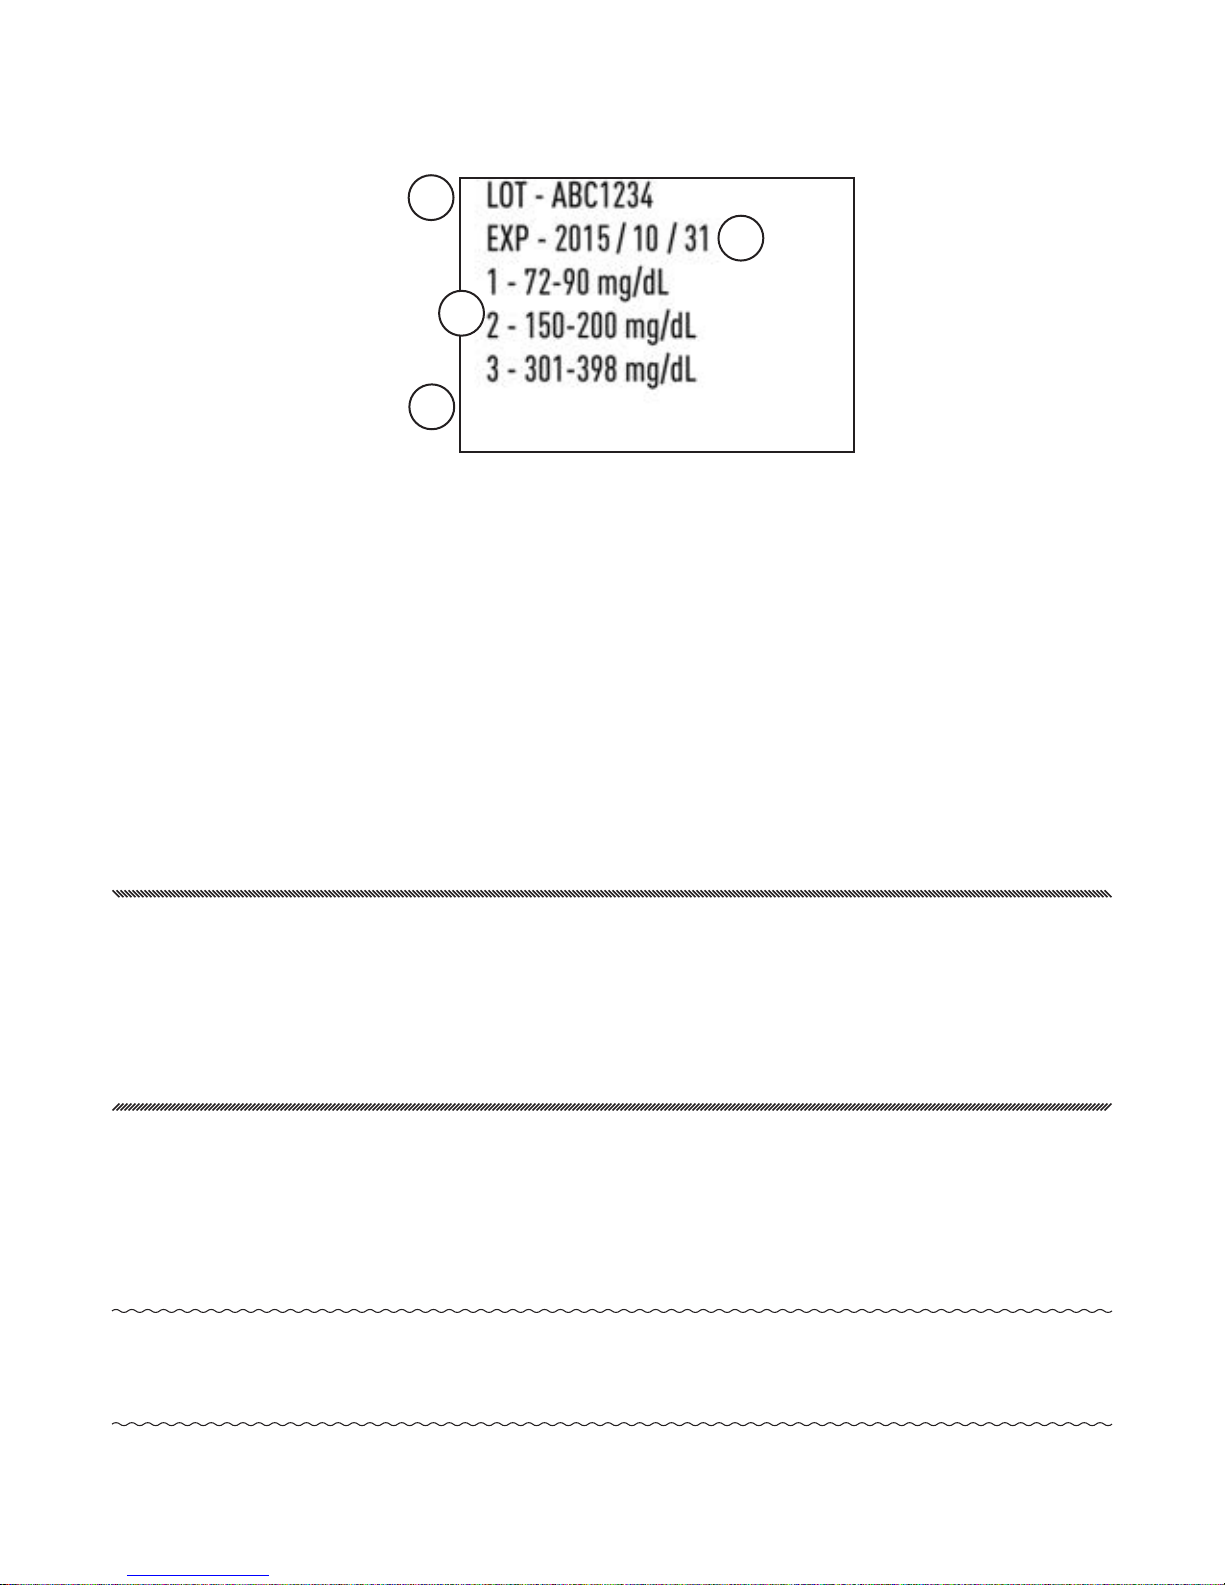
Control Solution Bottle Label
①Lot Number (LOT) - Used for identication
when calling for assistance.
②Expiration Dates (EXP) - Write date rst opened
on bottle label. Discard bottle if either 3 months
aer rst opening or date printed next to EXP on
bottle label has passed, whichever comes rst.
③Control Solution Level (1, 2, or 3) - We
recommend testing at least 2 levels of control
solution. Contact 1-800-803-6025 for assistance
with obtaining dierent levels of control solution.
12
3
May 30, 2015
Control Solution (Control)

Getting Started
Meter comes with pre-set time and date. e
Event Tag feature, Ketone Test Alert, and all Test
Reminders are o. Before using the meter for the
rst time or aer a battery change, check the time,
date, Event Tags, Alert and Reminders, and update
as needed (see Meter Set Up).
e meter turns on when a test strip is inserted into
the Test Port or when “ • ” Button is pressed (see
Memory and Meter Set Up).
Meter turns o when the test strip is released or
removed from the meter, “ • ” Button is pressed, or
aer 2 minutes of non-use.
Turning the Ketone Test Alert on sets a reminder to
check your ketones per your treatment plan when a
blood glucose result is over 240 mg/dL.
Test Reminders are set like an alarm clock to sound
a tone for 10 seconds to remind you to test. Up to
four Test Reminders per day may be set.
13

14
Getting Started (cont.)
Event Tags allow you to tag your blood glucose
results to link to the following events:
Before meal –test was taken just before a meal,
Aer meal –test was taken 2 hours aer the start
of a meal,
Exercise – test was taken during or aer exercise,
Medications – medication taken may have af-
fected test result,
Sick – test was taken when sick,
Other – any other reason that the test is unique
or dierent in some way (example: stress,
drinking alcohol). In your logbook, note the
reason that the test result was tagged. Seeing a
result with an Event Tag in the meter Memory
reminds you that there is more about this test
result in your log book.
Tagging results helps track the eect specic events
may have on your blood glucose test results Event
Tagging may assist you and your doctor or health-
care provider with managing diabetes.

15
Quality Control Testing
To assure you are getting accurate and reliable results,
TRUE METRIX oers two kinds of quality Control
Tests. ese tests let you know
that your System is working properly
and your testing technique is good.
Automatic Self-Test
An Automatic Self-Test is performed
by the meter each time a test strip is
inserted correctly into the Test Port.
Insert a test strip into the Test Port.
e meter is working properly if:
~ the full Display appears, then
~ the time appears in the upper
part of the Display, and then,
~ the Drop Symbol begins to blink.
If an error message appears in the Display,
the meter will not perform a test.
See Troubleshooting or call 1-800-803-6025.
Caution! If any segments are missing in the Display
when meter is first turned on, do not use the
meter for testing. Call 1-800-803-6025.
Contact
Blocks
Face Up
Full Display
Drop Symbol
Error Message

16
Control Test
We recommend performing Control Tests for practice
before using your meter for the rst time to test your
blood.
Control Tests should be performed:
• For practice to ensure your testing technique is good,
• Occasionally as you use a vial of test strips,
• When opening a new vial of test strips,
• If results seem unusually high or low,
• If a vial has been le opened or exposed to extreme
heat or cold, or humidity,
• Whenever a check on performance of the system is
needed,
• If meter damage is suspected (meter was dropped,
crushed, wet, etc.)
Note: It is important to perform Control Tests with more
than one level of control solution. ree levels of
TRUE METRIX Control Solution are available for
Control Tests. Call 1-800-803-6025 for assistance in
obtaining dierent levels of control solution.
Caution! Ranges printed on test strip vial label are for
Control Test results only and are not suggested
levels for your blood glucose. Do not drink
control solution.
How to Test Control Solution
Use ONLY TRUE METRIX Control Solution with
the TRUE METRIX Self Monitoring Meter and Test
Strips.
1. Check dates on control solution
label and test strip vial label. Do not
use control solution or test strips
if expiration dates have passed.
(Control solution - 3 months aer
rst opening or date next to EXP on
label; test strips - 4 months aer
rst opening or date next to EXP on
labels.) Discard expired products
and use new products.
2. Allow control solution, vial of test strips and
meter to adjust to room temperature. Write date
rst opened on both control solution bottle label
and test strip vial label when using for the rst
time.
3. Gently swirl or invert control solution bottle to
mix.
DO NOT SHAKE!
4. Remove one test strip from vial. Close test strip
vial immediately. Use test strip quickly aer
removal from vial.
17
May 30, 2015

18
5. Insert test strip into Test Port.
Meter turns on.
Note:
If test strip has been out of the vial
too long before testing, an error
message appears upon insertion
of the test strip into the meter.
Release and discard old test strip.
Use new test strip for testing.
6. Wait until Drop Symbol appears in
Display. Keep test strip in meter until
testing is nished.
Note: If test strip is removed before testing is finished, an
error message appears. Release and discard old test
strip. Use new test strip for testing.
7. With cap removed, turn control
solution bottle upside down.
Squeeze one drop of control
solution onto a clean tissue. Wipe
o bottle tip and discard tissue.
8. Gently squeeze a drop of control
solution onto a small piece of
unused aluminum foil or clear
plastic wrap. Dispose aer use.
LB0010
9 JUNE 2009
Drop Symbol
Contact Blocks
Face Up
Discard Control
Solution Drop on
Tissue
Table of contents


