4
5. MEASURING BLOOD PRESSURE
Several factors play a role in measuring blood pressure. For the most accurate values, you
must follow the following principles.
1. Before taking a measurement, be completely at rest for 5–10 minutes. If you have been
performing heavy manual work before taking the reading, rest for an hour to an hour and
a half.
2. Do not smoke, drink caeinated beverages or alcoholic beverages for at least half an hour
before the measurement and limit the intake of foods that could cause an increase or
decrease in blood pressure.
3. If you feel a strong urge to urinate, do not take a reading but empty your bladder rst. A full
bladder can cause an increase in blood pressure of up to 10 mmHg.
4. Take measurements on your bare arm while sitting upright and comfortably.
5. Rest the cued arm loosely on a at surface. The cu should be at the same height as
the heart.
6. Always measure on the same arm – ideally on the left. However, if the pressure on your
right arm is higher, give preference to measurements on this side.
7. Whilst taking a reading, even minor activities can increase the pressure by 5 mmHg.There-
fore, do not move or talk whilst taking a measurement.
8. Repeat the measurement at least twice with an interval of at least one minute between
each reading so as to release the pressure in the vessels completely.
9. Take measurements regularly and at the same time. Only regular measurements at the
same time of day over a long period of time allow for a meaningful assessment of blood
pressure values.
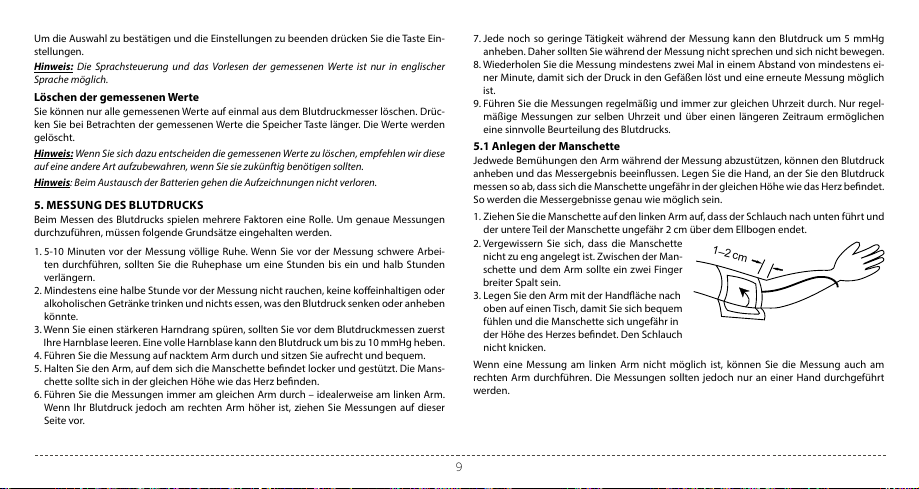
5.1 Attaching the cu
Any eort to support your arm whilst taking a reading can increase pressure and distort mea-
surement results. Hold the arm on which you are taking a reading so that the cu is roughly
at heart level. This will take the most accurate measurement.
1. Put the cu onto your left arm so that the hose faces downwards and the lower part of the
cu so that it is approximately 1–2 cm above the elbow.
2. Make sure that the cu is not tightened
too tightly. You should be able to tuck two
ngers between the cu and arm.
3. Place your hand on the table with your
palms pointed upwards so that you feel
comfortable with the cu roughly at heart
level. Do not bend the hose.
1–2 cm
If it is not possible to use your left arm to take a reading, you can also take measurements
on your right arm. However, the reading should always be taken on the same arm.
5.2 Taking measurements
1. Choose the user who you want to take a reading for.
2. Press the Power button to enter measurement mode.
3. After selecting the user, the cu will automatically start to inate, and the measurement
process will begin.
4. If the cu is poorly attached, the symbol is displayed. Make sure that the cu is attached
properly and try taking a reading again from the beginning.
5. If the symbol for Motion during measurement is displayed whilst taking a reading, it means
that you have moved your arm or body during the process. Take o your cu and wait
2–3 minutes. Then take a new reading.
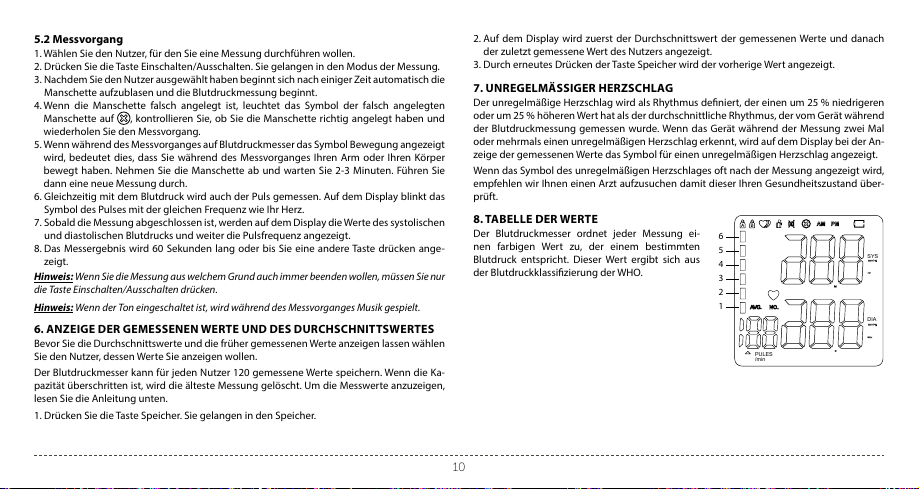
6. Whilst taking a blood pressure reading, the heart rate is also measured. The heart symbol
ashes on the display at the same heart rate as the heart.
7. Once the measurement is complete, the display will show the values of systolic and diasto-
lic blood pressure, as well as the heart rate value.
8. The measurement result remains displayed for 60 seconds or until you press any button.
Note: If you want to stop the measurement for any reason, just press the Power button.
Note: If your sound is turned on, music will play during the measurement.