TSCI Fluido Irrigation User manual

)OXLGR
0RGXODU6\VWHP
$LU*XDUG
7KH6XUJLFDO&RPSDQ\
,QWHUQDWLRQDO%9
)OXLGR
,UULJDWLRQ
)OXLG:DUPLQJ
(1
8VHU0DQXDO


INT/R347-EN/0-01/11
www.fluidoirrigation.nl
User Manual
Fluido®Irrigation Fluid Warmer
Article number: 651230-I


2
Foreword ....................................................................................................3
Disclaimer ..................................................................................................3
1Temperature Management..................................................................4
2Fluid Warming .....................................................................................4
3Fluido
Irrigation Fluid Warmer...........................................................5
4Description of the Fluido®Irrigation ...................................................6
4.1The Fluido®Irrigation Fluid Warmer ............................................6
4.2The Control Panel ......................................................................6
4.2.1Control Panel Symbols........................................................7
4.2.2Control thermometer ...........................................................8
4.3Fluido®Irrigation Disposable Sets and Accessories....................9
4.3.1Description of cassette......................................................10
5Preparing the Fluido®Irrigation for use............................................11
6User instructions...............................................................................12
6.1Connection to power supply.....................................................12
6.2Switching on.............................................................................12
6.3Positioning the Fluido®Irrigation URO Set ................................13
6.4Priming Fluido®Irrigation URO Set ...........................................13
6.4.1Priming the Fluido®Irrigation URO Set ..............................13
6.4.2Priming the Fluido®Irrigation URO Patient line ..................14
6.5Start Warming ..........................................................................15
6.6De-aeration ..............................................................................15
6.7Stop warming ...........................................................................16
6.8Post-operative options .............................................................16
6.8.1Post-operative non-heated irrigation .................................16
6.8.2Fluido®Irrigation URO Spike Set .......................................17
6.8.3Fluido®Irrigation URO Female cap ....................................17
7Extra options .....................................................................................18
8Problems and solutions....................................................................19
9Symbols and Warnings & Precautions ............................................22
9.1Symbols ...................................................................................22
9.2Warnings & precautions ...........................................................23
10Maintenance.......................................................................................25
11Storage and cleaning ........................................................................25
12Warranty.............................................................................................25
13Specifications ....................................................................................26

3
Foreword
Congratulations on your purchase of the Fluido®Irrigation Fluid Warmer.
This device is developed in accordance with the latest safety standards.
We wish you every success in preventing and controlling hypothermia and
we are sure that the Fluido®Irrigation Fluid Warmer can help you to do so.
Please read this manual carefully before working with the Fluido®Irrigation.
If you identify any improvements and/or discover any other applications
during the use of the Fluido®Irrigation products, please let us know.
TSCI (The Surgical Company International B.V.)
Disclaimer
The manufacturer reserves all rights. No part of this document may be
reproduced or published, electronically, mechanically, in print, photographic
print, on microfilm or by any other means whatsoever, without the explicit
consent of manufacturer.
The content of this document has been compiled with the greatest possible
care and this information can be regarded as reliable. Nevertheless, the
manufacturer reserves the right to make alterations and improvements to
the device. These may not yet have been described in the instructions. The
manufacturer cannot be held liable for the final outcome of the patients’
treatment.
This document contains proprietary information that may not be disclosed to
third parties. This document may not be used without the explicit written
consent of the manufacturer.
These instructions are intended for personnel authorised to work with the
medical device described in this manual.

4
1 Temperature Management
Hypothermia, an abnormal drop in body temperature, is a threat to human
life. Hospital patients in particular run serious risks if their body temperature
falls below 36 ºC. The risk of hypothermia is particularly high at times when
they are vulnerable, such as pre-, per-, and post-surgical procedures.
Factors that can contribute to hypothermia include the duration of the
surgical procedure, the location of the wound, the amount of blood loss, the
surface area of the wound, the environmental temperature and the
anaesthetic technique.
2 Fluid Warming
The use of irrigation fluids can cause hypothermia. If inadequately warmed
the fluids can exacerbate drops in temperature. Many of these operations
are carried out under regional anaesthesia, which has been shown to
attenuate the thermogenic response to hypothermia, it showed a clinically
significant, adverse, hemodynamic response in those patients who were not
warmed aggressively. Hypothermia can be reduced by the use of irrigation
fluid that has been warmed.
5
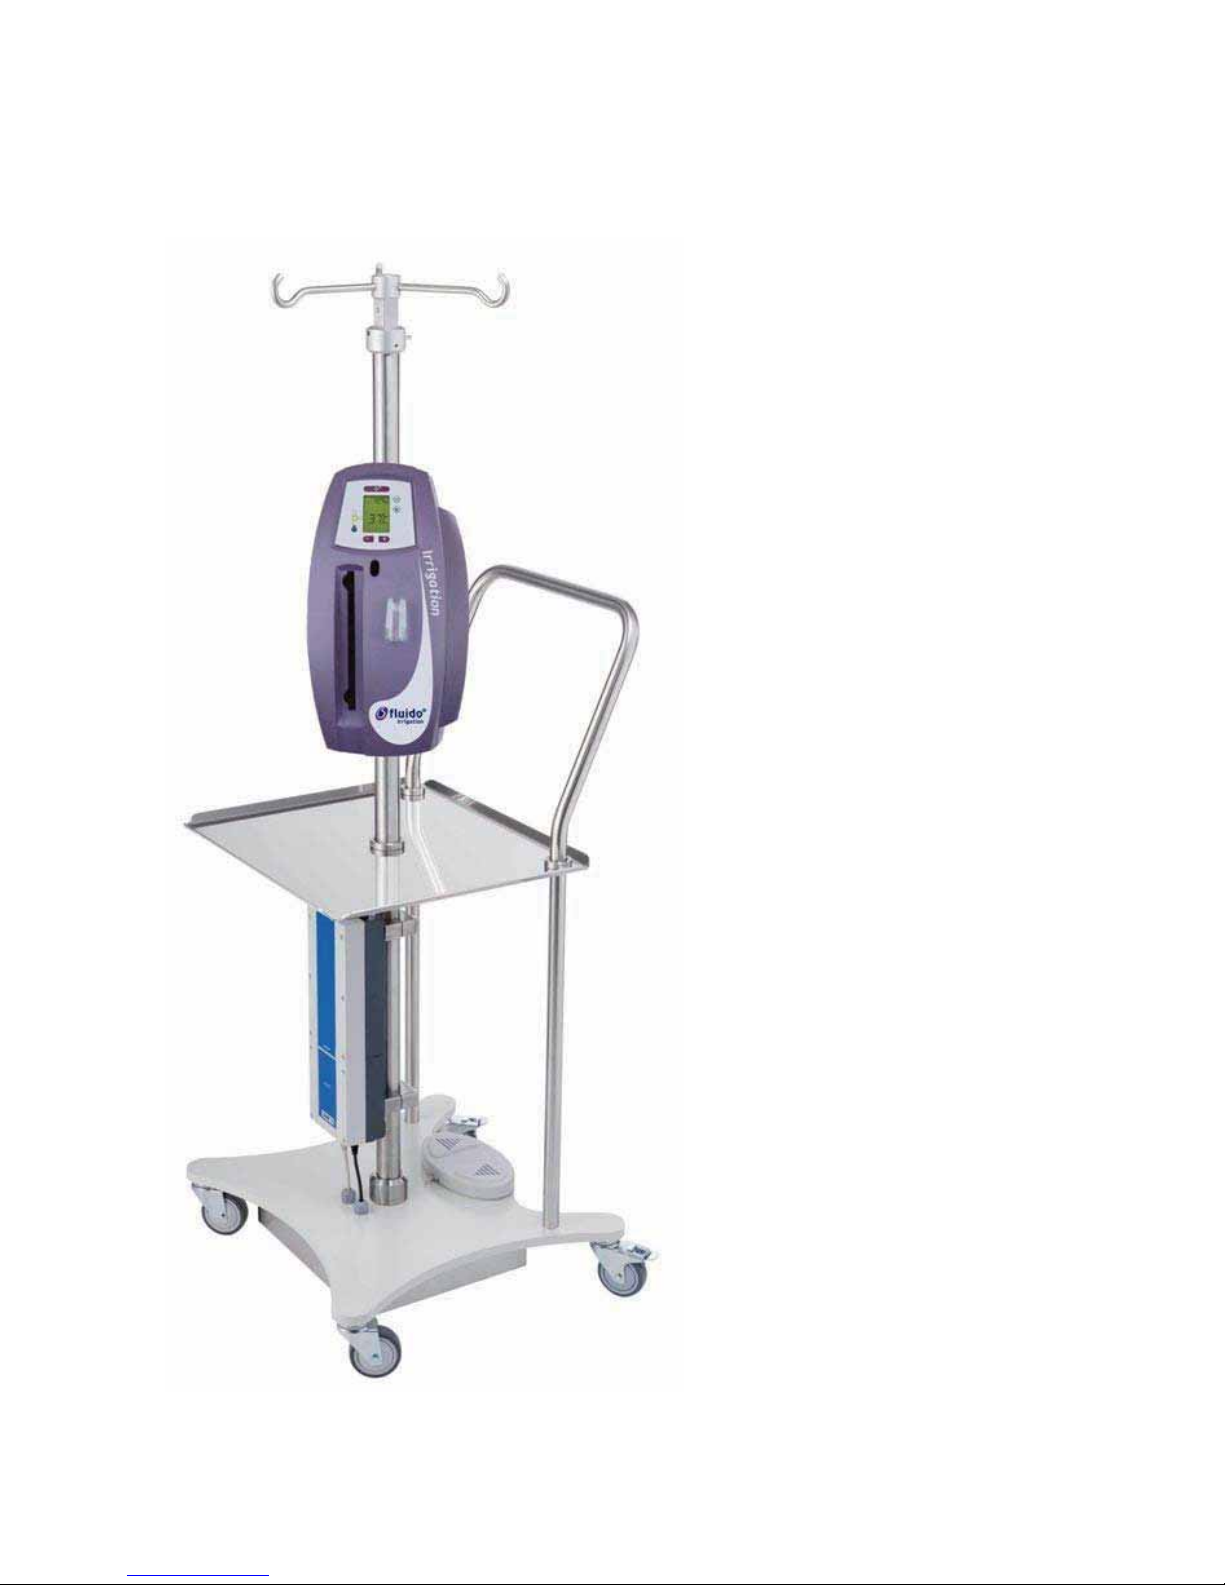
3 Fluido
Irrigation Fluid Warmer
The Fluido®Irrigation makes it possible to warm fluids, fast safe and easy.
Fluido
®
Irrigation
Fluid Warmer
(651230-I)
Fluido
®
PowerLifter II
(I-U02237)

6
4 Description of the Fluido®Irrigation
The Fluido®Irrigation (651230-I) is a fluid warmer that is easy to operate.
Five lamps ensure rapid fluid warming. The Fluido®Irrigation comes with
disposable sets for irrigation (see Chapter 4.3).
4.1 The Fluido®Irrigation Fluid Warmer
4.2 The Control Panel
The control panel is easy to use and the display shows all required
information. The control thermometer at the left side indicates continuously
whether the end of the line temperature equals the set temperature1.
In case of a malfunction, an audible alarm sounds and the control
thermometer turns completely red (see Chapter 4.2.2).
1The end temperature cannot be guaranteed when an extension line is being used. Please pay attention to
the margins mentioned in the Technical Data Sheet, Chapter 13.
Switch button: Flow indicator & volume meter
Stand-by / Start button
Suppress Audible alarm (3min.)
Control thermometer
Temperature setting
Control panel
Eject button
Slot for the Fluido®Irrigation disposable sets
7
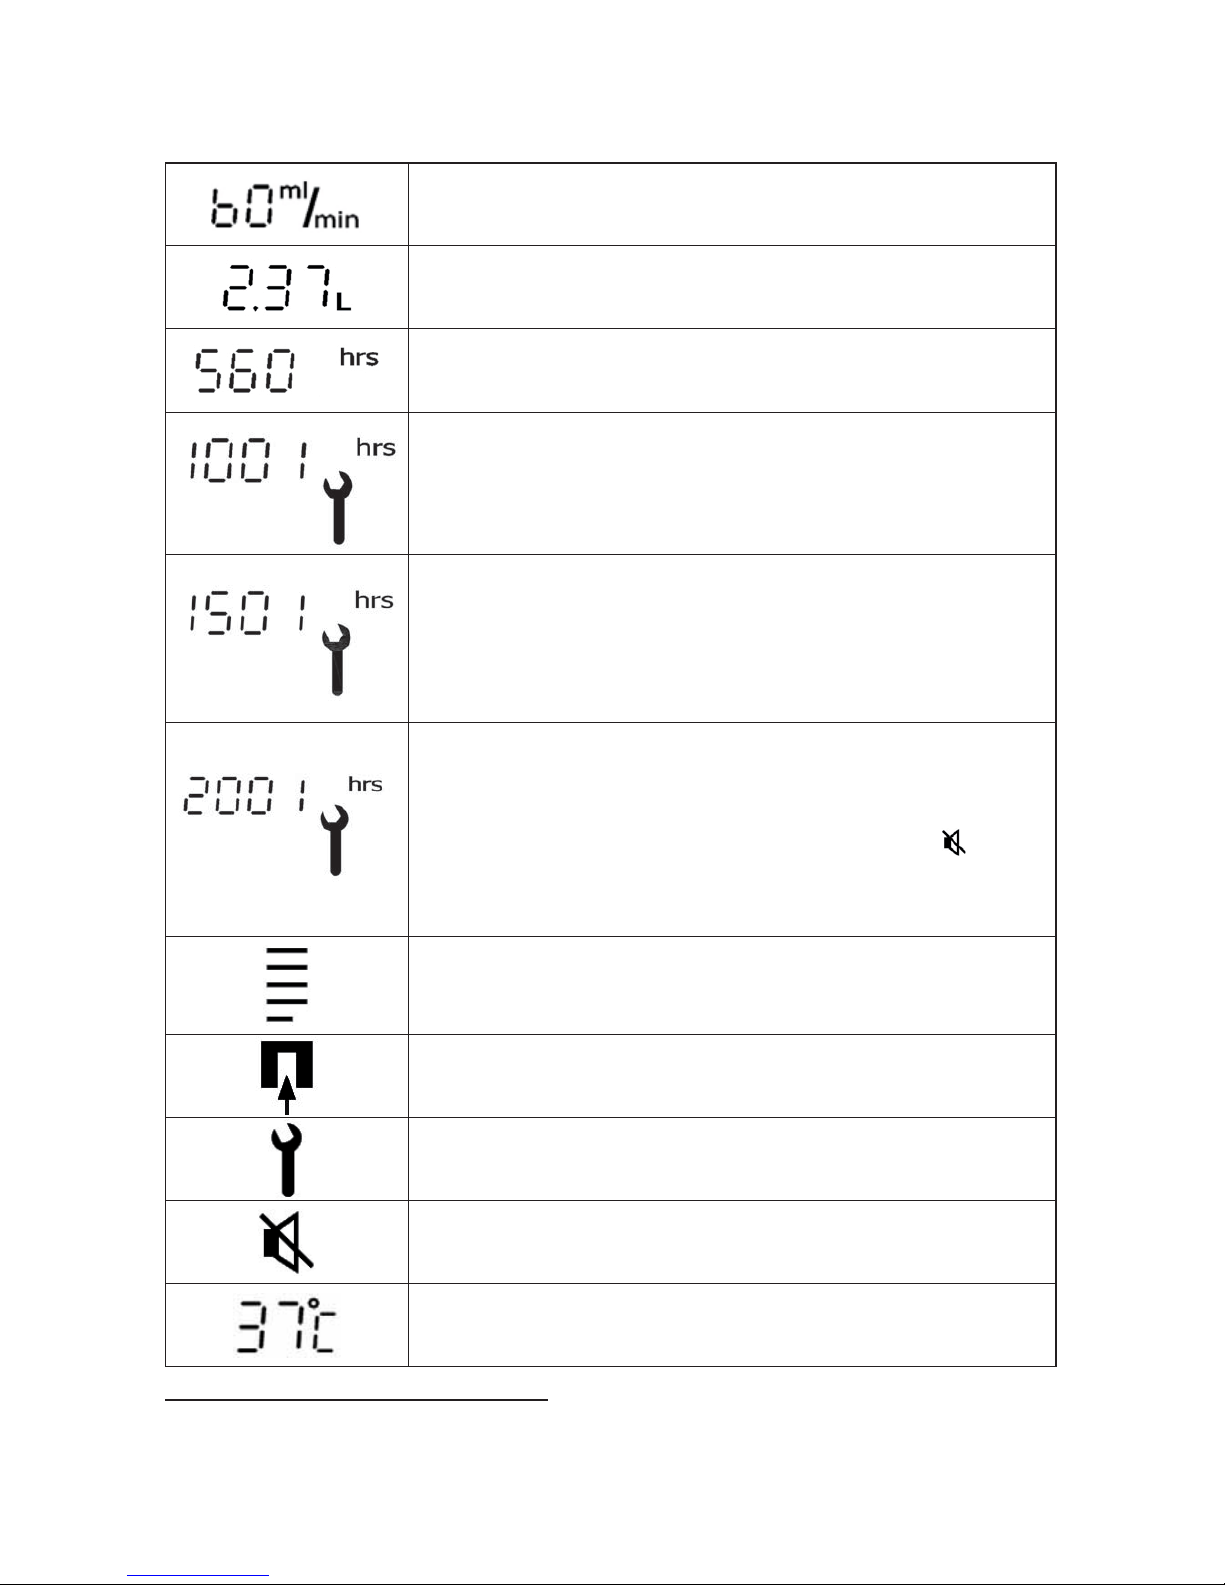
4.2.1 Control Panel Symbols
Flow in ml per minute, increments of 1ml (0-20), 5ml
(20-150) and 10ml (as of 150)
Total volume in litres
Total hours that the Fluido®Irrigation has been in
operation
Displayed between 1000 and 1500 operating hours
for 5 sec. after switching ON the Fluido®Irrigation. It
is still possible to operate the Fluido®Irrigation but
maintenance must take place2.
Displayed between 1500 and 2000 operating hours
continuously after switching ON the
Fluido®Irrigation. It is still possible to operate the
Fluido®Irrigation but maintenance must take place3.
Displayed after 2000 operating hours continuously
after switching ON the Fluido®Irrigation, joined by a
continuous audible beep. This beep can be
suppressed for 3 minutes after pressing the
button. It is still possible to operate the
Fluido®Irrigation but maintenance must take place3.
Status of the five lamps. A flashing bar shows that
the relevant lamp needs replacing
Insert the cassette of the Fluido®Irrigation
disposable set into the Fluido®Irrigation
There is a malfunction. Reset the Fluido®Irrigation or
contact your service centre
Audible alarm suppressed
Set temperature at the end of the line
2Maintenance can only be done by a trained/certified technician of your local supplier or the manufacturer.
3Please pay attention to the margins mentioned in the Chapter 13.

8
Remove the cassette from the Fluido®Irrigation Fluid
Warmer
Tilt sensor alarm
Alarm code
4.2.2 Control thermometer
The control thermometer is not illuminated.
There is no warming.
The lower section is green.
The end temperature is more than 1º C lower than
the set temperature.
The lower and middle sections are green.
The end temperature equals the set temperature3.
The top section is red.
The incoming temperature or the output
temperature is higher than the set temperature.
An alarm signal sounds.
The entire control thermometer is red.
There is a malfunction. An alarm signal sounds
and a spanner symbol appears (see Chapter 8).
9
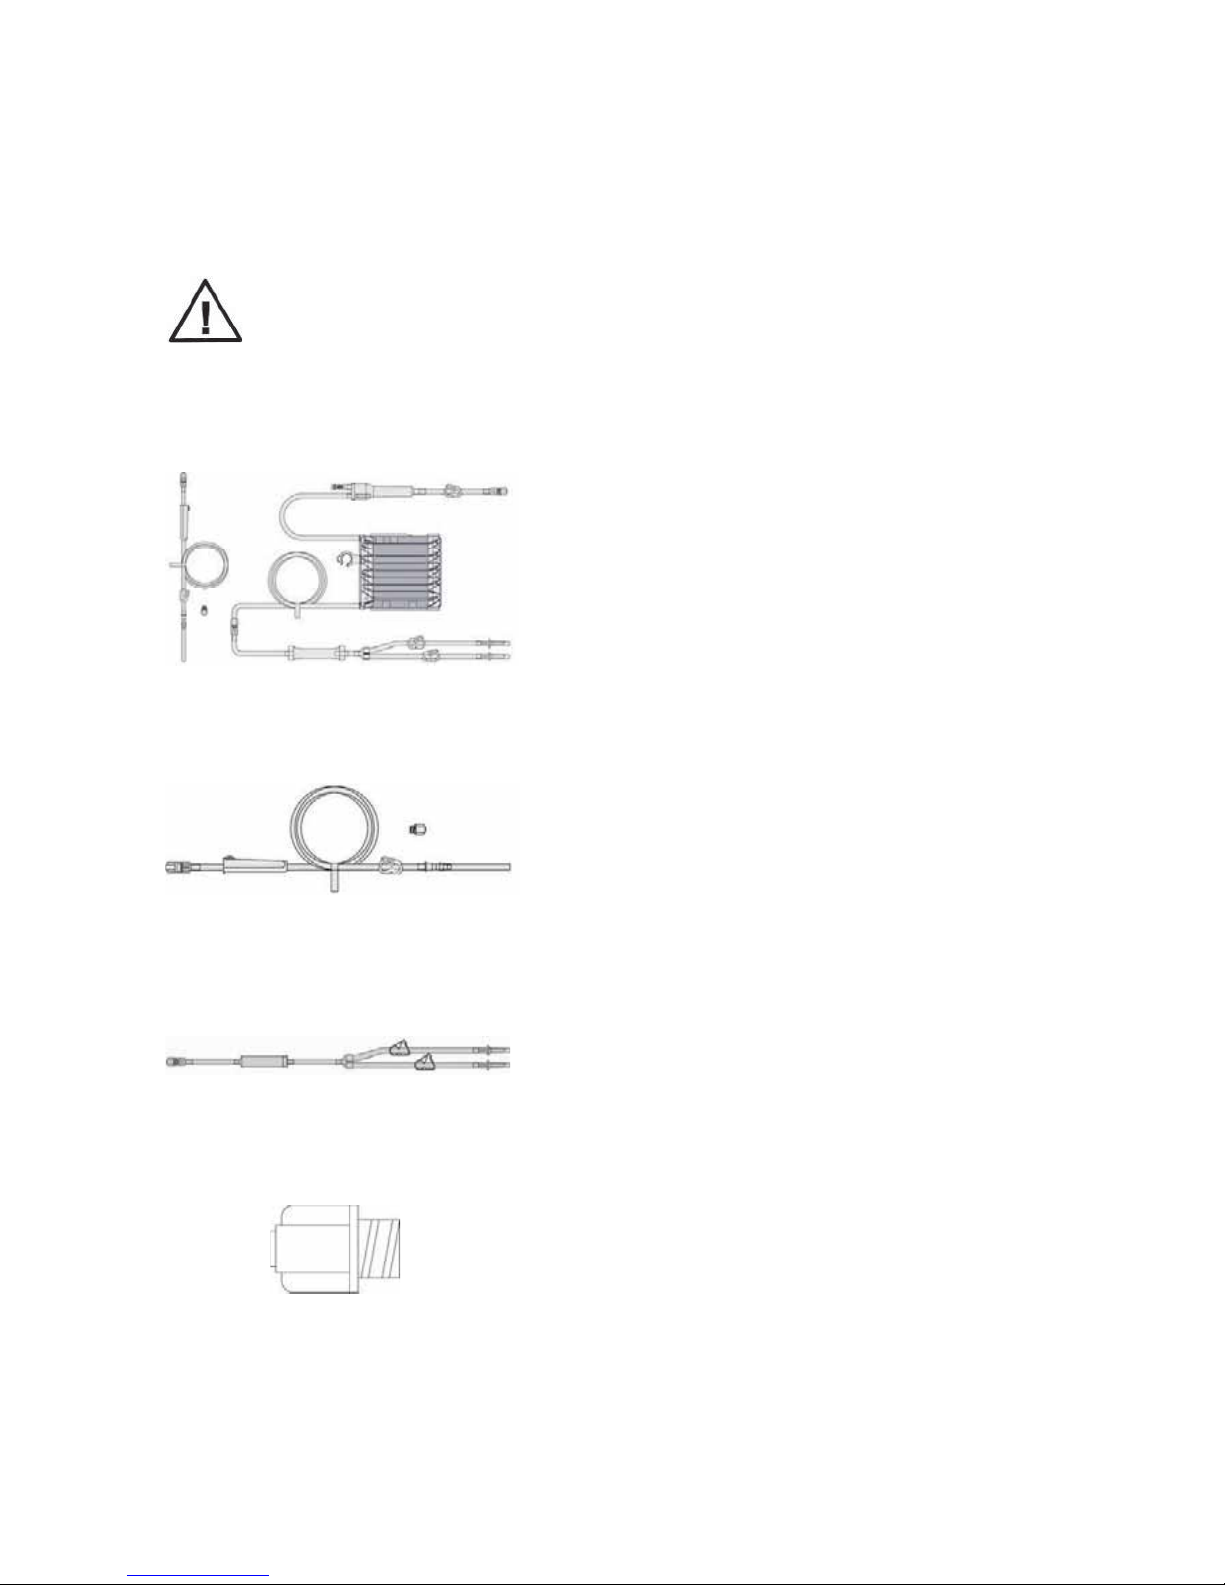
4.3 Fluido®Irrigation Disposable Sets and Accessories
The Fluido®Irrigation shall only be used with Fluido®Irrigation disposable
sets. A Fluido®Irrigation disposable set consists of a cassette with the
accompanying tubing.
Pressure must not exceed 300 mmHg. Usage of a (manually
operated) pressure device without a pressure indicator is NOT
allowed!
Fluido
®
Irrigation URO Set
This is a Urology set, which is suitable for
Urology. Its capacity is 680 ml/min
(normothermic flow). It is a complete set,
including a separate patient line and a
Luer Lock bore cap. The de-aeration
chamber contains a backflow valve. The
priming volume is 220 ml. This URO Set
shall only be used in combination with the
Fluido®Irrigation URO Patient Line, URO
Spike Set and URO Female Cap.
Article number: 670800-B
Fluido®Irrigation URO Patient Line
This is a patient line with extra Luer Lock
cap that shall only be used in combination
with the Fluido®Irrigation URO Set and/or
URO Spike Set
Article number: 680801-B
Fluido®Irrigation URO Spike Set
This is a URO Spike Set; a drip chamber
with spikes that shall only be used in
combination with the Fluido®Irrigation
URO Patient Line.
Article number: 680803-B
Fluido®Irrigation URO Female Cap
This is a bore cap that shall only be used
in combination with the Fluido®Irrigation
URO Set.
Article number: 680804
10
4.3.1 Description of cassette
The core of the heating cassette consists of ten channels through which
the fluid flows. Two partitions in the bends ensure that the fluid is mixed
well. The flow and temperature are measured at four measuring points.
The front of the Fluido®Irrigation disposable cassette is transparent. The
back is made of black plastic.
Use
The disposable cassette is sterile packed. Please check the tube
connections before use. The disposable cassette must be undamaged and
clean and can be used for a maximum of 24 hours.
In order to avoid damaging the Fluido®Irrigation, do not
use damaged cassettes.
Pressure must not exceed 300 mmHg. Usage of a
(manually operated) pressure device without a pressure
indicator is NOT allowed!

11
5 Preparing the Fluido®Irrigation for use
Before using the Fluido®Irrigation, it should be attached
to a (Fluido®) IV-pole or Fluido®Powerlifter II
The Fluido®Irrigation should hang upright on the (Fluido®)
IV-pole or Fluido®Powerlifter II. Any variation from this
must not exceed an angle of 2.5º forward or backward.
Ensure that the Fluido®Irrigation is not damaged and that
the ventilation grids (on the side and bottom of the
Fluido®Irrigation) are not covered.
Plug the unit into the main supply. The Fluido®Irrigation
will first perform a self-test*. When the display unit is
illuminated green and the light from the stand-by button
turns orange, the Fluido®Irrigation is ready for use.
* If a cassette is inside the Fluido®Irrigation, the test is automatically postponed until
after removal of the cassette!
If required, a safety test in accordance with the hospital protocol will follow.
To ensure that the Fluido®Irrigation is stable, the wheelbase of the IV-pole
must be in a certain ratio to the height of the Fluido®Irrigation clamp. See
below graph for use with a 4 or 5 wheel support IV-pole.

12
6 User instructions
6.1 Connection to power supply
a b c d
a. Plug the unit into an earthed socket.
b. The Fluido®Irrigation will now perform a four-second self-test,
which includes a light flash.
c. The display panel will illuminate green and the light next to the
stand-by button will turn orange.
d. The Fluido®Irrigation is now in Stand-by.
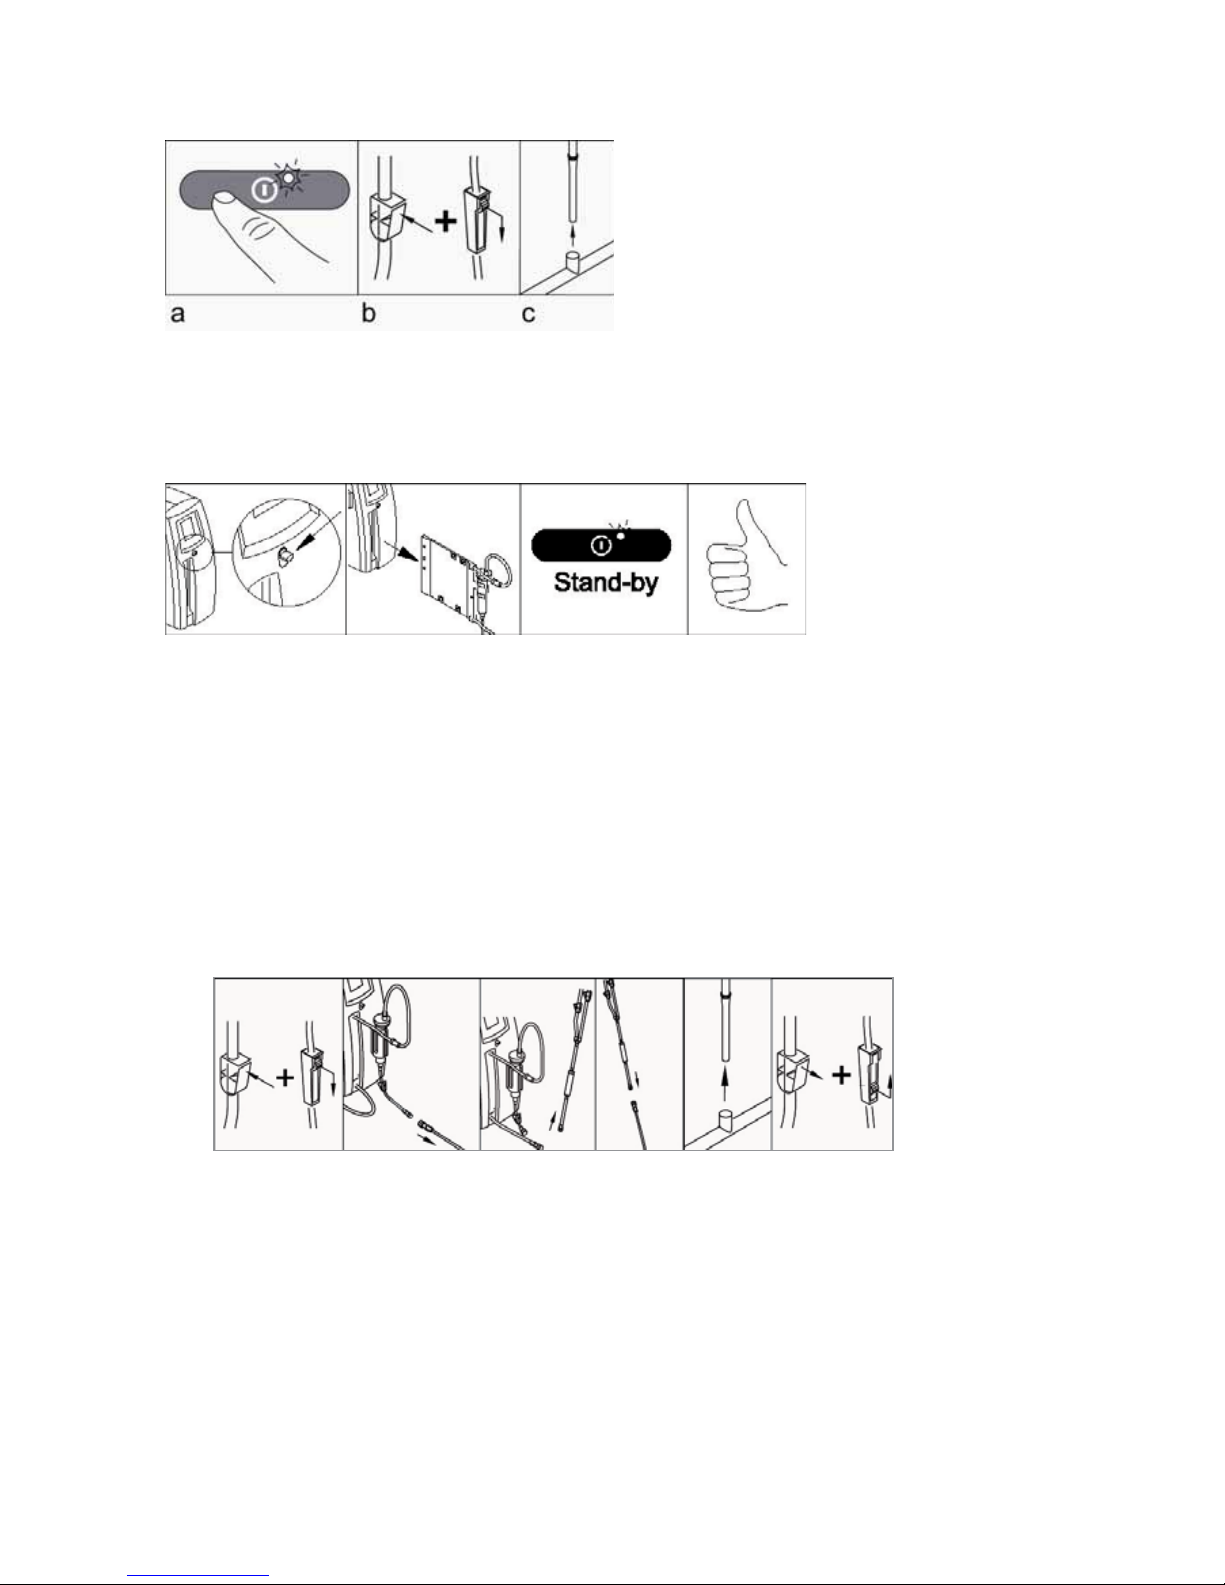
6.2 Switching on
a b c
a. Switch the Fluido®Irrigation on by pressing the Stand-by button.
b. A short audible signal will sound. The display will briefly show all
symbols and the control thermometer will illuminate green and red
for a moment. The light at the side of the Stand-by button will then
turn green and the following symbol will appear on the display
panel: .
c. The Fluido®Irrigation is now ready for use.
If the Fluido®Irrigation is not in use for 15 minutes, it will automatically
switch to Stand-by and the light at the side of the Stand-by button will turn
back to orange.

13
6.3 Positioning the Fluido®Irrigation URO Set
a b c d e
a. Inspect the package to make sure that it is undamaged. Take a
Fluido®Irrigation URO Set out of the packaging.
b. Hold the disposable cassette by the clamp next to the drip
chamber, with the clamp at the top.
c. Insert the disposable cassette vertically into the Fluido®Irrigation,
until you hear a ‘click’.
d. The display panel will now show the temperature and flow.
e. The Fluido®Irrigation URO Set is now positioned.
6.4 Priming Fluido®Irrigation URO Set
6.4.1 Priming the Fluido®Irrigation URO Set
a b c d e f g
a. Close all the clamps on the Fluido®Irrigation URO Set.
b. Spike the drip fluid container.
c. Hold the drip chamber of the giving set upside down.
d. Open all the clamps except the one on the unused spike.
e. Allow the drip chamber to half-fill with fluid.
f. Turn the drip chamber upright again.
g. Close the roller clamp.

14
h. Turn the de-aeration chamber upside down.
i. Open the roller clamp.
j. Fill the de-aeration chamber full with fluid.
k. Turn the de-aeration chamber upright again.
l. De-aerate the rest of the line.
m. Close the roller clamp.
n. Place the de-aeration chamber in the holder of the
Fluido®Irrigation.
o. The Fluido®Irrigation URO Set is now primed.
6.4.2 Priming the Fluido®Irrigation URO Patient line
a. Take the Fluido®Irrigation URO Patient Line out of the packaging
and place it in the sterile field.
b. Close the roller clamp of the Fluido®Irrigation URO Patient Line.
c. Remove the protective caps from the disposable cassette and the
URO Patient Line and connect the two.
d e f g
d. Open the roller clamps from top to operating element.
e. De-aerate the rest of the Fluido®Irrigation URO Patient Line.
f. Close the roller clamp.
g. The Fluido®Irrigation URO Set and URO Patient Line are now
primed.

15
6.5 Start Warming
The Fluido®Irrigation is switched on and a Fluido®Irrigation URO Set has
been positioned. The initial temperature is shown on the display panel. The
default temperature setting is 37º C.
Pressure must not exceed 300 mmHg. Usage of a (manually
operated) pressure device without a pressure indicator is NOT
allowed!
a. Remove the protective cap and connect the system to the
operating element.
b. Regulate the flow with the roller clamp.
c. Set the required temperature using the + and - buttons.
d. The Fluido®Irrigation warms the fluid. The display indicates the
flow per minute and the control thermometer will be illuminated
green, including the arrow.
e. The fluid at the end of the Fluido®Irrigation URO Patient Line is the
correct (set) temperature.
6.6 De-aeration
a. De -aeration shall take place when the de-aeration chamber is filled
with one-quarter of air.
b. Twist off the cap of the de-aeration chamber.
c. Twist a syringe with Luer Lock onto the opening of the de-aeration
chamber.
d. Suck the air from the de-aeration chamber.
e. Fill the de-aeration chamber full with fluid.
f. Remove the syringe from the de-aeration chamber.
g. Replace the cap on the de-aeration chamber.
h. The de-aeration chamber is now properly de-aerated.
16
6.7 Stop warming
a. First press the stand-by button (the fan will continue for another 2
minutes).
b. Close the clamps.
c. Disconnect the working element.
d e f g
d. Press the eject button. The disposable cassette will eject.
e. Remove the disposable cassette.
f. An orange light will come on next to the stand-by button.
g. The Fluido®Irrigation is now in Stand-by and ready for re-use.
6.8 Post-operative options
6.8.1 Post-operative non-heated irrigation
a b c d e f
a. Close all clamps
b. Disconnect URO Patient Line from the Fluido®Irrigation URO Set
c. Disconnect the spike set from the Fluido®Irrigation URO Set
d. Connect the spike set of the URO Set to the URO Patient Line.
e. Remove the URO Patient Line from the working element and
connect it to a urinary catheter
f. Open the clamps to start irrigating

17
6.8.2 Fluido®Irrigation URO Spike Set
a. Take the Fluido®Irrigation URO Spike Set out of the packaging and
slide the clamps down to the center of Y section.
b. Close the clamps of the Fluido®Irrigation URO Spike Set.
c. Spike the drip fluid container.
d. Hold the drip chamber of the giving set upside down.
e. Open all the clamps except the one on the unused spike.
f. Allow the drip chamber to half-fill with fluid.
g. Turn the drip chamber upright again.
h. Close the clamp.
i. Connect the URO Spike Set to the URO Patient Line
j. Open the clamps.
k. De-aerate the rest of the patient line.
l. Close the roller clamp.
m. The Fluido®Irrigation URO Spike Set is primed.
6.8.3 Fluido®Irrigation URO Female cap
The Fluido®Irrigation URO Set includes an extra URO Female Cap. The
URO Female Cap is also available as a separate article.
The URO Female Cap can be connected to the Fluido®Irrigation URO Set.
a b c d e f g h
Table of contents
Popular Medical Equipment manuals by other brands


Gradian
Gradian Universal Anaesthesia Machine Maintenance manual

Covidien
Covidien ForceTriad Service manual

Basko Healthcare
Basko Healthcare Titan Instructions for use

Otto Bock
Otto Bock AxonArm Hybrid 12K500 Instructions for use

Siemens
Siemens MOBILETT XP Installation and startup

Gima
Gima V6k5c user manual


