Body Clock Profile TENS User manual

Body Clock Health Care Limited
108 George Lane, South Woodford, London E18 1AD
Tel: 020 8532 9595 Fax: 020 8532 9551
PPrrooffiilleeTTEENNSS
instructions for use
For USA only:
Federal law restricts this device to sale use by or on
the order of a practitioner so licensed by the state.
Medical Devices Directive 93/42/EEC

Profile TENS - Technical Data
Equipment type: Dual channel digital TENS
Output voltage: 0 - 50v peak to peak adjustable in levels 0 - 20 (through a
500 Ohm load)
Output Intensity: 0 -100 mA peak to peak adjustable in level 0 - 20 (measured
across a 500 Ohm load) Level 0 is Ov and has no output
Frequency: 50 selectable frequencies - adjustable up or down 1- 200Hz
i.e.1,2,3,4,5,6,7,8,9,10,11,12,13,14,15,16,17,18,19,20
22,24,26,28,30,35,40,45,50,55,60,65,70,75,80,85,90,95
100,105,110,120,130,140,150,160,170,180,190,200Hz
Pulse width: 10 selectable pulse width settings adjustable up or down
25,50,75,100,125,150,175,200,225,and 250 microseconds
Output waveform: Symmetrical bi- phasic rectangular
Output Modes: 5 selectable modes
(a) Constant
(b) Burst 1 - Fixed 1 burst per 2 seconds. Each burst
consists of 80 pulses. Pulse width is adjustable.
(c) Fixed 2 bursts per second. Each burst consists of 7
pulses. Pulse width is adjustable.
(d) Width Modulation - Pulse width modulates between
25-250µs, ramp up for 8 seconds and ramp down
for 8 seconds. Frequency is adjustable.
Guarantee
Your TENS Machine is guaranteed for a period of 5 years against
manufacturer ‘s defects. Please record purchase details in the space
provided below for your record purposes
The guarantee does not include leads, electrodes or battery
Date of Purchase.............. Invoice Number..............
1.

7. Pulse width control. This two way button enables you to adjust the
pulse width upwards or downwards as desired between 25 - 250
microseconds.
8. Mode selector button.
9. Timer. This unit has 7 selectable settings
(i) continuous
When the unit is first used (or after removal of batteries unless you have
activated the locking facility) it will be automatically in constant time.
This means that the unit will work continuously until it is switched off by
the user. In this setting there is no time display on the screen.
(ii) If a specific time is selected, time will count down on the screen
as the unit is used. You simply press the timer button to select the
time in minutes which you require. The unit will shut down automati-
cally after the timer has completed counting.
10. LCD display.
9.
(e) Rate Modulation - Frequency modulates
decreasing from 100Hz to 20Hz in a period of 8
seconds. The frequency then increases from 20Hz
to 100Hz in the next 8 seconds. This pattern is then
repeated. Pulse width is adjustable.
Timer: 7 selectable settings
(a) Continuous (b) 10 minutes (c) 15 minutes (d) 20 minutes
(e) 30 minutes (f) 45 minutes (g) 60 minutes
Output Jacks: CE touchproof
Battery: 2 x 1.5v AA batteries (Type LR6)
FUNCTIONS
Memory: Saves last mode attempt in memory i.e. the next time the
unit is used it will start again at the same setting as
before. This memory is erased when batteries are changed.
Mode Change: When the mode is changed, the intensity level will drop
back to zero. It will then gradually increase to the level set
by the user.
Display: In both modulation modes, output changes are visible on
the display.
Timer: Timer counts down in minutes when timer is on.
2.

Profile TENS key
1 and 2. Two way buttons to increase and decrease intensity for
channels 1 and 2. Pressing the UP arrow increases intensity. Pressing
the DOWN arrow decreases intensity. The selected level of intensity is
indicated on the LCD screen by means of black bars on the left of the
screen for Channel 1 and on the right for Channel 2.
3. This button switches the machine on and off. Press once to turn the
unit on. There will be no feeling from either channel at this time
because the intensity always starts at zero. Press this button again to
switch the machine off.
4. Jack plug sockets.
5. Frequency (pulse rate) control. This two way button enables you
to select the frequency you require between 1 - 200 Hz,
6. Protective cover closes over screen with belt clip on reverse for
ease of use.
Automatic: If intensity levels are 0 on both channels and if the unit has
Shutdown: not been in use for five minutes it will shut down automatically.
Low battery A flashing symbol indicates low battery.
Indicator
Load detector If an electrode should accidentally detach itself from the
body or the leadwire, the intensity will drop to zero.
PROFESSIONAL FUNCTIONS
Permanent time Memorises up to 99 hours used time. Display appears in
used memory: hours and minutes.
Number of Provided the unit is in use for five minutes with the intensity
times used: activated, the unit will memorise the number of times the
unit is used.
Lock/unlock Option to lock and unlock device settings. When batteries
Parameter are removed, parameters are retained provided the
facility: locking facility is activated
Specifications are nominal and subject to variation from listed values due to
normal production tolerances of +
- 10 %.
3.
Equipment providing a particular degree of protection
against electric shock particularly regarding allowable
leakage currents having an F type (floating) applied part.
Warning - refer to these
instructions and “Easy
Guide to TENS Pain Relief”
!
Classification
This unit is fully compliant with EEC Directive 93/42/EEC, classified as internally powered
Equipment Type BF. It is intended for continuous operation.
8.

7.
6. Protective casing
4.Jackplug/
Leadwire
sockets
3. On/Off control
5. Frequency
control
2. Intensity control for
channel 2
1. Intensity control
for channel 1
10. LCD
display
7.Pulse width
control
9.Timer
8.Mode
Profile TENS diagram INSTRUCTIONS FOR USE
The Profile TENS is a dual channel
TENS, supplied with leadwires, elec-
trodes, battery and carrying pouch.
1. Slide battery cover off by gently
pressing on the triangular ribbed area
with your thumb and move down-
wards. Insert batteries, ensuring the
positive and negative terminals are
correct as marked inside the
battery compartment. Ensure that
the ribbon is left underneath the
batteries as this will assist you when
the batteries need to be removed.
Replace battery cover.
2. Insert the leadwire pins into the
electrodes.
3. If using carbon rubber electrodes
spread on a small amount of gel and
affix with surgical tape (not supplied).
4. If using self-adhesive electrodes,
read instructions provided with the
4.
Output Waveform

electrodes and ensure your skin is free
from oil, talc, etc.
5. Position electrodes in accordance
with the guidelines illustrated in “An
easy guide to TENS Pain Relief” or
preferably with your medical adviser.
NB It is a safety feature of the Profile
TENS that the intensity controls will only
work if the leadwires are connected
with electrodes attached to the skin.
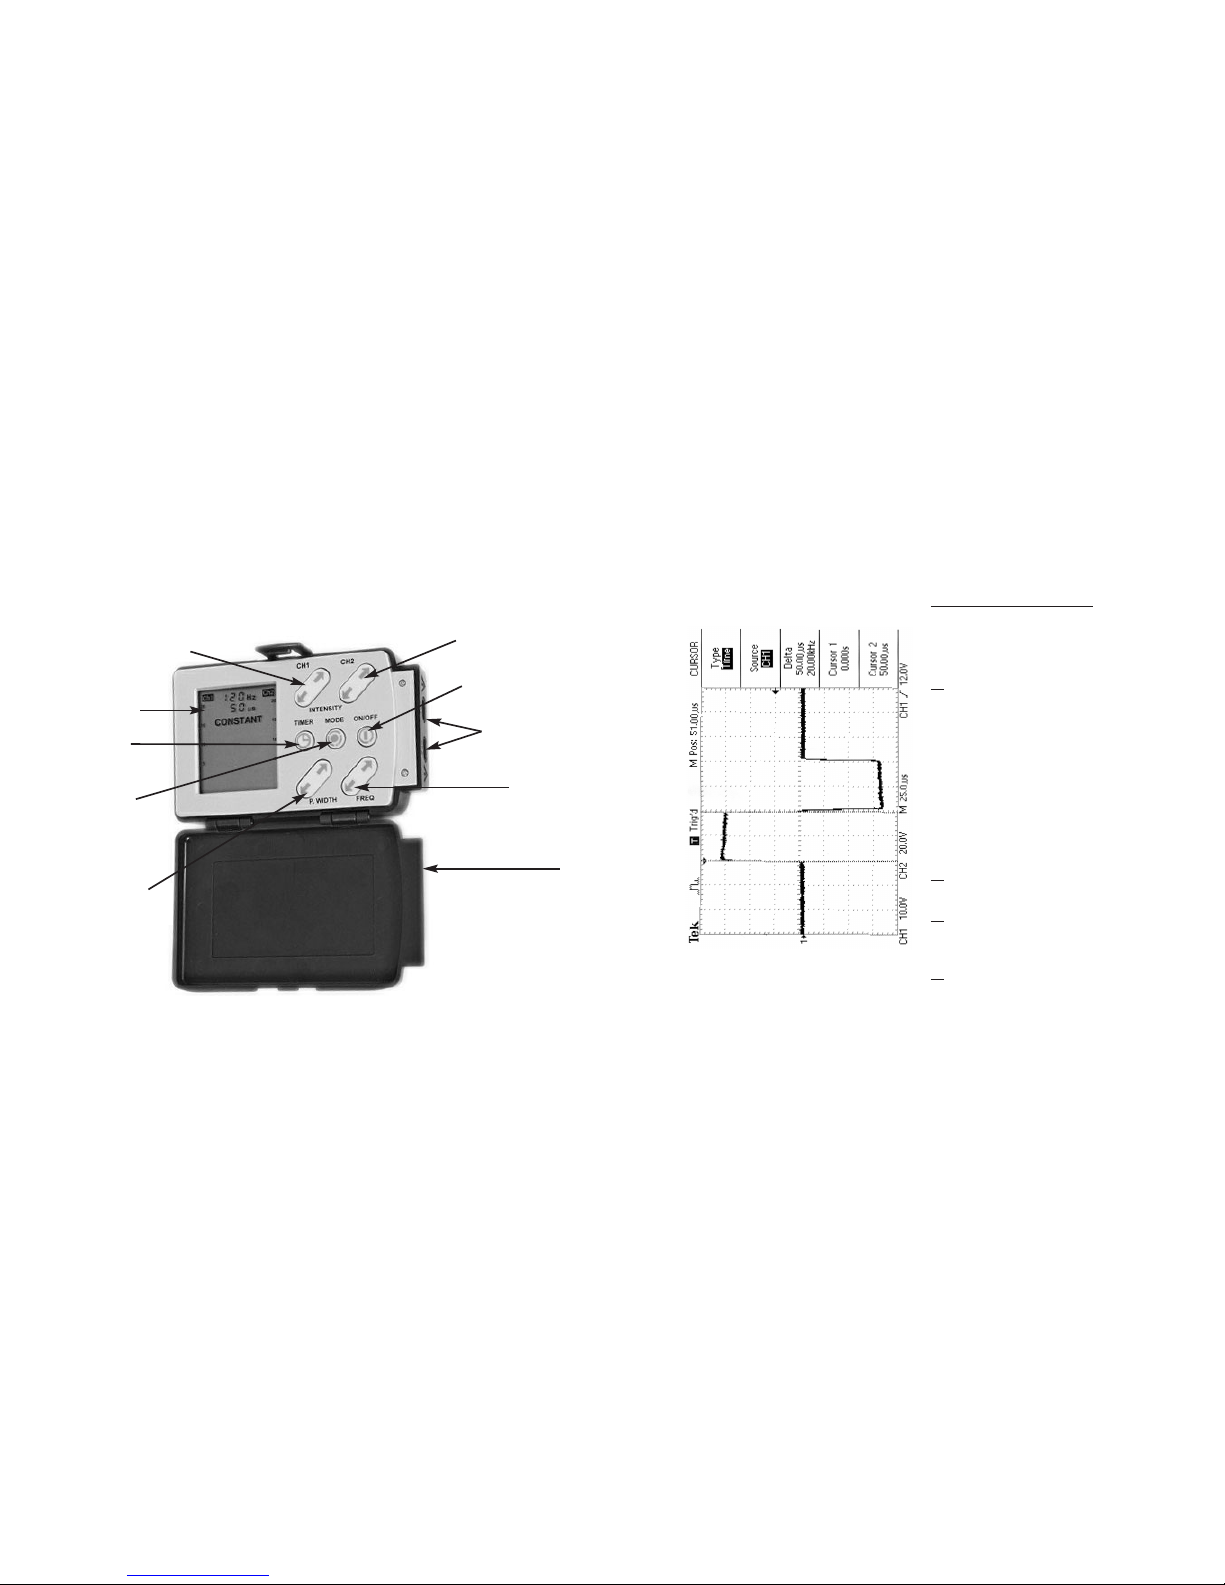
6. With the unit switched off, insert
the leadwires into the sockets (see
diagram on page 7). You are now
ready to commence stimulation.
7. Turn on the unit by means of the
ON/OFF button.
8. Set the pulse rate (frequency)
control to the 2Hz
9. Pulse Width adjustment
provides extra versatility. Increasing or
decreasing the setting heightens or
lessens the sensation at the site of the
electrodes. Set initially to 100, then
adjust as desired.
10. Slowly turn up the intensity using
the intensity controls (see diagram on
page 7).
11. By setting the pulse rate control
to the upper end of the pulse rate
range (80Hz or above) you feel a
tingling sensation. This is the Gate
Control Theory. Please refer to the
accompanying Book “An Easy Guide
to TENS Pain Relief” page 3, for a full
explanation.
12. Effective pain relief may also be
achieved at the lower end of the
pulse rate range - approx 2Hz, this will
feel like a heart beat. This is the
acupuncture-like TENS or endorphin
release theory. Please see page 3 in
“An Easy guide to TENS Pain Relief.”
13. With the mode button then
select the mode you wish to use .
5.
There are five modes to choose
from.-
Constant
: The pulses are
steady and continuous;
Burst 1
The
pulses are off and on in regular
cycles resembling massage;
Burst 11
The pulses are off and on in regular
cycles in a tapping rhythm.
Width
modulation
; Pulse width modulates to
create a gentle ebbing and flowing
effect.
Frequency modulation
; Pulse
rate quickens and then slows down
creating a pleasant tingling sensation.
14. Varying the modes helps avoid
or delay your body becoming used
to any particular setting. Your medical
adviser will be pleased to assist you
with electrode positions and settings.
Continue stimulating for as long as
necessary but preferably for no less
than 30 minutes unless you experi-
ence discomfort.
15. Some people achieve pain
relief after a short period, while others
may require to use their TENS for longer.
16. If you stimulate for a number of
hours check there is sufficient gel on
carbon rubber electrodes. If using
self-adhesive electrodes check they
have not dried out. If this happens,
dampen slightly. If electrodes dry out
this can cause minor skin irritation.
17. The timer allows you to pre-set
your Profile TENS to switch off
automatically and the LCD display will
keep you informed about the amount
of time your treatment still has to run.
18. When you have finished
stimulating, turn the machine off by
pressing the On/Off button (see
diagram on page 7).
19. Ensure that the unit is switched
off before removing the leads. Do
not pull the wires. Remove leads by
holding the jack plug between the
forefinger and thumb.
6 .
Other manuals for Profile TENS
1
Table of contents
Other Body Clock Medical Equipment manuals

Body Clock
Body Clock SensaTONE User manual

Body Clock
Body Clock Flexi TENS User manual

Body Clock
Body Clock Easy TENS User manual

Body Clock
Body Clock Stimplus User manual

Body Clock
Body Clock Smart TENS User manual

Body Clock
Body Clock Profile EMS User manual

Body Clock
Body Clock Easy TENS User manual

Body Clock
Body Clock Profile TENS User manual
Popular Medical Equipment manuals by other brands

Proactive
Proactive alevia 715-425 instructions

VIRTUFIT
VIRTUFIT Heart Rate Transmitter user manual

eNeura
eNeura SAVI manual

medi
medi Spinomed Instructions for use

MD Orthopaedics
MD Orthopaedics Mitchell Ponseti Ankle Foot Orthosis Instructions for use

illumina
illumina NextSeq 550Dx Instrument Safety and Compliance Guide