TSL SAM-Q-SDI User manual

SAM-Q-SDI
Audio Monitor
Installation and Operation Manual
Version 1.0

Page 2of 33
Version History
Issue
Date
Change Details
1
12/06/19
Initial Release

Page 3of 33
Contents
Introduction....................................................................................................................................................4
SAM-Q-SDI Functional Schematic...................................................................................................................5
SAM-Q-SDI Installation ...................................................................................................................................6
SAM-Q Front Panel Controls...........................................................................................................................7
SAM-Q-SDI General Operation .......................................................................................................................8
SAM-Q Front Panel Displays ...........................................................................................................................9
SAM-Q-SDI Operational Modes Overview....................................................................................................11
Operational Mode - Meters (S).....................................................................................................................13
Operational Mode - Meters (M) ...................................................................................................................14
Operational Mode - Video (S).......................................................................................................................15
Operational Mode - Video (M) .....................................................................................................................16
Operational Mode - Mix ...............................................................................................................................17
Operational Mode - Names ..........................................................................................................................18
SAM-Q Internal Audio Router.......................................................................................................................19
SAM-Q Internal Audio Mixer.........................................................................................................................20
SAM-Q-SDI Audio Sources ............................................................................................................................21
Accessing the SAM-Q-SDI Configuration Menus ..........................................................................................22
The SAM-Q-SDI Menus and associated Parameters.....................................................................................24
Updating the SAM-Q-SDI Software...............................................................................................................33

Page 4of 33
Introduction
The SAM-Q Range of Audio Monitors provide flexible, high quality audio monitoring in a compact 1RU
design. At just 100mm deep and less than 4kg, SAM-Q Audio Monitors are ideally suited for environments
where space and weight is a premium, such as OB Trucks and Flyaways.
Designed for ease of use, all SAM-Q Audio Monitors come complete with multiple of operational modes,
allowing customers to choose whichever operational mode is best suited to their workflow, application or
personal preference.
The SAM-Q has been designed such that extra audio monitoring features and functions will be made
available to customers by way of future software updates (see Updating the SAM-Q Software on Page 39
for further information).
This manual covers the following Audio Monitoring Product from the SAM-Q Range:
SAM-Q-SDI

Page 5of 33
SAM-Q-SDI Functional Schematic
Page 6of 33
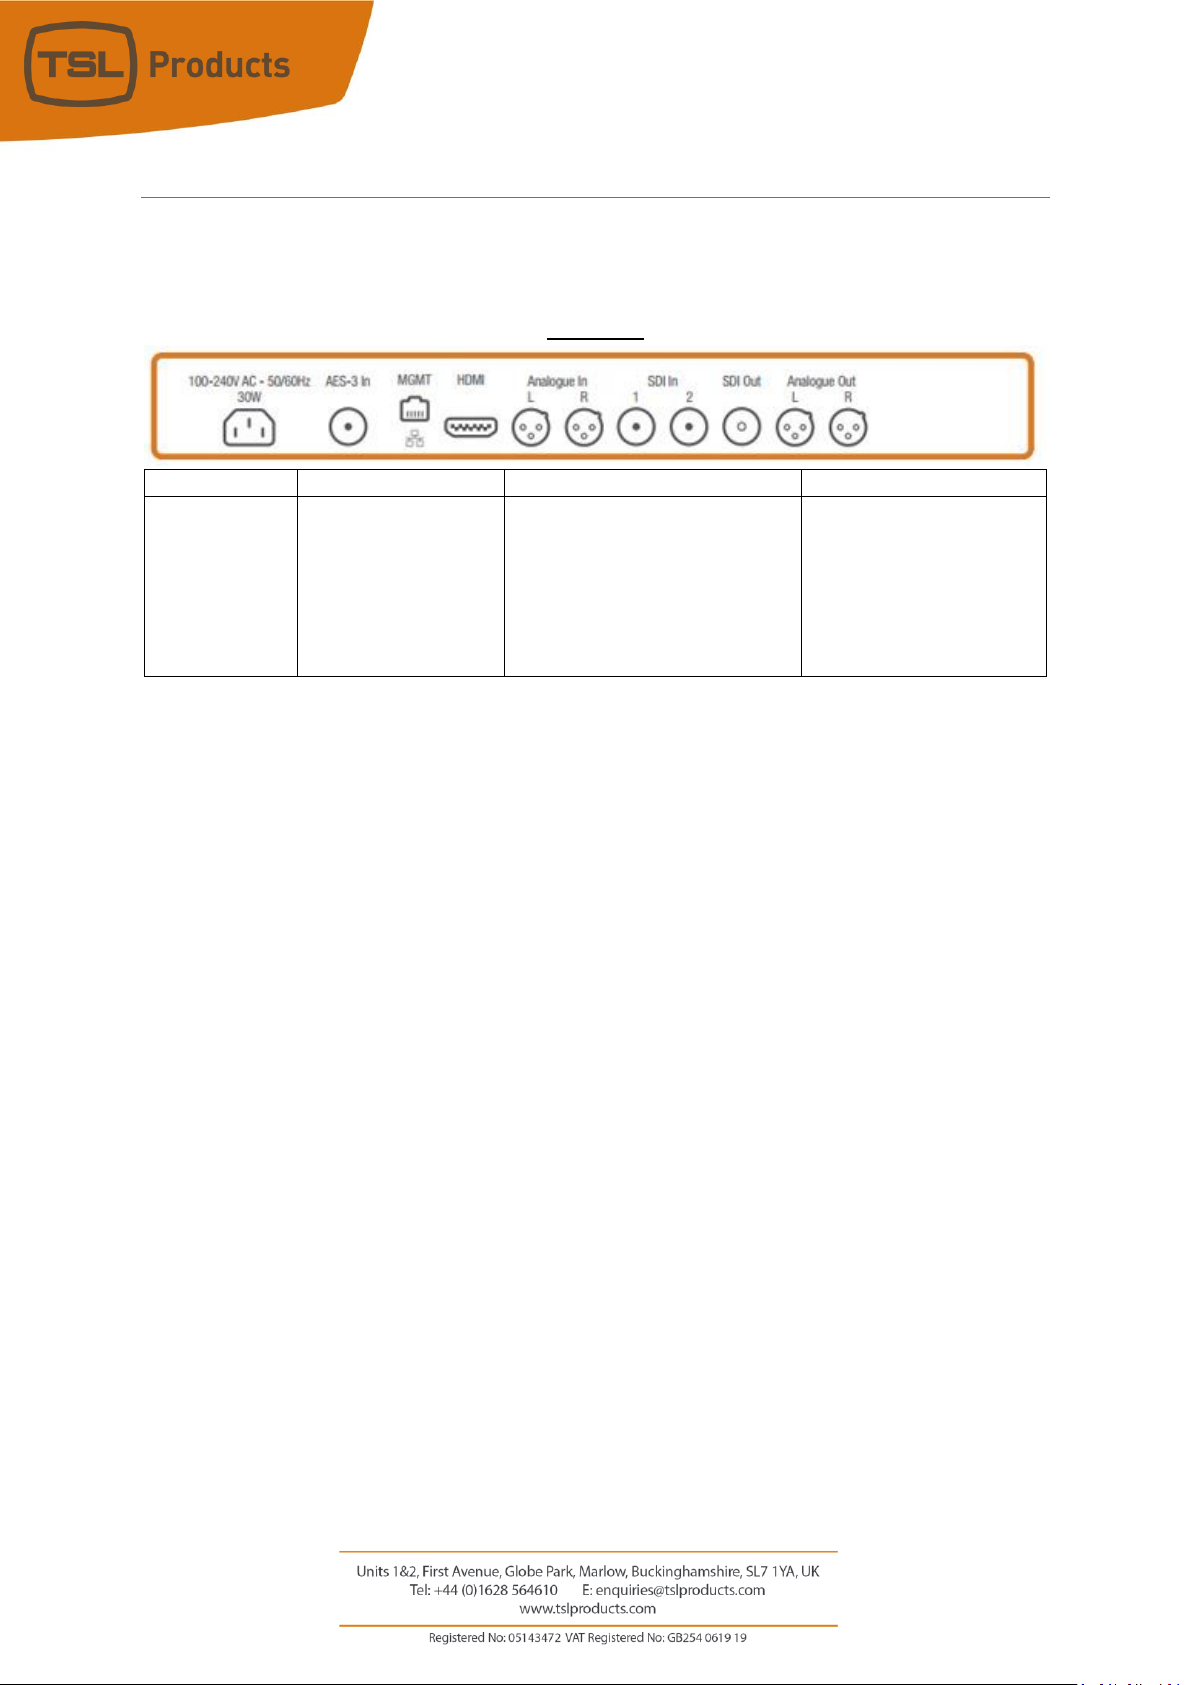
SAM-Q-SDI Installation
The SAM-Q range has been designed to be quick and easy to install, requiring minimal installation effort.
Input and output connectivity for the SAM-Q-SDI can be seen below:
SAM-Q-SDI
Product
Inputs
Outputs
Other
SAM-Q-SDI
2 x 3G/HD/SD-SDI
1 x AES-3id (75 ohm)
2 x Analogue Inputs
(Balanced)
1 x 3G/HD/SD-SDI (re-clocked)
2 x Analogue Outputs
(Balanced)
1 x Headphone Output
1 x HDMI Monitoring Output
1 x 100 Mbps Ethernet
Port (Management and
Control)
1 x USB Port (Software
Updates and
Configuration)
1 x IEC Power Inlet

Page 7of 33
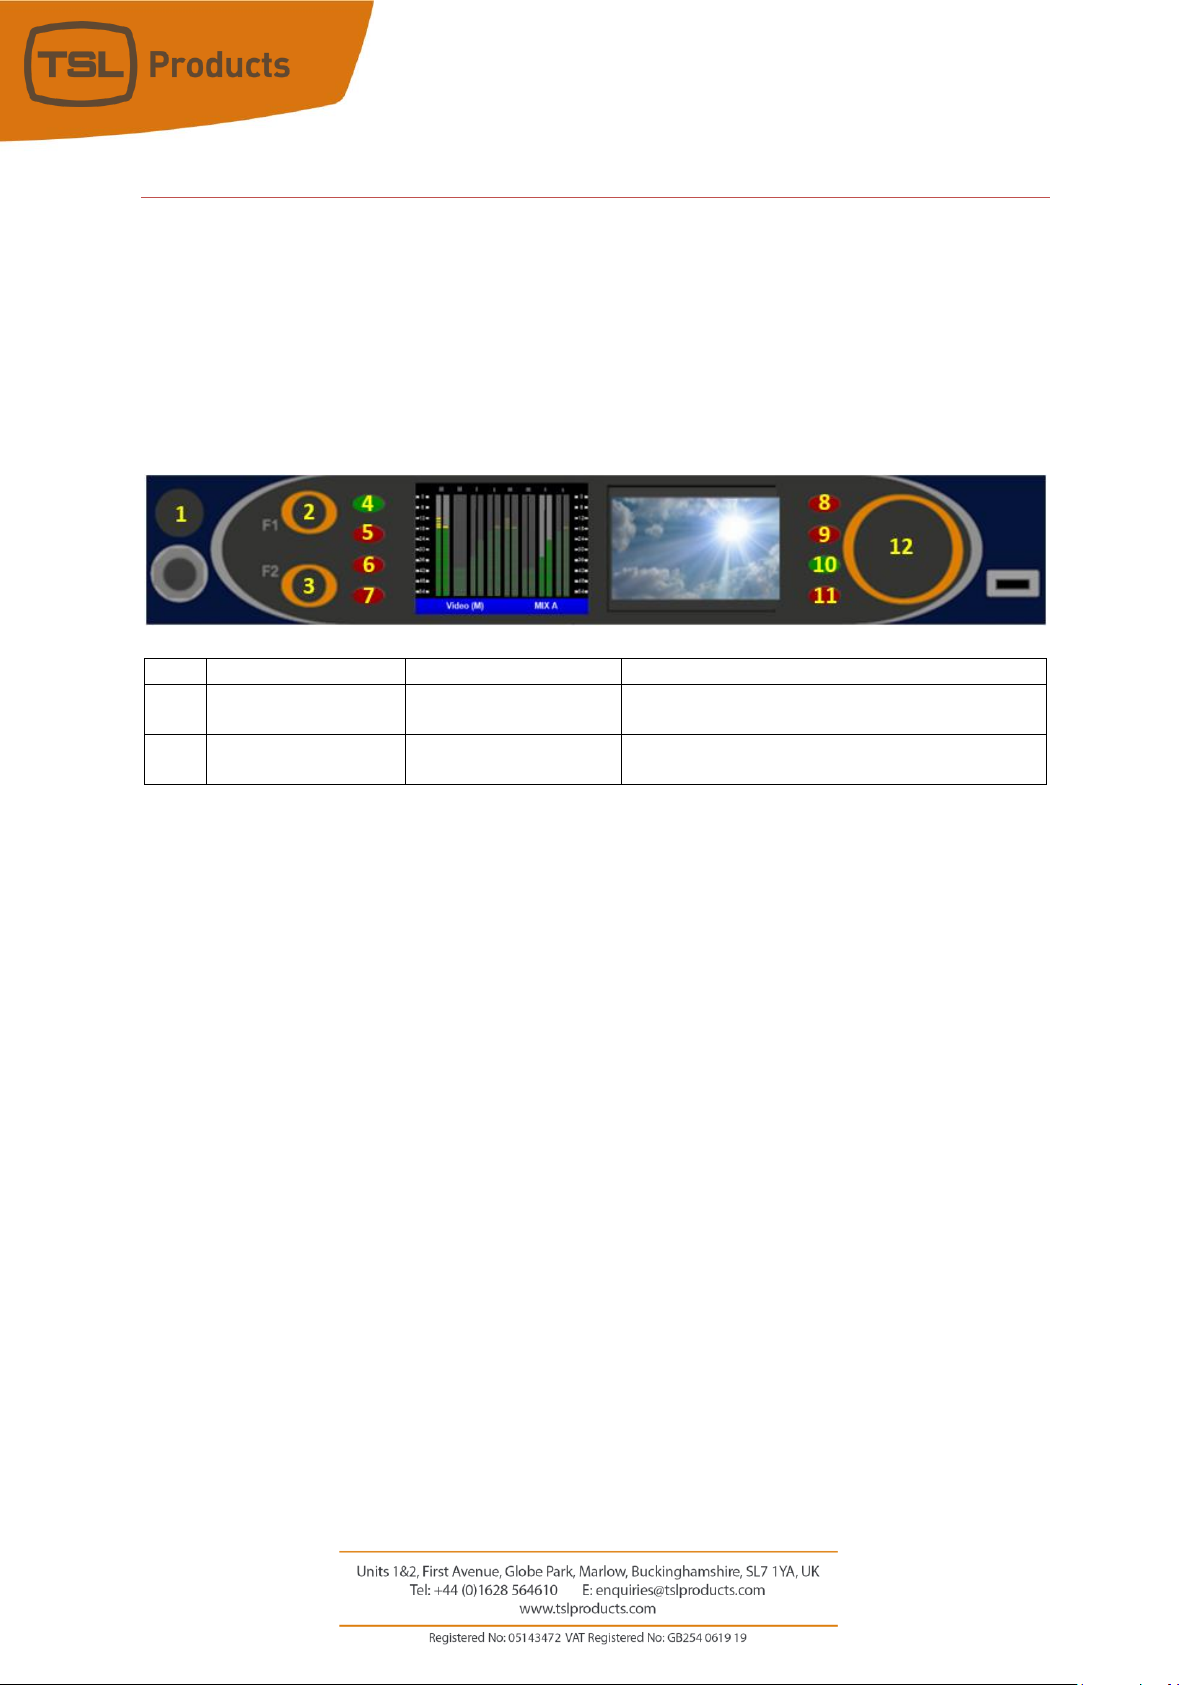
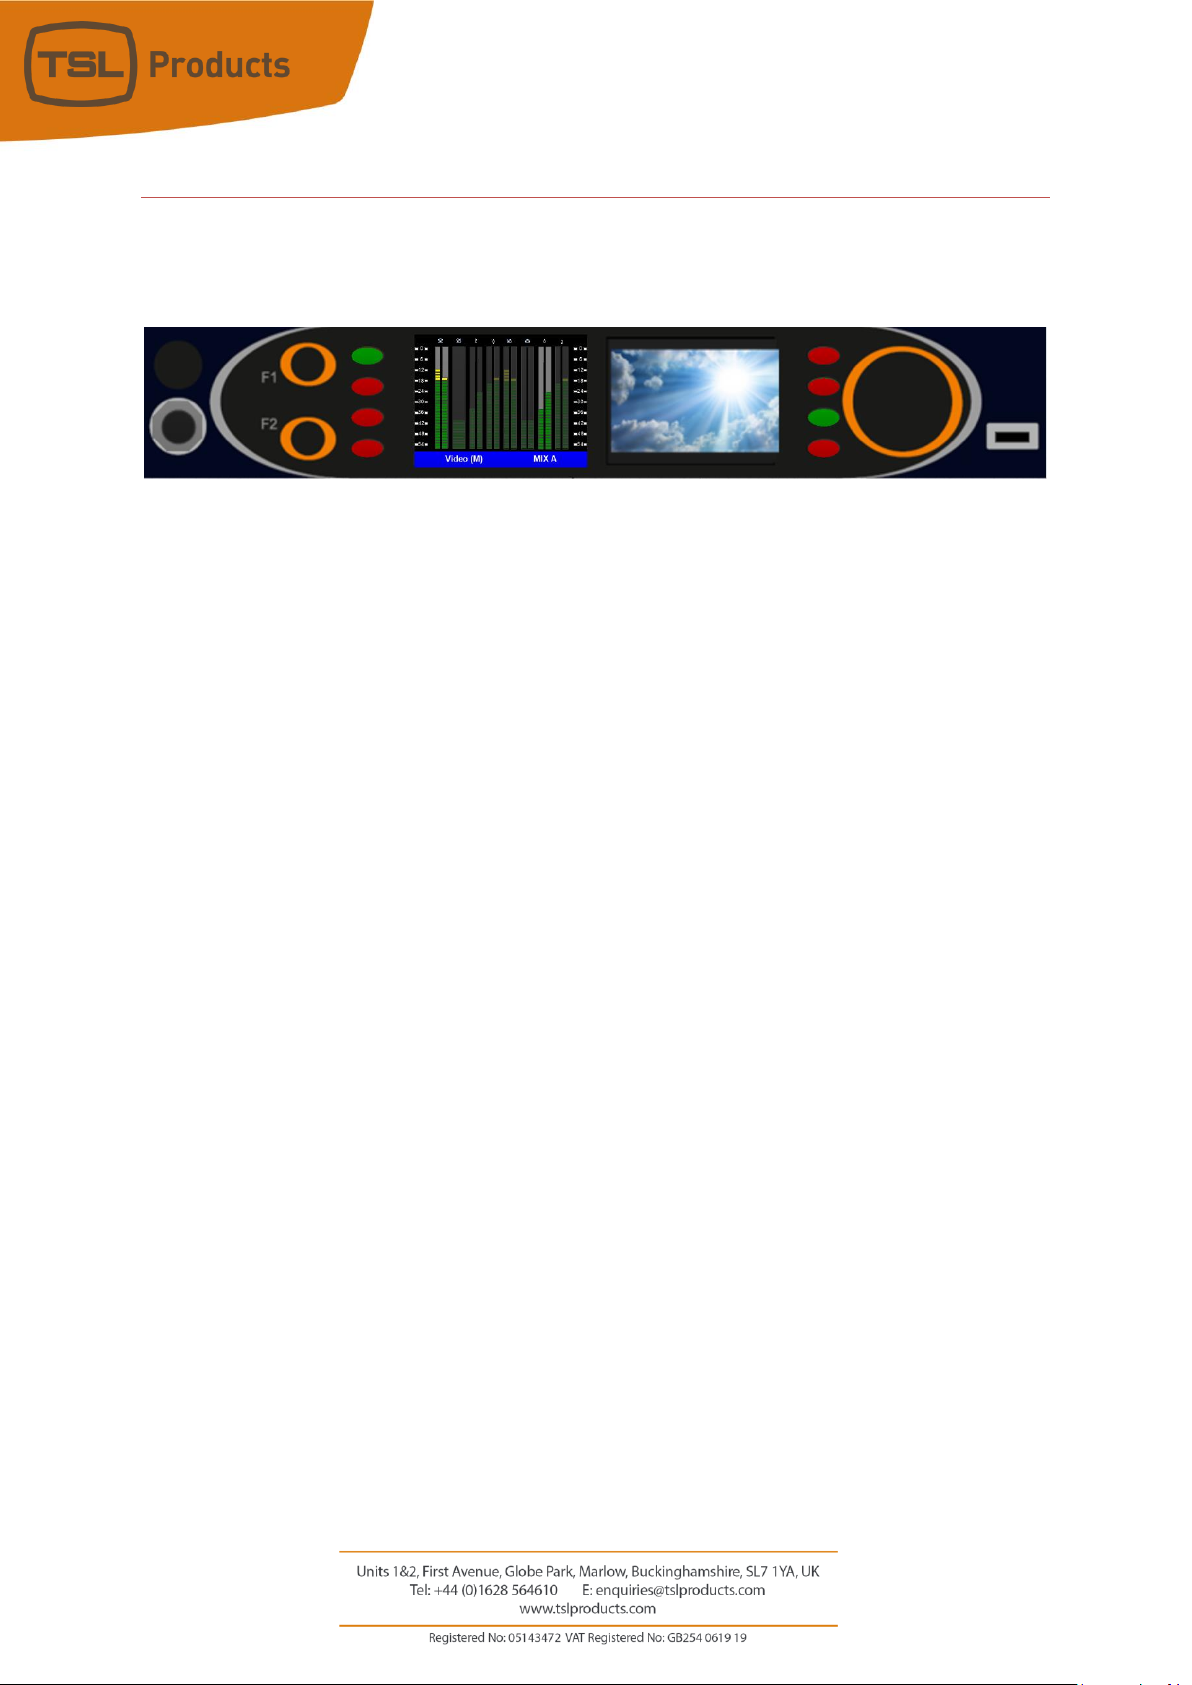
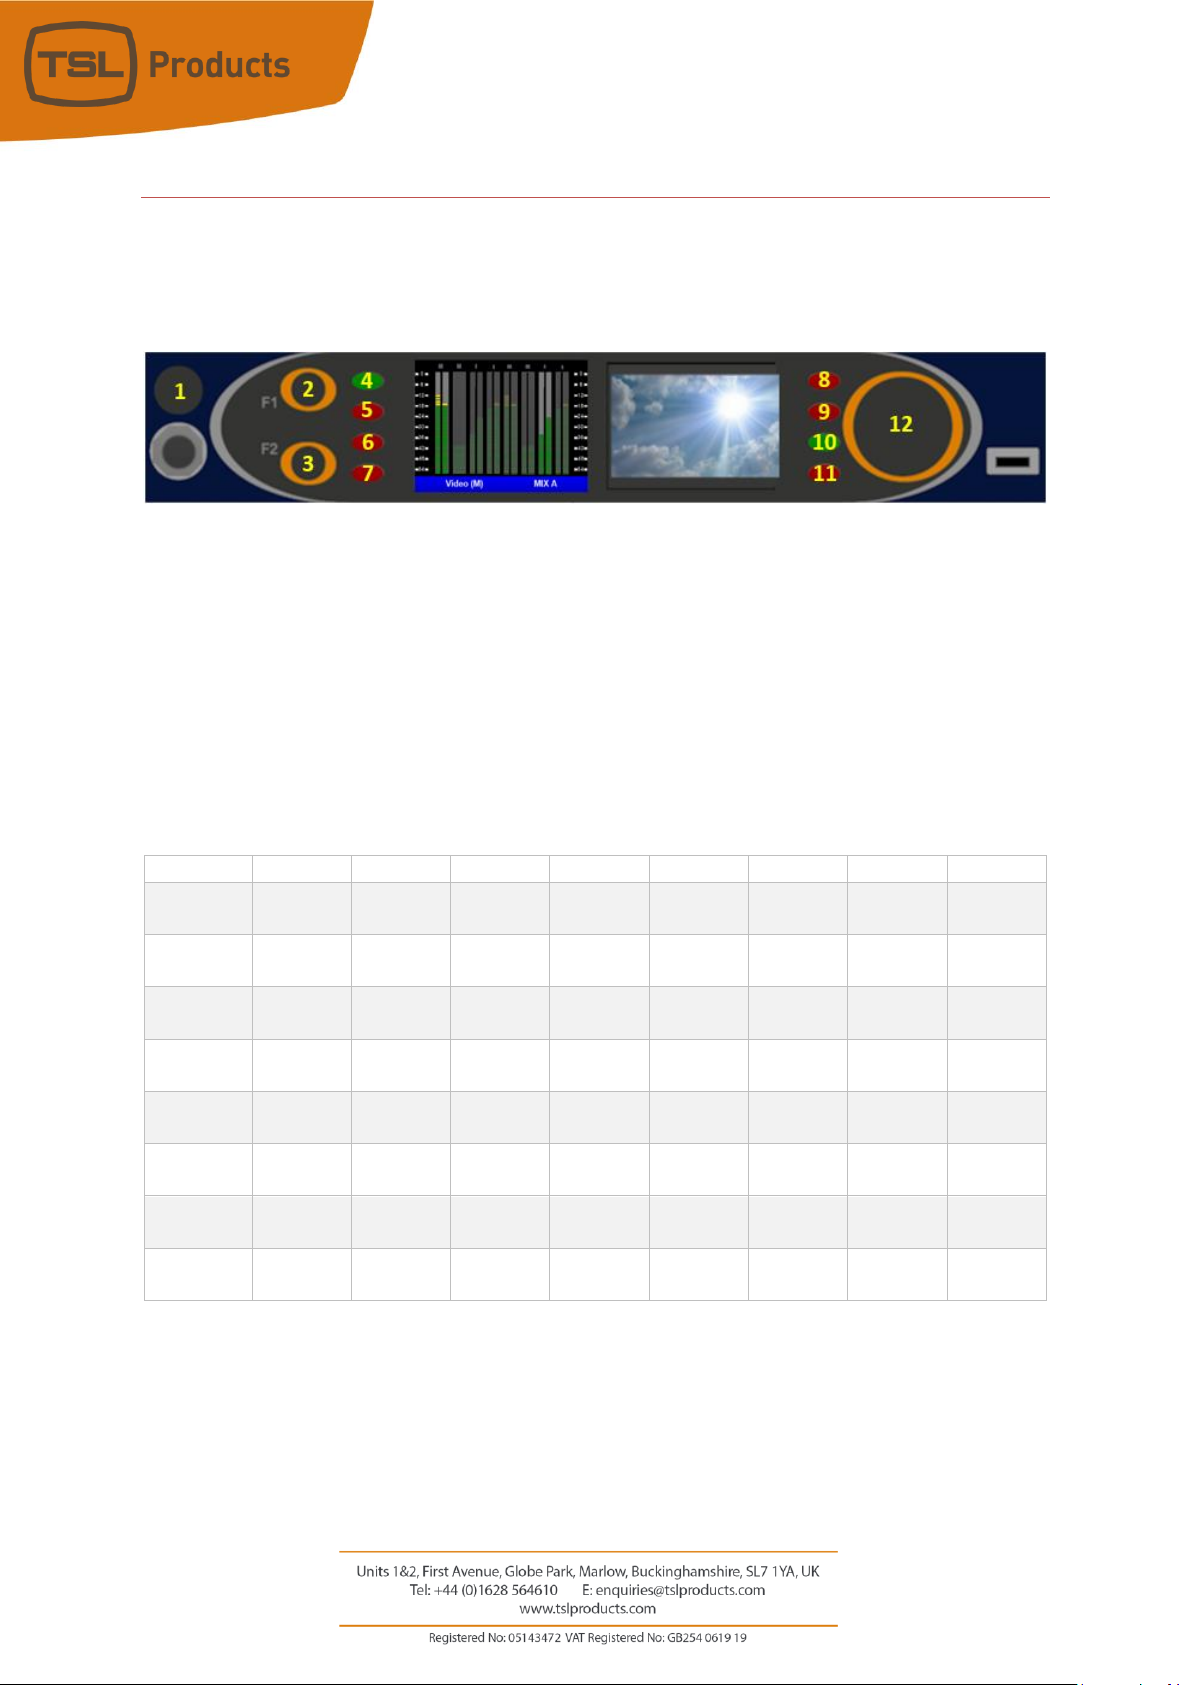
SAM-Q Front Panel Controls
Item
Name
Normal Function
Extended Functions
1
Small rotary encoder
Mix Selection
Pan/Balance Control
2
Function 1 button
Switch to
Previous
Operational Mode
Enter and Exit Menus
3
Function 2 button
Switch to Next
Operational Mode
None
4
Source select button
# 1
Mute/Unmute
Audio Source 1
Show Name of Audio Source # 1, enable Pan/Balance
(when used in conjunction with small rotary encoder)
or adjust Output level of Audio Source # 1 (when used
in conjunction with Large rotary encoder).
5
Source select button
# 2
Mute/Unmute
Audio Source 2
Show Name of Audio Source # 2, enable Pan/Balance
(when used in conjunction with small rotary encoder)
or adjust Output level of Audio Source # 2 (when used
in conjunction with Large rotary encoder).
6
Source select button
# 3
Mute/Unmute
Audio Source 3
Show Name of Audio Source # 3, enable Pan/Balance
(when used in conjunction with small rotary encoder)
or adjust Output level of Audio Source # 3 (when used
in conjunction with Large rotary encoder).
7
Source select button
# 4
Mute/Unmute
Audio Source 4
Show Name of Audio Source # 4, enable Pan/Balance
(when used in conjunction with small rotary encoder)
or adjust Output level of Audio Source # 4 (when used
in conjunction with Large rotary encoder).
8
Source select button
# 5
Mute/Unmute
Audio Source 5
Show Name of Audio Source # 5, enable Pan/Balance
(when used in conjunction with small rotary encoder)
or adjust Output level of Audio Source # 5 (when used
in conjunction with Large rotary encoder).
9
Source select button
# 6
Mute/Unmute
Audio Source 6
Show Name of Audio Source # 6, enable Pan/Balance
(when used in conjunction with small rotary encoder)
or adjust Output level of Audio Source # 6 (when used
in conjunction with Large rotary encoder).
10
Source select button
# 7
Mute/Unmute
Audio Source 7
Show Name of Audio Source # 7, enable Pan/Balance
(when used in conjunction with small rotary encoder)
or adjust Output level of Audio Source # 7 (when used
in conjunction with Large rotary encoder).
11
Source select button
# 8
Mute/Unmute
Audio Source 8
Show Name of Audio Source # 8, enable Pan/Balance
(when used in conjunction with small rotary encoder)
or adjust Output level of Audio Source # 8 (when used
in conjunction with Large rotary encoder).
12
Large rotary encoder
Adjust Output
Volume
Adjust Output Volume of nominated Audio Source or
Parameter value when in Menu.
Page 8of 33
SAM-Q-SDI General Operation
The SAM-Q-SDI has been designed to be quick and easy to operate, regardless of which operational
mode(s) you choose to work with.
The four most frequent functions are described below:
•Selecting a Source (buttons 4 through to 11)
•Selecting a Mix (small rotary encoder 1)
•Adjusting the Output Volume (large rotary encoder 12)
•Selecting a Different Operational Mode (Function buttons 1 (2) and 2 (3))
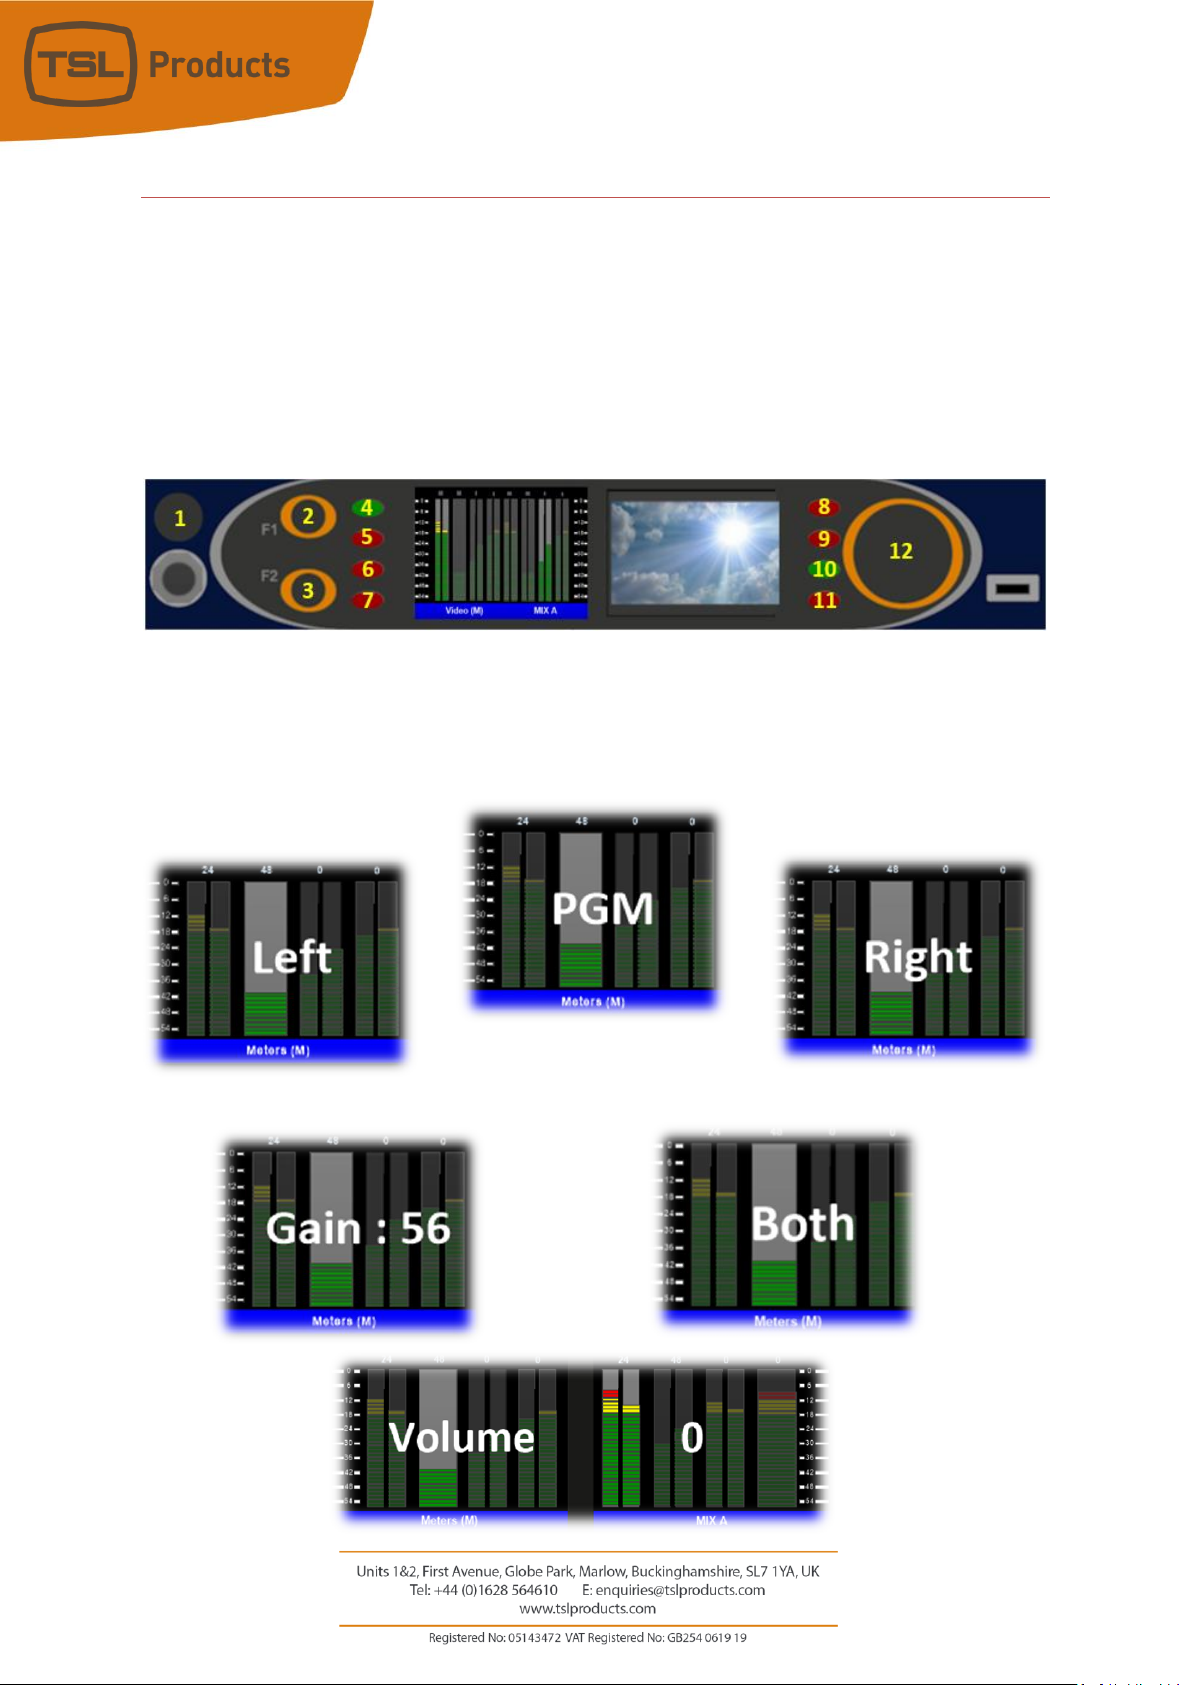
As you control the SAM-Q-SDI, messages on the front panel displays will confirm your choices and
adjustments
Example front panel messages

Page 9of 33
SAM-Q Front Panel Displays
The SAM-Q features two high quality front panel display screens to display multiple audio monitoring
elements, video sources and menu selections.
Item
Display Element
Description
1
Audio Meter Scale
Audio Meter scale (0 to -54dbFS). Displayed on left-hand and
right-hand side of audio level meters.
2
Output Level Ribbon Bar
Shows output level of each audio source (0-100)
3
Inactive Mono Audio Source
Single audio level meter for Mono audio sources
4
Inactive Stereo Audio Source
Dual audio level meter for Stereo audio sources
5
Active Audio Source
Audio source(s) currently selected for monitoring. See
selection buttons 1-8 on previous page.
6
Left Hand Title Bar
Displays name of currently selected Operational Mode
7
Right Hand Title Bar
Displays name of currently selected Audio Mix
1
3
4
5
2
6
7
Page 10 of 33
Selecting SAM-Q-SDI Operational Modes
The SAM-Q-SDI provides multiple modes of operation, allowing you to choose the most suitable mode for
your workflow, application or personal preference.
Each operational mode determines what is displayed on the front panel displays as well as the behaviour
of the front panel controls
Switching between operational modes may be achieved using Function buttons 1 and 2 (see below)
Item
Name
Standard Function
Extended Function
2
Function 1 button
Switch to Previous
Operational Mode
Enter and Exit Menus
3
Function 2 button
Switch to Next
Operational Mode
None
Please note that the functions assigned to buttons F1 and F2 are configurable (see page 29 for further
information). If configured to perform functions other than ‘Switch to Previous Operational Mode’ or ‘Switch
to Next Operational Mode’, mode selection can be performed directly in the User Menu (see page 24 for
further information).
Page 11 of 33
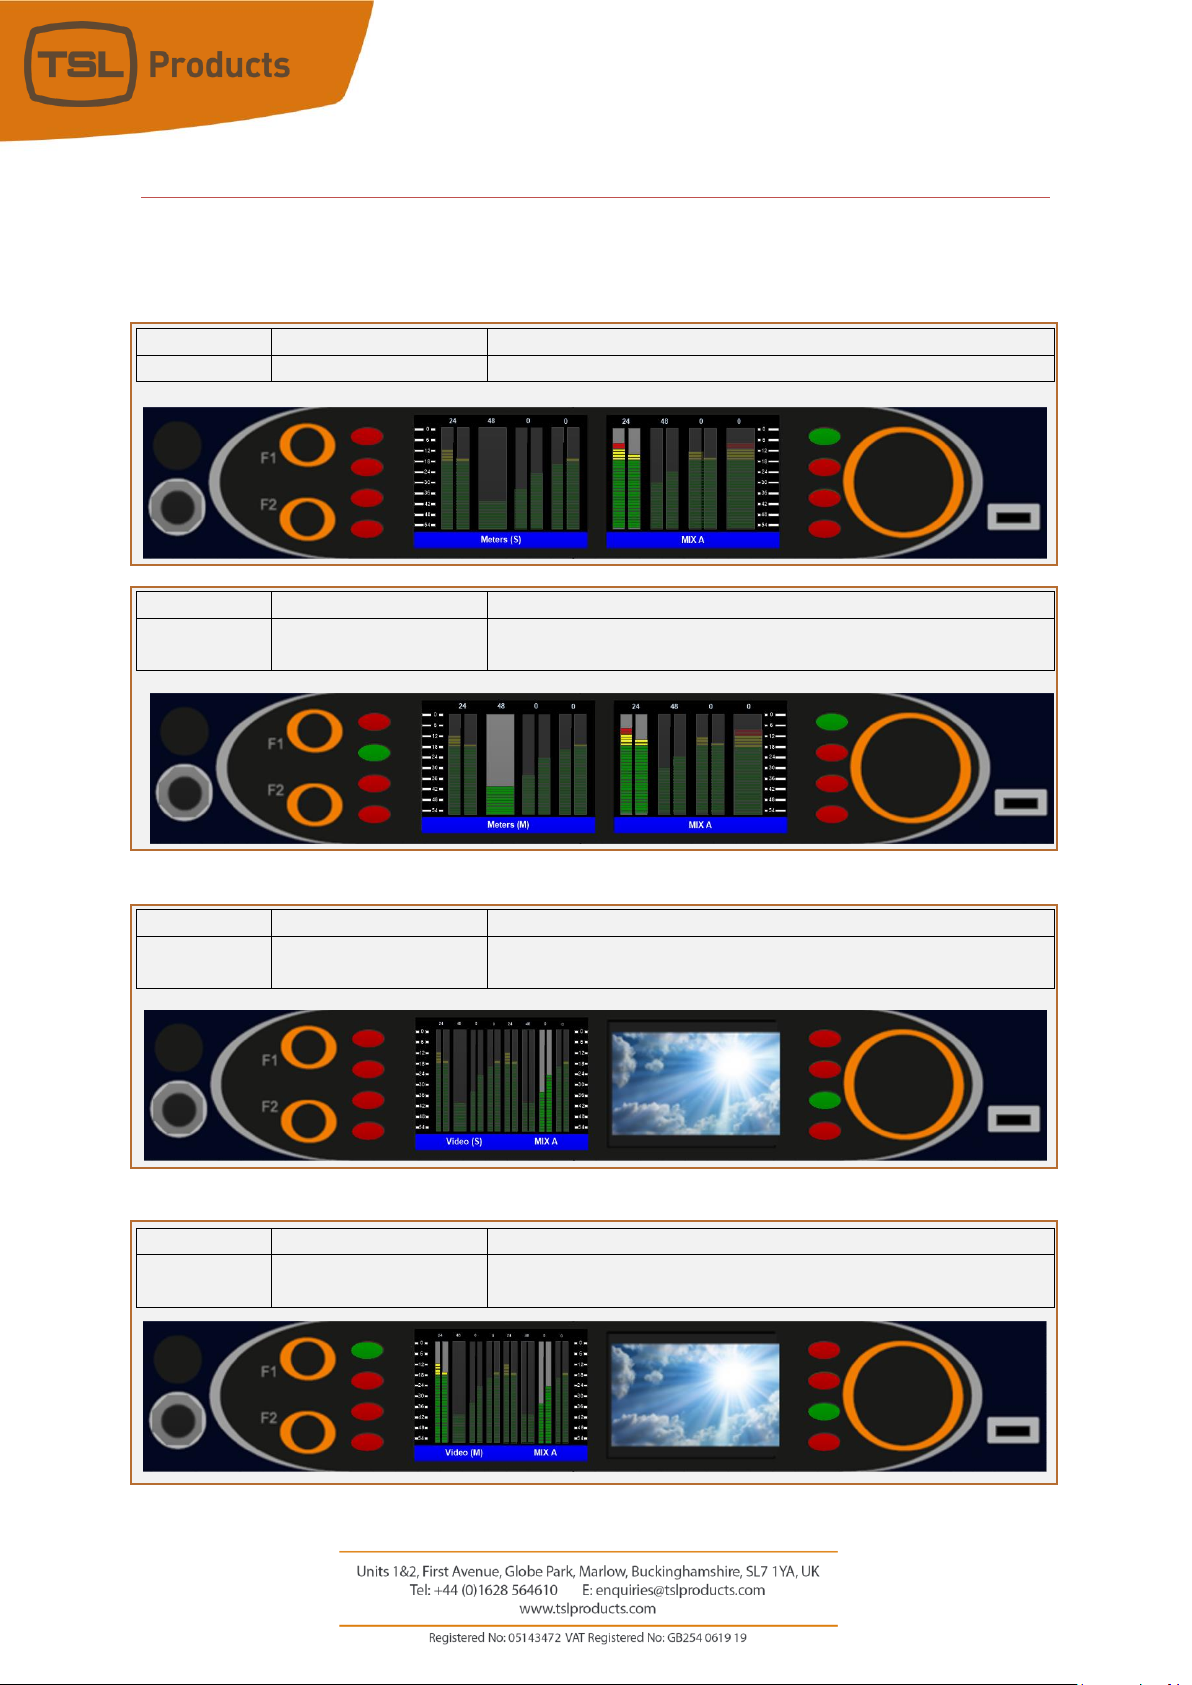
SAM-Q-SDI Operational Modes Overview
The SAM-Q-SDI comes complete with the following operational modes as standard.
Mode Name
Front Panel Display
Description
Meters (S)
16 Audio Level Meters
Allows one audio source to be selected and monitored at time
Mode Name
Front Panel Display
Description
Meters (M)
16 Audio Level Meters
Allows up to 8 audio sources to be selected and monitored
simultaneously
Mode Name
Front Panel Display
Description
Video (S)
16 Audio Level Meters
Allows one audio source to be selected and monitored at a time,
complete with front panel video display
Mode Name
Front Panel Display
Description
Video (M)
16 Audio Level Meters
Allows up to 8 audio pairs to be selected and monitored
simultaneously, complete with front panel video display

Page 12 of 33
Mode Name
Front Panel Display
Description
Mix
8 Gain Bars
Allows up to 8 audio pairs to be selected and monitored
simultaneously whilst displaying relative mix levels for each pair
Mode Name
Front Panel Display
Description
Names
8 Source Names
Allows up to 8 audio pairs to be selected and monitored
simultaneously, whilst displaying source names

Page 13 of 33
Operational Mode - Meters (S)
Meters (S) mode displays a maximum of 8 audio sources across both displays, using a maximum of 16 audio
level meters.
Meters (S) mode allows a single audio source to be selected for monitoring at a time.
Selecting the desired audio source is achieved achieved simply by pressing the corresponding Source Select
button.
When an audio source is selected for monitoring, its Source Select button will turn Green and the
corresponding audio level meter will be highlighted. In the example above, audio source # 5 has been
selected for monitoring and will be audible to the user.
Selecting a different audio source for monitoring causes the previously selected audio source to be
deselected automatically.
The audio sources displayed and available to be monitored are determined by the currently selected audio
mix (MIX A in the example above) and the sources assigned to those mixes.
Switching between available audio mixes is achieved using the small rotary encoder on the left-hand side
of the two displays.
Please refer to the Routing Menu option later in this document for Information on how sources can be
routed to specific audio mixes.

Page 14 of 33
Operational Mode - Meters (M)
Meters (M) mode displays a maximum of 8 audio sources across both displays, using a maximum of 16
audio level meters.
Meters (M) mode allows multiple audio sources to be selected and listened to simultaneously.
Selecting the desired audio sources is achieved simply by pressing the corresponding Source Select button.
When an audio source is selected for monitoring, its Source Select button will turn Green and the
corresponding audio level meter will be highlighted. In the example above, audio sources # 2 and # 5 have
been selected for monitoring and will be audible to the user.
Audio sources can be freely included or excluded simply by pressing their corresponding Source Select
buttons.
Source select buttons that are lit Red denote Audio sources that are not currently included and will
therefore not be audible to the user.
The respective audio balance between two or more audio sources is displayed in the Output Level Ribbon
Bar (see page 9 for further information).
The level of contribution to the output mix from any audio source can be changed by rotating the large
rotary encoder whilst simultaneously holding the corresponding pair select button.
Please note that the ability to change the level of contribution to the output mix can be disabled if required
(see page 29).
The audio sources displayed and available to be monitored are determined by the currently selected audio
mix (MIX A in the example above) and the sources assigned to those mixes.
Switching between available audio mixes is achieved using the small rotary encoder on the left-hand side
of the two displays.
Please refer to the Routing Menu option later in this document for Information on how sources can be
routed to specific audio mixes.

Page 15 of 33
Operational Mode - Video (S)
Video (S) mode displays a maximum of 8 audio sources on the left-hand display, using a maximum of 16
audio level meters, whilst also showing a video source derived from either of the SAM-Q-SDI inputs.
Video (S) mode allows a single audio source to be selected for monitoring at a time.
Selecting the desired audio source is achieved simply by pressing the corresponding Source Select button.
When an audio source is selected for monitoring, its Source Select button will turn Green and the
corresponding audio level meter will be highlighted. In the example above, audio source # 5 has been
selected for monitoring and will be audible to the user.
Selecting a different audio source for monitoring causes the previously selected audio source to be
deselected automatically.
The audio sources displayed and available to be monitored are determined by the currently selected audio
mix (MIX A in the example above) and the sources assigned to those mixes.
Switching between available audio mixes is achieved using the small rotary encoder on the left-hand side
of the two displays.
Please refer to the Routing Menu option later in this document for Information on how sources can be
routed to specific audio mixes.
Page 16 of 33
Operational Mode - Video (M)
Video (M) mode displays a maximum of 8 audio sources on the left-hand display, using a maximum of 16
audio level meters, whilst also showing a video source derived from either of the SAM-Q-SDI inputs.
Video (M) mode allows multiple audio sources to be selected and listened to simultaneously.
Selecting the desired audio sources is achieved simply by pressing the corresponding Source Select button.
When an audio source is selected for monitoring, its Source Select button will turn Green and the
corresponding audio level meter will be highlighted. In the example above, audio sources # 1 and # 7 have
been selected for monitoring and will be audible to the user.
Audio sources can be freely included or excluded simply by pressing their corresponding Source Select
buttons.
Source select buttons that are lit Red denote Audio sources that are not currently included and will
therefore not be audible to the user.
The respective audio balance between two or more audio sources is displayed in the Output Level Ribbon
Bar (see page 9 for further information).
The level of contribution to the output mix from any audio source can be changed by rotating the large
rotary encoder whilst simultaneously holding the corresponding pair select button.
Please note that the ability to change the level of contribution to the output mix can be disabled if required
(see page 29).
The audio sources displayed and available to be monitored are determined by the currently selected audio
mix (MIX A in the example above) and the sources assigned to those mixes.
Switching between available audio mixes is achieved using the small rotary encoder on the left-hand side
of the two displays.
Please refer to the Routing Menu option later in this document for Information on how sources can be
routed to specific audio mixes.

Page 17 of 33
Operational Mode - Mix
Mix mode displays a maximum of 8 audio sources, using 8 gain bars, akin to 8 fader positions on an audio
console.
Mix mode allows multiple audio sources to be selected and listened to simultaneously.
Selecting the desired audio sources is achieved simply by pressing the corresponding Source Select button.
When an audio source is selected for monitoring, its Source Select button will turn Green and the
corresponding gain bar will be highlighted. In the example above, audio sources # 2, # 6, #7 and # 8 have
been selected for monitoring and will be audible to the user.
Audio sources can be freely included or excluded simply by pressing their corresponding Source Select
buttons.
Source select buttons that are lit Red denote Audio sources that are not currently included and will
therefore not be audible to the user.
The level of contribution to the output mix from any audio source can be changed by rotating the large
rotary encoder whilst simultaneously holding the corresponding pair select button.
The audio sources displayed and available to be monitored are determined by the currently selected audio
mix (MIX A in the example above) and the sources assigned to those mixes.
Switching between available audio mixes is achieved using the small rotary encoder on the left-hand side
of the two displays.
Please refer to the Routing Menu option later in this document for Information on how sources can be
routed to specific audio mixes.

Page 18 of 33
Operational Mode - Names
Names mode displays a maximum of 8 audio sources, using 8 source name labels and audio presence
indicators.
Names mode allows multiple audio sources to be selected and listened to simultaneously.
Selecting the desired audio sources is achieved simply by pressing the corresponding Source Select button.
When an audio source is selected for monitoring, its Source Select button will turn Green and the
corresponding source name label will be highlighted. In the example above, audio sources # 6 and #7 have
been selected for monitoring and will be audible to the user.
Audio sources can be freely included or excluded simply by pressing their corresponding Source Select
buttons.
Source select buttons that are lit Red denote Audio sources that are not currently included and will
therefore not be audible to the user.
The respective audio balance between two or more audio sources is displayed in the Output Level Ribbon
Bar (see page 9 for further information).
The level of contribution to the output mix from any audio source can be changed by rotating the large
rotary encoder whilst simultaneously holding the corresponding pair select button.
Please note that the ability to change the level of contribution to the output mix can be disabled if required
(see page 29).
The audio sources displayed and available to be monitored are determined by the currently selected audio
mix (MIX A in the example above) and the sources assigned to those mixes.
Switching between available audio mixes is achieved using the small rotary encoder on the left-hand side
of the two displays.
Please refer to the Routing Menu option later in this document for Information on how sources can be
routed to specific audio mixes.

Page 19 of 33
SAM-Q Internal Audio Router
The SAM-Q-SDI audio monitor features an internal audio router comprising 36 Input channels (18 audio
pairs) and 16 Output channels (8 audio pairs).
Inputs to the audio router are derived from the physical input connections on the rear of the SAM-Q-SDI,
whilst the router outputs feed are used to feed the internal SAM-Q audio mixer (see below)
Physical
Input
Audio Pair
Channel Count
Physical
Input
Channel Count
SDI 1
SDI Input 1 Group 1 Pair 1
2
SDI 2
SDI Input 2 Group 1 Pair 1
2
SDI Input 1 Group 1 Pair 2
2
SDI Input 2 Group 1 Pair 2
2
SDI Input 1 Group 2 Pair 1
2
SDI Input 2 Group 2 Pair 1
2
SDI Input 1 Group 2 Pair 2
2
SDI Input 2 Group 2 Pair 2
2
SDI Input 1 Group 3 Pair 1
2
SDI Input 2 Group 3 Pair 1
2
SDI Input 1 Group 3 Pair 2
2
SDI Input 2 Group 3 Pair 2
2
SDI Input 1 Group 4 Pair 1
2
SDI Input 2 Group 4 Pair 1
2
SDI Input 1 Group 4 Pair 2
2
SDI Input 2 Group 4 Pair 2
2
AES
AES Input Pair 1
2
Analogue
Analogue Input Pair 1
2
Total Channel Count
36
Page 20 of 33
SAM-Q Internal Audio Mixer
The SAM-Q-SDI internal audio mixer features 16 input channels (8 audio pairs) that are fed by the internal
audio router, as well as the capacity to store and recall a up to 8 independent audio mixes.
Each of the 8 audio mixes can be readily recalled by rotating the small rotary encoder on the left-hand side
of the front panel (labelled #1 above).
The sources available in each mix are independent of one another and can be readily assigned to selection
buttons 1 to 8 as desired.
As well as assigning sources to the audio mix of your choice, audio mixes can also be assigned a friendly
name (i.e. SPORTS, NEWS, REPLAY 1, SERVER 2, EDIT 3 etc.), to help you quickly identify the audio mixes
and the audio sources you wish to monitor.
The default mix names and the audio sources assigned to them can be seen below:
MIX A
MIX B
MIX C
MIX D
MIX E
MIX F
MIX G
MIX H
Source 1
SDI 1
G1P1
SDI 2
G1P1
AES
Source 2
SDI 1
G1P2
SDI 2
G1P2
Analog
Source 3
SDI 1
G2P1
SDI 2
G2P1
Source 4
SDI 1
G2P2
SDI 2
G2P2
Source 5
SDI 1
G3P1
SDI 2
G3P1
Source 6
SDI 1
G3P2
SDI 2
G3P2
Source 7
SDI 1
G4P1
SDI 2
G4P1
Source 8
SDI1
G4P2
SDI2
G4P2
As well as assigning friendly names to each of the 8 audio mixes, it is also possible to assign friendly names
to each of the sources feeding them.
Please refer to the Routing Menu option later in this document for Information on how sources can be
routed to specific audio mixes.
Other manuals for SAM-Q-SDI
1
Table of contents
Other TSL Speakers System manuals


 User manual")


