Tsunami 21999-0265 User manual

THE FOLLOWING USER MANUAL APPLIES TO TSUNAMI BREATHING AIR SYSTEMS
Date Printed: 8/2/2023 764-2099 1
•Failure to understand and follow the warnings and instructions may cause
Injury or Death.
•Failure to read and understand all warning and instructions on the
products you are using (paints, solvents, epoxy resins, pesticides, etc.)
may cause Injury, Disease, or Death.
•Not for use with petroleum based powered air compressors.
•All maintenance and operational instructions must be followed. Failure to
follow these instructions may result in injury or loss of life.
•All instructions for the carbon monoxide (CO) monitor must be followed
exactly.
•Do not attempt to use the respirator without reading and understanding
the instructions of the product.
•Never wear supplied air respirators in any atmosphere that may contain
levels of contamination which are unknown or may be Immediately
Dangerous to Life or Health (IDLH).
•You must use a supplied air respirator that adheres to the guidelines set
by the ANSI Z88.2
•Your breathable air system MUST comply with OSHA 29 CFR 1910.134 and
CSA Z180.1-13
•All respirable hoses, masks, and hoods MUST be NIOSH approved.
•You must use a supplied air respirator that adheres to the statutes set
forth by your federal, state, and local Occupational Safety and Health
Administrations.
•This breathing air system reduces but does not eliminate your exposure
to inhaled chemicals or contaminants. It Does Not provide total
protection.
•If you have ever experienced breathing complications while around or
after exposure to paint, isocyanates, solvents, etc. DO NOT USE this
breathing air system.
•If you are sensitized to paint, isocyanates, solvents, etc., DO NOT USE this
breathing air system, it WILL NOT protect you.
•DO NOT USE this product if you cannot understand the warnings or
instructions contained within this manual.
•If these warnings and instructions lead you to believe that you should not
use this breathing air system or that it will not protect you, DO NOT USE
IT, regardless of any instructions or statements from another source such
as an employer, a parts supplier, product manufacturer, etc., that indicate
you will be protected.
•YOU ARE SOLELY RESPONSIBLE for any injury, disease, damage, or death
caused by failure to follow these warnings and instructions.
•Do not use filtered air from panel to run air tools or spray guns.
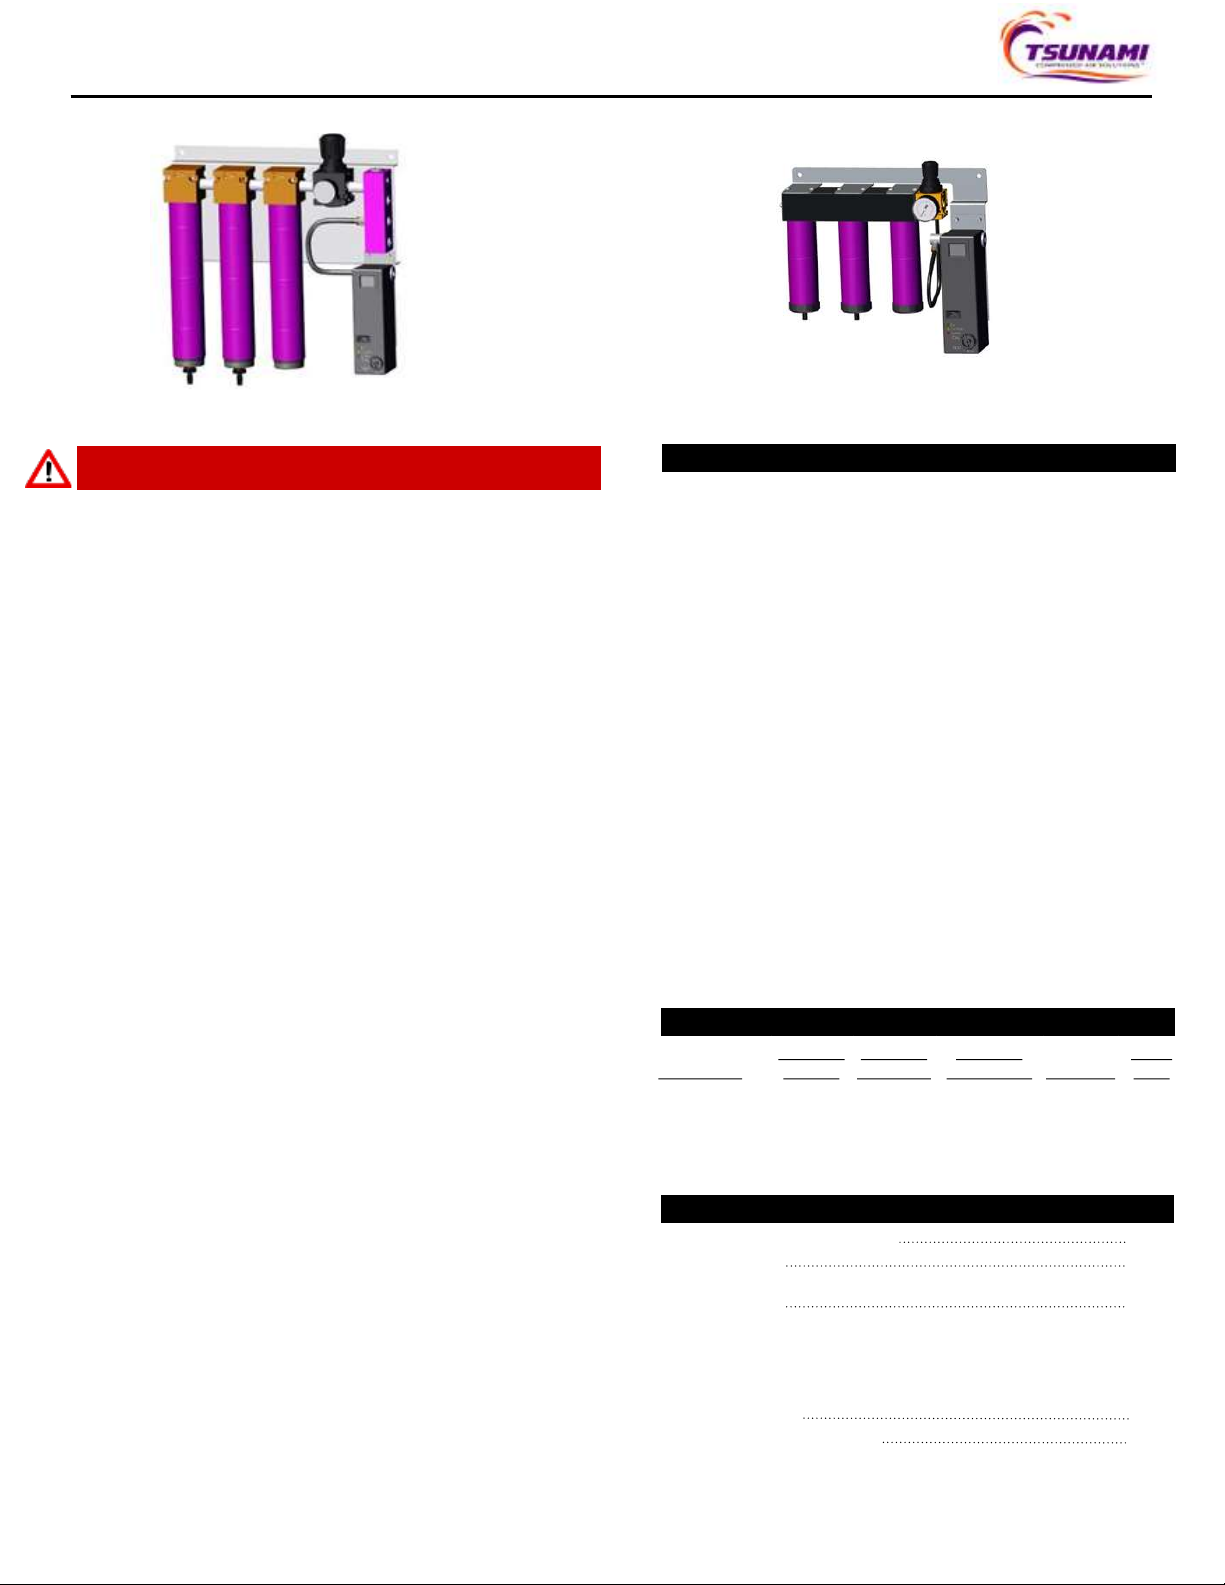
21999-0265 / 21999-0265-CA
WARNING!!!
21999-0980 / 21999-0980-CA
Congratulations on the purchase of your Tsunami Breathing Air
System! By adhering to the specifications and maintenance schedule
listed in the manual, your air system will provide years of service with
minimal maintenance.
Incoming air enters the 1st stage water separator where water and
particulates are removed down to 10 micron. The air then travels
through the 2nd stage oil coalescing filter where oil aerosols are
filtered down to .001 ppm and particulates are trapped down to .01
micron. Then it passes through an activated carbon filter to remove
oil vapors down to .003 ppm and progresses downstream to your
NIOSH approved supplied air breathing apparatus.
A small amount of this filtered breathing air is sampled through the
carbon monoxide monitor to accurately measure carbon monoxide
levels contained in you air stream and will emit an audible alarm
should the levels exceed OSHA or CSA permissible limits.
United States: 10ppm
Canada: 5ppm
All water separators and oil coalescing filters come standard with
automatic float drains to assure proper discharge of all contaminants
captured in the water separator and oil coalescing filter. The activated
carbon filter should not see any liquid contaminants so therefore
requires no drain. You can add your own manual drain to the bottom
of the activated carbon filter if you so choose.
DESCRIPTION
THE FOLLOWING USER MANUAL APPLIES TO TSUNAMI BREATHING AIR SYSTEMS
FILTER SPECIFICATIONS
Part Number
Maximum
Pressure
Maximum
Flow (CFM)
Maximum
Temperature
Inlet (NPT)
Outlet
(NPT)
21999
-0265 175 50 122 1/2" 1/4"
21999
-0265-CA 175 50 122 1/2" 1/4"
21999
-0980 175 20 122 1/4" 1/4"
21999
-0980-CA 175 20 122 1/4" 1/4"
INSTALLATION & SERVICE REQUIREMENTS
pg. 3
6 Month Service
•Inspect Water Separator Element
•Replace Oil Coalescing Filter Element
•Replace Activated Carbon Filter Element; earlier replacement may be
necessary in some applications
Parts Breakdown –Service Parts pg. 3
Drain Replacement pg. 3
pg. 2
Monthly Service
•Calibrate CO Monitor
pg. 2
Breathing Air System Installation

THE FOLLOWING USER MANUAL APPLIES TO TSUNAMI BREATHING AIR SYSTEMS
Breathing
Air Outlet .
Inlet Air
8/2/2023 764-2099 2
WARNING
Your safety is important. System pressure must be released prior to any
installation or service. Failure to follow instructions could result in operating
failure or product damage. Always install filtration with the arrows indicating the
direction of airflow. Use only appropriate thread sealant on all connection
fittings unless otherwise specified. Do not alter the filtration from its original
design as this may cause failure in its operation parameters.
Activate
Carbon Filter
Oil Coalescing
Filter
Water Separator
BREATHING AIR SYSTEM INSTALLATION
Figure 1
C
Carbon Monoxide
Monitor
Inlet Air
Breathing
Air Outlet .
CALIBRATION OF CARBON MONOXIDE MONITOR C
1. Follow calibration procedure laid out in the GFG RAM 744 manual
Note: GFG manual can be accessed using the QR code below
1. Read supplied GFG Carbon Monoxide Monitor manual.
2. Send in warranty registration for CO monitor as directed in manual
3. Mount panel to wall using appropriate hardware to properly secure a
weight of 25 pounds
4. Mount the filters in an upright position; allow a minimum clearance of
10” below the filters to allow for the removal of the housing during
required service of the water separator, oil coalescing filter, and
activated carbon filter.
5. When plumbing your filters into your air system, it is recommended to
install an isolation ball valve (not supplied).
6. Once mounted, route drain tubing from the first two filters to an
appropriate water/oil condensate collection tank or other location.
Note: Multi-User systems come with supplied barbed fittings and clear
drain tubing; single-user systems do not. For single-user systems, you
can purchase 5/16” I.D. clear vinyl tubing and gently secure to float
drain tip with a band clamp. Caution: band clamps do not guarantee
your tubing is effectively and properly secured.
7. Wire in the wall pack adaptor to the CO Monitor. (a skilled electrician
should be used with any electrical procedure)
BREATHING AIR SYSTEM INSTALLATION cont. C
8. Set respirator to respective manufacture’s specifications.
Note: Inlet and Outlet Air locations specified above. Outlet air is for
breathing equipment only.
9. Verify monitor is on when in use and system has air pressure present;
Alarm will sound if no pressure is present.

THE FOLLOWING USER MANUAL APPLIES TO TSUNAMI BREATHING AIR SYSTEMS
8/2/2023 764-2099 3
Figure #1: Water Separator Figure #2: Oil Coalescing Filter Figure #3: Activated Carbon
IMPORTANT: The following maintenance schedule is recommended for all Tsunami
Breathing Air Systems
•Water Separator - No Maintenance Required. Clean as needed
•Oil Coalescing Filter - Mandatory Every 6 Months
•Activated Carbon - Mandatory Every 6 Months, earlier replacement may be
necessary in some applications
•Calibrate Carbon Monoxide Monitor - Every Month
Calibration Kit for CO Monitor is: 21999-0264
Important:. Calibration procedures should be followed as detailed
in the GFG owners manual.
1. Release system pressure.
2. Remove tube from filter head by holding filter head and turning the tube
counter-clockwise.
3. Using a 5/16” wrench, remove the baffle from threaded rod below the
element.
4. Remove bottom baffle, filter element, and O-ring.
5. Clean stainless steel mesh with soapy water or replace entire element with
service kit. Refer to Service Chart shown above.
6. Replace filter element and hardware in reverse order from previous steps.
Tighten baffle until filter element can no longer spin freely. DO NOT OVER
TIGHTEN!
7. Reinstall outer tube by rotating clockwise onto filter head.
8. Slowly pressurize the unit.
SERVICE REQUIREMENTS
WATER SEPARATOR ELEMENT
OIL COALESCING ELEMENT / ACTIVATED CARBON ELEMENT
1. Release system pressure.
2. Remove tube from filter head by holding filter head and turning the tube
counter-clockwise.
3. Using a 5/16”wrench, remove the baffle from threaded rod below the
element.
4. Remove bottom baffle, filter element, element gaskets, top adaptor, and
O-ring.
5. Replace filter element and hardware in reverse order from previous
steps. Tighten baffle until filter element can no longer spin freely. DO
NOT OVER TIGHTEN!
6. Reinstall outer tube by turning clockwise onto filter head.
7. Slowly pressurize the unit.
FLOAT DRAIN REPLACEMENT
1. Release system pressure.
2. Remove bottom cap by holding filter tube and turn bottom cap counter-
clockwise.
3. Grasp the float drain by stem and turn counter-clockwise.
4. Reinstall new float drain by turning clockwise direction until O-ring
contacts the end cap. Tighten an additional 1/4 turn. DO NOT OVER
TIGHTEN!
5. Reinstall end cap on filter tube.
6. Slowly pressurize system.
SERVICE PARTS
Part Number Water Separator
Oil Coalescing
Filter 5-
Pack
Coalescing Elements
Activated Carbon
Filter 5-Pack Activated
Carbon Elements 3-
Pack
Float Drains
21999
-0265
21999
-0265-CA 21999-0227 21999-0202 21999-0825 21999-0200 21999-0826 21999-0868
21999
-0980
21999
-0980-CA 21999-0846 21999-0394 21999-0823 21999-0395 21999-0824 21999-0868
Your safety is important. System pressure must be released prior to any installation or service. Failure to follow instructions could result in
operating failure or product damage. Always install filtration with the arrows indicating the direction of airflow. Use only appropriate thread sealant
on all connection fittings unless otherwise specified. Do not alter the filtration from its original design as this may cause failure in its operation
parameters. Always wear eye protection when working on compressed air systems. Use appropriate thread sealant on all fittings unless otherwise
specified.
Warning!!!
This manual suits for next models
3