TT RC Sport Playerunknown's Battlegrounds PUBG buggy User manual

PUBGbuggy

SAFETY PRECAUTIONS 安全注意事項
INDEX 索引
TOOLS REQUIRED FOR ASSEMBLY 組裝維修工具
SYMBOL REFERENCE KEY 說明書符號說明
Build right and left assembly
組裝左和右配件
Xwrench
十字套筒
Hex Driver Tool Set ( 1.5/2.0 )
六角板手組
Build front and rear assembly
組裝前和後配件
Assemble the parts two times
組裝相同配件兩次
Assemble the parts four times
組裝相同配件四次
2 >>>
Please read all the instructions and familiarize yourself with the product and its controls before operation.
1. This product is not a toy. It is a high performance model car therefore it is important to familiarize yourself with the model, its manual,
and its construction before assembly or operation. Adult supervision is necessary for children operating this model.
2. Always keep this instruction manual on hand during assembly and for operating reference.
3. Do not use a power screwdriver to install screws into plastic parts. A power screwdriver's high rotation speed can heat up the screw
being installed which can result in some melting of the plastic parts or stripped threads.
4. For best performance, it is important to make sure all the moving parts can move freely without binding.
5. This product, its parts, and its assembly tools can be harmful to your health. Always exercise extreme caution when assembling and
operating this product. Keep away from any high speed rotating parts during operation.
在您開始操作本產品之前,請詳閱本產品說明書。
1. 本產品為高性能模型產品非一般玩具,組裝與操作過程皆需由成人陪同。
請詳讀此本使用說明書,避免因組裝錯誤與操作不當造成損壞。
2. 請妥善保管此說明書,對於後續維修、操控說明將可提供您協助。
3. 請勿使用電動工具旋緊自攻螺絲於塑膠零件上,可能導致塑膠零件融化或滑牙。
4. 請檢視所有活動部位零件是否不受干涉、可靈活作動,以達車輛最佳性能。
5. 此項商品具有相當之危險性,於組裝、操控上的不熟悉都可能造成自身或他人的傷害。
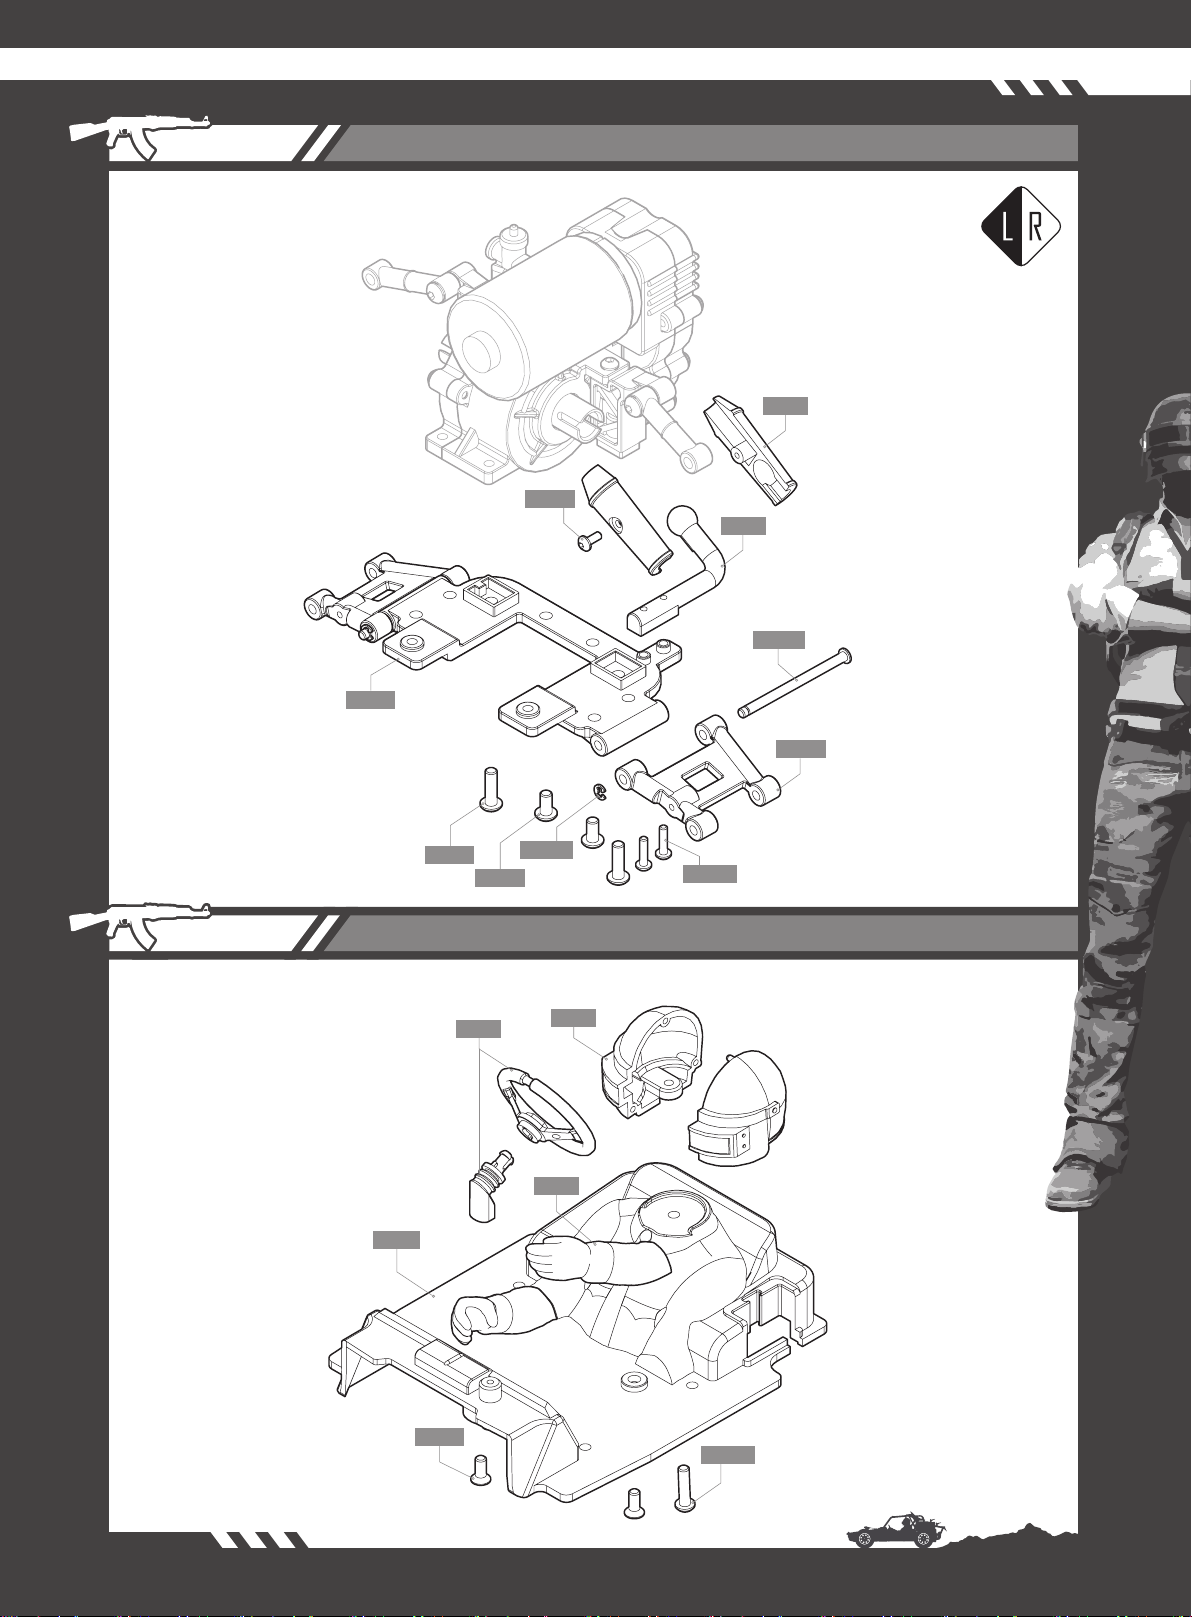
STEP 1 FRONT SUSPENSION 前擺臂 ---------------------------- P3
STEP 2 DIFFERENTIAL GEAR SET 差速齒輪組 ----------------- P3
STEP 3 GEAR BOX SET 齒輪箱組 -------------------------------- P4
STEP 4 REAR SUSPENSION 後擺臂 ------------------------------ P5
STEP 5 DRIVER INTERIOR DETAIL 駕駛內裝組 ----------------- P5
STEP 6 CHASSIS ASSEMBLY 底盤組裝 -------------------------- P6
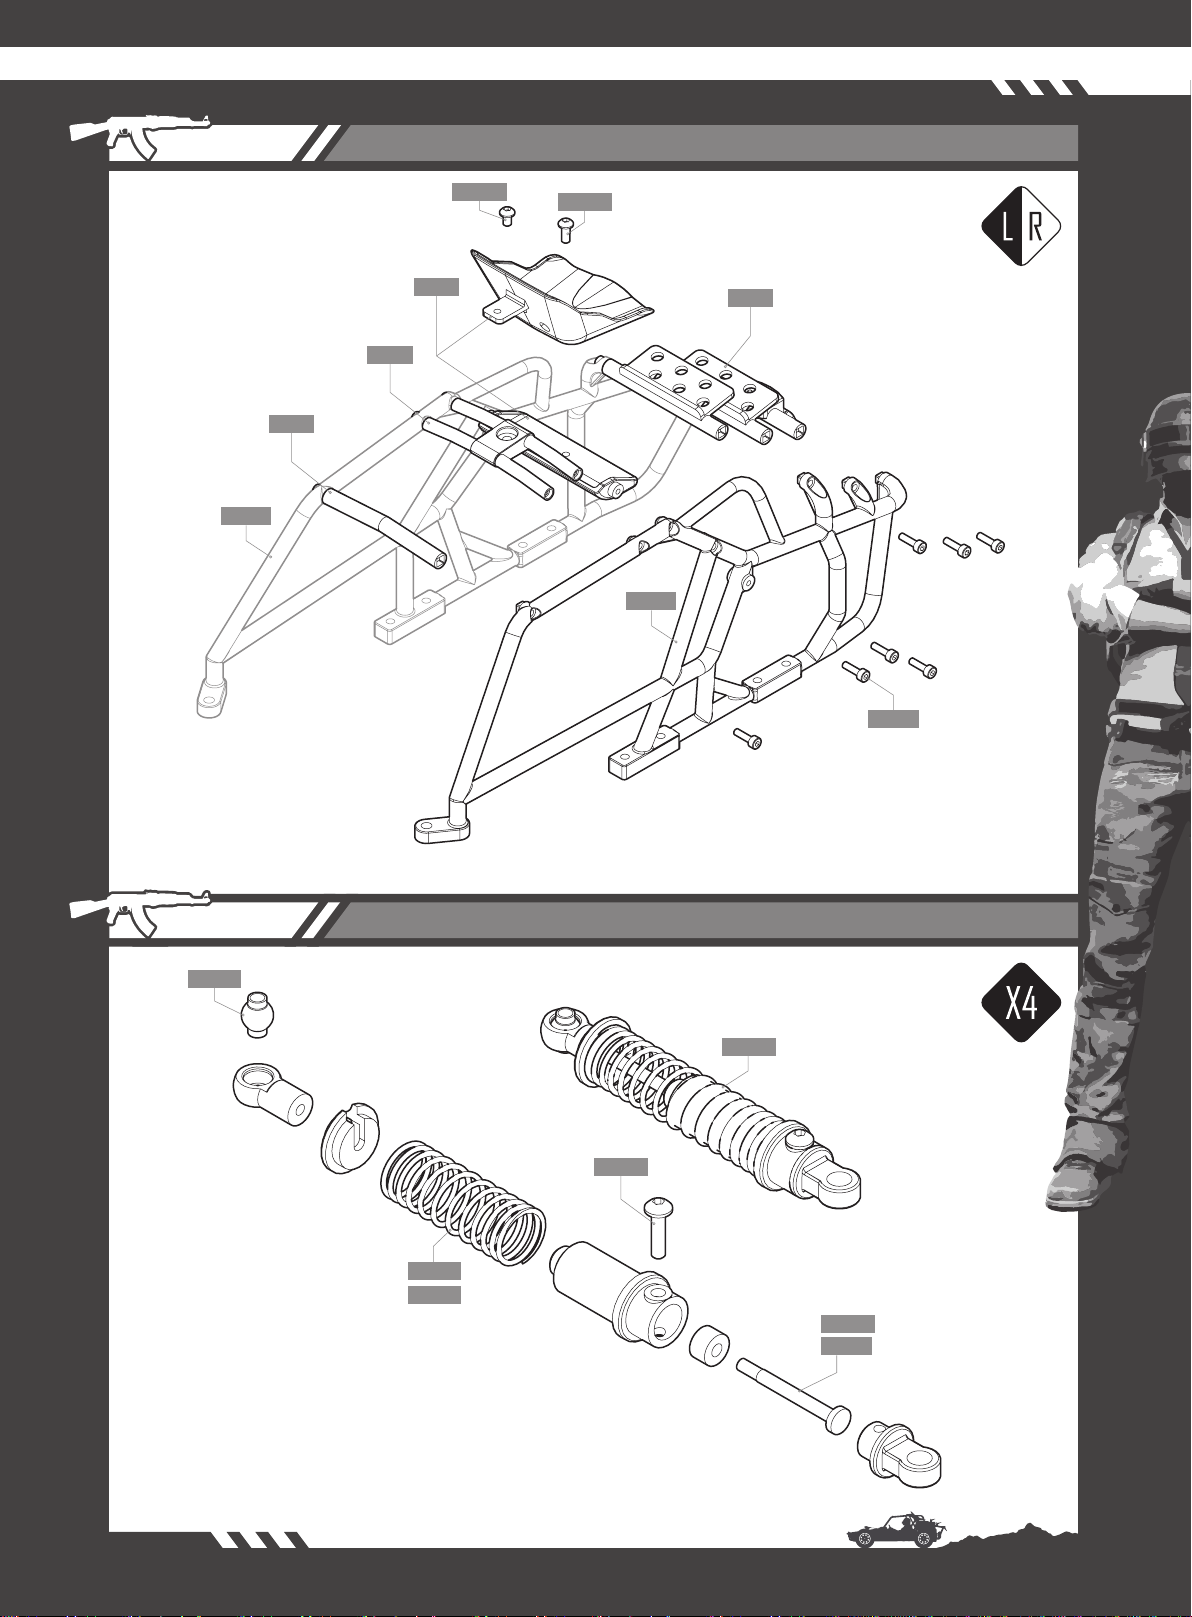
STEP 7 ROLL CAGE ASSEMBLY 防滾籠組裝 -------------------- P7
STEP 8 SHOCK ASSEMBLY 避震器組 ---------------------------- P7
STEP 9 BODY ASSEMBLY 車殼組裝 ------------------------------ P8
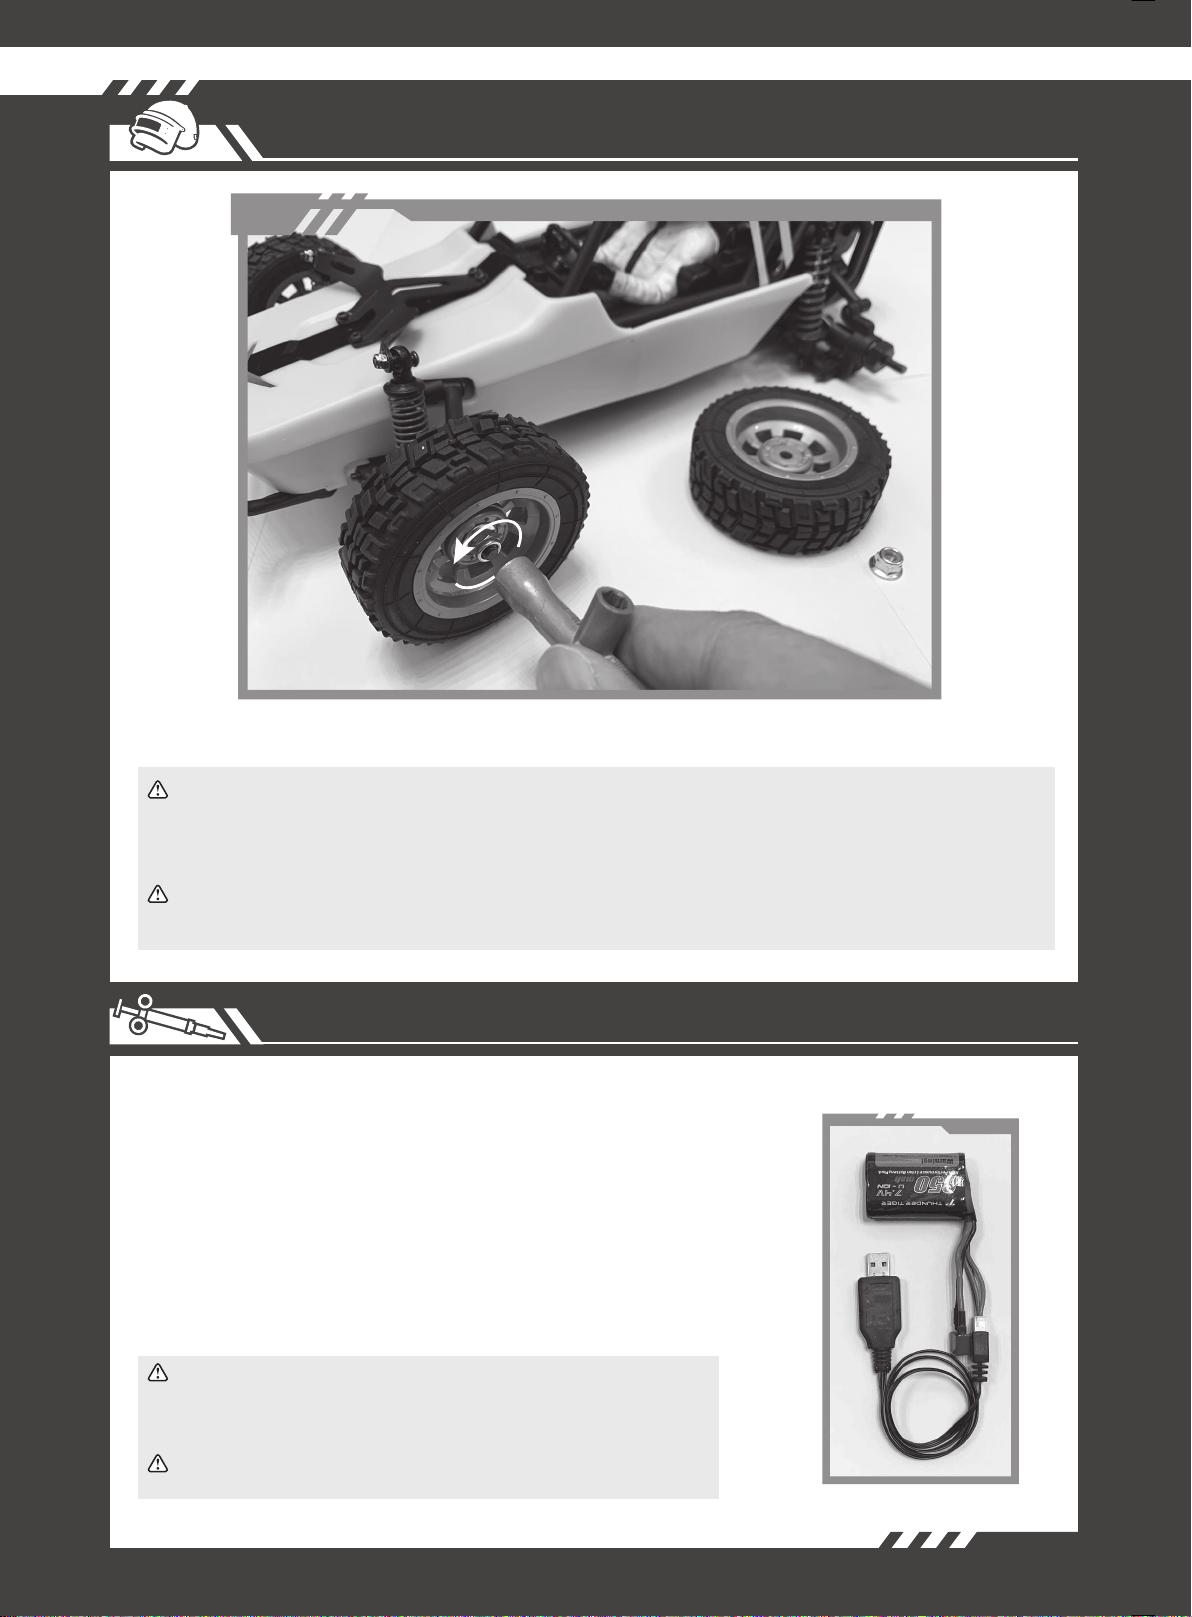
STEP 10 TIRES AND WHEELS 輪胎與輪框組 ----------------------- P9
WHEEL AND TIRE PREPARATION 輪框與輪胎拆卸 -------- P10
BATTERY CHARGING 電池充電指南 ----------------------- P10
TRANSMITTER 2.4GHz SYSTEM 2.4GHz 遙控器說明 ------ P11
BATTERY INSTALLATION 電池安裝 ------------------------- P12
RADIO OPERATION 遙控器操作 ---------------------------- P12
OPERATING RADIO STEERING FUNCTION 遙控器轉向設定 ----- P13
DRIVING BASIC 操控基本動作 ----------------------------- P13
PARTS LIST 零件表 --------------------------------------- P14.P15

SAFETY PRECAUTIONS 安全注意事項
INDEX 索引
TOOLS REQUIRED FOR ASSEMBLY 組裝維修工具
SYMBOL REFERENCE KEY 說明書符號說明
Build right and left assembly
組裝左和右配件
Xwrench
十字套筒
Hex Driver Tool Set ( 1.5/2.0 )
六角板手組
Build front and rear assembly
組裝前和後配件
Assemble the parts two times
組裝相同配件兩次
Assemble the parts four times
組裝相同配件四次
2 >>>
STEP 1 FRONT SUSPENSION 前擺臂
<<< 3
DIFFERENTIAL GEAR SET
STEP 2 差速齒輪組
PG-21126
M3x6
PG-21102
PG-21127
PG-21110
M2.5x8
M2.5x10
PG-21100
PG-21123
PG-21123
PG-21119
PG-21119 PG-21110
PG-21077
PG-21122
M2x6
M2.5x8
PG-21079
M3x2.5x6x6
32.4x2.5
PG-21074
4x1.5
PG-21122
PG-21094
PG-21027
PG-21027
M2x10
PG-21096
10x15x4
PG-21071
PG-21023
PG-21026
PG-21091
PG-21089
PG-21092
PG-21090
6x2.5
PG-21094
PG-21087

4 >>>
STEP 3 GEAR BOX SET 齒輪箱組
PG-21123
M3x6
PG-21109
PG-21024
PG-21072
PG-21124
PG-21124
PG-21127
M2.5x10
PG-21100
5x10x4
PG-21085
PG-21124
PG-21042
PG-21041
M3x14
PG-21093
M2.5x6 PG-21107
M2.5x6 PG-21098
M2x8
PG-21003
PG-21028
5x11x4
PG-21086
M2.5x10
PG-21100
M2.5x14
PG-21101
PG-21124
M2.5x6
PG-21098
PG-21125
PG-21123
PG-21088
PG-21111
M3x3
M2.5x12
PG-21124
M2.5x12
PG-21133
PG-21117
M3x2.5x6x6
PG-21079
PG-21122

STEP 4 REAR SUSPENSION 後擺臂
DRIVER INTERIOR DETAIL
前轉向組
STEP 5
<<< 5
駕駛內裝組
PG-21117
PG-21123
PG-21117
PG-21117
M2x5
M2x8 PG-21095
36x2.5
PG-21074
PG-21130
PG-21122
4x1.5
PG-21094
M3x10
PG-21104
M3x6
PG-21102
PG-21117
PG-21117
PG-21117
M2.5x8
PG-21099
M2.5x6
PG-21107

6 >>>
STEP 6 CHASSIS ASSEMBLY 底盤組裝
A
B
C
B
B
C
BA
PG-21119
M2.5x4
PG-21097
PG-21128
PG-21118
M3x6
M3x6
PG-21102
PG-21102
2 Sided tape
2 Sided tape
*Receiver
*ESC
*Battery
*Power switch

6 >>>
STEP 6 CHASSIS ASSEMBLY 底盤組裝
A
B
C
B
B
C
BA
<<< 7
STEP 7 ROLL CAGE ASSEMBLY 防滾籠組裝
SHOCK ABSORBER GROUP
STEP 8 避震器組
PG-21117
PG-21120
PG-21120
M2.5x4
PG-21097
M2.5x6
PG-21098
PG-21121
PG-21121
PG-21121
PG-21108
M2x8
M2x8
M2x8
PG-21076
REAR
FRONT PG-21082
PG-21084
M2x8
PG-21095
REAR
FRONTPG-21081
PG-21083
PG-21080

8 >>>
STEP 9 BODY ASSEMBLY 車殼組裝
<<< 9
STEP 10 TIRES AND WHEELS 輪胎與輪框組
PG-21117
PG-21118
PG-21110
PG-21113
M2x6
M3x12
PG-21105
PG-21106
M3x8
PG-21103
M2x10
M2
PG-21112 M2x10
PG-21096
PG-21096
M2x17 PG-21114
PG-21095
PG-21132
M2x8
M3x16
M3x16

<<< 9
STEP 10 TIRES AND WHEELS 輪胎與輪框組
PG-21122
PG-21122
PG-21122
M3x2.5x6x6
PG-21079
20x2.5
PG-21075
4x1.5
PG-21094
M3x2.5x6x4
PG-21078
PG-21069
M2x10
PG-21004
M4
PG-21058
PG-21115
PG-21116
PG-21077
PG-21073
PG-21080
PG-21070
5x10x4
PG-21085
PG-21075
30x2.5

WHEEL AND TIRE PREPARATION 輪框與輪胎拆卸
10 >>>
Battery Charging Steps and Safety:
Remove the battery from the vehicle before charging.
Place battery on a fire resistant surface.
Avoid any contact with water or other liquids.
從車台上將電池取出後,請將電池擺放在防火墊上,並且避免接觸到任何液體。
ALWAYS use a compatible charger for charging your batteries.
充電時請選擇適當的USB變壓器。
Never leave the battery unattended while charging. Always disconnect
the charger from the power source when finished charging.
充電時如中途離開,請務必拔除充電線。
Always disconnect the battery when you are finished driving the vehicle.
在不遊玩車台的情況下,請拔除電池的電源線。
Make Sure The Axle Nuts Are Tight Before Each Run
Before operating your vehicle, take a moment to make sure the axle nuts are tight, as they may have loosened during shipping.
The correct size axle-nut wrench is supplied with the truck. Check the tightness of the axle nuts before each run.
Please continue to check tightness prior to operating vehicle each time.
輪胎鎖附步驟加註注意事項
在操作之前請先確認輪胎之固定六角螺帽是被鎖緊的。如未鎖緊,可使用隨車所附的螺帽套筒扳手將螺帽鎖緊。
每趟跑完或是再次出發前請務必檢查固定螺帽是否鬆脫?此車之高轉速與高扭力很可能於每一次的操作時使螺帽漸漸地鬆脫。
BATTERY CHARGING 電池充電指南
Remove wheel lock nut using the Xwrench and detach wheels.
使用內附之六角螺帽套筒板手將輪轂上六角固定螺帽取下。
*Battery*Battery
*USB Charger*USB Charger
TRANSMITTER 2.4GHz SYSTEM 2.4GHz 2.4GHz遙控器說明
<<<11
1
5
6
9
2
3
4
8
10
7
1 1
Battery Level Indicator
發射機電源顯示燈
Power Switch
電源開關
Servo reversing switches
正逆轉設定裝置
Steering Trim
轉向微調鈕
Throttle Trim
油門微調鈕
Steering D/R (Dual Rates)
轉向大小動調整鈕
Throttle Trigger
油門控制板機
External Charging Jack
充電孔
2.4GHz Binding
校頻配對設定鈕
Steering Wheel
轉向舵輪
Battery Cover
電池蓋
TRANSMITTER CONTROLS
Green / Red LEDs indicate the battery voltage. If the Red LED flashes, please replace the batteries.
兩顆LED設計顯示發射機電池殘量,若紅色LED燈閃爍時,請更換發射機電池。
Slide to turn the transmitter on or off.
發射機電源開關。
Adjusts the steering in small increments or decrements to run the model straight.
利用此旋鈕,調整設定轉向正確中立點位置。
Adjusts the throttle in small increments or decrements to shift the neutral position.
利用此旋鈕,調整設定油門正確中立點位置。
Turn this knob left or right to adjust the amount of the steering dual rate.
Right to increase dual rate amount and left to decrease the amount.
調整轉向伺服機的行程量。
Pull or push to control the movement of the model.
控制車輛前進或後退的裝置。
For rechargeable NiCd/NiHM battery pack on the transmitter only.
使用充電式電池時,可利用此充電孔,進行充電工作。
The Binding button is located on the top of the 2.4GHz transmitter.
2.4Hz 之 BINDING SW 校頻配對設定鈕,為配對發射接收頻率之用。
Control the steering of the model.
控制車輛轉向裝置。
Slide cover to install or remove batteries.
推移電池護蓋即可取出電池進行更換。
To reverse the servo's rotation direction at the flip of the switch.
The reversing switches are recessed into the transmitter to prevent accidental operation.
依實際使用,控制伺服機作動方向。
發射機各部功能簡介
*Transmitter*Transmitter

RADIO OPERATION 遙控器操作
12 >>>
[ 1 ] [ 2 ] [ 3 ]
BATTERY INSTALLATION 電池安裝
Disconnect Batteries After Use
Always disconnect the batteries from the Speed Controller when you are finished using your vehicle. The switch on the
Speed Controller only shuts off power to the receiver and servos.The Speed Controller continues to draw power as long
as it is plugged in and may overdischarge your batteries if they are left connected to the Speed Controller.
操作完畢注意事項
請務必於每次操作完畢後解除電子速控器與電池的連結狀態。電子速控器電源開關僅只關掉接收機與伺服機的電源供應。
電池內部電流消耗會因為電源線未拔離而持續且可能會因此而過度放電而導致無法預期的危險。
[ 1 ] [ 2 ]
Install 4pcs alkaline or rechargeable
AA-size batteries into transmitter.
安裝 4 顆三號鹼性電池或充電電池
於發射機內。
Connect battery cable with (ESC)
Electronic Speed Controller cable.
將電池線連接速控器電源線。
WARNING: The electronic system is powerful. For
safety, please always keep the wheels away from
the ground when you are preparing to switch on
the car.
注意:本系統功率十分強勁!基於安全因素,
建議請在車輪懸空的裝態下開啟系統電源,
避免非預期性的暴衝。
When turning radio system on. Turn
the transmitter on first, then turn
on the ESC.
When turning the radio system off.
Turn the ESC off first, then turn off
the transmitter.
為避免車子失控暴衝,先開啟發射
機電源。
接著開啟速控器電源。電源的關閉
則是相反的順序,先關速控器電源
,再關發射機電源。
<<<13
DRIVING BASIC 操控基本動作
Return the steering wheel to neutral. The front tires/wheels should point
straight forward. If not, use the steering trim lever to correct it.
Turn the steering wheel to the right. The front tires/
wheels should turn right accordingly.
確認轉向功能。打開發射機及接收機電源,方向轉左邊時,輪胎將朝向左邊
,若方向不一致,請調整方向的正逆轉開關。
方向回中立點時,前輪應筆直向前,若有偏差,請調整方向微調旋鈕。
方向轉向右邊時,前輪應轉向右邊。
Stop (Neutral)
停 (中立點)
Brake
煞車
Reverse
後退
Acceleration
加速
OPERATING RADIO STEERING FUNCTION 遙控器轉向設定
Check the radio steering functions. With the radio transmitter and receiver on,
turn the steering wheel to the left. The front tires /wheels should turn left
accordingly. If not, flip the steering servo reverse switch.

14 >>>
PART# DESCRIPTION 品名 PART# DESCRIPTION 品名
PG-21003 SPUR GEAR SHAFT PIN
>>> 中差齒固定軸 PIN 2X7.8
PG-21004 WHEEL NUT PIN
>>> 輪胎轉接座 PIN
PG-21023 DIFF BEVEL GEAR 39T
>>> 大齒輪 39T
PG-21024 PINION GEAR 16T
>>> 小齒輪 16T
PG-21026 GEAR DIFF CASE
>>> 差速殼
PG-21027 DIFFERENTIAL SET
>>> 差速組
PG-21028 CENTER SPUR GEAR 56T
>>> 中差齒 56T
PG-21036 LION 850mAh BATTERY
>>> 850mAh 鋰鐵電池 T插
PG-21037 BRUSHED WATERPROOF ESC
>>> 防水電子變速器
PG-21039 2.4G RADIO SET
>>> 遙控器 + 防水接收機
PG-21041 CENTER DIFF GEAR
>>> 中差減速齒
PG-21042 BEARING 3x6x2.5
>>> 軸承 3x6x2.5
PG-21058 M4 LOCK NUT
>>> M4 尼帽
PG-21059 USB CHARGER 7.4V(OP500mAh)
>>> USB 充電線 7.4V( 輸出 500mAh)
PG-21069 PUBG BUGGY FRONT WHEEL AXLE (2PCS)
>>> PUBG BUGGY 前輪軸
PG-21070 PUBG BUGGY REAR OUTDRIVE (2PCS)
>>> PUBG BUGGY 後接杯
PG-21071 PUBG BUGGY DIFF. OUTDRIVE (2PCS)
>>> PUBG BUGGY 差速接杯
PG-21072 PUBG BUGGY GEAR SHAFT (2PCS)
>>> PUBG BUGGY 大直齒固定軸
PG-21073 PUBG BUGGY REAR DOGBONE (2PCS)
>>> PUBG BUGGY 後狗骨 38mm
PG-21074 PUBG BUGGY ARMS PIN F/R (2PCS ea.)
>>> PUBG BUGGY 擺臂插銷
PG-21075 PUBG BUGGY KNUCKLE PIN F/R (2PCS ea.)
>>> PUBG BUGGY 輪座插銷
PG-21076 PUBG BUGGY SHOCK BALLEND SET (4PCS)
>>> PUBG BUGGY 避震器球頭
PG-21077 PUBG BUGGY STEERING BALL END (4PCS)
>>> PUBG BUGGY 轉向拉桿球頭
PG-21078 PUBG BUGGY C-HUB SCREW (4PCS)
>>> PUBG BUGGY C 座螺絲
PG-21079 PUBG BUGGY LINK SCREW (8PCS)
>>> PUBG BUGGY 前後拉桿螺絲
PG-21080 PUBG BUGGY COMPLETE SHOCKS SET (2PCS ea.)
>>> PUBG BUGGY 前後筒身完成組 ( 各兩隻 )
PG-21081 PUBG BUGGY FRONT SHOCK SHAFT (2PCS)
>>> PUBG BUGGY 前避震軸心
PG-21082 PUBG BUGGY FRONT SHOCK SPRING (2PCS)
>>> PUBG BUGGY 前避震彈簧 - 紅色
PG-21083 PUBG BUGGY REAR SHOCK SHAFT (2PCS)
>>> PUBG BUGGY 後避震軸心
PG-21084 PUBG BUGGY REAR SHOCK SPRING (2PCS)
>>> PUBG BUGGY 後避震彈簧 - 紅色
PG-21085 BALL BEARING 5X10X4 (4PCS)
>>> 5x10x4 防塵軸承
PG-21086 BALL BEARING 5X11X4 (4PCS)
>>> 5x11x4 防塵軸承
PG-21087 BALL BEARING 10X15X4 (4PCS)
>>> 10x15x4 防塵軸承
PG-21088 18T PINION GEAR (1PC)
>>> 18T 馬達齒
PG-21089 14T GEAR (2PCS)
>>> 14T 大傘齒
PG-21090 SHIM 5x11.5x0.2 (3PCS)
>>> 5mm 大傘齒墊片 5x11.5x0.2
PG-21091 PUBG BUGGY DIFF. SHIM (1PC)
>>> PUBG BUGGY 差速墊片
PG-21092 O-RINGS 5X7.5X1.5 (5PCS)
>>> O環5x7.5x1.5(紅色)
PG-21093 PIN 3.0x13.8 (4PCS)
>>> PIN 3.0x13.8mm
PG-21094 E-CLIPS 1.5mm & 2.5mm (4PCS ea.)
>>> E扣組 (1.5mm & 2.5mm)

14 >>>
<<< 15
PART# DESCRIPTION 品名 PART# DESCRIPTION 品名
PG-21115 PUBG BUGGY FRONT TIRE COMPLETE SET (2 SETS)
>>> PUBG BUGGY 前輪胎完成組 (2 入 )
PG-21116 PUBG BUGGY REAR TIRE COMPLETE SET (2 SETS)
>>> PUBG BUGGY 後輪胎完成組 (2 入 )
PG-21117 PUBG BUGGY DRIVER ACCESSORIES
>>> PUBG BUGGY 車殼配件組
PG-21118 PUBG BUGGY CHASSIS SET
>>> PUBG BUGGY 底盤組
PG-21119 PUBG BUGGY BATTERY TRAY SET
>>> PUBG BUGGY 電池盒組
PG-21120 PUBG BUGGY ROLL CAGE SET (L/R)
>>> PUBG BUGGY 防滾架組(左/右)
PG-21121 PUBG BUGGY ROLL CAGE SET (TOP)
>>> PUBG BUGGY 防滾架組 ( 上 )
PG-21122 PUBG BUGGY SUSPENSION ARMS SET (F/R)
>>> PUBG BUGGY 擺臂拉桿組
PG-21123 PUBG BUGGY ARMS MOUNT SET
>>> PUBG BUGGY 擺臂拉桿固定組
PG-21124 PUBG BUGGY GEARBOX SET
>>> PUBG BUGGY 齒輪箱組
PG-21125 PUBG BUGGY BRUSHED MOTOR
>>> PUBG BUGGY 380 有刷馬達
PG-21126 PUBG BUGGY SERVO
>>> PUBG BUGGY 伺服機
PG-21127 PUBG BUGGY SHIM 2x6x0.4 (6pcs)
>>> PUBG BUGGY 墊片 (2x6x0.4)
PG-21128 PUBG BUGGY SERVO LEAD EXTENSION
>>> PUBG BUGGY 伺服器延長線
PG-21129 PUBG BUGGY BODY DECAL
>>> PUBG BUGGY 車殼貼紙
PG-21130 BUTTON HEAD SCREW M2x5 (6PCS)
>>> 圓頭內六角螺絲 M2x5
PG-21132 BUTTON HEAD SCREW M2x17 (6PCS)
>>> 圓頭內六角螺絲 M2x17
PG-21133 BUTTON HEAD SCREW M2.5x12 (6PCS)
>>> 圓頭內六角螺絲 M2.5x12
PG-21095 BUTTON HEAD SCREW M2.0x8 (6PCS)
>>> 圓頭內六角螺絲 M2x8
PG-21096 BUTTON HEAD SCREW M2.0x10 (6PCS)
>>> 圓頭內六角螺絲 M2x10
PG-21097 BUTTON HEAD SCREW M2.5x4 (6PCS)
>>> 圓頭內六角螺絲 M2.5x4
PG-21098 BUTTON HEAD SCREW M2.5x6 (6PCS)
>>> 圓頭內六角螺絲 M2.5x6
PG-21099 BUTTON HEAD SCREW M2.5x8 (6PCS)
>>> 圓頭內六角螺絲 M2.5x8
PG-21100 BUTTON HEAD SCREW M2.5x10 (6PCS)
>>> 圓頭內六角螺絲 M2.5x10
PG-21101 BUTTON HEAD SCREW M2.5x14 (6PCS)
>>> 圓頭內六角螺絲 M2.5x14
PG-21102 BUTTON HEAD SCREW M3.0x6 (6PCS)
>>> 圓頭內六角螺絲 M3x6
PG-21103 BUTTON HEAD SCREW M3.0x8 (6PCS)
>>> 圓頭內六角螺絲 M3x8
PG-21104 BUTTON HEAD SCREW M3.0x10 (6PCS)
>>> 圓頭內六角螺絲 M3x10
PG-21105 BUTTON HEAD SCREW M3.0x12 (6PCS)
>>> 圓頭內六角螺絲 M3x12
PG-21106 BUTTON HEAD SCREW M3.0x16 (6PCS)
>>> 圓頭內六角螺絲 M3x16
PG-21107 FLAT HEAD SCREW M2.5x6 (6PCS)
>>> 平頭內六角螺絲 M2.5x6
PG-21108 FLAT HEAD SCREW M2x8 (6PCS)
>>> 平頭內六角螺絲 M2x8
PG-21109 FLAT HEAD SCREW M3.0x6 (6PCS)
>>> 平頭內六角螺絲 M3x6
PG-21110 CAP HEAD SCREW M2.0x6 (6PCS)
>>> 有頭螺絲 M2x6
PG-21111 SET SCREWS M3x3 (4PCS)
>>> M3x3 止付
PG-21112 M2 LOCK NUT (6PCS)
>>> M2 防鬆螺帽
PG-21113 PUBG BUGGY FRONT SHOCK MOUNT
>>> PUBG BUGGY 前避震器固定板
PG-21114 PUBG BUGGY SPACERS (4PCS)
>>> PUBG BUGGY 下拉桿頭襯套

# 20002
Table of contents
Other TT RC Sport Motorized Toy Car manuals