TURBO RACING C81 User manual


2
The package contains
Charging connector x1
i
No. 1 Jumping platform x 2
130x140x50mm
No. 2 Jumping platform x 2
170x135x40mm
1*Transmitter 1*Car
1*Manual
1*Type-C line + 1*Bind
Safety information
●Movable parts are dangerous, so it is forbidden to put ngers、hair、clothes and other things into the
space between the tire and the car body, to avoid being clamped by the rotating parts.
●Please play the car with the following scence:
Please don’t play in places where the car is running or near children, then avoid the risk of collision.
Please don’t play it in sand、water or dust, then avoid trobule.
Please don’t play towards people or animal, then avoid accident.
●For functional requirements, this product contains sharp parts, please follow the correct steps and use
methods, pay attention to eye safety.
●Please don’t bend or throw the product or play it with rough ways, then avoid an accidents.
●Please don’t put this product into water or re source(such as stove、gas stove,etc.), then avoid accidents.
Please read the manual before using the product and keep the manual for future use.

3
This remote uses AAA battery or Ni MH battery, when the voltage is lower than 4.5V ± 0.2V, the LED
starts ashing.
Prepare for run
Function description
1 Transmitter battery installation
Head light Rear light
Forward/backward Forward/backward
Turn right/turn left
Recharging hole: connect Type-C line
Charging indicator light
Pin
Switch power

4
Rotate 90° counterclockwise
WARNING: DO NOT ATTEMPT TO CHARGE A NON
RECHARGEABLE BATTERY, OR IT WILL EXPLODE.
WARMING :DO NOT KEEP THE BATTERY IN THE
BATTERY COMPARTMENT FOR A LONG TIME TO
AVOID BATTERY OXIDATION AND DAMAGE THE
PRODUCT.
1 Transmitter battery installation. (Picture A-D)
4x 1.5V (AAA)
A.Turn the coin button clockwise 90° B. Take out the battery box from the bottom of the
remote
D. Install the battery box. Insert the battery box into the
handle and rotate coin button 90° counterclockwise.
The battery box is installed.
Note: Type-C port is aligned with the bottom hole
C. Install four AAA batteries according to the polarity
mark on the battery case bracket
Rotate 90° clockwise
When the car is in power o status, it can be charged in the following two ways; (Please charge the RC
car for the rst time you use.)
2 Charging

5
Rotate 90° clockwise
1.Use the hidden Type-C port on the remote to charge the car.(Picture A-G)
A. Push the charging rod forward to the bottom. B. When the push rod on the bottom, then rotate the
push rod 90° clockwise
C. The push rod rotate 90° clockwise done, launch port
nished.
D. Plug the charging connector into the remote control
port
F. After the vehicle is plugged into the charging port,
switch the remote switch to the charging mode.
E. Align the vehicle charging port and insert.
C
AB
F
E
D

6
40min
2. Insert the attached charging cable into the charging port of the car
and connect the power supply for charging. (as picture shows)
Charging
indicator light
Turn o the car: Turn o the power switch, (switch to "OFF" position), the LED goes o and the the car is power o.
Switch power
If the rear light of the car stays on, it indicates that it’s connected with the remote control.
If the rear light of the car is ashing, please check whether the power of remote control has
been turned on. If yes, you need to re-code the remote control with the car. (See page 9 for details)
Red light
Extinguish
Operation Note
Note: If you’re the rst time to use the 1:76 RC sports car, please take a few minutes to read this statement
carefully to get familiar with dierent features of this operation system.
Red light
Extinguish
G. Then the default red led of the remote is long light. If
the charging led light of the remote is o, means the
charging is completed. (Short press channel 3 to switch
the color of the multi-color light, long press channel 3
to switch the breathing light).
Note: Before charging the car, make sure the charging plug is dry.
Do not leave when charging the car.
CH3
G
3Turn on/o the power of the car

7
1 2
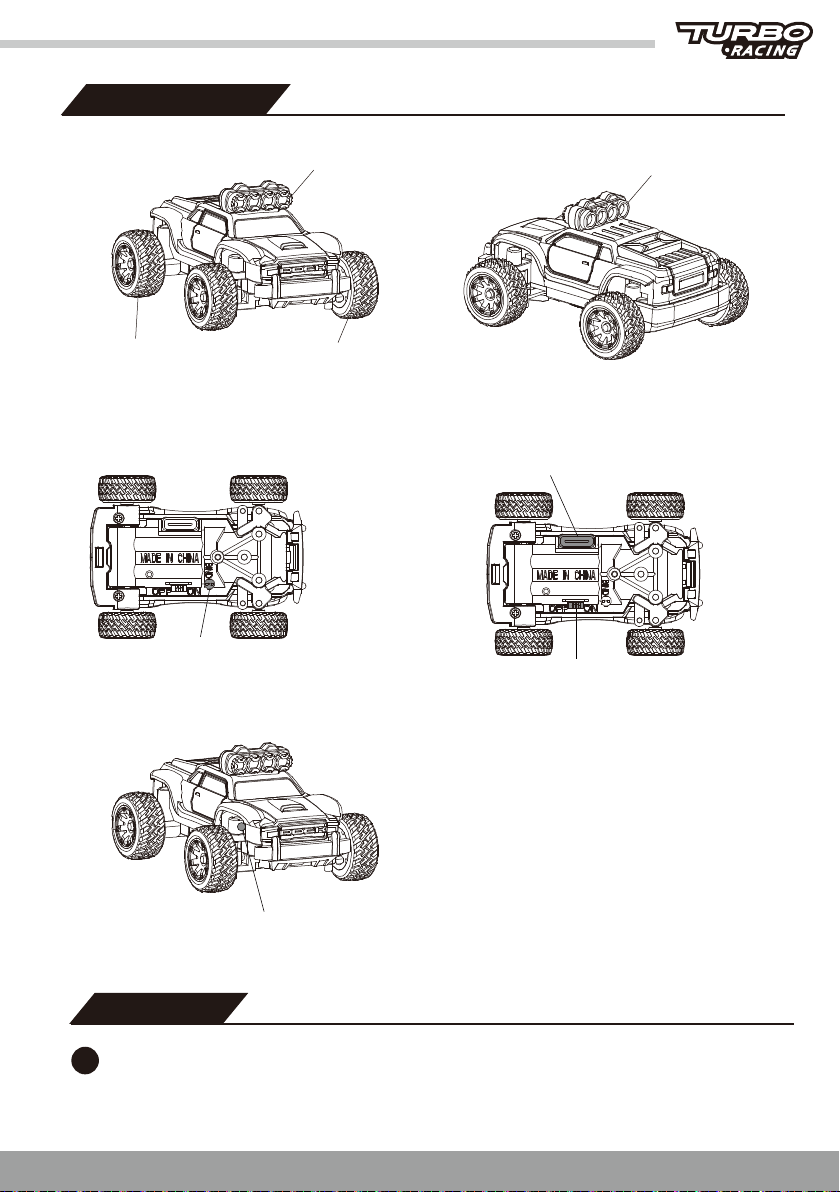
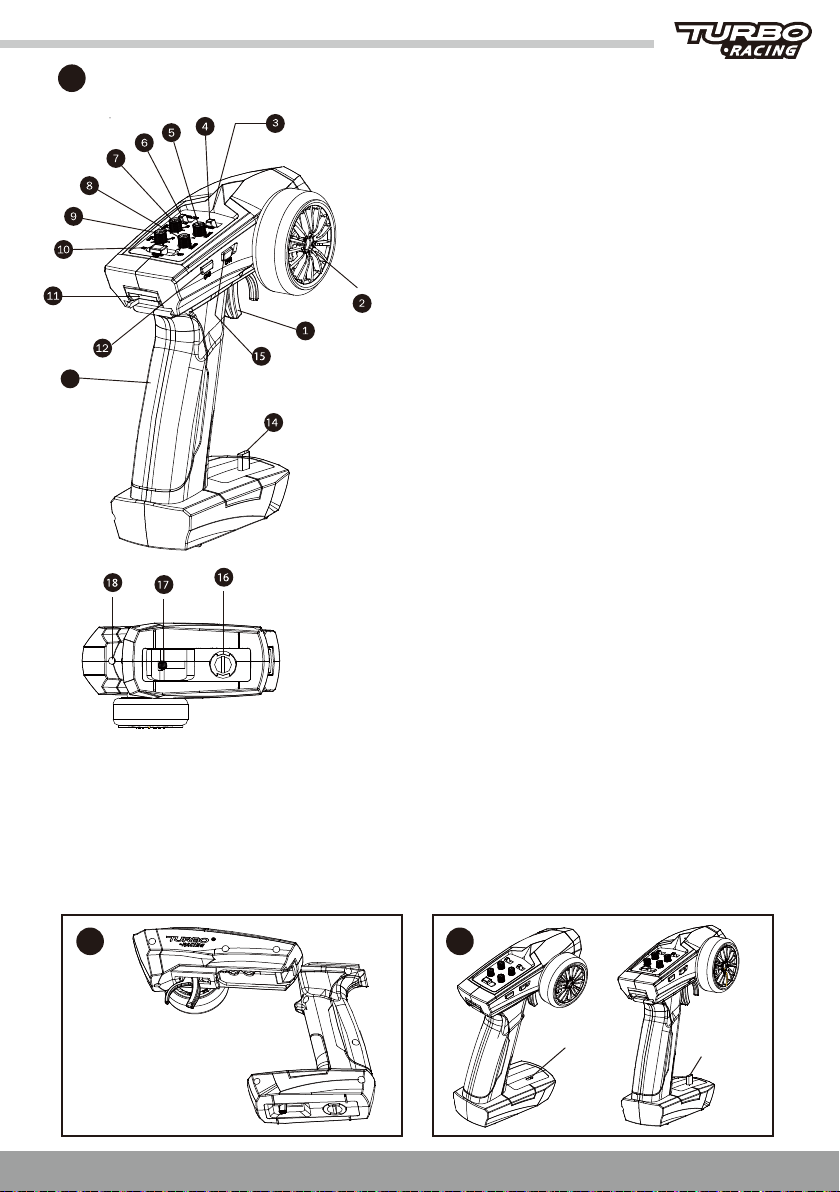
14. Type-C charging port: hidden port for charging the car
(as shown in picture 2)
16. Coin button of battery compartment(as shown in picture 3)
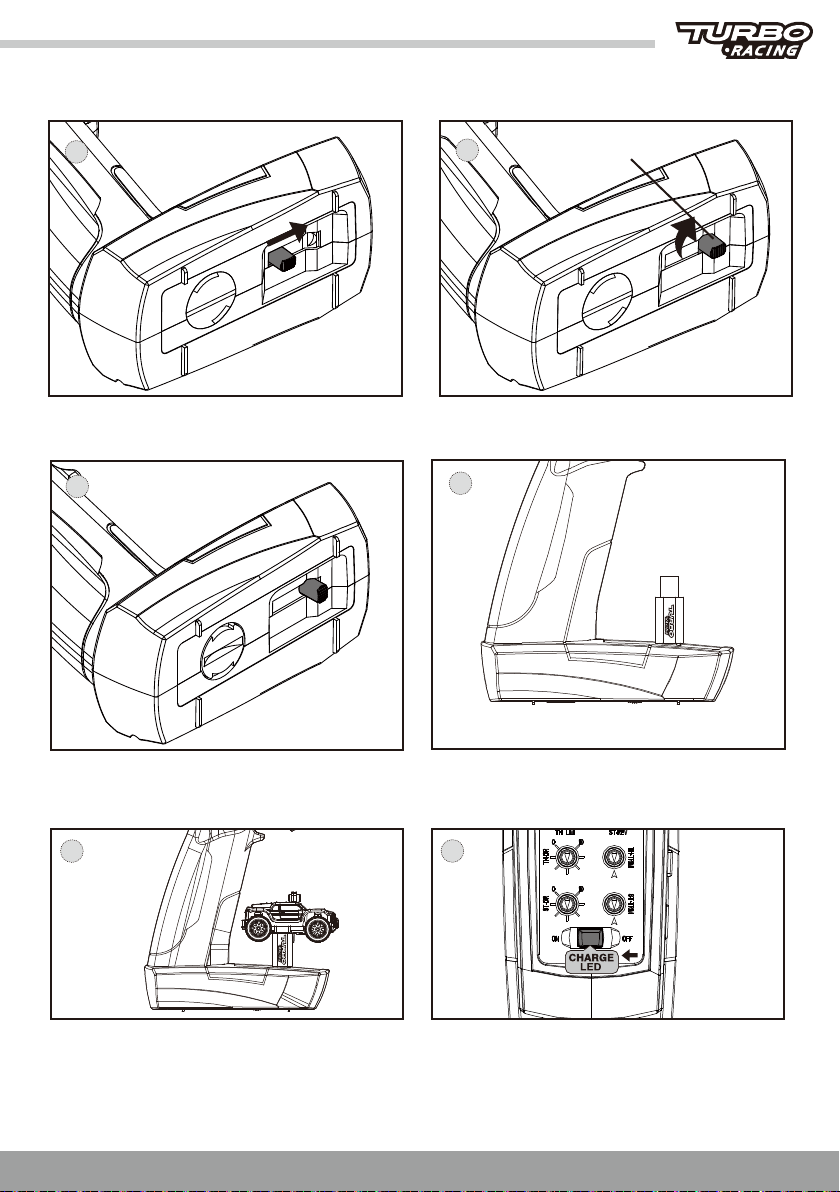
17. Type-C port charging push rod (as shown in picture 4)
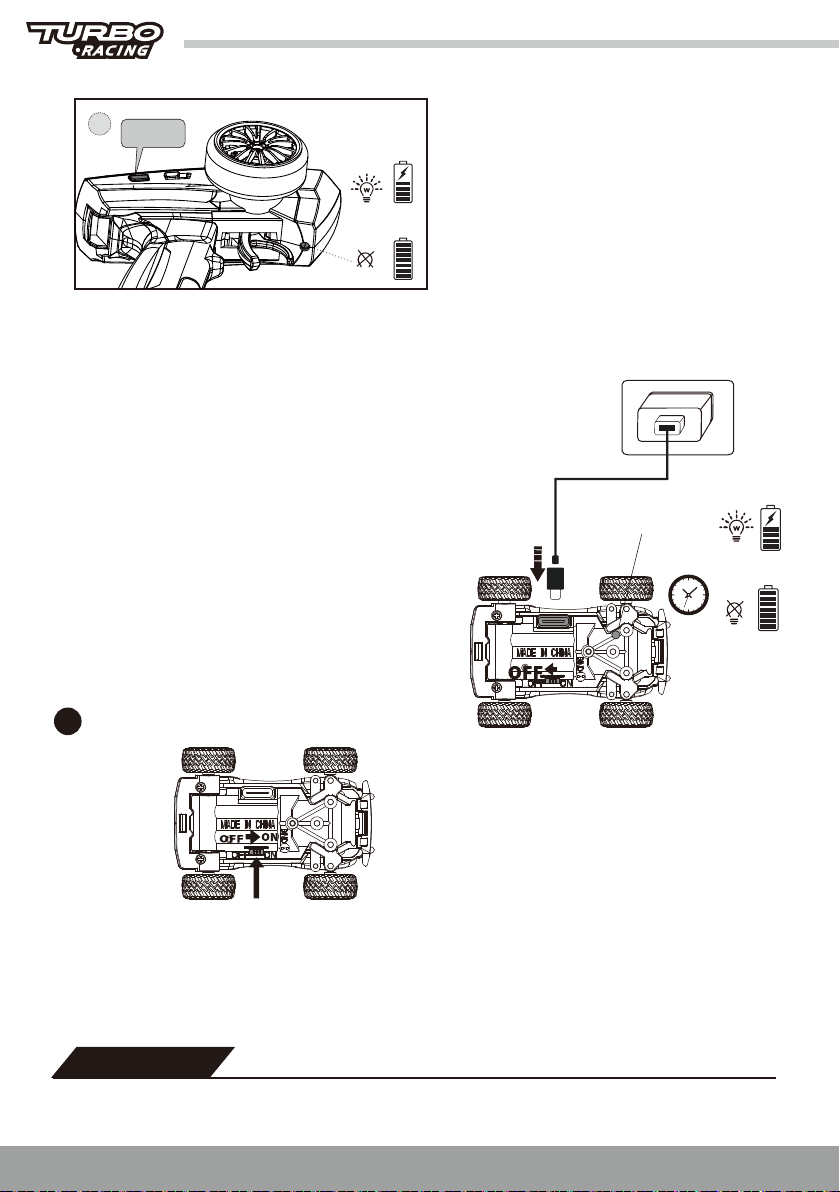
18. Charging indicator: in charging state, press channel 3 key
to switch the color of the indicator; Long press the channel
3 key to switch the breathing light (as shown in Figure 5).
9. Steering DR: steering DR is used to adjust the steering angle
of the front wheels to make the car reach the best turning
radius.
10. On/O Switch: turn on / charge switch / turn o the
transmitter
11. Disassemble the remote : the handle can be
disassembled (as shown in picture 1)
12. Channel 3 button: control the car Head light on / o;
when is charging, short press channel 3 button to switch
the color of multi-color light; Long press channel 3 button
to switch breathing light.
13. Handle: used to hold the transmitter.
15. Channel 4 button: Channel 4 is a three-stage switch, the
rst-stage switch turns o the rear lights of the car;
The second-stage switch used to turn on the front open
rear light; The third-stage switch headlight ashes twice
quickly.
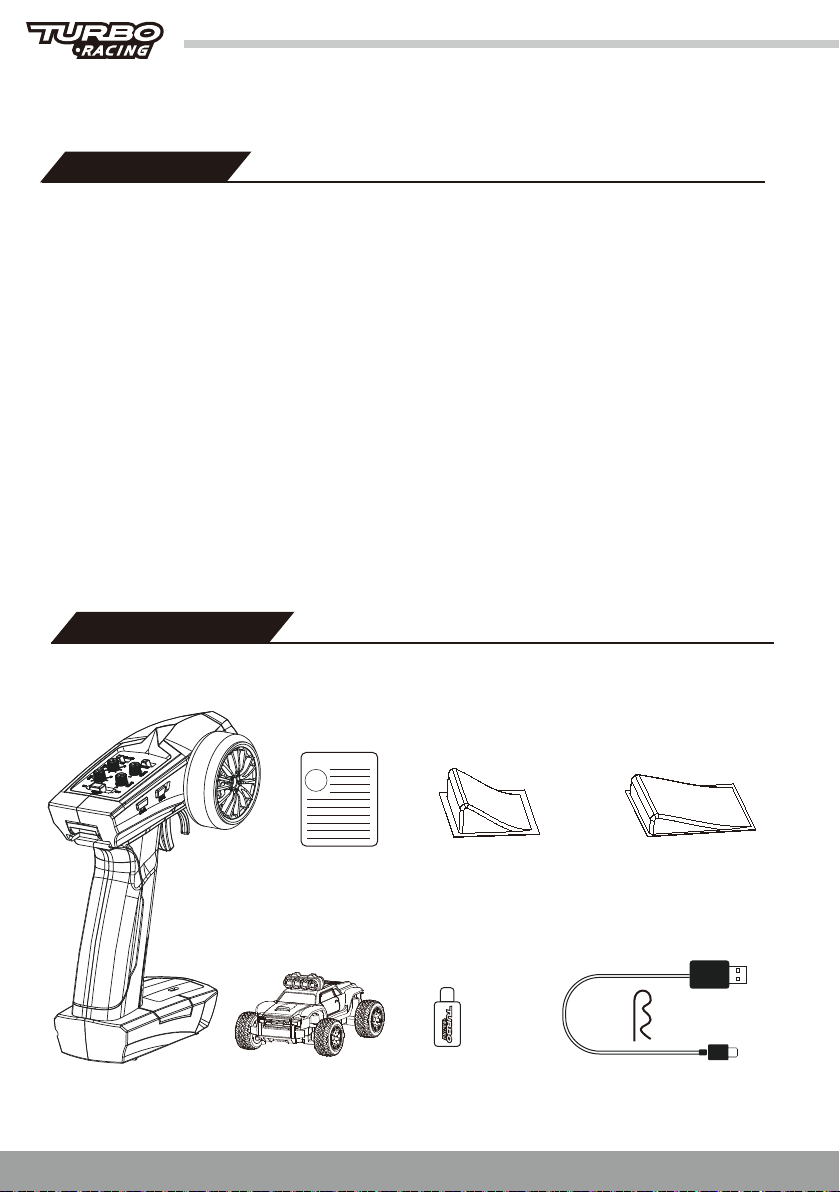
1Functions Transmitter
13
Handle is removable Hidden
charging port Charging port
7. Throttle DR: throttle DR is used to adjust the throttle stroke
and set the car speed freely. (This function can only work
when throttle speed limit switch is in 100% position)
8. Steering ne adjustment: when the adjusting wheel is in the
neutral position, if the front wheel is not go straight line,
please use steering ne adjustment.
2. Steering wheel: control left / right steering
1. Throttle: Control forward / brake / backward.
3. Multi function indicator LED
4. Steering Rev: use the reverse steering switch to reverse
the left and right directions.
5. Throttle ne adjustment: when the trigger is in the neutral
position, if the car moves forward or backward, please use
the throttle ne adjustment.
6. Three section throttle speed limit switch: 20% / 50% / 100%.
Reminder: The remote control uses AAA or
Ni-MH battery. When the voltage is lower
than 4.5V ±0.2V, the multi-function LED
indicator light will ash quickly, please replace
the battery.
Reminder: When the remote control is charging the car, when
the battery voltage is lower than 4.5V ±0.2V, the charging
indicator light will ash quickly, please replace the battery.

8
2
�����������������
Install and remove the remote
control handle
5
3 4
Note: If the handle of remote is in a wrong direction , it will not be powered on. Please install the handle
correctly according to the instructions.
1. Press the button
2. Remove the handle
3. Press and hold the remove button and
push the handle inside
Tips: Pay attention to the direction of the handle
Battery
compartment Charging
port push rod
Battery
compartment coin button
Charging indicator light
RGB multi-color light
Charging mode
CH3

Backward/speed up
Backward/speed up
9
BIND
4Car running settings
Forward/
speed up
Neutral
Right
Forward/speed up
Left
1.Switch on the transmitter.
3Binding
2.Turn on the power switch on the
car, and the rear light on the
car ashes.
3.Insert the binding plug into the BIND
channel slot on the car, if the LED rear
light , and stays lit permanently, the
binding procedure is completed.
Note: The wireless rc car has been connected to the remote. The above procedure is only necessary when use a
new remote or car.
Turn o the car: Please turn o the power switch of the car rst, and then turn o the power switch of the remote
to prevent the car from losing control.
Tip: If fail binding , please turn o the power switch of the car and remote , and restart the binding.
1. Throttle Trigger 2. Steering Wheel
Neutral
RightLeft

10
ST-DR
TH-DR
ST-TRIM
TH-TRIM
Linearity
ST-REV
TH LIM
1. TH/TRIM: When the throttle trigger is in the middle point, if the car is moving forward or backward, please
adjust it with TH/TRIM “+” or “-”button.
2. ST/TRIM: When the steering wheel in the middle position, if the front wheel is not in a straight line, please
adjust it with ST/TRIM “+” or “-”button.
3. TH/DR: Throttle DR is used to adjust the throttle and car speed freely. (This function can only work when
throttle speed limit switch is in 100% position)
4. ST/DR: Steering DR is used to adjust the front wheel steering angle to make the car reach the best turning
radius.
Note: Excessive steering angle may cause the front wheel and body parts to aect each other when running,
please adjust the steering angle reasonably.
5.Steering REV: It is used to reverse the left and right directions of the car.
6. Three section throttle speed limit switch: 20% / 50% / 100%.

The rear lights of the vehicle are on long lighe
The rc car is power o, the power is insucient,
channel 4 and rst-stage switche are in the o state
channel 3 switche are in the o state
11
Specication
Product name
Driving distance 30m
30°
30min
3.7V, 75mAh, lithium battery
Driving time
Slope angel Size
53.5x40.5x28mm
18gWeight
Proportional
steering Battery parameter
Drive mode Two-wheel drive
Proportional steering
Scale 1:76
1:76 mini remote control
o-road vehicle
The remote control is connected to the car and can
be operated
Product performance failure table
Display Status
The rear lights ash every 2 seconds
The front and tail lights are o
Please check whether the power of remote control
has been turned on, if yes, you need to re-code the
remote control with the car
Product Name Product performance failure
1:76 mini remote control o-road vehicle
1. The product cannot be turned on.
2. Cannot charge.
3. Unable to operate.
4. Dysfunction.
Maintenance
1. Before using the product, please ensure that all components have been tightened, check and clear foreign
matter in the gap between the wheel and chassis.
2. When the car is to be stored for a long time, it should be kept at 70% of its power to maximize battery
life. And charge the battery once every 1-3 months to avoid battery damage. (It is recommended to fully
charge the battery and store it after 5-10 minutes of use).
3.If the remote control will not be used for a long time, please remove the batteries to avoid oxidation.
LED light status table

12
Troubleshooting
Fault symptom Cause of failure Solutions
The tranmitter connection
failed
Freeze
1. Distance is too far
2. Multicars pairing at the
same time
No reaction when remote
control left and right
steering / no response
when steering
The steering is in the
opposite direction of the
remote steering operation
When the throttle is in
neutral position, the car
immediately starts to
move forward or backward
The car cannot move in a
straight line/The left and
right steering radius is
signicantly dierent
The maximum speed
cannot be reached
Overheating in the motor
part
The power-on light is not
on
Shutdown
Charge in a timely manner
Make sure that the product is in car
receiving mode.(The rear lights ash).
The steering angle is set
too small
Reset the steering angle
The remote steering
reverse switch is not
properly set
The throttle ne-tuning
does not set to the center
position
Set the remote throttle ne-tuning to the
center position
Set the remote steering reverse switch to
the correct direction
Steering ne-tuning is not
set to the center position
Ambient temperature is too
high
The car should be immediately turned o
and placed in a cool, well-ventilated place
for cooling to avoid damage to electronic
parts
1. The throttle DR setting is
too small
2. Battery Low
3. Foreign objects between
the wheels
Set the throttle DR size on the remote
throttle DR, and check for foreign objects
and battery level
Set the steering ne-tuning to the center
position
Foreign object between
the wheels
Check the wheels for foreign objects
The voltage is less than
3.0V and there is not
enough power

13
Precaution
●This product includes the small parts, there is a risk of suocation, children under 3 years old are not
allowed.
●The car contains lithium batteries. Disassembling, striking, squeezing or throwing the car into the re is
prohibited. If severe swelling occurs, do not continue to use it. Do not place it in high-temperature
environment.
●Due to the special feature of lithium batteries, overly high or low temperature will aect the battery charge
and discharge performance and battery life, so please do not use or store this product under environments
such as high temperature, low temperature, high humidity or direct sunlight.
●The charging cable, plug, body shell, and other parts must be checked regularly for damage. If the damage is
found, stop using until the repair is complete.
●The car has low battery voltage protection.
●When the battery voltage is lower than 3.0V, it will automatically cut o the current and the car will seize
all functions to protect the battery.
●When using remote control nearby high-voltage power lines, light rails, microwave ovens electric waves of
the same frequency will lead to dysfunction of the car. Please change the location or choose another time
to operate.
●Our company holds no responsibility if accidents such as injury to others or damage due to operating errors.
Non-warranty regulations
●Unauthorized repair, misuse, collision, negligence, abuse, uid intake, accidents, alterations, incorrect use.
Non-product accessories, or tear, alter marks and anti-counterfeiting marks;
●The validity period of "three guarantees" has passed.
●Damage caused by force majeure;
●Does not meet the performance failures listed in “performance failure table of 1:76 mini remote control
o-road vehicle”;
●Performance failure of the product and its accessories that meets the “performance failure table of 1:76 RC
sports car” due to human factors.
1. Return and exchange services require conrmation.
When the client applies for return and exchange, it is necessary to follow the 1:76 mini remote control
o-road vehicle warranty instructions and the customer service should conrm whether it meets the
after-sales conditions and then arrange relevant service.
Notice: The products, accessories, remote control, etc. in the instruction manual are schematic diagrams and
for reference only. Due to product updates and upgrades the physical and schematics of the product may dier
slightly, please refer to the actual product.

Disassembling
14
1. Disassemble The car body shell:
1 2
1.Grasp the front wheel (rear wheel) of the
vehicle shell by hand Just break it up
2. After breaking o the upper shell, take it out
2.
Install the car body shell:
1 2
1. Insert the lamp plug into the PCB interface
(Note:There are "+" - "poles and" + "on the
left and right of PCB Pole to red line, "-" pole
to black line; line placement (on the right
side of the battery)
2. Align the buckle position of the upper shell
with the front and rear holes and insert it
Just enter

15
General assembly drawing
Exploded view of nal assembly
Car shell
Screw
Rear wheel
Chassis
Steering assembly
Roof lamp
Rear lid spring
PCB
Switch handle
Drive shaft
Rear wheel upper housing
Rear wheel lower housing
Car shell trim
Steering support
Front wheel damping
spring
Steering radius
adjusting screw

16
Car shell explosion
Upper shell
Drive motor
Steering motor
760081
760002
760084

17
Transmission shaft
Rear wheel
Installation
position of drive motor
Installation position
of steering motor
Installation position
of drive shaft
760004 760006 760090
760091
760092
760013
760015
760093

18
Steering assembly
760082 760087 760007 760008 760088 760086

Original spare part
19
760013
Rear wheel outer shaft sleeve (inner)2pcs
760007
Gear 2pcs
760008
Fan teeth 2pcs
760002
Switch handle 2pcs 760004
Gear 2pcs
760006
Worm gear 2pcs
760021
Charging line
760020
Track (900x400mm)
Track (1200x800mm)760022
760018
Battery

760074 Grey
Guardrail Total 50pcs
760075 White
Guardrail Total 50pcs
760076 Red
Guardrail Total 50pcs
(Straight 45pcs) (Curved 5pcs)
20
760081
Car Shell assembly 1pcs
760082
Wheel 4pcs
760085
Screw 12pcs
760083
Roof lamp 2pcs
760094
Screw 2pcs
Track (1200x800mm)
760050
760084
motor 2pcs
Table of contents
Other TURBO RACING Motorized Toy Car manuals