Turcom TS-622 User manual


0 Page

Light Sensor
Adjustable Focus
Speaker
LED Indicators
Microphone
OVERVIEW
1 Page

2 Page

The following accessories are included with your cyberView Camera
cyberView camera (x1)
Ethernet cord (x1)
DC power adapter (x1)
Mounng gear for wall or ceiling applicaons
oScrews (x2)
oDrywall anchor (x2)
All necessary hardware for installaon
.
ACCESSORIES
3 Page

Navigang the app
The photo on the leis the Sign-in Page. You will
always be prompted to sign-in when you first open the
applicaon
You have two opons:
1.Sign in with your user name and password
2.Use the QR code on the box or the boom of your
camera to enter in the default name and password
(recommended for your first login)
Click the QR code box on the right of the
user name text field to enable this opon
CHAPTER 1: Navigating the Mobile Application
Figure 1
4 Page

DEVICE LIST: HOW TO USE THIS PAGE
This is your Main Page. It comes up aer you first
login
The image in the top le corner represents your
connected device. Mulple devices can be on one
account
The top le bar that has this symbol which
creates the drop-down menu shown on the right
The Drop-down
oControls Resoluon - HD 720P to a small
resoluon of 90P. HD is recommended for
best quality
oSengs – prompts you with another
menu (Figure 3 on the next page)
oExit – Exits the menu
CHAPTER 1: Navigating the Mobile Application
Figure 2
5 Page

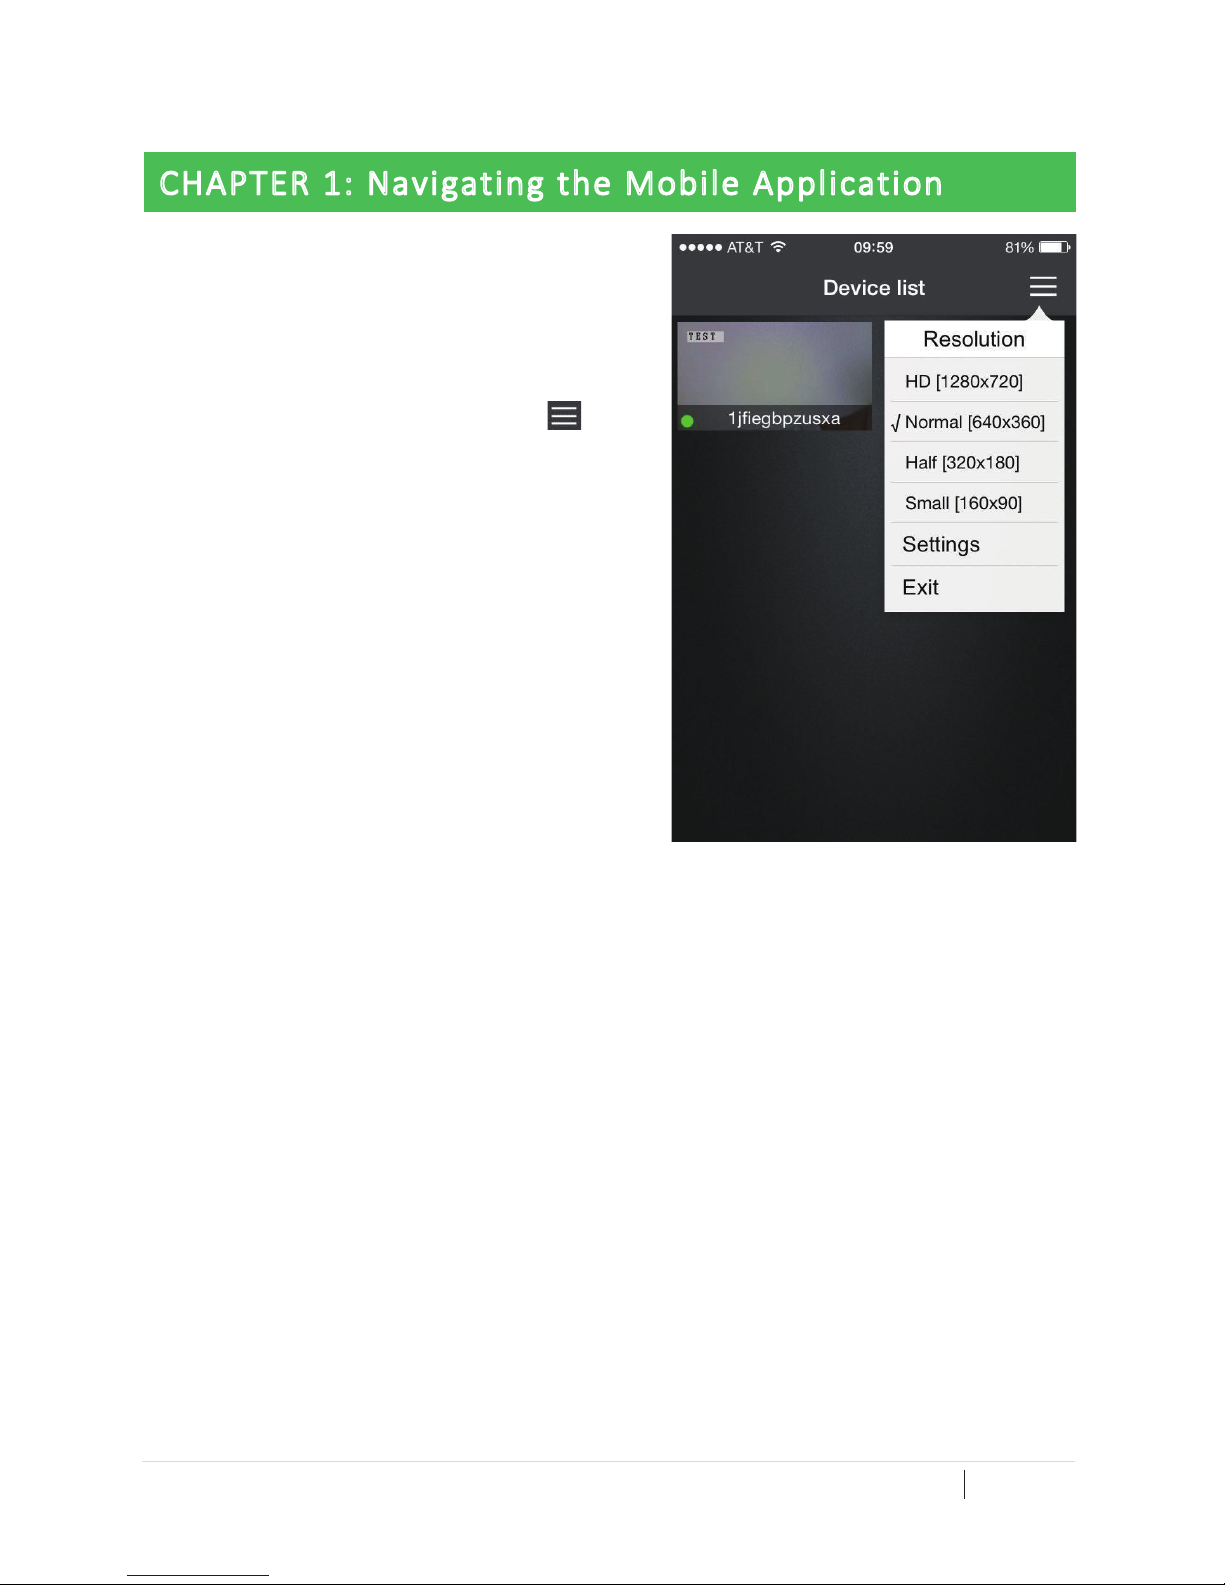
SETTINGS MENU FROM THE MAIN PAGE
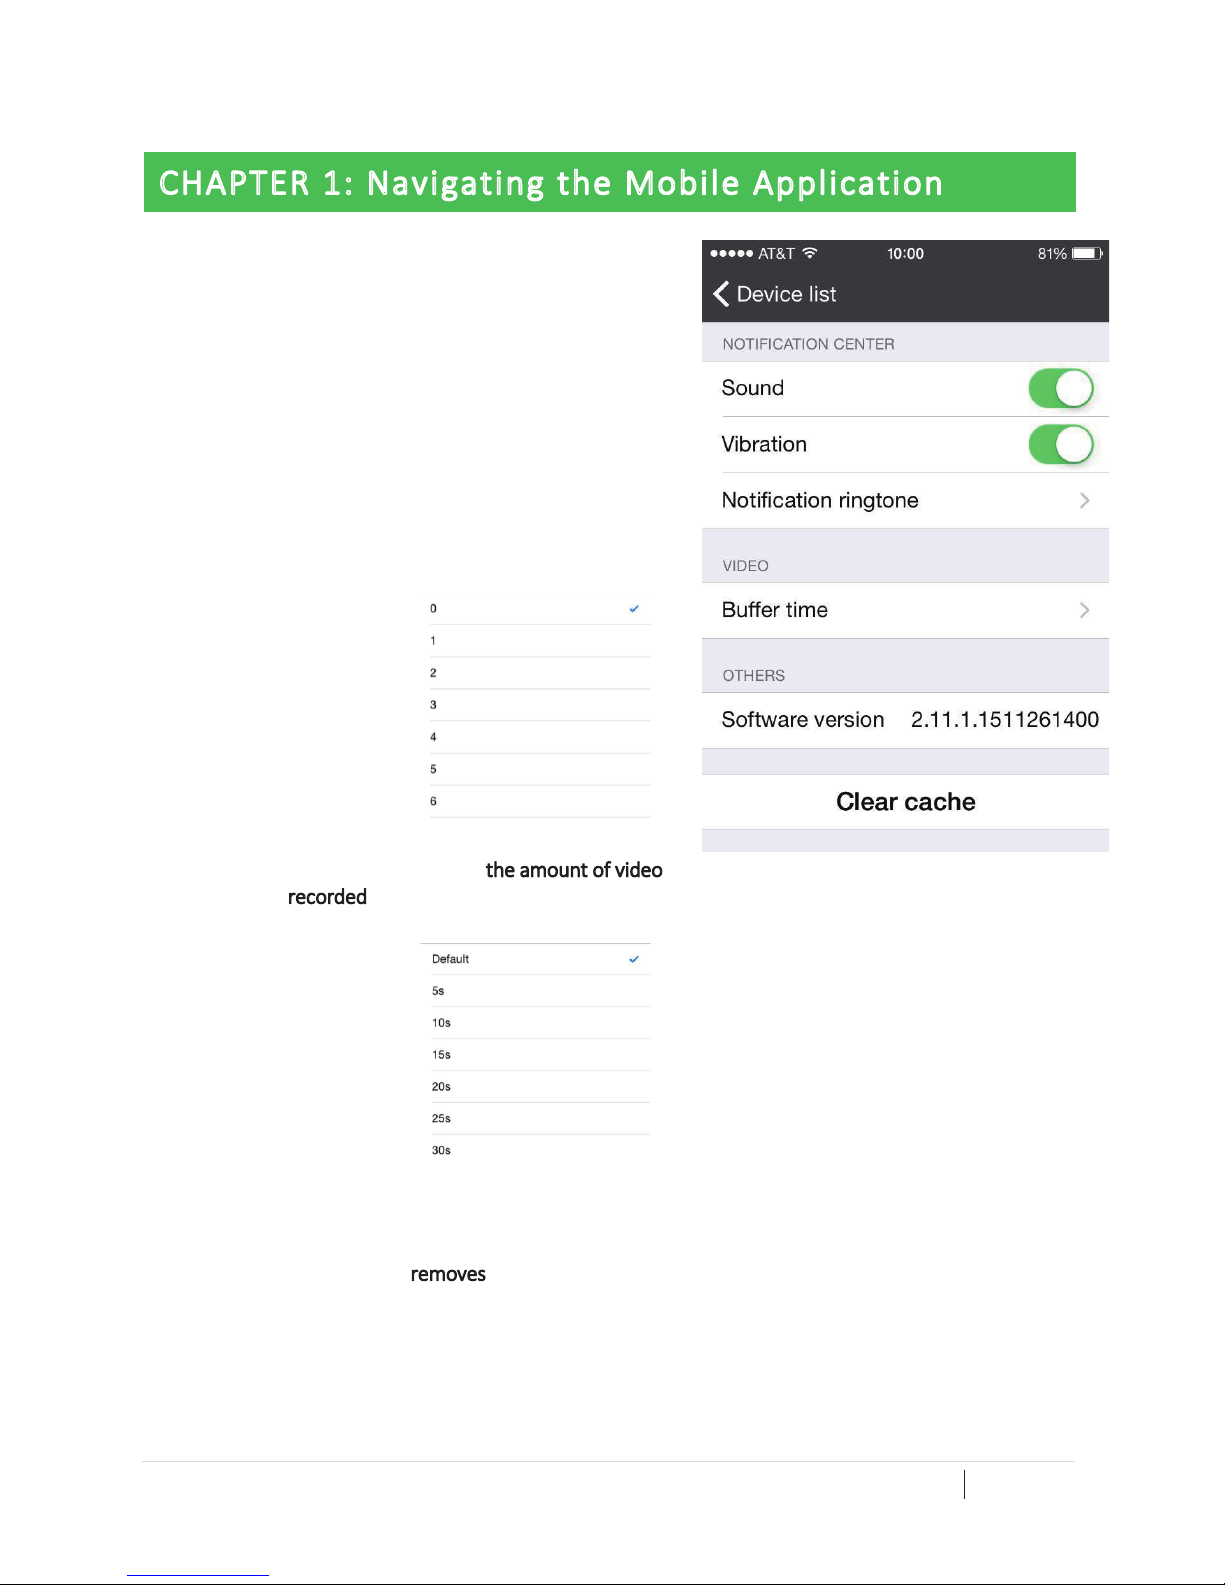
Figure 3 on the right is the Sengs page you can
access from the Device List page. It controls basic
funconality like noficaon and video opons.
Noficaon Center:
oSound – control whether or not
noficaons sent to your phone have
sound
oVibraon – control whether or not
noficaons sent to your phone have
vibraons
oNoficaon Ringtone – gives you up to six
opons for ringtone songs (Figure 4)
Video:
oBuffer me – controls the amount of video
recorded during a noficaon. Choose
between the seconds shown in Figure 5.
Others:
oSoware version – tells you what soware
version your Security camera is running.
oClear cache – removes any temporary
files, photos, or videos from your security
camera
CLICK THE TOP LEFT TO GO BACK TO THE MAIN
PAGE: DEVICE LIST
Figure 4
Figure 3
Figure 5
CHAPTER 1: Navigating the Mobile Application
6 Page

Figure 6 is your Live Recording page. It will
show you the live feed streaming from your
camera.
This page has five icons on top and three tabs
on boom. We will go into detail about the
four icons first and then the three tabs on the
next page.
FIVE ICONS:
Mute the audio coming from your device
Mute the microphone so your phone
speakers won’t output to the camera
Take a snapshot of the current camera
feed
Take a video that will connue to record
unl you manually stop the video
Settings tab for brightness, saturaon,
contrast, sharpness, and resoluon
(Figure 7)
NOTE: ALL IMAGES AND VIDEO FEED ARE GOING TO BE LOCALLY STORED IN THE CACHE AND IN THE SD
CARD IF YOU HAVE ONE INSTALLED
Figure 6
Figure 7
CHAPTER 1: Navigating the Mobile Application
7 Page

LIVE VIDEO FEED: THREE TABS
At the boom of your live video feed you will seethree tabs. We will go into detail about all of them. The
third one is in Chapter 2
Accesses the main live video feed. This is the page you should currently be on. This tab’s funconality is
described on the previous page of this manual
Accesses the local cache files and SD card files. On this tab you will be able to view any photos or video
recordings (Figure 8)
oTwo opons:
Local – view the cache files from
recent videos or photos. NOTE:
Do not rely on this for all of your
security needs. It will not
permanently save files
Records – view files stored on your
SD card.
oTo review a photo or video, you can click
on the video or photo and it will
automacally start playing the file
Tap on the LIVE tab to return to your life video
feed or the SETTINGS tab to access some of your
sengs.
CHAPTER 1: Navigating the Mobile Application
Figure 8
8 Page

Accesses all of your sengs for your live video, camera, and detecon preferences. This tab is the most
important tab in the manual because it controls most device funconality
Ref. Figure 9 for the main page
About – Basic device informaon (Figure 10)
Nickname – give your device an alias or nickname and click apply
when you’re done (Figure 11)
Device admin password (Figure 12)
oOld password – enter
in your old password.
When you’re first
seng a password
the “Old password”
will be the default
oNew Password – enter in the password that you want. Try
to make it hard to guess
oConfirm Password – retype the new password into this
text field and then click “Apply” at the boom
CHAPTER 2: Navigating the Settings Menu
Figure 9
Figure 10
Figure 11
Figure 12
9 Page

Device Guest Password (Figure 13)
Who is a guest? A guest
password can be entered as an
alternave password for your
camera. Anyone who enters it
can also have access to your
video feed but with limited
funconality and no access to adjust seng (ideal for
babysiers, guests, temporary access, children, etc.)
oAdmin password – enter in your current password
oGuest password – enter in the new password for guest
access only
oConfirm password – retype the new password to
confirm that you entered it correctly
Network
oConfigure your WI-FI sengs to your security camera.
This network can be automacally connected aer you
enter the password once
OSD (Figure 14)
oO.S.D. – Over Screen Display. Displays text, me, date,
and the name of your device over your video feed.
NOTE: this is ideal if you want your security camera to
record dates and mes of events
oNick – the name of your device
oDisplay date, me, and day are all similar in
funconality. Once you enable them, you will be able
to synchronize them with your security camera’s date
and me based on locaon (eg. TEST, PST, 12:30:15,
04/05/2016)
SD card (Figure 15)
oStatus – informs you if you have an SD card inserted or
not
oCapacity – memory size of your SD card
oUsage – memory used in your SD card
oValid – memory correctly formaed for your SD card
oFormat
When you first insert your SD card you will
need to format it for storing the correct type
of data. Click > Format > Wait for it to be
formaed. NOTE: only do this once per card
Figure 13
Figure 14
CHAPTER 2: Navigating the Settings Menu
Figure 15
10 Page

oUnmount
Before removing any SD card from your
camera, click this button to ensure you have no
data corruption
oFix
Cleans the data or fixes an improperly
formaed card
Moon and Noficaon (Figure 16)
Control the moon and I/O alarm sengs from this page. In
order to set these alarms press “Turn alert on” which is the
buon on the boom.
oMoon Detecon (Figure 17)
Control the sengs for moon detecons
sensivity. Day and night can be separately
set
Day:
o0: will not be sensivity to
moon which means it will
not detect moon.
o100: will be extremely
sensive to moon. Detects
anything in the camera that
moves
Night:
o0: will not be sensivity to
moon which means it will
not detect moon.
o100: will be extremely
sensive to moon. Detects
anything in the camera that
moves
Moon alert
Snapshots – will take a snapshot
whenever moon is detected
Record – will record a short video clip
whenever moon is detected
IO Alarm – sets off you 3rd party IO
alarm (ADVANCED USERS ONLY)
Figure 16
Figure 17
CHAPTER 2: Navigating the Settings Menu
11 Page

oI/O Alarm (ADVANCED USERS ONLY)
I/O Alarms are third party input-output alarm systems. This security camera is capable of
synching up with a burglar alarm or your own personal alarm system.
Control the way your security camera
responds to the third party IO alarm system
Schedule Recording (Figure 18)
Create a schedule which will begin and end recording
on certain dates and during certain mes.
o24/7 – record all video feed all of the me
NOTE: this is not recommended as it
will take up most of your memory
within the first few days
oSchedule 1
Begin me – it will start recording at
this me
End me – it will stop recording at
this me
Day – it will being recording at the
preset mes on this day
NOTE: this is set in days of
the week; Monday, Tuesday,
etc.
Day/Time (Figure 19)
Set the date and time for your device
oDay – set the year, month, and day
oTime – set the hour, minute, and second
oAuto sync – set the me to your phone’s
oTime server – set the me to a unique server
(Advanced users only)
oTime zone – set the me to your me zone
oClick “Apply” when you’re done
System sengs (Figure 20)
oUpgrade – install and update your security
camera to the newest soware
oRestore to factory sengs – resets all of your
soware to factory sengs, which means
usernames, passwords, local cache, etc. will
all be reset.
oRestart device – reset your device
temporarily
Note: does not erase data or
important informaon
CHAPTER 2: Navigating the Settings Menu
Figure 18
Figure 19
Figure 20
12 Page

Others (Figure 21)
oSpeaker – Control the volume of the speaker
oMicrophone – Control the microphone sensivity
oFlip – flip the image of your camera
oPower frequency – 50hz or 60hz if you have
different audio input/output devices
NOTE: do not change if you are using the
default microphone/speaker system
CHAPTER 2: Navigating the Settings Menu
Figure 21
13 Page

Other manuals for TS-622
1
Table of contents