TurnMedical Pronova-O2 User manual

QUICK
REFERENCE GUIDE
For Clinical or Technical Support Call
1.855.ASK.TURN
(1-855-275-8876)

1introduction
Important Information
This Quick Reference Guide is meant to supplement the Instructions for Use
Manual (IFU 100909) and in person training provided by Turn Medical
Personnel and should not be relied upon solely for product use and
training purposes. Specific Indications, Contraindications, Warnings,
Precautions, and Safety Information exist for the Pronova-O™ Automated
Prone Therapy System which are not fully covered in this Quick Reference
Guide. It is important for users to read and familiarize themselves with
the IFU and to consult the treating physician prior to product placement.
Individual patient conditions may vary. Contact Turn Medical to request
product education, training, or a copy of the IFU at
1.855.ASK.TURN (1-855-275-8876).
Indications for Use
The Pronova-O™ Automated Prone Therapy System is designed to treat
and prevent pressure injuries and to assist in the management of patients
experiencing pulmonary distress and/or complications due in part to
patient immobility. Such pulmonary distress or complications can arise in
immobile patients suering from pneumonia, sepsis and ventilatory
associated events, among others.
Contraindications
• Patient weight below 88 lbs./40 kg
• Patient weight above 400 lbs./181.4 kg
• Patient height below 4’6” (137.1 cm)
• Patient height above 6’6” (198.1 cm)
• Unstable spine (cervical, thoracic, lumbar)
Prone ONLY:
• Skull or severe facial fractures
• Uncontrolled Intracranial Pressure (ICP)
• Cervical and/or skeletal traction

2patient preparation
Patient Preparation for Placement
The following items describe preparations and considerations to prepare
the patient prior to Pronova-O™ placement.
• Prepare room to allow for patient transfer from left side to
facilitate safe transfer of Critical Lines through open side of
Head Hoop.
• Remove gown, allowing for privacy prior to transfer.
• Use of hard plastic Endotracheal Tube (ETT) securement devices
are not recommended for use in the Prone Position. Consult with
Respiratory Therapist and/or Attending Physician or Prescriber
regarding alternative ETT securement methods.
• Secure patient’s hair to prevent catching during rotation on surface.
• Remove any piercings to reduce risk for skin breakdown.
• Properly dress and secure any skin injury or surgical sites.
• Consult WOCN as appropriate prior to placement to discuss and
plan to reduce risk for skin breakdown.
• Consider high pressure points and prophylactic dressing
for cheeks/face and chest among others.
• Detach any non-essential equipment to prepare for transfer.
(ie: SCDs, enteral feedings NG suction, among others). Follow
hospital policy and protocol.
• Gather and consider the following supplies as needed:
••Line extensions-Invasive lines, arterial lines, chest tubes, etc.
••Eye lubricant
••Electrodes for EKG monitoring posteriorly
••Slide board in preparation for transfer

3Pronova-O preparation
Preparation of Pronova-O™ for Patient Placement
This section describes preparations and considerations to prepare the
Pronova-O™ surface for placement.
1. Plug into properly grounded outlet.
2. Gather InteliDerm™ Face Pack, Chest Wedge, and Abdominal
Sling, place on surface and zero scale.
3. Clear History: Select Begin New Patient from settings menu.
4. Ensure Critical Line Management System is secured and installed on
Head Hoop.
5. Open Head Hoop.
6. Lower and stow Head Side Supports, pull knob to rotate and lower.
7. Remove Pelvic Pads from Pelvic Prone Support.
8. Lower and stow Prone Surface Supports (see images).
1. Unbuckle and rotate surface to attach to prone support arm.
2. Pull knob on left side bottom of prone arm to lower parallel
to surface.
3. Press Prone Support to stow beneath surface.
9. Unbuckle Shin Slings.
10. Lower and stow Side Support Panels (see images).
1. Press button on side of frame to pull outward to edge
of surface.
2. Pull knob under center of panel and lift handle to rotate
outward and down beneath surface.
11. Lower and stow Foot Rests.
12. Lower and stow Inner Leg Support.
13. Lift Accessory Rack.
14. Lock brakes.
15. Ensure Lock Pin is in locked position.

4Pronova-O preparation
8. Lower and stow Prone Surface Supports.
10. Lower and stow Side Support Panels.

5patient transfer and securement
Patient Transfer and Securement on Pronova-O™
The following section reviews the steps for transferring and securing the
patient in preparation for initiating prone or supine therapy.
Ensure at least two clinicians remain at bedside when side supports
are stowed, and patient is on the surface.
1. Ensure Lock Pin is fully secured in locked position.
2. Ensure brakes on both surfaces are set in locked position.
3. Gather appropriate sta and equipment for transfer.
4. Transfer patient, center patient on surface, follow all facility protocols.
5. Raise and adjust Head Side Supports, center ears.
6. Ensure Head Hoop is open.
7. Secure invasive lines on Critical Line Management System or
Accessory Rack and close hoop.
8. Raise Inner Leg Support, buckle inner leg securement straps.
9. Secure Foot Rests.
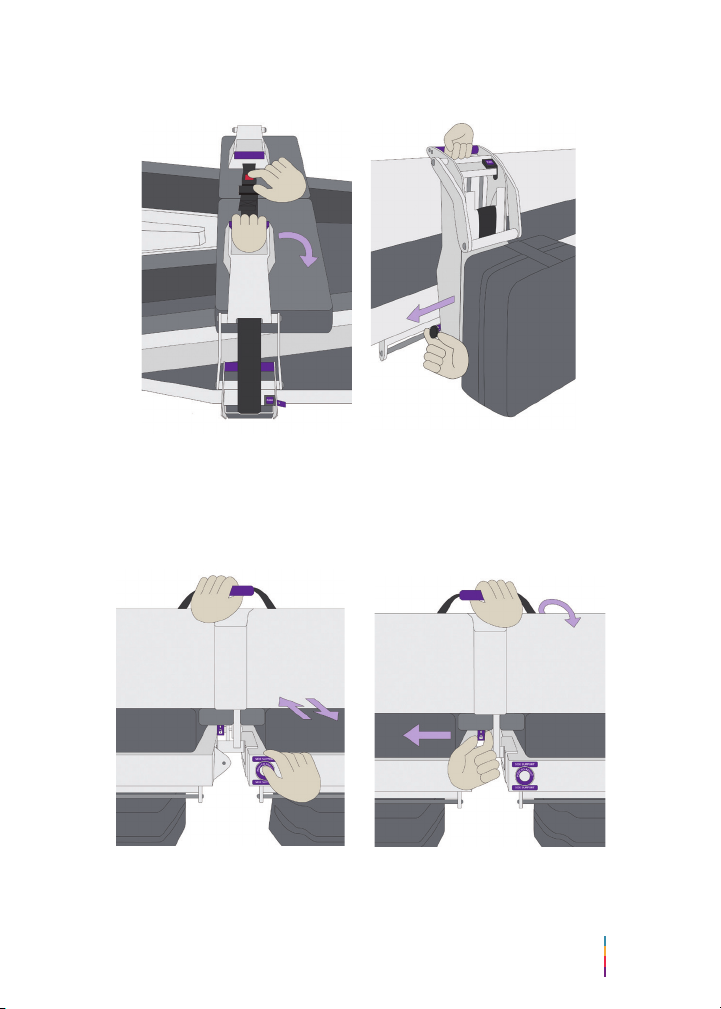
10. Raise, secure and adjust Side Supports (see images).
1. Use handle on center of panel to raise to surface.
2. Press button on side of frame and push inward to secure firmly
against patient.
3. Consider lengthening (see image) or angling inward/outward
(see image) based on patient size.
11. Close snaps to secure Arm Slings.
12. Buckle Shin Slings.
13. Place and connect InteliDerm™ Chest Wedge.
14. Secure Abdominal Sling and Pelvic Pads.
15. Secure and connect InteliDerm™ Face Pack.
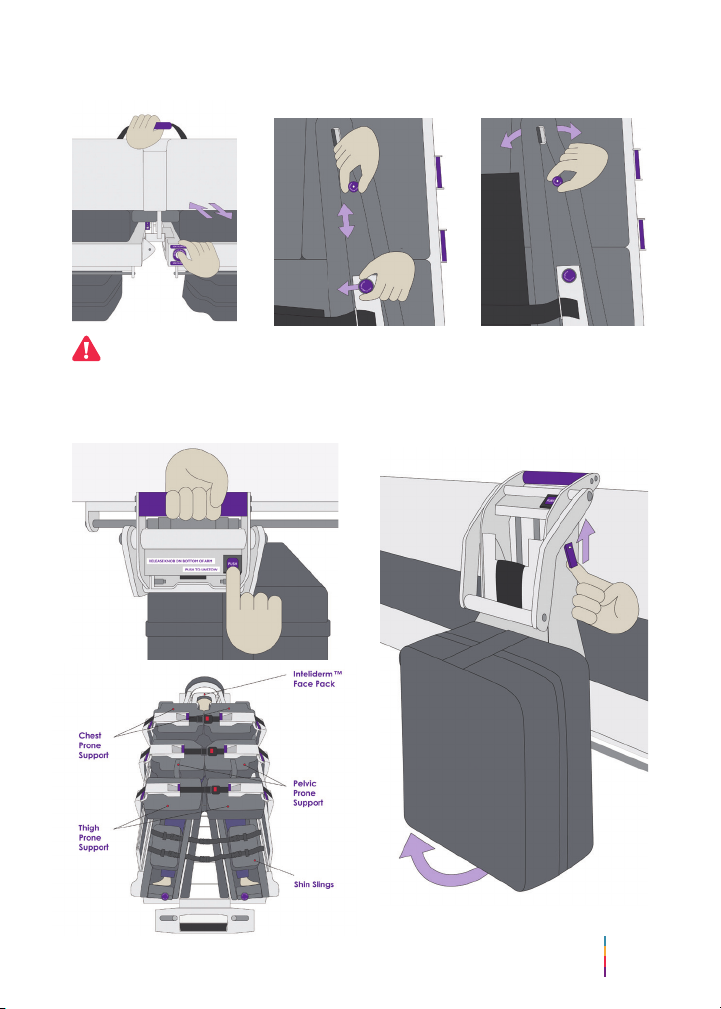
16. Raise and buckle Prone Support Surfaces (see images).
1. Press “Push” label just below handle to release support
and pull fully out.
2. Lift support upward and rotate against frame until locked in place.
3. Lift lever on right side of prone arm to release surface.
4. Lift surface to rest over the patient based on patient body type:
••Lower leg support (over thigh or shin, avoid knees)
••Pelvic support (over pelvis)
••Chest support (slide to highest point)
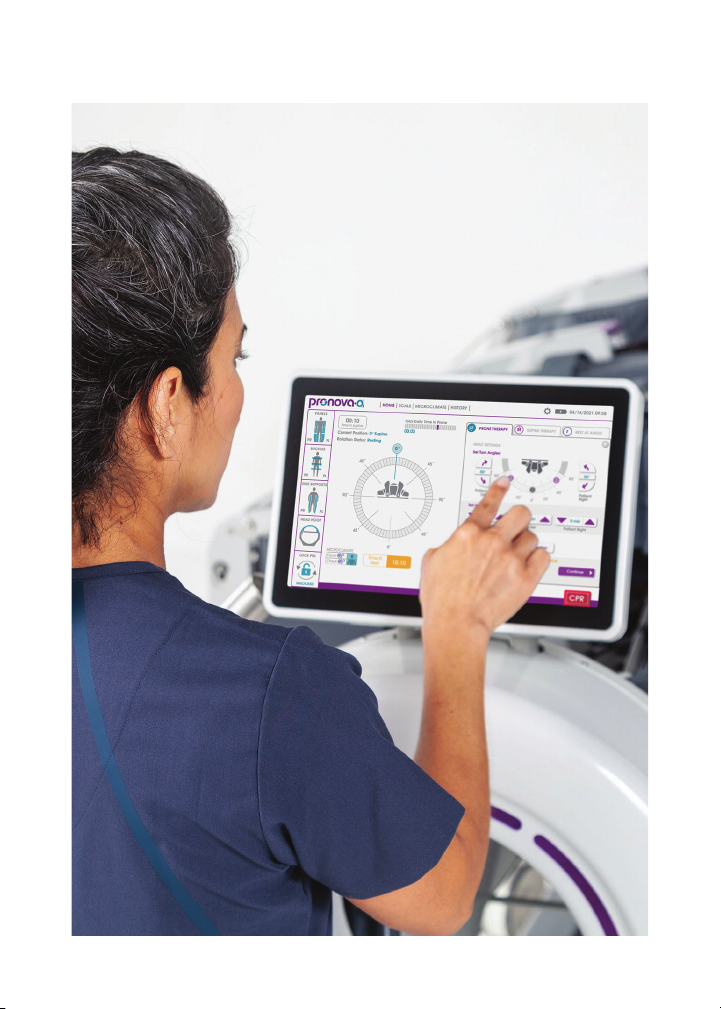
17. Turn on InteliDerm™ (Microclimate tab).

6
10. Raise, secure and adjust Side Supports
Adjust side support to properly secure patient on surface. Patient
may shift during rotation. Re-assess securement often and tighten
side supports against body as needed. Adjustment can be made at
any point in rotation.
16. Raise and buckle Prone Support Surfaces
patient transfer and securement

Initiate Therapy

8initiate therapy
Initiate Automated Prone Position
The following section reviews the steps to initiate the Automated Prone
position.
1. Pull Lock Pin fully out to unlocked position, or press Stop if surface
is in rotation.
2. Press Prone Therapy tab.
3. Input Physician orders.
4. Input Prone Direction (toward ventilator).
5. Press Continue.
6. Verify items on Checklist.
7. Press and hold Prone Patient.
8. Once 0° prone is reached, consider placing patient in Reverse
Trendelenberg using Hand Control or Home Screen.
9. Initiate Prone Rotational Therapy (Refer to Page 10, step 2).
Two clinicians should be present to observe patient lines, tubes, and
vital signs during initial rotation into the Prone Position.
Rotation into the Prone Position should always be set to rotate
towards the ventilator. Place ventilator tubing in Critical Line
Management System opposite of ventilator to allow for slack
during rotation.

9initiate therapy
Initiate Rest at Angle
This section reviews the steps to utilize the Rest at Angle tab. Rest at Angle
is utilized when procedures are required for the patient, such as patient
care, line management, assessments, among others.
1. Press Stop if surface is in rotation, or ensure Lock Pin is in unlocked position.
2. Press Rest at Angle tab.
3. Set desired angle.
4. Set desired direction of rotation if applicable.
5. Press Continue.
6. Verify items on Checklist.
7. Press and hold Set Rest At Angle.
Return to Supine Position
The following section reviews the steps to Return to the Supine Position.
1. Press Stop if surface is in rotation, or ensure Lock Pin is in unlocked position.
2. Lower surface by pressing Bed Height Down on Hand Control or
Home Screen.
3. Close all open panels.
4. Press Supine Therapy tab.
5. Verify Physician orders .
6. Press Continue.
7. Verify Checklist.
8. Press and hold Supine Patient.
9. Insert Lock Pin to locked position or initiate Supine Rotational Therapy.
Observe all lines, tubes and vital signs during rotation. You can use
the Hand Control at head of device to turn patient and assess
critical lines if additional clinician cannot visualize all lines.

10initiate therapy
Initiate Prone or Supine Rotational Therapy
The following section reviews the steps to initiate Prone or Supine
Rotational Therapy.
1. Press Stop if surface is in rotation, or ensure Lock Pin is in unlocked position.
2. Press Prone Therapy or Supine Therapy tab.
3. Input/Verify Settings.
4. Press Continue.
5. Verify Checklist.
6. Press Start Therapy.
Observe 2-3 full rotation cycles to ensure all lines and tubes are
secure with enough slack to complete fully programmed turns. Add
extensions or move equipment as needed.

11 cpr
CPR
Automated CPR
The following section reviews the steps to initiate Automated CPR.
1. Close all open panels if in the Prone Position.
2. Press CPR and resolve any issues shown on status screen.
3. Press and hold CPR to rotate and lower surface to 0° Supine.
4. Monitor all invasive lines for rotation.
5. Engage Lock Pin in Locked position.
6. Place CPR board under patient for proper compressions.
7. Initiate CPR procedures per hospital/facility protocol.
If there is an error with the sensors and all panels are closed to
safely rotate patient into the Supine Position, proceed to Manual
CPR/Manual Rotation procedures or press the Manual CPR
Instructions button on the CPR screen.

12cpr
CPR
Manual CPR/Manual Rotation
The device is designed with a rotation limiter safety feature that
prevents the surface from rotating 360º in either direction. If the
surface is rotated and the safety feature is reached, turn surface in
opposite direction to reach 0º Supine.
1. Gather 3 or more clinicians, 2 to support frame, 1 to release manual CPR
lever.
2. Place CPR board and close panels if in Prone Position.
3. Determine direction of rotation to Supine Position.
(toward ventilator, opposite of rotation direction to Prone Position).
4. Monitor all invasive lines for rotation.
5. Guide surface to 0° Supine.
6. Engage Lock Pin in
locked position.
7. Re-engage Manual
CPR Lever.
8. Initiate CPR
procedures per
hospital/facility
procotol, ensure
CPR board placed
for proper
compressions.

13 notes
Notes

14notes
Notes

CLM-012 Rev C
Contact Information
For questions regarding the Pronova-O™device, training,
maintenance, single patient use items, service oerings
or any additional information, please contact Turn Medical.
Website: www.turnmedical.com
Phone: 1.855.ASK.TURN (1-855-275-8876)
24/7 Clinical and Technical Support
Turn Medical™, Pronova-O™, and InteliDerm™ are trademarks of Turn Medical.
Software in this product is Copyright 2021 Turn Medical. All rights are reserved. A
copy of patents and/or patents pending can be found at Turnmedical.com.
NOTICE© 2021 Turn Medical. All rights are reserved. To support the intended use
of the product described in this publication, the purchaser of the product is not
permitted to copy this publication. No other use, reproduction, or distribution of
this publication, or any part of it, is permitted without written permission from Turn
Medical. For additional information on intended use of the products used in this
publication please contact Turn Medical @1.855.ASK.TURN (1-855-275-8876) or
email [email protected].
Popular Medical Equipment manuals by other brands

Otto Bock
Otto Bock Malleo Sprint light Instructions for use

Ceribell
Ceribell EEG Recorder operating manual

ChoiceMMed
ChoiceMMed MD300C2 user manual

Proactive Medical
Proactive Medical 30100 instruction manual

Proactive
Proactive Protekt PMNEBRDK-BF instruction manual

Jumper
Jumper JPD-500E Instructions to user