• Tirol • Family • EVOspace / • ECOspace • ELEMENT • Yetti
EN
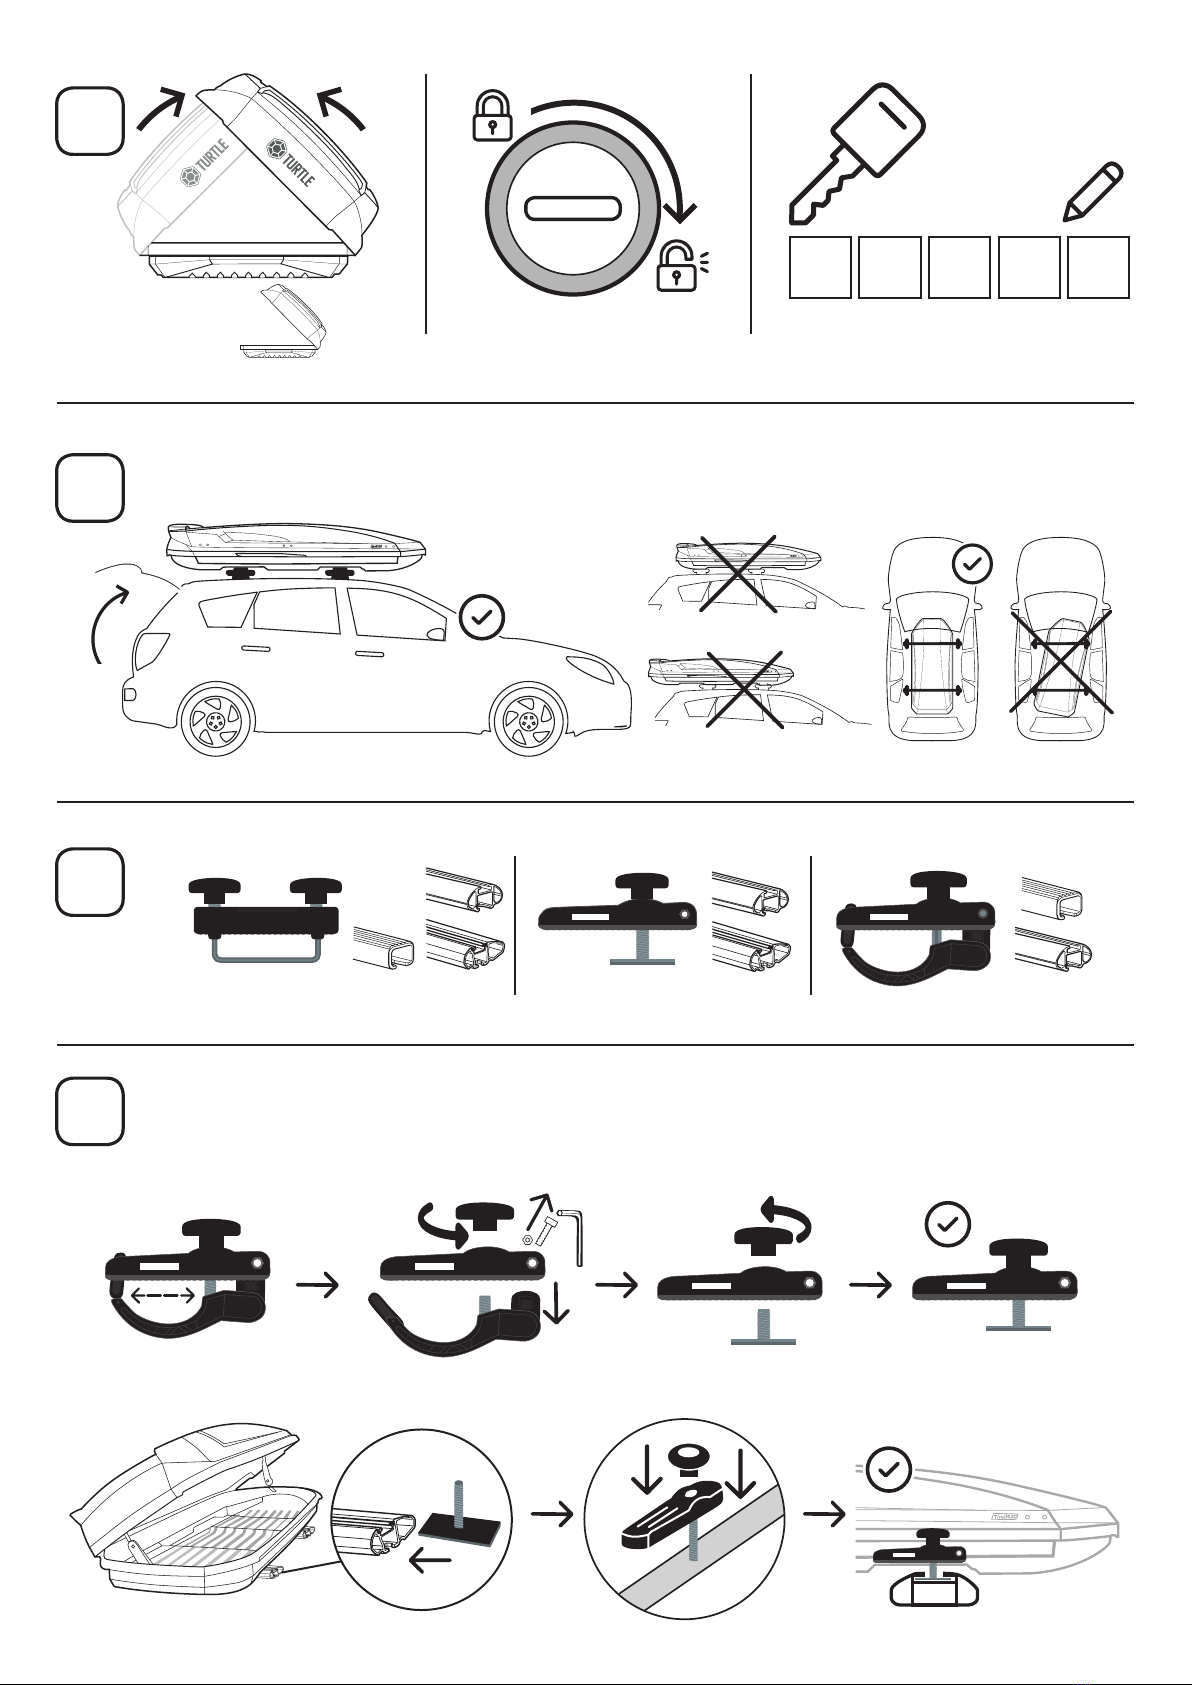
Opening and securing the roof box
The box can be opened on either side – see picture No. 1. The keys are attached on the side of the box near the central lock.
Opening: By turning the key anticlockwise – see picture No. 2 you will unlock the roof box and it may be opened. ATTENTION!!! BEFORE OPENING THE BOX ON
ONE SIDE PLEASE MAKE SURE THAT THE OTHER SIDE OF THE BOX IS ALWAYS LOCKED!!!
Closing and locking: Push the box top downwards, press it against the bottom part and then lock it by turning the key in the clockwise direction . Make sure that the
box is properly locked by trying to lift the box top upwards. The keys can be taken out only if the box is properly locked.
Which roof carriers are compatible with Turtle roof boxes
The roof box can be mounted on such roof carriers only that have been approved for the given car model. The distance between the two cross bars should not be
less than 60 cm (70 cm Adventure 205, Adventure 230, XX-line). The longer the distance between them the higher stability of the roof box. The grip holders of the
roof box fit all the roof carriers with cross bars of maximum dimensions: 80 mm in length x 38 mm in height.
Positioning of the roof box on the roof carrier
The box is to be placed on the roof carrier in such a way that its centre lies approximately in the middle between the two cross bars – see picture No. 4. It is not
recommended to place it too much forwards – see the picture No. 5 (in order to allow full opening of the boot) or too much backwards – see the picture No. 6. The
weight of the box is then not proportionally distributed on the roof which may cause vibrations during the ride. The box should also run parallel to the longitudinal axis
of the car – see the pictures No. 7 and 8.
Mounting the roof box to the roof carrier
Loosen the plastic nut M8 in anticlockwise direction (see the picture No. 9) so that the fast attachment part can move freely along the rails in the bottom and its
lower jaw opens suffi ciently. Shift the fast attachment part onto the cross bar until it clasps it completely (see the picture No. 10). Next tighten the plastic nut M8 fi
rmly during which the movable safety pin of the lower jaw passes up through the openings in the box bottom and in the upper part.
General instructions and recommendations
The load inside the box must be always secured with fastening straps. The unsufficiently fixed load, if loosened during the ride, may lead to an accident. Before
placing a load inside the box pull the fastening straps through slots in the upper parts of the attachment both in the front and at the back (see the picture 11). Finish
the attachment by fastening the straps firmly on top of the load.The height of the load should not exceed the height of the closed box. If the load is too high, the box
cannot be safely closed and it could be damaged. Spread the load evenly along the length of the box as recommended (see the picture No. 12). The weight of the
load may reach up to 75 kg. Attention!! The approved total car roof load (i.e. box weight + carrier weight + load weight ) should never exceed the maximum weight
allowed by the car manufacturer. The travelling speed with a loaded box must conform to the existing situation (weather and road conditions, traffic density, etc.).
The recommended maximum travelling speed with a loaded box is 130 km/hour. Watch out when driving under lowered entrances (e.g. garages, parking lots, etc.).
If the fast attachment system cannot clasp the massive aluminium bars of the carrier, remove the lower jaw from the system and the plastic nut M8 shown in the
picture No. 10. Place the box on the bars, lift its bottom, slide all the 4 T-adapters into the grooves of the bars. Then let the T-adapters pass through the holes in box
bottom inside the box – see picture No. 13. Inside the box set the plastic upper part on the T-adapters and tighten it firmly to the box bottom with plastic nuts M8 –
see the picture No. 14. The box manufacturer denies responsibility for damages caused by careless treatment of the product, by non-observance of the above
instructions and by the use of other than original parts of Can Otomotiv.
TR
Portbagajın açılması ve kilitlenmesi
Portbagaj her iki tarafından da açılabilmektedir - bakınız görsel No. 1. Anahtarlar portbagajın yan tarafında bulunan merkez kilidin üzerindedir.
Açılış: Anahtarı saat yönünün tersine çevirerek - bakınız görsel No. 2. portbagajın kilidini açabilirsiniz ya da zaten açık da olabilir. DİKKAT!!! PRTBAGAJI AÇMADAN
ÖNCE DİĞER TARAFIN KİLİTLİ OLDUĞUNDAN EMİN OLUNUZ!!!
Kapama ve Kilitleme: Portbagajın üst kapağını aşağı doğru bastırırken, alt kısmına da yukarı doğru baskı uygulayınız. Ardından anahtarı saat yönünde çevirerek
kilitleyiniz. Portbagajın üst kapağını yukarı doğru kaldırmaya çalışarak potbagajın düzgün şekilde kilitlendiğinden emin olunuz. Anahtarlar sadece portbagaj düzgün bir
şekilde kilitlendiğinde çıkarılabilir.
Hangi ara atkılar Turtle portbagajlarla uyumludur
Portbagaj yalnızca ilgili araç modeli için onaylanmış olan ara atkılar üzerine monte edilebilir. Ara atkının iki bar arasındaki uzaklığı 60 cmden (70 cm Adventure 205,
Adventure 230, XX-line) daha az olmamalıdır. Aralarındaki mesafe ne kadar uzun olursa, portbagajın dengesi o kadar yüksek olur. Portbagajın kavrama tutucuları,
maksimum 80 mm in uzunluk ve 38 mm yükseklikte bulunan ara atkılara uyumludur.
Turtle portbagajın taşıyıcı ara atkı üzerinde konumlandırılması
Portbagaj merkezi yaklaşık olarak barlarının ortasına denk gelecek şekilde taşıyıcı ara atkı üzerinde yerleştirilmelidir - bakınız görsel No. 4. Çok fazla öne doğru - bakınız
görsel No. 5 veya (bagajın tamamen açılmasını sağlayabilmek için) çok fazla geriye doğru yerleştirilmesi tavsiye edilmez - bakınız görsel No.6. Portbagaj ağırlığı tavana
orantılı olarak dağılmaz, bu da sürüş sırasında sarsıntılara neden olabilir. Ayrıca portbagajın aracın uzunlamasına eksenine de paralel olması gerekmektedir - bakınız
görsel No.7 ve 8. It is not recommended to place it too much forwards – see the picture No. 5 (in order to allow full opening of the boot) or too much backwards –
see the picture No. 6.
Turtle portbagajın taşıyıcı ara atkı üzerine monte edilmesi
M8 plastik somunu saat yönünün tersine gevşetiniz - bakınız görsel No. 9. Böylece hızlı bağlantı parçası alttaki raylar boyunca serbestçe hareket edebilir ve alt çenesi
yeterince açılır. Hızlı bağlantı parçasını, ara atkıyı tamamen kavrayana kadar kaydırınız - bakınız görsel No. 10. Ardından, alt çenenin hareketli emniyet piminin
portbagajın alt ve üst kısmındaki açıklıklardan geçtiği M8 plastik somununu iyice sıkınız.
Genel Talimatlar ve Tavsiyeler
Portbagajın içindeki yük her zaman bağlama kayışları ile sabitlenmelidir. Yetersiz sabitlenmiş yük, sürüş sırasında gevşer ise kazaya neden olabilir. Portbagajın içine bir
yük yerleştirmeden önce, sabitleme kayışlarını önde ve arkada bulunan sabitleme aparatlarının üst kısmındaki yuvalardan geçiriniz – bakınız görsel No. 11. Kayışları
yükün üzerine sıkıca bağlayarak işlemi tamamlayınız. Yükün yüksekliği portbagajın kapalı yüksekliğini geçmemelidir. Yük çok yüksekse, portbagaj güvenli bir şekilde
kapatılamaz ve hasar görebilir. Yükü, önerilen şekilde portbagaj uzunluğu boyunca eşit olarak dağıtınız (bkz. 12 numaralı resim). Yükün ağırlığı 75 kg'a kadar çıkabilir.
Dikkat!! Onaylanmış toplam tavan yükü (portbagaj ağırlığı + taşıyıcı ağırlığı + yük ağırlığı) asla otomobil üreticisinin izin verdiği maksimum ağırlığı aşmamalıdır. Yüklü bir
portbagaj ile seyahat hızı mevcut duruma (hava ve yol koşulları, trafik yoğunluğu vb.) uygun olmalıdır. Yüklü bir portbagaj ile önerilen maksimum seyahat hızı 130
km/saat'tir. Alçaltılmış girişlerin altından geçerken dikkatli olunuz. (örn. garajlar, otoparklar, vb.)
Hızlı bağlantı sistemi, taşıyıcının kalın alüminyum çubuklarını kavrayamıyorsa, yönergelerde belirtilen alt çene ve M8 plastik somunu sistemden çıkarınız - bakınız
görsel No. 10. Portbagajı ara atkıların üzerine yerleştirip altını kaldırınız, 4 adet T-cıvatanın tümünü ara atkıların oluklarından geçiriniz. Daha sonra T-cıvataları
portbagajın altındaki deliklerden geçiriniz – bakınız görsel No. 13. Portbagajın içindeki plastik üst parçayı T adaptörlerine takıp M8 plastik somunları sıkarak portbagajın
al tkısmını iyice sabitleyiniz – bakınız görsel No. 14. Portbagaj üreticisi, ürünün dikkatsizce kullanılmasından, yukarıda belirtilen talimatlara uyulmamasından ve Can
Otomotiv’e ait orijinal parçaların kullanılmamasından kaynaklanan hasarların sorumluluğunu kabul etmemektedir.