Tuthill SOTERA 825 Use and care manual


4
CAUTION: Wear proper safety equipment when han-
dling hazardous fluids.
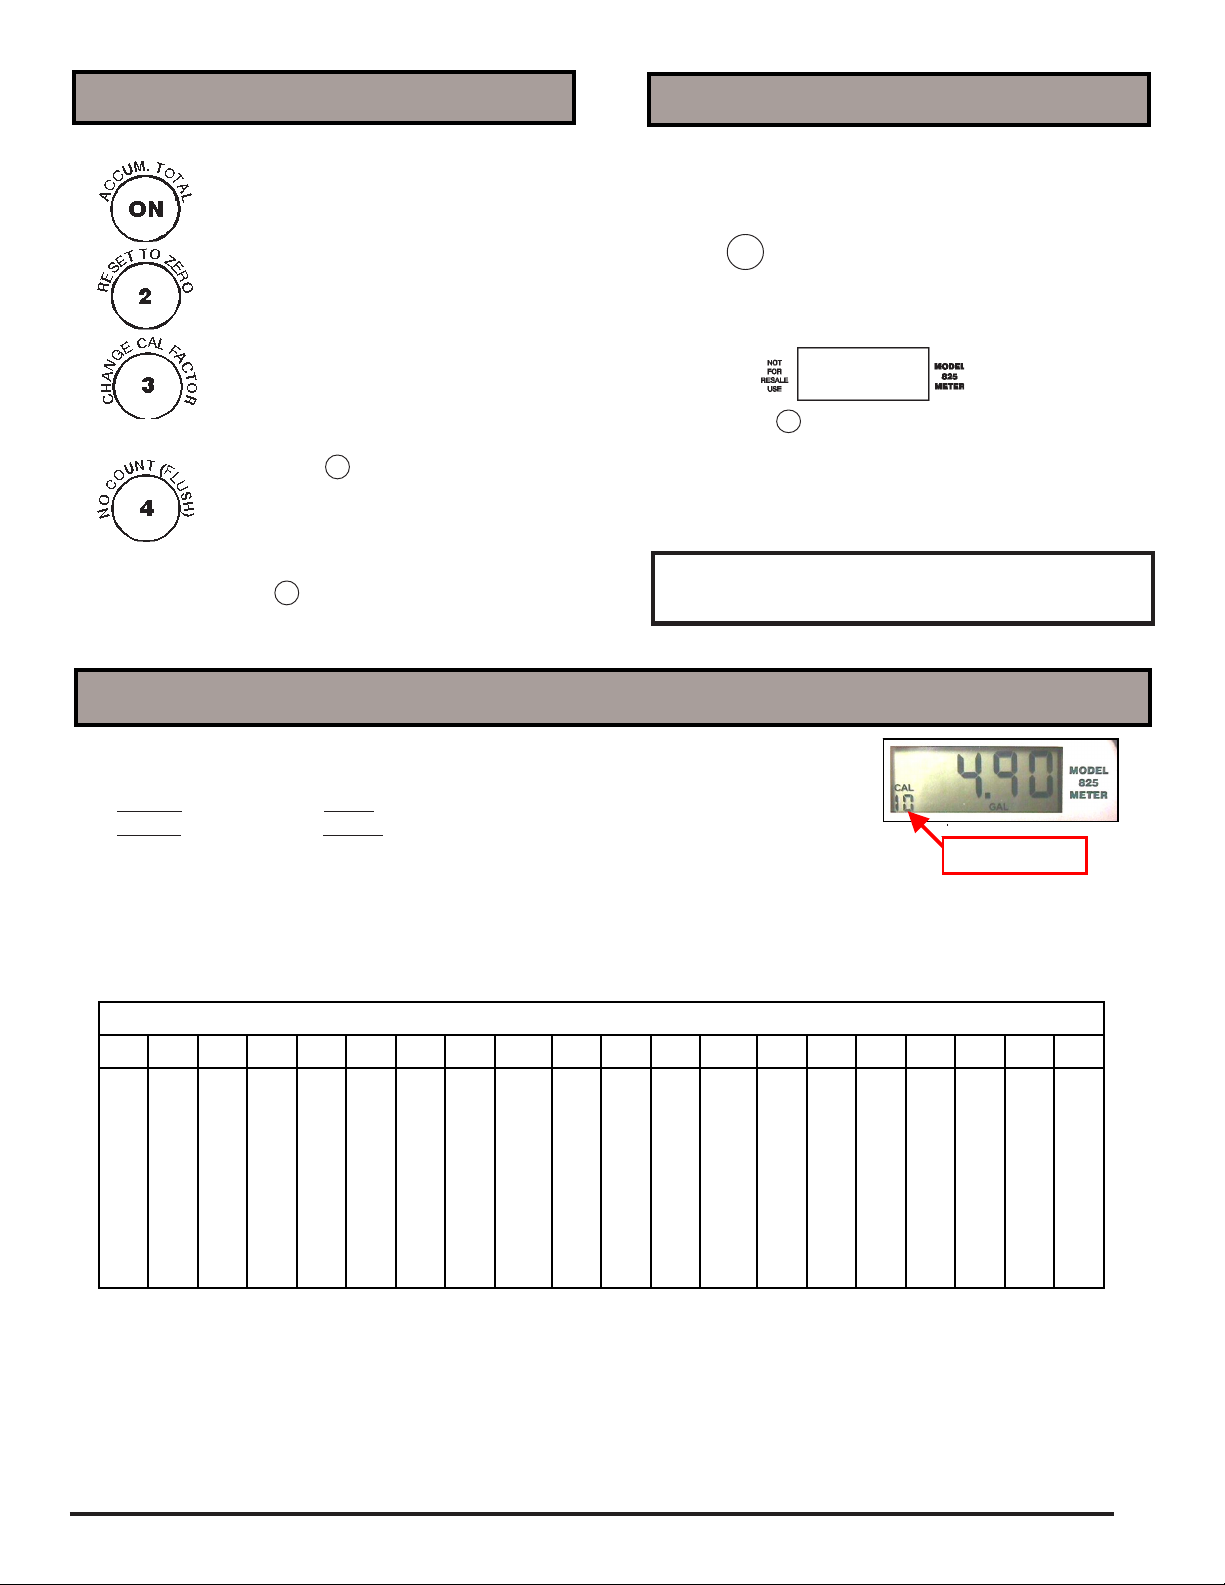
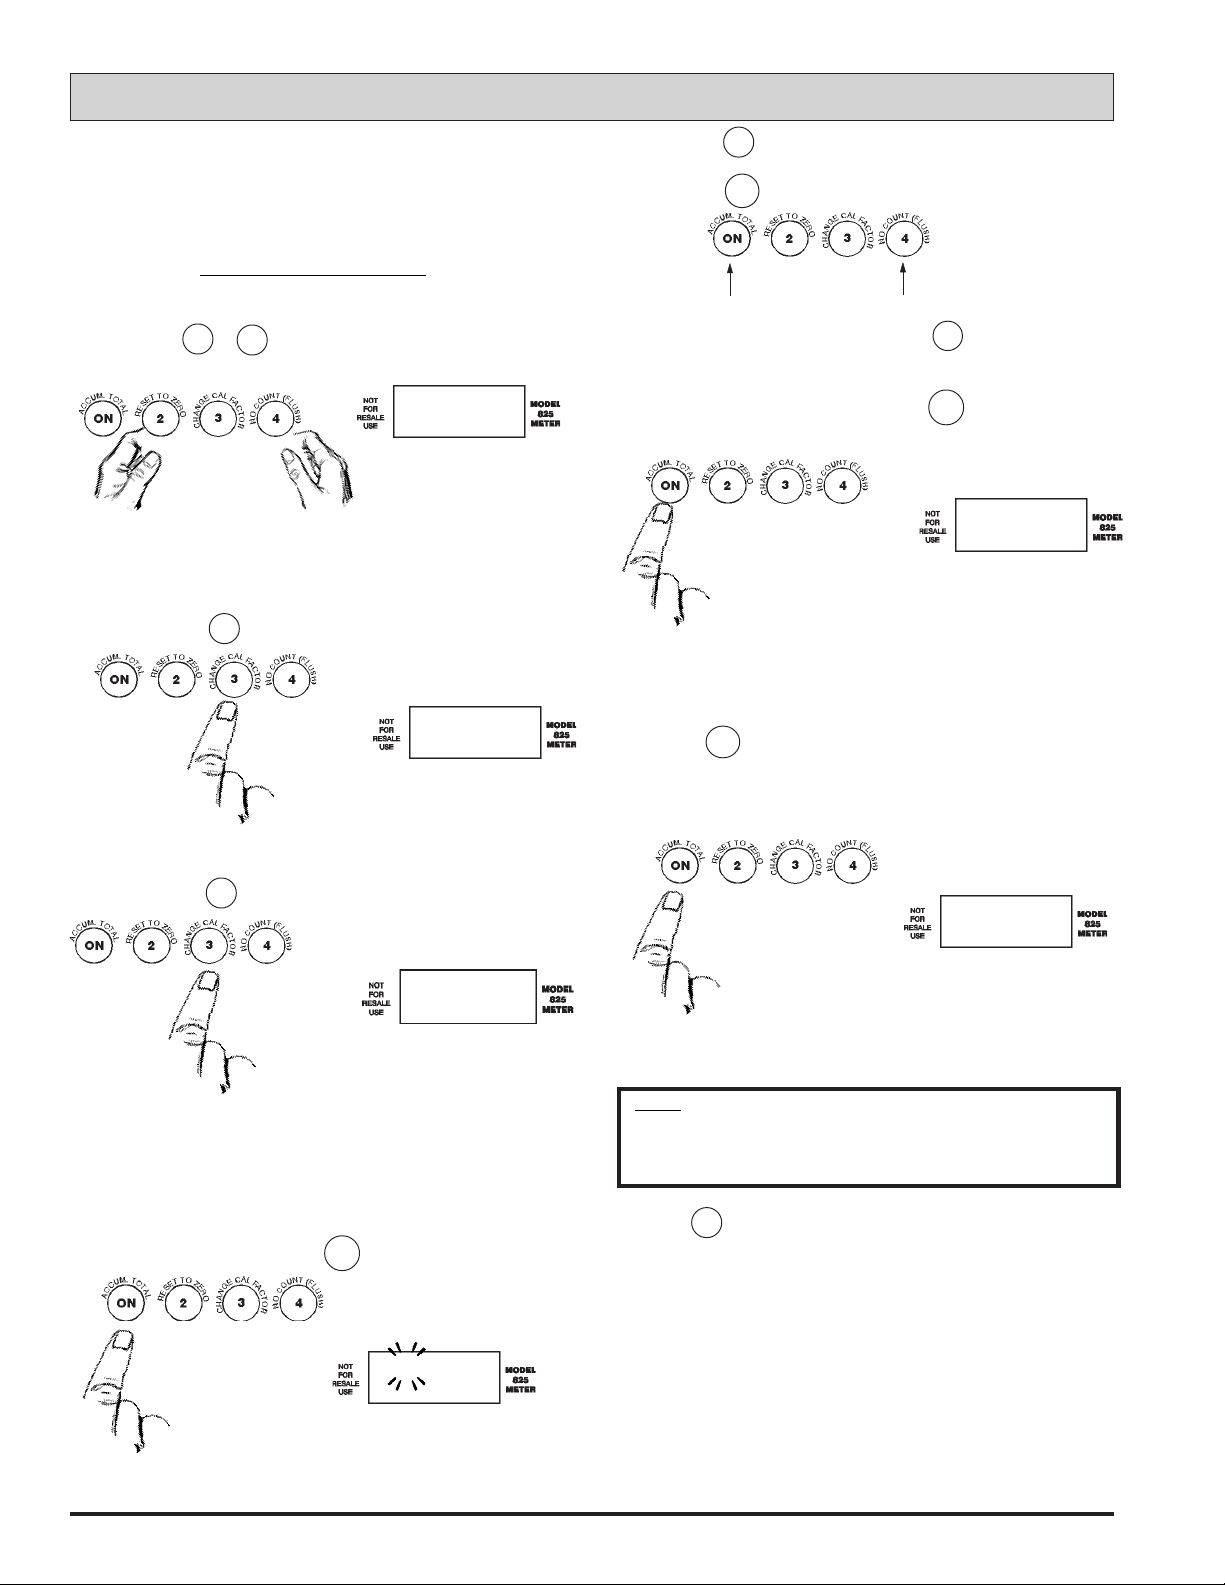
•Turns meter on when off.
•Displays accumulated total as long as it is
held on. If accumulated total is larger than
9999, the numbers will scroll across the
screen.
•When held for 1 second, it resets current total
to zero. Also resets to normal operating
mode when in CAL or FLSH mode.
•When held for 3 seconds, it allows changes
to the calibration factor displayed in the
bottom left corner. Repeated activation will
increment the number up to 19 and back to
zero. When desired number is displayed,
press button 2 to lock in the new number
and return to normal operation.
•When held for 3 seconds, FLSH is displayed.
Fluid dispensed will not be added to either
the accumulated total or current total. Press
button 2 to return to normal operation.
CAUTION: Meter will count air if you dispense air.
Before initial operation or when air has entered the system,
prime the meter by dispensing fluid until all trapped air has
been removed. Meter is now ready to operate
1. Press ON button to turn meter on. Current total, unit of
measure, and calibration factor are displayed. The meter
also turns on automatically and begins recording when fluid
starts flowing through it.
2. Hold button 2 for one second to set current total to "0.00."
3. Begin dispensing.
NOTE: Meter display automatically goes blank after 60 sec-
onds of inactivity and automatically comes back on when flow
resumes. No data is lost during periods of inactivity.
GAL
CAL
4
3.25
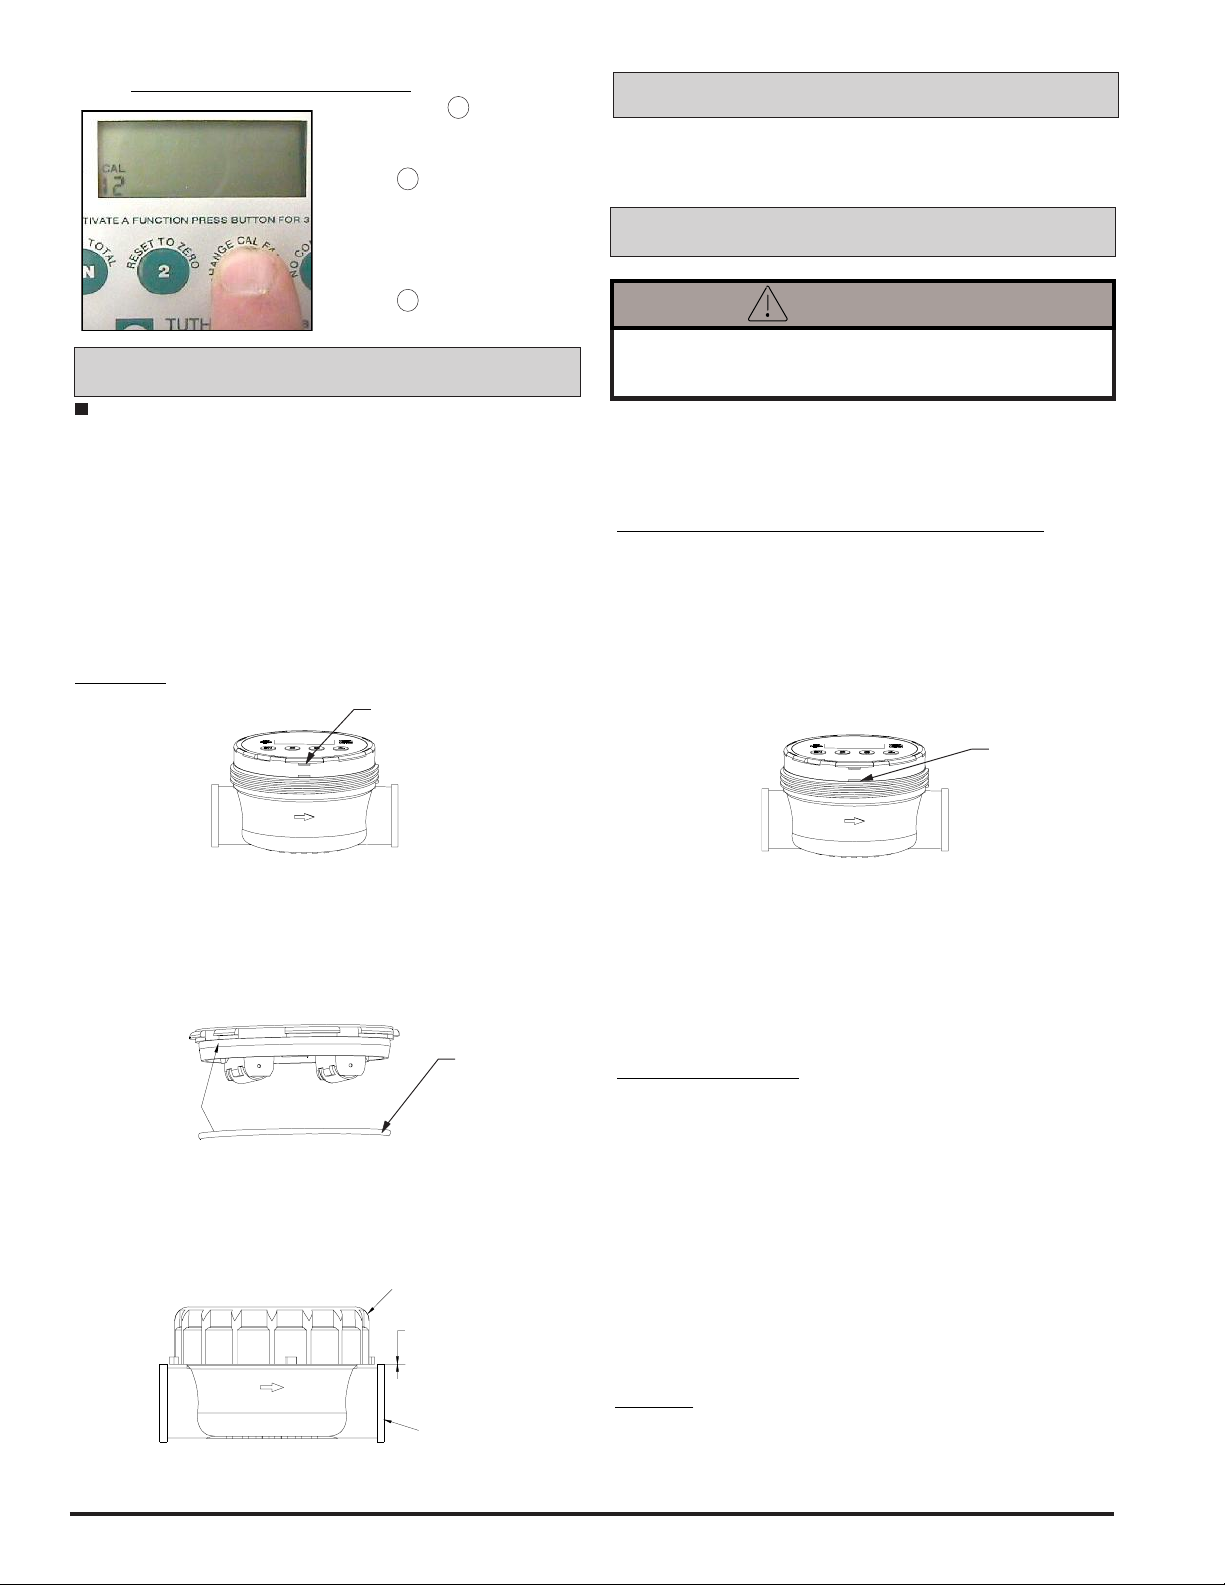
OPERATIONAL FUNCTIONS
CALIBRATION USING THE "CAL" FACTOR
TheThe
TheThe
The thinnerthinner
thinnerthinner
thinner the fluid, thethe fluid, the
the fluid, thethe fluid, the
the fluid, the lowerlower
lowerlower
lower the CAL numberthe CAL number
the CAL numberthe CAL number
the CAL number..
..
.
TheThe
TheThe
The thickerthicker
thickerthicker
thicker the fluid, thethe fluid, the
the fluid, thethe fluid, the
the fluid, the higherhigher
higherhigher
higher the CAL numberthe CAL number
the CAL numberthe CAL number
the CAL number..
..
.
•CAL 4 is set for thin fluids like water•CAL 4 is set for thin fluids like water
•CAL 4 is set for thin fluids like water..
..
.
•CAL 19, the highest number•CAL 19, the highest number
•CAL 19, the highest number, is set for very thick fluids like cold molasses., is set for very thick fluids like cold molasses.
, is set for very thick fluids like cold molasses., is set for very thick fluids like cold molasses.
, is set for very thick fluids like cold molasses.
•Each number changes the meter accuracy by about 1%.•Each number changes the meter accuracy by about 1%.
•Each number changes the meter accuracy by about 1%.
CAL Factor
USE
01234567 8 910111213141516171819
Water
Kerosene
GRAMOXONE
INTEON™@ 50°F
Anti-Freeze @ 70°F
ROUNDUP® @ 50°F
TREFLAN™ @ 50°F
ATRAZINE 4L @ 50°F
10 wt Oil @ 70°F
DUAL® @ 50°F
BICEP® @ 50°F
Molasses @ 32°F
Table #1: Suggested CAL Factor settings for Common Fluids
Note: The suggested CAL factors are for REFERENCE ONLNote: The suggested CAL factors are for REFERENCE ONL
Note: The suggested CAL factors are for REFERENCE ONLYY
YY
Y..
..
.


6
Thorough Cleaning (refer to exploded view)Thorough Cleaning (refer to exploded view)
Thorough Cleaning (refer to exploded view)
If meter is plugged due to hardened chemical or debris, do
the following:
1. Drain all fluid from meter.
2. Unscrew meter cap (item 1). Use a strap type oil filter
wrench or large 5" jaw pipe wrench if necessary.
3. Insert a flat-head screwdriver in the lower slot (see Figure 7)
and turn to pry up meter cover (item 6).
3. Remove old batteries and insert new batteries, making sure
battery polarity is correct, or meter damage could occur.
4. As noted in Figure 5, reinstall o-ring on electronics module.
Align sensor receptacle in proper location. Press module
gently down into meter cover.
Figure 6
1/8" GAP
CAP
RIDGE ON
OUTLET PORT
5. Thread on meter cap until hand tight. To check tightness,
there should be 1/8" gap between cap and ridge on outlet
port. (See Figure 6).
O-Ring
Figure 5
REPAIR
If any meter components are damaged, they should be re-
placed. See meter drawing and parts list for correct replace-
ment part number before ordering.
Meter should be flushed between uses with water to prevent
chemicals from drying and plugging meter.
MAINTENANCE
Follow fluid manufacturer's recommended procedures
for handling and disposing of metered fluids.
CAUTION
Figure 7
Lower Pry Slot
4. The meter chamber (item 8) can now be removed.
5. Rinse all meter components with flushing fluid. Do NOT
submerge display assembly. Be careful not to get any fluid
or dirt in the electronics module.
6. Reassemble meter.
CALIBRATION NOTE: Over time, the chamber inside the 825
meter will wear, requiring the meter to be recalibrated with
water. When this should be done depends on the
amount and type of fluid dispensed. In most crop protection
fluid uses (less than 1000 gallons of a clean fluid per year), the
825 meter will remain accurate for many years without
recalibration. On the other hand, dispensing an abrasive
fluid may require more frequent recalibration.
The 825 meter is designed to be calibrated with clean water
for safe handling. See "Water Calibration" section in Appen-
dix-B.
NOTE: Low battery icon will flash when batteries begin to
lose power. Meter still functions properly for several days after
the icon begins to flash. Neither calibration, current total or
totalizer quantities will be lost when replacing batteries.
To Replace BatteriesTo Replace Batteries
To Replace Batteries (refer to exploded view)
1. Unscrew meter cap (item 1). Use a strap type oil filter wrench
or large 5" jaw pipe wrench if needed.
2. Insert a flat-head screw driver into the top slot (see Figure
4) and gently pry up electronics module.
CAUTION: Be careful not to get fluid or dirt in electronics area.
Figure 4
Upper Pry Slot
CHANGING THE CAL FACTORCHANGING THE CAL FACTOR
CHANGING THE CAL FACTOR
• Hold button 3 until the
display only shows CAL and
number.
• Press 3 repeatedly until
you reach the desired
number. Note – number will
increment up to 19, then
back to zero.
• Press 2 to return to
normal operating mode.
StorageStorage
StorageStorage
Storage
Store in a cool, dry place. Drain out all fluid that could freeze
in the meter.
BATTERIES

7
TROUBLESHOOTING GUIDE
PROBLEM POSSIBLE CAUSE SOLUTION NOTES
Meter won't turn on •Dead batteries •Replace batteries. Seal to electronic chamber
•Damaged or contaminated •Replace electronics module is broken if display label is
electronics module & gaskets. removed or punctured.
Flashing decimal •Current total has rolled •Reset display to zero by pressing Meter will continue to
over button 2. operate normally.
Flashing or •Low batteries •Replace batteries. Use alkaline batteries.
dim display
Leaking fluid at •Need thread sealant •Add Teflon pipe tape to joint.
inlet/outlet port •Cross-threaded port •Replace body
Fluid flows; meter •Meter disk sticking •Clean out meter chamber.
won't count •Damaged driver •Repair or replace chamber assembly.
or magnet
•Meter failure •Repair or replace meter.
Meter reads high •Air in system •Prime system, fix suction leak at pump. Meter will count air.
•Wrong calibration factor •Use a higher calibration factor. See Chemical formulations
1-Step procedure sometimes change.
•See "Check Meter" in Appendix-A
Meter reads low by •Wrong calibration factor •Use a lower calibration factor. Chemical formulations
10% or less •See 1-Step procedure. sometimes change. Temperature
also affects accuracy.
Meter reads low by •Meter chamber is worn •Recalibrate meter with water. See
more than 10% •Chamber is partially Appendix-B. See "Check Meter" in
plugged Appendix-A.
•Clean chamber
•Damaged or very worn •Replace chamber and recalibrate
chamber meter.
Meter is not •Air in system •Prime system, fixsuction leak at pump.
cons is tent •Particulates in fluid •Put s creen in front of m eter. 40 m es h minimum.
•Meter has worn or •Clean chamber
damaged chamber •Replace chamber.
Err0 •Calibration error •Recalibrate meter with more accurate Indicates fluid calibration is
container. out of acceptable window.
•Damaged chamber •Replace chamber. Volumetric container may
be off, there may be air in
the system, or the meter
chamber may be damaged.
Err1 •Damaged electronics •Repair or replace electronics. Contact factory.
•Software fault •Pres s 2 then recalibrate meter
Err2 •Bad eeprom •Replace electronics Meter still functions, but all
data will be lost if batteries
are removed.


9
The units of measure can be changed to ounces (OZ), pints
(PT), quarts (QT), gallons (GAL), or liters (LITER) without
recalibrating the meter. If special units are desired, see note
below.
1. Hold buttons 2 and 4 for three seconds. Display will
read "7r1.02".
2. Press button 3 . Display will show the current units.
3. To change units, press the ON button repeatedly until the
desired unit is displayed.
4. Press button 2 . Display will read "7r1.02".
5. To return to normal operating mode press button 2 again.
The units selected will be displayed. Current or
accumulated total will be changed to reflect the new units.
Special Units
To use special units, you need to know how many ounces are
in your special unit. Here is an example: You want to use "acres"
as your "special" unit. The fluid is to be applied at 18 ounces per
acre. These are the additional steps to set the meter to "special"
units (ignore steps 4 & 5 above):
a. After selecting "special" in step #3 above, press button
2 .
b. Enter the number of ounces in a special unit by pressing
button 4 to increment the digit, and the ON button to
move the flashing digit to the right. If you make a mistake,
press button 2 to start back at the left most digit. Per our
example, we would enter 018.0.
c. Press the ON button again. Display will read "7r1.02".
d. To get back to the normal operating mode, press button
2 .
1. Press 2 and 4 at the same time and hold for 3 seconds.
Display will read the version of the software loaded in the
meter (example: "7 r1.02).
2. Press ON to display accumulated total. If over 9999,
display will scroll across the screen
3. Hold buttons ON and 4 for 5 seconds to reset accumu-
lated total.
4. Press button 2 twice to get back to normal operating
mode.
You can check the calibration in your meter.
1. Set to CAL 4 (See "to change the claibration factor").
2. Hold button 4 for 3 seconds. Meter will display "FLSH".
3. Hold buttons ON & 3 together. A number will display that
indicates the pulses per unit used to calculate flow (ie:
pulses per gallon). When new, this number is between
120.0-127.0 pulses per gallon.
*If you find a number higher than 127, recalibrate with water
(see Appendix-B). If this number is lower than 120, the meter
chamber may need to be replaced.
4. Press 2 to get back to normal operating mode.
TO CHANGE UNITS OF MEASURE
RESET ACCUMULATED TOTAL
000.0
GAL
196.4
GAL
r 1. 0 2
7
APPENDIX-A
METER CHECK
The 825 Meter can be flushed without adding to the
totalizer. Turn meter on by pressing the ON button. Press
4 and hold for 3 seconds. Display will show FLSH. Flush
meter with suitable fluid (water is suitable for most herbi-
cides). When completed, press 2 to leave FLSH mode
and return to normal operation. Quantity of fluid flushed
will not be added to total.
CAUTION:CAUTION:
CAUTION:CAUTION:
CAUTION: Do not leave meter in FLSH mode. Batteries
will completely drain within 20 days if left in FLSH mode.
FLSH (FLUSH) MODE

10
The 825 meter is designed to be recalibrated with water for
safe handling. Over time, the chamber inside the meter will
wear. Recalibrating the meter with clean water will insure that
Table #1 is most accurate.
You will need a container of known volume, at least 5 gallons
or larger. Do not exceed a 60 gallon container.
1.1.
1.1.
1. Press the 2 & 4 buttons at the same time
and hold for 3 seconds.
The display will read the version of the software loaded in the
meter (example: "7r1.02").
2.2.
2.2.
2. Press button 3 to enter calibration mode.
The unit of measure will be displayed.
3.3.
3.3.
3. Press button 3 .
The display will read "FILL".
4.4.
4.4.
4. Now dispense water into your container. "FILL" will flash on
the display.
5.5.
5.5.
5. After dispensing, press the ON button.
The left digit of the display will blink.
6.6.
6.6.
6. Press the 4 button to increment the digit to the amount
of fluid dispensed (example: 05.00).
Press the ON button to move to the right.
If you make a mistake, press button 2 to start back at the
left- most digit.
7.7.
7.7.
7. After number is loaded, press the ON button again
to accept.
88
88
8. Display now shows .
Since you are calibrating with water, accept this by press
ing the ON button again. If calibrating with a fluid other
than water, see Appendix-C. Display will again
show "7r1.02".
Note: If the value entered is out of an acceptable range, the
display will read "Err0" and the meter will revert to the
previous settings. See Troubleshooting Guide for more
information.
99
99
9. Press 2 to get back to the normal operating mode.
7r 1. 0 2
GAL
QT
Move to Right Increment No.
F I L L
0 0.0 0
CAL
4
APPENDIX-B Water Calibration
7r 1. 0 2
CAL
4

11
CAUTION:CAUTION:
CAUTION:CAUTION:
CAUTION: Calibrating with a fluid other than water voids
Table #1. After calibration, set the meter to CAL 4, and use
the meter on CAL 4 (unless you input a different number during
step 9 below).
You will need a container of known volume, at least 5 gallons
or larger. Do not exceed a 60 gallon container.
1.1.
1.1.
1. Press the 2 & 4 buttons at the same time
and hold for 3 seconds.
The display will read the version of the software loaded in
the meter (example: "7r1.02").
2.2.
2.2.
2. Press button 3 to enter calibration mode.
The unit of measure will be displayed.
3.3.
3.3.
3 . Press the ON button to change unit of measure, if required.
4.4.
4.4.
4. Press button 3 .
The display will read "FILL".
5.5.
5.5.
5. Now dispense fluid into your container. "FILL" will flash on
the display. For best results, dispense fluid at the same flow
rate that will be used in actual use.
6.6.
6.6.
6. After dispensing, press the ON button.
The left digit of the display will blink.
7.7.
7.7.
7. Press the 4 button to increment the digit to the amount
of fluid dispensed (example: 05.00).
Press the ON button to move to the right.
If you make a mistake, press button 2 to start back at the
left- most digit.
8.8.
8.8.
8. After number is loaded, press the ON button again
to accept.
99
99
9. Display now shows .
This is the default for water. Check Table 1 for your
fluid. Press 3 to change the Cal #. Press ON to accept.
Display will again Show "7r1.02".
Note:Note:
Note:Note:
Note: IF YOU ACCEPT CAL 4, USE THE METER ON CAL 4
WHEN DISPENSING THIS FLUID.
Note: If the value entered is out of an acceptable range, the
display will read "Err0" and the meter will revert to the
previous settings. See Troubleshooting Guide for more
information.
1010
1010
10. Press 2 to get back to the normal operating mode.
7r 1. 0 2
GAL
QT
F I L L
APPENDIX-C Fluid Calibration (other than water)
CAUTION: DON'T DO THIS unless you understand fully how CAL factors work.
QT
0 0.0 0
Move to Right Increment No.
CAL
4
CAL
4
7r 1. 0 2

12
CALIBRATION FACTOR
METER CALIBRATION FACTOR SELECTION BASED ON FLUID VISCOSITY
VISCOSITY (CPS)
Low
Viscosity
(thin)
Fluids
CALIBRATION FACTOR
VISCOSITY (CPS)
VISCOSITY (CPS)
CALIBRATION FACTOR
Medium
Viscosity
Fluids
High
Viscosity
(very thick)
Fluids
NOTE: Graphs are accurate with original factory calibration, or a water calibration. See page 8.
APPENDIX-D
This manual suits for next models
1
Table of contents
Other Tuthill Measuring Instrument manuals

Tuthill
Tuthill Sotera 900 Series Use and care manual

Tuthill
Tuthill TT10P Use and care manual

Tuthill
Tuthill Fill-Rite 900 Series Use and care manual

Tuthill
Tuthill FILL-RITE TN700 Series Use and care manual

Tuthill
Tuthill FILL-RITE TT10AN Use and care manual

Tuthill
Tuthill Fill-Rite 900 Series Use and care manual

Tuthill
Tuthill Sotera TS06AS83 Guide

Tuthill
Tuthill FILL-RITE TT10A Use and care manual

Tuthill
Tuthill FILL-RITE 820 Operating manual

Tuthill
Tuthill Fill-Rite 900DP Series Use and care manual