Tuzio Savoy W1051 User manual

Tuzio
®
Savoy
Towel Warmer
Installation Guide
Code: W1051 & W1053
23.5” x 47.75” Hardwired
Technical Helpline:
Toll-Free 1-877-757-8990
www.icocanada.com

Towel Warmer Installation Procedure
1. The incoming power feed goes to a deep single gang electrical box (for timer). This electrical box can be located
anywhere in the room, although we recommend it be alongside your light switches.
2. A power feed then goes from the timer electrical box to a single gang electrical box (for Towel Warmer). The location
of this electrical box governs the location of your Towel Warmer (see fig. 2).
3. Wall studs or plywood backing is required in the wall at all bracket locations. See figure 2 for bracket locations.
Rough-in Requirements
(see figure 3)
1
Do not connect the Towel Warmer to the power supply until all instructions have been read and installation carried out in
accord with them. The heating element is 300W 110V. The element conforms to UL standards and the unit to CSA
standards (File ref: 229718). Ensure the CSA label is visible. TURN OFF POWER SUPPLY BEFORE PROCEEDING.
1. Feed the electrical cord located at the bottom of the Towel Warmer first through the round tube and then through the
cover plate.
2. Complete all electrical connections as shown in figure 3.
3. Fit tube over Towel Warmer element sleeve until it meets the hexagonal chrome collar.
4. Push cover plate onto tube.
5. Screw cover plate to electric box with the enclosed screws. Adjust where necessary.
Warning: In case of damage or failure of the Towel Warmer the unit should be returned to the
manufacturer or their distributor. The warranty of 1 year on the heating element and 5 years
on the Towel Warmer is NOT VALID in case of improper use or installation. Product is
designed for use within Canada and the United States only.
Installation Instructions
(see figure 1)
2
1. Check all items have been received. You should have Towel Warmer, hardwire kit, programmable timer and mounting
bracket kit. Read all instructions before continuing.
2. Fix wall supports "A" to the wall using the screws provided and in locations as shown on figure 2.
3. Assemble the threaded pin "B", the washer "C", the bush "D" with the threaded head "E", between the second and
third upper and lower tubes of the Towel Warmer.
4. Hang and adjust the Towel Warmer using set screws "F" to lock pin "B" in the wall bracket "A". Ensure the Towel
Warmer is firmly and safely fixed.
Hardwire Connection
(see figure 4)
3
fig. 1 A
B
C D
E
F

Heating Element Specifications: 600 watt, 29.5" long, 120 volt, 60 Htz, IP55 cord, ULC approved
Material Specifications: Mild Steel - Din 2394 Quality - ST 34-2 KB
Warranty: Towel Warmer: 5 years, Heating Element: 1 year, Programmable Timer: 2 years
Fixings: Screws, and Allen Key (if needed) are included
Heating Element Location: Right-hand vertical column unless specified otherwise.
Care & Maintenance: A periodic wash using warm water and a soft cloth will retain the high quality finish of your towel warmer for
many years to come. ON NO ACCOUNT should any household bleaches, detergents, abrasive polishes, steel wool or other cleaning
agents be used on this item.
Specifications & Drawings
fig. 4
fig. 4
fig. 2
fig. 3
Model # Description Finish Weight (lb) Element Size Output WxH (mm) WxH (Inches) Metal Type
W1051 Savoy Electric Hardwire White 44.4 300W
3120Btu
600 x 1210 23.5” x 47.75” Mild Steel
W1053 Savoy Electric Hardwire Chrome 44.4 300W
3120Btu
600 x 1210 23.5” x 47.75” Mild Steel

Timer Installation Procedure
Installation
1
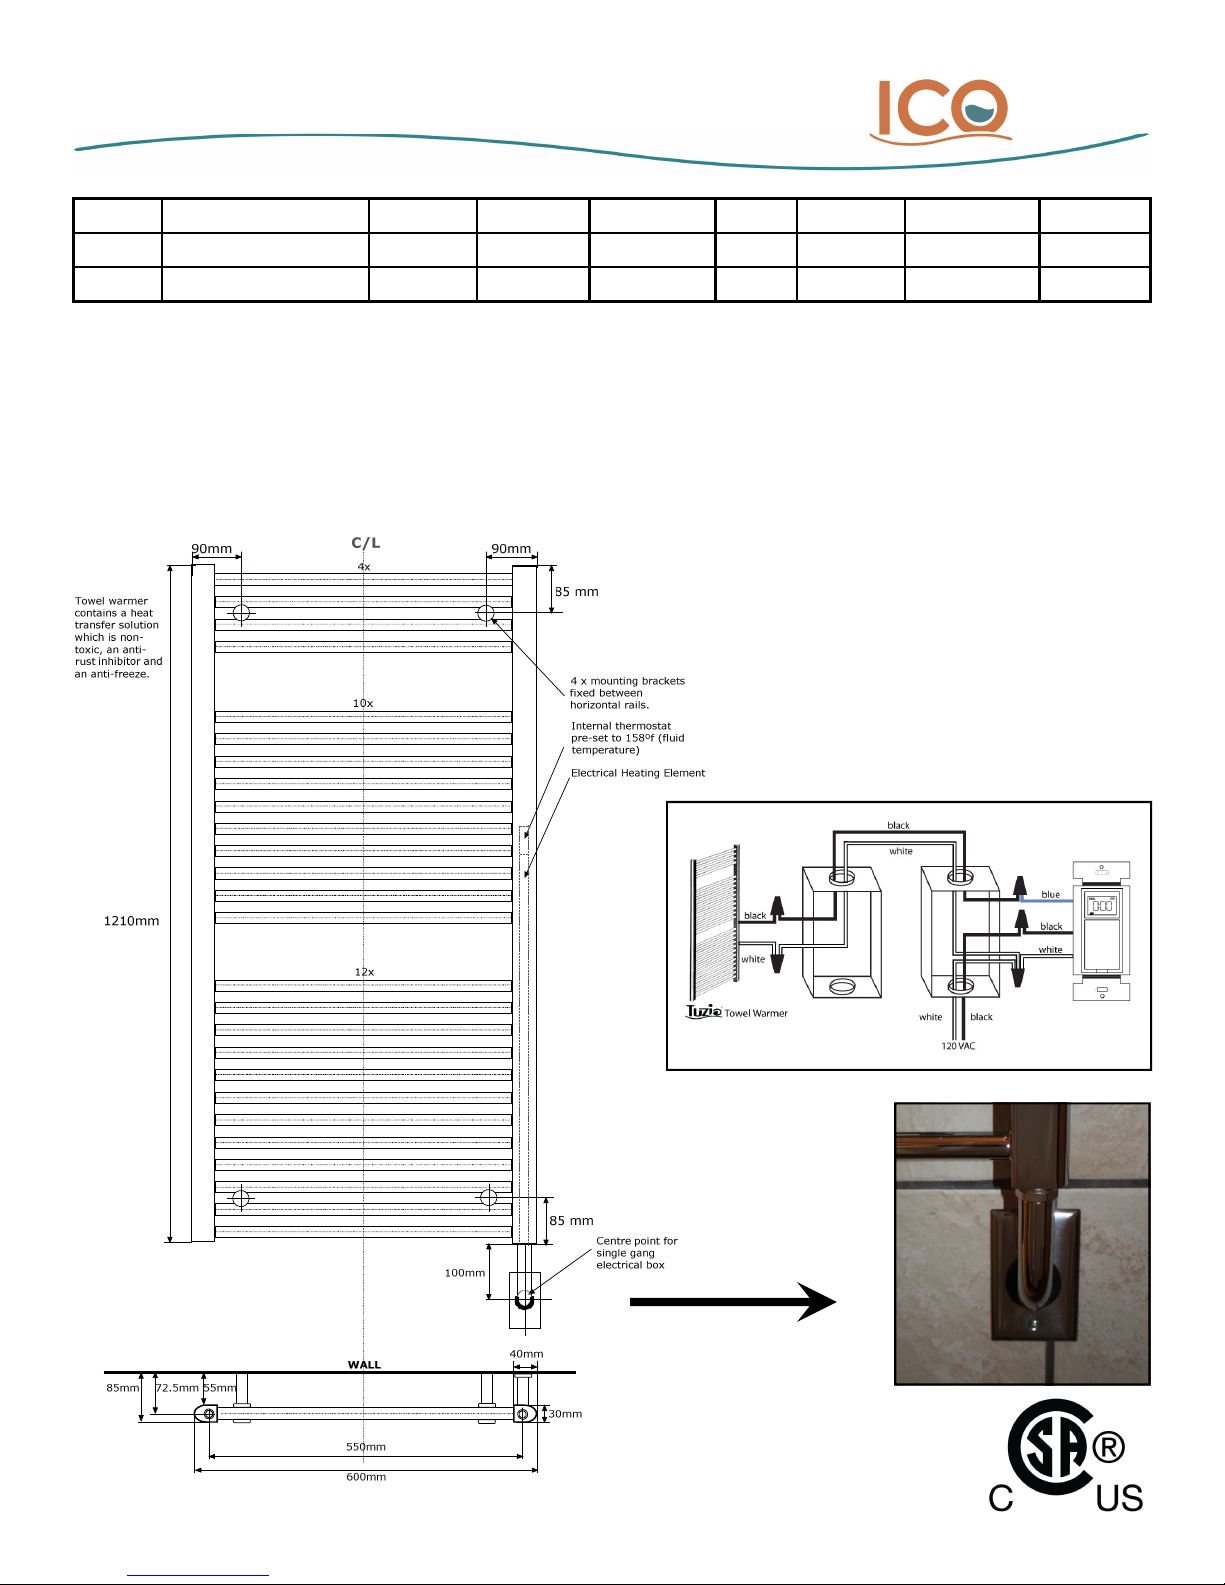
Install the timer as shown in figure 3.
Apply power at the circuit breaker.
1
2
Power On
2
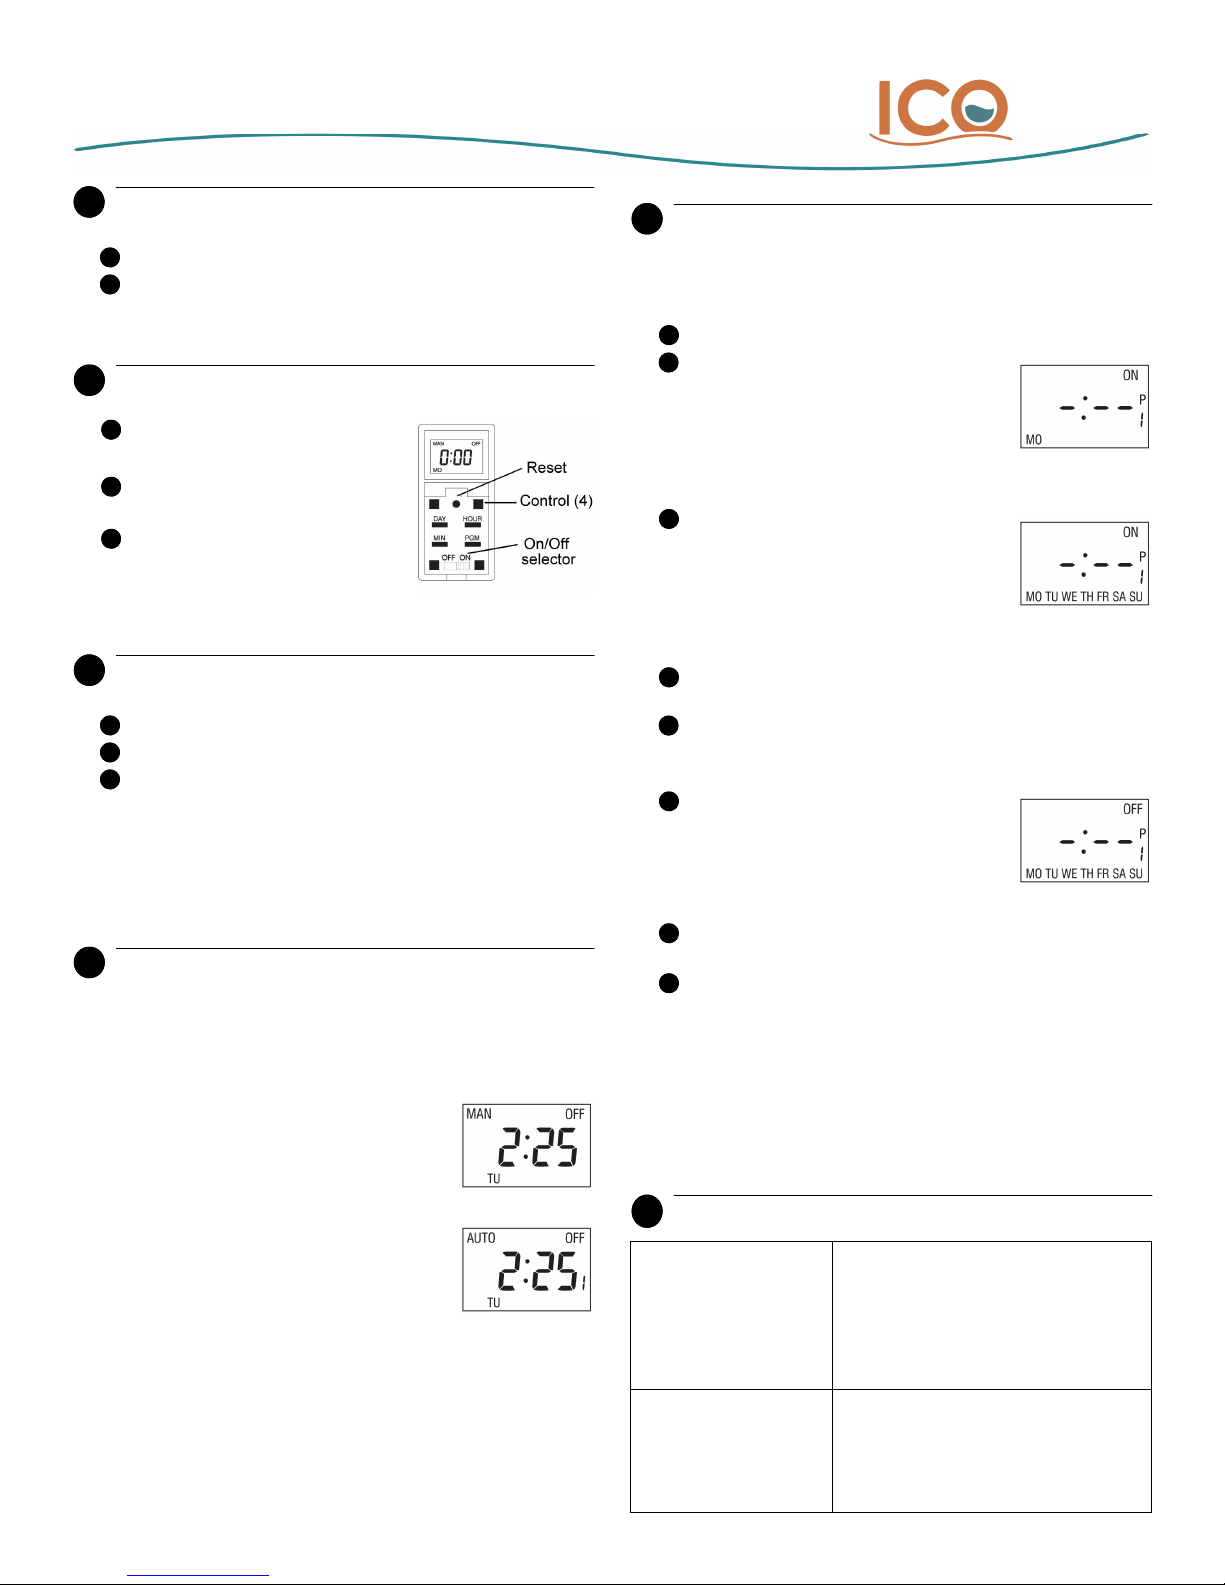
Pry the switch door open from the
bottom using a small screwdriver.
Ensure the ON/OFF selector is set
to ON.
Reset the switch using a
paperclip. 0:00 and MO will flash.
1
2
3
Setting the Clock
3
Set the time using the HOUR and MIN buttons.
Set the day by using the DAY button.
Press one of the control buttons or close the switch door
to return to normal operation.
1
2
3
Programming
5
Pry the timer door open using a small screwdriver.
Press the PGM button to display a
program and its On or Off time. For
example, when you first press PGM,
program number 1 (P1) and its On time
(ON) will appear. -:-- will appear instead
of the time if the program is not set (inactive).
Press the DAY button to select the day
to which you want to apply the program.
NOTE: If you want to apply the program
to every day of the week, press DAY
until all the days are displayed. (This
still counts as 1 program, not 7)
Press the HOUR and MIN buttons to set the ON time
(time when you want the towel warmer to turn on)
After you have programmed the ON time, press the PGM
button to display the OFF time (time when you want the
towel warmer to turn off).
Repeat steps 3 through 5 to program
the OFF time. If the program ON time is
set for every day of the week, the
program OFF time will automatically be
set for every day.
To set another program, repeat steps 2 through 6.
Programs that are not set will remain inactive.
Press one of the control buttons or close the timer door
to return to normal operation.
1
3
4
2
5
Troubleshooting
6
Blank display
•
Verify circuit breaker at main
panel.
•
Ensure the ON/OFF selector is at
ON.
•
Reset the switch using a paper
clip.
Programs do not run
as expected
•
Make sure the switch is properly
programmed.
•
Note that -:-- indicates an inactive
program, 00:00 indicates
midnight.
The programmable switch has 2 operating modes: manual
(MAN)and automatic (AUTO). To switch mode, press the timer
door for 3 seconds.
Selecting the Operating Mode
4
You can set up to 7 programs. To set a program, you need to
enter its start time (ON) and its end time (OFF).
6
7
8
Clearing a Program
Press the PGM button until the desired program is selected.
Hold the PGM button for 3 seconds. -:-- appears when the
program is erased.
Manual Mode
The programmable timer operates as a regular
switch. Briefly press the switch door to turn the
towel warmer On or Off. The mode (MAN) and
state (ON or OFF)are displayed.
Automatic Mode
The programmable timer follows the
programmed schedule. The mode (AUTO),
state (ON or OFF)and current program
number are displayed. To temporarily override
the programmed schedule, briefly press the
switch door. The new state (ON or OFF) will flash to show that
this state is temporary. The override remains in effect until you
press the timer door again or until the beginning of the next
program.
This manual suits for next models
1
Table of contents
Other Tuzio Food Warmer manuals
Popular Food Warmer manuals by other brands

ROBAND
ROBAND E14 operating instructions

Baron
Baron 90BM/E410 Instructions for installation, operation and maintenance

DELTA-SPORT
DELTA-SPORT 290394 Instructions for use

CULITEK
CULITEK TEKW2AL-S instruction manual

Nemco
Nemco 6000A-1A manual

Vulcan-Hart
Vulcan-Hart MEW14 Service manual & catalog of replacement parts